文章目录
- 一、基本知识
- 1.1 FFmpeg相关
- 1.2 H.264相关
- 1.3 YUV相关
- 二、H264编码原理
- 2.1 帧类型分析
- 2.2 帧内/帧间预测
- 2.3 变换+量化
- 2.4 滤波
- 2.5 熵编码
- 三、H264解码为YUV
- 3.1 代码逻辑及使用API
- 3.2 具体代码实现
- 3.3 YUV文件播放
- 四、YUV编码为H264
- 4.1 代码逻辑及使用API
- 4.2 具体代码实现
- 4.3 H264文件播放
一、基本知识
1.1 FFmpeg相关
FFmpeg 是领先的多媒体框架,能够解码、编码、转码、混合、解密、流媒体、过滤和播放人类和机器创造的几乎所有东西。它支持最晦涩的古老格式,直到最尖端的格式。无论它们是由某个标准委员会、社区还是公司设计的。它还具有高度的便携性。
FFmpeg 可以在 Linux、Mac OS X、Microsoft Windows、BSDs、Solaris 等各种构建环境、机器架构和配置下编译、运行,并通过测试基础设施 FATE
它包含了 libavcodec、libavutil、libavformat、libavfilter、libavdevice、libswscale 和 libswresample,可以被应用程序使用。还有 ffmpeg、ffplay 和 ffprobe,可以被终端用户用于转码和播放。
FFmpeg源码下载地址:FFmpeg官网
(可以选择下载源码自己编译并加入如x264, fdk-acc等,也可以直接下载动/静态库)
具体FFmpeg在Centos环境下编译可以参考:FFmpeg在Centos环境下编译
1.2 H.264相关
H.264是一种视频编码格式
视频编码是指视频中存在很多冗余信息,比如图像相邻像素之间有较强的相关性,视频序列的相邻图像之间内容相似,人的视觉系统对某些细节不敏感等,对这部分冗余信息进行处理的过程
常见的视频编码格式有:
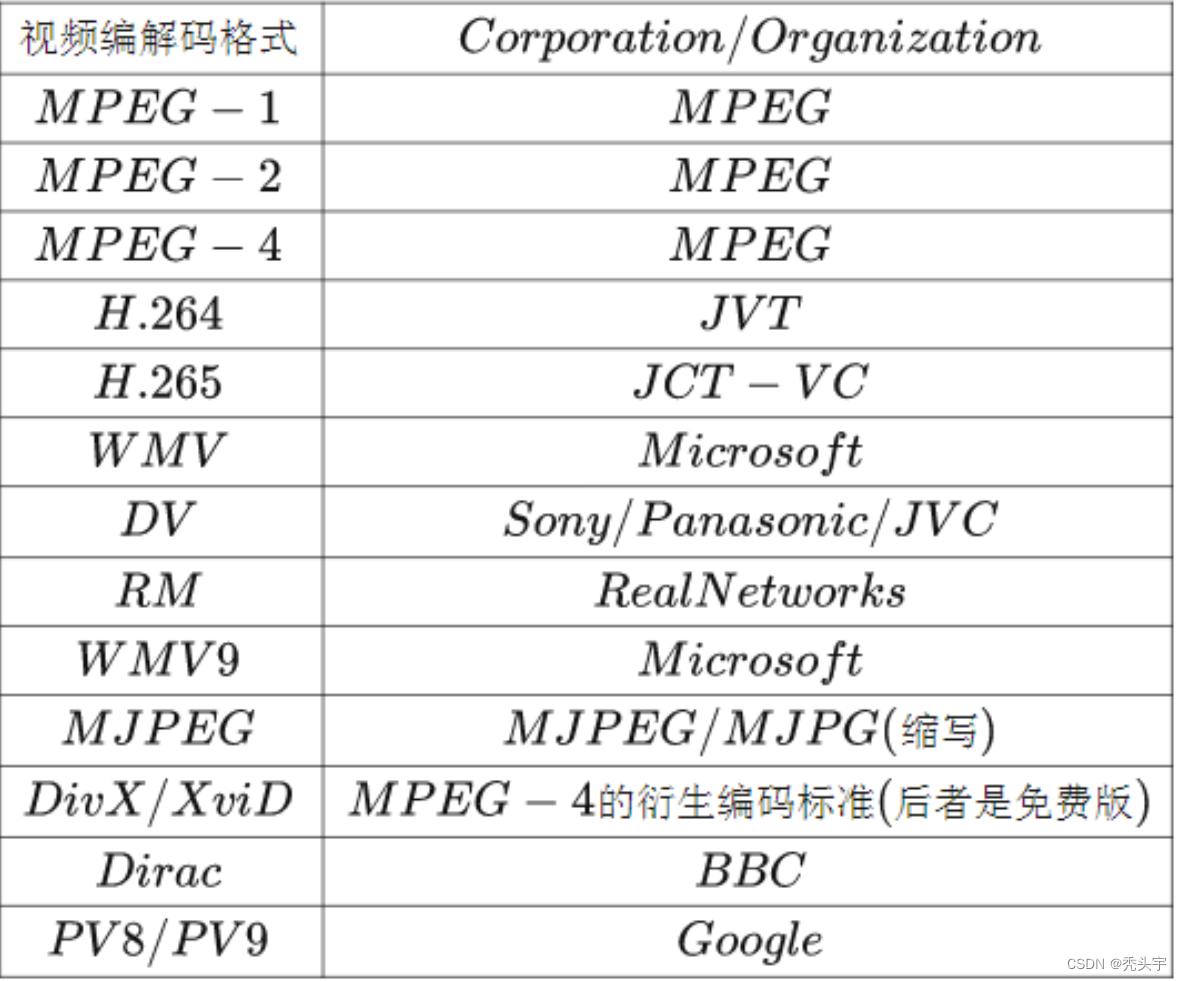 H.264是新一代的编码标准,以高压缩高质量和支持多种网络的流媒体传输著称
1.3 YUV相关
在转码过程中需要将视频解码成yuv再重新编码以便更改一些参数, 也需要在yuv上做一些处理比如添加水印, 提升亮度,等等
YUV是一种视频格式, YUV与RGB一样,都是像素数据的编码格式,一组YUV渲染屏幕上的一个像素,控制屏幕用色彩的形式将事物表现出来,其中Y表示像素中的亮度,英文是Luminance,U表示色度,英文是Chrominance,V表示浓度或饱和度,英文是Chroma。这是一种压缩后的颜色表示方法,占用更少的物理空间,且对颜色的表现失真不明显
YUV存储方式有两大分类:
- Packed
从字面意思来看,packed是打包的意思,打包就不一定是平整的了,对应到存储方式上就是把YUV三种分量交叉存储,以YUY2为例,存储方式为:Y0U0Y1V0 Y2U1Y3V1,这种方式在解析时就会比较麻烦 - Planar
从字面意思上来看,planar是平面的意思,平面比较平整,对应到存储方式上就是把YUV三种分量分别存储,以I420为例,存储方式为:YYYYYYYYUUVV,简单明了,先把Y存完,再存U,再存V,这种在解析时很方便
主流的YUV采样方式:
- 4:4:4,如果要完全存储,那一个一个像素点就要存储YUV三个分量,这种形式就是4:4:4
- 4:2:2,因为人的眼睛对色度和饱和度不是特别敏感,所以一定程度上丢失一部分UV并不影响我们分辨颜色在存储时就故意丢掉部分UV分量,用两个Y分量共用一组UV分量,这种形式就是4:2:2
- 4:2:0或用四个Y分量共用一组UV,这种形式就是4:2:0
下图中以黑点表示采样该像素点的Y分量,以空心圆圈表示采用该像素点的UV分量
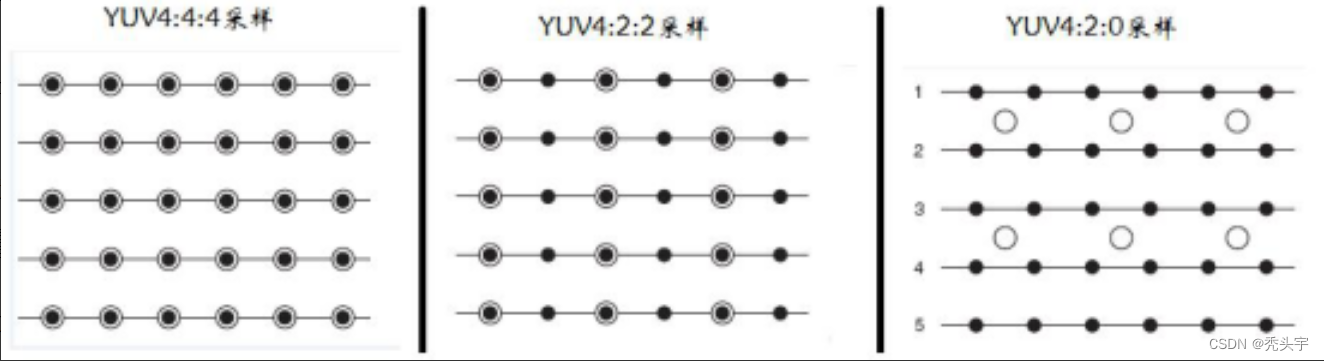 在存储时YUV各占一个字节Byte,如果4:4:4方式,那一个256X256分辨率的图片要占用256×256×3=196608Byte,4:2:2方式要占用256×256×2=131072Byte,4:2:0方式要占用256×256×2/3=43690.7Byte,可以看到采用4:2:0方式存储空间整整减少了一半
二、H264编码原理
H264编码过程主要分为五个模块:
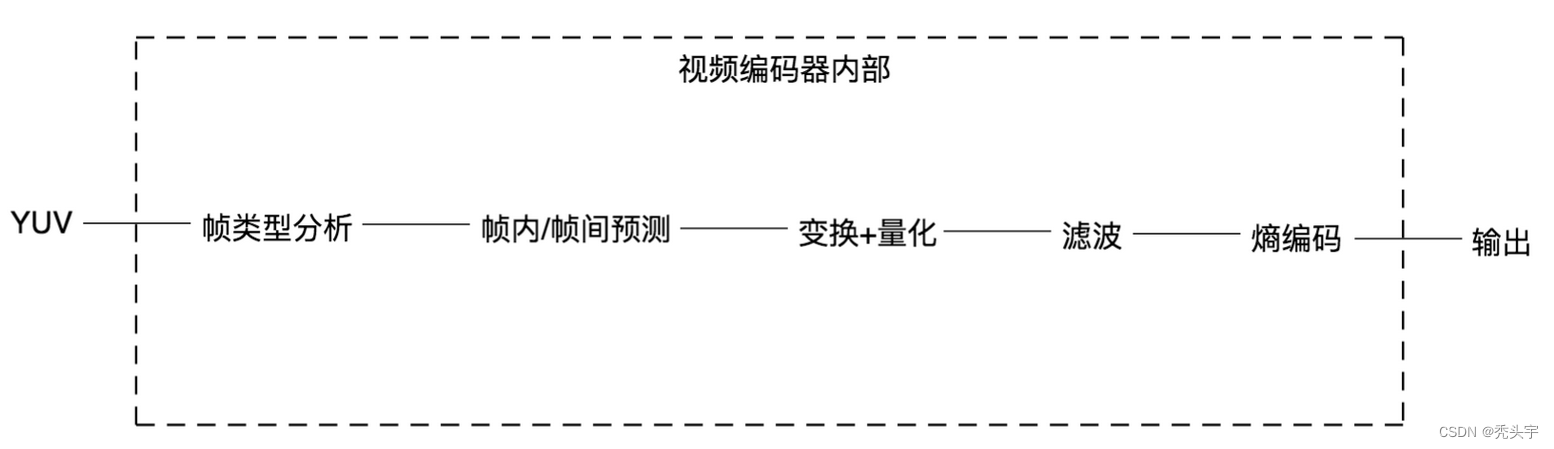
2.1 帧类型分析
对输入进来的YUV数据的每一帧确定一个类型,即I帧,P帧和B帧, I帧是内部编码帧,P帧是向前预测帧,B帧是双向内插帧。I帧不会依赖其他帧的信息,也就是自我进行参考的帧。P和B帧的话,都是会依赖其他帧信息来完成自身预测的帧,区别在于显示序列中P帧是前向参考,B帧是前后双向参考。
I 帧可以理解为电影中的一个完整画面,里面包含了所有的图像信息,而P帧和B帧记录的是相对于I帧的变化
可以想象现在有一段视频,一个人从画面左边走到右边,刚打开这个视频的时候,显示的第一帧图像肯定是要自我重建的,因为没有图像可以参考,这样的帧就是I帧。后面的再显示第二张图像发现除了画面中除了人运动的一点点位置发生了变化,剩下静止不动的地方都和前一帧一样。这样的话,就可以把前一帧静止的数据直接复制过来,当前帧只需要把和前一帧的不同点(也就是运动位移矢量)保存下来就行,这样的帧就是P/B帧,B帧因为还有后向参考,也就是说,它比P帧参考搜索的范围更大,所以B帧的压缩率相对更高。这时候镜头突然一转,给了这个人的脸一张特写。那么这时候就会需要重建一个新的画面,就是一个新的 I 帧
2.2 帧内/帧间预测
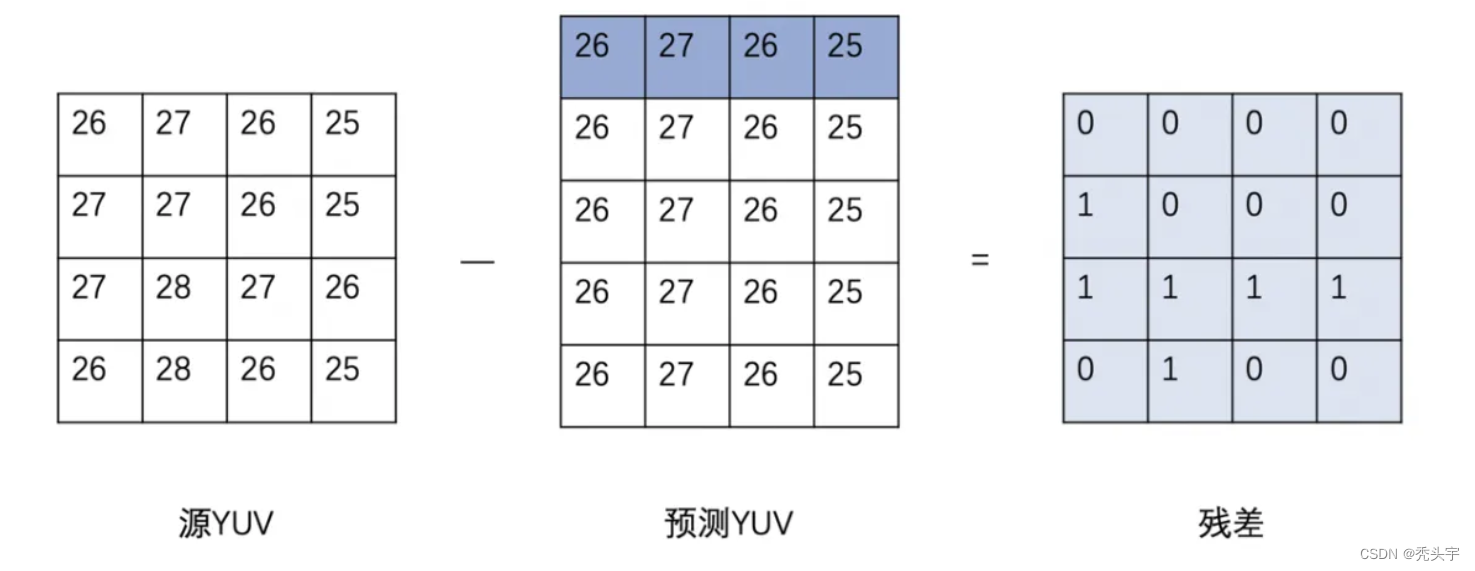
通常,编码器会通过算法将图像划分为一块一块的,然后逐块进行后续的压缩处理
假设当前的块不在图像边缘,我们可以用上方相邻块边界邻近值作为基础值,也就是上面一行中的每一个值,都垂直向下做拷贝,构建出和源 YUV 块一样大小的预测块,这种构建预测块的方式,叫做垂直预测模式,属于帧内预测模式的一种。与它相似的,还有水平预测模式、均值预测模式(也就是4x4的均值填充整个 4x4)等
紧接着,用源YUV的数据和预测YUV的数据做差值,得到残差块,这样我们在码流中,就直接传输残差的数据和当前4x4块的预测模式的标志位就行,这极大地节省了码流
2.3 变换+量化
预测之后的残差经过DCT空频变换,直流和低频(相对平坦,图像或块中大部分占比)能量集中在左上,高频(细节,图像或块中少部分占比)能量集中在右下,DCT本身虽然没有压缩作用,却为以后压缩时的取舍,奠定了必不可少的基础
于人眼对高频信号不敏感,我们可以定义这样一个变量QP=5,将变换块中所有的值都除以QP,这样做进一步节省传输码流位宽,同时主要去掉了高频分量的值,在解码端只需要将变换块中所有的值在乘QP就可以基本还原低频分量
我们将QP运算的过程称为量化,可见量化值越大,丢掉的高频信息就越多,再加上编码器中都是用整形变量代表像素值,所以量化值最大还原的低频信息也会越不准确,即造成的失真就越大,块效应也会越大,视频编码的质量损失主要来源于此
2.4 滤波
当量化值波动特别大的时候,可能会造成画面真实边界的区域内有明显的块效应,滤波是一个减少块效应提升画面质量的操作。
主要有三部分操作:1、初步估算块效应边界强度;2、区分真假边界 ;3、计算差值
2.5 熵编码
在真实网络传输的过程中肯定都是二进制码,所以需要将当前的像素值进一步压缩成二进制流。在编码中一共有两种熵编码方式:
- 较为简单的Cavlc
- 压缩效率更高但运算更复杂的Cabac
具体参考论文《H.264中CABAC算法与CAVLC算法比较和改进》
三、H264解码为YUV
FFmpeg的源代码和库都是C的代码和库,golang语言使用FFmpeg的接口需要使用cgo对C库的接口进行封装,以便go代码调用,这里使用的是go的第三方库
import (
	"github.com/giorgisio/goav/avcodec"
	"github.com/giorgisio/goav/avformat"
	"github.com/giorgisio/goav/avutil"
	 ...  ...  ...  ...  ...
)
3.1 代码逻辑及使用API
H264解码为YUV,整个代码逻辑如下:
- 创建AvformatContext结构体:
func avformat.AvformatAllocContext() *avformat.Context
- 打开输入文件:
func avformat.AvformatOpenInput(ps **avformat.Context, fi string, fmt *avformat.InputFormat, d **avutil.Dictionary) int
- 获取输入文件的视频流信息:
func (*avformat.Context).AvformatFindStreamInfo(d **avutil.Dictionary) int
- 循环查找视频中包含的流信息,直到找到视频类型的流:
func (*avformat.Context).Streams() []*avformat.Stream
func (*avformat.Stream).CodecParameters() *avcodec.AvCodecParameters
func (*avcodec.AvCodecParameters).AvCodecGetType() avcodec.MediaType
- 查找解码器:
func avcodec.AvcodecFindDecoder(id avcodec.CodecId) *avcodec.Codec   or
func avcodec.AvcodecFindDecoderByName(name string) *avcodec.Codec
- 配置解码器:
func (*avcodec.Codec).AvcodecAllocContext3() *avcodec.Context
func (*avcodec.Context).AvcodecCopyContext(ctxt2 *avcodec.Context) int
- 打开解码器:
func (*avcodec.Context).AvcodecOpen2(c *avcodec.Codec, d **avcodec.Dictionary) int
- 分配frame和packet结构
func avutil.AvFrameAlloc() *avutil.Frame
func avcodec.AvPacketAlloc() *avcodec.Packet
- 提供packet数据作为解码器的输入,frame接收解码器的输出
func (*avformat.Context).AvReadFrame(pkt *avcodec.Packet)
func (*avcodec.Context).AvcodecSendPacket(packet *avcodec.Packet) int
func (*avcodec.Context).AvcodecReceiveFrame(frame *avcodec.Frame) int
3.2 具体代码实现
package main

import (
	"errors"
	"fmt"
	"os"
	"unsafe"

	"github.com/giorgisio/goav/avcodec"
	"github.com/giorgisio/goav/avformat"
	"github.com/giorgisio/goav/avutil"
)

var width int
var height int

func FFmpeg_H264DecodeToYUV(input_filename string, output_filename string) error {
	file, _ := os.Create(output_filename)

	//创建AvformatContext结构体
	Inputformatctx := avformat.AvformatAllocContext()
	//打开文件
	if avformat.AvformatOpenInput(&Inputformatctx, input_filename, nil, nil) != 0 {
		return errors.New("Unable to open input file " + input_filename)
	}
	//获取视频流信息
	if Inputformatctx.AvformatFindStreamInfo(nil) < 0 {
		Inputformatctx.AvformatCloseInput()
		return errors.New("Error: Couldn't find stream information.")
	}

	Inputformatctx.AvDumpFormat(0, input_filename, 0)

	nCount := 0
	//循环查找视频中包含的流信息,直到找到视频类型的流
	//记录下来,保存到videoStreamIndex变量中
	var i int
	for i = 0; i < int(Inputformatctx.NbStreams()); i++ {
		switch Inputformatctx.Streams()[i].CodecParameters().AvCodecGetType() {
		case avformat.AVMEDIA_TYPE_VIDEO:

			// Get a pointer to the codec context for the video stream
			pCodecCtxOrig := Inputformatctx.Streams()[i].Codec()
			// 查找解码器
			pCodec := avcodec.AvcodecFindDecoder(avcodec.CodecId(pCodecCtxOrig.GetCodecId()))
			//pCodec := avcodec.AvcodecFindDecoderByName("libx264")
			if pCodec == nil {
				return errors.New("Unsupported codec!----------")
			}
			// 配置解码器
			pCodecCtx := pCodec.AvcodecAllocContext3()
			if pCodecCtx.AvcodecCopyContext((*avcodec.Context)(unsafe.Pointer(pCodecCtxOrig))) != 0 {
				return errors.New("Couldn't copy codec context--------------")
			}

			// 打开解码器
			if pCodecCtx.AvcodecOpen2(pCodec, nil) < 0 {
				return errors.New("Could not open codec-------------")
			}

			width := pCodecCtx.Width()

			height := pCodecCtx.Height()
			pFrameYUV := avutil.AvFrameAlloc()
			packet := avcodec.AvPacketAlloc()       //分配一个packet
			packet.AvNewPacket(int(width * height)) //调整packet的数据
			fmt.Println("width:", width)
			fmt.Println("height:", height)

			for Inputformatctx.AvReadFrame(packet) >= 0 {
				// Is this a packet from the video stream?
				if packet.StreamIndex() == i {
					// 提供原始数据包数据作为解码器的输入
					if pCodecCtx.AvcodecSendPacket(packet) >= 0 {
						//从解码器返回解码的输出数据
						for pCodecCtx.AvcodecReceiveFrame((*avcodec.Frame)(unsafe.Pointer(pFrameYUV))) == 0 {
							nCount++

							bytes := []byte{}
							//y
							ptr := uintptr(unsafe.Pointer(avutil.Data(pFrameYUV)[0]))
							for j := 0; j < width*height; j++ {
								bytes = append(bytes, *(*byte)(unsafe.Pointer(ptr)))
								ptr++
							}
							//u
							ptr = uintptr(unsafe.Pointer(avutil.Data(pFrameYUV)[1]))
							for j := 0; j < width*height/4; j++ {
								bytes = append(bytes, *(*byte)(unsafe.Pointer(ptr)))
								ptr++
							}
							//v
							ptr = uintptr(unsafe.Pointer(avutil.Data(pFrameYUV)[2]))
							for j := 0; j < width*height/4; j++ {
								bytes = append(bytes, *(*byte)(unsafe.Pointer(ptr)))
								ptr++
							}
							//写文件
							file.Write(bytes)
						}
						if nCount == 100 {
							break
						}

					}

				}
				packet.AvPacketUnref()
			}
			fmt.Printf("There are %d frames int total.\n", nCount)
			// Free the YUV frame
			avutil.AvFrameFree(pFrameYUV)
			packet.AvFreePacket()
			file.Close()
			// Close the codecs
			pCodecCtx.AvcodecClose()
			(*avcodec.Context)(unsafe.Pointer(pCodecCtxOrig)).AvcodecClose()

			// 关闭视频文件
			Inputformatctx.AvformatCloseInput()
			// Stop after saving frames of first video straem
			break

		default:
			return errors.New("Didn't find a video stream")
		}

	}
	return nil
}

func main() {

	input_filename := "song.mp4"
	output_filename := "1280x720_yuv420p.yuv"
	avformat.AvRegisterAll()
	//解码视频流数据
	FFmpeg_H264DecodeToYUV(input_filename, output_filename)

}
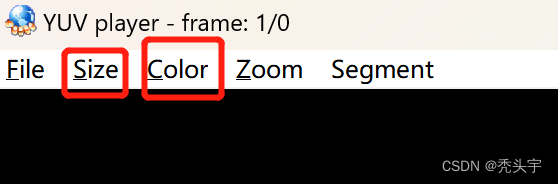
3.3 YUV文件播放
可以使用YUVplayer播放YUV文件,下载地址为YUVplayer播放器
播放时,设置好播放器的Size和Color
四、YUV编码为H264
4.1 代码逻辑及使用API
YUV数据编码为H264格式,其代码逻辑如下:
- 打开输出文件
func avformat.AvGuessFormat(sn string, f string, mt string) *avformat.OutputFormat
func avformat.AvformatAllocContext() *avformat.Context
func avformat.AvformatAllocOutputContext2(ctx **avformat.Context, o *avformat.OutputFormat, fo string, fi string) int
func avformat.AvIOOpen(url string, flags int) (res *avformat.AvIOContext, err error)
func (*avformat.Context).SetPb(pb *avformat.AvIOContext)
- 创建H264视频流,并设置参数
func (*avformat.Context).AvformatNewStream(c *avformat.AvCodec) *avformat.Stream
func (*avformat.Stream).AvStreamSetRFrameRate(r avcodec.Rational)
- 查找编码器
func avcodec.AvcodecFindEncoderByName(c string) *avcodec.Codec  or
func avcodec.AvcodecFindEncoder(id avcodec.CodecId) *avcodec.Codec
- 配置编码器
func (*avcodec.Codec).AvcodecAllocContext3() *avcodec.Context
func (*avcodec.Context).SetEncodeParams2(width int, height int, pxlFmt avcodec.PixelFormat, hasBframes bool, gopSize int, profile int)
- 打开编码器
func (*avcodec.Context).AvcodecOpen2(c *avcodec.Codec, d **avcodec.Dictionary) int
- 创建frame并配置
func avutil.AvFrameAlloc() *avutil.Frame
func avcodec.AvpictureGetSize(pf avcodec.PixelFormat, w int, h int) int
func (*avcodec.Picture).AvpictureFill(pt *uint8, pf avcodec.PixelFormat, w int, h int) int
- 写文件头并创建packet结构
func (*avformat.Context).AvformatWriteHeader(o **avutil.Dictionary) int
func avcodec.AvPacketAlloc() *avcodec.Packet
- 将YUV文件的数据读入frame中,并将frame发送给解码器,packet接收编码后的数据
func (*avcodec.Context).AvcodecSendFrame(frame *avcodec.Frame) int
func (*avcodec.Context).AvcodecReceivePacket(packet *avcodec.Packet) int
- 转换packet的Pts、dts
func (*avcodec.Context).AvCodecGetPktTimebase() avcodec.Rational
func (*avformat.Stream).TimeBase() avcodec.Rational
func avutil.AVRescaleQRnd(a int64, bq avutil.Rational, cq avutil.Rational, rnd uint32) int64
func avutil.AVRescaleQRnd(a int64, bq avutil.Rational, cq avutil.Rational, rnd uint32) int64
func (*avcodec.Packet).SetPts(pts int64)
func (*avcodec.Packet).SetDts(dts int64)
- 将packet里的数据写入输出文件中
func (*avformat.Context).AvInterleavedWriteFrame(pkt *avcodec.Packet) int
- 写文件尾,并释放之前的资源
func (*avformat.Context).AvWriteTrailer() int
4.2 具体代码实现
package main

import (
	"errors"
	"fmt"
	"os"
	"unsafe"

	"github.com/giorgisio/goav/avcodec"
	"github.com/giorgisio/goav/avformat"
	"github.com/giorgisio/goav/avutil"
)

const (
	width   = 1280
	height  = 720
	fps     = 25
	bitrate = 400000
	fmtCnt  = 100
)

func encode(enc_ctx *avcodec.Context, frame *avutil.Frame, packet *avcodec.Packet, VStream *avformat.Stream, outFmtCtx *avformat.Context) int {
	var ret int

	if frame != nil {
		fmt.Println("frame Send..........")
	}

	ret = enc_ctx.AvcodecSendFrame((*avcodec.Frame)(unsafe.Pointer(frame)))
	if ret < 0 {
		fmt.Println("Avcodec Send Frame failed")
		return -1
	}
	for ret >= 0 {
		ret = enc_ctx.AvcodecReceivePacket(packet)

		fmt.Println("packet size is ", ret, " ", packet.Size())
		if ret == avutil.AvErrorEAGAIN || ret == avutil.AvErrorEOF {
			return 0
		} else if ret < 0 {
			continue
		}
		fmt.Println("finish encode and write data to out_file")
		packet.SetStreamIndex(VStream.Index())
		input_time_base := enc_ctx.AvCodecGetPktTimebase()
		output_time_base := VStream.TimeBase()
		input_tmp := (*avutil.Rational)(unsafe.Pointer(&input_time_base))
		output_tmp := (*avutil.Rational)(unsafe.Pointer(&output_time_base))
		dtscurrent := avutil.AVRescaleQRnd(packet.Dts(), *input_tmp, *output_tmp, uint32(avutil.AV_ROUND_NEAR_INF|avutil.AV_ROUND_PASS_MINMAX))
		ptscurrent := avutil.AVRescaleQRnd(packet.Pts(), *input_tmp, *output_tmp, uint32(avutil.AV_ROUND_NEAR_INF|avutil.AV_ROUND_PASS_MINMAX))
		packet.SetPts(ptscurrent)
		packet.SetDts(dtscurrent)

		outFmtCtx.AvInterleavedWriteFrame(packet)

		packet.AvPacketUnref()
	}
	return 0
}

func FFmpeg_YuvEncodeToH264(input_filename string, output_filename string) error {

	in_file, err := os.Open(input_filename)
	if err != nil {
		return errors.New("Open file failed")
	}
	defer in_file.Close()

	var packet *avcodec.Packet
	var enc_ctx *avcodec.Context
	var frame *avutil.Frame
	var outFmtCtx *avformat.Context

	ufmt := avformat.AvGuessFormat("H264", output_filename, "")
	outFmtCtx = avformat.AvformatAllocContext()
	if avformat.AvformatAllocOutputContext2(&outFmtCtx, ufmt, "mp4", output_filename) < 0 {
		return errors.New("Cannot alloc output file context.")
	}

	pb, err := avformat.AvIOOpen(output_filename, avformat.AVIO_FLAG_WRITE)
	if err != nil {
		return err
	}
	outFmtCtx.SetPb(pb)
	// 创建h264流, 并设置参数
	var rational avcodec.Rational
	rational.Set(1, fps)
	VStream := outFmtCtx.AvformatNewStream(nil)
	if VStream == nil {
		return errors.New("VStream is nil")
	}
	VStream.AvStreamSetRFrameRate(rational) //设置25帧每秒,fps为25

	// //设置相关编码参数
	codecPara := outFmtCtx.Streams()[VStream.Index()].Codec()
	codecPara.SetCodecType(avformat.AVMEDIA_TYPE_VIDEO)
	codecPara.SetWidth(width)
	codecPara.SetHeight(height)

	//查找编码器
	pCodec := avcodec.AvcodecFindEncoderByName("libx264")
	if pCodec == nil {
		return errors.New("avcodec_find_encoder_by_name fail")
	}

	//配置编码器的上下文
	enc_ctx = pCodec.AvcodecAllocContext3()

	enc_ctx.SetEncodeParams2(width, height, avcodec.AV_PIX_FMT_YUV420P, false, 10, avcodec.FF_PROFILE_H264_HIGH)
	enc_ctx.SetTimebase(1, fps) //设置25帧每秒,fps为25

	if int(pCodec.AvcodecAllocContext3().CodecId()) == avcodec.AV_CODEC_ID_H264 {
		fmt.Println("H264........")
	}

	//打开编码器
	if enc_ctx.AvcodecOpen2(pCodec, nil) < 0 {
		errors.New("Could not open codec-------------")
	}

	//创建frame并初始化
	frame = avutil.AvFrameAlloc()
	avutil.AvSetFrame(frame, enc_ctx.Width(), enc_ctx.Height(), int(enc_ctx.PixFmt()))

	newSize := avcodec.AvpictureGetSize(enc_ctx.PixFmt(), enc_ctx.Width(), enc_ctx.Height())
	picture_buf := avutil.AvMalloc(uintptr(newSize))

	avp := (*avcodec.Picture)(unsafe.Pointer(frame))
	avp.AvpictureFill((*uint8)(picture_buf), enc_ctx.PixFmt(), enc_ctx.Width(), enc_ctx.Height())

	fmt.Println("newSize = ", newSize)
	fmt.Println("width:", enc_ctx.Width())
	fmt.Println("height:", enc_ctx.Height())
	fmt.Println("PixFmt:", enc_ctx.PixFmt())
	fmt.Println("Profile:", enc_ctx.Profile())

	//写文件头
	if outFmtCtx.AvformatWriteHeader(nil) < 0 {
		return errors.New("write header error,outputfile name : " + output_filename)
	}

	//创建编码后的数据包,用来存储frame编码后的数据
	packet = avcodec.AvPacketAlloc()
	packet.AvNewPacket(newSize)
	y_size := enc_ctx.Width() * enc_ctx.Height()
	//循环编码每一帧
	var j int = 0
	for i := 0; i < fmtCnt; i++ {
		//读入YUV

		buf := make([]byte, newSize)
		n, err := in_file.Read(buf)
		if err != nil {
			return errors.New("read in_file failed....")
		}

		//将buf数据拷贝倒picture_buf
		copy((*[1 << 30]byte)(picture_buf)[:newSize:newSize], buf[:n])

		pic_ptr := uintptr(picture_buf)
		//y
		avutil.SetData(frame, 0, (*uint8)(unsafe.Pointer(pic_ptr)))
		fmt.Println("data[0]:", avutil.Data(frame)[0])
		fmt.Println("*data[0]:", *(avutil.Data(frame)[0]))

		//u
		avutil.SetData(frame, 1, (*uint8)(unsafe.Pointer(pic_ptr+uintptr(y_size))))
		fmt.Println("data[1]:", avutil.Data(frame)[1])
		fmt.Println("*data[1]:", *(avutil.Data(frame)[1]))

		// v
		avutil.SetData(frame, 2, (*uint8)(unsafe.Pointer(pic_ptr+uintptr(y_size*5/4))))
		fmt.Println("data[2]:", avutil.Data(frame)[2])
		fmt.Println("*data[2]:", *(avutil.Data(frame)[2]))

		fmt.Println("准备编码 ---------------------")

		avutil.FrameSetPts(frame, int64(j))
		j = i + 1
		//利用编码器进行编码, 将frame的数据传入packet
		if encode(enc_ctx, frame, packet, VStream, outFmtCtx) == -1 {
			break
		}

	}
	//flush encoder
	encode(enc_ctx, nil, packet, VStream, outFmtCtx)

	//写文件尾
	outFmtCtx.AvWriteTrailer()

	//释放所有指针资源
	enc_ctx.AvcodecClose()
	avutil.AvFree(unsafe.Pointer(frame))

	if outFmtCtx != nil {
		outFmtCtx.Pb().Close()
		outFmtCtx.AvformatFreeContext()
	}
	return nil
}

func main() {
	output_filename := "1280x720_yuv420p.yuv"
	filename := "result.H264"
	avformat.AvRegisterAll()

	//编码码视频流数据
	FFmpeg_YuvEncodeToH264(output_filename, filename)
}
4.3 H264文件播放
H264文件可以用vlc播放器进行播放,播放器下载地址为:vlc播放器
vlc播放器工具栏—编解码器信息,可以查看视频的编码格式以及数据丢失率