前言
前面实现了一个基础的读取yaml文件内容,当成用例去执行。虽然入门简单,但需要扩展功能,比如在 yaml 用例实现参数化,就不好扩展了。
因为它并不是一个真正的pytest的模块和用例,无法被钩子函数探测到。所以这篇会把yaml文件动态生成一个py模块,把yaml文件的数据,动态生成一个函数。
pytest 用例收集
pytest 用例收集默认是按test_*.py 模块收集,并且test_开头的函数当成用例来执行的
# test_sample.py
def test_demo():
    print("hello")


def test_login():
    print("world")
如果我们把上面的代码转成 yaml 文件
test_demo:
    print: hello

test_login:
    print: hello
在yaml文件中写两个key,对应函数名称,对应的值是执行python的对应函数。
整体思路是把yaml文件转成一个py模块,把yaml里面的键值对,转成函数和待执行的内容。
(题外话:看到这里,有人要 mmp 了,好好代码写到 py 文件不行,非得装逼写到 yaml 文件,不都是一样执行么?)
这就回到面试上了,你去面试时候,面试官问你,你的测试数据有没跟代码分离,有没用到数据驱动,参数化等等等。
为什么测试数据要跟代码分离呢?
面试官觉得好维护,写到代码不好维护。
其实真的好维护吗?
这里打个大大的问号,yaml 文件和 py 文件本质上都是一个文件,你写到 yaml 文件,数据格式写错了编辑器都无法知道,你写到py文件编辑器还能快速识别,并且编辑器还能跳转到对应功能上。
还有一个方面原因:
面试官觉得写代码不好在公司推广,因为大部分公司测试人员不会代码,需要推广自动化,就需用到低代码的框架,让人人都能参与进来。
通过数据驱动的方式,还有个好处就是平台化,平台化落地底层得用数据驱动执行,在平台上维护自动化测试数据,做出可视化,可维护和管理的平台。
pytest+yaml 数据驱动
在conftest.py 完成yaml用例的收集,并转成标准的pytest用例
import types
import yaml
from pathlib import Path
from _pytest.python import Module


def pytest_collect_file(file_path: Path, parent):
    if file_path.suffix == ".yml" and file_path.name.startswith("test"):
        pytest_module = Module.from_parent(parent, path=file_path)
        # 动态创建 module
        module = types.ModuleType(file_path.stem)
        print('module name:, ', module)
        # 解析 yaml 内容
        raw_dict = yaml.safe_load(file_path.open(encoding='utf-8'))
        print(raw_dict)
        # 用例名称test_开头
        for function_name, value in raw_dict.items():
            def function_template(*args, **kwargs):
                """
                测试用例-函数模块
                """
                for step_key, step_value in value.items():
                    # 执行用例里面的方法
                    eval(step_key)(step_value)
            # 向 module 中加入函数
            setattr(module, function_name, function_template)
            # 重写_getobj 属性
        pytest_module._getobj = lambda: module
        return pytest_module
test_login.yml测试用例
test_demo:
    print: hello

test_login:
    print: hello
执行pytest -s
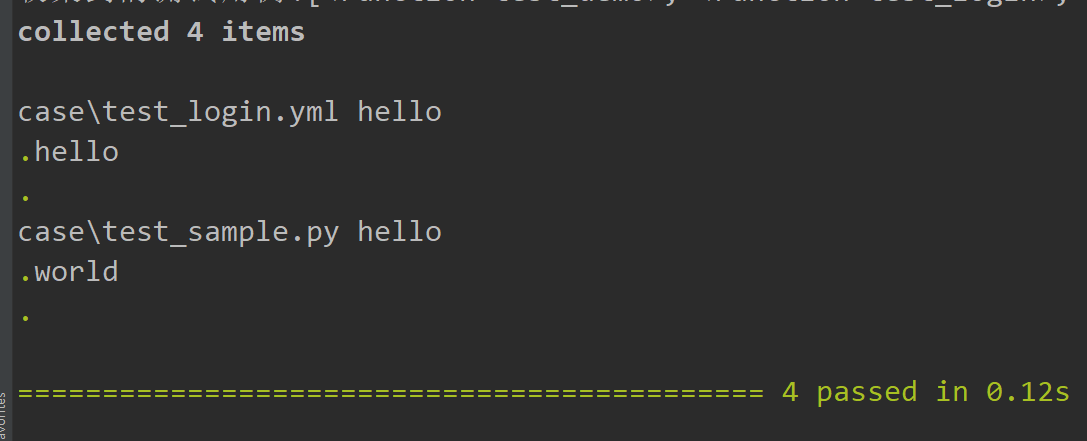
会看到yaml文件中的数据,被转成了标准的pytest 函数式的用例。
执行接口用例
如果我们需要把接口的用例,转成yaml文件,如下示例
# test_sample.py
import requests


def request(*args, **kwargs):
    res = requests.Session().request(*args, **kwargs)
    print(res.text)
    return res


def test_demo():
    print("hello")


def test_login():
    req = {
        "url": "http://127.0.0.1:8000/api/v1/login",
        "method": "POST",
        "headers": {"Content-Type": "application/json"},
        "json": {"username": "test", "password": "123456"}
    }
    request(**req)
封装一个公共的请求方法request,只需要传接口参数就可以实现, 于是在yaml中可以这样写
test_demo:
    print: hello

test_login:
    request:
        url: http://124.70.221.221:8201/api/v1/login/
        method: POST
        headers:
            Content-Type: application/json
            User-Agent: python-requests/2.18.4
        json:
            username: test
            password: 123456
在conftest.py 文件中完成收集用例钩子
import types
import yaml
from pathlib import Path
from _pytest.python import Module
import requests


def request(*args, **kwargs):
    res = requests.Session().request(*args, **kwargs)
    print(res.text)
    return res


def pytest_collect_file(file_path: Path, parent):
    if file_path.suffix == ".yml" and file_path.name.startswith("test"):
        pytest_module = Module.from_parent(parent, path=file_path)
        # 动态创建 module
        module = types.ModuleType(file_path.stem)
        print('module name:, ', module)
        # 解析 yaml 内容
        raw_dict = yaml.safe_load(file_path.open(encoding='utf-8'))
        print(raw_dict)
        # 用例名称test_开头
        for function_name, value in raw_dict.items():
            def function_template(*args, **kwargs):
                """
                测试用例-函数模块
                """
                for step_key, step_value in value.items():
                    # 执行用例里面的方法
                    if step_key == 'request':
                        res = request(**step_value)
                    else:
                        eval(step_key)(step_value)
            # 向 module 中加入函数
            setattr(module, function_name, function_template)
            # 重写_getobj 属性
        pytest_module._getobj = lambda: module
        return pytest_module
于是 yaml 文件中的接口请求,就会被当成用例执行了。
学习思路来自这篇https://blog.csdn.net/Hogwartstester/article/details/126767687

