其实个人偏爱用OpenCV DNN 部署,但是在前面一篇博客发现还要升级OpenCV。 笔记本的CPU 是AMD 牌子的,就只能用 ONNX Runtime 部署了。
目录
Pre:
cv::dnn::blobFromImages()
gettimeofday()
rand()
template
代码
utils.h
utils.cpp
detect.h
detect.cpp
main.cpp
CmakeList.txt
个人总结
End
Pre:
- 这份代码参考自该github项目,我把检测部分的整理出来,建议去看源码写的很哇塞,这里贴的代码也会添加一点点自己的注释,以便复习
- 由于yolov8输出与yolov5不一样,所以不能直接用于yolov5
想看代码之前翻到后面,前面我还要记一点新知识点,好记性不如烂笔头嘛
cv::dnn::blobFromImages()
函数原型:
void blobFromImages(InputArrayOfArrays images,
OutputArray blob,
double scalefactor=1.0,
Size size = Size(),
const Scalar& mean = Scalar(),
bool swapRB=false,
bool crop=false,int ddepth=CV_32F);
参数:
images:输入图像(4通道)
可选参数:
- scalefactor:图像各通道数值的缩放比例
- size:输出图像的空间尺寸,如size=(200,300)表示高h=300,宽w=200
- mean:用于各通道减去的值,以降低光照的影响(e.g. image为bgr3通道的图像,mean=[104.0, 177.0, 123.0],表示b通道的值-104,g-177,r-123)
- swapRB:交换RB通道,默认为False.(cv2.imread读取的是彩图是bgr通道)
- crop:图像裁剪,默认为False.当值为True时,先按比例缩放,然后从中心裁剪成size尺寸
- ddepth:输出的图像深度,可选CV_32F 或者 CV_8U.
gettimeofday()
gettimeofday() linux环境下的计时函数,int gettimeofday ( struct timeval * tv , struct timezone * tz ),gettimeofday()会把目前的时间由tv所指的结构返回,当地时区的信息则放到tz所指的结构中.
//timeval结构定义为:
struct timeval{
long tv_sec; /*秒*/
long tv_usec; /*微秒*/
};
//timezone 结构定义为:
struct timezone{
int tz_minuteswest; /*和Greenwich 时间差了多少分钟*/
int tz_dsttime; /*日光节约时间的状态*/
};
这个函数获取从1970年1月1日到现在经过的时间和时区(UTC时间),(按照linux的官方文档,时区已经不再使用,正常应该传NULL)。
调用代码:
#include <sys/time.h>   //引入头文件
int main()
{
    struct timeval t1,t2;
    double timeuse;
    gettimeofday(&t1,NULL);

    fun();

    gettimeofday(&t2,NULL);
    timeuse = (t2.tv_sec - t1.tv_sec) + (double)(t2.tv_usec - t1.tv_usec)/1000000.0;

    cout<<"time = "<<timeuse<<endl;  //输出时间(单位:s)
}
rand()
rand函数原型:
#include <stdlib.h>

int rand(void);
例子:
#include <stdio.h>
#include <stdlib.h>
#include <time.h>

int main(){
    srand((unsigned int)time(0));//初始化种子为随机值
    int i = 0;
    for(;i < 5;++i){
        int num = rand() % 50 + 1;//产生一个1-50之间的数
        printf("%d ",num);
    }
    printf("\n");
    return 0;
}
template <typename T>
优点在于:比如写一个求和函数,对于int、float等不同的数据类型,一般来说需要写多个函数,如int sum(int, int)、float sum(float, float);用template<typename T>的话,就只需要写一个通用函数就可以了,T就代替了int、float等数据类型,具体数据类型到实例化的时候再确定
示例:
#include<iostream>
#include<vector>
#include<algorithm>
using namespace std;
template <typename T>
T mmax(T a,T b)
{
    return a>b?a:b;
}
int main()
{
    int  a,b;
    cin>>a>>b;
    cout<<mmax(a,b)<<endl;
    char c,d;
    cin>>c>>d;
    cout<<mmax(c,d)<<endl;
    double f,g;
    cin>>f>>g;
    cout<<mmax(f,g)<<endl;
}
代码
utils.h
#pragma once
#include <iostream>
#include <opencv2/opencv.hpp>

struct OutputDet{
    int id;
    float confidence;
    cv::Rect box;
};

void DrawPred(cv::Mat& img, std::vector<OutputDet> result,
              std::vector<std::string> classNames, std::vector<cv::Scalar> color);
void LetterBox(const cv::Mat& image, cv::Mat& outImage,
               cv::Vec4d& params,
               const cv::Size& newShape = cv::Size(640, 640),
               bool autoShape = false,
               bool scaleFill=false,
               bool scaleUp=true,
               int stride= 32,
               const cv::Scalar& color = cv::Scalar(114,114,114));
utils.cpp
#pragma once
#include "utils.h"
using namespace cv;
using namespace std;

void LetterBox(const cv::Mat& image, cv::Mat& outImage,
               cv::Vec4d& params,
               const cv::Size& newShape,
               bool autoShape,
               bool scaleFill,
               bool scaleUp,
               int stride,
               const cv::Scalar& color)
{
    if (false) {
        int maxLen = MAX(image.rows, image.cols);
        outImage = Mat::zeros(Size(maxLen, maxLen), CV_8UC3);
        image.copyTo(outImage(Rect(0, 0, image.cols, image.rows)));
        params[0] = 1;
        params[1] = 1;
        params[3] = 0;
        params[2] = 0;
    }

    // 取较小的缩放比例
    cv::Size shape = image.size();
    float r = std::min((float)newShape.height / (float)shape.height,
                       (float)newShape.width / (float)shape.width);
    if (!scaleUp)
        r = std::min(r, 1.0f);

    // 依据前面的缩放比例后,原图的尺寸
    float ratio[2]{r,r};
    int new_un_pad[2] = { (int)std::round((float)shape.width  * r), (int)std::round((float)shape.height * r)};

    // 计算距离目标尺寸的padding像素数
    auto dw = (float)(newShape.width - new_un_pad[0]);
    auto dh = (float)(newShape.height - new_un_pad[1]);
    if (autoShape)
    {
        dw = (float)((int)dw % stride);
        dh = (float)((int)dh % stride);
    }
    else if (scaleFill)
    {
        dw = 0.0f;
        dh = 0.0f;
        new_un_pad[0] = newShape.width;
        new_un_pad[1] = newShape.height;
        ratio[0] = (float)newShape.width / (float)shape.width;
        ratio[1] = (float)newShape.height / (float)shape.height;
    }

    dw /= 2.0f;
    dh /= 2.0f;

    // 等比例缩放
    if (shape.width != new_un_pad[0] && shape.height != new_un_pad[1])
    {
        cv::resize(image, outImage, cv::Size(new_un_pad[0], new_un_pad[1]));
    }
    else{
        outImage = image.clone();
    }

    // 图像四周padding填充,至此原图与目标尺寸一致
    int top = int(std::round(dh - 0.1f));
    int bottom = int(std::round(dh + 0.1f));
    int left = int(std::round(dw - 0.1f));
    int right = int(std::round(dw + 0.1f));
    params[0] = ratio[0]; // width的缩放比例
    params[1] = ratio[1]; // height的缩放比例
    params[2] = left; // 水平方向两边的padding像素数
    params[3] = top; //垂直方向两边的padding像素数
    cv::copyMakeBorder(outImage, outImage, top, bottom, left, right, cv::BORDER_CONSTANT, color);
}

void DrawPred(cv::Mat& img, std::vector<OutputDet> result,
              std::vector<std::string> classNames,
              std::vector<cv::Scalar> color)
{
    for (size_t i=0; i<result.size(); i++){
        int  left,top;
        left = result[i].box.x;
        top = result[i].box.y;

        // 框出目标
        rectangle(img, result[i].box,color[result[i].id], 2, 8);

        // 在目标框左上角标识目标类别以及概率
        string label = classNames[result[i].id] + ":" + to_string(result[i].confidence);
        int baseLine;
        Size labelSize = getTextSize(label, FONT_HERSHEY_SIMPLEX, 0.5, 1, &baseLine);
        top = max(top, labelSize.height);
        putText(img, label, Point(left, top), FONT_HERSHEY_SIMPLEX, 1, color[result[i].id], 2);
    }
}
detect.h
#pragma onece
#include <iostream>
#include <memory>
#include <opencv2/opencv.hpp>
#include "utils.h"
#include <onnxruntime_cxx_api.h>
#include <numeric>

class Yolov8Onnx{
private:
    template<typename T>
    T VectorProduct(const std::vector<T>& v)
    {
        return std::accumulate(v.begin(), v.end(), 1, std::multiplies<T>());
    }

    int Preprocessing(const std::vector<cv::Mat>& SrcImgs,
                      std::vector<cv::Mat>& OutSrcImgs,
                      std::vector<cv::Vec4d>& params);

    const int _netWidth = 640;   //ONNX-net-input-width
    const int _netHeight = 640;  //ONNX-net-input-height

    int _batchSize = 1; //if multi-batch,set this
    bool _isDynamicShape = false;//onnx support dynamic shape

    float _classThreshold = 0.25;
    float _nmsThrehold= 0.45;
    float _maskThreshold = 0.5;


    //ONNXRUNTIME
    Ort::Env _OrtEnv = Ort::Env(OrtLoggingLevel::ORT_LOGGING_LEVEL_ERROR, "Yolov5-Seg");
    Ort::SessionOptions _OrtSessionOptions = Ort::SessionOptions();
    Ort::Session* _OrtSession = nullptr;
    Ort::MemoryInfo _OrtMemoryInfo;

    std::shared_ptr<char> _inputName, _output_name0;
    std::vector<char*> _inputNodeNames; //输入节点名
    std::vector<char*> _outputNodeNames; // 输出节点名

    size_t _inputNodesNum = 0;        // 输入节点数
    size_t _outputNodesNum = 0;      // 输出节点数

    ONNXTensorElementDataType _inputNodeDataType;  //数据类型
    ONNXTensorElementDataType _outputNodeDataType;

    std::vector<int64_t> _inputTensorShape;  // 输入张量shape
    std::vector<int64_t> _outputTensorShape;

public:
    Yolov8Onnx():_OrtMemoryInfo(Ort::MemoryInfo::CreateCpu(OrtAllocatorType::OrtDeviceAllocator, OrtMemType::OrtMemTypeCPUOutput)) {};
    ~Yolov8Onnx() {};// delete _OrtMemoryInfo;

public:
    /** \brief Read onnx-model
    * \param[in] modelPath:onnx-model path
    * \param[in] isCuda:if true,use Ort-GPU,else run it on cpu.
    * \param[in] cudaID:if isCuda==true,run Ort-GPU on cudaID.
    * \param[in] warmUp:if isCuda==true,warm up GPU-model.
    */
    bool ReadModel(const std::string& modelPath, bool isCuda=false, int cudaId=0, bool warmUp=true);

    /** \brief  detect.
    * \param[in] srcImg:a 3-channels image.
    * \param[out] output:detection results of input image.
    */
    bool OnnxDetect(cv::Mat& srcImg, std::vector<OutputDet>& output);

    /** \brief  detect,batch size= _batchSize
    * \param[in] srcImg:A batch of images.
    * \param[out] output:detection results of input images.
    */
    bool OnnxBatchDetect(std::vector<cv::Mat>& srcImgs, std::vector<std::vector<OutputDet>>& output);

public:
    std::vector<std::string> _className = {
        "person", "bicycle", "car", "motorcycle", "airplane", "bus", "train", "truck", "boat", "traffic light",
        "fire hydrant", "stop sign", "parking meter", "bench", "bird", "cat", "dog", "horse", "sheep", "cow",
        "elephant", "bear", "zebra", "giraffe", "backpack", "umbrella", "handbag", "tie", "suitcase", "frisbee",
        "skis", "snowboard", "sports ball", "kite", "baseball bat", "baseball glove", "skateboard", "surfboard",
        "tennis racket", "bottle", "wine glass", "cup", "fork", "knife", "spoon", "bowl", "banana", "apple",
        "sandwich", "orange", "broccoli", "carrot", "hot dog", "pizza", "donut", "cake", "chair", "couch",
        "potted plant", "bed", "dining table", "toilet", "tv", "laptop", "mouse", "remote", "keyboard", "cell phone",
        "microwave", "oven", "toaster", "sink", "refrigerator", "book", "clock", "vase", "scissors", "teddy bear",
        "hair drier", "toothbrush"
    };


};
detect.cpp
#include "detect.h"
using namespace std;
using namespace cv;
using namespace cv::dnn;
using namespace Ort;
bool Yolov8Onnx::ReadModel(const std::string &modelPath, bool isCuda, int cudaId, bool warmUp){
if (_batchSize < 1) _batchSize =1;
try
{
std::vector<std::string> available_providers = GetAvailableProviders();
auto cuda_available = std::find(available_providers.begin(), available_providers.end(), "CUDAExecutionProvider");
if (isCuda && (cuda_available == available_providers.end()))
{
std::cout << "Your ORT build without GPU. Change to CPU." << std::endl;
std::cout << "************* Infer model on CPU! *************" << std::endl;
}
else if (isCuda && (cuda_available != available_providers.end()))
{
std::cout << "************* Infer model on GPU! *************" << std::endl;
//#if ORT_API_VERSION < ORT_OLD_VISON
// OrtCUDAProviderOptions cudaOption;
// cudaOption.device_id = cudaID;
// _OrtSessionOptions.AppendExecutionProvider_CUDA(cudaOption);
//#else
// OrtStatus* status = OrtSessionOptionsAppendExecutionProvider_CUDA(_OrtSessionOptions, cudaID);
//#endif
}
else
{
std::cout << "************* Infer model on CPU! *************" << std::endl;
}
//
_OrtSessionOptions.SetGraphOptimizationLevel(GraphOptimizationLevel::ORT_ENABLE_EXTENDED);
#ifdef _WIN32
std::wstring model_path(modelPath.begin(), modelPath.end());
_OrtSession = new Ort::Session(_OrtEnv, model_path.c_str(), _OrtSessionOptions);
#else
_OrtSession = new Ort::Session(_OrtEnv, modelPath.c_str(), _OrtSessionOptions);
#endif
Ort::AllocatorWithDefaultOptions allocator;
//init input
_inputNodesNum = _OrtSession->GetInputCount();
#if ORT_API_VERSION < ORT_OLD_VISON
_inputName = _OrtSession->GetInputName(0, allocator);
_inputNodeNames.push_back(_inputName);
#else
_inputName = std::move(_OrtSession->GetInputNameAllocated(0, allocator));
_inputNodeNames.push_back(_inputName.get());
#endif
//cout << _inputNodeNames[0] << endl;
Ort::TypeInfo inputTypeInfo = _OrtSession->GetInputTypeInfo(0);
auto input_tensor_info = inputTypeInfo.GetTensorTypeAndShapeInfo();
_inputNodeDataType = input_tensor_info.GetElementType();
_inputTensorShape = input_tensor_info.GetShape();
if (_inputTensorShape[0] == -1)
{
_isDynamicShape = true;
_inputTensorShape[0] = _batchSize;
}
if (_inputTensorShape[2] == -1 || _inputTensorShape[3] == -1) {
_isDynamicShape = true;
_inputTensorShape[2] = _netHeight;
_inputTensorShape[3] = _netWidth;
}
//init output
_outputNodesNum = _OrtSession->GetOutputCount();
#if ORT_API_VERSION < ORT_OLD_VISON
_output_name0 = _OrtSession->GetOutputName(0, allocator);
_outputNodeNames.push_back(_output_name0);
#else
_output_name0 = std::move(_OrtSession->GetOutputNameAllocated(0, allocator));
_outputNodeNames.push_back(_output_name0.get());
#endif
Ort::TypeInfo type_info_output0(nullptr);
type_info_output0 = _OrtSession->GetOutputTypeInfo(0); //output0
auto tensor_info_output0 = type_info_output0.GetTensorTypeAndShapeInfo();
_outputNodeDataType = tensor_info_output0.GetElementType();
_outputTensorShape = tensor_info_output0.GetShape();
//_outputMaskNodeDataType = tensor_info_output1.GetElementType(); //the same as output0
//_outputMaskTensorShape = tensor_info_output1.GetShape();
//if (_outputTensorShape[0] == -1)
//{
// _outputTensorShape[0] = _batchSize;
// _outputMaskTensorShape[0] = _batchSize;
//}
//if (_outputMaskTensorShape[2] == -1) {
// //size_t ouput_rows = 0;
// //for (int i = 0; i < _strideSize; ++i) {
// // ouput_rows += 3 * (_netWidth / _netStride[i]) * _netHeight / _netStride[i];
// //}
// //_outputTensorShape[1] = ouput_rows;
// _outputMaskTensorShape[2] = _segHeight;
// _outputMaskTensorShape[3] = _segWidth;
//}
//warm up
if (isCuda && warmUp) {
//draw run
cout << "Start warming up" << endl;
size_t input_tensor_length = VectorProduct(_inputTensorShape);
float* temp = new float[input_tensor_length];
std::vector<Ort::Value> input_tensors;
std::vector<Ort::Value> output_tensors;
input_tensors.push_back(Ort::Value::CreateTensor<float>(
_OrtMemoryInfo, temp, input_tensor_length, _inputTensorShape.data(),
_inputTensorShape.size()));
for (int i = 0; i < 3; ++i) {
output_tensors = _OrtSession->Run(Ort::RunOptions{ nullptr },
_inputNodeNames.data(),
input_tensors.data(),
_inputNodeNames.size(),
_outputNodeNames.data(),
_outputNodeNames.size());
}
delete[]temp;
}
}
catch (const std::exception&) {
return false;
}
return true;
}
int Yolov8Onnx::Preprocessing(const std::vector<cv::Mat> &SrcImgs,
std::vector<cv::Mat> &OutSrcImgs,
std::vector<cv::Vec4d> ¶ms){
OutSrcImgs.clear();
Size input_size = Size(_netWidth, _netHeight);
// 信封处理
for (size_t i=0; i<SrcImgs.size(); ++i){
Mat temp_img = SrcImgs[i];
Vec4d temp_param = {1,1,0,0};
if (temp_img.size() != input_size){
Mat borderImg;
LetterBox(temp_img, borderImg, temp_param, input_size, false, false, true, 32);
OutSrcImgs.push_back(borderImg);
params.push_back(temp_param);
}
else {
OutSrcImgs.push_back(temp_img);
params.push_back(temp_param);
}
}
int lack_num = _batchSize - SrcImgs.size();
if (lack_num > 0){
Mat temp_img = Mat::zeros(input_size, CV_8UC3);
Vec4d temp_param = {1,1,0,0};
OutSrcImgs.push_back(temp_img);
params.push_back(temp_param);
}
return 0;
}
bool Yolov8Onnx::OnnxBatchDetect(std::vector<cv::Mat> &srcImgs, std::vector<std::vector<OutputDet> > &output)
{
vector<Vec4d> params;
vector<Mat> input_images;
cv::Size input_size(_netWidth, _netHeight);
//preprocessing (信封处理)
Preprocessing(srcImgs, input_images, params);
// [0~255] --> [0~1]; BGR2RGB
Mat blob = cv::dnn::blobFromImages(input_images, 1 / 255.0, input_size, Scalar(0,0,0), true, false);
// 前向传播得到推理结果
int64_t input_tensor_length = VectorProduct(_inputTensorShape);// ?
std::vector<Ort::Value> input_tensors;
std::vector<Ort::Value> output_tensors;
input_tensors.push_back(Ort::Value::CreateTensor<float>(_OrtMemoryInfo, (float*)blob.data,
input_tensor_length, _inputTensorShape.data(),
_inputTensorShape.size()));
output_tensors = _OrtSession->Run(Ort::RunOptions{ nullptr },
_inputNodeNames.data(),
input_tensors.data(),
_inputNodeNames.size(),
_outputNodeNames.data(),
_outputNodeNames.size()
);
//post-process
int net_width = _className.size() + 4;
float* all_data = output_tensors[0].GetTensorMutableData<float>(); // 第一张图片的输出
_outputTensorShape = output_tensors[0].GetTensorTypeAndShapeInfo().GetShape(); // 一张图片输出的维度信息 [1, 84, 8400]
int64_t one_output_length = VectorProduct(_outputTensorShape) / _outputTensorShape[0]; // 一张图片输出所占内存长度 8400*84
for (int img_index = 0; img_index < srcImgs.size(); ++img_index){
Mat output0 = Mat(Size((int)_outputTensorShape[2], (int)_outputTensorShape[1]), CV_32F, all_data).t(); // [1, 84 ,8400] -> [1, 8400, 84]
all_data += one_output_length; //指针指向下一个图片的地址
float* pdata = (float*)output0.data; // [x,y,w,h,class1,class2.....class80]
int rows = output0.rows; // 预测框的数量 8400
// 一张图片的预测框
vector<int> class_ids;
vector<float> confidences;
vector<Rect> boxes;
for (int r=0; r<rows; ++r){//如果是yolov5则需要做修改
Mat scores(1, _className.size(), CV_32F, pdata + 4); // 80个类别的概率
// 得到最大类别概率、类别索引
Point classIdPoint;
double max_class_soces;
minMaxLoc(scores, 0, &max_class_soces, 0, &classIdPoint);
max_class_soces = (float)max_class_soces;
// 预测框坐标映射到原图上
if (max_class_soces >= _classThreshold){
// rect [x,y,w,h]
float x = (pdata[0] - params[img_index][2]) / params[img_index][0]; //x
float y = (pdata[1] - params[img_index][3]) / params[img_index][1]; //y
float w = pdata[2] / params[img_index][0]; //w
float h = pdata[3] / params[img_index][1]; //h
int left = MAX(int(x - 0.5 *w +0.5), 0);
int top = MAX(int(y - 0.5*h + 0.5), 0);
class_ids.push_back(classIdPoint.x);
confidences.push_back(max_class_soces);
boxes.push_back(Rect(left, top, int(w + 0.5), int(h + 0.5)));
}
pdata += net_width; //下一个预测框
}
// 对一张图的预测框执行NMS处理
vector<int> nms_result;
cv::dnn::NMSBoxes(boxes, confidences, _classThreshold, _nmsThrehold, nms_result); // 还需要classThreshold?
// 对一张图片:依据NMS处理得到的索引,得到类别id、confidence、box,并置于结构体OutputDet的容器中
vector<OutputDet> temp_output;
for (size_t i=0; i<nms_result.size(); ++i){
int idx = nms_result[i];
OutputDet result;
result.id = class_ids[idx];
result.confidence = confidences[idx];
result.box = boxes[idx];
temp_output.push_back(result);
}
output.push_back(temp_output); // 多张图片的输出;添加一张图片的输出置于此容器中
}
if (output.size())
return true;
else
return false;
}
bool Yolov8Onnx::OnnxDetect(cv::Mat &srcImg, std::vector<OutputDet> &output){
vector<Mat> input_data = {srcImg};
vector<vector<OutputDet>> temp_output;
if(OnnxBatchDetect(input_data, temp_output)){
output = temp_output[0];
return true;
}
else return false;
}
main.cpp
#include <iostream>
#include <opencv2/opencv.hpp>
#include "detect.h"
#include <sys/time.h>

using namespace std;
using namespace cv;
using namespace cv::dnn;

//template<typename _Tp>
//int yolov8_onnx(_Tp& cls, Mat& img, string& model_path)
//{
//    if (cls.ReadModel(model_path, false)){
//        cout << "read net ok!" <<  endl;
//    }
//    else {
//        return -1;
//    }

//    // 生成随机颜色;每个类别都有自己的颜色
//    vector<Scalar> color;
//    srand((time(0)));
//    for (int i=0; i<80; i++){
//        int b = rand() %  256; //随机数为0~255
//        int g = rand() % 256;
//        int r = rand() % 256;
//        color.push_back(Scalar(b,g,r));
//    }
//    vector<OutputDet> result;
//    if (cls.OnnxDetect(img, result)){
//        DrawPred(img, result, cls._className, color);
//    }
//    else {
//        cout <<  "Detect Failed!" << endl;
//    }
//    return 0;
//}

int main(){

    string detect_model_path = "/home/jason/PycharmProjects/pytorch_learn/yolo/ultralytics-main-yolov8/yolov8n.onnx";
    Yolov8Onnx yolov8;
    if (yolov8.ReadModel(detect_model_path))
        cout << "read Net ok!\n";
    else {
        return -1;
    }

    //生成随机颜色;每个类别都有自己的颜色
    vector<Scalar> color;
    srand((time(0)));
    for (int i=0; i<80; i++){
        int b = rand() %  256; //随机数为0~255
        int g = rand() % 256;
        int r = rand() % 256;
        color.push_back(Scalar(b,g,r));
    }


    VideoCapture capture(0);

    Mat frame;
    struct timeval t1, t2;
    double timeuse;
    while (1) {
        capture>>frame;
        vector<OutputDet> reuslt;

        gettimeofday(&t1, NULL);
        bool  find = yolov8.OnnxDetect(frame, reuslt);
        gettimeofday(&t2, NULL);

        if(find)
        {
            DrawPred(frame, reuslt, yolov8._className, color);
        }
        else {
            cout << "Don't find !\n";
        }

        timeuse = (t2.tv_sec - t1.tv_sec) +
                (double)(t2.tv_usec -t1.tv_usec)/1000000; //s
        string label = "duration:" + to_string(timeuse*1000); // ms
        putText(frame, label, Point(30,30), FONT_HERSHEY_SIMPLEX,
                0.5, Scalar(0,0,255), 2, 8);

        imshow("result", frame);
        if (waitKey(1)=='q')  break;

    }


    return 0;
}
CmakeList.txt
cmake_minimum_required(VERSION 3.5)

project(14-yolov8-onnxruntime LANGUAGES CXX)

set(CMAKE_CXX_STANDARD 11)
set(CMAKE_CXX_STANDARD_REQUIRED ON)

include_directories("/home/jason/下载/onnxruntime-linux-x64-1.14.1/include")
#link_directories("/home/jason/下载/onnxruntime-linux-x64-1.14.1/lib")

include_directories(./include)
aux_source_directory(./src SOURCES)


find_package(OpenCV 4 REQUIRED)
add_executable(${PROJECT_NAME} ${SOURCES})

target_link_libraries(${PROJECT_NAME} ${OpenCV_LIBS})
target_link_libraries(${PROJECT_NAME} "/home/jason/下载/onnxruntime-linux-x64-1.14.1/lib/libonnxruntime.so")
个人总结
运行效果:
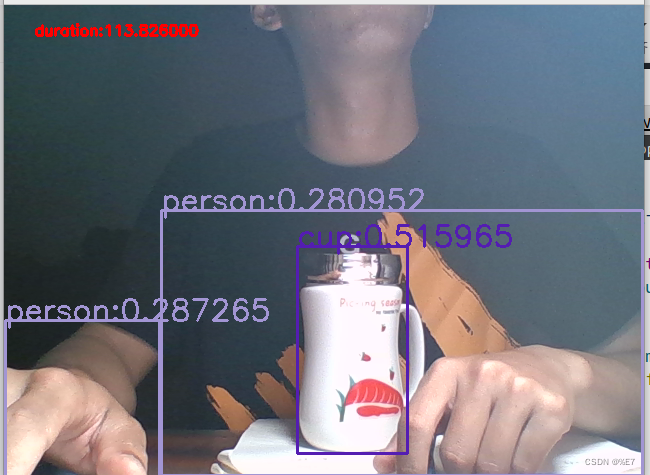
输入为640*640,CPU推理耗时100ms左右速度比yolov5快一点
但是也可以把手识别成人??应该可以根据使用情况把detect.h中的分类阈值提高一点,可以解决误识别的 问题

End
觉得写得还不错,点个赞再走呗
参考:
cv2.dnn.blobFromImage()函数用法_田土豆的博客-CSDN博客
C++下四种常用的程序运行时间的计时方法总结 - 知乎
C语言中的rand()函数_c rand_TLpigff的博客-CSDN博客
template <typename T> - 知乎


