文章目录
- **[1 — 7] ** [ 配置K8S主从集群前置准备操作 ]
- 一:主节点操作 查看主机域名->编辑域名
- 1.1 编辑HOST 从节点也做相应操作
- 1.2 从节点操作 查看从节点102域名->编辑域名
- 1.3 从节点操作 查看从节点103域名->编辑域名
- 二:安装自动填充,虚拟机默认没有
- 三:关闭防火墙
- 四:关闭交换空间
- 五:禁用 Selinux
- 六: 允许 ip tables 检查桥接流量
- 七:设置K8S相关系统参数
- 7.0:镜像加速
- 7.1:K8S仓库
- 7.2:配置 sysctl 参数,重新启动后配置不变
- 7.3.2:配置sysctl 内核参数而不重新启动
- 八:安装K8S -- kubelet,kubeadm,kubectl核心组件
- 8.1:安装命令
- pre-9 注意:安装网络插件coredns,否则在第九步执行init会卡住
- pre-9.1: 安装coredns
- pre-9.2: 注意:查看coredns pod状态Ready=0
- pre-9.2.1: 执行 kubectl get pods -n kube-system查看日志输出
- pre-9.2.2: 查看pod错误日志输出 kubectl describe pod coredns-545d6fc579-fknqn -n kube-system
- pre-9.2.3: 安装Colico网络通信插件
- 9.2.3.1 - 执行: wget --no-check-certificate https://projectcalico.docs.tigera.io/archive/v3.25/manifests/calico.yaml
- 9.2.3.2 - 修改calico.yaml
- 9.2.3.3 - 执行 kubectl apply -f calico.yaml
- 注意异常:error converting YAML
- 执行成功
- 查看coredns pod节点状态
- 九:kubeadm init生成Node
- 9.1: 注意主从节点分别执行,address不一样
- 9.1.1:master节点操作address=192.168.56.101
- 9.1.2:node节点操作address=192.168.56.102
- 9.2: 上述会生成如下日志说明成功
- 9.2.1: 注意主从从节点分别在尾部生成token
- 9.3: 注意:在从节点执行主节点init对应生成的join命令
- 十:配置K8S主从节点的网络通信
- 10.1 查看node和pod 对应status 状态 发现master和node状态为 [NotReady]
- 10.2 查看K8S异常信息命令 journalctl -f -u kubelet
- 10.3 配置calico网络
- 10.4 修改calico.yaml
- 10.5 K8S部署calico容器
- 10.6 再次查看节点状态 kubectl get nodes -o wide [ status状态为Ready ]
**[1 — 7] ** [ 配置K8S主从集群前置准备操作 ]
一:主节点操作 查看主机域名->编辑域名
[root@localhost ~]# hostname
localhost.localdomain
[root@localhost ~]# hostnamectl set-hostname master
[root@localhost ~]# hostname
master
[root@localhost ~]#
1.1 编辑HOST 从节点也做相应操作
[root@vbox-master-01-vbox-01 ~]# vi /etc/hosts
127.0.0.1   localhost localhost.localdomain localhost4 localhost4.localdomain4
::1         localhost localhost.localdomain localhost6 localhost6.localdomain6
192.168.56.101  master
192.168.56.102  node
1.2 从节点操作 查看从节点102域名->编辑域名
[root@localhost ~]# hostname
localhost.localdomain
[root@localhost ~]# hostnamectl set-hostname node
[root@localhost ~]# hostname
node
1.3 从节点操作 查看从节点103域名->编辑域名
[root@localhost /]# hostname
localhost.localdomain
[root@localhost /]# hostnamectl set-hostname nodeslavethree
[root@localhost /]# hostname
nodeslavethree
二:安装自动填充,虚拟机默认没有
[root@vbox-master-01-vbox-01 ~]# yum -y install bash-completion
已加载插件:fastestmirror, product-id, search-disabled-repos, subscription-manager

This system is not registered with an entitlement server. You can use subscription-manager to register.

Determining fastest mirrors
 * base: ftp.sjtu.edu.cn
 * extras: mirrors.nju.edu.cn
 * updates: mirrors.aliyun.com
三:关闭防火墙
systemctl stop firewalld
systemctl disable firewalld
四:关闭交换空间
free -h
swapoff -a
sed -i 's/.*swap.*/#&/' /etc/fstab
free -h
五:禁用 Selinux
sed -i “s/^SELINUX=enforcing/SELINUX=disabled/g” /etc/sysconfig/selinux
[root@nodemaster /]# sed -i "s/^SELINUX=enforcing/SELINUX=disabled/g" /etc/sysconfig/selinux
cat /etc/selinux/config
六: 允许 ip tables 检查桥接流量
iptables -F && iptables -X && iptables -F -t nat && iptables -X -t nat && iptables -P FORWARD ACCEPT
七:设置K8S相关系统参数
7.0:镜像加速
tee /etc/docker/daemon.json <<-'EOF'
{
  "registry-mirrors": ["https://hnkfbj7x.mirror.aliyuncs.com"],
  "exec-opts": ["native.cgroupdriver=systemd"]
}
EOF
7.1:K8S仓库
cat <<EOF > /etc/yum.repos.d/kubernetes.repo
[kubernetes]
name=Kubernetes
baseurl=https://mirrors.aliyun.com/kubernetes/yum/repos/kubernetes-el7-x86_64/
# 是否开启本仓库
enabled=1
# 是否检查 gpg 签名文件
gpgcheck=0
# 是否检查 gpg 签名文件
repo_gpgcheck=0
gpgkey=https://mirrors.aliyun.com/kubernetes/yum/doc/yum-key.gpg https://mirrors.aliyun.com/kubernetes/yum/doc/rpm-package-key.gpg

EOF
7.2:配置 sysctl 参数,重新启动后配置不变
cat <<EOF | sudo tee /etc/sysctl.d/k8s.conf
net.bridge.bridge-nf-call-iptables  = 1
net.bridge.bridge-nf-call-ip6tables = 1
net.ipv4.ip_forward                 = 1
EOF
7.3.2:配置sysctl 内核参数而不重新启动
sysctl --system
八:安装K8S – kubelet,kubeadm,kubectl核心组件
8.1:安装命令
[root@master local]# sudo yum install -y kubelet-1.21.0 kubeadm-1.21.0 kubectl-1.21.0 --disableexcludes=kubernetes --nogpgcheck
[root@node local]# sudo yum install -y kubelet-1.21.0 kubeadm-1.21.0 kubectl-1.21.0 --disableexcludes=kubernetes --nogpgcheck
已加载插件:fastestmirror
Loading mirror speeds from cached hostfile
 * base: ftp.sjtu.edu.cn
 * extras: ftp.sjtu.edu.cn
 * updates: ftp.sjtu.edu.cn
kubernetes                                                                                              | 1.4 kB  00:00:00
正在解决依赖关系
--> 正在检查事务
---> 软件包 kubeadm.x86_64.0.1.21.0-0 将被 安装
--> 正在处理依赖关系 kubernetes-cni >= 0.8.6,它被软件包 kubeadm-1.21.0-0.x86_64 需要
---> 软件包 kubectl.x86_64.0.1.21.0-0 将被 安装
---> 软件包 kubelet.x86_64.0.1.21.0-0 将被 安装
--> 正在检查事务
---> 软件包 kubernetes-cni.x86_64.0.1.2.0-0 将被 安装
--> 解决依赖关系完成

依赖关系解决

===============================================================================================================================
 Package                           架构                      版本                          源                             大小
===============================================================================================================================
正在安装:
 kubeadm                           x86_64                    1.21.0-0                      kubernetes                    9.1 M
 kubectl                           x86_64                    1.21.0-0                      kubernetes                    9.5 M
 kubelet                           x86_64                    1.21.0-0                      kubernetes                     20 M
为依赖而安装:
 kubernetes-cni                    x86_64                    1.2.0-0                       kubernetes                     17 M

事务概要
===============================================================================================================================
安装  3 软件包 (+1 依赖软件包)

总下载量:55 M
安装大小:248 M
Downloading packages:
(1/4): dc4816b13248589b85ee9f950593256d08a3e6d4e419239faf7a83fe686f641c-kubeadm-1.21.0-0.x86_64.rpm     | 9.1 MB  00:00:44
(2/4): d625f039f4a82eca35f6a86169446afb886ed9e0dfb167b38b706b411c131084-kubectl-1.21.0-0.x86_64.rpm     | 9.5 MB  00:00:46
(3/4): 0f2a2afd740d476ad77c508847bad1f559afc2425816c1f2ce4432a62dfe0b9d-kubernetes-cni-1.2.0-0.x86_64.r |  17 MB  00:01:21
(4/4): 13b4e820d82ad7143d786b9927adc414d3e270d3d26d844e93eff639f7142e50-kubelet-1.21.0-0.x86_64.rpm     |  20 MB  00:01:39
-------------------------------------------------------------------------------------------------------------------------------
总计                                                                                           395 kB/s |  55 MB  00:02:23
Running transaction check
Running transaction test
Transaction test succeeded
Running transaction
警告:RPM 数据库已被非 yum 程序修改。
  正在安装    : kubernetes-cni-1.2.0-0.x86_64                                                                              1/4
  正在安装    : kubelet-1.21.0-0.x86_64                                                                                    2/4
  正在安装    : kubectl-1.21.0-0.x86_64                                                                                    3/4
  正在安装    : kubeadm-1.21.0-0.x86_64                                                                                    4/4
  验证中      : kubelet-1.21.0-0.x86_64                                                                                    1/4
  验证中      : kubeadm-1.21.0-0.x86_64                                                                                    2/4
  验证中      : kubectl-1.21.0-0.x86_64                                                                                    3/4
  验证中      : kubernetes-cni-1.2.0-0.x86_64                                                                              4/4

已安装:
  kubeadm.x86_64 0:1.21.0-0                 kubectl.x86_64 0:1.21.0-0                 kubelet.x86_64 0:1.21.0-0

作为依赖被安装:
  kubernetes-cni.x86_64 0:1.2.0-0

完毕!
pre-9 注意:安装网络插件coredns,否则在第九步执行init会卡住
pre-9.1: 安装coredns
docker pull coredns/coredns
docker tag coredns/coredns:latest
docker tag coredns/coredns:latest registry.aliyuncs.com/google_containers/coredns/coredns:v1.8.0
[root@master kubernetes]# docker pull coredns/coredns
Using default tag: latest
latest: Pulling from coredns/coredns
d92bdee79785: Pull complete
6e1b7c06e42d: Pull complete
Digest: sha256:5b6ec0d6de9baaf3e92d0f66cd96a25b9edbce8716f5f15dcd1a616b3abd590e
Status: Downloaded newer image for coredns/coredns:latest
docker.io/coredns/coredns:latest
[root@master kubernetes]# docker tag coredns/coredns:latest
"docker tag" requires exactly 2 arguments.
See 'docker tag --help'.

Usage:  docker tag SOURCE_IMAGE[:TAG] TARGET_IMAGE[:TAG]

Create a tag TARGET_IMAGE that refers to SOURCE_IMAGE

[root@master kubernetes]# docker tag coredns/coredns:latest registry.aliyuncs.com/google_containers/coredns/coredns:v1.8.0
pre-9.2: 注意:查看coredns pod状态Ready=0
pre-9.2.1: 执行 kubectl get pods -n kube-system查看日志输出
[root@master soft]# kubectl get pods -n kube-system
NAME                             READY   STATUS              RESTARTS   AGE
coredns-545d6fc579-fknqn         0/1     ContainerCreating   0          6m41s
coredns-545d6fc579-s22rb         0/1     ContainerCreating   0          6m41s
etcd-master                      1/1     Running             0          6m49s
kube-apiserver-master            1/1     Running             0          6m49s
kube-controller-manager-master   1/1     Running             0          6m49s
kube-proxy-56ppg                 1/1     Running             0          6m41s
kube-proxy-pp7d6                 1/1     Running             0          85s
kube-scheduler-master            1/1     Running             0          6m48s
pre-9.2.2: 查看pod错误日志输出 kubectl describe pod coredns-545d6fc579-fknqn -n kube-system
主要是:check that the calico/node container is running and has mounted /var/lib/calico/
说明colico网络插件没有配置,容器没有运行
[root@master soft]# kubectl describe pod coredns-545d6fc579-fknqn -n kube-system
Name:                 coredns-545d6fc579-fknqn
Namespace:            kube-system
Priority:             2000000000
Priority Class Name:  system-cluster-critical
Node:                 master/192.168.56.101
Start Time:           Thu, 04 May 2023 18:02:01 +0800
Labels:               k8s-app=kube-dns
                      pod-template-hash=545d6fc579
Annotations:          <none>
Status:               Pending
IP:
IPs:                  <none>
Controlled By:        ReplicaSet/coredns-545d6fc579
Containers:
  coredns:
    Container ID:
    Image:         registry.aliyuncs.com/google_containers/coredns/coredns:v1.8.0
    Image ID:
    Ports:         53/UDP, 53/TCP, 9153/TCP
    Host Ports:    0/UDP, 0/TCP, 0/TCP
    Args:
      -conf
      /etc/coredns/Corefile
    State:          Waiting
      Reason:       ContainerCreating
    Ready:          False
    Restart Count:  0
    Limits:
      memory:  170Mi
    Requests:
      cpu:        100m
      memory:     70Mi
    Liveness:     http-get http://:8080/health delay=60s timeout=5s period=10s #success=1 #failure=5
    Readiness:    http-get http://:8181/ready delay=0s timeout=1s period=10s #success=1 #failure=3
    Environment:  <none>
    Mounts:
      /etc/coredns from config-volume (ro)
      /var/run/secrets/kubernetes.io/serviceaccount from kube-api-access-mzbf7 (ro)
Conditions:
  Type              Status
  Initialized       True
  Ready             False
  ContainersReady   False
  PodScheduled      True
Volumes:
  config-volume:
    Type:      ConfigMap (a volume populated by a ConfigMap)
    Name:      coredns
    Optional:  false
  kube-api-access-mzbf7:
    Type:                    Projected (a volume that contains injected data from multiple sources)
    TokenExpirationSeconds:  3607
    ConfigMapName:           kube-root-ca.crt
    ConfigMapOptional:       <nil>
    DownwardAPI:             true
QoS Class:                   Burstable
Node-Selectors:              kubernetes.io/os=linux
Tolerations:                 CriticalAddonsOnly op=Exists
                             node-role.kubernetes.io/control-plane:NoSchedule
                             node-role.kubernetes.io/master:NoSchedule
                             node.kubernetes.io/not-ready:NoExecute op=Exists for 300s
                             node.kubernetes.io/unreachable:NoExecute op=Exists for 300s
Events:
  Type     Reason                  Age                   From               Message
  ----     ------                  ----                  ----               -------
  Warning  FailedScheduling        13m                   default-scheduler  0/1 nodes are available: 1 node(s) had taint {node.kubernetes.io/not-ready: }, that the pod didn't tolerate.
  Normal   Scheduled               13m                   default-scheduler  Successfully assigned kube-system/coredns-545d6fc579-fknqn to master
  Warning  FailedScheduling        13m                   default-scheduler  0/1 nodes are available: 1 node(s) had taint {node.kubernetes.io/not-ready: }, that the pod didn't tolerate.
  Warning  FailedCreatePodSandBox  13m                   kubelet            Failed to create pod sandbox: rpc error: code = Unknown desc = failed to set up sandbox container "4150bf828bb587a7f27efcd33b96e534f26951949779c572bedd09f57d6211ff" network for pod "coredns-545d6fc579-fknqn": networkPlugin cni failed to set up pod "coredns-545d6fc579-fknqn_kube-system" network: stat /var/lib/calico/nodename: no such file or directory: check that the calico/node container is running and has mounted /var/lib/calico/
  Warning  FailedCreatePodSandBox  13m                   kubelet            Failed to create pod sandbox: rpc error: code = Unknown desc = failed to set up sandbox container "98ea203f10a10ac5398693a9702a130224ec23f30335e6d33212eb6af3289c4a" network for pod "coredns-545d6fc579-fknqn": networkPlugin cni failed to set up pod "coredns-545d6fc579-fknqn_kube-system" network: stat /var/lib/calico/nodename: no such file or directory: check that the calico/node container is running and has mounted /var/lib/calico/
pre-9.2.3: 安装Colico网络通信插件
9.2.3.1 - 执行: wget --no-check-certificate https://projectcalico.docs.tigera.io/archive/v3.25/manifests/calico.yaml
[root@master kubernetes]# wget --no-check-certificate https://projectcalico.docs.tigera.io/archive/v3.25/manifests/calico.yaml
--2023-05-03 02:23:02--  https://projectcalico.docs.tigera.io/archive/v3.25/manifests/calico.yaml
正在解析主机 projectcalico.docs.tigera.io (projectcalico.docs.tigera.io)... 13.228.199.255, 18.139.194.139, 2406:da18:880:3800::c8, ...
正在连接 projectcalico.docs.tigera.io (projectcalico.docs.tigera.io)|13.228.199.255|:443... 已连接。
已发出 HTTP 请求,正在等待回应... 200 OK
长度:238089 (233K) [text/yaml]
正在保存至: “calico.yaml”

100%[=====================================================================================>] 238,089      392KB/s 用时 0.6s

2023-05-03 02:23:03 (392 KB/s) - 已保存 “calico.yaml” [238089/238089])
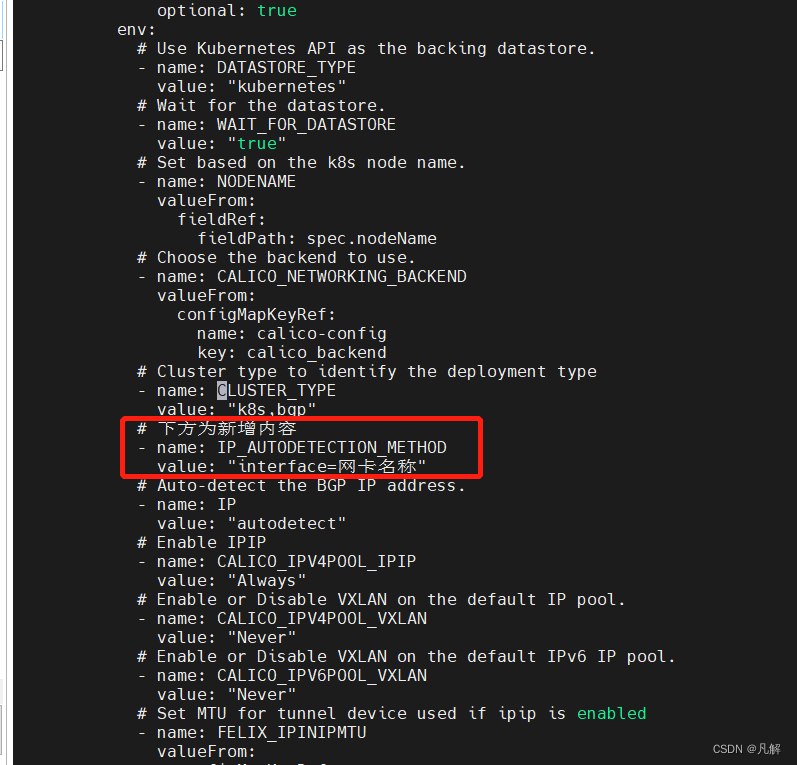
9.2.3.2 - 修改calico.yaml
[root@master kubernetes]# vi calico.yaml
# CLUSTER_TYPE 下方添加信息
- name: CLUSTER_TYPE
  value: "k8s,bgp"
  # 下方为新增内容
- name: IP_AUTODETECTION_METHOD
  value: "interface=网卡名称[如 ens33]
9.2.3.3 - 执行 kubectl apply -f calico.yaml
注意异常:error converting YAML
查看yaml文件内容发现刚刚改的缩进不对
执行成功
[root@master soft]# kubectl apply -f calico.yaml
poddisruptionbudget.policy/calico-kube-controllers configured
serviceaccount/calico-kube-controllers unchanged
serviceaccount/calico-node unchanged
configmap/calico-config unchanged
customresourcedefinition.apiextensions.k8s.io/bgpconfigurations.crd.projectcalico.org configured
customresourcedefinition.apiextensions.k8s.io/bgppeers.crd.projectcalico.org configured
customresourcedefinition.apiextensions.k8s.io/blockaffinities.crd.projectcalico.org configured
customresourcedefinition.apiextensions.k8s.io/caliconodestatuses.crd.projectcalico.org configured
customresourcedefinition.apiextensions.k8s.io/clusterinformations.crd.projectcalico.org configured
customresourcedefinition.apiextensions.k8s.io/felixconfigurations.crd.projectcalico.org configured
customresourcedefinition.apiextensions.k8s.io/globalnetworkpolicies.crd.projectcalico.org configured
customresourcedefinition.apiextensions.k8s.io/globalnetworksets.crd.projectcalico.org configured
customresourcedefinition.apiextensions.k8s.io/hostendpoints.crd.projectcalico.org configured
customresourcedefinition.apiextensions.k8s.io/ipamblocks.crd.projectcalico.org configured
customresourcedefinition.apiextensions.k8s.io/ipamconfigs.crd.projectcalico.org configured
customresourcedefinition.apiextensions.k8s.io/ipamhandles.crd.projectcalico.org configured
customresourcedefinition.apiextensions.k8s.io/ippools.crd.projectcalico.org configured
customresourcedefinition.apiextensions.k8s.io/ipreservations.crd.projectcalico.org configured
customresourcedefinition.apiextensions.k8s.io/kubecontrollersconfigurations.crd.projectcalico.org configured
customresourcedefinition.apiextensions.k8s.io/networkpolicies.crd.projectcalico.org configured
customresourcedefinition.apiextensions.k8s.io/networksets.crd.projectcalico.org configured
clusterrole.rbac.authorization.k8s.io/calico-kube-controllers unchanged
clusterrole.rbac.authorization.k8s.io/calico-node unchanged
clusterrolebinding.rbac.authorization.k8s.io/calico-kube-controllers unchanged
clusterrolebinding.rbac.authorization.k8s.io/calico-node unchanged
daemonset.apps/calico-node created
deployment.apps/calico-kube-controllers created
查看coredns pod节点状态
九:kubeadm init生成Node
9.1: 注意主从节点分别执行,address不一样
9.1.1:master节点操作address=192.168.56.101
kubeadm init --kubernetes-version=v1.21.0 --image-repository=registry.aliyuncs.com/google_containers --apiserver-advertise-address=192.168.56.101
9.1.2:node节点操作address=192.168.56.102
kubeadm init --kubernetes-version=v1.21.0 --image-repository=registry.aliyuncs.com/google_containers --apiserver-advertise-address=192.168.56.102
9.2: 上述会生成如下日志说明成功
9.2.1: 注意主从从节点分别在尾部生成token
主节点生成:
kubeadm join 192.168.56.101:6443 --token ofgeif.siy6c7i3bkwd8zhe \
         --discovery-token-ca-cert-hash sha256:153569126910a8000fc13dab0ef9123f3c798d392965b3555415951d20d7fcf9
从节点生成:
kubeadm join 192.168.56.102:6443 --token hyixs7.p3qz6w2lglxv5p5o \
        --discovery-token-ca-cert-hash sha256:1ffcb2d4d8acd6da8c5dc1abbb8b3035d5fb53705660b9275fe8972e6e08cbd0
[root@node local]# kubeadm init --image-repository=registry.aliyuncs.com/google_containers --apiserver-advertise-address=192.16                         8.56.102
I0503 02:13:29.368712   19886 version.go:254] remote version is much newer: v1.27.1; falling back to: stable-1.21
[init] Using Kubernetes version: v1.21.14
[preflight] Running pre-flight checks
        [WARNING SystemVerification]: this Docker version is not on the list of validated versions: 23.0.5. Latest validated ve                         rsion: 20.10
[preflight] Pulling images required for setting up a Kubernetes cluster
[preflight] This might take a minute or two, depending on the speed of your internet connection
[preflight] You can also perform this action in beforehand using 'kubeadm config images pull'
[certs] Using certificateDir folder "/etc/kubernetes/pki"
[certs] Generating "ca" certificate and key
[certs] Generating "apiserver" certificate and key
[certs] apiserver serving cert is signed for DNS names [kubernetes kubernetes.default kubernetes.default.svc kubernetes.default                         .svc.cluster.local node] and IPs [10.96.0.1 192.168.56.102]
[certs] Generating "apiserver-kubelet-client" certificate and key
[certs] Generating "front-proxy-ca" certificate and key
[certs] Generating "front-proxy-client" certificate and key
[certs] Generating "etcd/ca" certificate and key
[certs] Generating "etcd/server" certificate and key
[certs] etcd/server serving cert is signed for DNS names [localhost node] and IPs [192.168.56.102 127.0.0.1 ::1]
[certs] Generating "etcd/peer" certificate and key
[certs] etcd/peer serving cert is signed for DNS names [localhost node] and IPs [192.168.56.102 127.0.0.1 ::1]
[certs] Generating "etcd/healthcheck-client" certificate and key
[certs] Generating "apiserver-etcd-client" certificate and key
[certs] Generating "sa" key and public key
[kubeconfig] Using kubeconfig folder "/etc/kubernetes"
[kubeconfig] Writing "admin.conf" kubeconfig file
[kubeconfig] Writing "kubelet.conf" kubeconfig file
[kubeconfig] Writing "controller-manager.conf" kubeconfig file
[kubeconfig] Writing "scheduler.conf" kubeconfig file
[kubelet-start] WARNING: unable to stop the kubelet service momentarily: [exit status 5]
[kubelet-start] Writing kubelet environment file with flags to file "/var/lib/kubelet/kubeadm-flags.env"
[kubelet-start] Writing kubelet configuration to file "/var/lib/kubelet/config.yaml"
[kubelet-start] Starting the kubelet
[control-plane] Using manifest folder "/etc/kubernetes/manifests"
[control-plane] Creating static Pod manifest for "kube-apiserver"
[control-plane] Creating static Pod manifest for "kube-controller-manager"
[control-plane] Creating static Pod manifest for "kube-scheduler"
[etcd] Creating static Pod manifest for local etcd in "/etc/kubernetes/manifests"
[wait-control-plane] Waiting for the kubelet to boot up the control plane as static Pods from directory "/etc/kubernetes/manife                         sts". This can take up to 4m0s
[kubelet-check] Initial timeout of 40s passed.
[apiclient] All control plane components are healthy after 60.507892 seconds
[upload-config] Storing the configuration used in ConfigMap "kubeadm-config" in the "kube-system" Namespace
[kubelet] Creating a ConfigMap "kubelet-config-1.21" in namespace kube-system with the configuration for the kubelets in the cl                         uster
[upload-certs] Skipping phase. Please see --upload-certs
[mark-control-plane] Marking the node node as control-plane by adding the labels: [node-role.kubernetes.io/master(deprecated) n                         ode-role.kubernetes.io/control-plane node.kubernetes.io/exclude-from-external-load-balancers]
[mark-control-plane] Marking the node node as control-plane by adding the taints [node-role.kubernetes.io/master:NoSchedule]
[bootstrap-token] Using token: hyixs7.p3qz6w2lglxv5p5o
[bootstrap-token] Configuring bootstrap tokens, cluster-info ConfigMap, RBAC Roles
[bootstrap-token] configured RBAC rules to allow Node Bootstrap tokens to get nodes
[bootstrap-token] configured RBAC rules to allow Node Bootstrap tokens to post CSRs in order for nodes to get long term certifi                         cate credentials
[bootstrap-token] configured RBAC rules to allow the csrapprover controller automatically approve CSRs from a Node Bootstrap To                         ken
[bootstrap-token] configured RBAC rules to allow certificate rotation for all node client certificates in the cluster
[bootstrap-token] Creating the "cluster-info" ConfigMap in the "kube-public" namespace
[kubelet-finalize] Updating "/etc/kubernetes/kubelet.conf" to point to a rotatable kubelet client certificate and key
[addons] Applied essential addon: CoreDNS
[addons] Applied essential addon: kube-proxy

Your Kubernetes control-plane has initialized successfully!

To start using your cluster, you need to run the following as a regular user:

  mkdir -p $HOME/.kube
  sudo cp -i /etc/kubernetes/admin.conf $HOME/.kube/config
  sudo chown $(id -u):$(id -g) $HOME/.kube/config

Alternatively, if you are the root user, you can run:

  export KUBECONFIG=/etc/kubernetes/admin.conf

You should now deploy a pod network to the cluster.
Run "kubectl apply -f [podnetwork].yaml" with one of the options listed at:
  https://kubernetes.io/docs/concepts/cluster-administration/addons/

Then you can join any number of worker nodes by running the following on each as root:

kubeadm join 192.168.56.102:6443 --token hyixs7.p3qz6w2lglxv5p5o \
        --discovery-token-ca-cert-hash sha256:1ffcb2d4d8acd6da8c5dc1abbb8b3035d5fb53705660b9275fe8972e6e08cbd0
9.3: 注意:在从节点执行主节点init对应生成的join命令
[root@node local]# kubeadm join 192.168.56.101:6443 --token ofgeif.siy6c7i3bkwd8zhe \
         --discovery-token-ca-cert-hash sha256:153569126910a8000fc13dab0ef9123f3c798d392965b3555415951d20d7fcf9
[preflight] Running pre-flight checks
        [WARNING SystemVerification]: this Docker version is not on the list of validated versions: 23.0.5. Latest validated ve                         rsion: 20.10
error execution phase preflight: [preflight] Some fatal errors occurred:
        [ERROR DirAvailable--etc-kubernetes-manifests]: /etc/kubernetes/manifests is not empty
        [ERROR FileAvailable--etc-kubernetes-kubelet.conf]: /etc/kubernetes/kubelet.conf already exists
        [ERROR Port-10250]: Port 10250 is in use
        [ERROR FileAvailable--etc-kubernetes-pki-ca.crt]: /etc/kubernetes/pki/ca.crt already exists
[preflight] If you know what you are doing, you can make a check non-fatal with `--ignore-preflight-errors=...`
To see the stack trace of this error execute with --v=5 or higher
[root@node local]# kubeadm reset
[reset] Reading configuration from the cluster...
[reset] FYI: You can look at this config file with 'kubectl -n kube-system get cm kubeadm-config -o yaml'
[reset] WARNING: Changes made to this host by 'kubeadm init' or 'kubeadm join' will be reverted.
[reset] Are you sure you want to proceed? [y/N]: y
[preflight] Running pre-flight checks
[reset] Removing info for node "node" from the ConfigMap "kubeadm-config" in the "kube-system" Namespace
[reset] Stopping the kubelet service
[reset] Unmounting mounted directories in "/var/lib/kubelet"
[reset] Deleting contents of config directories: [/etc/kubernetes/manifests /etc/kubernetes/pki]
[reset] Deleting files: [/etc/kubernetes/admin.conf /etc/kubernetes/kubelet.conf /etc/kubernetes/bootstrap-kubelet.conf /etc/ku                         bernetes/controller-manager.conf /etc/kubernetes/scheduler.conf]
[reset] Deleting contents of stateful directories: [/var/lib/etcd /var/lib/kubelet /var/lib/dockershim /var/run/kubernetes /var                         /lib/cni]

The reset process does not clean CNI configuration. To do so, you must remove /etc/cni/net.d

The reset process does not reset or clean up iptables rules or IPVS tables.
If you wish to reset iptables, you must do so manually by using the "iptables" command.

If your cluster was setup to utilize IPVS, run ipvsadm --clear (or similar)
to reset your system's IPVS tables.

The reset process does not clean your kubeconfig files and you must remove them manually.
Please, check the contents of the $HOME/.kube/config file.
[root@node local]# kubeadm join 192.168.56.101:6443 --token ofgeif.siy6c7i3bkwd8zhe         --discovery-token-ca-cert-hash sha2                         56:153569126910a8000fc13dab0ef9123f3c798d392965b3555415951d20d7fcf9
[preflight] Running pre-flight checks
        [WARNING SystemVerification]: this Docker version is not on the list of validated versions: 23.0.5. Latest validated ve                         rsion: 20.10
[preflight] Reading configuration from the cluster...
[preflight] FYI: You can look at this config file with 'kubectl -n kube-system get cm kubeadm-config -o yaml'
[kubelet-start] Writing kubelet configuration to file "/var/lib/kubelet/config.yaml"
[kubelet-start] Writing kubelet environment file with flags to file "/var/lib/kubelet/kubeadm-flags.env"
[kubelet-start] Starting the kubelet
[kubelet-start] Waiting for the kubelet to perform the TLS Bootstrap...

This node has joined the cluster:
* Certificate signing request was sent to apiserver and a response was received.
* The Kubelet was informed of the new secure connection details.

Run 'kubectl get nodes' on the control-plane to see this node join the cluster.

[root@node local]#  kubectl get nodes
NAME     STATUS     ROLES                  AGE    VERSION
master   NotReady   control-plane,master   39m    v1.21.0
node     NotReady   <none>                 101s   v1.21.0
[root@node local]# kubectl get pods --all-namespaces -o wide
NAMESPACE     NAME                             READY   STATUS    RESTARTS      AGE    IP               NODE     NOMINATED NODE                            READINESS GATES
kube-system   coredns-545d6fc579-p4pj4         0/1     Pending   0             39m    <none>           <none>   <none>                                    <none>
kube-system   coredns-545d6fc579-r8cnv         0/1     Pending   0             39m    <none>           <none>   <none>                                    <none>
kube-system   etcd-master                      1/1     Running   0             40m    192.168.56.101   master   <none>                                    <none>
kube-system   kube-apiserver-master            1/1     Running   1 (40m ago)   40m    192.168.56.101   master   <none>                                    <none>
kube-system   kube-controller-manager-master   1/1     Running   0             40m    192.168.56.101   master   <none>                                    <none>
kube-system   kube-proxy-72w98                 1/1     Running   0             2m5s   192.168.56.102   node     <none>                                    <none>
kube-system   kube-proxy-zc2f7                 1/1     Running   0             39m    192.168.56.101   master   <none>                                    <none>
kube-system   kube-scheduler-master            1/1     Running   0             40m    192.168.56.101   master   <none>                                    <none>
[root@node local]# systemctl start kubelet
十:配置K8S主从节点的网络通信
10.1 查看node和pod 对应status 状态 发现master和node状态为 [NotReady]
[root@master kubernetes]# kubectl get nodes -o wide
NAME     STATUS     ROLES                  AGE     VERSION   INTERNAL-IP      EXTERNAL-IP   OS-IMAGE                KERNEL-VERSION                CONTAINER-RUNTIME
master   NotReady   control-plane,master   40m     v1.21.0   192.168.56.101   <none>        CentOS Linux 7 (Core)   3.10.0-1160.88.1.el7.x86_64   docker://23.0.5
node     NotReady   <none>                 2m30s   v1.21.0   192.168.56.102   <none>        CentOS Linux 7 (Core)   3.10.0-1160.el7.x86_64        docker://23.0.5
10.2 查看K8S异常信息命令 journalctl -f -u kubelet
[root@master kubernetes]# journalctl -f -u kubelet
[root@master kubernetes]# journalctl -f -u kubelet
-- Logs begin at 三 2023-05-03 01:04:05 CST. --
5月 03 02:30:24 master kubelet[5376]: E0503 02:30:24.876889    5376 kubelet.go:2218] "Container runtime network not ready" networkReady="NetworkReady=false reason:NetworkPluginNotReady message:docker: network plugin is not ready: cni config uninitialized"
5月 03 02:30:26 master kubelet[5376]: I0503 02:30:26.182120    5376 cni.go:239] "Unable to update cni config" err="no networks found in /etc/cni/net.d"
5月 03 02:30:29 master kubelet[5376]: E0503 02:30:29.896174    5376 kubelet.go:2218] "Container runtime network not ready" networkReady="NetworkReady=false reason:NetworkPluginNotReady message:docker: network plugin is not ready: cni config uninitialized"
10.3 配置calico网络
wget --no-check-certificate https://projectcalico.docs.tigera.io/archive/v3.25/manifests/calico.yaml
[root@master kubernetes]# wget --no-check-certificate https://projectcalico.docs.tigera.io/archive/v3.25/manifests/calico.yaml
--2023-05-03 02:23:02--  https://projectcalico.docs.tigera.io/archive/v3.25/manifests/calico.yaml
正在解析主机 projectcalico.docs.tigera.io (projectcalico.docs.tigera.io)... 13.228.199.255, 18.139.194.139, 2406:da18:880:3800::c8, ...
正在连接 projectcalico.docs.tigera.io (projectcalico.docs.tigera.io)|13.228.199.255|:443... 已连接。
已发出 HTTP 请求,正在等待回应... 200 OK
长度:238089 (233K) [text/yaml]
正在保存至: “calico.yaml”

100%[=====================================================================================>] 238,089      392KB/s 用时 0.6s

2023-05-03 02:23:03 (392 KB/s) - 已保存 “calico.yaml” [238089/238089])
10.4 修改calico.yaml
[root@master kubernetes]# vi calico.yaml
# CLUSTER_TYPE 下方添加信息
- name: CLUSTER_TYPE
  value: "k8s,bgp"
  # 下方为新增内容
- name: IP_AUTODETECTION_METHOD
  value: "interface=网卡名称
10.5 K8S部署calico容器
kubectl apply -f calico.yaml
10.6 再次查看节点状态 kubectl get nodes -o wide [ status状态为Ready ]
[root@node local]# kubectl get nodes -o wide
NAME     STATUS   ROLES                  AGE   VERSION   INTERNAL-IP      EXTERNAL-IP   OS-IMAGE                KERNEL-VERSION                                         CONTAINER-RUNTIME
master   Ready    control-plane,master   58m   v1.21.0   192.168.56.101   <none>        CentOS Linux 7 (Core)   3.10.0-1160.88.                         1.el7.x86_64   docker://23.0.5
node     Ready    <none>                 20m   v1.21.0   192.168.56.102   <none>        CentOS Linux 7 (Core)   3.10.0-1160.el7                         .x86_64        docker://23.0.5
