一、基础配置
1.修改主机名
hostnamectl set-hostname k8s-master01
hostnamectl set-hostname k8s-master02
hostnamectl set-hostname k8s-master03
hostnamectl set-hostname k8s-node01
hostnamectl set-hostname k8s-node02
2.添加 主机名与IP地址解析
cat > /etc/hosts <<EOF
127.0.0.1 localhost localhost.localdomain localhost4 localhost4.localdomain4
::1 localhost localhost.localdomain localhost6 localhost6.localdomain6

192.168.1.62 lookup apiserver.cluster.local
192.168.1.60 k8s-master01
192.168.1.61 k8s-master02
192.168.1.62 k8s-master03
192.168.1.63 k8s-node01
192.168.1.64 k8s-node02
EOF
3.升级服务器内核,时间同步,关闭防火墙,重启服务器
#添加访问互联路由
cat > /etc/resolv.conf <<EOF
nameserver 211.137.58.20
nameserver 8.8.8.8
nameserver 114.114.114.114
EOF

cat /etc/resolv.conf


#设置为阿里云yum源

rm -rf /etc/yum.repos.d/bak && mkdir -p /etc/yum.repos.d/bak && mv /etc/yum.repos.d/* /etc/yum.repos.d/bak

curl -o /etc/yum.repos.d/CentOS-7.repo http://mirrors.aliyun.com/repo/Centos-7.repo


yum clean all && yum makecache

cd /etc/yum.repos.d


#CentOS7使用/etc/rc.d/rc.local设置开机自动启动
chmod +x /etc/rc.d/rc.local

#安装依赖包
yum -y install sshpass  wget conntrack ntpdate ntp ipvsadm ipset jq iptables curl sysstat libseccomp wget vim net-tools git lrzsz unzip gcc telnet

#时间同步
echo '*/5 * * * * /usr/sbin/ntpdate ntp1.aliyun.com >/dev/null 2>&1'>/var/spool/cron/root && crontab -l


#设置防火墙为 Iptables 并设置空规则
systemctl  stop firewalld  &&  systemctl  disable firewalld

yum -y install iptables-services  &&  systemctl  start iptables  &&  systemctl  enable iptables  &&  iptables -F  &&  service iptables save


#关闭 SELINUX
swapoff -a && sed -i '/ swap / s/^\(.*\)$/#\1/g' /etc/fstab
setenforce 0 && sed -i 's/^SELINUX=.*/SELINUX=disabled/' /etc/selinux/config

#调整内核参数,对于 K8S
cat > /etc/sysctl.d/kubernetes.conf <<EOF
net.bridge.bridge-nf-call-iptables=1
net.bridge.bridge-nf-call-ip6tables=1
net.ipv4.ip_forward=1
#net.ipv4.tcp_tw_recycle=0
vm.swappiness=0 # 禁止使用 swap 空间,只有当系统 OOM 时才允许使用它
vm.overcommit_memory=1 # 不检查物理内存是否够用
vm.panic_on_oom=0 # 开启 OOM
fs.inotify.max_user_instances=8192
fs.inotify.max_user_watches=1048576
fs.file-max=52706963
fs.nr_open=52706963
net.ipv6.conf.all.disable_ipv6=1
net.netfilter.nf_conntrack_max=2310720
EOF

modprobe ip_vs_rr && modprobe br_netfilter && sysctl -p /etc/sysctl.d/kubernetes.conf


#关闭系统不需要服务
systemctl stop postfix && systemctl disable postfix
4.升级内核,重启服务器
rpm --import https://www.elrepo.org/RPM-GPG-KEY-elrepo.org

yum -y install https://www.elrepo.org/elrepo-release-7.0-4.el7.elrepo.noarch.rpm

yum --enablerepo="elrepo-kernel" -y install kernel-lt.x86_64

awk -F \' '$1=="menuentry " {print i++ " : " $2}' /etc/grub2.cfg
grub2-set-default "CentOS Linux (5.4.204-1.el7.elrepo.x86_64) 7 (Core)"
#grub2-set-default 'CentOS Linux (4.4.222-1.el7.elrepo.x86_64) 7 (Core)'
#重启服务器
reboot
################################
二、sealos部署k8s-v1.19
1.安装sealos3.3
#添加访问互联路由
cat > /etc/resolv.conf <<EOF
nameserver 8.8.8.8
nameserver 114.114.114.114
nameserver 223.5.5.5
EOF

cat /etc/resolv.conf

#时间同步
ntpdate ntp1.aliyun.com


wget -c https://github.com/fanux/sealos/releases/download/v3.3.8/sealos

tar zxvf sealos*.tar.gz sealos && chmod +x sealos && mv sealos /usr/bin

sealos version

#时间同步
ntpdate ntp1.aliyun.com
2.离线安装k8s 1.19
链接:https://pan.baidu.com/s/1F9sZoHBX1K1ihBP9rZSHBQ?pwd=jood
提取码:jood

#安装
sealos init --passwd 1qaz@WSX \
	--master 192.168.1.60 \
	--master 192.168.1.61 \
	--master 192.168.1.62 \
	--node 192.168.1.63 \
	--node 192.168.1.64 \
	--pkg-url /root/kube1.19.16.tar.gz \
	--version v1.19.16
3.验证集群
kubectl get nodes

kubectl get pod -A


#配置kubectl自动补全
yum install -y bash-completion
source /usr/share/bash-completion/bash_completion
source <(kubectl completion bash)
echo "source <(kubectl completion bash)" >> /etc/profile


#查看污点
kubectl describe node |grep -i taints

#去除污点

#kubectl taint node k8s-master02 node-role.kubernetes.io/master:NoSchedule-
#kubectl taint node k8s-master03 node-role.kubernetes.io/master:NoSchedule-
4.sealos3.3常用命令
#添加 node 节点:
sealos join --node 192.168.1.63,192.168.1.64


#添加master
sealos join -master 192.168.1.61,192.168.1.62


#删除 node 节点:
sealos clean --node 192.168.1.63,192.168.1.64


#删除 master 节点:
sealos clean --master 192.168.1.61,192.168.1.62


#重置集群
sealos clean --all -f
三、部署nfs
1.服务端
# 我们这里在192.168.1.60上安装(在生产中,大家要提供作好NFS-SERVER环境的规划)
yum -y install nfs-utils

# 创建NFS挂载目录
mkdir /nfs_dir
chown nobody.nobody /nfs_dir

# 修改NFS-SERVER配置
echo '/nfs_dir *(rw,sync,no_root_squash)' > /etc/exports

# 重启服务
systemctl restart rpcbind.service
systemctl restart nfs-utils.service
systemctl restart nfs-server.service

# 增加NFS-SERVER开机自启动
systemctl enable  rpcbind.service
systemctl enable  nfs-utils.service
systemctl enable  nfs-server.service

# 验证NFS-SERVER是否能正常访问
#showmount -e 192.168.1.60
2.客户端
#需要挂载的服务器执行
mkdir /nfs_dir
yum install nfs-utils -y

#挂载
mount 192.168.1.60:/nfs_dir /nfs_dir

#添加开机挂载
echo "mount 192.168.1.60:/nfs_dir /nfs_dir" >> /etc/rc.local

cat /etc/rc.local
四、部署StorageClass
1.创建nfs-sc.yaml
cat > /root/nfs-sc.yaml <<EOF
apiVersion: v1
kind: ServiceAccount
metadata:
  name: nfs-client-provisioner
  namespace: kube-system

---
kind: ClusterRole
apiVersion: rbac.authorization.k8s.io/v1
metadata:
  name: nfs-client-provisioner-runner
rules:
  - apiGroups: [""]
    resources: ["persistentvolumes"]
    verbs: ["get", "list", "watch", "create", "delete"]
  - apiGroups: [""]
    resources: ["persistentvolumeclaims"]
    verbs: ["get", "list", "watch", "update"]
  - apiGroups: ["storage.k8s.io"]
    resources: ["storageclasses"]
    verbs: ["get", "list", "watch"]
  - apiGroups: [""]
    resources: ["events"]
    verbs: ["list", "watch", "create", "update", "patch"]
  - apiGroups: [""]
    resources: ["endpoints"]
    verbs: ["get", "list", "watch", "create", "update", "patch"]

---
kind: ClusterRoleBinding
apiVersion: rbac.authorization.k8s.io/v1
metadata:
  name: run-nfs-client-provisioner
subjects:
  - kind: ServiceAccount
    name: nfs-client-provisioner
    namespace: kube-system
roleRef:
  kind: ClusterRole
  name: nfs-client-provisioner-runner
  apiGroup: rbac.authorization.k8s.io

---
kind: Deployment
apiVersion: apps/v1
metadata:
  name: nfs-provisioner-01
  namespace: kube-system
spec:
  replicas: 1
  strategy:
    type: Recreate
  selector:
    matchLabels:
      app: nfs-provisioner-01
  template:
    metadata:
      labels:
        app: nfs-provisioner-01
    spec:
      serviceAccountName: nfs-client-provisioner
      containers:
        - name: nfs-client-provisioner
#老版本插件使用jmgao1983/nfs-client-provisioner:latest
#          image: jmgao1983/nfs-client-provisioner:latest
          image: vbouchaud/nfs-client-provisioner:latest
          imagePullPolicy: IfNotPresent
          volumeMounts:
            - name: nfs-client-root
              mountPath: /persistentvolumes
          env:
            - name: PROVISIONER_NAME
              value: nfs-provisioner-01  # 此处供应者名字供storageclass调用
            - name: NFS_SERVER
              value: 192.168.1.60   # 填入NFS的地址
            - name: NFS_PATH
              value: /nfs_dir   # 填入NFS挂载的目录
      volumes:
        - name: nfs-client-root
          nfs:
            server: 192.168.1.60   # 填入NFS的地址
            path: /nfs_dir   # 填入NFS挂载的目录

---
apiVersion: storage.k8s.io/v1
kind: StorageClass
metadata:
  name: nfs-boge
provisioner: nfs-provisioner-01
# Supported policies: Delete、 Retain , default is Delete
reclaimPolicy: Retain
EOF


#创建
kubectl apply -f /root/nfs-sc.yaml

#查看
kubectl -n kube-system get pod
五、kuboard界面管理
1.下载地址
curl -o kuboard-v3.yaml https://addons.kuboard.cn/kuboard/kuboard-v3-storage-class.yaml
2.编辑yaml
#编辑 kuboard-v3.yaml 文件中的配置,该部署文件中,有1处配置必须修改:storageClassName


  volumeClaimTemplates:
  - metadata:
      name: data
    spec:
      # 请填写一个有效的 StorageClass name
      storageClassName: nfs-boge
      accessModes: [ "ReadWriteMany" ]
      resources:
        requests:
          storage: 5Gi
3.执行
kubectl create -f kuboard-v3.yaml

kubectl get pod -n kuboard

############################################

#访问
http://192.168.1.60:30080/
输入初始用户名和密码,并登录
    用户名: admin
    密码: Kuboard123
#############################################

#查看错误
journalctl -f -u kubelet.service
六、安装top命令
cat > /root/top.yaml <<EOF
apiVersion: v1
kind: ServiceAccount
metadata:
  labels:
    k8s-app: metrics-server
  name: metrics-server
  namespace: kube-system
---
apiVersion: rbac.authorization.k8s.io/v1
kind: ClusterRole
metadata:
  labels:
    k8s-app: metrics-server
    rbac.authorization.k8s.io/aggregate-to-admin: "true"
    rbac.authorization.k8s.io/aggregate-to-edit: "true"
    rbac.authorization.k8s.io/aggregate-to-view: "true"
  name: system:aggregated-metrics-reader
rules:
- apiGroups:
  - metrics.k8s.io
  resources:
  - pods
  - nodes
  verbs:
  - get
  - list
  - watch
---
apiVersion: rbac.authorization.k8s.io/v1
kind: ClusterRole
metadata:
  labels:
    k8s-app: metrics-server
  name: system:metrics-server
rules:
- apiGroups:
  - ""
  resources:
  - pods
  - nodes
  - nodes/stats
  - namespaces
  - configmaps
  verbs:
  - get
  - list
  - watch
---
apiVersion: rbac.authorization.k8s.io/v1
kind: RoleBinding
metadata:
  labels:
    k8s-app: metrics-server
  name: metrics-server-auth-reader
  namespace: kube-system
roleRef:
  apiGroup: rbac.authorization.k8s.io
  kind: Role
  name: extension-apiserver-authentication-reader
subjects:
- kind: ServiceAccount
  name: metrics-server
  namespace: kube-system
---
apiVersion: rbac.authorization.k8s.io/v1
kind: ClusterRoleBinding
metadata:
  labels:
    k8s-app: metrics-server
  name: metrics-server:system:auth-delegator
roleRef:
  apiGroup: rbac.authorization.k8s.io
  kind: ClusterRole
  name: system:auth-delegator
subjects:
- kind: ServiceAccount
  name: metrics-server
  namespace: kube-system
---
apiVersion: rbac.authorization.k8s.io/v1
kind: ClusterRoleBinding
metadata:
  labels:
    k8s-app: metrics-server
  name: system:metrics-server
roleRef:
  apiGroup: rbac.authorization.k8s.io
  kind: ClusterRole
  name: system:metrics-server
subjects:
- kind: ServiceAccount
  name: metrics-server
  namespace: kube-system
---
apiVersion: v1
kind: Service
metadata:
  labels:
    k8s-app: metrics-server
  name: metrics-server
  namespace: kube-system
spec:
  ports:
  - name: https
    port: 443
    protocol: TCP
    targetPort: https
  selector:
    k8s-app: metrics-server
---
apiVersion: apps/v1
kind: Deployment
metadata:
  labels:
    k8s-app: metrics-server
  name: metrics-server
  namespace: kube-system
spec:
  selector:
    matchLabels:
      k8s-app: metrics-server
  strategy:
    rollingUpdate:
      maxUnavailable: 0
  template:
    metadata:
      labels:
        k8s-app: metrics-server
    spec:
      containers:
      - args:
        - --cert-dir=/tmp
        - --kubelet-insecure-tls
        - --secure-port=4443
        - --kubelet-preferred-address-types=InternalIP,ExternalIP,Hostname
        - --kubelet-use-node-status-port
        #这里可以自己把metrics-server做到自己的阿里云镜像里面,并把下面替换成自己的镜像地址
        image: registry.cn-hangzhou.aliyuncs.com/lfy_k8s_images/metrics-server:v0.4.3
        imagePullPolicy: IfNotPresent
        livenessProbe:
          failureThreshold: 3
          httpGet:
            path: /livez
            port: https
            scheme: HTTPS
          periodSeconds: 10
        name: metrics-server
        ports:
        - containerPort: 4443
          name: https
          protocol: TCP
        readinessProbe:
          failureThreshold: 3
          httpGet:
            path: /readyz
            port: https
            scheme: HTTPS
          periodSeconds: 10
        securityContext:
          readOnlyRootFilesystem: true
          runAsNonRoot: true
          runAsUser: 1000
        volumeMounts:
        - mountPath: /tmp
          name: tmp-dir
      nodeSelector:
        kubernetes.io/os: linux
      priorityClassName: system-cluster-critical
      serviceAccountName: metrics-server
      volumes:
      - emptyDir: {}
        name: tmp-dir
---
apiVersion: apiregistration.k8s.io/v1
kind: APIService
metadata:
  labels:
    k8s-app: metrics-server
  name: v1beta1.metrics.k8s.io
spec:
  group: metrics.k8s.io
  groupPriorityMinimum: 100
  insecureSkipTLSVerify: true
  service:
    name: metrics-server
    namespace: kube-system
  version: v1beta1
  versionPriority: 100
EOF


kubectl apply -f /root/top.yaml
七、helm3安装
1.helm包下载地址
wget https://get.helm.sh/helm-v3.6.1-linux-amd64.tar.gz
2.安装helm
#解压 && 移动到 /usr/bin 目录下:

tar -xvf helm-v3.6.1-linux-amd64.tar.gz && cd linux-amd64/ && mv helm /usr/bin


#查看版本
helm version
3.配置仓库
#添加公用的仓库
helm repo add incubator https://charts.helm.sh/incubator
helm repo add bitnami https://charts.bitnami.com/bitnami
# 配置helm微软源地址
helm repo add stable http://mirror.azure.cn/kubernetes/charts
# 配置helm阿里源地址
helm repo add aliyun https://kubernetes.oss-cn-hangzhou.aliyuncs.com/charts

helm repo add stable   https://kubernetes.oss-cn-hangzhou.aliyuncs.com/charts
helm repo add google  https://kubernetes-charts.storage.googleapis.com
helm repo add jetstack https://charts.jetstack.io

# 查看仓库
helm repo list
# 更新仓库
helm repo update

# 删除仓库
#helm repo remove  aliyun


# helm list
八、haproxy+keepalived+ingress
1.部署阿里云ingress
mkdir -p /data/k8s/

cd /data/k8s/

cat > /data/k8s/aliyun-ingress-nginx.yaml <<EOF
apiVersion: v1
kind: Namespace
metadata:
  name: ingress-nginx
  labels:
    app: ingress-nginx
---
apiVersion: v1
kind: ServiceAccount
metadata:
  name: nginx-ingress-controller
  namespace: ingress-nginx
  labels:
    app: ingress-nginx
---
apiVersion: rbac.authorization.k8s.io/v1beta1
kind: ClusterRole
metadata:
  name: nginx-ingress-controller
  labels:
    app: ingress-nginx
rules:
  - apiGroups:
      - ""
    resources:
      - configmaps
      - endpoints
      - nodes
      - pods
      - secrets
      - namespaces
      - services
    verbs:
      - get
      - list
      - watch
  - apiGroups:
      - "extensions"
      - "networking.k8s.io"
    resources:
      - ingresses
    verbs:
      - get
      - list
      - watch
  - apiGroups:
      - ""
    resources:
      - events
    verbs:
      - create
      - patch
  - apiGroups:
      - "extensions"
      - "networking.k8s.io"
    resources:
      - ingresses/status
    verbs:
      - update
  - apiGroups:
      - ""
    resources:
      - configmaps
    verbs:
      - create
  - apiGroups:
      - ""
    resources:
      - configmaps
    resourceNames:
      - "ingress-controller-leader-nginx"
    verbs:
      - get
      - update
---
apiVersion: rbac.authorization.k8s.io/v1beta1
kind: ClusterRoleBinding
metadata:
  name: nginx-ingress-controller
  labels:
    app: ingress-nginx
roleRef:
  apiGroup: rbac.authorization.k8s.io
  kind: ClusterRole
  name: nginx-ingress-controller
subjects:
  - kind: ServiceAccount
    name: nginx-ingress-controller
    namespace: ingress-nginx
---
apiVersion: v1
kind: Service
metadata:
  labels:
    app: ingress-nginx
  name: nginx-ingress-lb
  namespace: ingress-nginx
spec:
  # DaemonSet need:
  # ----------------
  type: ClusterIP
  # ----------------
  # Deployment need:
  # ----------------
#  type: NodePort
  # ----------------
  ports:
  - name: http
    port: 80
    targetPort: 80
    protocol: TCP
  - name: https
    port: 443
    targetPort: 443
    protocol: TCP
  - name: metrics
    port: 10254
    protocol: TCP
    targetPort: 10254
  selector:
    app: ingress-nginx
---
kind: ConfigMap
apiVersion: v1
metadata:
  name: nginx-configuration
  namespace: ingress-nginx
  labels:
    app: ingress-nginx
data:
  keep-alive: "75"
  keep-alive-requests: "100"
  upstream-keepalive-connections: "10000"
  upstream-keepalive-requests: "100"
  upstream-keepalive-timeout: "60"
  allow-backend-server-header: "true"
  enable-underscores-in-headers: "true"
  generate-request-id: "true"
  http-redirect-code: "301"
  ignore-invalid-headers: "true"
  log-format-upstream: '{"@timestamp": "$time_iso8601","remote_addr": "$remote_addr","x-forward-for": "$proxy_add_x_forwarded_for","request_id": "$req_id","remote_user": "$remote_user","bytes_sent": $bytes_sent,"request_time": $request_time,"status": $status,"vhost": "$host","request_proto": "$server_protocol","path": "$uri","request_query": "$args","request_length": $request_length,"duration": $request_time,"method": "$request_method","http_referrer": "$http_referer","http_user_agent":  "$http_user_agent","upstream-sever":"$proxy_upstream_name","proxy_alternative_upstream_name":"$proxy_alternative_upstream_name","upstream_addr":"$upstream_addr","upstream_response_length":$upstream_response_length,"upstream_response_time":$upstream_response_time,"upstream_status":$upstream_status}'
  max-worker-connections: "65536"
  worker-processes: "2"
  proxy-body-size: 20m
  proxy-connect-timeout: "10"
  proxy_next_upstream: error timeout http_502
  reuse-port: "true"
  server-tokens: "false"
  ssl-ciphers: ECDHE-RSA-AES128-GCM-SHA256:ECDHE-ECDSA-AES128-GCM-SHA256:ECDHE-RSA-AES256-GCM-SHA384:ECDHE-ECDSA-AES256-GCM-SHA384:DHE-RSA-AES128-GCM-SHA256:DHE-DSS-AES128-GCM-SHA256:kEDH+AESGCM:ECDHE-RSA-AES128-SHA256:ECDHE-ECDSA-AES128-SHA256:ECDHE-RSA-AES128-SHA:ECDHE-ECDSA-AES128-SHA:ECDHE-RSA-AES256-SHA384:ECDHE-ECDSA-AES256-SHA384:ECDHE-RSA-AES256-SHA:ECDHE-ECDSA-AES256-SHA:DHE-RSA-AES128-SHA256:DHE-RSA-AES128-SHA:DHE-DSS-AES128-SHA256:DHE-RSA-AES256-SHA256:DHE-DSS-AES256-SHA:DHE-RSA-AES256-SHA:AES128-GCM-SHA256:AES256-GCM-SHA384:AES128-SHA256:AES256-SHA256:AES128-SHA:AES256-SHA:AES:CAMELLIA:DES-CBC3-SHA:!aNULL:!eNULL:!EXPORT:!DES:!RC4:!MD5:!PSK:!aECDH:!EDH-DSS-DES-CBC3-SHA:!EDH-RSA-DES-CBC3-SHA:!KRB5-DES-CBC3-SHA
  ssl-protocols: TLSv1 TLSv1.1 TLSv1.2
  ssl-redirect: "false"
  worker-cpu-affinity: auto
---
kind: ConfigMap
apiVersion: v1
metadata:
  name: tcp-services
  namespace: ingress-nginx
  labels:
    app: ingress-nginx
---
kind: ConfigMap
apiVersion: v1
metadata:
  name: udp-services
  namespace: ingress-nginx
  labels:
    app: ingress-nginx
---
apiVersion: apps/v1
kind: DaemonSet
metadata:
  name: nginx-ingress-controller
  namespace: ingress-nginx
  labels:
    app: ingress-nginx
  annotations:
    component.version: "v0.30.0"
    component.revision: "v1"
spec:
  # Deployment need:
  # ----------------
#  replicas: 1
  # ----------------
  selector:
    matchLabels:
      app: ingress-nginx
  template:
    metadata:
      labels:
        app: ingress-nginx
      annotations:
        prometheus.io/port: "10254"
        prometheus.io/scrape: "true"
        scheduler.alpha.kubernetes.io/critical-pod: ""
    spec:
      # DaemonSet need:
      # ----------------
      hostNetwork: true
      # ----------------
      serviceAccountName: nginx-ingress-controller
      priorityClassName: system-node-critical
      affinity:
        podAntiAffinity:
          preferredDuringSchedulingIgnoredDuringExecution:
          - podAffinityTerm:
              labelSelector:
                matchExpressions:
                - key: app
                  operator: In
                  values:
                  - ingress-nginx
              topologyKey: kubernetes.io/hostname
            weight: 100
        nodeAffinity:
          requiredDuringSchedulingIgnoredDuringExecution:
            nodeSelectorTerms:
            - matchExpressions:
              - key: type
                operator: NotIn
                values:
                - virtual-kubelet
      containers:
        - name: nginx-ingress-controller
          image: registry.cn-beijing.aliyuncs.com/acs/aliyun-ingress-controller:v0.30.0.2-9597b3685-aliyun
          args:
            - /nginx-ingress-controller
            - --configmap=$(POD_NAMESPACE)/nginx-configuration
            - --tcp-services-configmap=$(POD_NAMESPACE)/tcp-services
            - --udp-services-configmap=$(POD_NAMESPACE)/udp-services
            - --publish-service=$(POD_NAMESPACE)/nginx-ingress-lb
            - --annotations-prefix=nginx.ingress.kubernetes.io
            - --enable-dynamic-certificates=true
            - --v=2
          securityContext:
            allowPrivilegeEscalation: true
            capabilities:
              drop:
                - ALL
              add:
                - NET_BIND_SERVICE
            runAsUser: 101
          env:
            - name: POD_NAME
              valueFrom:
                fieldRef:
                  fieldPath: metadata.name
            - name: POD_NAMESPACE
              valueFrom:
                fieldRef:
                  fieldPath: metadata.namespace
          ports:
            - name: http
              containerPort: 80
            - name: https
              containerPort: 443
          livenessProbe:
            failureThreshold: 3
            httpGet:
              path: /healthz
              port: 10254
              scheme: HTTP
            initialDelaySeconds: 10
            periodSeconds: 10
            successThreshold: 1
            timeoutSeconds: 10
          readinessProbe:
            failureThreshold: 3
            httpGet:
              path: /healthz
              port: 10254
              scheme: HTTP
            periodSeconds: 10
            successThreshold: 1
            timeoutSeconds: 10
#          resources:
#            limits:
#              cpu: "1"
#              memory: 2Gi
#            requests:
#              cpu: "1"
#              memory: 2Gi
          volumeMounts:
          - mountPath: /etc/localtime
            name: localtime
            readOnly: true
      volumes:
      - name: localtime
        hostPath:
          path: /etc/localtime
          type: File
      nodeSelector:
        boge/ingress-controller-ready: "true"
      tolerations:
      - operator: Exists
      initContainers:
      - command:
        - /bin/sh
        - -c
        - |
          mount -o remount rw /proc/sys
          sysctl -w net.core.somaxconn=65535
          sysctl -w net.ipv4.ip_local_port_range="1024 65535"
          sysctl -w fs.file-max=1048576
          sysctl -w fs.inotify.max_user_instances=16384
          sysctl -w fs.inotify.max_user_watches=524288
          sysctl -w fs.inotify.max_queued_events=16384
        image: registry.cn-beijing.aliyuncs.com/acs/busybox:v1.29.2
        imagePullPolicy: Always
        name: init-sysctl
        securityContext:
          privileged: true
          procMount: Default
---
## Deployment need for aliyun'k8s:
#apiVersion: v1
#kind: Service
#metadata:
#  annotations:
#    service.beta.kubernetes.io/alibaba-cloud-loadbalancer-id: "lb-xxxxxxxxxxxxxxxxxxx"
#    service.beta.kubernetes.io/alibaba-cloud-loadbalancer-force-override-listeners: "true"
#  labels:
#    app: nginx-ingress-lb
#  name: nginx-ingress-lb-local
#  namespace: ingress-nginx
#spec:
#  externalTrafficPolicy: Local
#  ports:
#  - name: http
#    port: 80
#    protocol: TCP
#    targetPort: 80
#  - name: https
#    port: 443
#    protocol: TCP
#    targetPort: 443
#  selector:
#    app: ingress-nginx
#  type: LoadBalancer
EOF


kubectl  apply -f /data/k8s/aliyun-ingress-nginx.yaml
2.节点打标签
#允许节点打标签
kubectl label node k8s-master01  boge/ingress-controller-ready=true
kubectl label node k8s-master02  boge/ingress-controller-ready=true
kubectl label node k8s-master03  boge/ingress-controller-ready=true

#删除标签
#kubectl label node k8s-master01  boge/ingress-controller-ready=true --overwrite
#kubectl label node k8s-master02  boge/ingress-controller-ready=true --overwrite
#kubectl label node k8s-master03  boge/ingress-controller-ready=true --overwrite
3.haproxy+keepalived部署
3.0 部署
yum install haproxy keepalived -y

#重启程序
systemctl restart haproxy.service
systemctl restart keepalived.service


# 查看运行状态
systemctl status haproxy.service
systemctl status keepalived.service

#开机自启动
systemctl  enable keepalived.service
systemctl  enable haproxy.service
3.1 修改配置haproxy
vim /etc/haproxy/haproxy.cfg
###################################################
listen ingress-http
        bind 0.0.0.0:80
        mode tcp
        option tcplog
        option dontlognull
        option dontlog-normal
        balance roundrobin
        server 192.168.1.60 192.168.1.60:80 check inter 2000 fall 2 rise 2 weight 1
        server 192.168.1.61 192.168.1.61:80 check inter 2000 fall 2 rise 2 weight 1
        server 192.168.1.62 192.168.1.62:80 check inter 2000 fall 2 rise 2 weight 1


listen ingress-https
        bind 0.0.0.0:443
        mode tcp
        option tcplog
        option dontlognull
        option dontlog-normal
        balance roundrobin
        server 192.168.1.60 192.168.1.60:443 check inter 2000 fall 2 rise 2 weight 1
        server 192.168.1.61 192.168.1.61:443 check inter 2000 fall 2 rise 2 weight 1
        server 192.168.1.62 192.168.1.62:443 check inter 2000 fall 2 rise 2 weight 1
3.2 A机器修改keepalived配置
cat > /etc/keepalived/keepalived.conf <<EOF
global_defs {
    router_id lb-master
}
vrrp_script check-haproxy {
    script "killall -0 haproxy"
    interval 5
    weight -60
}
vrrp_instance VI-kube-master {
    state MASTER
    priority 120
    unicast_src_ip 192.168.1.63	  	#本机ip
    unicast_peer {
        192.168.1.64  				#另一台机器ip
    }
    dont_track_primary
    interface ens33  				# 注意这里的网卡名称修改成你机器真实的内网网卡名称,可用命令ip addr查看
    virtual_router_id 111
    advert_int 3
    track_script {
        check-haproxy
    }
    virtual_ipaddress {
        192.168.1.100 				#vip  地址
    }
}
EOF
3.3 B机器修改keepalived配置
cat > /etc/keepalived/keepalived.conf <<EOF
global_defs {
    router_id lb-master
}
vrrp_script check-haproxy {
    script "killall -0 haproxy"
    interval 5
    weight -60
}
vrrp_instance VI-kube-master {
    state MASTER
    priority 120
    unicast_src_ip 192.168.1.64	  	#本机ip
    unicast_peer {
        192.168.1.63  				#另一台机器ip
    }
    dont_track_primary
    interface ens33  				# 注意这里的网卡名称修改成你机器真实的内网网卡名称,可用命令ip addr查看
    virtual_router_id 111
    advert_int 3
    track_script {
        check-haproxy
    }
    virtual_ipaddress {
        192.168.1.100 				#vip  地址
    }
}
EOF
3.4 重启
#重启程序
systemctl restart haproxy.service
systemctl restart keepalived.service


# 查看运行状态
systemctl status haproxy.service
systemctl status keepalived.service
4.部署nginx-ingress
cat > /root/nginx-ingress.yaml <<EOF
apiVersion: v1
kind: Service
metadata:
  namespace: test
  name: nginx
  labels:
    app: nginx
spec:
  ports:
    - port: 80
      protocol: TCP
      targetPort: 80
  selector:
    app: nginx
---
apiVersion: apps/v1
kind: Deployment
metadata:
  namespace: test
  name: nginx
  labels:
    app: nginx
spec:
  replicas: 1
  selector:
    matchLabels:
      app: nginx
  template:
    metadata:
      labels:
        app: nginx
    spec:
      containers:
        - name: nginx
          image: nginx
          ports:
            - containerPort: 80
---
apiVersion: extensions/v1beta1
kind: Ingress
metadata:
  namespace: test
  name: nginx-ingress
spec:
  rules:
    - host: nginx.boge.com
      http:
        paths:
          - backend:
              serviceName: nginx
              servicePort: 80
            path: /
EOF
5.测试nginx-ingress
kubectl apply -f /root/nginx-ingress.yaml
#查看创建的ingress资源
kubectl get ingress -A


#服务器新增域名解析
echo "192.168.1.100 nginx.boge.com" >> /etc/hosts


# 我们在其它节点上,加下本地hosts,来测试下效果
20.6.1.226 nginx.boge.com


#测试
curl nginx.boge.com
九、elk日志监控
1.创建测试tomcat
cat > 01-tomcat-test.yaml <<EOF
apiVersion: apps/v1
kind: Deployment
metadata:
  labels:
    app: tomcat
  name: tomcat
spec:
  replicas: 1
  selector:
    matchLabels:
      app: tomcat
  template:
    metadata:
      labels:
        app: tomcat
    spec:
      tolerations:
      - key: "node-role.kubernetes.io/master"
        effect: "NoSchedule"
      containers:
      - name: tomcat
        image: "tomcat:7.0"
        env:      # 注意点一,添加相应的环境变量(下面收集了两块日志1、stdout 2、/usr/local/tomcat/logs/catalina.*.log)
        - name: aliyun_logs_tomcat-syslog   # 如日志发送到es,那index名称为 tomcat-syslog
          value: "stdout"
        - name: aliyun_logs_tomcat-access   # 如日志发送到es,那index名称为 tomcat-access
          value: "/usr/local/tomcat/logs/catalina.*.log"
        volumeMounts:   # 注意点二,对pod内要收集的业务日志目录需要进行共享,可以收集多个目录下的日志文件
          - name: tomcat-log
            mountPath: /usr/local/tomcat/logs
      volumes:
        - name: tomcat-log
          emptyDir: {}
EOF


kubectl apply -f 01-tomcat-test.yaml
2.部署elasticsearch
cat > 02-elasticsearch.6.8.13-statefulset.yaml <<EOF
apiVersion: apps/v1
kind: StatefulSet
metadata:
  labels:
    addonmanager.kubernetes.io/mode: Reconcile
    k8s-app: elasticsearch-logging
    version: v6.8.13
  name: elasticsearch-logging
  namespace: logging
spec:
  replicas: 1
  revisionHistoryLimit: 10
  selector:
    matchLabels:
      k8s-app: elasticsearch-logging
      version: v6.8.13
  serviceName: elasticsearch-logging
  template:
    metadata:
      labels:
        k8s-app: elasticsearch-logging
        version: v6.8.13
    spec:
#      nodeSelector:
#        esnode: "true"  ## 注意给想要运行到的node打上相应labels
      containers:
      - env:
        - name: NAMESPACE
          valueFrom:
            fieldRef:
              apiVersion: v1
              fieldPath: metadata.namespace
        - name: cluster.name
          value: elasticsearch-logging-0
        - name: ES_JAVA_OPTS
          value: "-Xms512m -Xmx512m"
        image: elastic/elasticsearch:6.8.13
        name: elasticsearch-logging
        ports:
        - containerPort: 9200
          name: db
          protocol: TCP
        - containerPort: 9300
          name: transport
          protocol: TCP
        volumeMounts:
        - mountPath: /usr/share/elasticsearch/data
          name: elasticsearch-logging
      dnsConfig:
        options:
        - name: single-request-reopen
      initContainers:
      - command:
        - /bin/sysctl
        - -w
        - vm.max_map_count=262144
        image: busybox
        imagePullPolicy: IfNotPresent
        name: elasticsearch-logging-init
        resources: {}
        securityContext:
          privileged: true
      - name: fix-permissions
        image: busybox
        command: ["sh", "-c", "chown -R 1000:1000 /usr/share/elasticsearch/data"]
        securityContext:
          privileged: true
        volumeMounts:
        - name: elasticsearch-logging
          mountPath: /usr/share/elasticsearch/data
      volumes:
      - name: elasticsearch-logging
        hostPath:
          path: /esdata
---
apiVersion: v1
kind: Service
metadata:
  labels:
    k8s-app: elasticsearch-logging
  name: elasticsearch
  namespace: logging
spec:
  ports:
  - port: 9200
    protocol: TCP
    targetPort: db
  selector:
    k8s-app: elasticsearch-logging
  type: ClusterIP


kubectl apply -f 02-elasticsearch.6.8.13-statefulset.yaml
3.部署kibana
cat > 03-kibana.6.8.13.yaml <<EOF
apiVersion: apps/v1
kind: Deployment
metadata:
  name: kibana
  namespace: logging
  labels:
    app: kibana
spec:
  selector:
    matchLabels:
      app: kibana
  template:
    metadata:
      labels:
        app: kibana
    spec:
      containers:
      - name: kibana
        image: elastic/kibana:6.8.13
        resources:
          limits:
            cpu: 1000m
          requests:
            cpu: 100m
        env:
          - name: ELASTICSEARCH_URL
            value: http://elasticsearch:9200
        ports:
        - containerPort: 5601
---
apiVersion: v1
kind: Service
metadata:
  name: kibana
  namespace: logging
  labels:
    app: kibana
spec:
  ports:
  - port: 5601
    protocol: TCP
    targetPort: 5601
  type: ClusterIP
  selector:
    app: kibana
---
apiVersion: extensions/v1beta1
kind: Ingress
metadata:
  name: kibana
  namespace: logging
spec:
  rules:
  - host: kibana.boge.com
    http:
      paths:
      - path: /
        backend:
          serviceName: kibana
          servicePort: 5601


kubectl apply -f 03-kibana.6.8.13.yaml
4.部署log-pilot
cat > 04-log-pilot.yml <<EOF
apiVersion: apps/v1
kind: DaemonSet
metadata:
  name: log-pilot
  namespace: logging
  labels:
    app: log-pilot
  # 设置期望部署的namespace

spec:
  selector:
    matchLabels:
      app: log-pilot
  updateStrategy:
    type: RollingUpdate
  template:
    metadata:
      labels:
        app: log-pilot
      annotations:
        scheduler.alpha.kubernetes.io/critical-pod: ''
    spec:
      # 是否允许部署到Master节点上
      #tolerations:
      #- key: node-role.kubernetes.io/master
      #  effect: NoSchedule
      containers:
      - name: log-pilot
        # 版本请参考https://github.com/AliyunContainerService/log-pilot/releases
        image: registry.cn-hangzhou.aliyuncs.com/acs/log-pilot:0.9.7-filebeat
        resources:
          limits:
            memory: 500Mi
          requests:
            cpu: 200m
            memory: 200Mi
        env:
          - name: "NODE_NAME"
            valueFrom:
              fieldRef:
                fieldPath: spec.nodeName
          ##--------------------------------
#          - name: "LOGGING_OUTPUT"
#            value: "logstash"
#          - name: "LOGSTASH_HOST"
#            value: "logstash-g1"
#          - name: "LOGSTASH_PORT"
#            value: "5044"
          ##--------------------------------
          - name: "LOGGING_OUTPUT"
            value: "elasticsearch"
          ## 请确保集群到ES网络可达
          - name: "ELASTICSEARCH_HOSTS"
            value: "elasticsearch:9200"
          ## 配置ES访问权限
          #- name: "ELASTICSEARCH_USER"
          #  value: "{es_username}"
          #- name: "ELASTICSEARCH_PASSWORD"
          #  value: "{es_password}"
          ##--------------------------------
          ## https://github.com/AliyunContainerService/log-pilot/blob/master/docs/filebeat/docs.md
          ## to file need configure 1
#          - name: LOGGING_OUTPUT
#            value: file
#          - name: FILE_PATH
#            value: /tmp
#          - name: FILE_NAME
#            value: filebeat.log
        volumeMounts:
        - name: sock
          mountPath: /var/run/docker.sock
        - name: root
          mountPath: /host
          readOnly: true
        - name: varlib
          mountPath: /var/lib/filebeat
        - name: varlog
          mountPath: /var/log/filebeat
        - name: localtime
          mountPath: /etc/localtime
          readOnly: true
         ## to file need configure 2
#        - mountPath: /tmp
#          name: mylog
        livenessProbe:
          failureThreshold: 3
          exec:
            command:
            - /pilot/healthz
          initialDelaySeconds: 10
          periodSeconds: 10
          successThreshold: 1
          timeoutSeconds: 2
        securityContext:
          capabilities:
            add:
            - SYS_ADMIN
      terminationGracePeriodSeconds: 30
      volumes:
      - name: sock
        hostPath:
          path: /var/run/docker.sock
      - name: root
        hostPath:
          path: /
      - name: varlib
        hostPath:
          path: /var/lib/filebeat
          type: DirectoryOrCreate
      - name: varlog
        hostPath:
          path: /var/log/filebeat
          type: DirectoryOrCreate
      - name: localtime
        hostPath:
          path: /etc/localtime
       ## to file need configure 3
#      - hostPath:
#          path: /tmp/mylog
#          type: ""
#        name: mylog


kubectl apply -f 04-log-pilot.yml
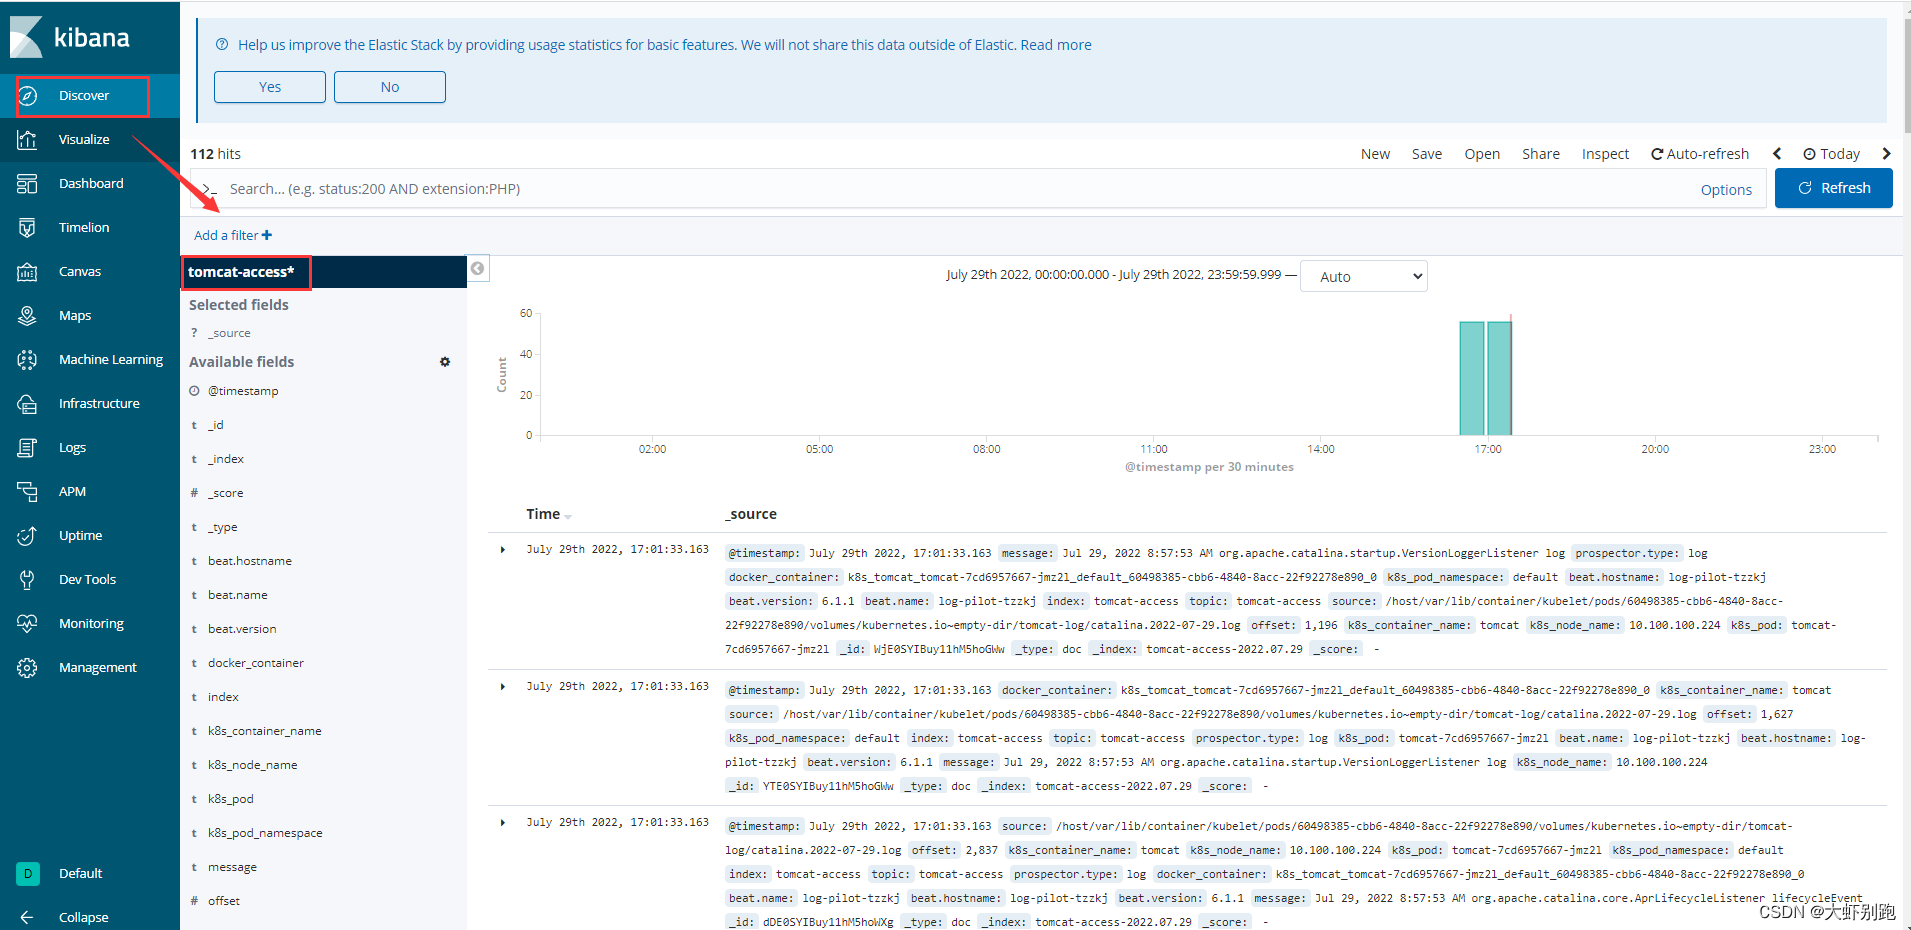
5.配置kibana页面


十、Prometheus监控
1.导入离线包
链接:https://pan.baidu.com/s/1DyMJPT8r_TUpI8Dr31SVew?pwd=m1bk
提取码:m1bk


#导入上传tar包
sudo docker load -i alertmanager-v0.21.0.tar
sudo docker load -i grafana-7.3.4.tar
sudo docker load -i k8s-prometheus-adapter-v0.8.2.tar
sudo docker load -i kube-rbac-proxy-v0.8.0.tar
sudo docker load -i kube-state-metrics-v1.9.7.tar
sudo docker load -i node-exporter-v1.0.1.tar
sudo docker load -i prometheus-config-reloader-v0.43.2.tar
sudo docker load -i prometheus_demo_service.tar
sudo docker load -i prometheus-operator-v0.43.2.tar
sudo docker load -i prometheus-v2.22.1.tar
2.主节点创建
#解压下载的代码包
sudo unzip kube-prometheus-master.zip
sudo rm -f kube-prometheus-master.zip && cd kube-prometheus-master


#这里建议先看下有哪些镜像,便于在下载镜像快的节点上先收集好所有需要的离线docker镜像
find ./ -type f |xargs grep 'image: '|sort|uniq|awk '{print $3}'|grep ^[a-zA-Z]|grep -Evw 'error|kubeRbacProxy'|sort -rn|uniq


kubectl create -f manifests/setup
kubectl create -f manifests/


#过一会查看创建结果:
kubectl -n monitoring get all


# 附:清空上面部署的prometheus所有服务:
# kubectl delete --ignore-not-found=true -f manifests/ -f manifests/setup
3. 访问下prometheus的UI
# 修改下prometheus UI的service模式,便于我们访问
# kubectl -n monitoring patch svc prometheus-k8s -p '{"spec":{"type":"NodePort"}}'
service/prometheus-k8s patched

# kubectl -n monitoring get svc prometheus-k8s
NAME             TYPE       CLUSTER-IP    EXTERNAL-IP   PORT(S)          AGE
prometheus-k8s   NodePort   10.68.23.79   <none>        9090:22129/TCP   7m43s
3.1 修改用户权限
#   kubectl edit clusterrole prometheus-k8s
#------ 原始的rules -------
rules:
- apiGroups:
  - ""
  resources:
  - nodes/metrics
  verbs:
  - get
- nonResourceURLs:
  - /metrics
  verbs:
  - get
#---------------------------

apiVersion: rbac.authorization.k8s.io/v1
kind: ClusterRole
metadata:
  name: prometheus-k8s
rules:
- apiGroups:
  - ""
  resources:
  - nodes
  - services
  - endpoints
  - pods
  - nodes/proxy
  verbs:
  - get
  - list
  - watch
- apiGroups:
  - ""
  resources:
  - configmaps
  - nodes/metrics
  verbs:
  - get
- nonResourceURLs:
  - /metrics
  verbs:
  - get
4. 监控ingress-nginx
cat > servicemonitor.yaml <<EOF
apiVersion: monitoring.coreos.com/v1
kind: ServiceMonitor
metadata:
  labels:
    app: ingress-nginx
  name: nginx-ingress-scraping
  namespace: ingress-nginx
spec:
  endpoints:
  - interval: 30s
    path: /metrics
    port: metrics
  jobLabel: app
  namespaceSelector:
    matchNames:
    - ingress-nginx
  selector:
    matchLabels:
      app: ingress-nginx
EOF


kubectl apply -f servicemonitor.yaml


kubectl -n ingress-nginx get servicemonitors.monitoring.coreos.com

![[附源码]Python计算机毕业设计SSM联动共享汽车管理系统(程序+LW)](https://img-blog.csdnimg.cn/48dc57608fb348bcb0d4845e40cc3cca.png)



![[附源码]SSM计算机毕业设计学生宿舍管理系统JAVA](https://img-blog.csdnimg.cn/79447298c7c64ddb9fba24f8bc28b67a.png)


![[Spring]第五篇:AOP面向切面编程概念](https://img-blog.csdnimg.cn/f1163cced3bf41d0aa19f4e40574b1bc.png)
