现在STM32公司主推的是HAL库的开发,标准库已经不再更新。通过STM32cubeMX的图形界面生成代码非常的方便。
一、程序框架的构想
1、STM32cubeMX 生成的代码与添加的应用代码分离;
2、利用 STM32cubeMX 重新生成代码,不影响应用代码;
3、应用代码的添加,移除与修改,不影响 cube 生成的代码;
4、代码架构方便阅读,编辑,修改与移植;
5、代码架构标准化,可以很方便的应用到产品开发中。
二、程序框架的实现
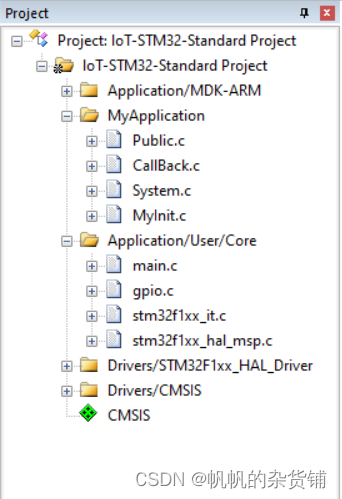
1、新增 MyApplication 文件夹,放置 4 个标准 c 文件,分别是公共文件,回调文件,系统文件, 用户初始化文件,后续应用代码均放在此文件夹;
2、新增 MyApplication.h 文件,包含所有用户代码的头文件与外设头文件,调整外设或用户文件, 只需要调整此文件内的相应头文件即可;
3、main.c 文件标准化。
三 、MyApplication.h
#ifndef __MyApplication_H__
#define __MyApplication_H__

/* Includes ------------------------------------------------------------------*/
#include "main.h"
#include "gpio.h"

#include "stdio.h"
#include "stdlib.h"
#include "System.h"
#include "Public.h"
#include "MyInit.h"
#endif
/********************************************************
  End Of File
********************************************************/
1、此文件放置于 main.c 与应用代码文件中,作为头文件的集合;
2、更改处理器外设或应用代码,此文件需要相应的增加或删除相应的头文件。
四 、main.c 文件
1、添加头文件集合
/* Private includes ----------------------------------------------------------*/
/* USER CODE BEGIN Includes */
#include "MyApplication.h"
/* USER CODE END Includes */
2、添加用户初始化函数
  /* USER CODE BEGIN 2 */
  MyInit.Peripheral_Set();
  /* USER CODE END 2 */
3、标准化主循环
 /* Infinite loop */
  /* USER CODE BEGIN WHILE */
  while (1)
  {
    System.Run();
    /* USER CODE END WHILE */

    /* USER CODE BEGIN 3 */
  }
  /* USER CODE END 3 */
}
4、标准化错误处理函数
/**
  * @brief  This function is executed in case of error occurrence.
  * @retval None
  */
void Error_Handler(void)
{
  /* USER CODE BEGIN Error_Handler_Debug */
  /* User can add his own implementation to report the HAL error return state */
  System.Error_Handler();
  /* USER CODE END Error_Handler_Debug */
}
5、标准化断言失败处理函数
#ifdef  USE_FULL_ASSERT
/**
  * @brief  Reports the name of the source file and the source line number
  *         where the assert_param error has occurred.
  * @param  file: pointer to the source file name
  * @param  line: assert_param error line source number
  * @retval None
  */
void assert_failed(uint8_t *file, uint32_t line)
{
  /* USER CODE BEGIN 6 */
  /* User can add his own implementation to report the file name and line number,
     tex: printf("Wrong parameters value: file %s on line %d\r\n", file, line) */
	System.Assert_Failed();
  /* USER CODE END 6 */
}
#endif /* USE_FULL_ASSERT */
五 、system 文件
1、头文件
//定义结构体类型
typedef struct
{
	void (*Run)(void);
	void (*Error_Handler)(void);
	void (*Assert_Failed)(void);
} System_t;

/* extern variables-----------------------------------------------------------*/
extern System_t  System;
/* extern function prototypes-------------------------------------------------*/
主要定义结构体类型 System_t,包含 3 个函数指针,分别为函数运行,系统错误处理,断言失败 处理,被 main.c 文件调用。
2、源文件
/* Private variables----------------------------------------------------------*/
static void Run(void);
static void Error_Handler(void);
static void Assert_Failed(void);

/* Public variables-----------------------------------------------------------*/
System_t System =
{
	Run,
	Error_Handler,
	Assert_Failed
};
主要定义结构体 System 以及 3 个函数,并将 3 个函数的名称(首地址)赋值给 System 结构体,完成结构体的初始化。 如此一来,main.c 文件可以通过 System 结构体的函数指针调用 System.c 文件的 3 个函数了。
Run 函数:用户应用代码;
Error_Hander 函数:系统错误处理代码;
Asset_Failed 函数: 断言失败处理代码
六 、Run 函数
static void Run()
{
	//初始化时,LED1,LED2,LED3均亮灯
	//HAL_GPIO_TogglePin -> 取反GPIO输出状态
	//HAL_GPIO_WritePin  -> 设置GPIO输出状态
	//                      GPIO_PIN_SET   -> 输出高电平,灯亮
	//                      GPIO_PIN_RESET -> 输出低电平

	//延时500ms,LED1,LED2,LED3均灭灯
	HAL_Delay(500);
	HAL_GPIO_TogglePin(LED1_GPIO_Port,LED1_Pin);
	HAL_GPIO_TogglePin(LED2_GPIO_Port,LED2_Pin);
	HAL_GPIO_TogglePin(LED3_GPIO_Port,LED3_Pin);

}
作为功能演示,简单的实现了 LED1 、LED2 、LED3间隔 1s 闪烁。
这样的全新的程序框架就非常的完美啦,在日后的编写和程序一直都带来了极大的便利。
详细的视频讲解,请关注B站UP:硬件家园,本博客只是供自己学习,复习使用。








![[java]云HIS:检验字典维护](https://img-blog.csdnimg.cn/d730fb41e95b486b8a33e80ce6e09836.png)


