文章目录
- 一、Sequlize是Node.JS中ORM实现
- 二、Sequelize 执行基础的CRUD
- 三、Sequelize 执行复杂的CRUD
- 1. 指定字段attributes
- 2. 触发数据库事务
- 3. LEFT JOIN 联表关系
- 4. INNER JOIN 联表关系
- 5. 嵌套查询
- 四、Sequlize常用方法和参数
- 1. findAll
- 2. count
- 3. findByPk
- 4. findOne
- 5. findAndCountAll
一、Sequlize是Node.JS中ORM实现
在 nodejs 中,「Sequlizejs」可能是最出类拔萃的 ORM 实现。植根于 nodejs,Sequlizejs 完美支持 Promise 式调用,进一步你可以走 async/await,和业务代码紧密粘合;如果上了 ts,从模型定义带来的类型提醒能让调用更省心。
表/模型的定义
ORM 的第一步就是要建立对象到数据表的映射,在 Sequlize 里是这样的,比如我们关联一个 station 的表
数据表station的定义
CREATE TABLE `station` (
`id` bigint(11) unsigned NOT NULL AUTO_INCREMENT,
`store_id` varchar(20) NOT NULL DEFAULT '',
`name` varchar(20) NOT NULL DEFAULT '',
`type` tinyint(4) NOT NULL DEFAULT '0',
`status` tinyint(4) NOT NULL DEFAULT '0',
`ip` varchar(20) NOT NULL DEFAULT '',
`related_work_order_id` bigint(20) NOT NULL DEFAULT '0',
`created_at` datetime NOT NULL DEFAULT CURRENT_TIMESTAMP,
`updated_at` datetime NOT NULL DEFAULT CURRENT_TIMESTAMP,
`plate_no` varchar(20) NOT NULL DEFAULT '',
PRIMARY KEY (`id`)
) ENGINE=InnoDB AUTO_INCREMENT=7 DEFAULT CHARSET=utf8 COMMENT='工位表';
Node.JS中station模型的定义
const Model = sequlize.define('station', {
    id: {
        field: 'id',
        type: Sequelize.INTEGER,
        allowNull: false,
        primaryKey: true,
        autoIncrement: true,
    },
    store_id: Sequelize.STRING(20),
    name: Sequelize.STRING(20),
    type: Sequelize.TINYINT,
    status: Sequelize.TINYINT,
    ip: Sequelize.STRING(20),
    plate_no: Sequelize.STRING(20),
    related_work_order_id: Sequelize.BIGINT,
});
二、Sequelize 执行基础的CRUD
Sequlize对象提供丰富的API,诸如:findOne、findAll、create、upsert、aggregate、max,文档/lib/model.js~Model里面安排的明明白白。
执行一个基本的CRUD
当我执行一个简单的CRUD:Station.findAll(),Sequlize转成的SQL是这样的:
SELECT
    `id`,
    `store_id`,
    `name`,
    `type`,
    `status`,
    `ip`,
    `plate_no`
FROM
    `station` AS `station`;
三、Sequelize 执行复杂的CRUD
1. 指定字段attributes
Station.findAll({
    attributes: [ 'ip' ],
    where: {
        status: 1,
    },
order: [
[ 'name', 'ASC' ],
],
limit: 10,
offset: 5,
});
SELECT `ip` FROM `station` AS `station` WHERE
`station`.`status` = 1 ORDER BY `station`.`name` ASC LIMIT 5, 10;
2. 触发数据库事务
Station.findOrCreate({
    where: {
        id: 1,
    },
    defaults: {
        name: 'haha',
    },
});
START TRANSACTION;
SELECT `id`, `store_id`, `name`, `type`, `status`, `ip`, `plate_no` FROM `station` AS `station` WHERE `station`.`id` = 2;
INSERT INTO `station` (`id`,`name`) VALUES (2,`haha`);
COMMIT;
3. LEFT JOIN 联表关系
一对一联表查询
一对一关系可用 belongsTo、hasOne 两种方式标记
// belongsTo:
File.BelongsTo(User, {
	foreignKey:'creator_id',	// File类的creatorId属性
	targetKey:'id',				// User类的id属性
});

// hasOne:
User.HasOne(File, {
	foreignKey:'creator_id',	// File类的creatorId属性
	sourceKey:'id',				// User类的id属性
});
事实上转换后的 SQL 也是一样的::LEFT JOIN::
# File.BelongsTo(User)
SELECT `file`.`id`, `user`.`id` AS `user.id`
FROM `file`
    LEFT JOIN `user` ON `file`.`creator_id ` = `user`.`id`
# User.HasOne(File)
SELECT `user`.`id`, `file`.`id` AS `file.id`
FROM `user`
    LEFT JOIN `file` ON `user`.`id ` = `file`.`creator_id `
操作示例
// Task.belongsTo(User)

const tasks = await Task.findAll({ include: User });
console.log(JSON.stringify(tasks, null, 2));

// 结果
[{
  "name": "A Task",
  "id": 1,
  "userId": 1,
  "user": {
    "name": "张三",
    "id": 1
  }
},
{
  "name": "B Task",
  "id": 2,
  "userId": 2,
  "user": {
    "name": "李四",
    "id": 2
  }
}]
一对多联表查询
User.HasMany(File, {
    foreignKey: 'creator_id',   // 如果不定义这个,也会自动定义为「源模型名 + 源模型主键名」即 user_id
    sourceKey: 'id',    // 源模型的关联键,默认主键,通常省略
}
// 这里 creator_id 位于目标模型 File 上
操作示例
// User.hasMany(Task);

const users = await User.findAll({ include: Task });
console.log(JSON.stringify(users, null, 2));

// 结果
[{
  "name": "张三",
  "id": 1,
  "tasks": [{
    "name": "A Task",
    "id": 1,
    "userId": 1
  }]
}]
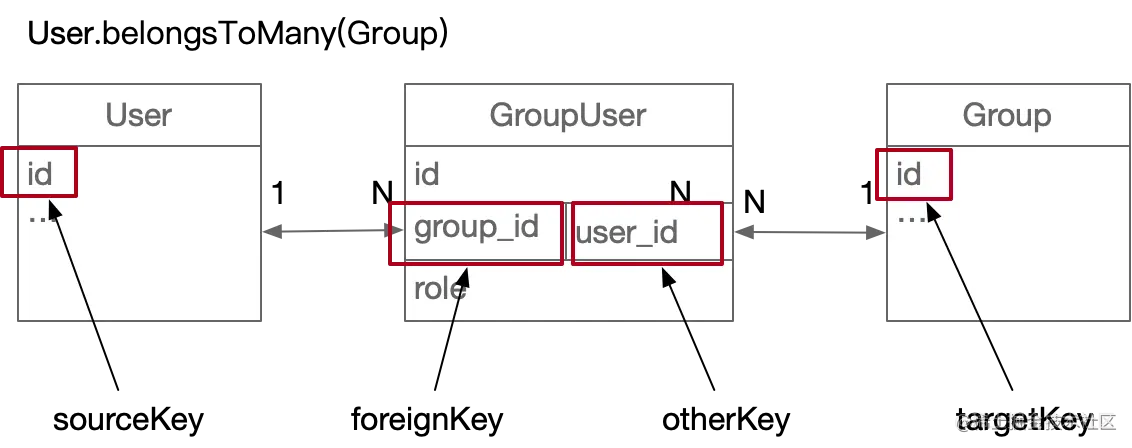
多对多联表查询
User.BelongsToMany(Group, {
    through: GroupUser,     //
    foreignKey: 'group_id', // 如果不定义这个,也会自动定义为「目标模型名 + 目标模型主键名」即 user_id
    otherKey: 'user_id',
}
4. INNER JOIN 联表关系
预先加载时,可以强制查询仅返回具有关联模型的记录,通过 required: true 参数将查询从默认的 OUTER JOIN 转为 INNER JOIN
// User.hasMany(Task);

User.findAll({
  include: {
    model: Task,
    required: true
  }
});
5. 嵌套查询
嵌套列的顶级 WHERE 子句, Sequelize 引用嵌套列的方法:'$nested.column$', 可以用于将 where 条件从包含的模型从 ON 条件移动到顶层的 WHERE 子句
User.findAll({
  where: {
    '$Instruments.size$': { [Op.ne]: 'small' }
  },
  include: [{
    model: Tool,
    as: 'Instruments'
  }]
});
四、Sequlize常用方法和参数
1. findAll
// 从数据库读取整个表
const user = await User.findAll()
SELECT * FROM User;

// 选择某些特定属性
const user = await User.findAll({
	attributes:['name','age']
})
SELECT name,age FROM User;

// 重命名
User.findAll({
  attributes: ['name', ['age', 'ageage'], 'hats']
})
SELECT name, age AS ageage, hats FROM User;

// 使用聚合函数
User.findAll({
  attributes: {
    include: [
      [sequelize.fn('COUNT', sequelize.col('hats')), 'n_hats']
    ]
  }
})
SELECT name, age, ..., hats, COUNT(hats) AS n_hats FROM User;

// 使用聚合函数 + 部分属性字段
User.findAll({
  attributes: [
    'name',
    [sequelize.fn('COUNT', sequelize.col('hats')), 'n_hats'],
    'age'
  ]
})
SELECT name, COUNT(hats) AS n_hats, age FROM User;

// 排除部分字段
User.findAll({
  attributes: {
    include: [
      [sequelize.fn('COUNT', sequelize.col('hats')), 'n_hats']
    ],
    exclude: ['age']
  }
})
SELECT name, ..., hats, COUNT(hats) AS n_hats FROM User;

// 使用WHERE语句,and
User.findAll({
  where: {
    name: 'Tom',
    age: 20
  }
})
SELECT * FROM User WHERE name = 'TOM' AND age = 20;

// 使用WHERE语句,or
const { Op } = require('sequelize')
User.findAll({
  where: {
    [Op.or]: [
      { name: 'Tom' },
      { age: 20' }
    ]
  }
})
SELECT * FROM User WHERE name = 'TOM' OR age = 20;

// 分页限制 :跳过5行,然后获取10行
User.findAll({ offset: 5, limit: 10 })
2. count
// 查询 age = 20 的用户数量
const total = await User.count({
  where: {
    age: 20
  }
})
3. findByPk
findByPk 方法使用提供的主键从表中仅获得一行数据:
const user = await User.findByPk(1024) // 主键的值是 1024
4. findOne
findOne 方法获得它找到的 第一行 数据:
const user = await User.findOne({ where: { name: 'Tom' } })
5. findAndCountAll
结合了 findAll 和 count 的便捷方法。具体参考:findAndCountAll。findAndCountAll 方法返回有两个属性的对象:
- count —— 整数,符合查询条件的记录总数
- rows —— 数组对象,获得的记录
const { count, rows } = await User.findAndCountAll({
  where: {
    name: {
      [Op.like]: 'T%'
    }
  },
  offset: 10,
  limit: 2
})
console.log(count)
console.log(rows)
