【图像分割】【深度学习】SAM官方Pytorch代码-Image encoder模块Vision Transformer网络解析
Segment Anything:建立了迄今为止最大的分割数据集,在1100万张图像上有超过1亿个掩码,模型的设计和训练是灵活的,其重要的特点是Zero-shot(零样本迁移性)转移到新的图像分布和任务,一个图像分割新的任务、模型和数据集。SAM由三个部分组成:一个强大的图像编码器(Image encoder)计算图像嵌入,一个提示编码器(Prompt encoder)嵌入提示,然后将两个信息源组合在一个轻量级掩码解码器(Mask decoder)中来预测分割掩码。本博客将讲解Image encoder模块的深度学习网络代码,Image encoder使用"Vision Transformer"作为backbone。
文章目录
- 【图像分割】【深度学习】SAM官方Pytorch代码-Image encoder模块Vision Transformer网络解析
- 前言
- Vision Transformer网络简述
- SAM模型关于ViT网络的配置
- ViT网络结构与执行流程
- ViT网络基本步骤代码详解
- patch embedding
- positional embedding
- Transformer Encoder
- Encoder Block
- Multi-Head Attention
- MLP
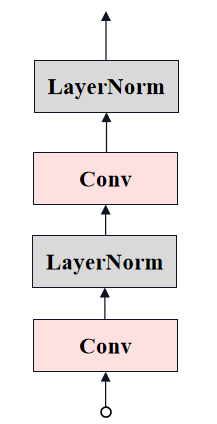
- Neck
- 总结
前言
在详细解析SAM代码之前,首要任务是成功运行SAM代码【win10下参考教程】,后续学习才有意义。本博客讲解Image encoder(Vision Transformer)模块的深度网络代码,不涉及其他功能模块代码。
Vision Transformer参考博主之前的博客【ViT(Vision Transformer)算法Pytorch代码讲解】
Vision Transformer网络简述
SAM模型关于ViT网络的配置
博主以sam_vit_b为例,详细讲解ViT网络的结构。
代码位置:segment_anything/build_sam.py
def build_sam_vit_b(checkpoint=None):
    return _build_sam(
        # 图像编码channel
        encoder_embed_dim=768,
        # 主体编码器的个数
        encoder_depth=12,
        # attention中head的个数
        encoder_num_heads=12,
        # 需要将相对位置嵌入添加到注意力图的编码器( Encoder Block)
        encoder_global_attn_indexes=[2, 5, 8, 11],
        # 权重
        checkpoint=checkpoint,
    )
sam模型中image_encoder模块初始化
image_encoder=ImageEncoderViT(
    # 主体编码器的个数
    depth=encoder_depth,
    # 图像编码channel
    embed_dim=encoder_embed_dim,
    # 输入图像的标准尺寸
    img_size=image_size,
    # mlp中channel缩放的比例
    mlp_ratio=4,
    # 归一化层
    norm_layer=partial(torch.nn.LayerNorm, eps=1e-6),
    # attention中head的个数
    num_heads=encoder_num_heads,
    # patch的大小
    patch_size=vit_patch_size,
    # qkv全连接层的偏置
    qkv_bias=True,
    # 是否需要将相对位置嵌入添加到注意力图
    use_rel_pos=True,
    # 需要将相对位置嵌入添加到注意力图的编码器序号(Encoder Block)
    global_attn_indexes=encoder_global_attn_indexes,
    # attention中的窗口大小
    window_size=14,
    # 输出的channel
    out_chans=prompt_embed_dim,
),
ViT网络结构与执行流程
Image encoder源码位置:segment_anything/modeling/image_encoder.py
ViT网络(ImageEncoderViT类)结构参数配置。
def __init__(
    self,
    img_size: int = 1024,       # 输入图像的标准尺寸
    patch_size: int = 16,       # patch的大小
    in_chans: int = 3,          # 输入图像channel
    embed_dim: int = 768,       # 图像编码channel
    depth: int = 12,            # 主体编码器的个数
    num_heads: int = 12,        # attention中head的个数
    mlp_ratio: float = 4.0,     # mlp中channel缩放的比例
    out_chans: int = 256,       # 输出特征的channel
    qkv_bias: bool = True,      # qkv全连接层的偏置flag
    norm_layer: Type[nn.Module] = nn.LayerNorm,     # 归一化层
    act_layer: Type[nn.Module] = nn.GELU,           # 激活层
    use_abs_pos: bool = True,               # 是否使用绝对位置嵌入
    use_rel_pos: bool = False,              # 是否需要将相对位置嵌入添加到注意力图
    rel_pos_zero_init: bool = True,         # 源码暂时没有用到
    window_size: int = 0,                   # attention中的窗口大小
    global_attn_indexes: Tuple[int, ...] = (),      # 需要将相对位置嵌入添加到注意力图的编码器序号(Encoder Block)
) -> None:
    super().__init__()
    self.img_size = img_size

    # -----patch embedding-----
    self.patch_embed = PatchEmbed(
        kernel_size=(patch_size, patch_size),
        stride=(patch_size, patch_size),
        in_chans=in_chans,
        embed_dim=embed_dim,
    )
    # -----patch embedding-----

    # -----positional embedding-----
    self.pos_embed: Optional[nn.Parameter] = None
    if use_abs_pos:
        # Initialize absolute positional embedding with pretrain image size.
        # 使用预训练图像大小初始化绝对位置嵌入。
        self.pos_embed = nn.Parameter(
            torch.zeros(1, img_size // patch_size, img_size // patch_size, embed_dim)
        )
    # -----positional embedding-----

    # -----Transformer Encoder-----
    self.blocks = nn.ModuleList()
    for i in range(depth):
        block = Block(
            dim=embed_dim,
            num_heads=num_heads,
            mlp_ratio=mlp_ratio,
            qkv_bias=qkv_bias,
            norm_layer=norm_layer,
            act_layer=act_layer,
            use_rel_pos=use_rel_pos,
            rel_pos_zero_init=rel_pos_zero_init,
            window_size=window_size if i not in global_attn_indexes else 0,
            input_size=(img_size // patch_size, img_size // patch_size),
        )
        self.blocks.append(block)
    # -----Transformer Encoder-----

    # -----Neck-----
    self.neck = nn.Sequential(
        nn.Conv2d(
            embed_dim,
            out_chans,
            kernel_size=1,
            bias=False,
        ),
        LayerNorm2d(out_chans),
        nn.Conv2d(
            out_chans,
            out_chans,
            kernel_size=3,
            padding=1,
            bias=False,
        ),
        LayerNorm2d(out_chans),
    )
    # -----Neck-----
SAM模型中ViT网络结构如下图所示:
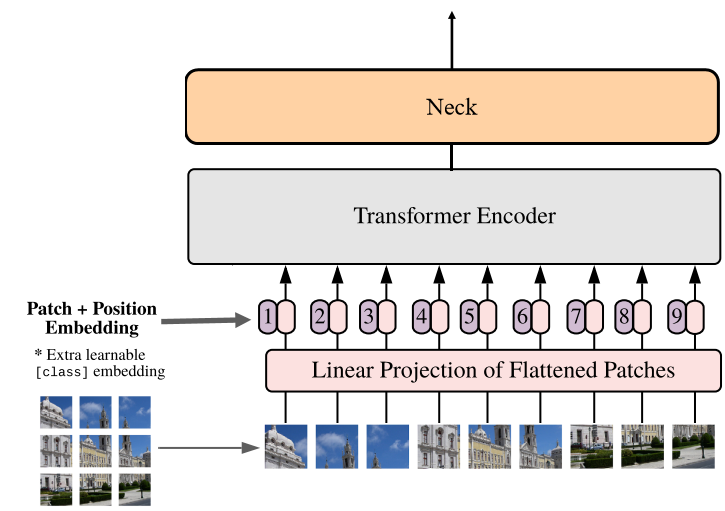
ViT网络(ImageEncoderViT类)在特征提取中的几个基本步骤:
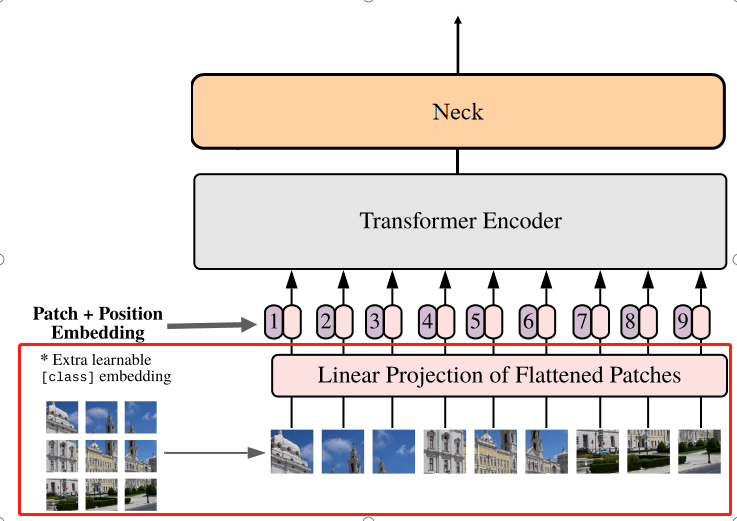
- patch embedding:将图片切分成图片序列块,再经过维度映射后展平成一维向量
- positional embedding:嵌入位置编码(用于保留位置信息)
- Transformer Encoder:主体编码器
- Neck:过渡层
def forward(self, x: torch.Tensor) -> torch.Tensor:
    # patch embedding过程
    x = self.patch_embed(x)
    # positional embedding过程
    if self.pos_embed is not None:
        x = x + self.pos_embed
    # Transformer Encoder过程
    for blk in self.blocks:
        x = blk(x)
    # Neck过程
    # B H W C -> B C H W
    x = self.neck(x.permute(0, 3, 1, 2))
    return x
ViT网络基本步骤代码详解
patch embedding
PatchEmbed类: 源码其实就是卷积核大小16x16(巧妙切分成固定大小16x16的patch),卷积核通道3×768的卷积操作。patch embedding示意图如下图所示:
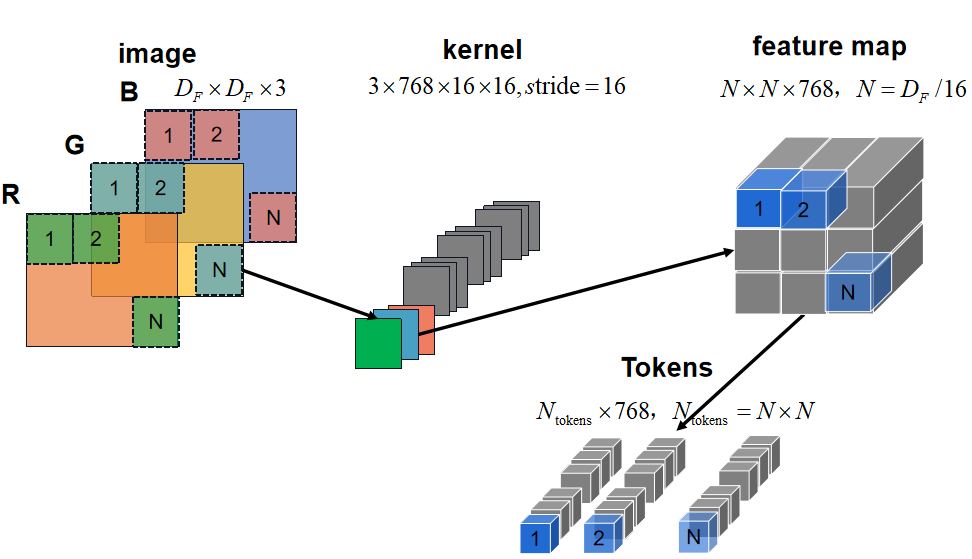
图像大小决定了patch的数量
class PatchEmbed(nn.Module):
    def __init__(
        self,
        kernel_size: Tuple[int, int] = (16, 16),    # 卷积核大小
        stride: Tuple[int, int] = (16, 16),         # 步长
        padding: Tuple[int, int] = (0, 0),          # padding
        in_chans: int = 3,                          # 输入channel
        embed_dim: int = 768,                       # 输出channel
    ) -> None:
        super().__init__()
        self.proj = nn.Conv2d(
            in_chans, embed_dim, kernel_size=kernel_size, stride=stride, padding=padding
        )
    def forward(self, x: torch.Tensor) -> torch.Tensor:
        x = self.proj(x)
        # B C H W -> B H W C
        x = x.permute(0, 2, 3, 1)
        return x
patch embedding过程在结构图中对应的部分:
positional embedding
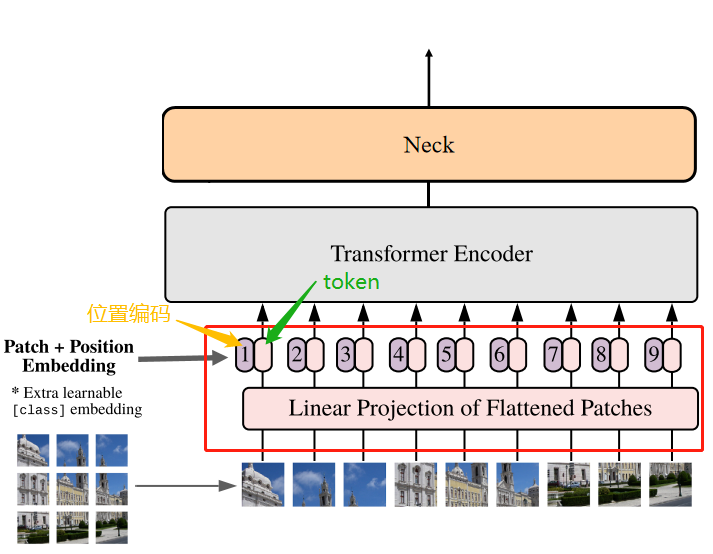
经过patch embedding后输出tokens需要加入位置编码,位置编码可以理解为一张map,map的行数与输入序列个数相同,每一行代表一个向量,向量的维度和输入序列tokens的维度相同,位置编码的操作是sum,所以维度依旧保持不变。
positional embedding结构如下图所示:
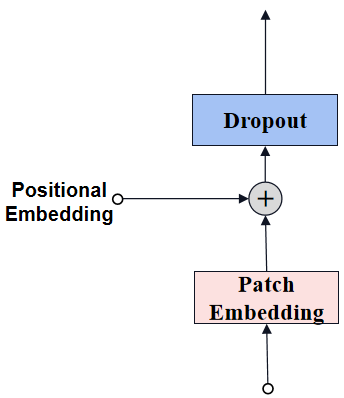
图像尺寸是1024的,因此patch数量是64(=1024/16)
# 在ImageEncoderViT的__init__定义
if use_abs_pos:
    # Initialize absolute positional embedding with pretrain image size.
    # 使用预训练图像大小初始化绝对位置嵌入。
    self.pos_embed = nn.Parameter(
        torch.zeros(1, img_size // patch_size, img_size // patch_size, embed_dim)
    )
# 在ImageEncoderViT的forward添加位置编码
if self.pos_embed is not None:
    x = x + self.pos_embed
注意这里不再需要类别编码,这类似于backbone网络不需要最后用于分类的全连接层。
positional embedding过程在结构图中对应的部分:
Transformer Encoder
Transformer Encoder多个重复堆叠Encoder Block组成。
# 在ImageEncoderViT的__init__定义
# -----Transformer Encoder-----
self.blocks = nn.ModuleList()
for i in range(depth):
    block = Block(
        dim=embed_dim,                  # 输入channel
        num_heads=num_heads,            # attention中head的个数
        mlp_ratio=mlp_ratio,            # mlp中channel缩放的比例
        qkv_bias=qkv_bias,              # qkv全连接层的偏置flag
        norm_layer=norm_layer,          # 归一化层
        act_layer=act_layer,            # 激活层
        use_rel_pos=use_rel_pos,        # 是否需要将相对位置嵌入添加到注意力图
        rel_pos_zero_init=rel_pos_zero_init,        # 源码暂时没有用到
        window_size=window_size if i not in global_attn_indexes else 0,      # attention中的窗口大小
        input_size=(img_size // patch_size, img_size // patch_size),         # 输入特征的尺寸
    )
    self.blocks.append(block)
# -----Transformer Encoder-----
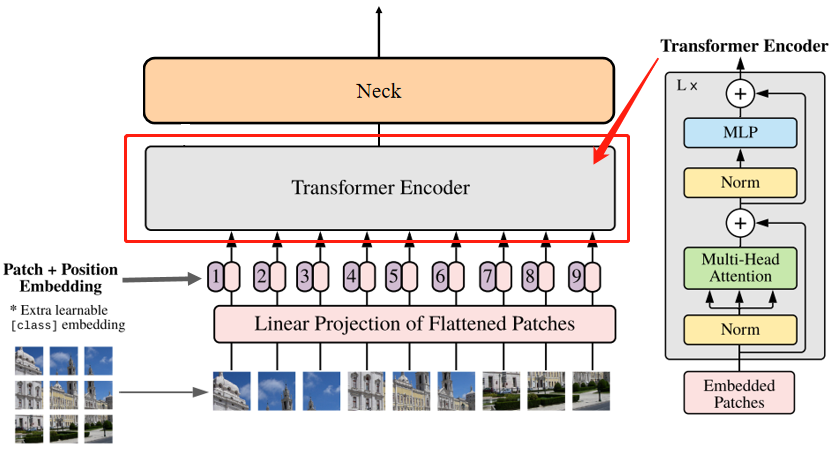
Transformer Encoder过程在结构图中对应的部分:
Encoder Block
Encoder Block从低到高由LayerNorm 、Multi-Head Attention和MLP构成。
class Block(nn.Module):
    def __init__(
        self,
        dim: int,                           # 输入channel
        num_heads: int,                     # attention中head的个数
        mlp_ratio: float = 4.0,             # mlp中channel缩放的比例
        qkv_bias: bool = True,              # qkv全连接层的偏置flag
        norm_layer: Type[nn.Module] = nn.LayerNorm,     # 归一化层
        act_layer: Type[nn.Module] = nn.GELU,           # 激活层
        use_rel_pos: bool = False,                      # 是否需要将相对位置嵌入添加到注意力图
        rel_pos_zero_init: bool = True,                 # 源码暂时没有用到
        window_size: int = 0,                           # attention中的窗口大小
        input_size: Optional[Tuple[int, int]] = None,   # 输入特征的尺寸
    ) -> None:
        super().__init__()
        self.norm1 = norm_layer(dim)         # 激活层
        self.attn = Attention(               # Multi-Head Attention
            dim,
            num_heads=num_heads,
            qkv_bias=qkv_bias,
            use_rel_pos=use_rel_pos,
            rel_pos_zero_init=rel_pos_zero_init,
            input_size=input_size if window_size == 0 else (window_size, window_size),
        )
        self.norm2 = norm_layer(dim)
        self.mlp = MLPBlock(embedding_dim=dim, mlp_dim=int(dim * mlp_ratio), act=act_layer)     # MLP
        self.window_size = window_size              #
    def forward(self, x: torch.Tensor) -> torch.Tensor:
        shortcut = x
        x = self.norm1(x)
        # Window partition 对X进行padding
        if self.window_size > 0:
            H, W = x.shape[1], x.shape[2]
            x, pad_hw = window_partition(x, self.window_size)
        x = self.attn(x)
        # Reverse window partition 去除X的padding部分
        if self.window_size > 0:
            x = window_unpartition(x, self.window_size, pad_hw, (H, W))
        x = shortcut + x
        x = x + self.mlp(self.norm2(x))
        return x
Partition操作
def window_partition(x: torch.Tensor, window_size: int) -> Tuple[torch.Tensor, Tuple[int, int]]:
    B, H, W, C = x.shape
    pad_h = (window_size - H % window_size) % window_size
    pad_w = (window_size - W % window_size) % window_size
    if pad_h > 0 or pad_w > 0:
        x = F.pad(x, (0, 0, 0, pad_w, 0, pad_h))
    Hp, Wp = H + pad_h, W + pad_w
    # B,Hp/S,S,Wp/S,S,C
    x = x.view(B, Hp // window_size, window_size, Wp // window_size, window_size, C)
    # B,Hp/S,Wp/S,S,S,C-->BHpWp/SS,S,S,C
    windows = x.permute(0, 1, 3, 2, 4, 5).contiguous().view(-1, window_size, window_size, C)
    return windows, (Hp, Wp)
Unpartition操作
def window_unpartition(
    windows: torch.Tensor, window_size: int, pad_hw: Tuple[int, int], hw: Tuple[int, int]
) -> torch.Tensor:
    Hp, Wp = pad_hw
    H, W = hw
    B = windows.shape[0] // (Hp * Wp // window_size // window_size)
    # BHpWp/SS,S,S,C-->B,Hp/S,Wp/S,S,S,C
    x = windows.view(B, Hp // window_size, Wp // window_size, window_size, window_size, -1)
    # B,Hp/S,Wp/S,S,S,C-->B,Hp,Wp,C
    x = x.permute(0, 1, 3, 2, 4, 5).contiguous().view(B, Hp, Wp, -1)
    if Hp > H or Wp > W:
        x = x[:, :H, :W, :].contiguous()
    # B,H,W,C
    return x
Encoder Block过程示意图,这里忽略了B(bacthsize):
Hp和Wp是S的整数倍

window_partition调整了原始特征尺寸为(H×W–>S×S),目的是了在后续的Multi-Head Attention过程中将相对位置嵌入添加到注意力图(attn),并不是所有Block都需要在注意力图中嵌入相对位置信息;window_unpartition则是恢复特征的原始尺寸(S×S–>H×W)。
Multi-Head Attention
这个模块代码不多,但是理解起来有一定的难度,我们先从Attention讲解,再到Multi-Head Attention,最后再讲注意力特征嵌入了相对位置特征的Multi-Head Attention。
class Attention(nn.Module):
    """Multi-head Attention block with relative position embeddings."""
    def __init__(
        self,
        dim: int,               # 输入channel
        num_heads: int = 8,     # head数目
        qkv_bias: bool = True,
        use_rel_pos: bool = False,
        rel_pos_zero_init: bool = True,
        input_size: Optional[Tuple[int, int]] = None,       # 嵌入相对位置注意力特征的尺寸
    ) -> None:
        super().__init__()
        self.num_heads = num_heads
        head_dim = dim // num_heads
        self.scale = head_dim**-0.5
        self.qkv = nn.Linear(dim, dim * 3, bias=qkv_bias)
        self.proj = nn.Linear(dim, dim)
        self.use_rel_pos = use_rel_pos
        if self.use_rel_pos:        # 使用相对位置编码
            assert (
                input_size is not None
            ), "Input size must be provided if using relative positional encoding."
            # initialize relative positional embeddings
            # 2S-1,Epos
            self.rel_pos_h = nn.Parameter(torch.zeros(2 * input_size[0] - 1, head_dim))
            self.rel_pos_w = nn.Parameter(torch.zeros(2 * input_size[1] - 1, head_dim))

    def forward(self, x: torch.Tensor) -> torch.Tensor:
        B, H, W, _ = x.shape
        # qkv with shape (3, B, nHead, H * W, C)
        qkv = self.qkv(x).reshape(B, H * W, 3, self.num_heads, -1).permute(2, 0, 3, 1, 4)
        # q, k, v with shape (B * nHead, H * W, C)
        q, k, v = qkv.reshape(3, B * self.num_heads, H * W, -1).unbind(0)
        # attn with shape (B * nHead, H * W,  H * W)
        attn = (q * self.scale) @ k.transpose(-2, -1)
        if self.use_rel_pos:
            # 假设use_rel_pos是true (H, W)是 S×S
            attn = add_decomposed_rel_pos(attn, q, self.rel_pos_h, self.rel_pos_w, (H, W), (H, W))
        attn = attn.softmax(dim=-1)
        x = (attn @ v).view(B, self.num_heads, H, W, -1).permute(0, 2, 3, 1, 4).reshape(B, H, W, -1)
        x = self.proj(x)
        return x
Attention结构如下图所示:

Attention中q、k和v的作用:
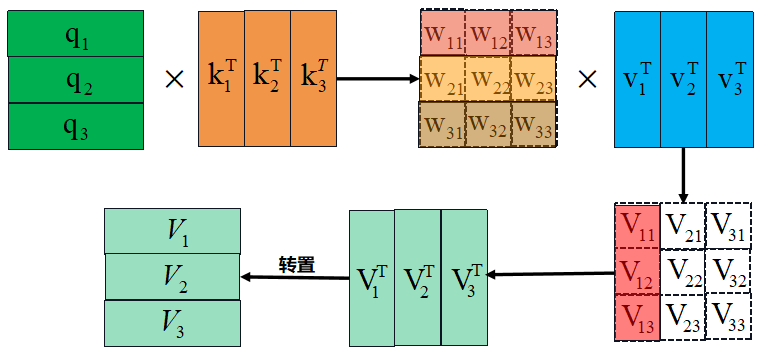
对于输入到Multi-head attention模块的特征 F(N×E) ,通过attention模块的nn.Linear进一步提取特征获得输出特征 v(value) 。为了考虑 N 个特征之间存在的亲疏和位置关系对于 v 的影响,所以需要一个额外 attn(attention) 或者理解为权重 w(weight) 对 v 进行加权操作,这引出了计算 w 所需的 q(query) 与 k(key) ,因此可以看到任何V都考虑了N 个token特征之间相互的影响。
Multi-head attention的流程如下图所示(不考虑batchsize):
- 首先将每个token的qkv特征维度embed_dim均拆分到每个head的上:
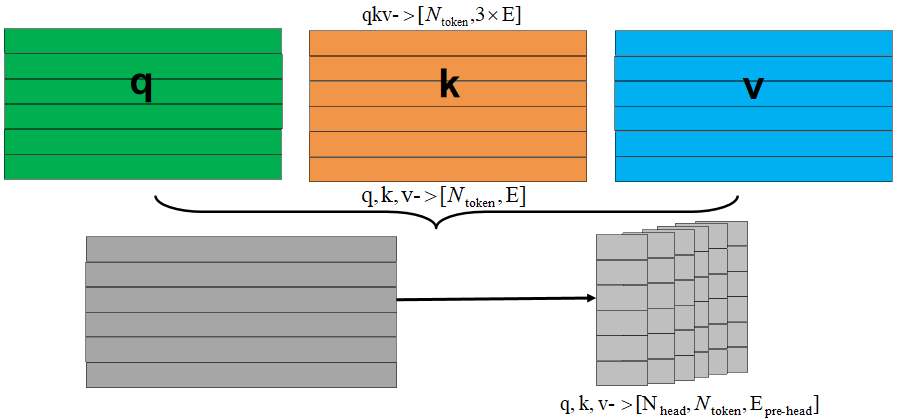
- 每个head分别通过q和k计算得到权重w,权重w和v得到输出output,合并所有head的output得到最终的output:

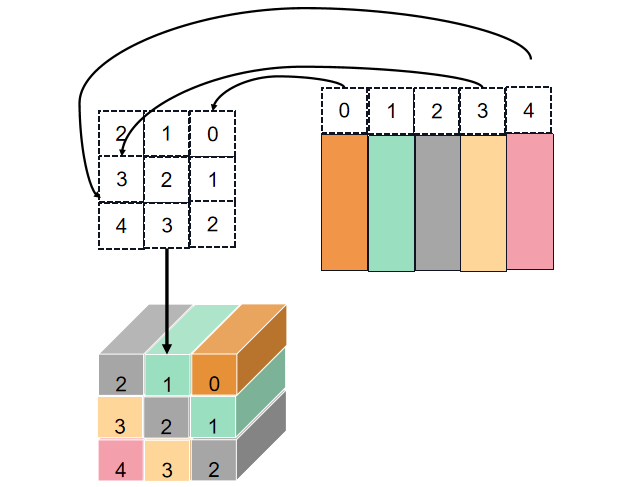
get_rel_pos用于计算h和w的相对位置的嵌入特征
def get_rel_pos(q_size: int, k_size: int, rel_pos: torch.Tensor) -> torch.Tensor:
    max_rel_dist = int(2 * max(q_size, k_size) - 1)
    # Interpolate rel pos if needed.
    if rel_pos.shape[0] != max_rel_dist:
        # Interpolate rel pos.  相关位置进行插值
        rel_pos_resized = F.interpolate(
            # 1,N,Ep --> 1,Ep,N --> 1,Ep,2S-1
            rel_pos.reshape(1, rel_pos.shape[0], -1).permute(0, 2, 1),
            size=max_rel_dist,
            mode="linear",
        )
        # Ep,2S-1 --> 2S-1,Ep
        rel_pos_resized = rel_pos_resized.reshape(-1, max_rel_dist).permute(1, 0)
    else:
        rel_pos_resized = rel_pos

    # Scale the coords with short length if shapes for q and k are different.
    # 如果q和k长度值不同,则用短边长度缩放坐标。
    q_coords = torch.arange(q_size)[:, None] * max(k_size / q_size, 1.0)
    k_coords = torch.arange(k_size)[None, :] * max(q_size / k_size, 1.0)
    # S,S
    relative_coords = (q_coords - k_coords) + (k_size - 1) * max(q_size / k_size, 1.0)

    # tensor索引是tensor时,即tensor1[tensor2]
    # 假设tensor2某个具体位置值是2,则tensor1[2]位置的tensor1切片替换tensor2中的2
    # tensor1->shape 5,5,3 tensor2->shape 2,2,3 tensor1切片->shape 5,3 tensor1[tensor2]->shape 2,2,3,5,3
    # tensor1->shape 5,5 tensor2->shape 3,2,3 tensor1切片->shape 5 tensor1[tensor2]->shape 3,2,3,5

    # 2S-1,Ep-->S,S,Ep
    return rel_pos_resized[relative_coords.long()]
get_rel_pos过程示意图:
add_decomposed_rel_pos为atten注意力特征添加相对位置的嵌入特征。
def add_decomposed_rel_pos(
    attn: torch.Tensor,
    q: torch.Tensor,
    rel_pos_h: torch.Tensor,
    rel_pos_w: torch.Tensor,
    q_size: Tuple[int, int],
    k_size: Tuple[int, int],
) -> torch.Tensor:
    # S,S
    q_h, q_w = q_size
    k_h, k_w = k_size
    # rel_pos_h -> 2S-1×Epos
    Rh = get_rel_pos(q_h, k_h, rel_pos_h)
    Rw = get_rel_pos(q_w, k_w, rel_pos_w)

    B, _, dim = q.shape
    r_q = q.reshape(B, q_h, q_w, dim)
    # torch.einsum用于简洁的表示乘积、点积、转置等方法
    rel_h = torch.einsum("bhwc,hkc->bhwk", r_q, Rh)
    rel_w = torch.einsum("bhwc,wkc->bhwk", r_q, Rw)
    attn = (
        attn.view(B, q_h, q_w, k_h, k_w) + rel_h[:, :, :, :, None] + rel_w[:, :, :, None, :]
    ).view(B, q_h * q_w, k_h * k_w)
    return attn
add_decomposed_rel_pos过程示意图:

Multi-Head Attention模块为注意力特征嵌入了相对位置特征(add_decomposed_rel_pos):

MLP
class MLPBlock(nn.Module):
    def __init__(
        self,
        embedding_dim: int,
        mlp_dim: int,
        act: Type[nn.Module] = nn.GELU,
    ) -> None:
        super().__init__()
        self.lin1 = nn.Linear(embedding_dim, mlp_dim)
        self.lin2 = nn.Linear(mlp_dim, embedding_dim)
        self.act = act()
    def forward(self, x: torch.Tensor) -> torch.Tensor:
        return self.lin2(self.act(self.lin1(x)))
Neck
# 在ImageEncoderViT的__init__定义
# -----Neck-----
self.neck = nn.Sequential(
    nn.Conv2d(
        embed_dim,
        out_chans,
        kernel_size=1,
        bias=False,
    ),
    LayerNorm2d(out_chans),
    nn.Conv2d(
        out_chans,
        out_chans,
        kernel_size=3,
        padding=1,
        bias=False,
    ),
    LayerNorm2d(out_chans),
)
# -----Neck-----
class LayerNorm2d(nn.Module):
    def __init__(self, num_channels: int, eps: float = 1e-6) -> None:
        super().__init__()
        self.weight = nn.Parameter(torch.ones(num_channels))
        self.bias = nn.Parameter(torch.zeros(num_channels))
        self.eps = eps

    def forward(self, x: torch.Tensor) -> torch.Tensor:
        u = x.mean(1, keepdim=True)                 # dim=1维度求均值并保留通道
        s = (x - u).pow(2).mean(1, keepdim=True)
        x = (x - u) / torch.sqrt(s + self.eps)
        x = self.weight[:, None, None] * x + self.bias[:, None, None]
        return x
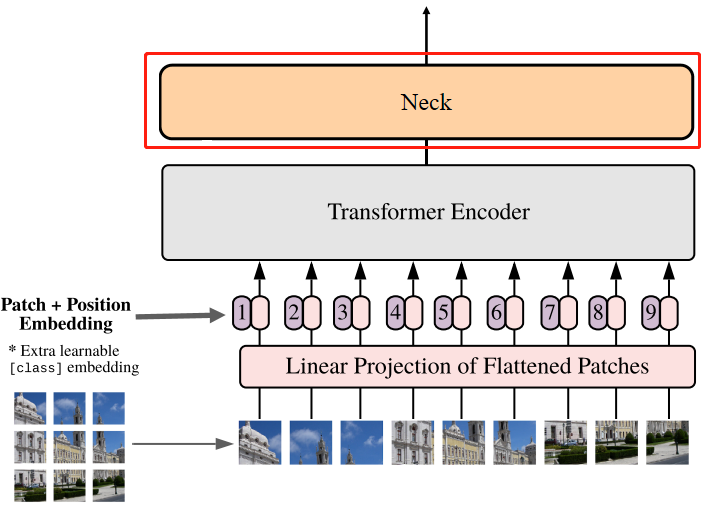
Neck过程在结构图中对应的部分:
总结
尽可能简单、详细的介绍SAM中Image encoder模块的Vision Transformer网络的代码。后续会讲解SAM的其他模块的代码。


