简介
原型模式(Prototype Pattern)是一种创建型设计模式,使你能够复制已有对象,而无需使代码依赖它们所属的类,同时又能保证性能。
这种模式是实现了一个原型接口,该接口用于创建当前对象的克隆。当直接创建对象的代价比较大时,则采用这种模式。
如果你需要复制一些对象,同时又希望代码独立于这些对象所属的具体类,可以使用原型模式。
作用
- 利用已有的一个原型对象,快速地生成和原型对象一样的实例。
- 跳过构造函数的约束,便于提升性能。
实现步骤
- 创建原型接口,并声明克隆方法。
- 使用new运算符调用原型版本的构造函数。
- 将子类构造函数的直接调用,替换为对原型工厂方法的调用。
UML
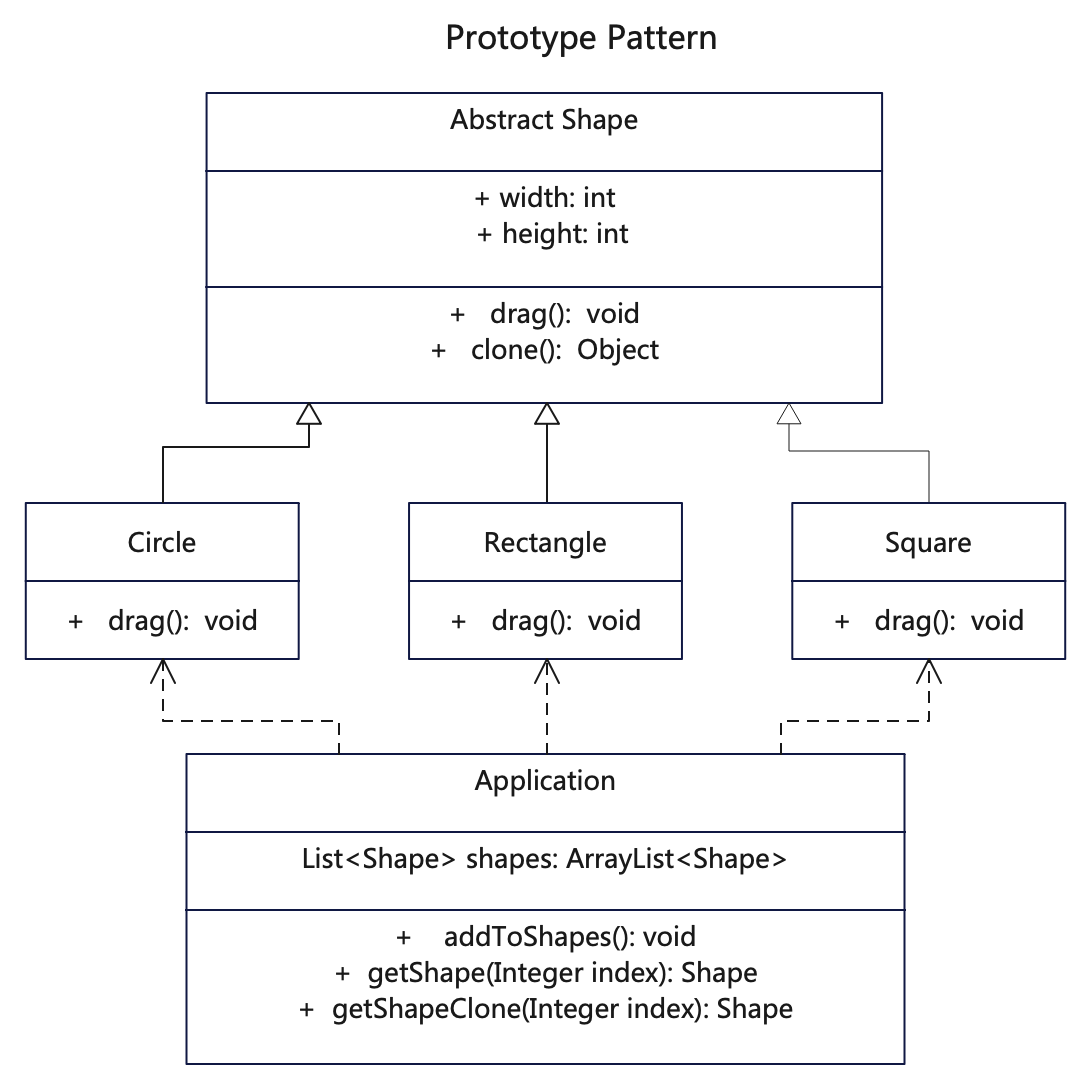
prototype-pattern.png
Java代码
基础原型抽象类
// Shape.java 基础抽象类
public abstract class Shape implements Cloneable {

  private int width;
  private int height;
  private String color = "";
  protected String type;

  public Shape() {

  }

  public String getType() {
    return type;
  }

  // 抽象方法,子类覆盖
  public abstract void draw();

  public void setWidth(int width) {
    this.width = width;
  }

  public int getWidth() {
    return this.width;
  }

  public int getHeight() {
    return this.height;
  }

  public void setHeight(int height) {
    this.height = height;
  }

  public void setColor(String color) {
    this.color = color;
  }

  public String getColor() {
    return this.color;
  }

  // 克隆方法
  public Object clone() {
    Object clone = null;
    try {
      clone = super.clone();
    } catch (CloneNotSupportedException e) {
      e.printStackTrace();
    }
    return clone;
  }

  @Override
  public String toString() {
    return String.format("{width = %s, height = %s, type = %s, color = %s }",
        this.width, this.height, this.type, this.color);
  }
}
具体原型者
// Circle.java 具体原型类,克隆方法会创建一个新对象并将其传递给构造函数。
public class Circle extends Shape {
  public Circle() {
    super();
    type = "Circle";
  }

  @Override
  public void draw() {
    System.out.println("Circle::draw() method.");
  }
}
// Rectangle.java 具体原型类,克隆方法会创建一个新对象并将其传递给构造函数。
public class Rectangle extends Shape {
  public Rectangle() {
    super();
    type = "Rectangle";
  }

  @Override
  public void draw() {
     System.out.println("Rectangle::draw() method.");
  }
}
// 具体原型类,克隆方法会创建一个新对象并将其传递给构造函数。
public class Square extends Shape {
  public Square() {
    super();
    type = "Square";
  }

  @Override
  public void draw() {
    System.out.println("Square::draw() method.");
  }
}
客户使用类
// Application.java 客户调用方
public class Application {

  public List<Shape> shapes = new ArrayList<Shape>();

  public Application() {
  }

  public void addToShapes() {
    Circle circle = new Circle();
    circle.setWidth(10);
    circle.setHeight(20);
    circle.setColor("red");
    shapes.add(circle);

    // 添加clone
    Circle anotherCircle = (Circle) circle.clone();
    anotherCircle.setColor("pink");
    shapes.add(anotherCircle);
    // 变量 `anotherCircle(另一个圆)`与 `circle(圆)`对象的内容完全一样。

    Rectangle rectangle = new Rectangle();
    rectangle.setWidth(99);
    rectangle.setHeight(69);
    rectangle.setColor("green");
    shapes.add(rectangle);
    // 添加clone
    shapes.add((Shape) rectangle.clone());
  }

  // 直接取出
  public Shape getShape(Integer index) {
    return this.shapes.get(index);
  }

  // 取出时候clone
  public Shape getShapeClone(Integer index) {
    Shape shape = this.shapes.get(index);
    return (Shape) shape.clone();
  }

  public void printShapes() {
    for (int i = 0; i < this.shapes.size(); i++) {
      Shape shape = this.shapes.get(i);
      System.out.println("shape " + i + " : " + shape.toString());
    }
  }

}
测试调用
    /**
     * 原型模式主要就是复制已有的对象,而无需实例化类,从而提升实例化对象时的性能
     * 其实就是复制实例的属性到新对象上,减少了执行构造的步骤
     */
    Application application = new Application();
    application.addToShapes();
    Shape shapeClone = application.getShapeClone(1);
    // 更改clone
    shapeClone.setColor("gray");
    System.out.println("shapeClone : " + shapeClone.toString());
    // 直接更改
    application.getShape(3).setColor("yellow");
    application.printShapes();

    // /*********************** 分割线 ******************************************/
    application.shapes.add(new Square());
    for (Shape shape : application.shapes) {
      shape.draw();
      System.out.println(shape.toString());
    }
C代码
基础原型抽象类
// func.h 基础头文件
#include <stdio.h>
#include <ctype.h>
#include <stdlib.h>
#include <stdbool.h>
#include <string.h>

typedef struct Shape shape;
typedef struct Circle circle;
typedef struct Rectangle rectangle;
typedef struct Square square;

// 定义了Shape作为基础接口,以便各形状有统一类型
typedef struct Shape
{
    char name[50];
    int width;
    int height;
    char color[50];
    char category[50];
    void (*draw)(struct Shape *shape);
    struct Shape *(*clone)(struct Shape *shape);
    char *(*to_string)(struct Shape *shape);
    void (*set_width)(struct Shape *shape, int width);
    int (*get_width)(struct Shape *shape);
    void (*set_height)(struct Shape *shape, int height);
    int (*get_height)(struct Shape *shape);
    void (*set_color)(struct Shape *shape, char *color);
    char *(*get_color)(struct Shape *shape);
    void (*set_category)(struct Shape *shape, char *category);
    char *(*get_category)(struct Shape *shape);
} Shape;
Shape *shape_constructor(char *name);

typedef struct Circle
{
    char name[50];
    int width;
    int height;
    char color[50];
    char category[50];
    void (*draw)(struct Circle *shape);
    struct Circle *(*clone)(struct Circle *shape);
    char *(*to_string)(struct Circle *shape);
    void (*set_width)(struct Circle *shape, int width);
    int (*get_width)(struct Circle *shape);
    void (*set_height)(struct Circle *shape, int height);
    int (*get_height)(struct Circle *shape);
    void (*set_color)(struct Circle *shape, char *color);
    char *(*get_color)(struct Circle *shape);
    void (*set_category)(struct Circle *shape, char *category);
    char *(*get_category)(struct Circle *shape);
} Circle;
Circle *circle_constructor(char *name);

typedef struct Square
{
    char name[50];
    int width;
    int height;
    char color[50];
    char category[50];
    void (*draw)(struct Square *shape);
    struct Square *(*clone)(struct Square *shape);
    char *(*to_string)(struct Square *shape);
    void (*set_width)(struct Square *shape, int width);
    int (*get_width)(struct Square *shape);
    void (*set_height)(struct Square *shape, int height);
    int (*get_height)(struct Square *shape);
    void (*set_color)(struct Square *shape, char *color);
    char *(*get_color)(struct Square *shape);
    void (*set_category)(struct Square *shape, char *category);
    char *(*get_category)(struct Square *shape);
} Square;
Square *square_constructor(char *name);

typedef struct Rectangle
{
    char name[50];
    int width;
    int height;
    char color[50];
    char category[50];
    void (*draw)(struct Rectangle *shape);
    struct Rectangle *(*clone)(struct Rectangle *shape);
    char *(*string)(struct Rectangle *shape);
    void (*set_width)(struct Rectangle *shape, int width);
    int *(*get_width)(struct Rectangle *shape);
    void (*set_height)(struct Rectangle *shape, int height);
    int *(*get_height)(struct Rectangle *shape);
    void (*set_color)(struct Rectangle *shape, char *color);
    char *(*get_color)(struct Rectangle *shape);
    void (*set_category)(struct Rectangle *shape, char *category);
    char *(*get_category)(struct Rectangle *shape);
} Rectangle;
Rectangle *rectangle_constructor(char *name);

// 调用客户端
typedef struct Application
{
    struct Shape **shapes;
    int shapes_length;
    void (*add_to_shapes)(struct Application *app);
    void (*add_shape)(struct Application *app, Shape *shape);
    Shape *(*get_shape)(struct Application *app, int index);
    Shape **(*get_shapes)(struct Application *app);
    Shape *(*get_shape_clone)(struct Application *app, int index);
    void (*print_shapes)(struct Application *app);
} Application;
Application *application_constructor();
// shape.c 基础类,供各种具体形状复用
#include "func.h"

// shape基础抽象类,供子类继承覆盖
// C没有抽象和继承,此处作为公共类存在
void shape_draw(Shape *shape)
{
  printf("\r\n Shape::draw()");
}

void shape_set_width(Shape *shape, int width)
{
  shape->width = width;
}

int shape_get_width(Shape *shape)
{
  return shape->width;
}

int shape_get_height(Shape *shape)
{
  return shape->height;
}

void shape_set_height(Shape *shape, int height)
{
  shape->height = height;
}

void shape_set_color(Shape *shape, char *color)
{
  strncpy(shape->color, color, 50);
}

char *shape_get_color(Shape *shape)
{
  return shape->color;
}

void shape_set_category(Shape *shape, char *category)
{
  strncpy(shape->category, category, 50);
}

char *shape_get_category(Shape *shape)
{
  return shape->category;
}

char *shape_to_string(Shape *shape)
{
  static char result[1024];
  sprintf(result, "[name = %s width = %d, height = %d, category = %s, color = %s]",
          shape->name, shape->width, shape->height, shape->category, shape->color);
  return result;
}

// 将指针指向同一内存的方式来实现clone
Shape *shape_clone(Shape *shape)
{
  Shape *copy = (Shape *)malloc(sizeof(Shape));
  memcpy(copy, shape, sizeof(Shape));
  strcat(copy->name, "(clone)");
  // printf("\r\n shape_clone: %s", copy->to_string(copy));
  return copy;
}

// 定义简单结构体,复制基本属性和draw函数
Shape *shape_clone2(Shape *shape)
{
  struct Shape copy = {
      .width = shape->width,
      .height = shape->height,
  };
  strcpy(copy.name, shape->name);
  strcat(copy.name, "[clone]");
  strcpy(copy.color, shape->color);
  strcpy(copy.category, shape->category);
  Shape *shape_copy = ©
  shape_copy->draw = shape->draw;
  // printf("\r\n shape_clone: %s", shape->to_string(shape_copy));
  return shape_copy;
}

Shape *shape_constructor(char *name)
{
  printf("\r\n shape_constructor() [构建Shape]");
  Shape *shape = (Shape *)malloc(sizeof(Shape));
  strncpy(shape->name, name, 50);
  shape->draw = &shape_draw;
  shape->clone = &shape_clone;
  shape->to_string = &shape_to_string;
  shape->set_width = &shape_set_width;
  shape->get_width = &shape_get_width;
  shape->set_height = &shape_set_height;
  shape->get_height = &shape_get_height;
  shape->set_color = &shape_set_color;
  shape->get_color = &shape_get_color;
  shape->set_category = &shape_set_category;
  shape->get_category = &shape_get_category;
  return shape;
}
具体原型者
// circle.c 具体原型类,复用父类方法,实现自己的draw函数。
#include "func.h"

// 重新定义draw函数
void circle_draw(Circle *shape)
{
  printf("\r\n Circle::draw()");
}

Circle *circle_constructor(char *name)
{
  printf("\r\n shape_constructor() [构建Circle]");
  Shape *shape = (Shape *)shape_constructor(name);
  Circle *circle = (Circle *)shape;
  circle->draw = &circle_draw;
  return circle;
}
// rectangle.c 具体原型类,复用父类方法,实现自己的draw函数。
#include "func.h"

// 重新定义draw函数
void rectangle_draw(Rectangle *shape)
{
  printf("\r\n Rectangle::draw()");
}

Rectangle *rectangle_constructor(char *name)
{
  printf("\r\n shape_constructor() [构建Rectangle]");
  Shape *shape = (Shape *)shape_constructor(name);
  Rectangle *rectangle = (Rectangle *)shape;
  rectangle->draw = &rectangle_draw;
  return rectangle;
}
// square.c 具体原型类,复用父类方法,实现自己的draw函数。
#include "func.h"

// 重新定义draw函数
void square_draw(Square *shape)
{
  printf("\r\n Square::draw()");
}

Square *square_constructor(char *name)
{
  printf("\r\n shape_constructor() [构建Square]");
  Shape *shape = (Shape *)shape_constructor(name);
  Square *square = (Square *)shape;
  square->draw = &square_draw;
  return square;
}
客户使用类
// application.c 客户调用方
#include "func.h"

void app_add_to_shapes(Application *app)
{
  Circle *circle = circle_constructor("circle");
  circle->set_category(circle, "Circle");
  circle->set_width(circle, 10);
  circle->set_height(circle, 20);
  circle->set_color(circle, "red");
  app->add_shape(app, (Shape *)circle);

  // 添加Clone
  Circle *another_circle = circle->clone(circle);
  another_circle->set_color(another_circle, "pink");
  app->add_shape(app, (Shape *)another_circle);
  // 变量 `another_circle(另一个圆)`与 `circle(圆)`对象的内容完全一样。

  Rectangle *rectangle = rectangle_constructor("rectangle");
  rectangle->set_category(rectangle, "Rectangle");
  rectangle->set_width(rectangle, 99);
  rectangle->set_height(rectangle, 69);
  rectangle->set_color(rectangle, "green");
  app->add_shape(app, (Shape *)rectangle);
  // 再添加一个clone
  app->add_shape(app, (Shape *)rectangle->clone(rectangle));
}

void app_add_shape(Application *app, Shape *shape)
{
  app->shapes_length += 1;
  Shape **new_shapes = (Shape **)calloc(app->shapes_length, sizeof(Shape));
  // 复制原有数组,并追加新内容到新数组
  for (int i = 0; i < app->shapes_length - 1; i++)
  {
    new_shapes[i] = app->shapes[i];
  }
  new_shapes[app->shapes_length - 1] = shape;
  free(app->shapes);
  // 指向新数组
  app->shapes = new_shapes;
}

Shape *app_get_shape(Application *app, int index)
{
  return app->shapes[index];
}

Shape **app_get_shapes(Application *app)
{
  return app->shapes;
}

Shape *app_get_shape_clone(Application *app, int index)
{
  Shape *shape = app->shapes[index];
  if (shape != NULL)
  {
    return shape->clone(shape);
  }
  return NULL;
}

void app_print_shapes(Application *app)
{
  for (int i = 0; i < app->shapes_length; i++)
  {
    Shape *shape = app->shapes[i];
    printf("\r\n shape%d: %s", i, shape->to_string(shape));
  }
}

// 给观察者绑定主题,同时把观察者添加到主题列表
Application *application_constructor()
{
  printf("\r\n application_constructor() [构建Application]");
  Application *app = (Application *)malloc(sizeof(Application));
  app->shapes_length = 0;
  app->shapes = (Shape **)calloc(app->shapes_length, sizeof(Shape));
  app->add_to_shapes = &app_add_to_shapes;
  app->add_shape = &app_add_shape;
  app->get_shape = &app_get_shape;
  app->get_shapes = &app_get_shapes;
  app->get_shape_clone = &app_get_shape_clone;
  app->print_shapes = &app_print_shapes;
  return app;
}
测试调用
#include "../src/func.h"

int main(void)
{
  printf("test start:\r\n");
  /**
   * 原型模式主要就是复制已有的对象,而无需实例化类,从而提升实例化对象时的性能
   * 其实就是复制实例的属性到新对象上,减少了执行构造的步骤。
   */
  Application *application = application_constructor();
  application->add_to_shapes(application);
  Shape *shape_clone = application->get_shape_clone(application, 0);
  // SetColor需要接口中定义
  shape_clone->set_color(shape_clone, "gray");
  printf("\r\n shape_clone : %s", shape_clone->to_string(shape_clone));
  // 直接更改
  // application->get_shape(application, 3)->set_color(application->get_shape(application, 3), "yellow");
  application->print_shapes(application);

  /*********************** 分割线 ******************************************/
  // 追加一个Squre实例,相关属性为空
  application->add_shape(application, (Shape *)square_constructor("square"));
  // 打不打印查看结果

  for (int i = 0; i < application->shapes_length; i++)
  {
    Shape *shape = application->shapes[i];
    shape->draw(shape);
    printf("\r\n shape_%d %s", i, shape->to_string(shape));
  }
}
更多语言版本
不同语言实现设计模式:https://github.com/microwind/design-pattern


