一、准备工作
1.安装node
2.idea 旗舰版**
idea**教程
上述教程中的idea**工具
3.安装mysql任意版本
mysql
4.安装mysql workbench(没用上)
5.安装navicate
参考文章:百度-从小白到架构(作者)-Navicat16** Navicat最新版**教程「永久,亲测有效」
navicate16**工具-百度网盘下载
6.安装postman
postman下载
可能需要新建一个工作区后,点下图中圈内的加号,即可使用postman

7.jdk17(根据springboot的版本的需要)
jdk17-installer
二、Vue前端
强推这两篇博文作为参考:
参考博文-CSDN-Joshua_HIT(作者)-零基础Vue入门学习记录(1)
参考博文-CSDN-Joshua_HIT(作者)-零基础Vue入门学习记录(2)
(一)Vue配置:
# npm换源,加速安装过程 !!!重要重要
npm config set registry http://registry.npm.taobao.org

# 如果需要安装vue3,把下面语句中的2删掉就行
npm install vue2 -g

npm install @vue/cli -g
npm i -g @vue/cli-init
创建一个项目
# 注意项目名称不能有大写字母
vue init webpack preject_name
# 我这里
cd preject_name
npm install
# 前后端通信用到的库
Vue add axios
npm run dev
(二)前后端通信
1.新建一个页面
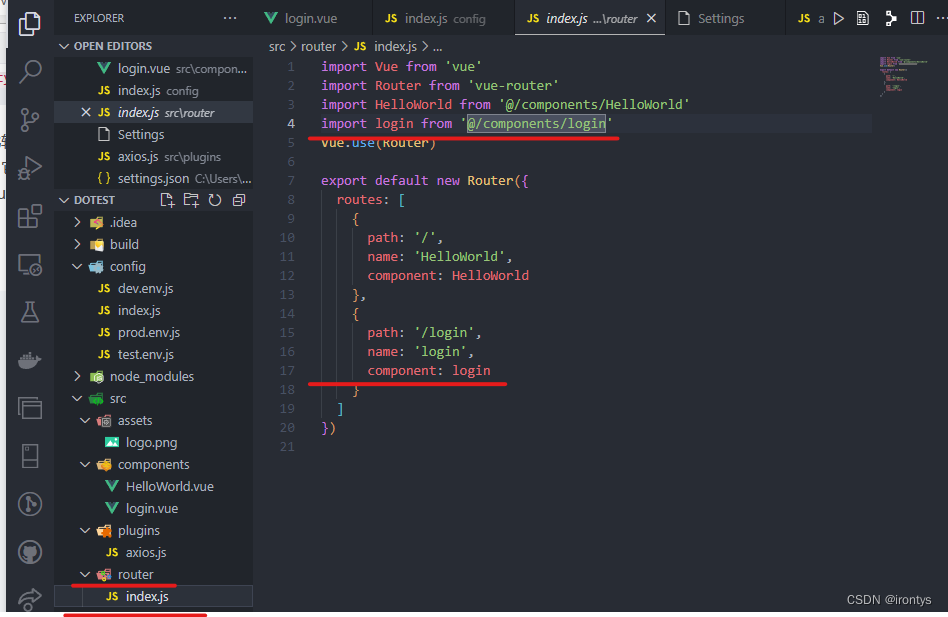
import Vue from 'vue'
import Router from 'vue-router'
import HelloWorld from '@/components/HelloWorld'
import login from '@/components/login'
Vue.use(Router)

export default new Router({
  routes: [
    {
      path: '/',
      name: 'HelloWorld',
      component: HelloWorld
    },
    {
      path: '/login',
      name: 'login',
      component: login
    }
  ]
})
2.login页面
<template>
  <div>
    <h1>show me something different</h1>
    <input type="text" v-model="inputText.id" placeholder="请输入学生ID">
    <br>
    <input type="text" v-model="inputText.name" placeholder="请输入学生姓名">
    <br>
    <input type="text" v-model="inputText.benValue" placeholder="请输入学生笨蛋值">
      <br>
    <button @click="sendRequest">向数据库写入学生信息</button>
    <br>
    <button @click="showData">获取数据库中学生信息</button>
    <p v-if="students.length > 0">获取到的学生数据:</p>
    <ul>
      <li v-for="student in students" >{{ student.id}} -{{ student.name }} -笨蛋值: {{ student.benValue }}</li>
    </ul>
  </div>
</template>
<script>
import axios from 'axios'
export default {
  name: 'login',
  data() {
    return {
      inputText: {
        id: '',
        name: '',
        benValue: ''
      },
      students: []
    }
  },
  methods: {
    sendRequest() {

      if(this.inputText.id == '' || this.inputText.name == '' || this.inputText.benValue == '' )
      {
        alert('请填写完整信息')
        return;
      }
      axios.post('http://127.0.0.1:8022/insertStudent', { id: this.inputText.id, name:this.inputText.name, benValue: parseInt(this.inputText.benValue) })
        .then(response => {
          this.inputText = ''
          console.log(response.data)
          alert('发送成功')
        })
        .catch(error => {
          console.log(error)
        })
    },
    showData() {
      axios.get('http://127.0.0.1:8022/getStudentInfo')
        .then(response => {
          this.students = response.data
          console.log(this.students)
        })
        .catch(error => {
          console.log(error)
        })
    }
  }
}
</script>
<style scoped></style>
二、后端配置
(一)环境搭建:
参考博文:CSDN-kong清空(作者)-十分钟快速入门Springboot(入门级)
基本上按照上述博文的内容进行操作,有些注意事项:
1.
经尝试sdk版本选择jdk17、springboot版本使用3.0.5/3.0.6可以。
jdk17-installer
2.
navicat建表的操作:
3.
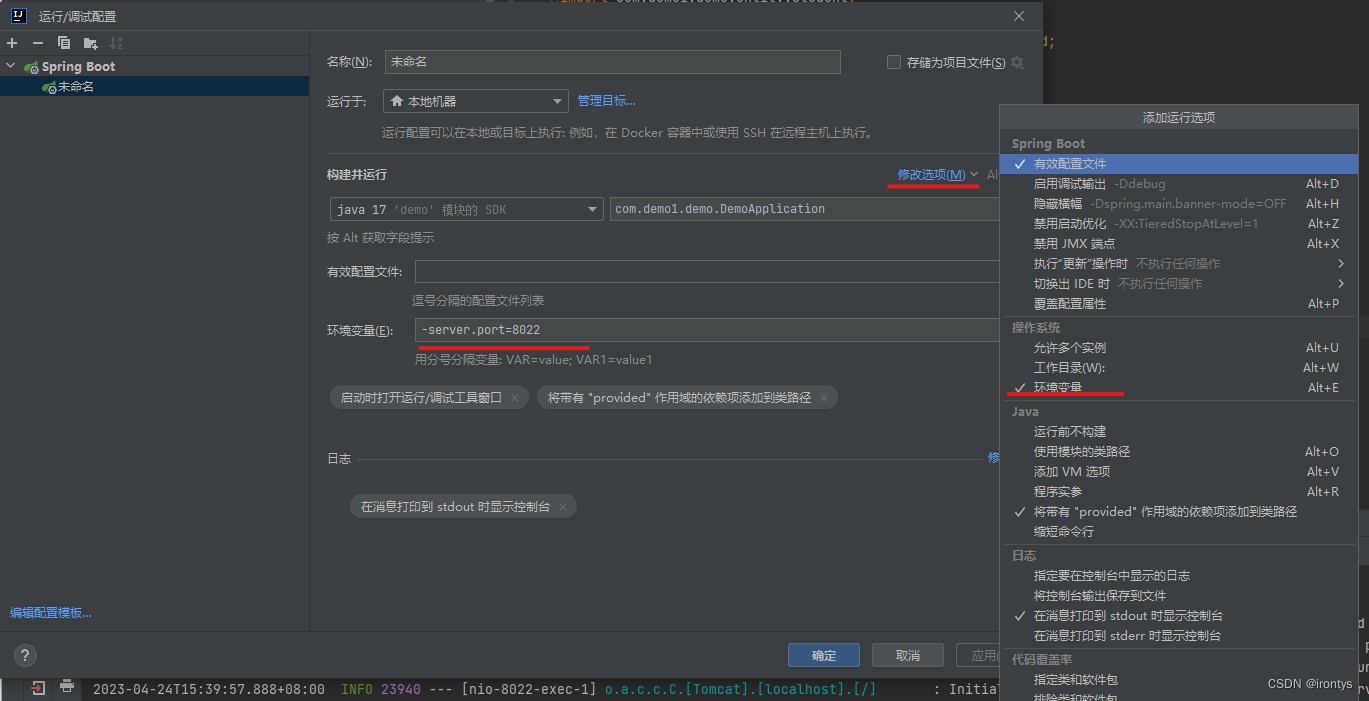
修改端口:

(二)前后端通信:
在上述提到的参考的教程基础上:参考博文:CSDN-kong清空(作者)-十分钟快速入门Springboot(入门级)
本文的springboot侧的代码如下:(student类的设计与参考教程不一样)
1.com.demo1.demo.entity.Student.java
package com.demo1.demo.entity;

public class Student {
    private  String id;
    private String name;
    private int benValue;
    public String getId(){
        return id;
    }
    public void setId(String id){
        this.id = id;
    }
    public String getName(){
        return name;
    }
    public void setName(String name){
        this.name = name;
    }
    public int getBenValue(){
        return benValue;
    }
    public void setBenValue(int benValue){
        this.benValue = benValue;
    }
    public Student(String id, String name, int benValue){
        this.id = id;
        this.name = name;
        this.benValue = benValue;
    }
}
2.com.demo1.demo.contoller.StudentController.java
package com.demo1.demo.controller;

import com.demo1.demo.entity.Student;
import com.demo1.demo.service.StudentService;
import org.springframework.beans.factory.annotation.Autowired;
import org.springframework.web.bind.annotation.*;
import java.util.List;
@RestController
public class StudentController {
    @Autowired
    private StudentService studentService;

    @RequestMapping(value="/getStudentInfo", method = {RequestMethod.GET, RequestMethod.POST})
    public List<Student> getStudent(){
        return studentService.findAll();
    }

    @PostMapping("/insertStudent")
    public void insertStudent(@RequestBody Student student){
        studentService.insert(student);
    }
}
3.com/demo1/demo/service/StudentService.java
package com.demo1.demo.service;

import com.demo1.demo.entity.Student;
import com.demo1.demo.mapper.StudentMapper;
import org.springframework.beans.factory.annotation.Autowired;
import org.springframework.stereotype.Service;

import java.util.List;

@Service
public class StudentService {

    @Autowired
    private StudentMapper studentMapper;

    public List<Student>findAll(){
        return studentMapper.findAll();
    }

    public void insert(Student new_student) {studentMapper.insert(new_student);}

}
4.com/demo1/demo/mapper/StudentMapper.java
package com.demo1.demo.mapper;

import com.demo1.demo.entity.Student;
import org.apache.ibatis.annotations.Mapper;
import java.util.List;

@Mapper
public interface StudentMapper {

    List<Student>findAll();
    int insert(Student student);
}
5.com/demo1/demo/config/corsConfig.java(跨域通信)
参考博文:CSDN-深情不及里子(作者)-Springboot+Vue实现简单的前端后分离数据交互
在博文的2.1.5节
package com.demo1.demo.config;

import org.springframework.context.annotation.Bean;
import org.springframework.context.annotation.Configuration;
import org.springframework.web.cors.CorsConfiguration;
import org.springframework.web.cors.UrlBasedCorsConfigurationSource;
import org.springframework.web.filter.CorsFilter;

/**
 * @author young
 * @date 2022/8/23 17:33
 * @description: 跨域配置
 */
@Configuration
public class corsConfig {
    /**
     * 最大有效时长
     */
    private static final  long MAX_TIMEOUT=24*60*60;
    @Bean
    public CorsConfiguration corsConfiguration(){
        CorsConfiguration corsConfiguration = new CorsConfiguration();
        corsConfiguration.setMaxAge(MAX_TIMEOUT);
        //设置访问源请求头
        corsConfiguration.addAllowedHeader("*");
        //设置访问源地址
        corsConfiguration.addAllowedOrigin("*");
        //设置访问源请求方法
        corsConfiguration.addAllowedMethod("*");
        return corsConfiguration;
    }

    /**
     * 设置跨域配置
     * @return
     */
    @Bean
    public CorsFilter corsFilter(){
        UrlBasedCorsConfigurationSource source = new UrlBasedCorsConfigurationSource();
        source.registerCorsConfiguration("/**",corsConfiguration());
        return new CorsFilter(source);
    }
}
6.StudentMapper.xml
<?xml version="1.0" encoding="UTF-8" ?>
<!DOCTYPE mapper
        PUBLIC "-//mybatis.org//DTD Mapper 3.0//EN"
        "http://mybatis.org/dtd/mybatis-3-mapper.dtd">
<mapper namespace="com.demo1.demo.mapper.StudentMapper">
    <select id="findAll" resultType="com.demo1.demo.entity.Student">
        SELECT * FROM student
    </select>
    <insert id="insert" parameterType="com.demo1.demo.entity.Student">
        INSERT INTO student(id, name, benValue) VALUES (#{id}, #{name},  #{benValue})
            ON DUPLICATE KEY UPDATE id = id
    </insert>
</mapper>
数据库中内容如下图所示,有个需要特别注意的地方:id、name、benValue的相对位置,与Student类中的声明顺序最好一致(非必要)