目录
一、概述
二、驱动程序
2.1debug串口
2.2体重传感器HX711
2.3滴答定时器
2.4ESP8266
2.5人体检测
2.6 IIC的GPIO
2.7 OLED的IIC
2.8 LED
三、应用
四、中断
一、概述
使用STM32C8T6作为主控
A9		--->	tx(调试串口)
A10		--->    rx
A6		--->	SCK(体重)
A7		--->	DOUT(体重)
A2		--->	tx
A3		--->    rx
B3      --->    wifi reset
C14     --->    人体感应
A5		--->	SCL	(OLED)
A4		--->	SDA
C13		--->	LED1
B0		--->	key1(进站)
B1		--->	key2(出站)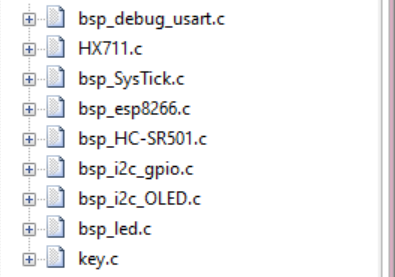
用串口一进行打印调试
串口二和ESP01s进行通信连接服务器。
A6和A7用模拟IIC的方式和HX711通信,采集压力传感器,看看是否有人在上面,配合C14管脚的HC-SR501,当两个条件都满足证明有人经过地铁站的检测门。
A4A5是软件IIC和OLED进行通信。
二、驱动程序
2.1debug串口
#include "bsp/usart/bsp_debug_usart.h"

/* 私有类型定义 --------------------------------------------------------------*/
/* 私有宏定义 ----------------------------------------------------------------*/
/* 私有变量 ------------------------------------------------------------------*/
/* 扩展变量 ------------------------------------------------------------------*/
/* 私有函数原形 --------------------------------------------------------------*/
/* 函数体 --------------------------------------------------------------------*/

/**
  * 函数功能: 板载调试串口参数配置.
  * 输入参数: 无
  * 返 回 值: 无
  * 说    明:使用宏定义方法代替具体引脚号,方便程序移植,只要简单修改bsp_led.h
  *           文件相关宏定义就可以方便修改引脚。
  */
void DEBUG_USART_Init(void)
{
  /* 定义IO硬件初始化结构体变量 */
  GPIO_InitTypeDef GPIO_InitStructure;
  /* 定义USART初始化结构体变量 */
	USART_InitTypeDef USART_InitStructure;
  /* 使能USART时钟 */
  DEBUG_USARTx_ClockCmd(DEBUG_USARTx_CLK,ENABLE);
  /* 使能USART功能GPIO时钟 */
  DEBUG_USARTx_GPIO_ClockCmd(DEBUG_USARTx_TX_CLK | DEBUG_USARTx_RX_CLK | RCC_APB2Periph_AFIO,ENABLE);

	/* 调试USART功能GPIO初始化 */
	/* 设定USART发送对应IO编号 */
	GPIO_InitStructure.GPIO_Pin =  DEBUG_USARTx_TX_PIN;
  /* 设定USART发送对应IO模式:复用推挽输出 */
	GPIO_InitStructure.GPIO_Mode = GPIO_Mode_AF_PP;
  /* 设定USART发送对应IO最大操作速度 :GPIO_Speed_50MHz */
	GPIO_InitStructure.GPIO_Speed = GPIO_Speed_50MHz;
  /* 初始化USART发送对应IO */
	GPIO_Init(DEBUG_USARTx_TX_PORT, &GPIO_InitStructure);

	/* 设定USART接收对应IO编号 */
	GPIO_InitStructure.GPIO_Pin = DEBUG_USARTx_RX_PIN;
  /* 设定USART发送对应IO模式:浮空输入 */
	GPIO_InitStructure.GPIO_Mode = GPIO_Mode_IN_FLOATING;
  /* 其他没有重新赋值的成员使用与串口发送相同配置 */
  /* 初始化USART接收对应IO */
	GPIO_Init(DEBUG_USARTx_RX_PORT, &GPIO_InitStructure);

	/* USART工作环境配置 */
  /* USART波特率:115200 */
	USART_InitStructure.USART_BaudRate = DEBUG_USARTx_BAUDRATE;
  /* USART字长(有效位):8位 */
	USART_InitStructure.USART_WordLength = USART_WordLength_8b;
  /* USART停止位:1位 */
	USART_InitStructure.USART_StopBits = USART_StopBits_1;
  /* USART校验位:无 */
	USART_InitStructure.USART_Parity = USART_Parity_No ;
  /* USART硬件数据流控制(硬件信号控制传输停止):无 */
	USART_InitStructure.USART_HardwareFlowControl = USART_HardwareFlowControl_None;
	/* USART工作模式使能:允许接收和发送 */
  USART_InitStructure.USART_Mode = USART_Mode_Rx | USART_Mode_Tx;
  /* 初始化USART */
	USART_Init(DEBUG_USARTx, &USART_InitStructure);

  /* 使能USART */
	USART_Cmd(DEBUG_USARTx, ENABLE);

}

/**
  * 函数功能: 重定向c库函数printf到USARTx
  * 输入参数: 无
  * 返 回 值: 无
  * 说    明:无
  */
int fputc(int ch, FILE *f)
{
  /* 发送一个字节数据到调试串口 */
  USART_SendData(DEBUG_USARTx, (uint8_t) ch);

  /* 等待串口数据发送完毕 */
  while (USART_GetFlagStatus(DEBUG_USARTx, USART_FLAG_TXE) == RESET);

  return (ch);
}

/**
  * 函数功能: 重定向c库函数getchar,scanf到USARTx
  * 输入参数: 无
  * 返 回 值: 无
  * 说    明:无
  */
int fgetc(FILE *f)
{
  /* 等待串口输入数据 */
  while (USART_GetFlagStatus(DEBUG_USARTx, USART_FLAG_RXNE) == RESET);

  return (int)USART_ReceiveData(DEBUG_USARTx);
}
就是一个简单的串口
2.2体重传感器HX711
#include "bsp/HX711/HX711.h"
#include "bsp/systick/bsp_SysTick.h"

u32 HX711_Buffer;
u32 Weight_Maopi;
s32 Weight_Shiwu;
u8 Flag_Error = 0;

//校准参数
//因为不同的传感器特性曲线不是很一致,因此,每一个传感器需要矫正这里这个参数才能使测量值很准确。
//当发现测试出来的重量偏大时,增加该数值。
//如果测试出来的重量偏小时,减小改数值。
//该值可以为小数
#define GapValue 106.5


void Init_HX711pin(void)
{
	GPIO_InitTypeDef GPIO_InitStructure;
	RCC_APB2PeriphClockCmd(RCC_APB2Periph_GPIOA, ENABLE);	 //使能PF端口时钟

	//HX711_SCK
	GPIO_InitStructure.GPIO_Pin = GPIO_Pin_6;				 // 端口配置
	GPIO_InitStructure.GPIO_Mode = GPIO_Mode_Out_PP; 		 //推挽输出
	GPIO_InitStructure.GPIO_Speed = GPIO_Speed_50MHz;		 //IO口速度为50MHz
	GPIO_Init(GPIOA, &GPIO_InitStructure);					 //根据设定参数初始化GPIOB

	//HX711_DOUT
    GPIO_InitStructure.GPIO_Pin = GPIO_Pin_7;
    GPIO_InitStructure.GPIO_Mode = GPIO_Mode_IPU;//输入上拉
    GPIO_Init(GPIOA, &GPIO_InitStructure);

	GPIO_SetBits(GPIOA,GPIO_Pin_6);					//初始化设置为0
}


//****************************************************
//读取HX711
//****************************************************
u32 HX711_Read(void)	//增益128
{
	unsigned long count;
	unsigned char i;
  	GPIO_SetBits(GPIOA,GPIO_Pin_7);
	Delay_us(1);
  	GPIO_ResetBits(GPIOA,GPIO_Pin_6);
  	count=0;
  	while(GPIO_ReadInputDataBit(GPIOA,GPIO_Pin_7));
  	for(i=0;i<24;i++)
	{
	  	GPIO_SetBits(GPIOA,GPIO_Pin_6);
	  	count=count<<1;
		Delay_us(1);
		GPIO_ResetBits(GPIOA,GPIO_Pin_6);
	  	if(GPIO_ReadInputDataBit(GPIOA,GPIO_Pin_7))
			count++;
		Delay_us(1);
	}
 	GPIO_SetBits(GPIOA,GPIO_Pin_6);
    count=count^0x800000;//第25个脉冲下降沿来时,转换数据
	Delay_us(1);
	GPIO_ResetBits(GPIOA,GPIO_Pin_6);
	return(count);
}

//****************************************************
//获取毛皮重量
//****************************************************
void Get_Maopi(void)
{
	Weight_Maopi = HX711_Read();
}

//****************************************************
//称重
//****************************************************
void Get_Weight(void)
{
	HX711_Buffer = HX711_Read();
	if(HX711_Buffer > Weight_Maopi)
	{
		Weight_Shiwu = HX711_Buffer;
		Weight_Shiwu = Weight_Shiwu - Weight_Maopi;				//获取实物的AD采样数值。

		Weight_Shiwu = (s32)((float)Weight_Shiwu/GapValue); 	//计算实物的实际重量
																		//因为不同的传感器特性曲线不一样,因此,每一个传感器需要矫正这里的GapValue这个除数。
																		//当发现测试出来的重量偏大时,增加该数值。
																		//如果测试出来的重量偏小时,减小改数值。
	}


}
我手搓的,参考它给的51程序,还好大一学了一年51.
2.3滴答定时器
/* 包含头文件 ----------------------------------------------------------------*/
#include "bsp/systick/bsp_SysTick.h"

/* 私有类型定义 --------------------------------------------------------------*/
/* 私有宏定义 ----------------------------------------------------------------*/
/* 私有变量 ------------------------------------------------------------------*/
static __IO u32 TimingDelay;
/* 扩展变量 ------------------------------------------------------------------*/
/* 私有函数原形 --------------------------------------------------------------*/
/* 函数体 --------------------------------------------------------------------*/
/**
  * 函数功能: 初始化配置系统滴答定时器 SysTick
  * 输入参数: 无
  * 返 回 值: 无
  * 说    明:无
  */
void SysTick_Init(void)
{
	/* SystemFrequency / 1000    1ms中断一次
	 * SystemFrequency / 100000	 10us中断一次
	 * SystemFrequency / 1000000 1us中断一次
	 */
	if (SysTick_Config(SystemCoreClock / 1000000))
	{
		/* Capture error */
		while (1);
	}
	/* 关闭系统滴答定时器:初始化先不用开启,等需要延时时才开启定时器  */
	SysTick->CTRL &= ~ SysTick_CTRL_ENABLE_Msk;
}

/**
  * 函数功能: us延时程序
  * 输入参数: nTime:延时时间
  * 返 回 值: 无
  * 说    明:无
  */
void Delay_us(__IO u32 nTime)
{
	TimingDelay = nTime;

	/* 使能滴答定时器 */
	SysTick->CTRL |=  SysTick_CTRL_ENABLE_Msk;

	while(TimingDelay != 0);

  /* 关闭系统滴答定时器 */
	SysTick->CTRL &= ~ SysTick_CTRL_ENABLE_Msk;
}

/**
  * 函数功能: 获取节拍程序
  * 输入参数: 无
  * 返 回 值: 无
  * 说    明:在 SysTick 中断函数 SysTick_Handler()调用
  */
void TimingDelay_Decrement(void)
{
	if (TimingDelay != 0x00)
	{
		TimingDelay--;
	}
}
2.4ESP8266
/* 包含头文件 ----------------------------------------------------------------*/
#include "bsp/ESP8266/bsp_esp8266.h"
#include "bsp/systick/bsp_SysTick.h"
#include <stdio.h>
#include <string.h>
#include <stdbool.h>
#include <stdarg.h>

/* 私有类型定义 --------------------------------------------------------------*/
/* 私有宏定义 ----------------------------------------------------------------*/
/* 私有变量 ------------------------------------------------------------------*/
struct  STRUCT_USARTx_Fram strEsp8266_Fram_Record = { 0 };

/* 扩展变量 ------------------------------------------------------------------*/
/* 私有函数原形 --------------------------------------------------------------*/
static char * itoa( int value, char * string, int radix );

/* 函数体 --------------------------------------------------------------------*/
/**
  * 函数功能: 初始化ESP8266用到的GPIO引脚
  * 输入参数: 无
  * 返 回 值: 无
  * 说    明:无
  */
static void ESP8266_GPIO_Config ( void )
{
	/*定义一个GPIO_InitTypeDef类型的结构体*/
	GPIO_InitTypeDef GPIO_InitStructure;

	/* 配置 CH_PD 引脚*/
	RCC_APB2PeriphClockCmd( ESP8266_RST_CLK, ENABLE );
	GPIO_InitStructure.GPIO_Mode = GPIO_Mode_Out_PP;
	GPIO_InitStructure.GPIO_Speed = GPIO_Speed_50MHz;

	/* 配置 RST 引脚*/
	GPIO_InitStructure.GPIO_Pin = ESP8266_RST_PIN;
	GPIO_Init ( ESP8266_RST_PORT, & GPIO_InitStructure );

  /* 拉高WiFi模块的复位重启引脚	*/
  GPIO_ResetBits( ESP8266_RST_PORT, ESP8266_RST_PIN );

}

/**
  * 函数功能: 配置 ESP8266 USART 的 NVIC 中断优先级
  * 输入参数: 无
  * 返 回 值: 无
  * 说    明:无
  */
static void ESP8266_USART_NVIC_Configuration ( void )
{
	NVIC_InitTypeDef NVIC_InitStructure;

	/* Configure the NVIC Preemption Priority Bits */
	NVIC_PriorityGroupConfig ( NVIC_PriorityGroup_2 );

	/* Enable the USART2 Interrupt */
	NVIC_InitStructure.NVIC_IRQChannel = ESP8266_USART_IRQ;
	NVIC_InitStructure.NVIC_IRQChannelPreemptionPriority = 0;
	NVIC_InitStructure.NVIC_IRQChannelSubPriority = 1;
	NVIC_InitStructure.NVIC_IRQChannelCmd = ENABLE;
	NVIC_Init(&NVIC_InitStructure);

}

/**
  * 函数功能: 初始化ESP8266用到的 USART
  * 输入参数: 无
  * 返 回 值: 无
  * 说    明:无
  */
static void ESP8266_USART_Config ( void )
{
	GPIO_InitTypeDef GPIO_InitStructure;
	USART_InitTypeDef USART_InitStructure;

	/* config USART clock */
	ESP8266_USART_APBxClock_FUN ( ESP8266_USART_CLK, ENABLE );
	ESP8266_USART_GPIO_APBxClock_FUN ( ESP8266_USART_GPIO_CLK | RCC_APB2Periph_AFIO, ENABLE );

	/* USART GPIO config */
	/* Configure USART Tx as alternate function push-pull */
	GPIO_InitStructure.GPIO_Pin =  ESP8266_USART_TX_PIN;
	GPIO_InitStructure.GPIO_Mode = GPIO_Mode_AF_PP;
	GPIO_InitStructure.GPIO_Speed = GPIO_Speed_50MHz;
	GPIO_Init(ESP8266_USART_TX_PORT, &GPIO_InitStructure);

	/* Configure USART Rx as input floating */
	GPIO_InitStructure.GPIO_Pin = ESP8266_USART_RX_PIN;
	GPIO_InitStructure.GPIO_Mode = GPIO_Mode_IN_FLOATING;
	GPIO_Init(ESP8266_USART_RX_PORT, &GPIO_InitStructure);

	/* USART1 mode config */
	USART_InitStructure.USART_BaudRate = ESP8266_USART_BAUD_RATE;
	USART_InitStructure.USART_WordLength = USART_WordLength_8b;
	USART_InitStructure.USART_StopBits = USART_StopBits_1;
	USART_InitStructure.USART_Parity = USART_Parity_No ;
	USART_InitStructure.USART_HardwareFlowControl = USART_HardwareFlowControl_None;
	USART_InitStructure.USART_Mode = USART_Mode_Rx | USART_Mode_Tx;
	USART_Init(ESP8266_USARTx, &USART_InitStructure);

	/* 中断配置 */
	USART_ITConfig ( ESP8266_USARTx, USART_IT_RXNE, ENABLE ); //使能串口接收中断
	USART_ITConfig ( ESP8266_USARTx, USART_IT_IDLE, ENABLE ); //使能串口总线空闲中断

	ESP8266_USART_NVIC_Configuration();

	USART_Cmd(ESP8266_USARTx, ENABLE);

  /* 清除发送完成标志 */
	USART_ClearFlag(ESP8266_USARTx, USART_FLAG_TC|USART_FLAG_TXE|USART_FLAG_RXNE);
}

/**
  * 函数功能: 格式化输出,类似于C库中的printf,但这里没有用到C库
  * 输入参数: USARTx 串口通道,这里只用到了串口2,即USART2
  *		        Data   要发送到串口的内容的指针
  *			      ...    其他参数
  * 返 回 值: 无
  * 说    明:典型应用 USART2_printf( USART2, "\r\n this is a demo \r\n" );
  *            		     USART2_printf( USART2, "\r\n %d \r\n", i );
  *            		     USART2_printf( USART2, "\r\n %s \r\n", j );
  */
void USART_printf(USART_TypeDef * USARTx, char * Data, ... )
{
	const char *s;
	int d;
	char buf[16];

	va_list ap;
	va_start(ap, Data);
	while ( * Data != 0 )     // 判断是否到达字符串结束符
	{
		if ( * Data == 0x5c )  //'\'
		{
			switch ( *++Data )
			{
				case 'r':							          //回车符
					USART_SendData(USARTx, 0x0d);
					Data ++;
				break;
				case 'n':							          //换行符
					USART_SendData(USARTx, 0x0a);
					Data ++;
				break;
				default:
					Data ++;
				break;
			}
		}
		else if ( * Data == '%')
		{									  //
			switch ( *++Data )
			{
				case 's':										  //字符串
					s = va_arg(ap, const char *);
					for ( ; *s; s++)
					{
						USART_SendData(USARTx,*s);
						while( USART_GetFlagStatus(USARTx, USART_FLAG_TXE) == RESET );
					}
					Data++;
				break;
				case 'd':
					//十进制
					d = va_arg(ap, int);
					itoa(d, buf, 10);
					for (s = buf; *s; s++)
					{
						USART_SendData(USARTx,*s);
						while( USART_GetFlagStatus(USARTx, USART_FLAG_TXE) == RESET );
					}
					Data++;
				break;
				default:
					Data++;
				break;
			}
		}
		else USART_SendData(USARTx, *Data++);
		while ( USART_GetFlagStatus ( USARTx, USART_FLAG_TXE ) == RESET );
	}
}

/**
  * 函数功能: 将整形数据转换成字符串
  * 输入参数: radix =10 表示10进制,其他结果为0
  *           value 要转换的整形数
  *           buf 转换后的字符串
  *           radix = 10
  * 返 回 值: 无
  * 说    明:被USART_printf()调用
  */
static char * itoa( int value, char *string, int radix )
{
	int     i, d;
	int     flag = 0;
	char    *ptr = string;
	/* This implementation only works for decimal numbers. */
	if (radix != 10)
	{
		*ptr = 0;
		return string;
	}
	if (!value)
	{
		*ptr++ = 0x30;
		*ptr = 0;
		return string;
	}
	/* if this is a negative value insert the minus sign. */
	if (value < 0)
	{
		*ptr++ = '-';
		/* Make the value positive. */
		value *= -1;
	}
	for (i = 10000; i > 0; i /= 10)
	{
		d = value / i;
		if (d || flag)
		{
			*ptr++ = (char)(d + 0x30);
			value -= (d * i);
			flag = 1;
		}
	}
	/* Null terminate the string. */
	*ptr = 0;
	return string;
} /* NCL_Itoa */

/**
  * 函数功能: ESP8266初始化函数
  * 输入参数: 无
  * 返 回 值: 无
  * 说    明:无
  */
void ESP8266_Init ( void )
{
	ESP8266_GPIO_Config ();
	ESP8266_USART_Config ();
}

/**
  * 函数功能: 停止使用ESP8266
  * 输入参数: 无
  * 返 回 值: 无
  * 说    明:无
  */
void  ESP8266_stop( void )
{
	ESP8266_RST_LOW_LEVEL();

	USART_ITConfig ( ESP8266_USARTx, USART_IT_RXNE, DISABLE ); //使能串口接收中断
	USART_ITConfig ( ESP8266_USARTx, USART_IT_IDLE, DISABLE ); //使能串口总线空闲中断
	USART_Cmd(ESP8266_USARTx, DISABLE);
	ESP8266_USART_APBxClock_FUN ( ESP8266_USART_CLK, DISABLE );
}

/**
  * 函数功能: 重启ESP8266模块
  * 输入参数: 无
  * 返 回 值: 无
  * 说    明:被ESP8266_AT_Test调用
  */
void ESP8266_Rst ( void )
{
#if 0
	 ESP8266_Cmd ( "AT+RST", "OK", "ready", 2500 );
#else
	 ESP8266_RST_LOW_LEVEL();
	 Delay_ms( 500 );
	 ESP8266_RST_HIGH_LEVEL();
#endif
}

/**
  * 函数功能: 对ESP8266模块发送AT指令
  * 输入参数: cmd,待发送的指令
  *           reply1,reply2,期待的响应,为NULL表不需响应,两者为或逻辑关系
  *           waittime,等待响应的时间
  * 返 回 值: 1,指令发送成功
  *           0,指令发送失败
  * 说    明:无
  */
bool ESP8266_Cmd ( char * cmd, char * reply1, char * reply2, u32 waittime )
{
	strEsp8266_Fram_Record .InfBit .FramLength = 0;               //从新开始接收新的数据包

	ESP8266_Usart ( "%s\r\n", cmd );

	if ( ( reply1 == 0 ) && ( reply2 == 0 ) )                      //不需要接收数据
		return true;

	Delay_ms( waittime );                 //延时

	strEsp8266_Fram_Record .Data_RX_BUF [ strEsp8266_Fram_Record .InfBit .FramLength ]  = '\0';

	PC_Usart ( "%s", strEsp8266_Fram_Record .Data_RX_BUF );
//  printf("%s->%s\n",cmd,strEsp8266_Fram_Record .Data_RX_BUF);
	if ( ( reply1 != 0 ) && ( reply2 != 0 ) )
		return ( ( bool ) strstr ( strEsp8266_Fram_Record .Data_RX_BUF, reply1 ) ||
						 ( bool ) strstr ( strEsp8266_Fram_Record .Data_RX_BUF, reply2 ) );

	else if ( reply1 != 0 )
		return ( ( bool ) strstr ( strEsp8266_Fram_Record .Data_RX_BUF, reply1 ) );

	else
		return ( ( bool ) strstr ( strEsp8266_Fram_Record .Data_RX_BUF, reply2 ) );

}

/**
  * 函数功能: 对ESP8266模块进行AT测试启动
  * 输入参数: 无
  * 返 回 值: 1,选择成功
  *           0,选择失败
  * 说    明:无
  */
bool ESP8266_AT_Test ( void )
{
	char count=0;

	ESP8266_RST_HIGH_LEVEL();
	Delay_ms ( 1000 );
	while(count<10)
	{
		if(ESP8266_Cmd("AT","OK",NULL,1000)) return 1;
		ESP8266_Rst();
    Delay_ms ( 1000 );
		++count;
	}
	return 0;
}

/**
  * 函数功能: 选择ESP8266模块的工作模式
  * 输入参数: enumMode,工作模式
  * 返 回 值: 1,选择成功
  *           0,选择失败
  * 说    明:无
  */
bool ESP8266_Net_Mode_Choose ( ENUM_Net_ModeTypeDef enumMode )
{
	bool result=0;
	char count=0;
	while(count<10)
	{
		switch ( enumMode )
		{
			case STA:
				result=ESP8266_Cmd ( "AT+CWMODE=1", "OK", "no change", 2500 );
			break;
			case AP:
				result=ESP8266_Cmd ( "AT+CWMODE=2", "OK", "no change", 2500 );
			break;
			case STA_AP:
				result=ESP8266_Cmd ( "AT+CWMODE=3", "OK", "no change", 2500 );
			break;
			default:
				result=false;
			break;
		}
		if(result) return result;
		++count;
	}
	return 0;
}

/**
  * 函数功能: ESP8266模块连接外部WiFi
  * 输入参数: pSSID,WiFi名称字符串
  *           pPassWord,WiFi密码字符串
  * 返 回 值: 1,连接成功
  *           0,连接失败
  * 说    明:无
  */
bool ESP8266_JoinAP ( char * pSSID, char * pPassWord )
{
	char cCmd [120];
	char count=0;
	sprintf ( cCmd, "AT+CWJAP=\"%s\",\"%s\"", pSSID, pPassWord );
	while(count<10)
	{
		if(ESP8266_Cmd(cCmd,"OK",NULL,5000))return 1;
		++count;
	}
	return 0;
}

/**
  * 函数功能: ESP8266模块创建WiFi热点
  * 输入参数: pSSID,WiFi名称字符串
  *           pPassWord,WiFi密码字符串
  *           enunPsdMode,WiFi加密方式代号字符串
  * 返 回 值: 1,创建成功
  *           0,创建失败
  * 说    明:无
  */
bool ESP8266_BuildAP ( char * pSSID, char * pPassWord, ENUM_AP_PsdMode_TypeDef enunPsdMode )
{
	char cCmd [120];
	char count=0;
	sprintf ( cCmd, "AT+CWSAP=\"%s\",\"%s\",1,%d", pSSID, pPassWord, enunPsdMode );
	while(count<10)
	{
		if(ESP8266_Cmd(cCmd,"OK",0,1000))return 1;
		++count;
	}
	return 0;
}

/**
  * 函数功能: ESP8266模块启动多连接
  * 输入参数: enumEnUnvarnishTx,配置是否多连接
  * 返 回 值: 1,配置成功
  *           0,配置失败
  * 说    明:无
  */
bool ESP8266_Enable_MultipleId ( FunctionalState enumEnUnvarnishTx )
{
	char cStr [20];
	char count=0;
	sprintf ( cStr, "AT+CIPMUX=%d", ( enumEnUnvarnishTx ? 1 : 0 ) );
	while(count<10)
	{
		if(ESP8266_Cmd(cStr,"OK",0,500))return 1;
		++count;
	}
	return 0;
}

/**
  * 函数功能: ESP8266模块连接外部服务器
  * 输入参数: enumE,网络协议
  *           ip,服务器IP字符串
  *           ComNum,服务器端口字符串
  *           id,模块连接服务器的ID
  * 返 回 值: 1,连接成功
  *           0,连接失败
  * 说    明:无
  */
bool ESP8266_Link_Server ( ENUM_NetPro_TypeDef enumE, char * ip, char * ComNum, ENUM_ID_NO_TypeDef id)
{
	char cStr [100] = { 0 }, cCmd [120];

  switch (  enumE )
  {
		case enumTCP:
		  sprintf ( cStr, "\"%s\",\"%s\",%s", "TCP", ip, ComNum );
		  break;

		case enumUDP:
		  sprintf ( cStr, "\"%s\",\"%s\",%s", "UDP", ip, ComNum );
		  break;

		default:
			break;
  }

  if ( id < 5 )
    sprintf ( cCmd, "AT+CIPSTART=%d,%s", id, cStr);

  else
	  sprintf ( cCmd, "AT+CIPSTART=%s", cStr );

	return ESP8266_Cmd ( cCmd, "OK", "ALREAY CONNECT", 4000 );

}

/**
  * 函数功能: ESP8266模块开启或关闭服务器模式
  * 输入参数: enumMode,开启/关闭
  *           pPortNum,服务器端口号字符串
  *           pTimeOver,服务器超时时间字符串,单位:秒
  * 返 回 值: 1,操作成功
  *           0,操作失败
  * 说    明:无
  */
bool ESP8266_StartOrShutServer ( FunctionalState enumMode, char * pPortNum, char * pTimeOver )
{
	char cCmd1 [120], cCmd2 [120];

	if ( enumMode )
	{
		sprintf ( cCmd1, "AT+CIPSERVER=%d,%s", 1, pPortNum );

		sprintf ( cCmd2, "AT+CIPSTO=%s", pTimeOver );

		return ( ESP8266_Cmd ( cCmd1, "OK", 0, 500 ) &&
						 ESP8266_Cmd ( cCmd2, "OK", 0, 500 ) );
	}

	else
	{
		sprintf ( cCmd1, "AT+CIPSERVER=%d,%s", 0, pPortNum );

		return ESP8266_Cmd ( cCmd1, "OK", 0, 500 );
	}
}

/**
  * 函数功能: 获取ESP8266 的连接状态,较适合单端口时使用
  * 输入参数: 无
  * 返 回 值: 2,获得ip
  *           3,建立连接
  *           4,失去连接
  *           0,获取状态失败
  * 说    明:无
  */
uint8_t ESP8266_Get_LinkStatus ( void )
{
	if ( ESP8266_Cmd ( "AT+CIPSTATUS", "OK", 0, 500 ) )
	{
		if ( strstr ( strEsp8266_Fram_Record .Data_RX_BUF, "STATUS:2\r\n" ) )
			return 2;

		else if ( strstr ( strEsp8266_Fram_Record .Data_RX_BUF, "STATUS:3\r\n" ) )
			return 3;

		else if ( strstr ( strEsp8266_Fram_Record .Data_RX_BUF, "STATUS:4\r\n" ) )
			return 4;
	}
	return 0;
}

/**
  * 函数功能: 获取ESP8266 的端口(Id)连接状态,较适合多端口时使用
  * 输入参数: 无
  * 返 回 值: 端口(Id)的连接状态,低5位为有效位,分别对应Id5~0,某位若置1表该Id建立了连接,若被清0表该Id未建立连接
  * 说    明:无
  */
uint8_t ESP8266_Get_IdLinkStatus ( void )
{
	uint8_t ucIdLinkStatus = 0x00;


	if ( ESP8266_Cmd ( "AT+CIPSTATUS", "OK", 0, 500 ) )
	{
		if ( strstr ( strEsp8266_Fram_Record .Data_RX_BUF, "+CIPSTATUS:0," ) )
			ucIdLinkStatus |= 0x01;
		else
			ucIdLinkStatus &= ~ 0x01;

		if ( strstr ( strEsp8266_Fram_Record .Data_RX_BUF, "+CIPSTATUS:1," ) )
			ucIdLinkStatus |= 0x02;
		else
			ucIdLinkStatus &= ~ 0x02;

		if ( strstr ( strEsp8266_Fram_Record .Data_RX_BUF, "+CIPSTATUS:2," ) )
			ucIdLinkStatus |= 0x04;
		else
			ucIdLinkStatus &= ~ 0x04;

		if ( strstr ( strEsp8266_Fram_Record .Data_RX_BUF, "+CIPSTATUS:3," ) )
			ucIdLinkStatus |= 0x08;
		else
			ucIdLinkStatus &= ~ 0x08;

		if ( strstr ( strEsp8266_Fram_Record .Data_RX_BUF, "+CIPSTATUS:4," ) )
			ucIdLinkStatus |= 0x10;
		else
			ucIdLinkStatus &= ~ 0x10;
	}
	return ucIdLinkStatus;
}

/**
  * 函数功能: 获取ESP8266 的 AP IP
  * 输入参数: pApIp,存放 AP IP 的数组的首地址
  *           ucArrayLength,存放 AP IP 的数组的长度
  * 返 回 值: 1,获取成功
  *           0,获取失败
  * 说    明:无
  */
uint8_t ESP8266_Inquire_ApIp ( char * pApIp, uint8_t ucArrayLength )
{
	char uc;

	char * pCh;


  ESP8266_Cmd ( "AT+CIFSR", "OK", 0, 500 );

	pCh = strstr ( strEsp8266_Fram_Record .Data_RX_BUF, "APIP,\"" );

	if ( pCh )
		pCh += 6;

	else
		return 0;

	for ( uc = 0; uc < ucArrayLength; uc ++ )
	{
		pApIp [ uc ] = * ( pCh + uc);

		if ( pApIp [ uc ] == '\"' )
		{
			pApIp [ uc ] = '\0';
			break;
		}
	}
	return 1;
}

/**
  * 函数功能: 配置ESP8266模块进入透传发送
  * 输入参数: 无
  * 返 回 值: 1,配置成功
  *           0,配置失败
  * 说    明:无
  */
bool ESP8266_UnvarnishSend ( void )
{

	if ( ! ESP8266_Cmd ( "AT+CIPMODE=1", "OK", 0, 1000 ) )
		return false;
	return  ESP8266_Cmd ( "AT+CIPSEND", "OK", ">", 1000 );

}

/**
  * 函数功能: 配置ESP8266模块退出透传模式
  * 输入参数: 无
  * 返 回 值: 无
  * 说    明:无
  */
void ESP8266_ExitUnvarnishSend ( void )
{
	Delay_ms ( 1000 );

	ESP8266_Usart ( "+++" );

	Delay_ms( 500 );

}

/**
  * 函数功能: ESP8266模块发送字符串
  * 输入参数: enumEnUnvarnishTx,声明是否已使能了透传模式
  *           pStr,要发送的字符串
  *           ucId,哪个ID发送的字符串
  *           ulStrLength,要发送的字符串的字节数
  * 返 回 值: 1,发送成功
  *           0,发送失败
  * 说    明:无
  */
bool ESP8266_SendString ( FunctionalState enumEnUnvarnishTx, char * pStr, u32 ulStrLength, ENUM_ID_NO_TypeDef ucId )
{
	char cStr [20];
	bool bRet = false;


	if ( enumEnUnvarnishTx )
	{
		ESP8266_Usart ( "%s", pStr );

		bRet = true;

	}

	else
	{
		if ( ucId < 5 )
			sprintf ( cStr, "AT+CIPSEND=%d,%d", ucId, ulStrLength + 2 );

		else
			sprintf ( cStr, "AT+CIPSEND=%d", ulStrLength + 2 );

		ESP8266_Cmd ( cStr, "> ", 0, 1000 );

		bRet = ESP8266_Cmd ( pStr, "SEND OK", 0, 1000 );
  }

	return bRet;

}

/**
  * 函数功能: ESP8266模块接收字符串
  * 输入参数: enumEnUnvarnishTx,声明是否已使能了透传模式
  * 返 回 值: 接收到的字符串首地址
  * 说    明:无
  */
char * ESP8266_ReceiveString ( FunctionalState enumEnUnvarnishTx )
{
	char * pRecStr = 0;


	strEsp8266_Fram_Record .InfBit .FramLength = 0;
	strEsp8266_Fram_Record .InfBit .FramFinishFlag = 0;

	while ( ! strEsp8266_Fram_Record .InfBit .FramFinishFlag );
	strEsp8266_Fram_Record .Data_RX_BUF [ strEsp8266_Fram_Record .InfBit .FramLength ] = '\0';

	if ( enumEnUnvarnishTx )
		pRecStr = strEsp8266_Fram_Record .Data_RX_BUF;
	else
	{
		if ( strstr ( strEsp8266_Fram_Record .Data_RX_BUF, "+IPD" ) )
			pRecStr = strEsp8266_Fram_Record .Data_RX_BUF;

	}
	return pRecStr;
}
2.5人体检测
/* 包含头文件 ----------------------------------------------------------------*/
#include "bsp/HC-SR501/bsp_HC-SR501.h"

/* 私有类型定义 --------------------------------------------------------------*/
/* 私有宏定义 ----------------------------------------------------------------*/
/* 私有变量 ------------------------------------------------------------------*/
/* 扩展变量 ------------------------------------------------------------------*/
/* 私有函数原形 --------------------------------------------------------------*/
/* 函数体 --------------------------------------------------------------------*/

/**
  * 函数功能: 板载按键IO引脚初始化.
  * 输入参数: 无
  * 返 回 值: 无
  * 说    明:使用宏定义方法代替具体引脚号,方便程序移植,只要简单修改bsp_key.h
  *           文件相关宏定义就可以方便修改引脚。
  */
void HC_SR501_GPIO_Init(void)
{
   /* 定义IO硬件初始化结构体变量 */
  GPIO_InitTypeDef GPIO_InitStructure;

	/* 使能(开启)KEY1引脚对应IO端口时钟 */
  RCC_APB2PeriphClockCmd(HC_SR501_RCC_CLOCKGPIO, ENABLE);

  /* 设定KEY1对应引脚IO编号 */
  GPIO_InitStructure.GPIO_Pin = HC_SR501_GPIO_PIN;
  /* 设定KEY1对应引脚IO最大操作速度 :GPIO_Speed_50MHz */
  GPIO_InitStructure.GPIO_Speed = GPIO_Speed_10MHz;
  /* 设定KEY1对应引脚IO为浮空输入模式 */
  GPIO_InitStructure.GPIO_Mode = GPIO_Mode_IPU;
  /* 初始化KEY1对应引脚IO */
  GPIO_Init(HC_SR501_GPIO, &GPIO_InitStructure);
}

/**
  * 函数功能: 简单粗暴的延时函数
  * 输入参数: time;延时时间设置
  * 返 回 值: 无
  * 说    明:软件消抖
  */
static void HC_SR501_ScanDelay(void)
{
  uint32_t i,j;
  for(i=0;i<100;++i)
    for(j=0;j<1000;++j){ }
}

/**
  * 函数功能: 读取按键KEY1的状态
  * 输入参数:无
  * 返 回 值: KEY_DOWN:按键被按下;
  *           KEY_UP  :按键没被按下
  * 说    明:无。
  */
HC_SR501_State_TypeDef HC_SR501_StateRead(void)
{
  /* 读取此时按键值并判断是否是被按下状态,如果是被按下状态进入函数内 */
  if(GPIO_ReadInputDataBit(HC_SR501_GPIO,HC_SR501_GPIO_PIN)==HC_SR501_ACTIVE_LEVEL)
  {
    /* 延时一小段时间,消除抖动 */
    HC_SR501_ScanDelay();
    /* 延时时间后再来判断按键状态,如果还是按下状态说明按键确实被按下 */
    if(GPIO_ReadInputDataBit(HC_SR501_GPIO,HC_SR501_GPIO_PIN)==HC_SR501_ACTIVE_LEVEL)
    {
       /* 按键扫描完毕,确定按键被按下,返回按键被按下状态 */
      return HC_SR501_HIGH;
    }
  }
  /* 按键没被按下,返回没被按下状态 */
  return HC_SR501_LOW;
}
2.6 IIC的GPIO
/* 包含头文件 ----------------------------------------------------------------*/
#include "bsp/i2c/bsp_i2c_gpio.h"

/* 私有类型定义 --------------------------------------------------------------*/
/* 私有宏定义 ----------------------------------------------------------------*/
/* 私有变量 ------------------------------------------------------------------*/
/* 扩展变量 ------------------------------------------------------------------*/
/* 私有函数原形 --------------------------------------------------------------*/
void i2c_Start(void);
void i2c_Stop(void);
void i2c_SendByte(uint8_t _ucByte);
uint8_t i2c_ReadByte(void);
uint8_t i2c_WaitAck(void);
void i2c_Ack(void);
void i2c_NAck(void);

/* 函数体 --------------------------------------------------------------------*/
/**
  * 函数功能: I2C总线位延迟,最快400KHz
  * 输入参数: 无
  * 返 回 值: 无
  * 说    明:无
  */
static void i2c_Delay(void)
{
	uint8_t i;

	/*
	 	下面的时间是通过逻辑分析仪测试得到的。
		CPU主频72MHz时,在内部Flash运行, MDK工程不优化
		循环次数为10时,SCL频率 = 205KHz
		循环次数为7时,SCL频率 = 347KHz, SCL高电平时间1.5us,SCL低电平时间2.87us
	 	循环次数为5时,SCL频率 = 421KHz, SCL高电平时间1.25us,SCL低电平时间2.375us

    IAR工程编译效率高,不能设置为7
	*/
	for (i = 0; i < 10; i++);
}

/**
  * 函数功能: CPU发起I2C总线启动信号
  * 输入参数: 无
  * 返 回 值: 无
  * 说    明:无
  */
void i2c_Start(void)
{
	/* 当SCL高电平时,SDA出现一个下跳沿表示I2C总线启动信号 */
	I2C_SDA_1();
	I2C_SCL_1();
	i2c_Delay();
	I2C_SDA_0();
	i2c_Delay();
	I2C_SCL_0();
	i2c_Delay();
}

/**
  * 函数功能: CPU发起I2C总线停止信号
  * 输入参数: 无
  * 返 回 值: 无
  * 说    明:无
  */
void i2c_Stop(void)
{
	/* 当SCL高电平时,SDA出现一个上跳沿表示I2C总线停止信号 */
	I2C_SDA_0();
	I2C_SCL_1();
	i2c_Delay();
	I2C_SDA_1();
}

/**
  * 函数功能: CPU向I2C总线设备发送8bit数据
  * 输入参数: Byte : 等待发送的字节
  * 返 回 值: 无
  * 说    明:无
  */
void i2c_SendByte(uint8_t Byte)
{
	uint8_t i;

	/* 先发送字节的高位bit7 */
	for (i = 0; i < 8; i++)
	{
		if (Byte & 0x80)
		{
			I2C_SDA_1();
		}
		else
		{
			I2C_SDA_0();
		}
		i2c_Delay();
		I2C_SCL_1();
		i2c_Delay();
		I2C_SCL_0();
		if (i == 7)
		{
			I2C_SDA_1(); // 释放总线
		}
		Byte <<= 1;	/* 左移一个bit */
		i2c_Delay();
	}
}


/**
  * 函数功能: CPU从I2C总线设备读取8bit数据
  * 输入参数: 无
  * 返 回 值: 读到的数据
  * 说    明:无
  */
uint8_t i2c_ReadByte(void)
{
	uint8_t i;
	uint8_t value;

	/* 读到第1个bit为数据的bit7 */
	value = 0;
	for (i = 0; i < 8; i++)
	{
		value <<= 1;
		I2C_SCL_1();
		i2c_Delay();
		if (I2C_SDA_READ())
		{
			value++;
		}
		I2C_SCL_0();
		i2c_Delay();
	}
	return value;
}

/**
  * 函数功能: CPU产生一个时钟,并读取器件的ACK应答信号
  * 输入参数: 无
  * 返 回 值: 返回0表示正确应答,1表示无器件响应
  * 说    明:无
  */
uint8_t i2c_WaitAck(void)
{
	uint8_t re;

	I2C_SDA_1();	/* CPU释放SDA总线 */
	i2c_Delay();
	I2C_SCL_1();	/* CPU驱动SCL = 1, 此时器件会返回ACK应答 */
	i2c_Delay();
	if (I2C_SDA_READ())	/* CPU读取SDA口线状态 */
	{
		re = 1;
	}
	else
	{
		re = 0;
	}
	I2C_SCL_0();
	i2c_Delay();
	return re;
}

/**
  * 函数功能: CPU产生一个ACK信号
  * 输入参数: 无
  * 返 回 值: 无
  * 说    明:无
  */
void i2c_Ack(void)
{
	I2C_SDA_0();	/* CPU驱动SDA = 0 */
	i2c_Delay();
	I2C_SCL_1();	/* CPU产生1个时钟 */
	i2c_Delay();
	I2C_SCL_0();
	i2c_Delay();
	I2C_SDA_1();	/* CPU释放SDA总线 */
}

/**
  * 函数功能: CPU产生1个NACK信号
  * 输入参数: 无
  * 返 回 值: 无
  * 说    明:无
  */
void i2c_NAck(void)
{
	I2C_SDA_1();	/* CPU驱动SDA = 1 */
	i2c_Delay();
	I2C_SCL_1();	/* CPU产生1个时钟 */
	i2c_Delay();
	I2C_SCL_0();
	i2c_Delay();
}

/**
  * 函数功能: 配置I2C总线的GPIO,采用模拟IO的方式实现
  * 输入参数: 无
  * 返 回 值: 无
  * 说    明:无
  */
void I2C_InitGPIO(void)
{
	GPIO_InitTypeDef GPIO_InitStructure;

	RCC_APB2PeriphClockCmd(RCC_I2C_PORT, ENABLE);	/* 打开GPIO时钟 */

	GPIO_InitStructure.GPIO_Pin = I2C_SCL_PIN | I2C_SDA_PIN;
	GPIO_InitStructure.GPIO_Speed = GPIO_Speed_50MHz;
	GPIO_InitStructure.GPIO_Mode = GPIO_Mode_Out_OD;  	/* 开漏输出 */
	GPIO_Init(GPIO_PORT_I2C, &GPIO_InitStructure);

	/* 给一个停止信号, 复位I2C总线上的所有设备到待机模式 */
	i2c_Stop();
}

/**
  * 函数功能: 写入数据到i2c
  * 输入参数: 无
  * 返 回 值: 无
  * 说    明:无
  */
void write_i2c(uint8_t device,uint8_t addr,uint8_t dat)
{
	i2c_Start();
	i2c_SendByte(device);
	i2c_WaitAck();
	i2c_SendByte(addr);
	i2c_WaitAck();
	i2c_SendByte(dat);
	i2c_WaitAck();
	i2c_Stop();
}

/**
  * 函数功能: 从i2c读取数据
  * 输入参数: 无
  * 返 回 值: 无
  * 说    明:无
  */
uint8_t read_i2c(uint8_t device,uint8_t addr)
{
	uint8_t dat;
	i2c_Start();
	i2c_SendByte(device);
	i2c_WaitAck();
	i2c_SendByte(addr);
	i2c_WaitAck();
	i2c_Start();
	i2c_SendByte(device+0x01);
	i2c_WaitAck();
	dat=i2c_ReadByte();
	i2c_NAck();
	i2c_Stop();
	return dat;
}
2.7 OLED的IIC
/* 包含头文件 ----------------------------------------------------------------*/
#include "bsp/i2c/bsp_i2c_gpio.h"
#include "bsp/i2c/bsp_i2c_OLED.h"
#include "bsp/i2c/codetab.h"
#include "bsp/systick/bsp_SysTick.h"

/* 私有类型定义 --------------------------------------------------------------*/
/* 私有宏定义 ----------------------------------------------------------------*/
/* 私有变量 ------------------------------------------------------------------*/
/* 扩展变量 ------------------------------------------------------------------*/
/* 私有函数原形 --------------------------------------------------------------*/
/* 函数体 --------------------------------------------------------------------*/

/**
  * @brief  WriteCmd,向OLED写入命令
  * @param  I2C_Command:命令代码
  * @retval 无
  */
void WriteCmd(unsigned char I2C_Command)//写命令
{
	write_i2c(OLED_DEV_ADDR,0x00, I2C_Command);
}


 /**
  * @brief  WriteDat,向OLED写入数据
  * @param  I2C_Data:数据
  * @retval 无
  */
void WriteDat(unsigned char I2C_Data)//写数据
{
	write_i2c(OLED_DEV_ADDR,0x40, I2C_Data);
}


 /**
  * @brief  OLED_Init,初始化OLED
  * @param  无
  * @retval 无
  */
void OLED_Init(void)
{
  I2C_InitGPIO();

	Delay_ms(100); //这里的延时很重要

	WriteCmd(0xAE); //display off
	WriteCmd(0x20);	//Set Memory Addressing Mode
	WriteCmd(0x10);	//00,Horizontal Addressing Mode;01,Vertical Addressing Mode;10,Page Addressing Mode (RESET);11,Invalid
	WriteCmd(0xb0);	//Set Page Start Address for Page Addressing Mode,0-7
	WriteCmd(0xc8);	//Set COM Output Scan Direction
	WriteCmd(0x00); //---set low column address
	WriteCmd(0x10); //---set high column address
	WriteCmd(0x40); //--set start line address
	WriteCmd(0x81); //--set contrast control register
	WriteCmd(0xff); //亮度调节 0x00~0xff
	WriteCmd(0xa1); //--set segment re-map 0 to 127
	WriteCmd(0xa6); //--set normal display
	WriteCmd(0xa8); //--set multiplex ratio(1 to 64)
	WriteCmd(0x3F); //
	WriteCmd(0xa4); //0xa4,Output follows RAM content;0xa5,Output ignores RAM content
	WriteCmd(0xd3); //-set display offset
	WriteCmd(0x00); //-not offset
	WriteCmd(0xd5); //--set display clock divide ratio/oscillator frequency
	WriteCmd(0xf0); //--set divide ratio
	WriteCmd(0xd9); //--set pre-charge period
	WriteCmd(0x22); //
	WriteCmd(0xda); //--set com pins hardware configuration
	WriteCmd(0x12);
	WriteCmd(0xdb); //--set vcomh
	WriteCmd(0x20); //0x20,0.77xVcc
	WriteCmd(0x8d); //--set DC-DC enable
	WriteCmd(0x14); //
	WriteCmd(0xaf); //--turn on oled panel
}


 /**
  * @brief  OLED_SetPos,设置光标
  * @param  x,光标x位置
	*					y,光标y位置
  * @retval 无
  */
void OLED_SetPos(unsigned char x, unsigned char y) //设置起始点坐标
{
	WriteCmd(0xb0+y);
	WriteCmd(((x&0xf0)>>4)|0x10);
	WriteCmd((x&0x0f)|0x01);
}

 /**
  * @brief  OLED_Fill,填充整个屏幕
  * @param  fill_Data:要填充的数据
	* @retval 无
  */
void OLED_Fill(unsigned char fill_Data)//全屏填充
{
	unsigned char m,n;
	for(m=0;m<8;m++)
	{
		WriteCmd(0xb0+m);		//page0-page1
		WriteCmd(0x00);		//low column start address
		WriteCmd(0x10);		//high column start address
		for(n=0;n<128;n++)
			{
				WriteDat(fill_Data);
			}
	}
}

 /**
  * @brief  OLED_CLS,清屏
  * @param  无
	* @retval 无
  */
void OLED_CLS(void)//清屏
{
	OLED_Fill(0x00);
}


 /**
  * @brief  OLED_ON,将OLED从休眠中唤醒
  * @param  无
	* @retval 无
  */
void OLED_ON(void)
{
	WriteCmd(0X8D);  //设置电荷泵
	WriteCmd(0X14);  //开启电荷泵
	WriteCmd(0XAF);  //OLED唤醒
}


 /**
  * @brief  OLED_OFF,让OLED休眠 -- 休眠模式下,OLED功耗不到10uA
  * @param  无
	* @retval 无
  */
void OLED_OFF(void)
{
	WriteCmd(0X8D);  //设置电荷泵
	WriteCmd(0X10);  //关闭电荷泵
	WriteCmd(0XAE);  //OLED休眠
}


 /**
  * @brief  OLED_ShowStr,显示codetab.h中的ASCII字符,有6*8和8*16可选择
  * @param  x,y : 起始点坐标(x:0~127, y:0~7);
	*					ch[] :- 要显示的字符串;
	*					TextSize : 字符大小(1:6*8 ; 2:8*16)
	* @retval 无
  */
void OLED_ShowStr(unsigned char x, unsigned char y, unsigned char ch[], unsigned char TextSize)
{
	unsigned char c = 0,i = 0,j = 0;
	switch(TextSize)
	{
		case 1:
		{
			while(ch[j] != '\0')
			{
				c = ch[j] - 32;
				if(x > 126)
				{
					x = 0;
					y++;
				}
				OLED_SetPos(x,y);
				for(i=0;i<6;i++)
					WriteDat(F6x8[c][i]);
				x += 6;
				j++;
			}
		}break;
		case 2:
		{
			while(ch[j] != '\0')
			{
				c = ch[j] - 32;
				if(x > 120)
				{
					x = 0;
					y++;
				}
				OLED_SetPos(x,y);
				for(i=0;i<8;i++)
					WriteDat(F8X16[c*16+i]);
				OLED_SetPos(x,y+1);
				for(i=0;i<8;i++)
					WriteDat(F8X16[c*16+i+8]);
				x += 8;
				j++;
			}
		}break;
	}
}

 /**
  * @brief  OLED_ShowCN,显示codetab.h中的汉字,16*16点阵
  * @param  x,y: 起始点坐标(x:0~127, y:0~7);
	*					N:汉字在codetab.h中的索引
	* @retval 无
  */
void OLED_ShowCN(unsigned char x, unsigned char y, unsigned char N)
{
	unsigned char wm=0;
	unsigned int  adder=32*N;
	OLED_SetPos(x , y);
	for(wm = 0;wm < 16;wm++)
	{
		WriteDat(F16x16[adder]);
		adder += 1;
	}
	OLED_SetPos(x,y + 1);
	for(wm = 0;wm < 16;wm++)
	{
		WriteDat(F16x16[adder]);
		adder += 1;
	}
}


 /**
  * @brief  OLED_DrawBMP,显示BMP位图
  * @param  x0,y0 :起始点坐标(x0:0~127, y0:0~7);
	*					x1,y1 : 起点对角线(结束点)的坐标(x1:1~128,y1:1~8)
	* @retval 无
  */
void OLED_DrawBMP(unsigned char x0,unsigned char y0,unsigned char x1,unsigned char y1,unsigned char BMP[])
{
	unsigned int j=0;
	unsigned char x,y;

  if(y1%8==0)
		y = y1/8;
  else
		y = y1/8 + 1;
	for(y=y0;y<y1;y++)
	{
		OLED_SetPos(x0,y);
    for(x=x0;x<x1;x++)
		{
			WriteDat(BMP[j++]);
		}
	}
}
2.8 LED
/* 包含头文件 ----------------------------------------------------------------*/
#include "bsp/led/bsp_led.h"

/* 私有类型定义 --------------------------------------------------------------*/
/* 私有宏定义 ----------------------------------------------------------------*/
/* 私有变量 ------------------------------------------------------------------*/
/* 扩展变量 ------------------------------------------------------------------*/
/* 私有函数原形 --------------------------------------------------------------*/
/* 函数体 --------------------------------------------------------------------*/

/**
  * 函数功能: 板载LED灯IO引脚初始化.
  * 输入参数: 无
  * 返 回 值: 无
  * 说    明:使用宏定义方法代替具体引脚号,方便程序移植,只要简单修改bsp_led.h
  *           文件相关宏定义就可以方便修改引脚。
  */
void LED_GPIO_Init(void)
{
   /* 定义IO硬件初始化结构体变量 */
  GPIO_InitTypeDef GPIO_InitStructure;

	/* 使能(开启)LED1引脚对应IO端口时钟 */
  RCC_APB2PeriphClockCmd(LED1_RCC_CLOCKGPIO, ENABLE);

  /* 设定LED1对应引脚IO编号 */
  GPIO_InitStructure.GPIO_Pin = LED1_GPIO_PIN;
  /* 设定LED1对应引脚IO最大操作速度 :GPIO_Speed_50MHz */
  GPIO_InitStructure.GPIO_Speed = GPIO_Speed_50MHz;
  /* 设定LED1对应引脚IO为输出模式 */
  GPIO_InitStructure.GPIO_Mode = GPIO_Mode_Out_PP;
  /* 初始化LED1对应引脚IO */
  GPIO_Init(LED1_GPIO, &GPIO_InitStructure);


  /* 设置引脚输出为低电平,此时LED1灭 */
  GPIO_SetBits(LED1_GPIO,LED1_GPIO_PIN);

}

/**
  * 函数功能: 设置板载LED灯的状态
  * 输入参数: LEDx:其中x可甚至为(1,2,3)用来选择对应的LED灯
  * 输入参数:state:设置LED灯的输出状态。
  *             可选值:LED_OFF:LED灯灭;
  *             可选值:LED_ON: LED灯亮。
  * 返 回 值: 无
  * 说    明:该函数使用类似标准库函数的编程方法,方便理解标准库函数编程思想。
  */
void LEDx_StateSet(uint8_t LEDx,LEDState_TypeDef state)
{
  /* 检查输入参数是否合法 */
  assert_param(IS_LED_TYPEDEF(LEDx));
  assert_param(IS_LED_STATE(state));

  /* 判断设置的LED灯状态,如果设置为LED灯灭 */
  if(state==LED_OFF)
  {
    if(LEDx & LED1)
      GPIO_ResetBits(LED1_GPIO,LED1_GPIO_PIN);/* 设置引脚输出为低电平,此时LED1灭 */
  }
  else  /* state=LED_ON :否则,设置LED灯为亮 */
  {
    if(LEDx & LED1)
      GPIO_SetBits(LED1_GPIO,LED1_GPIO_PIN);/* 设置引脚输出为高电平,此时LED1亮 */
  }
}
三、应用
主函数
int main(void)
{

	/* 调试串口初始化配置,115200-N-8-1.使能串口发送和接受 */
	DEBUG_USART_Init();
	/*初始化体重*/
	Init_HX711pin();
	  /* 初始化系统滴答定时器 */
	SysTick_Init();
	HC_SR501_GPIO_Init();
	OLED_Init();
	KEY_GPIO_Init();

    ESP8266_Init();
	LED_GPIO_Init();

	wifi_test();


	Get_Maopi();				//称毛皮重量
	Delay_us(1000);
	Get_Maopi();				//重新获取毛皮重量
	oled_test();

	/* 无限循环 */
	while (1)
	{
		Get_Weight();
		printf("净重量 = %d g\r\n",Weight_Shiwu); //打印
		demo();
		Delay_ms(1000);
	}
}
有些串口打印是调试信息,只有ESP8266的发送才是真正要上传到前端的。
前端和后端不是我写的,没有代码,不过感觉不难。
下面是wifi初始话连接的程序
void wifi_test(void)
{
	printf("正在配置 ESP8266 ......\n" );

	if(ESP8266_AT_Test())
	{
		printf("AT test OK\n");
	}
	printf("\n< 1 >\n");
	if(ESP8266_Net_Mode_Choose(STA))
	{
		printf("ESP8266_Net_Mode_Choose OK\n");
	}
	printf("\n< 2 >\n");
	while(!ESP8266_JoinAP(User_ESP8266_ApSsid,User_ESP8266_ApPwd));
		printf("\n< 3 >\n");
	ESP8266_Enable_MultipleId(DISABLE);
		while(!ESP8266_Link_Server(enumTCP,User_ESP8266_TcpServer_IP,User_ESP8266_TcpServer_Port,Single_ID_0));
		printf("\n< 4 >\n");
	while(!ESP8266_UnvarnishSend());
		printf("配置 ESP8266 完毕\n");
}
下面是对OLEd的初始化
void oled_test(void)
{
	uint8_t i;
    OLED_Fill(0xFF);//全屏点亮
    Delay_ms(2000);
    OLED_Fill(0x00);//全屏灭
    Delay_ms(2000);
    for(i=4;i<=10;i++)
    {
      OLED_ShowCN((i-4)*16,0,i);									//测试显示中文
    }
    Delay_ms(2000);
    OLED_CLS();//清屏

	show((uint8_t *)"0",(uint8_t *)"0",(uint8_t *)"0");

	Delay_ms(2000);

//    OLED_OFF();//测试OLED休眠
//    Delay_ms(2000);
//    OLED_ON();//测试OLED休眠后唤醒
//    OLED_DrawBMP(0,0,128,8,(unsigned char *)BMP2);//测试BMP位图显示
//    Delay_ms(20000);
}
下面是显示函数,里面都是我用字模取的字
void show(uint8_t *a,uint8_t *b, uint8_t *c)
{
	OLED_ShowCN(0,0,11);//进
	OLED_ShowCN(16,0,6);//站
	OLED_ShowCN(32,0,7);//人
	OLED_ShowCN(48,0,13);//数
	OLED_ShowCN(64,0,14);//:
	OLED_ShowStr(80,0,a,2);

	OLED_ShowCN(0,2,12);//出
	OLED_ShowCN(16,2,6);//站
	OLED_ShowCN(32,2,7);//人
	OLED_ShowCN(48,2,13);//数
	OLED_ShowCN(64,2,14);//:
	OLED_ShowStr(80,2,b,2);

	OLED_ShowCN(0,4,6);//站
	OLED_ShowCN(16,4,15);//内
	OLED_ShowCN(32,4,7);//人
	OLED_ShowCN(48,4,13);//数
	OLED_ShowCN(64,4,14);//:
	OLED_ShowStr(80,4,c,2);
}
然后因为用不了库函数的整型转字符串,又自己写了一个
char *itoa_my(int value,char *string,int radix)
{
	char zm[37]="0123456789abcdefghijklmnopqrstuvwxyz";
	char aa[100]={0};

	int sum=value;
	char *cp=string;
	int i=0;

	if(radix<2||radix>36)//增加了对错误的检测
	{
		return string;
	}

	if(value<0)
	{
		return string;
	}


	while(sum>0)
	{
		aa[i++]=zm[sum%radix];
		sum/=radix;
	}

	for(int j=i-1;j>=0;j--)
	{
		*cp++=aa[j];
	}
	*cp='\0';
	return string;
}
然后是读取wifi发过来的数据
u32 wifi_rec(void)
{
	u32 pCH,a = 0;
    ESP8266_ReceiveString(ENABLE);
   if ( strEsp8266_Fram_Record .InfBit .FramFinishFlag )
		{
    	strEsp8266_Fram_Record .Data_RX_BUF [ strEsp8266_Fram_Record .InfBit .FramLength ]  = '\0';
      printf ( "\r\n%s\r\n", strEsp8266_Fram_Record .Data_RX_BUF );
      /*将接收到的字符串转成整形数*/
      pCH=atoi(strEsp8266_Fram_Record .Data_RX_BUF);

       switch(pCH)
       {
         case 0:
           LED1_ON;
			printf("1111111111111111111\r\n");
			a = 0;//进站
         break;

         case 1:
           LED1_OFF;
		 printf("22222222222222222222\r\n");
		 a = 1;//出站
         break;


       }
    }
	return a;
}
完整的测试demo
void demo(void)
{
	if(wifi_rec() == 0)
	{
		if((Weight_Shiwu >= 100) && (HC_SR501_StateRead()==HC_SR501_HIGH))
		{
			inbound++;
			GPIO_ResetBits(LED1_GPIO,LED1_GPIO_PIN);//亮
			printf("%d\r\n",inbound);
		}
		else
		{
			printf("无人\r\n"); //打印
			GPIO_SetBits(LED1_GPIO,LED1_GPIO_PIN);//灭
		}
	}else if(wifi_rec() == 1){
		if((Weight_Shiwu >= 100) && (HC_SR501_StateRead()==HC_SR501_HIGH))
		{
			outbound++;
			GPIO_ResetBits(LED1_GPIO,LED1_GPIO_PIN);//亮
			printf("%d\r\n",inbound);
		}
		else
		{
			printf("无人\r\n"); //打印
			GPIO_SetBits(LED1_GPIO,LED1_GPIO_PIN);//灭
		}
	}else{
		//error
	}
	station = inbound - outbound;
	printf("%d+%d+%d",inbound,outbound,station);
	sprintf(cStr,"%d+%d+%d",inbound,outbound,station);
	ESP8266_SendString(ENABLE,cStr,0,Single_ID_0);               //发送数据
	OLED_CLS();//清屏
	Delay_ms(20);
	itoa_my(inbound,in,10);
	itoa_my(outbound,out,10);
	itoa_my(station,s,10);
	show((u8 *)in,(u8 *)out,(u8 *)s);
}
四、中断
/**
******************************************************************************
* @file Project/STM32F10x_StdPeriph_Template/stm32f10x_it.c
* @author MCD Application Team
* @version V3.5.0
* @date 08-April-2011
* @brief Main Interrupt Service Routines.
* This file provides template for all exceptions handler and
* peripherals interrupt service routine.
******************************************************************************
* @attention
*
* THE PRESENT FIRMWARE WHICH IS FOR GUIDANCE ONLY AIMS AT PROVIDING CUSTOMERS
* WITH CODING INFORMATION REGARDING THEIR PRODUCTS IN ORDER FOR THEM TO SAVE
* TIME. AS A RESULT, STMICROELECTRONICS SHALL NOT BE HELD LIABLE FOR ANY
* DIRECT, INDIRECT OR CONSEQUENTIAL DAMAGES WITH RESPECT TO ANY CLAIMS ARISING
* FROM THE CONTENT OF SUCH FIRMWARE AND/OR THE USE MADE BY CUSTOMERS OF THE
* CODING INFORMATION CONTAINED HEREIN IN CONNECTION WITH THEIR PRODUCTS.
*
* <h2><center>© COPYRIGHT 2011 STMicroelectronics</center></h2>
******************************************************************************
*/
/* Includes ------------------------------------------------------------------*/
#include "stm32f10x_it.h"
#include "bsp/systick/bsp_SysTick.h"
#include "bsp/ESP8266/bsp_esp8266.h"
#include <string.h>
/** @addtogroup STM32F10x_StdPeriph_Template
* @{
*/
__IO uint8_t ucTcpClosedFlag = 0;
/* Private typedef -----------------------------------------------------------*/
/* Private define ------------------------------------------------------------*/
/* Private macro -------------------------------------------------------------*/
/* Private variables ---------------------------------------------------------*/
/* Private function prototypes -----------------------------------------------*/
/* Private functions ---------------------------------------------------------*/
/******************************************************************************/
/* Cortex-M3 Processor Exceptions Handlers */
/******************************************************************************/
/**
* @brief This function handles NMI exception.
* @param None
* @retval None
*/
void NMI_Handler(void)
{
}
/**
* @brief This function handles Hard Fault exception.
* @param None
* @retval None
*/
void HardFault_Handler(void)
{
/* Go to infinite loop when Hard Fault exception occurs */
while (1)
{
}
}
/**
* @brief This function handles Memory Manage exception.
* @param None
* @retval None
*/
void MemManage_Handler(void)
{
/* Go to infinite loop when Memory Manage exception occurs */
while (1)
{
}
}
/**
* @brief This function handles Bus Fault exception.
* @param None
* @retval None
*/
void BusFault_Handler(void)
{
/* Go to infinite loop when Bus Fault exception occurs */
while (1)
{
}
}
/**
* @brief This function handles Usage Fault exception.
* @param None
* @retval None
*/
void UsageFault_Handler(void)
{
/* Go to infinite loop when Usage Fault exception occurs */
while (1)
{
}
}
/**
* @brief This function handles SVCall exception.
* @param None
* @retval None
*/
void SVC_Handler(void)
{
}
/**
* @brief This function handles Debug Monitor exception.
* @param None
* @retval None
*/
void DebugMon_Handler(void)
{
}
/**
* @brief This function handles PendSVC exception.
* @param None
* @retval None
*/
void PendSV_Handler(void)
{
}
/**
* @brief This function handles SysTick Handler.
* @param None
* @retval None
*/
void SysTick_Handler(void)
{
TimingDelay_Decrement();
}
void ESP8266_USART_INT_FUN(void)
{
uint8_t ucCh;
if ( USART_GetITStatus (ESP8266_USARTx, USART_IT_RXNE ) != RESET )
{
ucCh = USART_ReceiveData(ESP8266_USARTx );
if ( strEsp8266_Fram_Record .InfBit .FramLength < ( RX_BUF_MAX_LEN - 1 ) ) //预留1个字节写结束符
strEsp8266_Fram_Record .Data_RX_BUF [ strEsp8266_Fram_Record .InfBit .FramLength ++ ] = ucCh;
}
if ( USART_GetITStatus(ESP8266_USARTx, USART_IT_IDLE ) == SET ) //数据帧接收完毕
{
strEsp8266_Fram_Record .InfBit .FramFinishFlag = 1;
ucCh = USART_ReceiveData(ESP8266_USARTx );
ucTcpClosedFlag = strstr(strEsp8266_Fram_Record .Data_RX_BUF, "CLOSED\r\n" ) ? 1 : 0;
}
}
/******************************************************************************/
/* STM32F10x Peripherals Interrupt Handlers */
/* Add here the Interrupt Handler for the used peripheral(s) (PPP), for the */
/* available peripheral interrupt handler's name please refer to the startup */
/* file (startup_stm32f10x_xx.s). */
/******************************************************************************/
/**
* @brief This function handles PPP interrupt request.
* @param None
* @retval None
*/
/*void PPP_IRQHandler(void)
{
}*/
/**
* @}
*/
/******************* (C) COPYRIGHT 2011 STMicroelectronics *****END OF FILE****/
---------------------------------------------------------------------------------------------------------------------------------
以后上传新项目只发应用层。驱动新驱动才发
