准备好前端dist文件 保证dist/index.html 点击在本地可以访问,
一,nginx安装
第一步,更新源列表
apt-get update第二步,安装nginx
apt-get install nginx第三步,检查nginx是否安装成功。如果出现版本号说明安装成功。
nginx -v二、nginx的配置文件
nginx的配置文件和静态资源文件分布在不同的地方,这里需要注意。
- /usr/sbin/nginx:主程序
- /etc/nginx:存放配置文件(nginx.conf)
- /usr/share/nginx:存放静态文件
- /var/log/nginx:存放日志
三、配置nginx
现在要修改配置文件,在 /etc/nginx目录下有个 nginx.conf,我们需要修改的就是这个文件。在修改文件之前,我们需要做一些准备工作。
1、配置监听端口号、访问IP、代理跨域
nginx.conf配置文件中并没有 配置端口号和IP,这个我们需要自己手动添加,为了便于修改,我们将vue项目的配置放在其他地方文件里,在nginx.conf 只需要将vue项目的配置文件所在路径引入即可。
我打算把vue项目的配置文件放在 /etc/nginx/hosts 目录下。第一步,新建host目录
cd /etc/nginx #切换到/etc/nginx路径下
mkdir hosts #新建目录host
第二步,新建 server0.host 文件。名字和后缀可以自己命名。这个文件就可以保存当前vue项目的相关配置。
touch server0.host
第三步,加入端口号和IP相关配置,然后将下面提供的配置模板拷贝进去
vim server0.host #编辑server0.host
server {
        listen       8080;                   #自己设置端口号
        server_name  xxx.xxx.xxx.xxx;        #自己设置ip地址
        #access_log  logs/host.access.log  main;
        location / {
            root   /usr/share/nginx/dist;        #这里写vue项目打包好的dist文件的地址
            index  index.html;               #这里是vue项目的首页,需要保证dist中有index.html文件
            try_files $uri $uri/ @router;
        }

        location @router {
			rewrite ^.*$ /index.html last;            //解决重新刷新页面,页面空白的问题
		}

        location /api/ {
            proxy_pass http://xxx.xxx.xxx.xxx:9090/;    //9090是后端端口
        }
        error_page   500 502 503 504  /50x.html;#错误页面
}
2、引入vue项目配置文件的路径
准备工作做好以后,下面就需要在nginx的配置文件中引入 vue配置文件的路径,vue配置文件的路径设置的是 /etc/nginx/hosts/server0.host
cd /etc/nginx
vim nginx.conf    #编辑nginx配置文件
我们只需要在nginx配置文件加入一行即可
user www-data;
worker_processes auto;
pid /run/nginx.pid;
include /etc/nginx/modules-enabled/*.conf;


events {
	worker_connections 768;
	# multi_accept on;
}

http {

	##
	# Basic Settings
	##

	sendfile on;
	tcp_nopush on;
	types_hash_max_size 2048;
	# server_tokens off;

	# server_names_hash_bucket_size 64;
	# server_name_in_redirect off;

	include /etc/nginx/mime.types;
	default_type application/octet-stream;

	##
	# SSL Settings
	##

	ssl_protocols TLSv1 TLSv1.1 TLSv1.2 TLSv1.3; # Dropping SSLv3, ref: POODLE
	ssl_prefer_server_ciphers on;

	##
	# Logging Settings
	##

	access_log /var/log/nginx/access.log;
	error_log /var/log/nginx/error.log;

	##
	# Gzip Settings
	##

	gzip on;

	# gzip_vary on;
	# gzip_proxied any;
	# gzip_comp_level 6;
	# gzip_buffers 16 8k;
	# gzip_http_version 1.1;
	# gzip_types text/plain text/css application/json application/javascript text/xml application/xml application/xml+rss text/javascript;

	##
	# Virtual Host Configs
	##

	include /etc/nginx/conf.d/*.conf;
	include /etc/nginx/sites-enabled/*;
	include /etc/nginx/hosts/*.host;  #此处加入
}


#mail {
#	# See sample authentication script at:
#	# http://wiki.nginx.org/ImapAuthenticateWithApachePhpScript
#
#	# auth_http localhost/auth.php;
#	# pop3_capabilities "TOP" "USER";
#	# imap_capabilities "IMAP4rev1" "UIDPLUS";
#
#	server {
#		listen     localhost:110;
#		protocol   pop3;
#		proxy      on;
#	}
#
#	server {
#		listen     localhost:143;
#		protocol   imap;
#		proxy      on;
#	}
#}
五、启动nginx
启动nginx
systemctl start nginx停止nginx
systemctl stop nginx重启nginx
systemctl reload nginx查看nginx的启停状态(如果正常启动,会看到绿色的Running)
systemctl status nginx出现报错
Job for nginx.service failed because the control process exited with
error code. See "systemctl status nginx.service" and "journalctl -xe"
for details.
[root@localhost /]# nginx -t -c /etc/nginx/nginx.conf

如果配置文件有错误,修改配置文件后,先执行 nginx -t 命令检查配置文件无错误后,再执行nginx -s reload 重新加载配置文件命令。我出现的问题是主要是删除红框里面,后续按照需要来进行配置后台地址

出现发布后403问题,保证dist的权限是最大的
chmod -R 777 dist
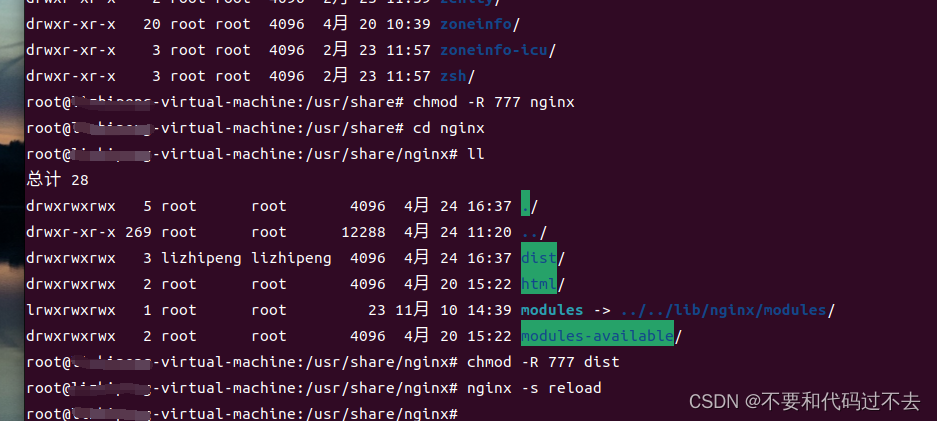
最中效果,访问
http://192.168.144.129:8080/#/login
————————————————感谢两位的博客
安装参考
Ubuntu 上使用nginx部署vue项目_仲夏夜之梦~的博客-CSDN博客
报错解决
Nginx——Nginx启动报错Job for nginx.service failed because the control process exited with error code_小志的博客的博客-CSDN博客


