👉🏻 SpringCloud 入门实战系列不迷路 👈🏻:
- SpringCloud 入门实战(一)什么是SpringCloud?
- SpringCloud 入门实战(二)-SpringCloud项目搭建
- SpringCloud 入门实战(三)-Eureka注册中心集成
- SpringCloud入门 实战(四)-Zookeeper、Consul注册中心集成
- SpringCloud入门实战(五)-Ribbon负载均衡集成
- SpringCloud入门实战(六)-OpenFeign服务调用集成
- SpringCloud入门实战(七)-Hystrix入门简介
- SpringCloud入门实战(七)-Hystrix服务降级
- SpringCloud入门实战(七)-Hystrix服务熔断
- SpringCloud入门实战(七)-Hystrix服务限流
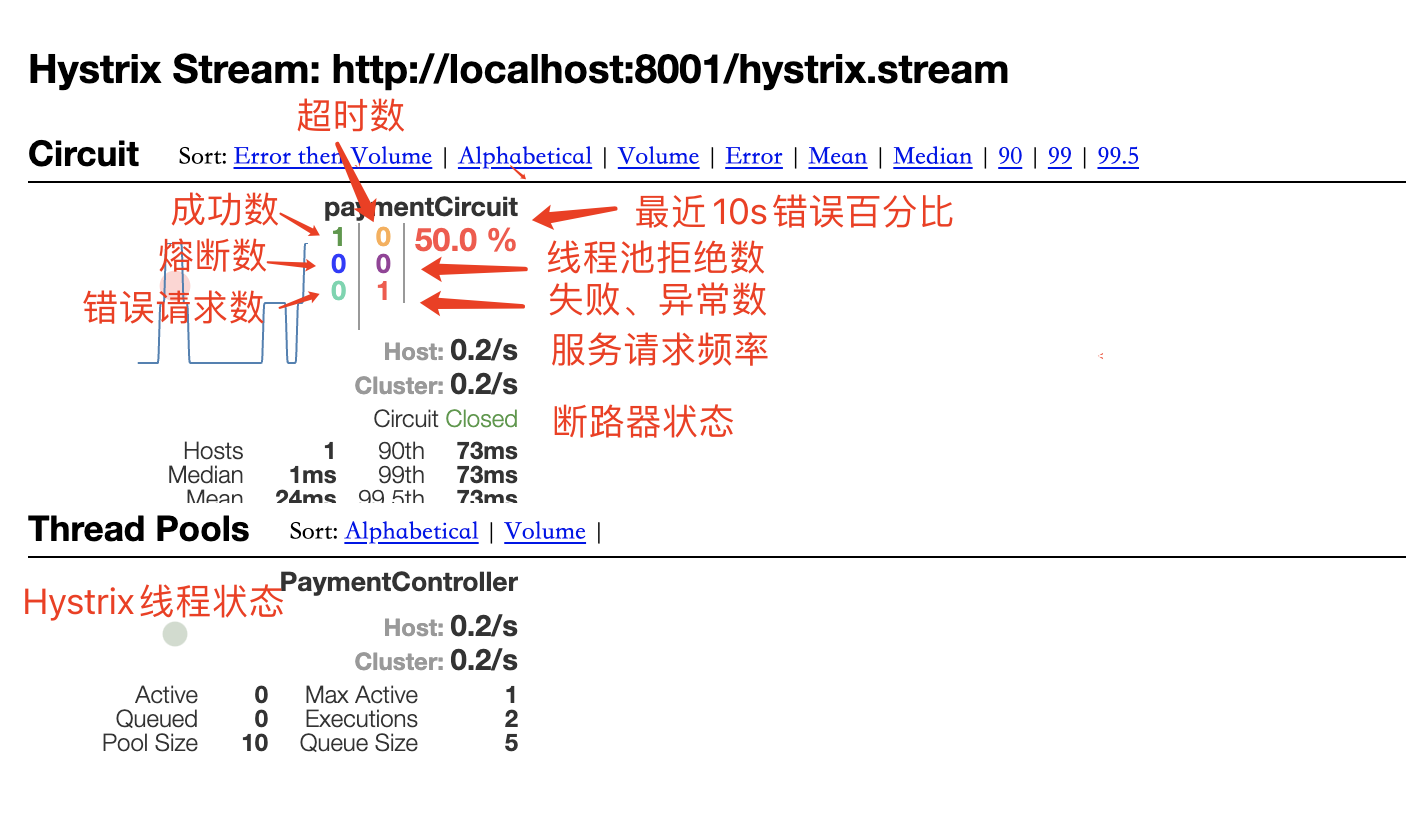
- SpringCloud入门实战(七)-Hystrix Dashboard图形化监控
文章目录
- 一、Hystrix Dashboard图形化监控搭建
- 二、Hystrix Dashboard监控实战
一、Hystrix Dashboard图形化监控搭建
Hystrix还提供了准实时的调用监控(Hystrix Dashboard),Hystrix会持续的记录所有通过Hystrix发起的请求的执行信息,并以统计报表和图形的形式展示给用户,包括每秒执行多少请求,多少成功,多少失败等。Netflix通过hystrix-metrics-event-stream项目实现了对以上指标的监控。Spring Cloud也提供了Hystrix Dashboard的整合,对监控内容转化成可视化界面。
1、项目添加依赖spring-cloud-starter-netflix-hystrix-dashboard
   <dependency>
            <groupId>org.springframework.cloud</groupId>
            <artifactId>spring-cloud-starter-netflix-hystrix-dashboard</artifactId>
  </dependency>
注意还有一个依赖,这个依赖如果是要进行图形化展示是一定要有的,一般和web同时存在
<dependency>
        <groupId>org.springframework.boot</groupId>
        <artifactId>spring-boot-starter-actuator</artifactId>
</dependency>
2、主启动类添加激活注解:@EnableHystrixDashboard
@SpringBootApplication(exclude = {DataSourceAutoConfiguration.class})
@EnableDiscoveryClient
@EnableHystrix
@EnableHystrixDashboard
public class CloudOrder {
    public static void main(String[] args) {
        SpringApplication.run(CloudOrder.class, args);
    }
}
3、yml
server:
  port: 80
4、启动测试:

二、Hystrix Dashboard监控实战
让我们的上边的80项目监控我们之前的服务端项目8001项目:
重点代码PaymentController.java:
@RestController
@RequestMapping("/payment")
@Slf4j
public class PaymentController {
    @Resource
    private PaymentService paymentService;

    @GetMapping(value = "/hystrix/timeout/{id}")
    public String paymentInfoTimeOut(@PathVariable("id") Integer id) {
        int time = 1;
        try {
            TimeUnit.SECONDS.sleep(time);
        } catch (InterruptedException e) {
            e.printStackTrace();
        }
        return "线程池:" + Thread.currentThread().getName() +  "耗时" + time + "秒成功访问paymentInfoTimeOut,id=" + id;

    }


    @HystrixCommand(fallbackMethod = "circuitFallback", commandProperties = {
            @HystrixProperty(name = "circuitBreaker.enabled", value = "true"),//是否开启断路器
            @HystrixProperty(name = "circuitBreaker.requestVolumeThreshold", value = "10"),// 请求次数
            @HystrixProperty(name = "circuitBreaker.sleepWindowInMilliseconds", value = "10000"),// 时间窗口期
            @HystrixProperty(name = "circuitBreaker.errorThresholdPercentage", value = "60")// 失败率达到多少后跳
    })
    @GetMapping(value = "/hystrix/ok/{id}")
    public String paymentCircuit(@PathVariable("id") Integer id) {
        if (id < 0) {
            throw new RuntimeException("id不能为负数");
        }
        String serial = IdUtil.simpleUUID();
        return "调用成功,线程池:" + Thread.currentThread().getName() + "访问paymentInfoTimeOut,serial=" + serial;
    }

    public String circuitFallback(Integer id) {
        return "测试断路器,线程池:" + Thread.currentThread().getName() + "访问paymentInfoTimeOut,id=" + id;

    }
}
http://localhost:8001/hystrix.stream

会发现报错了:Unable to connect to Command Metric Stream.

解决办法:
为了服务监控配置下ServletRegistrationBean,springcloud升级后,因为springboot的默认路径不是"/hystrix.stream只要在自己的电脑上配置一下Servlet就可以了。我们在PaymentController中添加如下内容:
@Bean
public ServletRegistrationBean getServlet() {
    HystrixMetricsStreamServlet streamServlet = new HystrixMetricsStreamServlet();
    ServletRegistrationBean registrationBean = new ServletRegistrationBean(streamServlet);
    registrationBean.setLoadOnStartup(1);
    registrationBean.addUrlMappings("/hystrix.stream");
    registrationBean.setName("HystrixMetricsStream");
    return registrationBean;
}
