导航
- 1. radio
- 1-1. 业务场景:
- 1-2. 效果:
- 1-3. 问题点:
- 1-4. 解决方案:
- 1-5. 代码:
- 1-5-1. HTML
- 1-5-2. JS
- 1-5-3. html 内容排版的 css
- 1-5-4. 实现 radio 效果的 css
- 2. switch
- 2-1. 业务场景:
- 2-2. 效果:
- 2-3. 问题点:
- 2-4. 解决方案:
- 2-5. 代码:
- 2-5-1. HTML
- 2-5-2. JS
- 2-5-3. html 内容排版的 css
- 2-5-4. 实现 switch 效果的 css
- 3. 公共文件
- 3-1. 基础 css
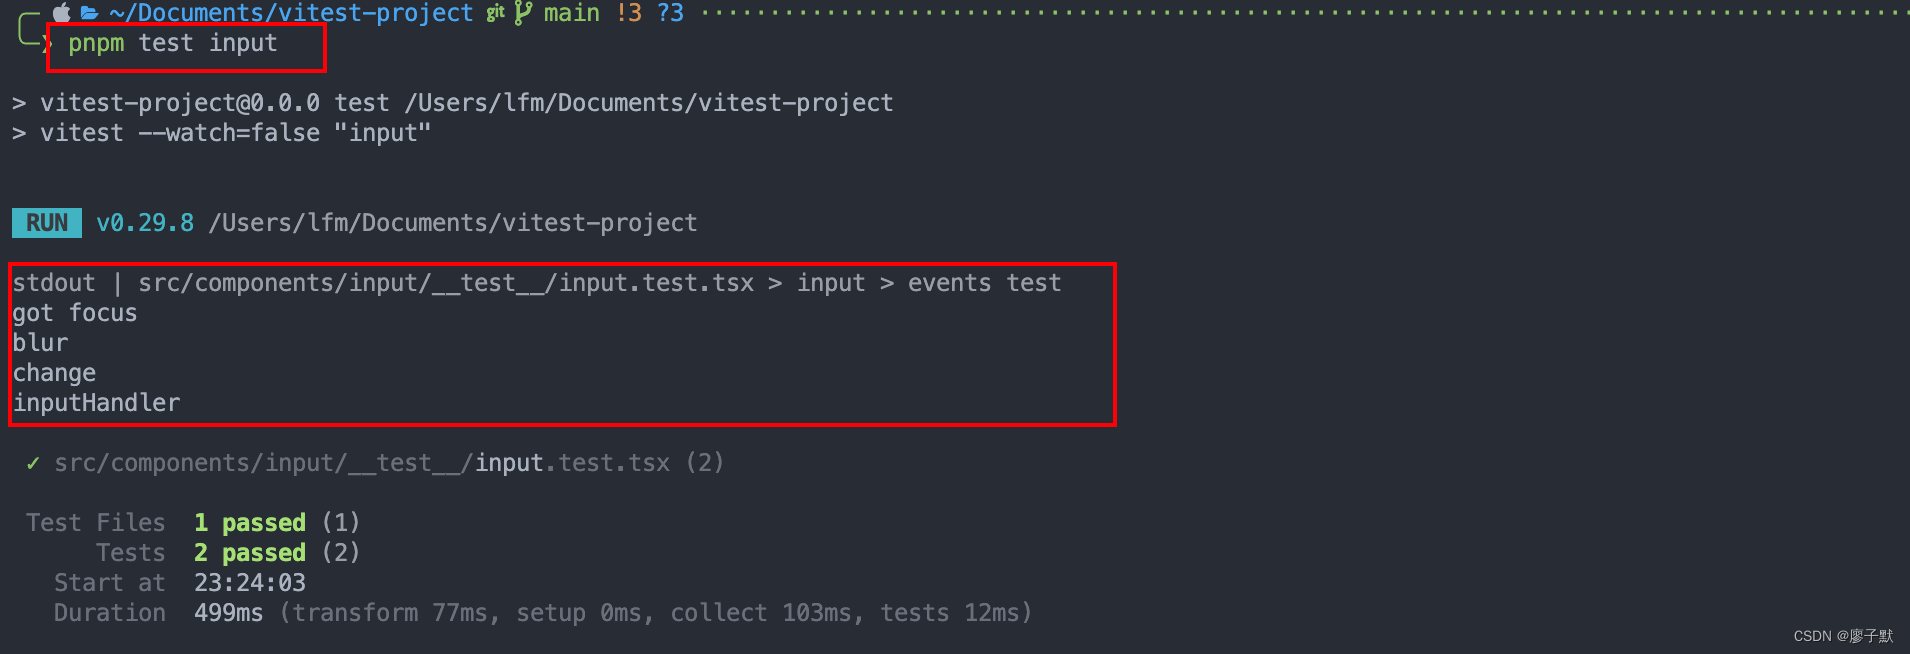
本文代码齐全,可直接复制各版块代码,略作修改即可生成 demo。
1. radio
1-1. 业务场景:
- 当某用户满足条件 A 时,方式一 与 方式二 可任意选择,即点击哪个高亮哪个。
- 当不满足条件 A 时,只可选择方式一,当选择方式二时,弹出提示,且选中的情况不发生变化。
1-2. 效果:

1-3. 问题点:
当直接使用 input 的 checked 属性时,直接点击 input 控件,被点击的就高亮了,且该控件的高亮不受 checked 控制,即使将该 input 的值设置为空,被点击控件的高亮并不消失。
1-4. 解决方案:
不使用 input 的 checked 属性,直接使用 class,通过 js 改变 class 达到 radio 的动态高亮效果。
1-5. 代码:
1-5-1. HTML
<div class="fm-radio-item">
  <label class="item-label require">签约方式</label>
  <div class="radio-group">
    <span (click)="changeRadio(1)">
      <input
        type="radio"
        id="contractMode1"
        [(ngModal)]="shopForm.contractMode"
        [class]="
          shopForm.contractMode === 1
            ? 'radio-component-checked'
            : 'radio-component'
        "
      />
      <label
        for="contractMode1"
        class="radio-label"
        (click)="forbidden($event)"
        >方式一</label
      >
    </span>
    <span (click)="changeRadio(2)">
      <input
        type="radio"
        id="contractMode2"
        [(ngModal)]="shopForm.contractMode"
        [class]="
          shopForm.contractMode === 2
            ? 'radio-component-checked'
            : 'radio-component'
        "
      />
      <label for="contractMode2" (click)="forbidden($event)">方式二</label>
    </span>
  </div>
</div>
1-5-2. JS
changeRadio = (value: number) => {
  if (value === 2) {
  	alert('条件不满足,方式二不可选');
    return;
  }
  this.shopForm[type] = value;
};
// 不阻止的话会触发2次
forbidden = (e: Event) => {
  e.preventDefault();
};
1-5-3. html 内容排版的 css
@import "./base";
@import "./radio-component-checked";

$label-width: 160px;

.fm-radio-item {
  padding: 20px;
  display: flex;
  align-items: center;
  position: relative;
  .item-label {
    display: inline-block;
    width: $label-width;
    line-height: 64px;
    font-size: $f-s-default;
    &.require {
      @include requiredAfter();
    }
  }
  .radio-group {
    flex: 1;
    width: 100%;
    padding: 11px 0;
    line-height: 40px;
    font-size: $f-s-default-max;
    .radio-label {
      margin-right: 40px;
    }
  }
}
1-5-4. 实现 radio 效果的 css
/* radio-component-checked.css */
@import "./base";
.radio-component {
  width: 32px;
  height: 32px;
  position: relative;
  top: -4px;
  margin-right: 10px;
  -webkit-appearance: none;
  appearance: none;
  box-sizing: border-box;
  padding: 0;
  /* 按钮 */
  &::before {
    content: "";
    width: 32px;
    height: 32px;
    border: 1px solid #7d7d7d;
    display: inline-block;
    border-radius: 50%;
    vertical-align: middle;
  }
}

.radio-component-checked {
  width: 32px;
  height: 32px;
  position: relative;
  top: -4px;
  margin-right: 10px;
  -webkit-appearance: none;
  appearance: none;
  box-sizing: border-box;
  padding: 0;
  /* 按钮 */
  &::before {
    content: "";
    width: 32px;
    height: 32px;
    border: 2px solid $color-primary;
    display: inline-block;
    border-radius: 50%;
    vertical-align: middle;
  }
  &::after {
    content: "";
    width: 18px;
    height: 18px;
    background-color: $color-primary;
    border-radius: 50%;
    text-align: center;
    display: block;
    position: absolute;
    top: 13px;
    left: 7px;
    vertical-align: middle;
  }
}
2. switch
2-1. 业务场景:
切换营业状态,在『开』状态时高亮。
2-2. 效果:


2-3. 问题点:
原生 input 没有 switch 属性。Switch 组件只在第三方组件中存在,如:elementUI、antd 等。
2-4. 解决方案:
使用原生开发,css 需改 input=checkbox 的基本样式为滑动按钮,js 动态改变 class 属性做到高亮的变化效果。
2-5. 代码:
2-5-1. HTML
<div class="fm-item">
  <label class="item-label require">营业状态</label>
  <div class="btn-group-con">
    <div class="radio-group">
      <input
        type="checkbox"
        (change)="changeStatus('shopStatus')"
        [ngClass]="
          !!timeForm.shopStatus
            ? 'switch-component-checked'
            : 'switch-component'
        "
      />
      <span class="tip">{{
        timeForm.shopStatus ? "营业中" : "打烊中"
      }}</span>
    </div>
  </div>
</div>
2-5-2. JS
changeStatus = (type: string) => {
  this.timeForm[type] = this.timeForm[type] === 1 ? 0 : 1;
};
2-5-3. html 内容排版的 css
.fm-item {
  display: flex;
  align-items: center;
  position: relative;
  padding: 15px 30px;
  background-color: $bg-color-main;
  border-radius: 10px;
  .item-label {
    display: inline-block;
    width: $fm-item-label-width;
    line-height: 64px;
    font-size: $f-s-default;
    &.require {
      @include requiredAfter();
    }
  }
  .radio-group {
    flex: 1;
    width: 100%;
    padding: 11px 0;
    line-height: 40px;
    font-size: $f-s-default-max;
    .tip {
      font-size: $f-s-default-min;
      color: $text-color-lightGray;
      margin-left: 20px;
    }
  }
}
2-5-4. 实现 switch 效果的 css
/* switch-component-checked */
@import "./base";
.switch-component {
  width: 80px;
  height: 40px;
  position: relative;
  top: 10px;
  background-color: $text-color-lightGray;
  border-radius: 30px;
  border: none;
  outline: none;
  -webkit-appearance: none;
  transition: all 0.2s ease;
  /* 按钮 */
  &::after {
    content: "";
    position: absolute;
    top: 0;
    left: 1px;
    width: 50%;
    height: 100%;
    background-color: $bg-color-main;
    border-radius: 50%;
    transition: all 0.2s ease;
  }
}

.switch-component-checked {
  width: 80px;
  height: 40px;
  position: relative;
  top: 10px;
  background-color: $color-primary;
  border-radius: 30px;
  border: none;
  outline: none;
  -webkit-appearance: none;
  transition: all 0.2s ease;
  /* 按钮 */
  &::after {
    content: "";
    position: absolute;
    top: 0;
    left: 49%;
    width: 50%;
    height: 100%;
    background-color: $bg-color-main;
    border-radius: 50%;
    transition: all 0.2s ease;
  }
}
3. 公共文件
3-1. 基础 css
// 基础类型颜色
$color-primary: #1890ff;
$color-success: #52c41a;
$color-warning: #faad14;
$color-danger: #ff4d4f;
$color-purple: rgb(117, 117, 255);

// 文字颜色
$text-color-placeholder: #cccccc;
$text-color-lightGray: #999999;
$text-color-gray: #666666;
$text-color-darkGray: #333333;
$text-color-default: rgba(0, 0, 0, 0.85);
$text-color-white: #ffffff;

// 字体大小
$f-s-default-max: 32px;
$f-s-default-big: 30px;
$f-s-default: 28px;
$f-s-default-small: 26px;
$f-s-default-min: 24px;

// 行高
$l-h-default-max: 38px;
$l-h-default-big: 36px;
$l-h-default: 34px;
$l-h-default-small: 32px;
$l-h-default-min: 30px;

// 背景色
$bg-color-default: rgb(240, 240, 245);
$bg-color-main: rgb(255, 255, 255);

// border 线
$border-lightGray: 1px solid #cccccc;
/**
 * 文字后的星号(必填标识)
 */
@mixin requiredAfter($left: 10px) {
  &::after {
    content: "*";
    color: $color-danger;
    position: relative;
    left: $left;
  }
}