本文内容参考:
Linux安全模块AppArmor总结-CSDN博客,
apparmor首页、文档和下载 - 应用程序访问控制系统 - OSCHINA - 中文开源技术交流社区,
AppArmor · GitBook,
AppArmor配置(二)_domybest_nsg的博客-CSDN博客
接前一篇文章:AppArmor零知识学习十三、实操与实践(1)
上一篇文章使能了AppArmor,但是目前系统中还没有具有配置文件的应用程序,本文就来添加访问控制规则以使系统中存在具有配置文件的应用程序。
二、添加访问控制规则
1. 编写测试例程
先编写一个测试例程,代码如下:
#include <stdio.h>
#include <stdlib.h>
#include <string.h>
#include <errno.h>


int main(int argc, char *argv[])
{
        FILE *f;
        int i = 0;
        char ch;

        if(3 == argc)
        {
                f = fopen(argv[1], "w");
                if(!f)
                {
                        fprintf(stderr, "fopen failed with w, error: %s\n", strerror(errno));
                        return 2;
                }
                while(i < strlen(argv[2]))
                {
                        fputc(argv[2][i], f);
                        i++;
                }
                fclose(f);
        }
        else if(argc == 2)
        {
                f = fopen(argv[1], "r");
                if(!f)
                {
                        fprintf(stderr, "fopen failed with r, error: %s\n", strerror(errno));
                        return 2;
                }
                while((ch=fgetc(f)) != EOF)
                        printf(" %c", ch);
                fclose(f);
        }
        else
        {
                printf("Usage:\n");
                printf("\ttest_app file \"string\"\n");
                printf("\ttest_app file\n");
                return 3;
        }

        return 0;
}
对测试例程进行编译和简单测试。如下所示:
$ gcc test_app.c -o test_app
$ ls
test_app  test_app.c
$ ./test_app kkk
fopen failed with r, error: No such file or directory

$ ./test_app kkk 1234
$ ./test_app kkk
 1 2 3 4
2. 创建规则
利用genprof创建规则。步骤如下:
(1)进入到创建测试例程的目录
penghao@Ding-Perlis-MP260S48:~/AppArmor$ cd sample_code/
penghao@Ding-Perlis-MP260S48:~/AppArmor/sample_code$ ls
kkk  test_app  test_app.c

penghao@Ding-Perlis-MP260S48:~/AppArmor/sample_code$ rm kkk
penghao@Ding-Perlis-MP260S48:~/AppArmor/sample_code$ ls
test_app  test_app.c
(2)创建规则
$ aa-genprof test_app
正在在 /etc/apparmor.d 中更新 AppArmor 配置文件。Writing updated profile for /home/penghao/AppArmor/sample_code/test_app.

ERROR: [Errno 13] Permission denied: '/etc/apparmor.d/tmpdy6clx3q~'
前边加上sudo,再次执行以上命令:
$ sudo aa-genprof test_app
[sudo] penghao 的密码:正在在 /etc/apparmor.d 中更新 AppArmor 配置文件。Writing updated profile for /home/penghao/AppArmor/sample_code/test_app.
正在将 /home/penghao/AppArmor/sample_code/test_app 设置为投诉模式。
在开始之前,您可能希望检查您希望限制的应用程序的配置文件是否已经存在。有关详细信息,请参考以下维基页面:https://gitlab.com/apparmor/apparmor/wikis/Profiles

分析中: /home/penghao/AppArmor/sample_code/test_app

请启动要在另一个窗口中分析的应用程序,并立即执行其功能。
完成后,选择下面的“扫描”选项,以扫描系统日志中的AppArmor事件。
对于每个 AppArmor 事件,您将有机会选择是应允许还是拒绝访问。
[扫描系统日志以查找 AppArmor 事件(S)] / 完成(F)
按'F'键(无需回车)完成过程,如下所示:
[扫描系统日志以查找 AppArmor 事件(S)] / 完成(F)
正在设置 /home/penghao/AppArmor/sample_code/test_app 到强制模式
重启 AppArmor 到强制模式
请考虑贡献您的新配置文件!参阅以下 wiki 页面获取更多信息:https://gitlab.com/apparmor/apparmor/wikis/Profiles

已完成为 /home/penghao/AppArmor/sample_code/test_app 生成配置文件。
查看/etc/apparmor.d/下的内容:
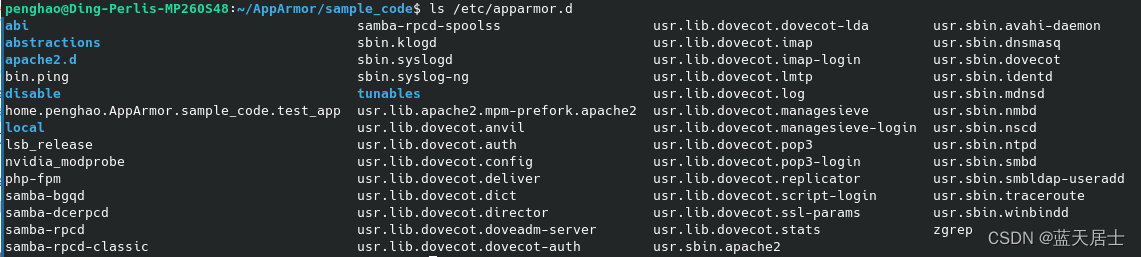
对比之前的内容:
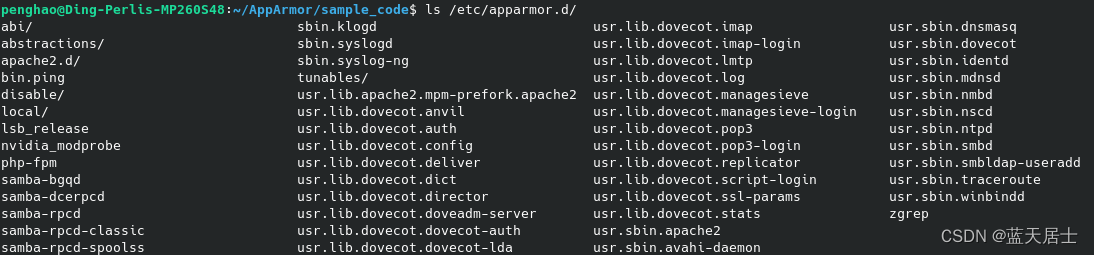
可以看到,最大的变化是在/etc/apparmor.d/下多了一个home.penghao.AppArmor.sample_code.test_app文件,文件名就是该文件的绝对路径,只是由'/'变为了'.'。文件内容如下:
# Last Modified: Wed Apr 19 10:23:02 2023
abi <abi/3.0>,

include <tunables/global>

/home/penghao/AppArmor/sample_code/test_app {
  include <abstractions/base>

  /home/penghao/AppArmor/sample_code/test_app mr,

}
此时再使用上一篇文章中提到的aa-status命令查看当前AppArmor的运行状态和具有配置文件的应用程序。命令及结果如下所示:
$ sudo aa-status
apparmor module is loaded.
1 profiles are loaded.
1 profiles are in enforce mode.
   /home/penghao/AppArmor/sample_code/test_app
0 profiles are in complain mode.
0 profiles are in kill mode.
0 profiles are in unconfined mode.
0 processes have profiles defined.
0 processes are in enforce mode.
0 processes are in complain mode.
0 processes are unconfined but have a profile defined.
0 processes are in mixed mode.
0 processes are in kill mode.
对比之前没有设置规则时的结果:
$ sudo apparmor_status
apparmor module is loaded.
(3)修改规则
修改/etc/apparmor.d/home.penghao.AppArmor.sample_code.test_app文件,在文件大括号内加入以下内容:
/home/penghao/AppArmor/sample_code/abcde rwm,
/home/penghao/AppArmor/sample_code/abcd w,
/home/penghao/AppArmor/sample_code/abc r,
前一部分为文件名,后一部分为权限。
修改后的文件内容如下:
# Last Modified: Wed Apr 19 10:23:02 2023
abi <abi/3.0>,

include <tunables/global>

/home/penghao/AppArmor/sample_code/test_app {
  include <abstractions/base>

  /home/penghao/AppArmor/sample_code/test_app mr,
  /home/penghao/AppArmor/sample_code/abcde rwm,
  /home/penghao/AppArmor/sample_code/abcd w,
  /home/penghao/AppArmor/sample_code/abc r,

}
(4)重新装载