BDD - SpecFlow & SpecRun 一个 Cases 匹配多个浏览器
- 引言
- 方案
- SpecFlow+ Runner profiles
- 实现
- 被测 Web Application
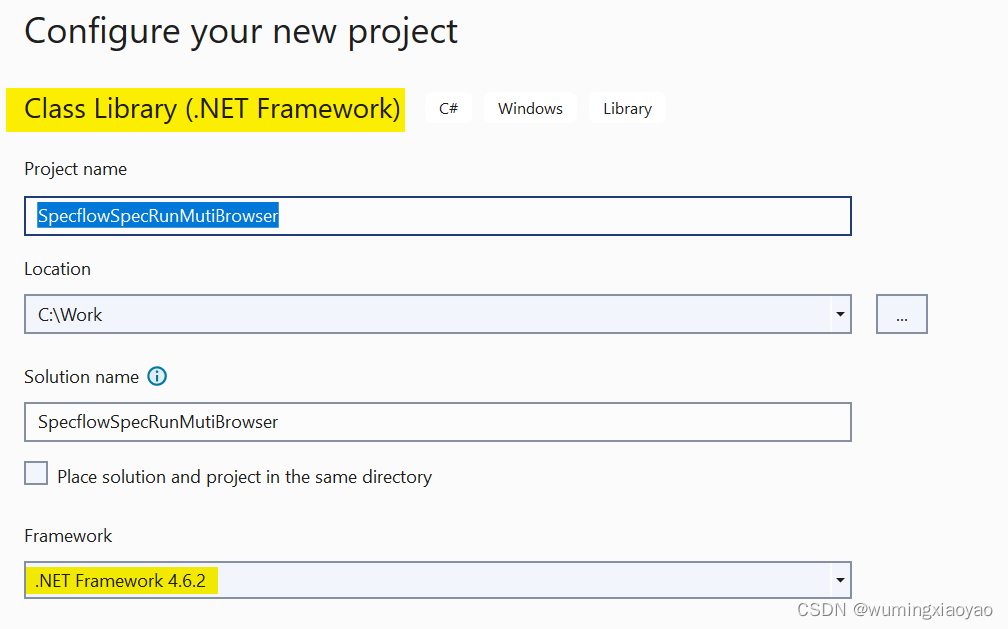
- 创建一个 Class Libary 项目
- 添加 NuGet Packages
- SpecFlow & SpecRun 包
- 添加 Selenium包
- 其它包
- 创建 Feature 文件
- 配置 Default.srprofile
- Default.srprofile 添加 Targets
- 添加 DeploymentTransformation
- 配置 App.config
- 设计 Driver 层
- ConfigurationDriver.cs
- BrowserSeleniumDriverFactory.cs
- WebDriver.cs
- CalculatorPageDriver.cs
- 实现 Step Definition
- 添加 Hooks
- 执行测试
引言
在进行 Web UI 测试,通常需要在多个浏览器上进行兼容性测试,例如:Chrome,IE,Edge 和 Firefox。但是为所有浏览器都分别写 Cases 似乎是费时,也是没有必要的事。今天我们就来介绍一种方案,一套 Cases 可以在所有浏览器上运行。如果你不太了解 BDD SpecFlow Web UI 测试,请先阅读之前的文章 《 BDD - SpecFlow Web UI 测试实践 》
方案
SpecFlow+ Runner 可通过 Targets 来实现,Targets 定义在 SpecFlow+ Runner profile 文件中,可以定义不同环境的设置,filters 和 为每个 target 部署转换步骤 (deployment transformation steps)
为每个浏览器定义 targets 使得一个 cases 可以在所有的浏览器上执行。
SpecFlow+ Runner profiles
SpecFlow+ Runner profiles (.srprofile 扩展名文件) 是 XML 结构文件,用来决定 SpecFlow+ Runner 如何运行测试用例,例如:失败的测试是可以再执行 1 次或多次, 定义测试环境的不同 target(定义不同的浏览器或 x64/x86),启动多线程,配置文件及文件夹路径,应用 transformations 规则为不同的 target 环境来改变配置变量等。
默认,SpecFlow+ Runner 会有一个名为 Default.srprofile 的文件。注意:对于 SpecFlow 2,当添加 SpecFlow.SpecRun NuGet 包时,这个 Default.srprofile 文件会自动加到项目中。对于 SpecFlow 3,需要后动添加这个文件,但是我试过,SpecFlow 3 没法手动添加这个文件。 出于这个考虑,所以本文将采用 SpecFlow 2.
实现
被测 Web Application
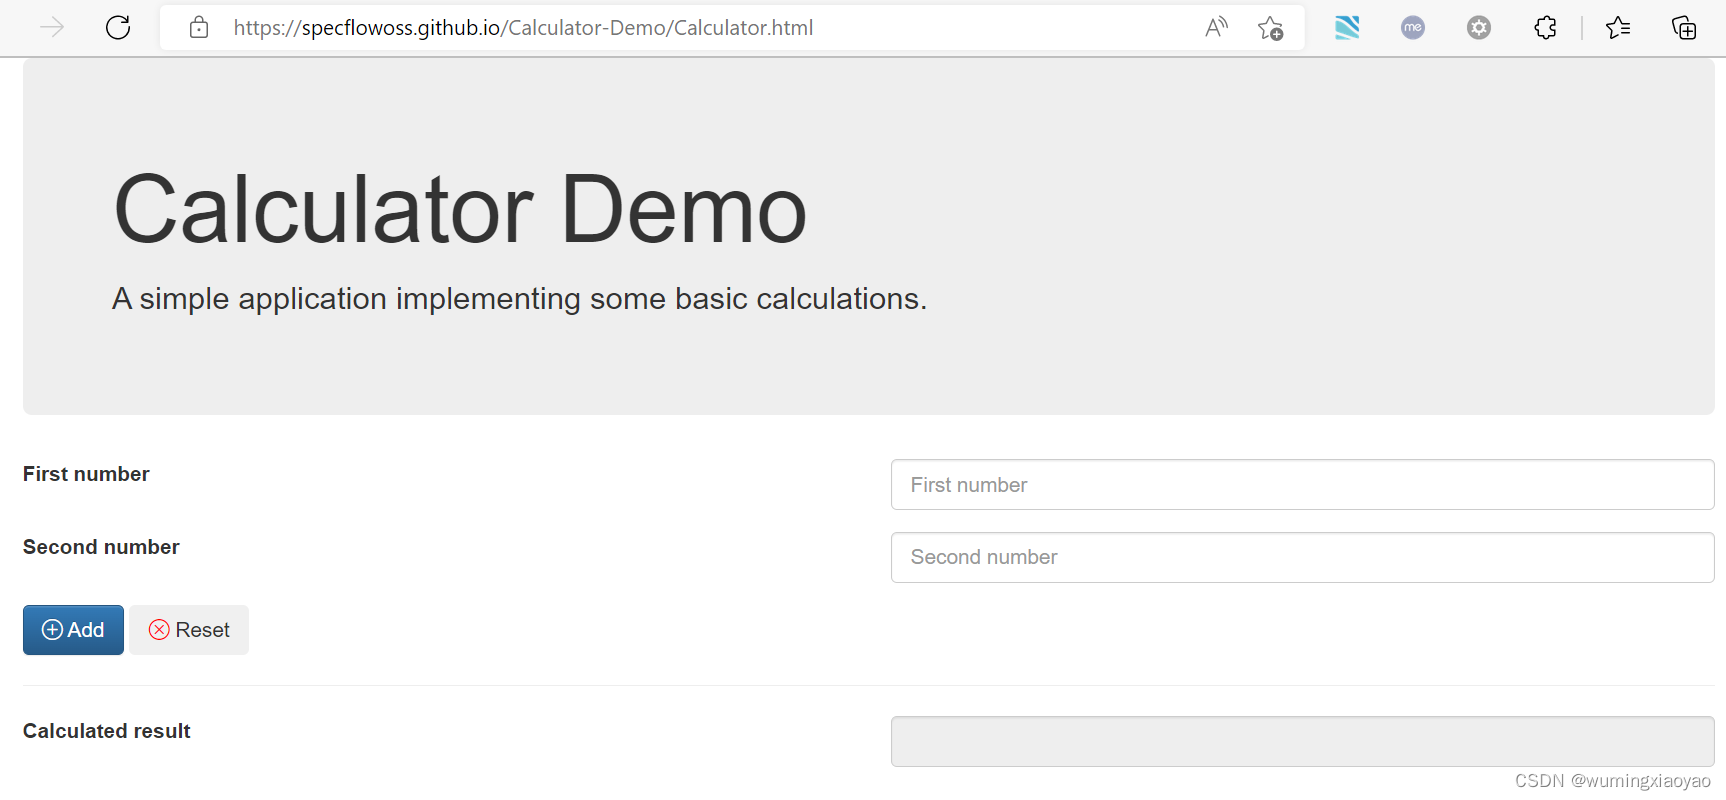
我们的实践测试项目是一个 Web 版的简单的计算器实现,Web Calculator, 实现了两个数相加的功能。
创建一个 Class Libary 项目
添加 NuGet Packages
SpecFlow & SpecRun 包
需要注意匹配的版本
SpecFlow 2.4
SpecRun.SpecFlow 1.8.5
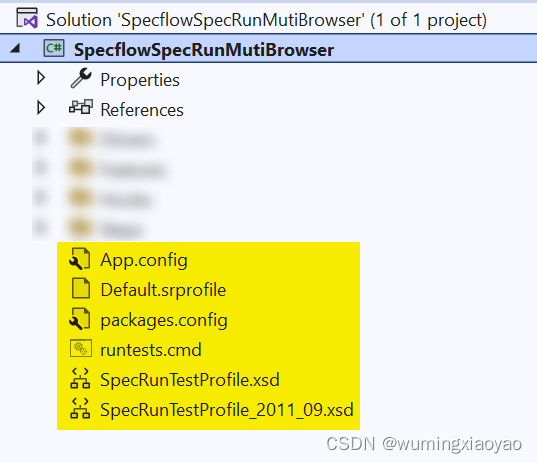
安装成功后,项目中会自动添加这些文件,重点关注 Default.srprofile 文件
添加 Selenium包
下面这些 Selenium 包只需最新版本就可以了
Selenium.Support
Selenium.Firefox.WebDriver
Selenium.WebDriver.ChromeDriver
Selenium.WebDriver.IEDriver
Selenium.WebDriver.MSEdgeDriver
添加成功后,编译一下整个 Solution,Bin 目录下会下载各个浏览器的 Web Dirver,用来启动浏览器,并进行元素定位操作。

其它包
可根据代码需要添加一些依赖包,例如 FluentAssertions 包用来断言的。
创建 Feature 文件
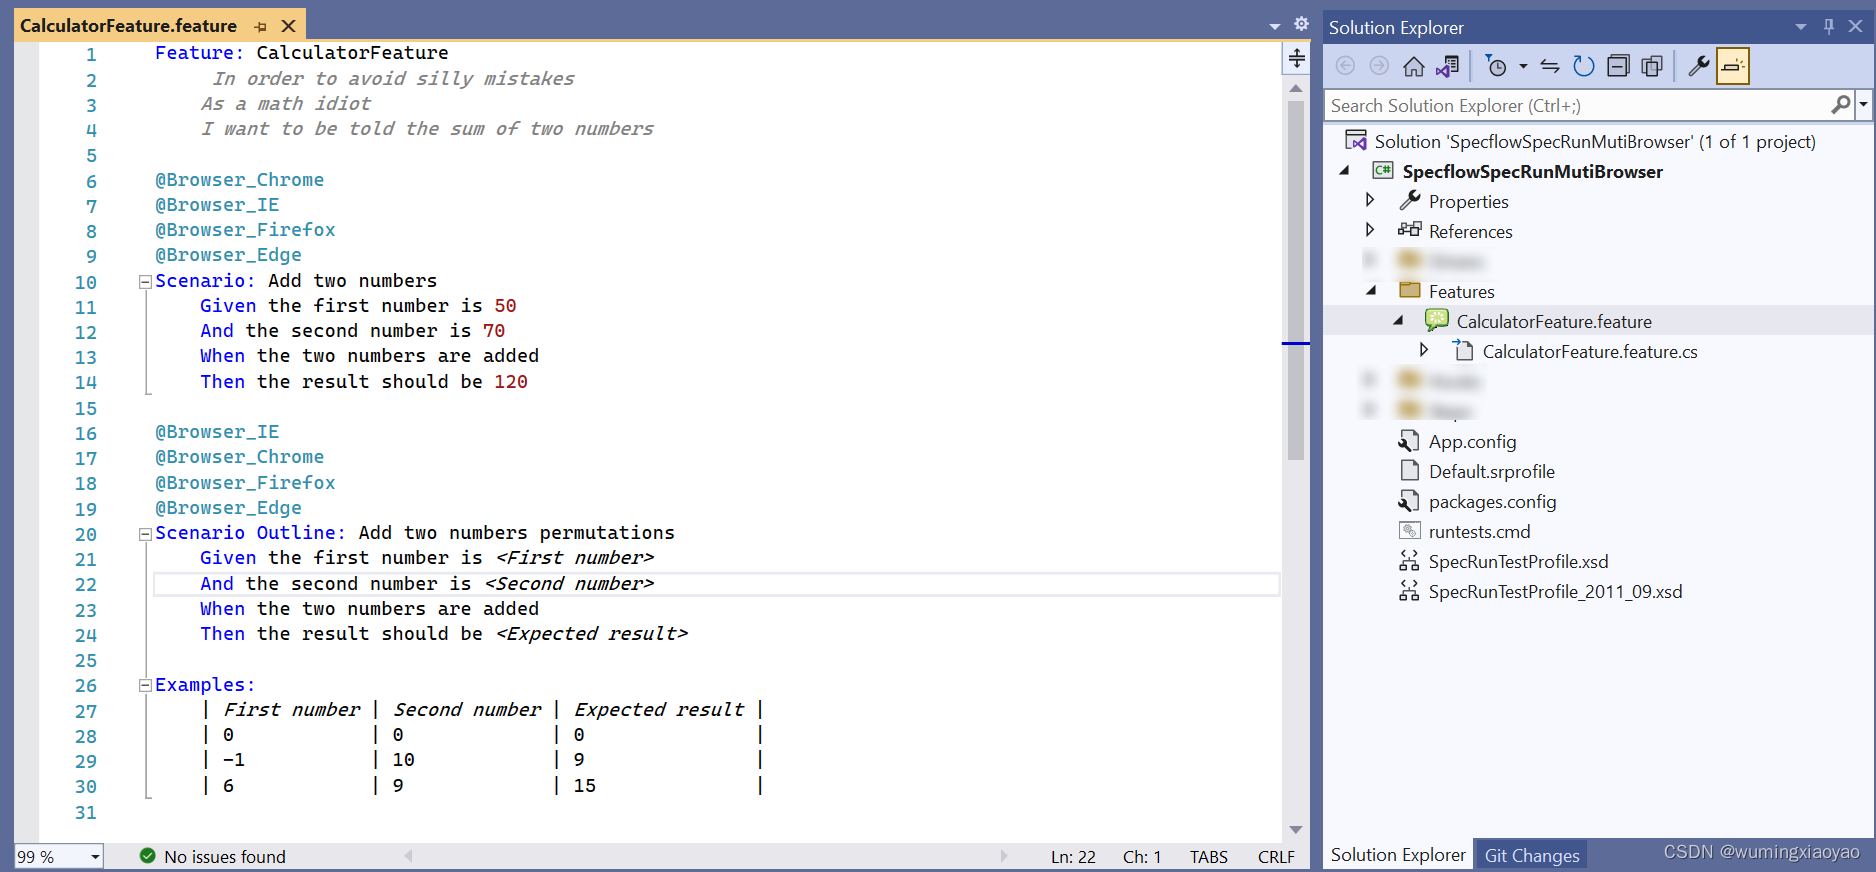
Feature: CalculatorFeature
	 In order to avoid silly mistakes
	As a math idiot
	I want to be told the sum of two numbers

@Browser_Chrome
@Browser_IE
@Browser_Firefox
@Browser_Edge
Scenario: Add two numbers
	Given the first number is 50
	And the second number is 70
	When the two numbers are added
	Then the result should be 120

@Browser_IE
@Browser_Chrome
@Browser_Firefox
@Browser_Edge
Scenario Outline: Add two numbers permutations
	Given the first number is <First number>
	And the second number is <Second number>
	When the two numbers are added
	Then the result should be <Expected result>

Examples:
	| First number | Second number | Expected result |
	| 0            | 0             | 0               |
	| -1           | 10            | 9               |
	| 6            | 9             | 15              |
配置 Default.srprofile
Default.srprofile 添加 Targets
定义各种浏览器 Target,用 Scenarios 的 tag 做为 filter。
例如:打上 @Browser_IE tag 的 Scenario target 为 IE 浏览器。
<Targets>
    <Target name="IE">
      <Filter>Browser_IE</Filter>
    </Target>
    <Target name="Chrome">
      <Filter>Browser_Chrome</Filter>
    </Target>
    <Target name="Firefox">
      <Filter>Browser_Firefox</Filter>
    </Target>
   <Target name="Edge">
     <Filter>Browser_Edge</Filter>
   </Target>
  </Targets>
但是官网例子中下面这种方式,EnvironmentVariable tag 识别不了,很是奇怪。
    <Target name="IE">
      <Filter>Browser_IE</Filter>
      <DeploymentTransformationSteps>
        <EnvironmentVariable variable="Test_Browser" value="IE" />
      </DeploymentTransformationSteps>
    </Target>
添加 DeploymentTransformation
用来解析 target 中的值,转换 app.config 文件,将 browser key 的值 设置成 target 的 name,用 {Target} 作为占位符。在转换过程中用当前 target 的 name 来替换这个占位符。
 <DeploymentTransformation>
    <Steps>
      <ConfigFileTransformation configFile="App.config">
        <Transformation>
        <![CDATA[<?xml version="1.0" encoding="utf-8"?>
        <configuration xmlns:xdt="http://schemas.microsoft.com/XML-Document-Transform">
        <appSettings>
        <add key="browser" value="{Target}"
        xdt:Locator="Match(key)"
        xdt:Transform="SetAttributes(value)" />
        </appSettings>
        </configuration>]]>
      </Transformation>
   </ConfigFileTransformation>
    </Steps>
  </DeploymentTransformation>

配置 App.config
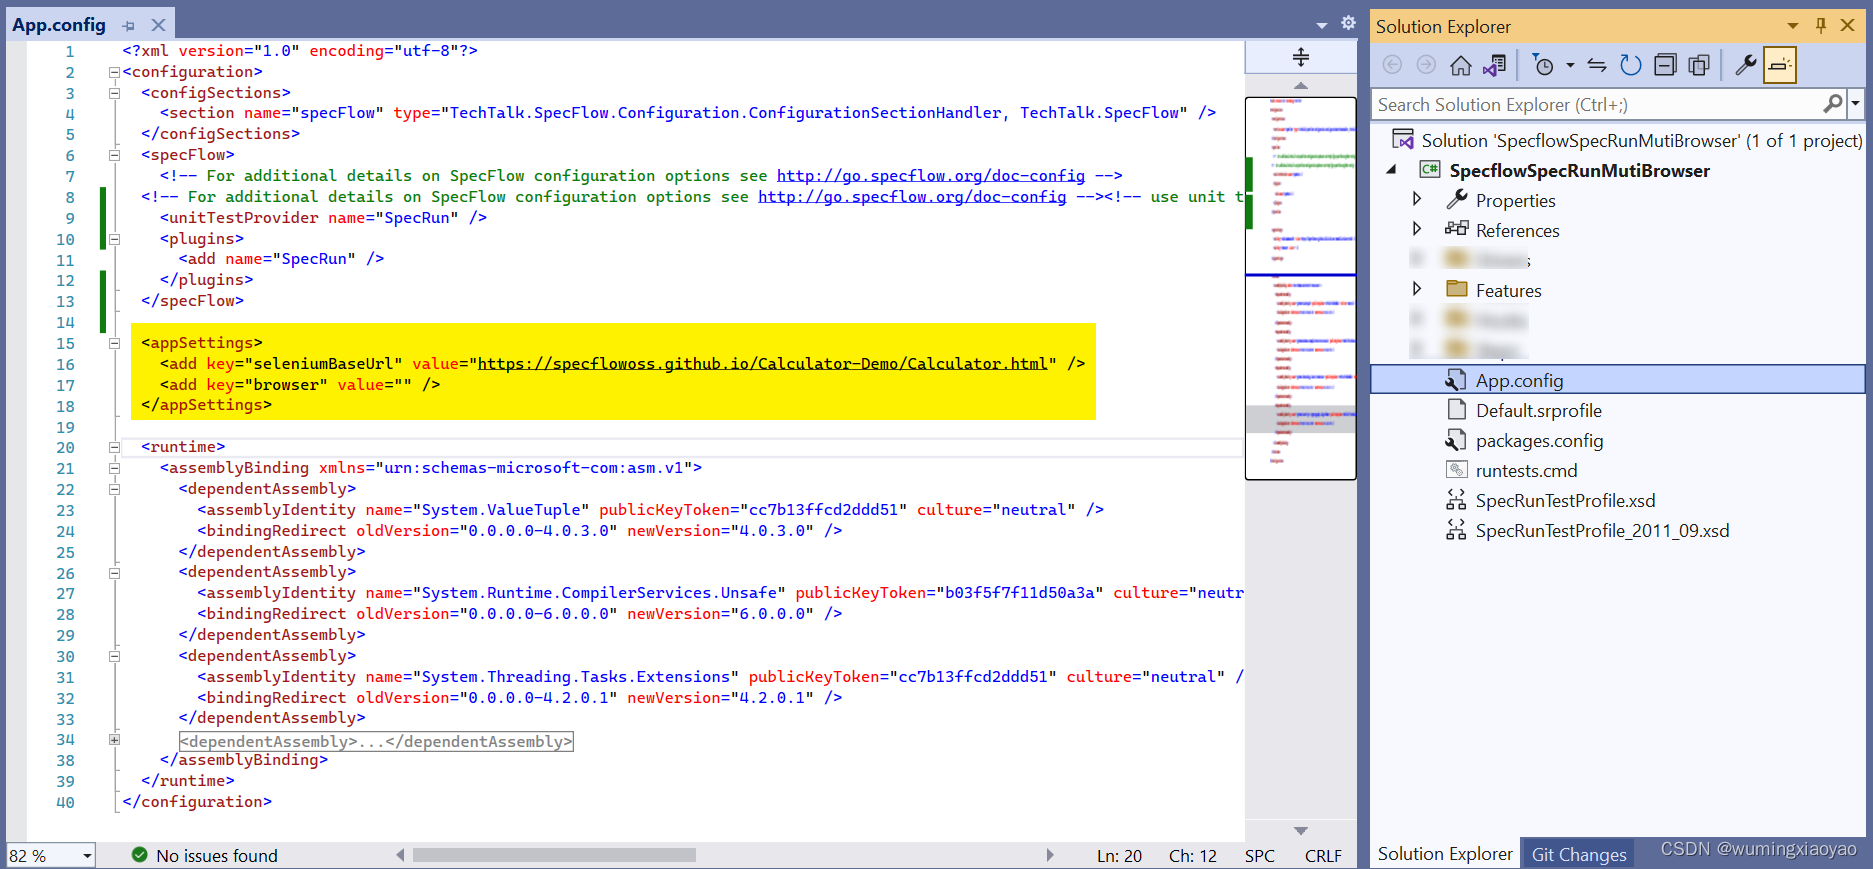
添加下面这个配置,用来配置被测 APP 的 URL,以及 browser 变量,这个变量的值不用赋值,通过 Default.srprofile 中添加的 DeploymentTransformation 来动态转换成对应的 target。
  <appSettings>
    <add key="seleniumBaseUrl" value="https://specflowoss.github.io/Calculator-Demo/Calculator.html" />
    <add key="browser" value="" />
  </appSettings>
设计 Driver 层
整个设计都设计到 Context Injection,具体细节可以参考 《 BDD - SpecFlow Context Injection 上下文依赖注入 》
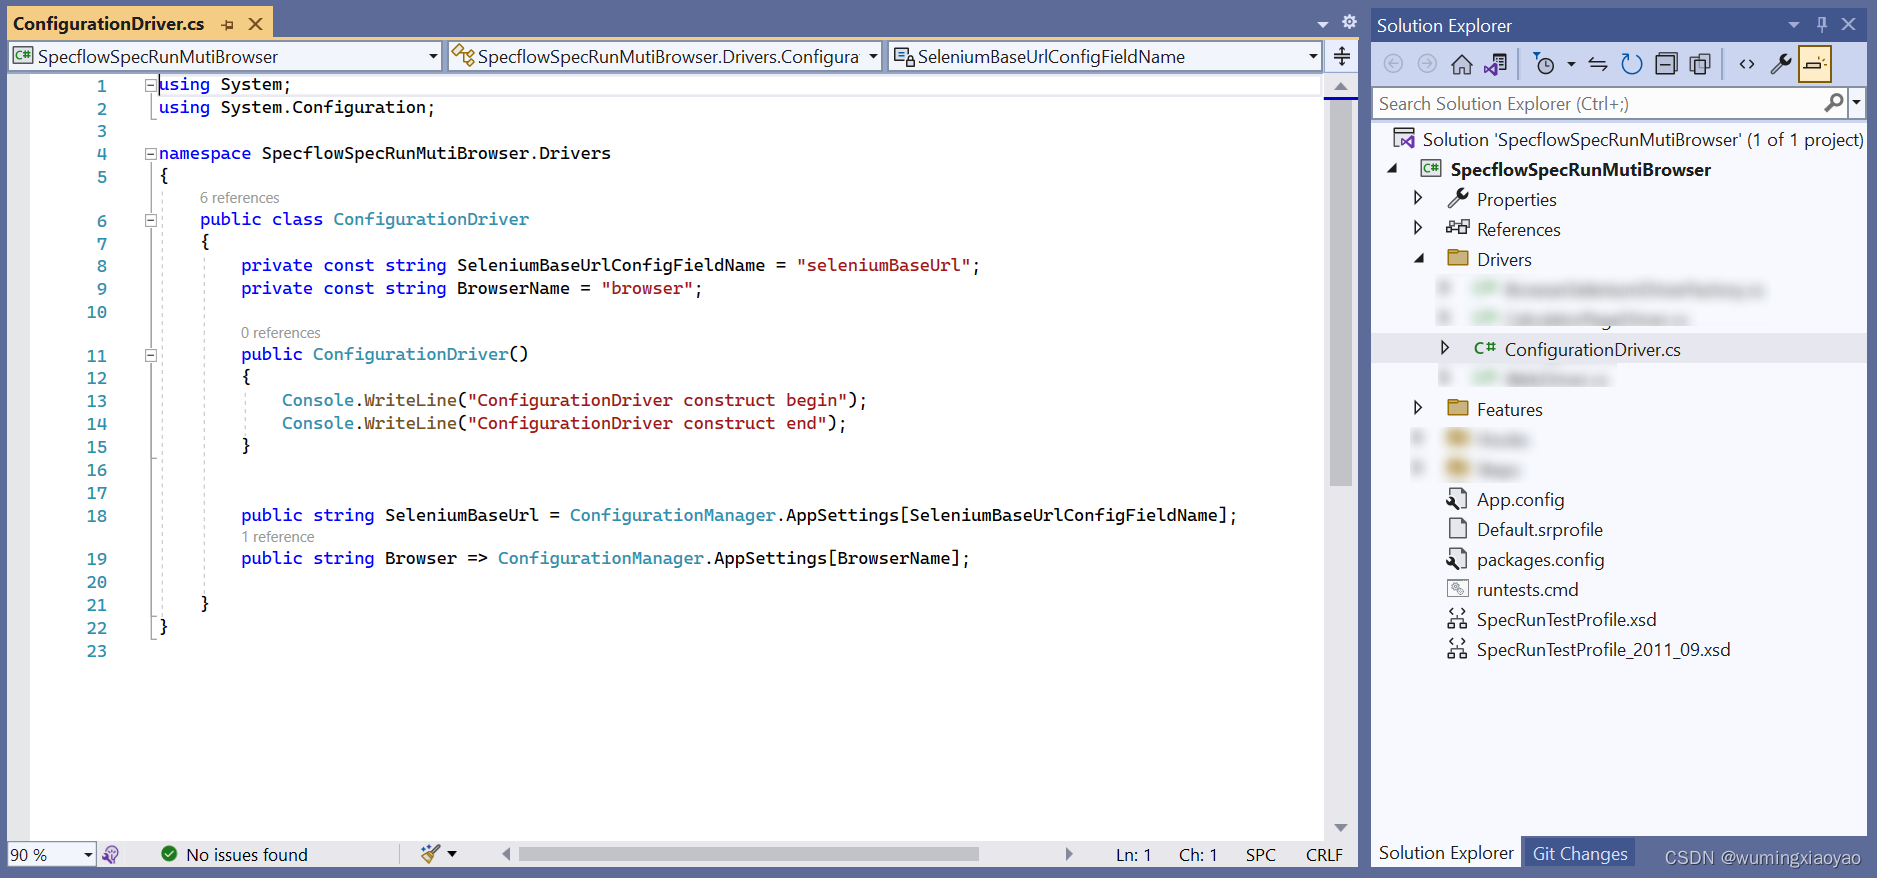
ConfigurationDriver.cs
用来读取 App.config 中的配置的被测 APP URL 及 browser 信息。
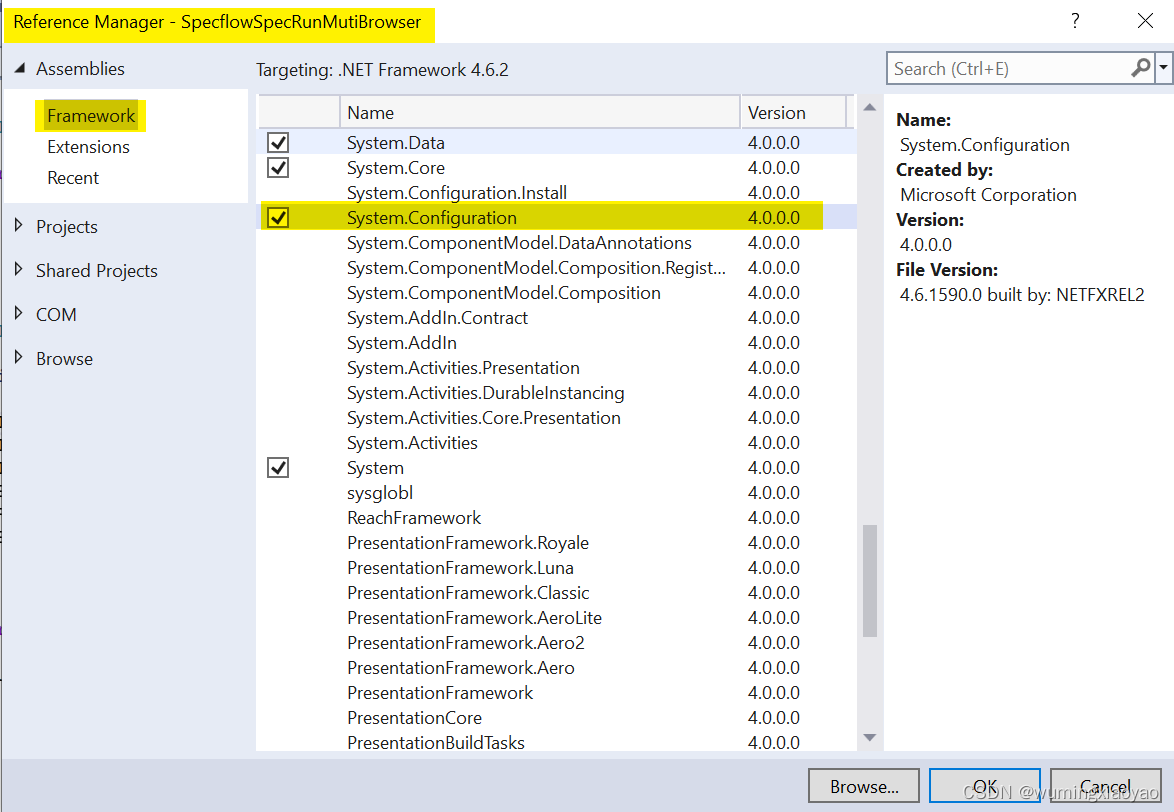
为了读取 App.config 中的配置,需要添加 Add Reference “System.Configuration”
using System;
using System.Configuration;

namespace SpecflowSpecRunMutiBrowser.Drivers
{
    public class ConfigurationDriver
    {
        private const string SeleniumBaseUrlConfigFieldName = "seleniumBaseUrl";
        private const string BrowserName = "browser";

        public ConfigurationDriver()
        {
            Console.WriteLine("ConfigurationDriver construct begin");
            Console.WriteLine("ConfigurationDriver construct end");
        }

        public string SeleniumBaseUrl = ConfigurationManager.AppSettings[SeleniumBaseUrlConfigFieldName];
        public string Browser => ConfigurationManager.AppSettings[BrowserName];

    }
}
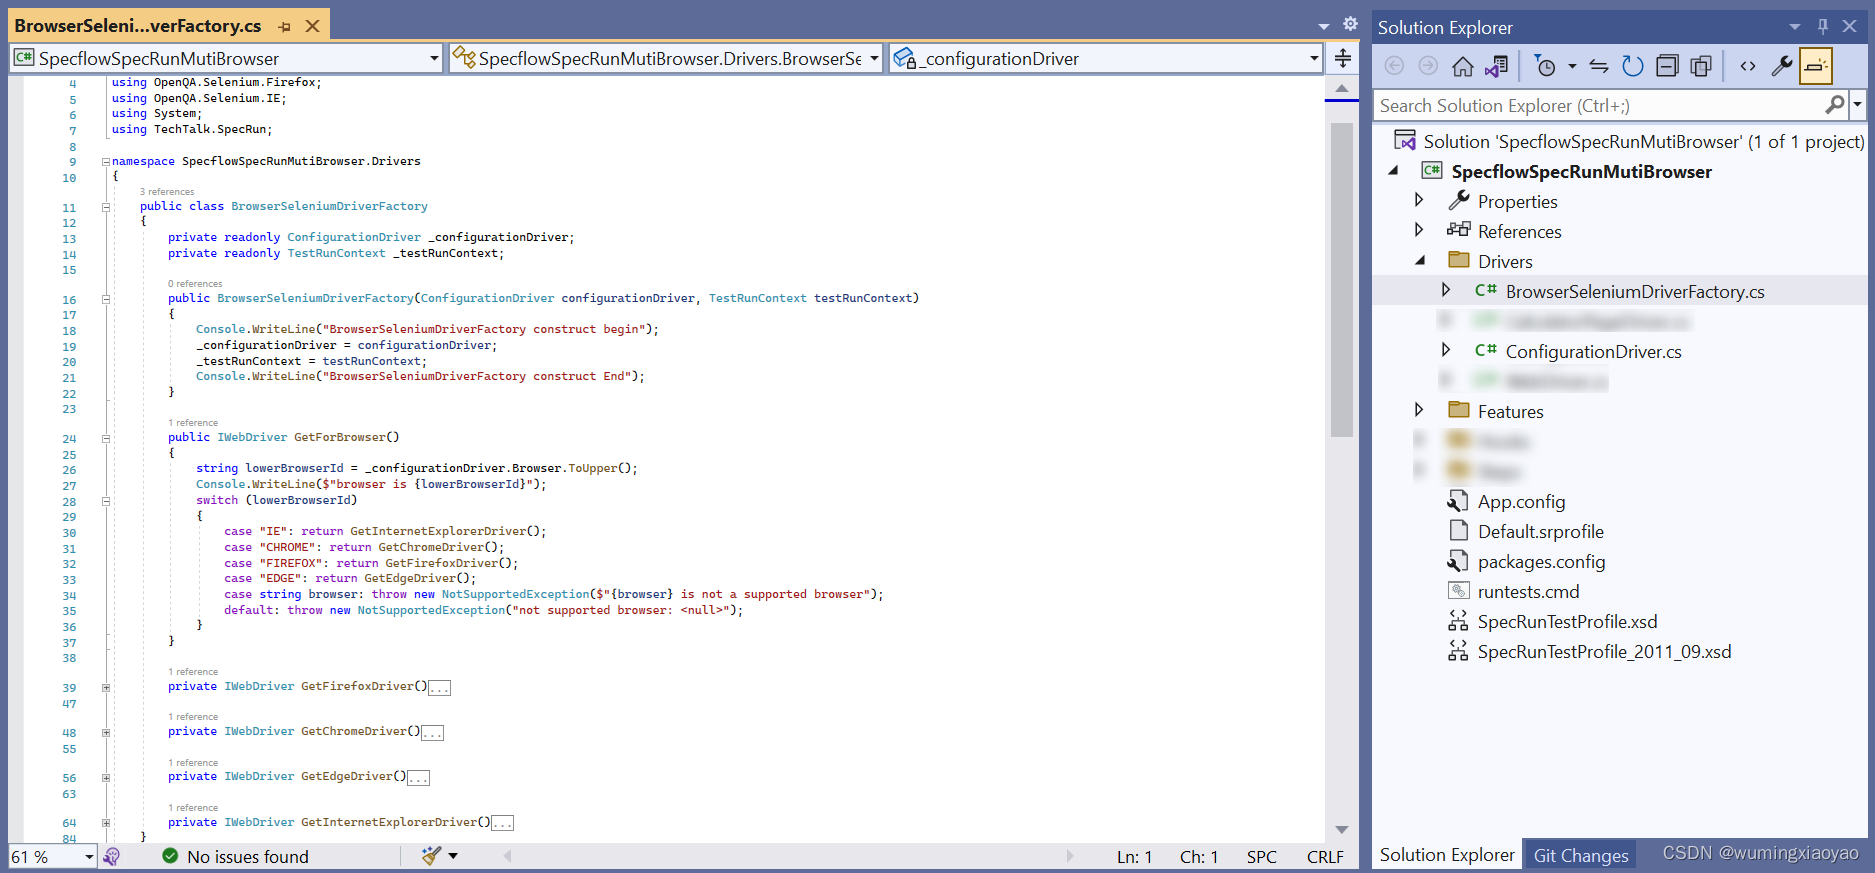
BrowserSeleniumDriverFactory.cs
基于 App.config 配置的 browser 来创建对应的 WebDriver
using OpenQA.Selenium;
using OpenQA.Selenium.Chrome;
using OpenQA.Selenium.Edge;
using OpenQA.Selenium.Firefox;
using OpenQA.Selenium.IE;
using System;
using TechTalk.SpecRun;

namespace SpecflowSpecRunMutiBrowser.Drivers
{
    public class BrowserSeleniumDriverFactory
    {
        private readonly ConfigurationDriver _configurationDriver;
        private readonly TestRunContext _testRunContext;

        public BrowserSeleniumDriverFactory(ConfigurationDriver configurationDriver, TestRunContext testRunContext)
        {
            Console.WriteLine("BrowserSeleniumDriverFactory construct begin");
            _configurationDriver = configurationDriver;
            _testRunContext = testRunContext;
            Console.WriteLine("BrowserSeleniumDriverFactory construct End");
        }

        public IWebDriver GetForBrowser()
        {
            string lowerBrowserId = _configurationDriver.Browser.ToUpper();
            Console.WriteLine($"browser is {lowerBrowserId}");
            switch (lowerBrowserId)
            {
                case "IE": return GetInternetExplorerDriver();
                case "CHROME": return GetChromeDriver();
                case "FIREFOX": return GetFirefoxDriver();
                case "EDGE": return GetEdgeDriver();
                case string browser: throw new NotSupportedException($"{browser} is not a supported browser");
                default: throw new NotSupportedException("not supported browser: <null>");
            }
        }

        private IWebDriver GetFirefoxDriver()
        {
            return new FirefoxDriver(FirefoxDriverService.CreateDefaultService(_testRunContext.TestDirectory))
            {
                Url = _configurationDriver.SeleniumBaseUrl,

            };
        }

        private IWebDriver GetChromeDriver()
        {
            return new ChromeDriver(ChromeDriverService.CreateDefaultService(_testRunContext.TestDirectory))
            {
                Url = _configurationDriver.SeleniumBaseUrl
            };
        }

        private IWebDriver GetEdgeDriver()
        {
            return new EdgeDriver(EdgeDriverService.CreateDefaultService(_testRunContext.TestDirectory));
            //{
            //    Url = _configurationDriver.SeleniumBaseUrl
            //};
        }

        private IWebDriver GetInternetExplorerDriver()
        {
            var internetExplorerOptions = new InternetExplorerOptions
            {
                InitialBrowserUrl = null,
                IntroduceInstabilityByIgnoringProtectedModeSettings = true,
                IgnoreZoomLevel = true,
                EnableNativeEvents = true,
                RequireWindowFocus = true,
                EnablePersistentHover = true


            };
            return new InternetExplorerDriver(InternetExplorerDriverService.CreateDefaultService(_testRunContext.TestDirectory), internetExplorerOptions)
            {
                Url = _configurationDriver.SeleniumBaseUrl,


            };
        }
    }
}
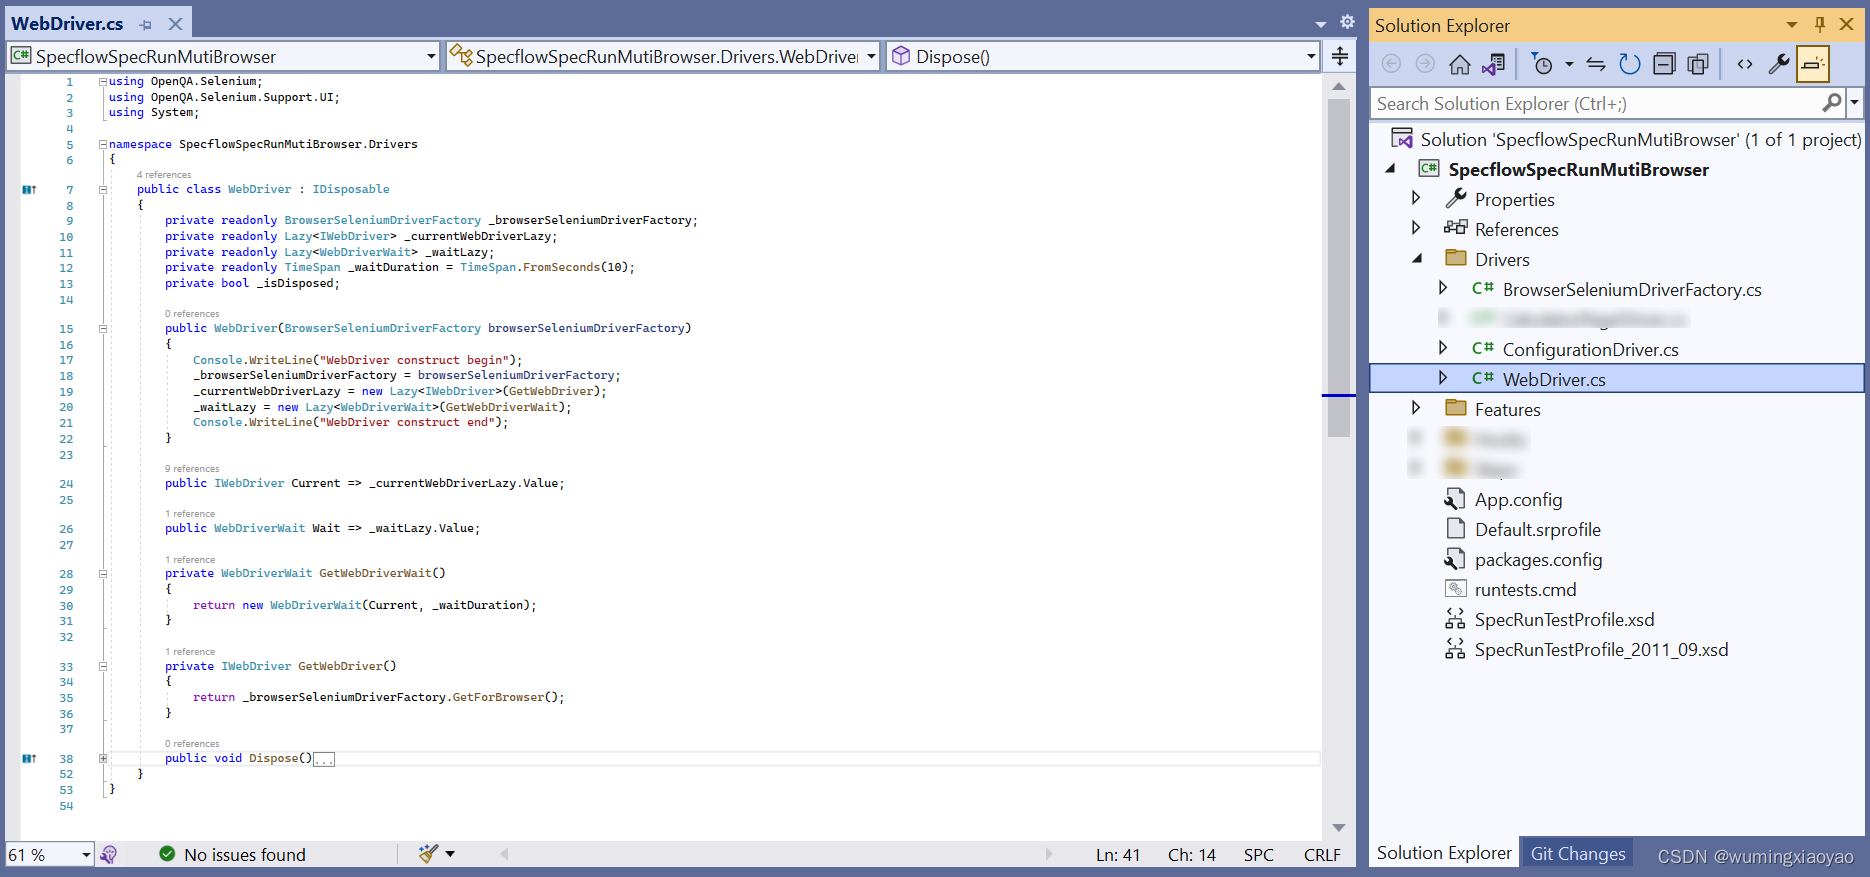
WebDriver.cs
用来得到当前 WebDriver 实例
using OpenQA.Selenium;
using OpenQA.Selenium.Support.UI;
using System;

namespace SpecflowSpecRunMutiBrowser.Drivers
{
    public class WebDriver : IDisposable
    {
        private readonly BrowserSeleniumDriverFactory _browserSeleniumDriverFactory;
        private readonly Lazy<IWebDriver> _currentWebDriverLazy;
        private readonly Lazy<WebDriverWait> _waitLazy;
        private readonly TimeSpan _waitDuration = TimeSpan.FromSeconds(10);
        private bool _isDisposed;

        public WebDriver(BrowserSeleniumDriverFactory browserSeleniumDriverFactory)
        {
            Console.WriteLine("WebDriver construct begin");
            _browserSeleniumDriverFactory = browserSeleniumDriverFactory;
            _currentWebDriverLazy = new Lazy<IWebDriver>(GetWebDriver);
            _waitLazy = new Lazy<WebDriverWait>(GetWebDriverWait);
            Console.WriteLine("WebDriver construct end");
        }

        public IWebDriver Current => _currentWebDriverLazy.Value;

        public WebDriverWait Wait => _waitLazy.Value;

        private WebDriverWait GetWebDriverWait()
        {
            return new WebDriverWait(Current, _waitDuration);
        }

        private IWebDriver GetWebDriver()
        {
            return _browserSeleniumDriverFactory.GetForBrowser();
        }

        public void Dispose()
        {
            if (_isDisposed)
            {
                return;
            }

            if (_currentWebDriverLazy.IsValueCreated)
            {
                Current.Quit();
            }

            _isDisposed = true;
        }
    }
}
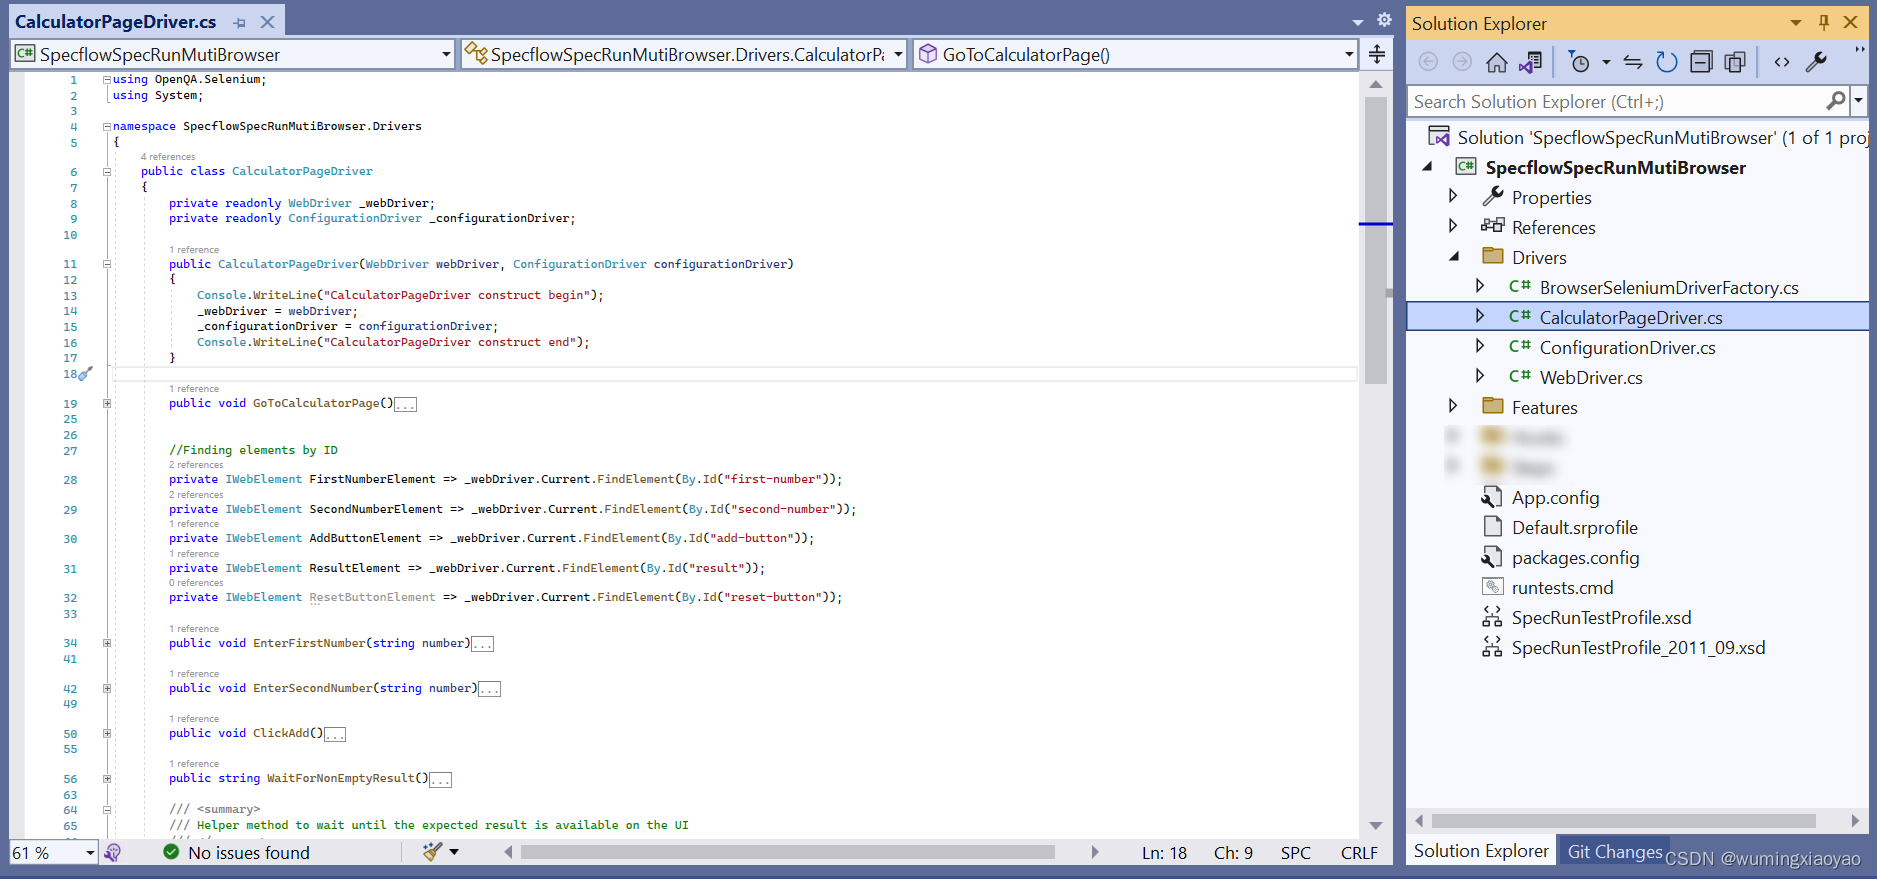
CalculatorPageDriver.cs
用来封装被测 APP 的页面元素和行为
using OpenQA.Selenium;
using System;

namespace SpecflowSpecRunMutiBrowser.Drivers
{
    public class CalculatorPageDriver
    {
        private readonly WebDriver _webDriver;
        private readonly ConfigurationDriver _configurationDriver;

        public CalculatorPageDriver(WebDriver webDriver, ConfigurationDriver configurationDriver)
        {
            Console.WriteLine("CalculatorPageDriver construct begin");
            _webDriver = webDriver;
            _configurationDriver = configurationDriver;
            Console.WriteLine("CalculatorPageDriver construct end");
        }

        public void GoToCalculatorPage()
        {
            string baseUrl = _configurationDriver.SeleniumBaseUrl;
            _webDriver.Current.Manage().Window.Maximize();
            _webDriver.Current.Navigate().GoToUrl($"{baseUrl}");
        }


        //Finding elements by ID
        private IWebElement FirstNumberElement => _webDriver.Current.FindElement(By.Id("first-number"));
        private IWebElement SecondNumberElement => _webDriver.Current.FindElement(By.Id("second-number"));
        private IWebElement AddButtonElement => _webDriver.Current.FindElement(By.Id("add-button"));
        private IWebElement ResultElement => _webDriver.Current.FindElement(By.Id("result"));
        private IWebElement ResetButtonElement => _webDriver.Current.FindElement(By.Id("reset-button"));

        public void EnterFirstNumber(string number)
        {
            //Clear text box
            FirstNumberElement.Clear();
            //Enter text
            FirstNumberElement.SendKeys(number);
        }

        public void EnterSecondNumber(string number)
        {
            //Clear text box
            SecondNumberElement.Clear();
            //Enter text
            SecondNumberElement.SendKeys(number);
        }

        public void ClickAdd()
        {
            //Click the add button
            AddButtonElement.Click();
        }

        public string WaitForNonEmptyResult()
        {
            //Wait for the result to be not empty
            return WaitUntil(
                () => ResultElement.GetAttribute("value"),
                result => !string.IsNullOrEmpty(result));
        }

        /// <summary>
        /// Helper method to wait until the expected result is available on the UI
        /// </summary>
        /// <typeparam name="T">The type of result to retrieve</typeparam>
        /// <param name="getResult">The function to poll the result from the UI</param>
        /// <param name="isResultAccepted">The function to decide if the polled result is accepted</param>
        /// <returns>An accepted result returned from the UI. If the UI does not return an accepted result within the timeout an exception is thrown.</returns>
        private T WaitUntil<T>(Func<T> getResult, Func<T, bool> isResultAccepted) where T : class
        {

            return _webDriver.Wait.Until(driver =>
            {
                var result = getResult();
                if (!isResultAccepted(result))
                    return default;

                return result;
            });

        }
    }
}
实现 Step Definition
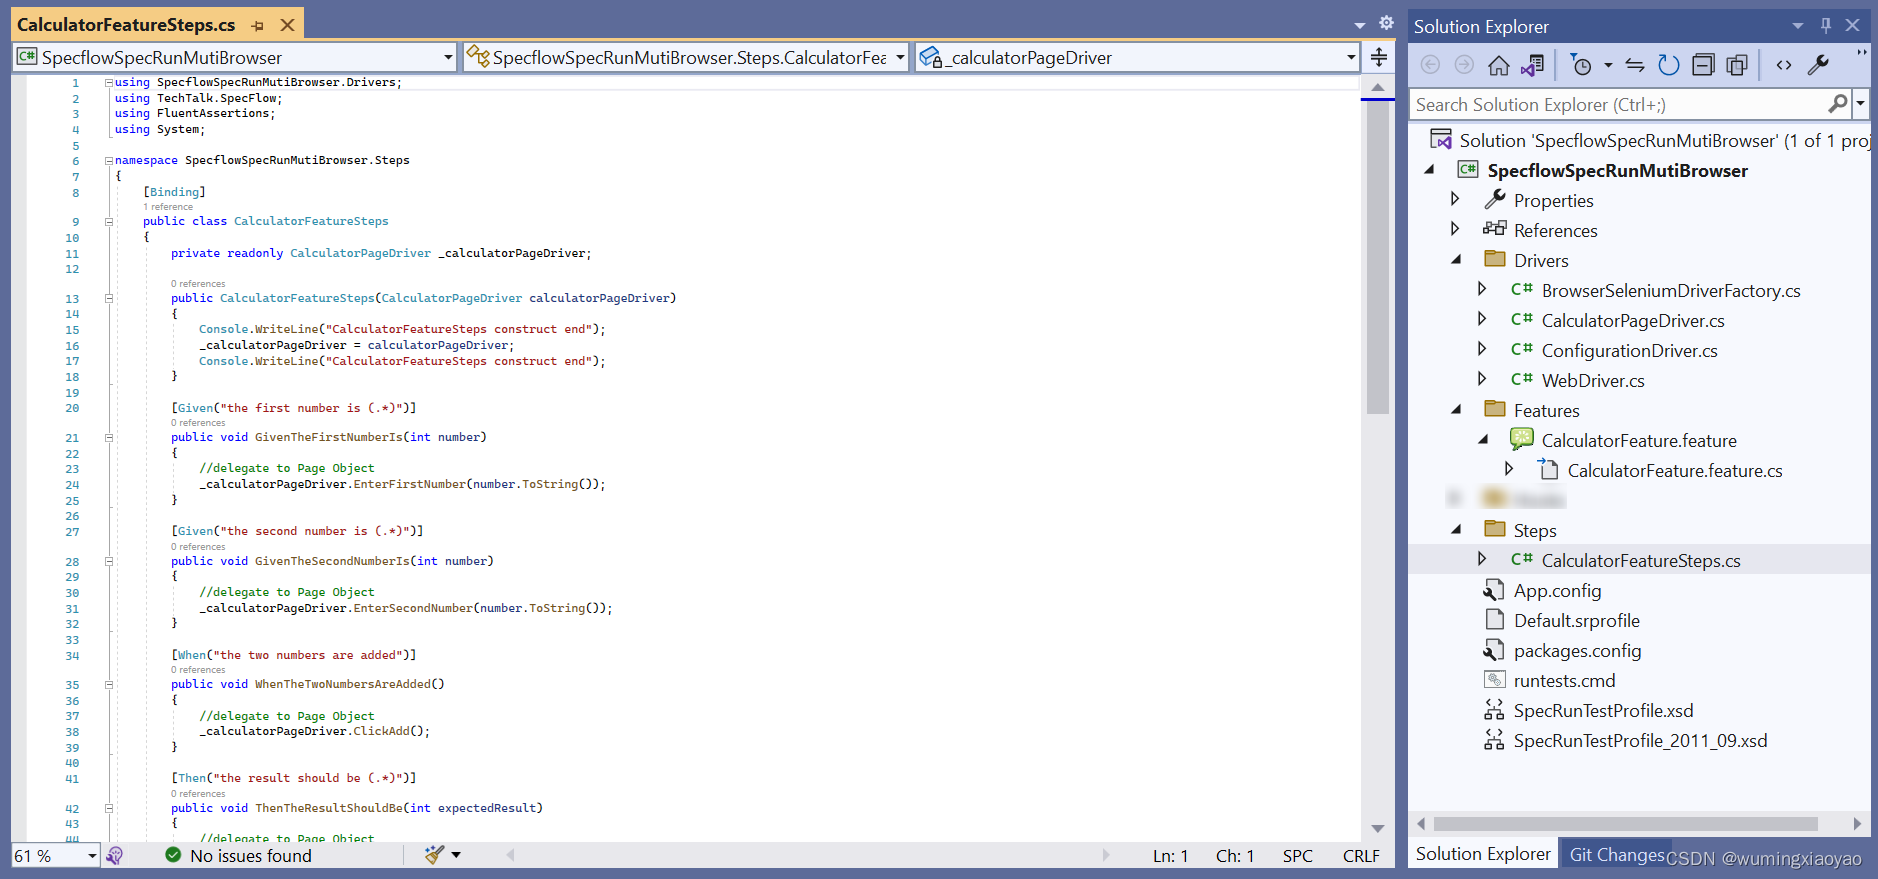
CalculatorFeatureSteps.cs 通过调用 CalculatorPageDriver 封装的 UI 元素和方法来实现 Feature 文件中的 Steps。
using SpecflowSpecRunMutiBrowser.Drivers;
using TechTalk.SpecFlow;
using FluentAssertions;
using System;

namespace SpecflowSpecRunMutiBrowser.Steps
{
    [Binding]
    public class CalculatorFeatureSteps
    {
        private readonly CalculatorPageDriver _calculatorPageDriver;

        public CalculatorFeatureSteps(CalculatorPageDriver calculatorPageDriver)
        {
            Console.WriteLine("CalculatorFeatureSteps construct end");
            _calculatorPageDriver = calculatorPageDriver;
            Console.WriteLine("CalculatorFeatureSteps construct end");
        }

        [Given("the first number is (.*)")]
        public void GivenTheFirstNumberIs(int number)
        {
            //delegate to Page Object
            _calculatorPageDriver.EnterFirstNumber(number.ToString());
        }

        [Given("the second number is (.*)")]
        public void GivenTheSecondNumberIs(int number)
        {
            //delegate to Page Object
            _calculatorPageDriver.EnterSecondNumber(number.ToString());
        }

        [When("the two numbers are added")]
        public void WhenTheTwoNumbersAreAdded()
        {
            //delegate to Page Object
            _calculatorPageDriver.ClickAdd();
        }

        [Then("the result should be (.*)")]
        public void ThenTheResultShouldBe(int expectedResult)
        {
            //delegate to Page Object
            var actualResult = _calculatorPageDriver.WaitForNonEmptyResult();

            actualResult.Should().Be(expectedResult.ToString());
        }
    }
}
添加 Hooks
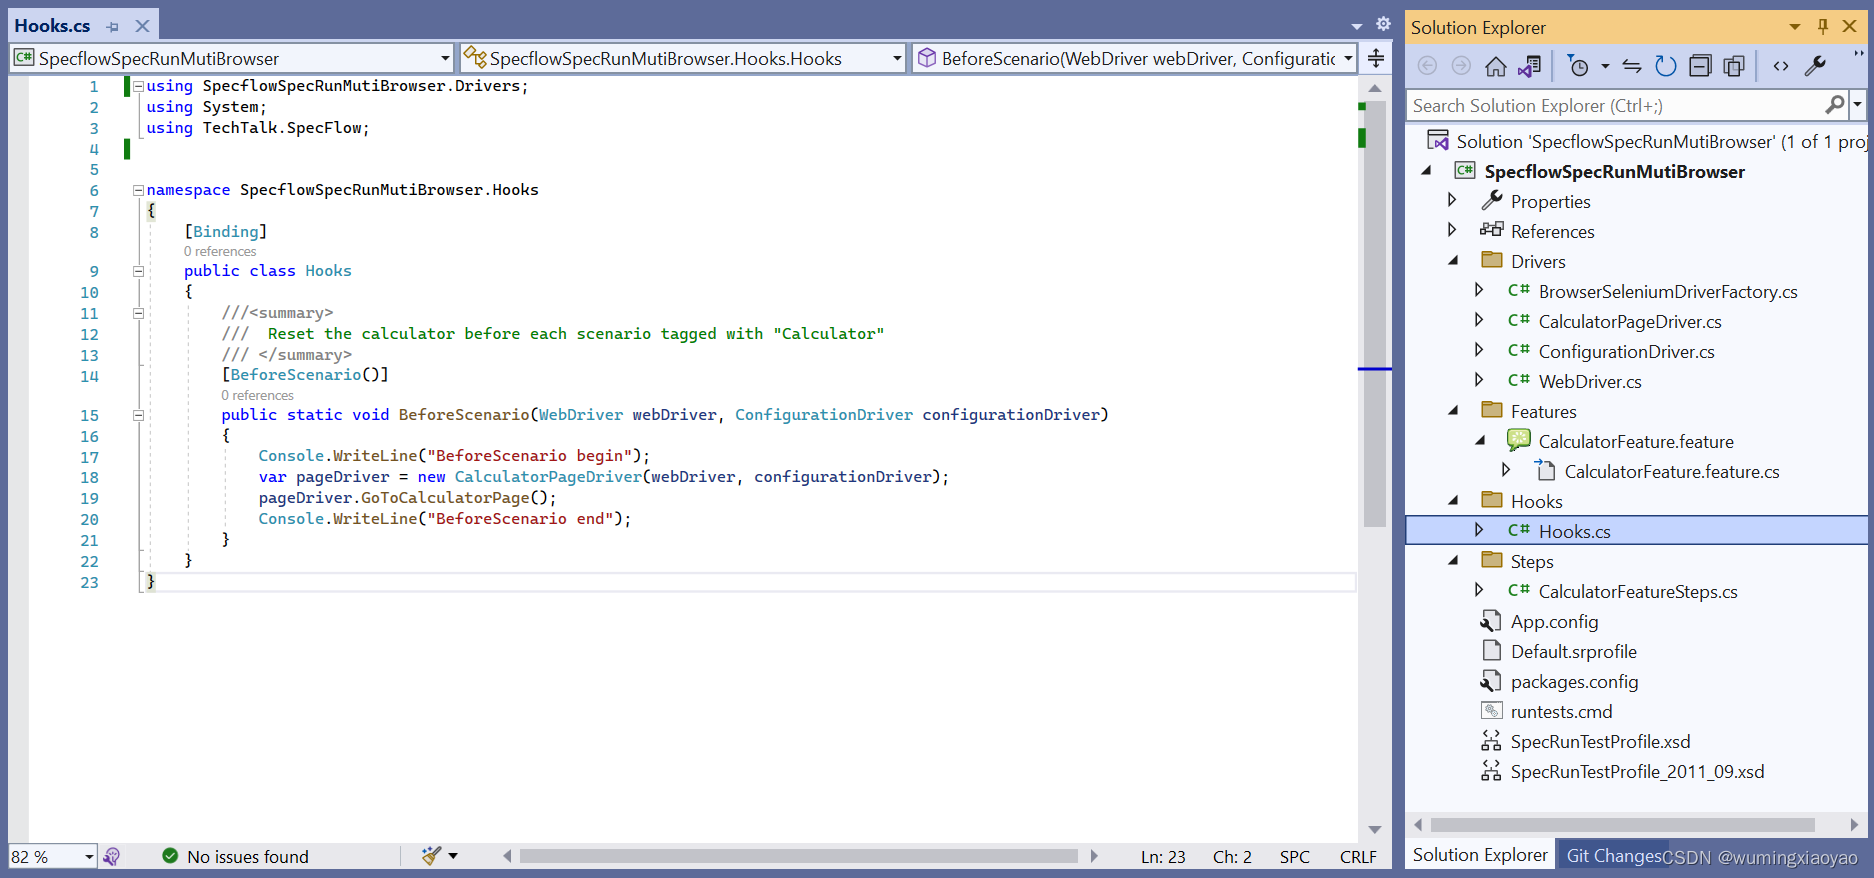
Hooks.cs 用于添加 BeforeScenario Hook,Scenario 执行前先导航到被测 APP 的 Home page。当然如果不添加 Hook,就得在每个 Scenario 中添加一个前置 Step 也是可以的,例如:Given I navigated to the Calculator page
using SpecflowSpecRunMutiBrowser.Drivers;
using System;
using TechTalk.SpecFlow;

namespace SpecflowSpecRunMutiBrowser.Hooks
{
    [Binding]
    public class Hooks
    {
        ///<summary>
        ///  Reset the calculator before each scenario tagged with "Calculator"
        /// </summary>
        [BeforeScenario()]
        public static void BeforeScenario(WebDriver webDriver, ConfigurationDriver configurationDriver)
        {
            Console.WriteLine("BeforeScenario begin");
            var pageDriver = new CalculatorPageDriver(webDriver, configurationDriver);
            pageDriver.GoToCalculatorPage();
            Console.WriteLine("BeforeScenario end");
        }
    }
}
执行测试
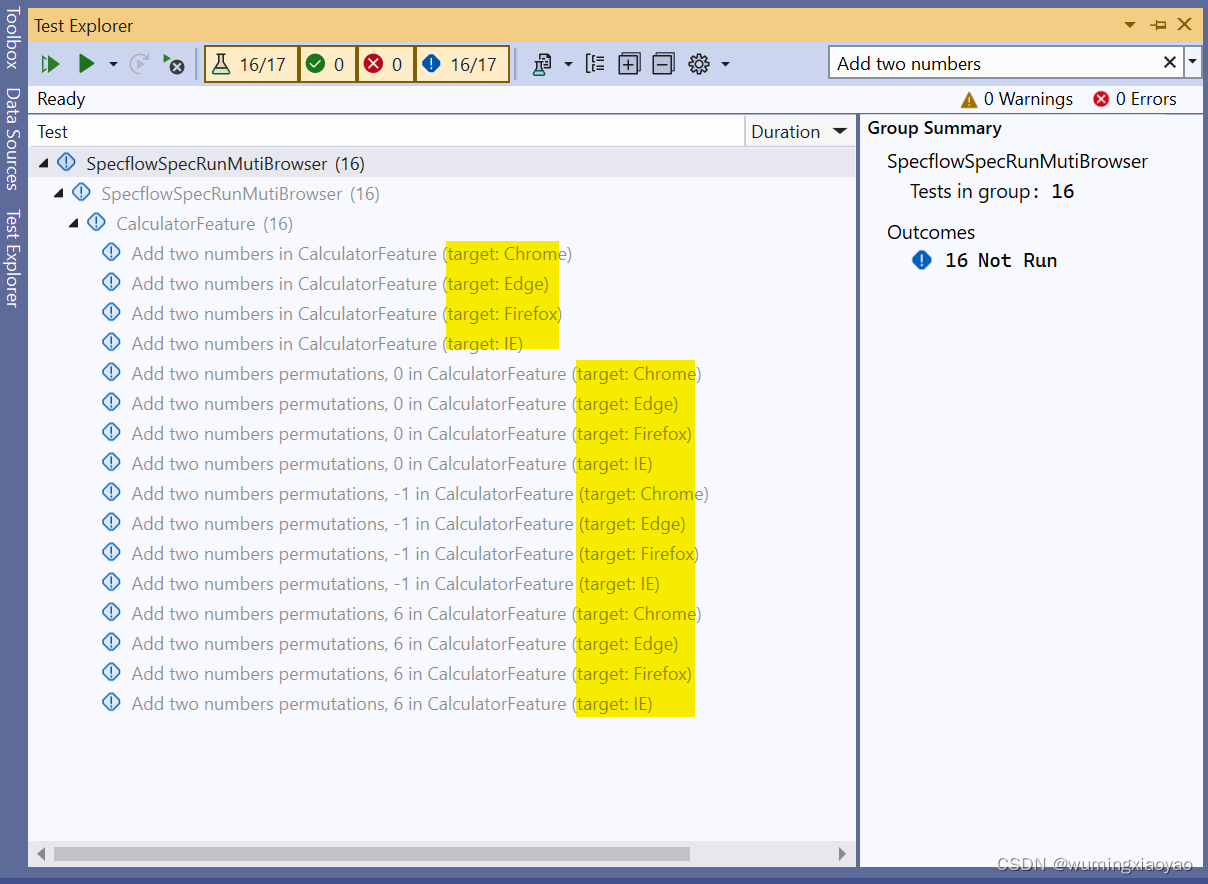
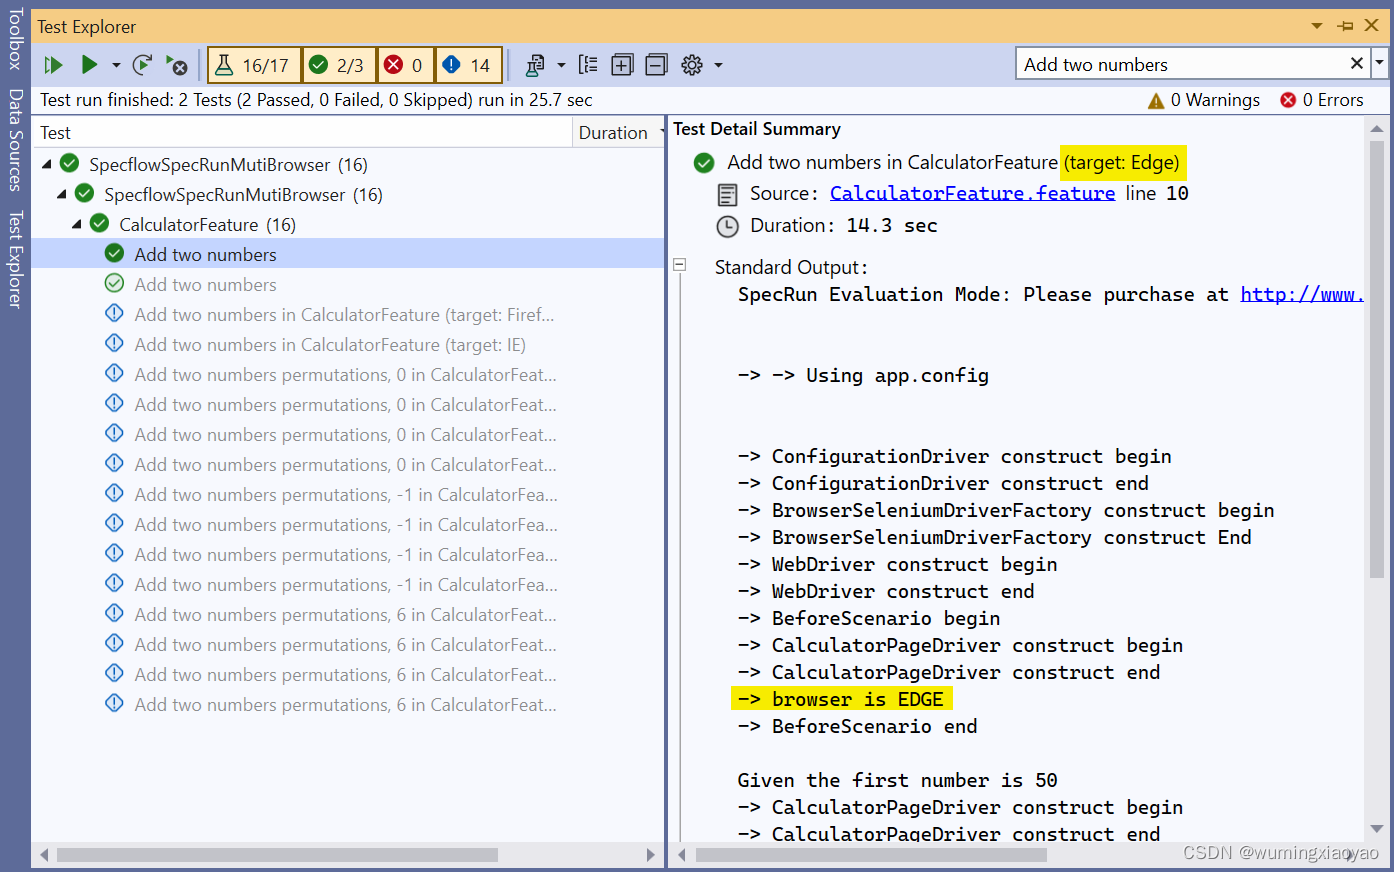
Build 整个 Solution,打开 Test Explore,会发现每个 Scenario 都会自动生成了 4 个 测试用例,因为分别打上了 4 个浏览器标签,就会 target 到对应的浏览器上运行。
为了更好的理解 Context Injection,在各个 Class 的 Public 的构造函数中都加了一些输出日志。
我们来运行一个 target chrome 的测试用例,会启动 Chrome 浏览器来执行
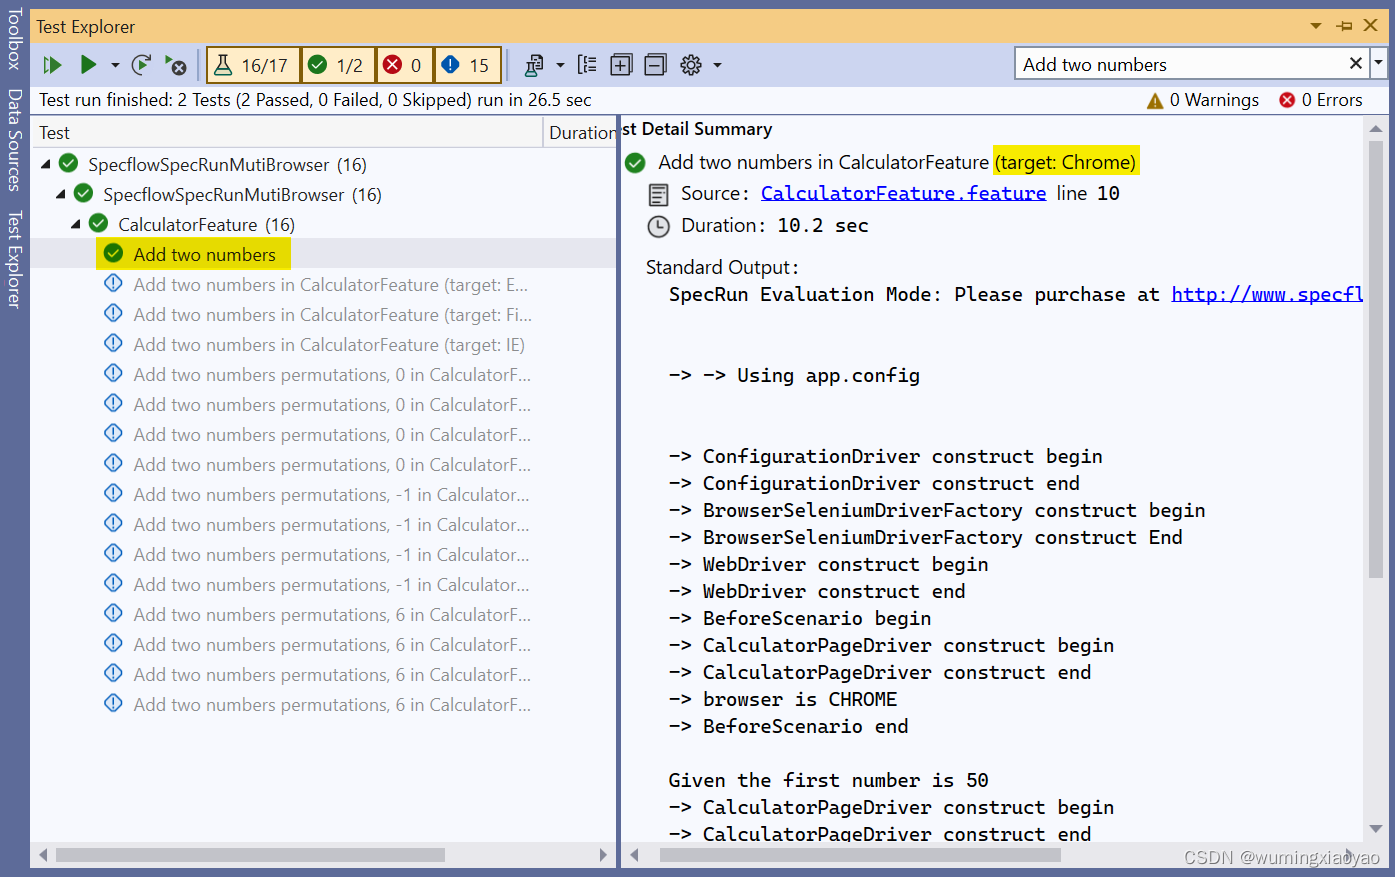
日志细节:
 Add two numbers in CalculatorFeature (target: Chrome)
   Source: CalculatorFeature.feature line 10
   Duration: 10.2 sec

  Standard Output:
SpecRun Evaluation Mode: Please purchase at http://www.specflow.org/plus to remove test execution delay.


-> -> Using app.config


-> ConfigurationDriver construct begin
-> ConfigurationDriver construct end
-> BrowserSeleniumDriverFactory construct begin
-> BrowserSeleniumDriverFactory construct End
-> WebDriver construct begin
-> WebDriver construct end
-> BeforeScenario begin
-> CalculatorPageDriver construct begin
-> CalculatorPageDriver construct end
-> browser is CHROME
-> BeforeScenario end

Given the first number is 50
-> CalculatorPageDriver construct begin
-> CalculatorPageDriver construct end
-> CalculatorFeatureSteps construct end
-> CalculatorFeatureSteps construct end
-> done: CalculatorFeatureSteps.GivenTheFirstNumberIs(50) (0.1s)

And the second number is 70
-> done: CalculatorFeatureSteps.GivenTheSecondNumberIs(70) (0.1s)

When the two numbers are added
-> done: CalculatorFeatureSteps.WhenTheTwoNumbersAreAdded() (0.1s)

Then the result should be 120
-> done: CalculatorFeatureSteps.ThenTheResultShouldBe(120) (0.7s)
再运行一个 target Edge 的用例,会启动 Edge 浏览器运行
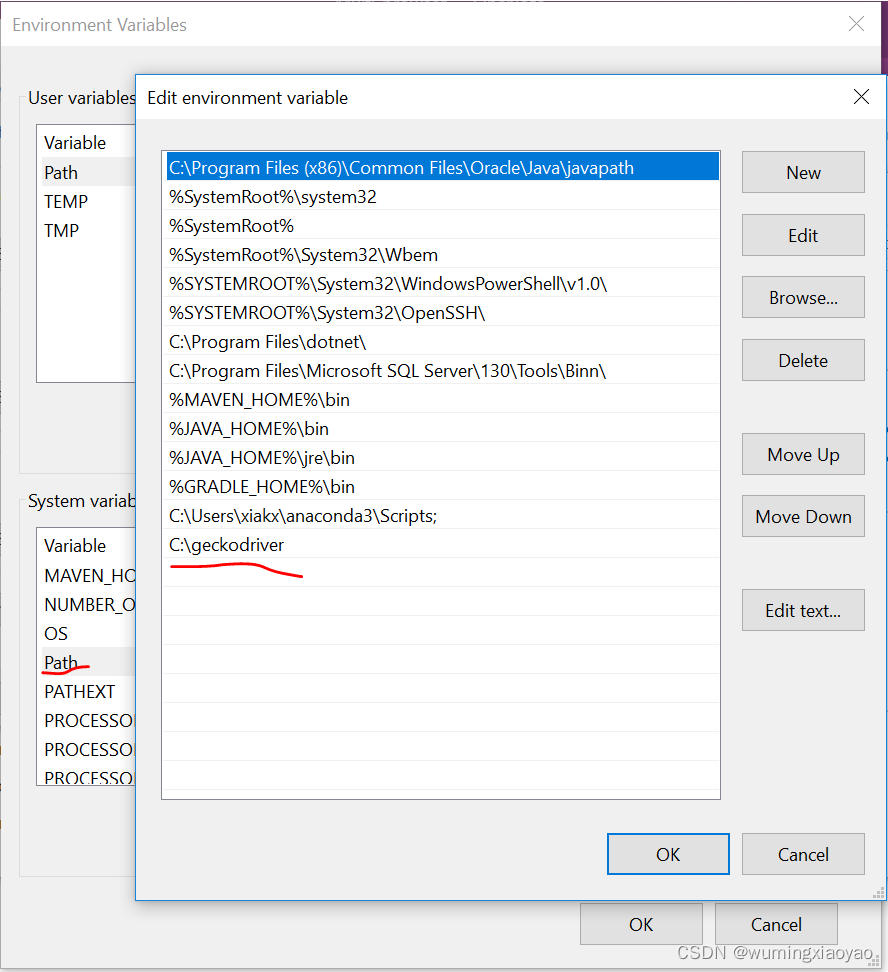
对于IE, FireFox 就不一一运行了,提醒一下 FireFox 有必要需要设置环境变量,将 geckodriver.exe 所在路径添加到 Path 中,例如:




![[附源码]计算机毕业设计JAVA实验教学过程管理平台](https://img-blog.csdnimg.cn/a0c9c2426b3743619d880cd8dca1a29b.png)

