文章目录
- 网页布局实战
- 一 表单
- 案例1-表单前后端交互
- 案例2-常用表单元素
- 知识点
- input的属性总结:
- type属性的其他值(了解):
- 按钮
- label标签
- 二 结构伪类选择器
- 三 表单布局案例
- 案例1贯穿案例-登录页面制作
- 案例2贯穿案例-注册页面制作
- 四 表格
- 案例1-表格设计
- 案例2-表格样式
网页布局实战
一 表单
案例1-表单前后端交互
<!DOCTYPE html>
<html lang="en">
<head>
    <meta charset="UTF-8">
    <meta http-equiv="X-UA-Compatible" content="IE=edge">
    <meta name="viewport" content="width=device-width, initial-scale=1.0">
    <title>Document</title>
</head>
<body>
    <!--
        表单form
            作用:用来收集用户输入的数据,并发数据发送到服务器
                数据的发送是键值对形式
            action:填写后端服务器地址
            method:填写数据的提交方式(get/post)
                get:数据封装在浏览器地址栏上
                    安全性低
                post:数据封装在浏览器的请求体里面
                    安全性高
        表单元素
            文本输入框
            密码输入框

            提交按钮
     -->
     <form action="填写后端服务器地址" method="post">
        账号<input type="text" name="username"><br>
        密码<input type="password" name="password"><br>

        <button type="submit">登录</button>
     </form>
</body>
</html>
案例2-常用表单元素


    <h1>用户注册</h1>
    <form action="" method="">
        账号<input type="text" name="username"><br>
        密码<input type="password" name="password"><br>
        性别<input type="radio" name="sex" value="man">男<input type="radio" name="sex" value="women">女<br>
        爱好<input type="checkbox" name="hobby" value="lanqiu">篮球<input type="checkbox" name="hobby" value="zuqiu">足球<br>
        籍贯
            <select name="address">
                <option value="hb">湖北</option>
                <option value="hn">湖南</option>
            </select><br>
        备注<textarea name="remark"></textarea><br>
        图像<input type="file" name="img"><br>
        <button type="submit">注册</button>
        <button type="reset">重置</button>
    </form>
知识点
input的属性总结:
| 属性名 | 值 | 解释 |
|---|---|---|
| type | text/ password/ radio/checkbox/file | 输入框类型 |
| name | 自定义 | 有name的标签数据才会提交到后台,单选与多选的分组 |
| value | 自定义 | 值 |
| placeholder | 自定义 | 输入框的提示文字 |
| maxlength | 自定义 | 设置文本框最多输入多少字符 |
| readonly | readonly | 只读 |
| disabled | disabled | 禁用 |
| checked | checked | 选中,仅用于 radio/checkbox |
type属性的其他值(了解):
hidden:隐藏域(在用户不知情的情况下,传一些有用的数据)
date:日期选择框
datatime-local:日期和时间选择框
week: (你选中的日期是)一年中的第几周
month: 年和月的选择框
number: 数字输入框(在移动端输入时默认就打开数字键盘)
tel: 电话输入框(可以限制输入的个数,在移动端输入时默认就打开数字键盘)
color: 颜色选择框
time: 时间选择框(只有时间,没有年月日)
email: 邮箱输入框(会自动在提交表单时,给邮箱做验证)
range: 进度条滑块(可以用来控制 音量、音视频的进度条)
search: 搜索输入框 (会加上一个关闭按钮 X)
url:网址输入框(必须由http:// https:// 开头才可以通过提交)
按钮
<button type="button">普通</button>
<button type="submit">提交</button>
<button type="reset">重置</button>
普通按钮点击后不会有页面触发效果,以后会用javascript进行交互
提交按钮,点击后,将选中的内容,提交给服务器。action后面写服务器地址
重置按钮,点击后,在不刷新网页的情况,将表单元素清空
按钮在使用一定注意增加type属性,指定什么类型按钮,否定默认提交按钮
label标签
可以给表单元素的描述文本增加html结构方便做样式,可以使用户点击输入框旁边的文本时,激活输入框

<!DOCTYPE html>
<html lang="en">
<head>
    <meta charset="UTF-8">
    <meta http-equiv="X-UA-Compatible" content="IE=edge">
    <meta name="viewport" content="width=device-width, initial-scale=1.0">
    <title>Document</title>
</head>
<body>
    <form action="">
        <label for="uname">账号</label> <input type="text" id="uname"><br>
        <button type="submit">登录</button>
    </form>
</body>
</html>
二 结构伪类选择器
场景:在家具网站中,商品列表排列,每个元素都有一个margin-right。但是一行最后一个盒子不想要margin-right。需要选中每一行最后一个元素。可以使用结构选择器来实现
:first-child:选中指定元素中的第一个元素
:last-child:选中指定元素中的最后一个
:nth-child(n):可以指定选中某一个元素
:nth-child(4n):选中4的倍数元素
<!DOCTYPE html>
<html lang="en">
<head>
    <meta charset="UTF-8">
    <meta http-equiv="X-UA-Compatible" content="IE=edge">
    <meta name="viewport" content="width=device-width, initial-scale=1.0">
    <title>Document</title>
    <style>
        .box{
            width: 1000px;
            height: 400px;
            border: 1px red solid;
            display: flex;
            justify-content: space-evenly;
        }
        .box .item{
            width: 100px;
            height: 100px;
            background-color: black;
        }
        /* 结构伪类选择器 */
        /* first-child 选择第一个item */
        /* .box .item:first-child{
            background-color: red;
        } */
        /* last-child 选择最后一个item */
        /* .box .item:last-child{
            background-color: pink;
        } */

        /* 选择第一个item */
        .box .item:nth-child(1){
            background-color: red;
        }
        /* 选择第二个item */
        .box .item:nth-child(8){
            background-color: aqua;
        }
        /* 选择4的倍数个item */
        .box .item:nth-child(4n){
            background-color: brown;
        }
    </style>
</head>
<body>
    <div class="box">
        <div class="item"></div>
        <div class="item"></div>
        <div class="item"></div>
        <div class="item"></div>
        <div class="item"></div>
        <div class="item"></div>
        <div class="item"></div>
        <div class="item"></div>
    </div>
</body>
</html>
三 表单布局案例
案例1贯穿案例-登录页面制作
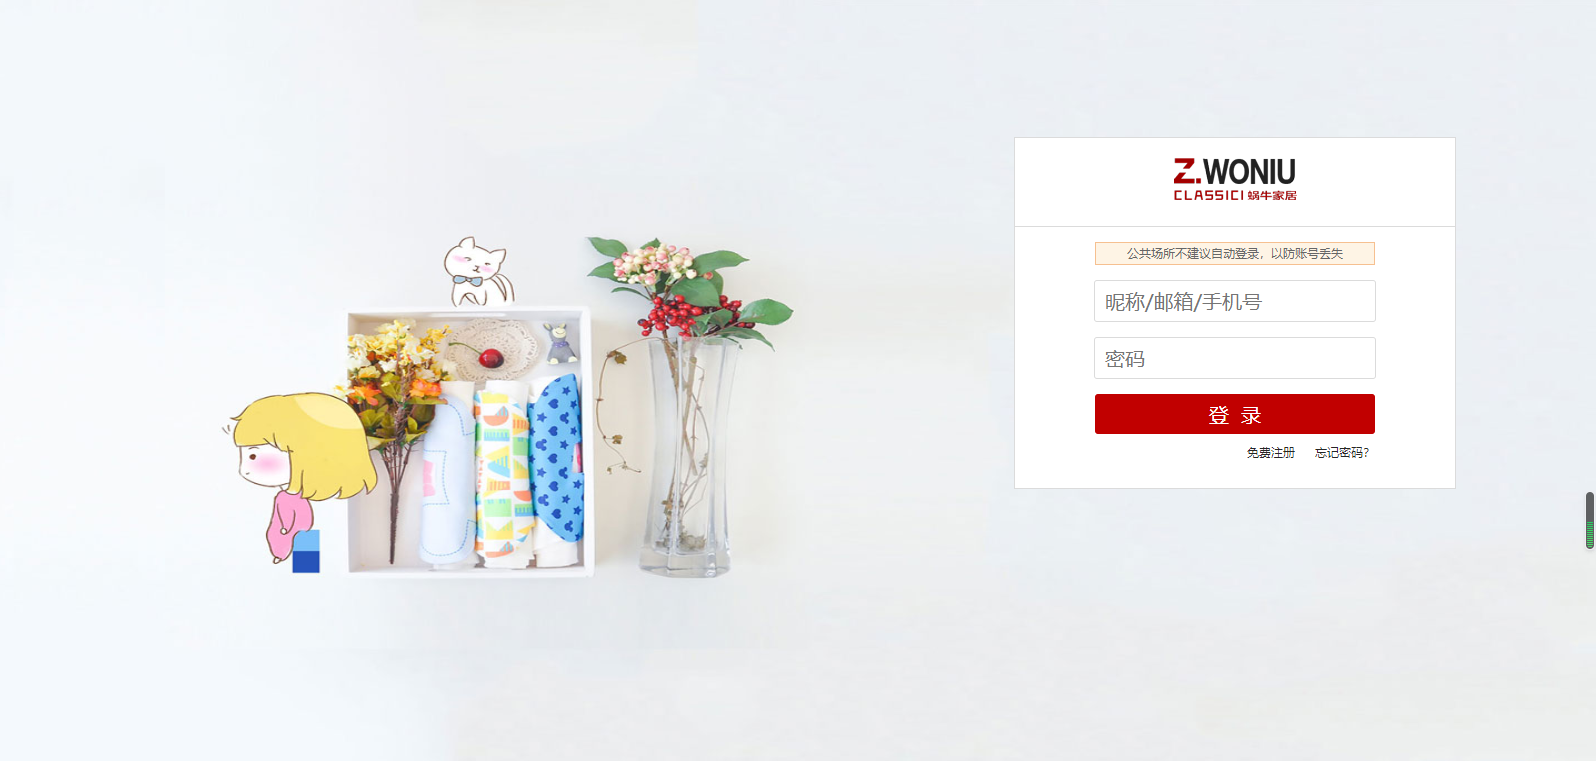
<!DOCTYPE html>
<html lang="en">
<head>
    <meta charset="UTF-8">
    <meta http-equiv="X-UA-Compatible" content="IE=edge">
    <meta name="viewport" content="width=device-width, initial-scale=1.0">
    <title>Document</title>
    <style>
        *{
            padding: 0;
            margin: 0;
        }

        img{
            vertical-align: top;
        }

        html{
            height: 100%;
        }
        body{
            height: 100%;
            background-image: url("./img/temp/19.jpg");
            background-repeat: no-repeat;
            background-size: 100% 100%;
            display: flex;
            justify-content: flex-end;
            /* align-items: center; */
            padding-top: 150px;
            box-sizing: border-box;
        }

        main{
            width: 464px;
            height: 352px;
            background-color: #ffffff;
            /* 圆角边框 值代表圆角半径*/
            border-radius: 4px;
            border: solid 1px #d6d6d6;
            margin-right: 200px;
            display: flex;
            flex-direction: column;
        }

        main .logo{
            height: 86px;
            /* background-color: aqua; */
            display: flex;
            justify-content: center;
            align-items: center;
            border-bottom: 1px #d6d6d6 solid;
        }

        main .logo img{
            width: 123px;
	        height: 42px;
        }
        main form{
            flex: 1;
            /* background-color: chocolate; */
            display: flex;
            flex-direction: column;
            align-items: center;
            justify-content: space-evenly;
        }

        main form div:nth-child(1){
            width: 256px;
            height: 30px;
            background-color: #fdf4e5;
            border: solid 1px #f7cda4;
            font-size: 12px;
            color: #333333;
            display: flex;
            justify-content: center;
            align-items: center;
        }
        main form div input,button{
            width: 256px;
	        height: 42px;
            border-radius: 4px;
        }
        main form div input{
            border: 1px #d3d3d3 solid;
            outline: none;
            padding: 10px;
            box-sizing: border-box;
        }
        main form div button{
            background-color: #c20000;
            border: none;
        }

        main form div:last-child{
            width: 256px;
            /* background-color: #f7cda4; */
            display: flex;
            justify-content: flex-end;
            align-items: center;
        }

        main form div:last-child a{
            text-decoration: none;
            font-size: 12px;
            color: #000000;
            margin: 0 8px;
        }
    </style>
</head>
<body>
    <main>
        <div class="logo">
            <img src="./img/logo.png" alt="">
        </div>
        <form action="">
            <div>公共场所不建议自动登录,以防账号丢失</div>
            <div>
                <input type="text" placeholder="昵称/邮箱/手机号">
            </div>
            <div>
                <input type="password" placeholder="密码">
            </div>
            <div>
                <button type="submit">登录</button>
            </div>
            <div>
                <a href="">免费注册</a>
                <a href="">忘记密码?</a>
            </div>
        </form>
    </main>
</body>
</html>
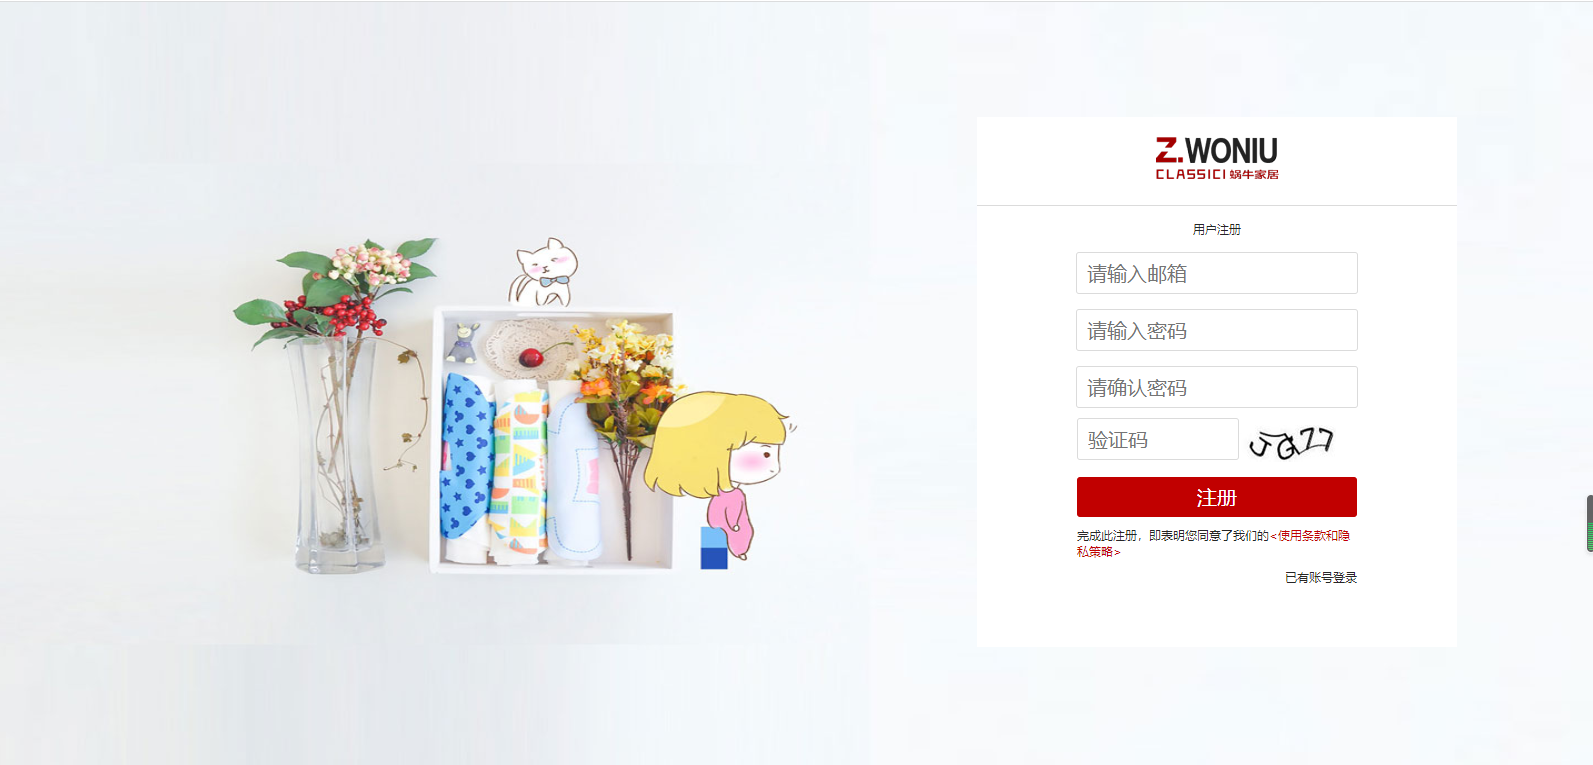
案例2贯穿案例-注册页面制作
四 表格
表格主要用来展示数据
案例1-表格设计
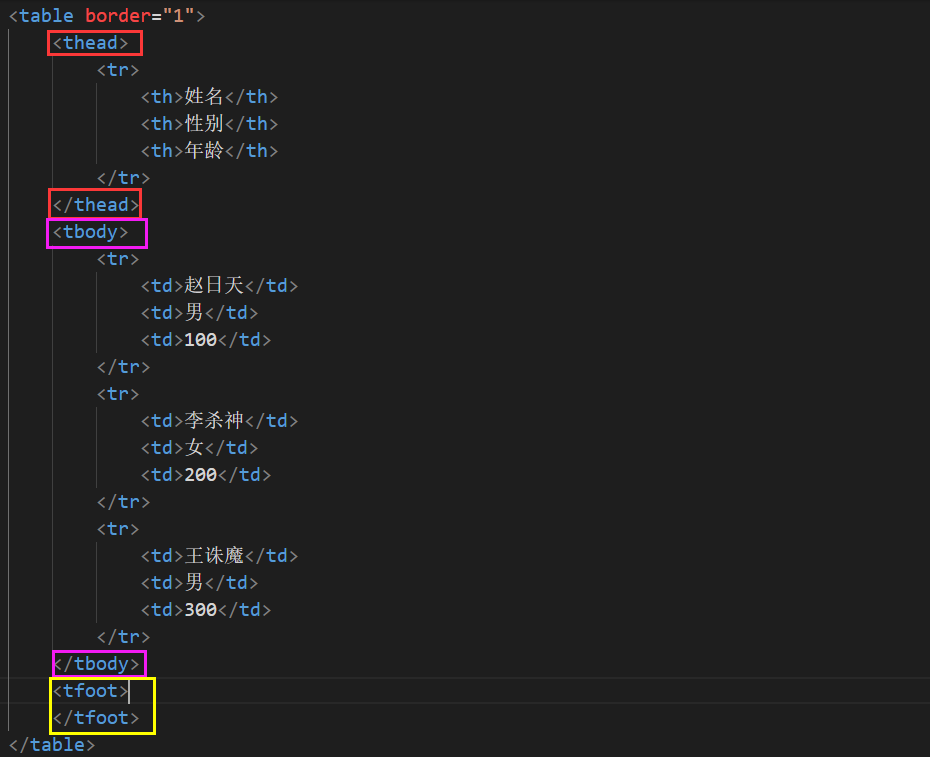
table:表格
tr:行
th、td:列

thead和tbody,tfoot是语义化标签标签
thead:代表表格头部,里面存放表头信息
tbody:表格内容部分,表格数据呈现
tfoot:代表表格的尾部
案例2-表格样式
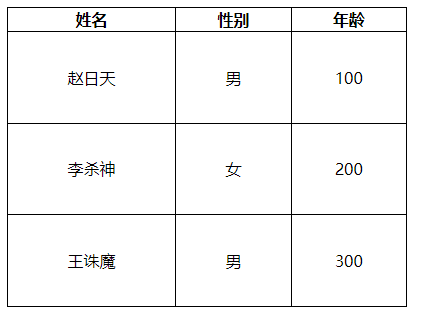
表格的样式有两种设计方式
- 表格标签默认的属性样式(不推荐使用)
- 通过CSS表来控制表格的样式(推荐使用)
<!DOCTYPE html>
<html lang="en">
<head>
    <meta charset="UTF-8">
    <meta http-equiv="X-UA-Compatible" content="IE=edge">
    <meta name="viewport" content="width=device-width, initial-scale=1.0">
    <title>Document</title>
    <style>
        table{
            border: 1px black solid;
            width: 400px;
            height: 300px;
            /* 合并表格的边框。双边框合并为单一边框 */
            border-collapse: collapse;
            text-align: center;
        }
        th,td{
            border: 1px black solid;
        }
    </style>
</head>
<body>
    <!--
        table
            表头 thead
            表格主体内容 tbody
            表格的尾部  tfoot

            行 tr
            列 th/td
     -->
     <table >
        <!-- 表头 -->
        <thead>
            <tr>
                <th>姓名</th>
                <th>性别</th>
                <th>年龄</th>
            </tr>
        </thead>
        <!-- 表格主体内容 -->
        <tbody>
            <tr>
                <td>赵日天</td>
                <td>男</td>
                <td>100</td>
            </tr>
            <tr>
                <td>李杀神</td>
                <td>女</td>
                <td>200</td>
            </tr>
            <tr>
                <td>王诛魔</td>
                <td>男</td>
                <td>300</td>
            </tr>
        </tbody>
        <!-- 表格的尾部 -->
        <tfoot>

        </tfoot>
     </table>
</body>
</html>

