android studio版本:2021.2.1
例程名:hfserachcityid
这几天没什么事做,而且我原来那个“项目”因为免费api不能用了,只能改为和风的免费api,但需要申请,而且还要城市ID,玩天气的基本都知道城市ID这个东西,之前我找到一个在网页上查询城市 ID的网址,但现在也用不了了,我记得好像还哪里可以查,但不记得了。既然和风也可以查,就再做个app不就行了,其实也可以把代码 放到我那个“项目”里,这事以后再说。而且还可以顺便学点东西,我肯定会遇到问题的,解决的过程就是学习的过程。可没想到这个东西还真给我找了不少麻烦,也算学到了东西。我之前做过一个“andriod 和风天气SDK获取实时天气(保姆级教程)”,我原本想这不是一样吗?代码都不用大的改动,其实不一样,而且我现在怀疑那个教程的代码还能不能用,我真想不通,代码干嘛改动那么大?这样以前做的东西不都用不了?算了,生气也没用。先说说两个为难我的地方。
这个东西获取的城市数据是List<LocationBean>这种格式(相关数据格式见:https://dev.qweather.com/docs/android-sdk/geoapi/android-city-lookup/),我以为是list,于是按照list<bean>的获取值方法好一顿折腾,就是不成功,原来获取天气的时候就很简单,而且当时还提供例程代码,现在好了,例程代码也没有了,只能一遍遍试, 因为我真不会啊。而且原来获取天气的代码搬过来没好使。折腾我好几天。
在获取天气的时候,直接可以在代码里面修改ui界面,在这里不行,settext出现致命错误:Only the original thread that created a view hierarchy can touch its views.一查才知道不可以在非ui线程更新ui线程(其实我哪里知道,后来才知道是这么回事。)于是又查解决办法,书到用时方恨少啊。
好了,剩下的就是如何完整的做这个app了。
重要:申请key之前先建立项目,项目的package name要用,不建立没有这个名称。
一、申请免费和风key.
网址:https://id.qweather.com/#/register?redirect=https%3A%2F%2Fconsole.qweather.com
注册略。
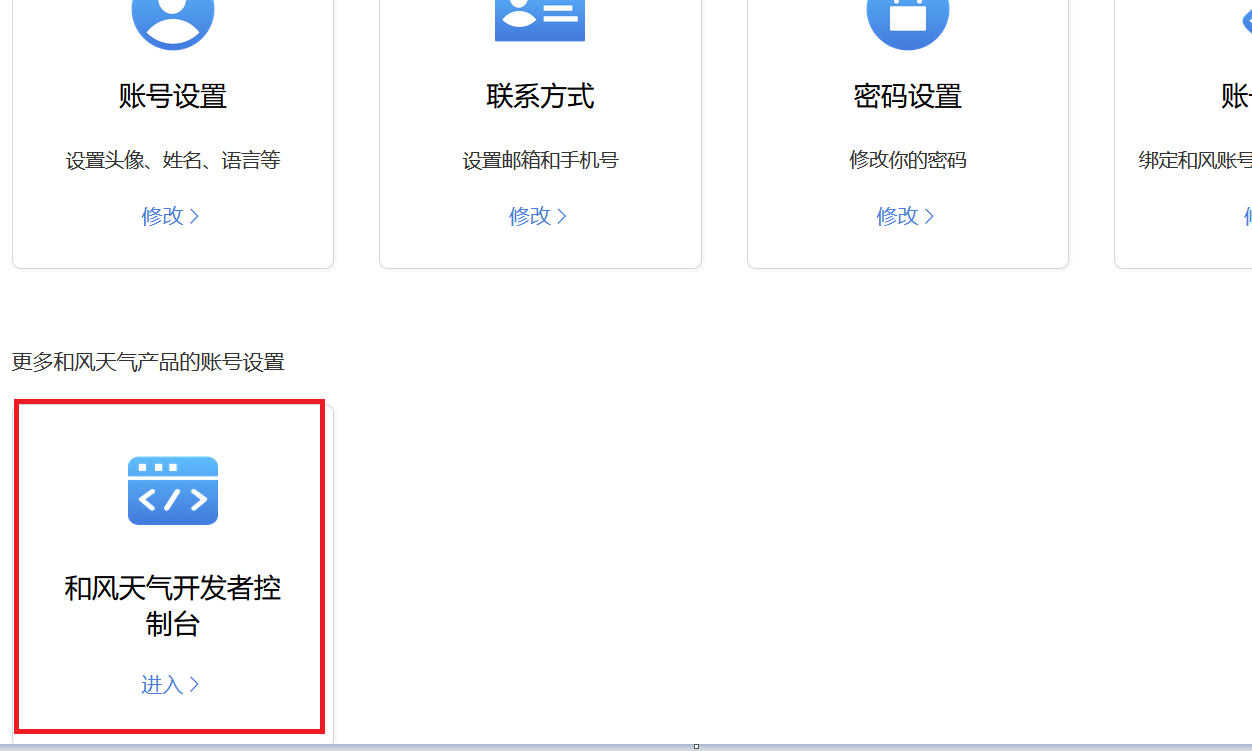
登录后进入“和风天气开发者控制台”
点击左侧"项目管理":
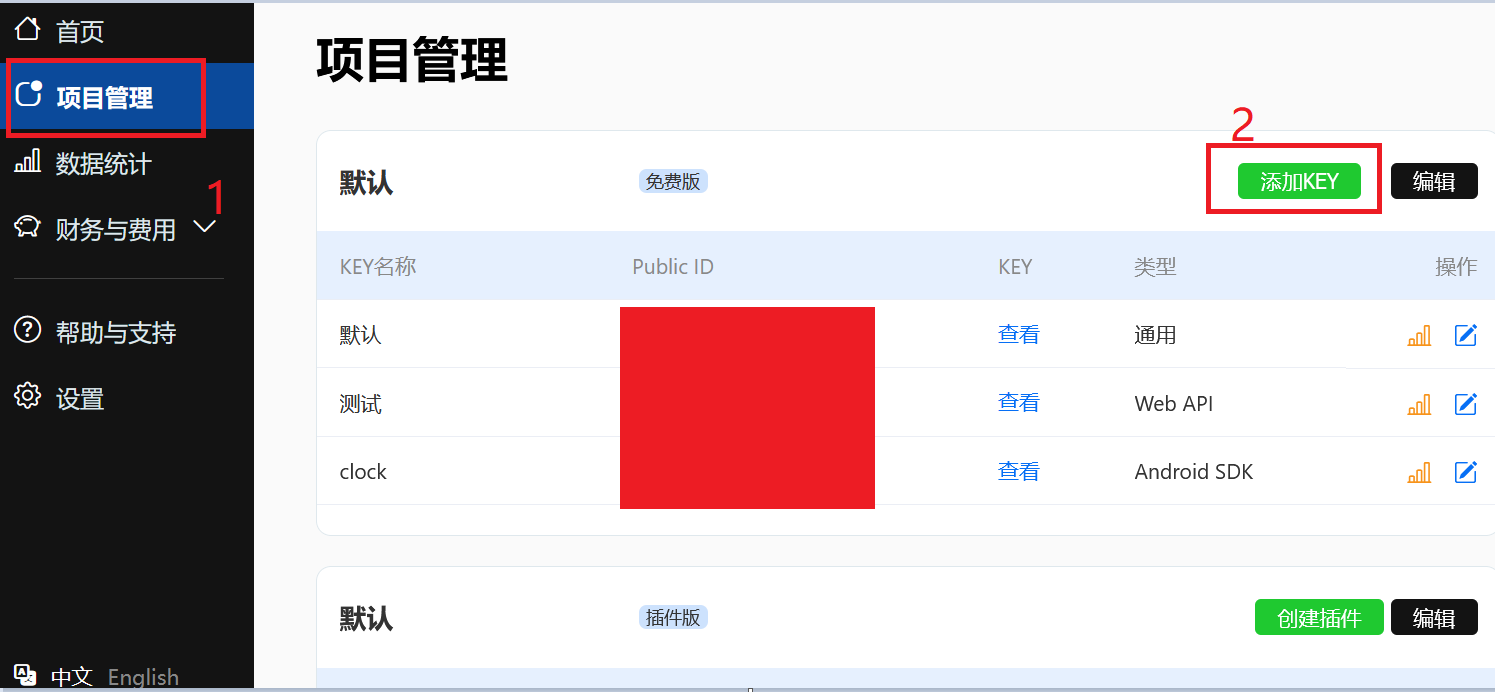
进入后点击右侧"添加key"进入下图(上图只是演示,和风只能申请3个免费KEY):选择“android SDK”,key的名称随便写,package name "必须"与你的appg 一致,否则无法获取数据。(下面有提示如何获取package name,一般类似com.example.nothing这样。)
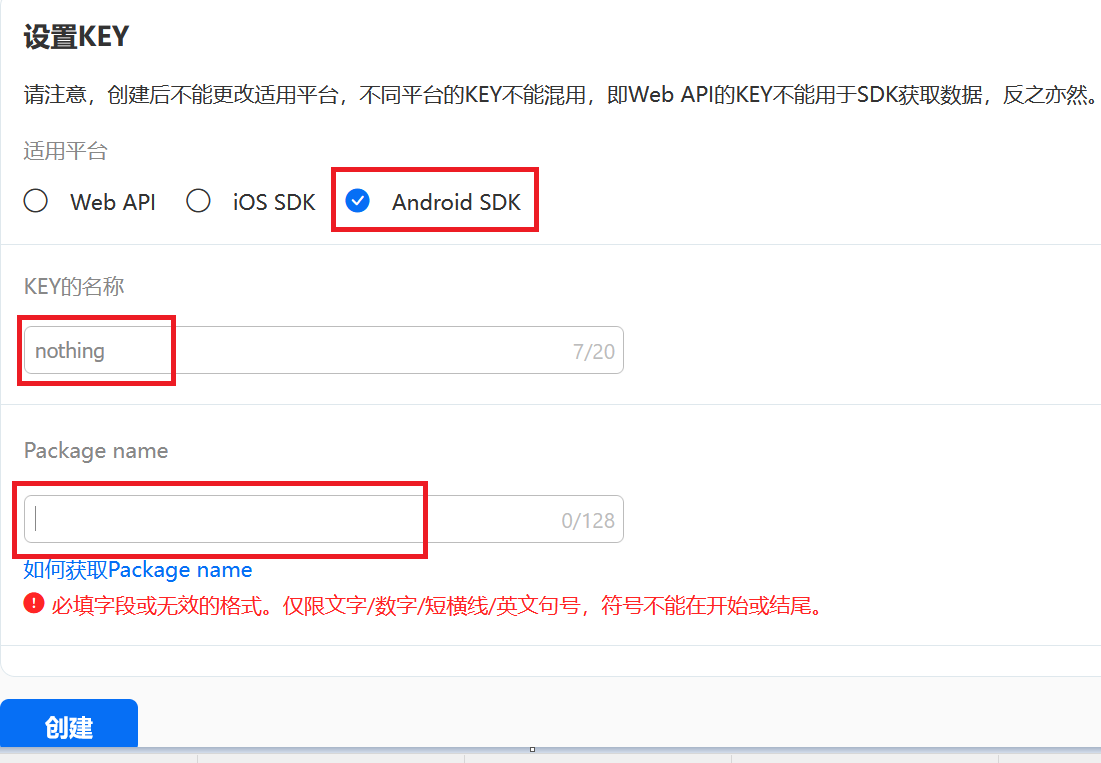
点击创建后如下图,就得到了key 和public id.这两个在代码里和风初始化的时候都要用到。
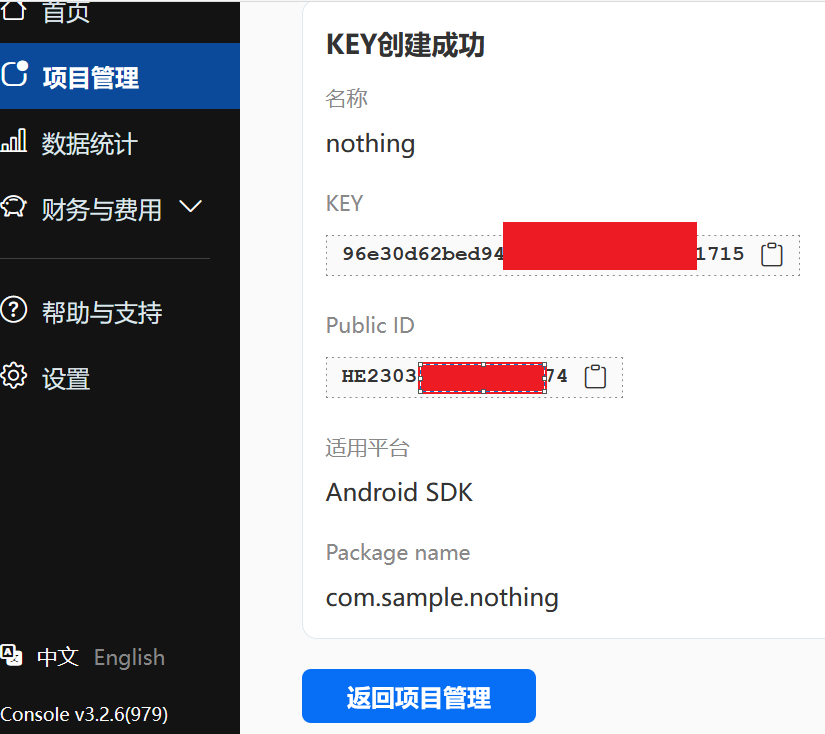
至此和风免费key申请完成,此key每天有1000次免费访问,足够了。
二、新建项目。(android studio2021.2.1)
file-new-newproject后如下图:选择empty activity.
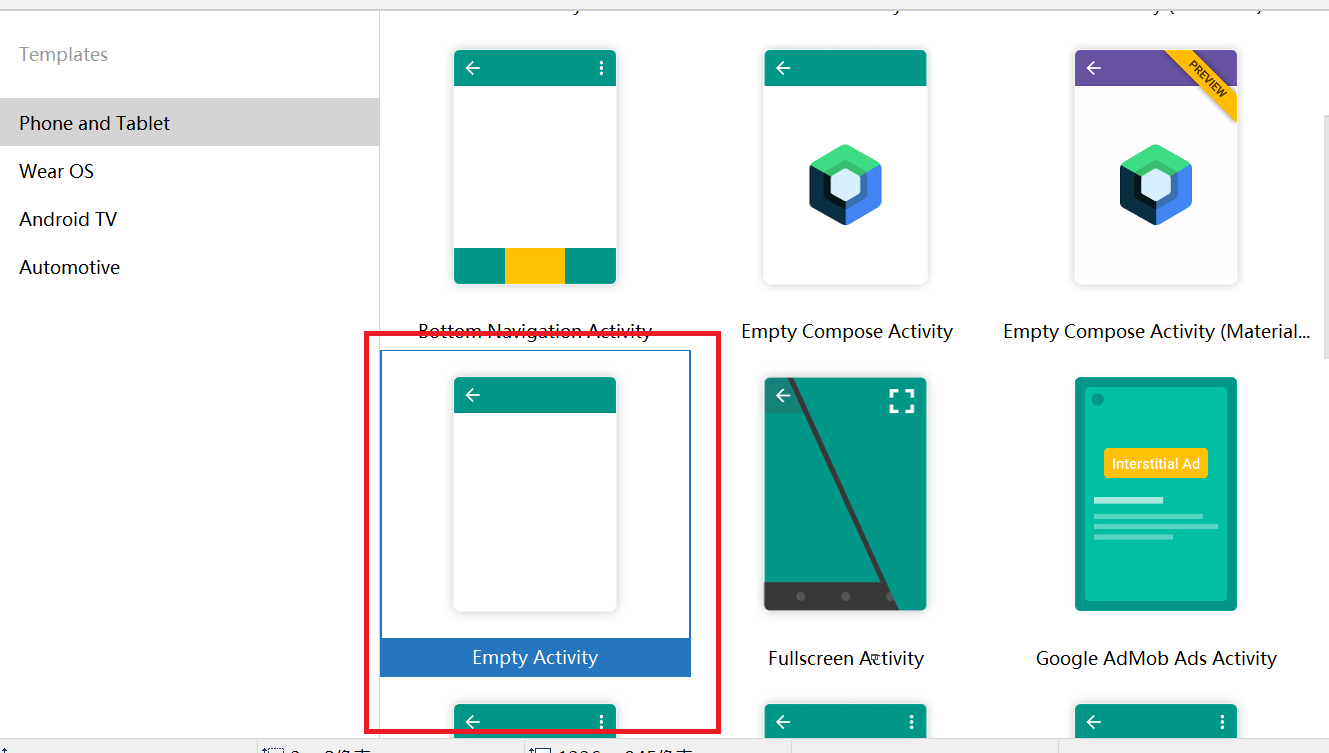
next后:
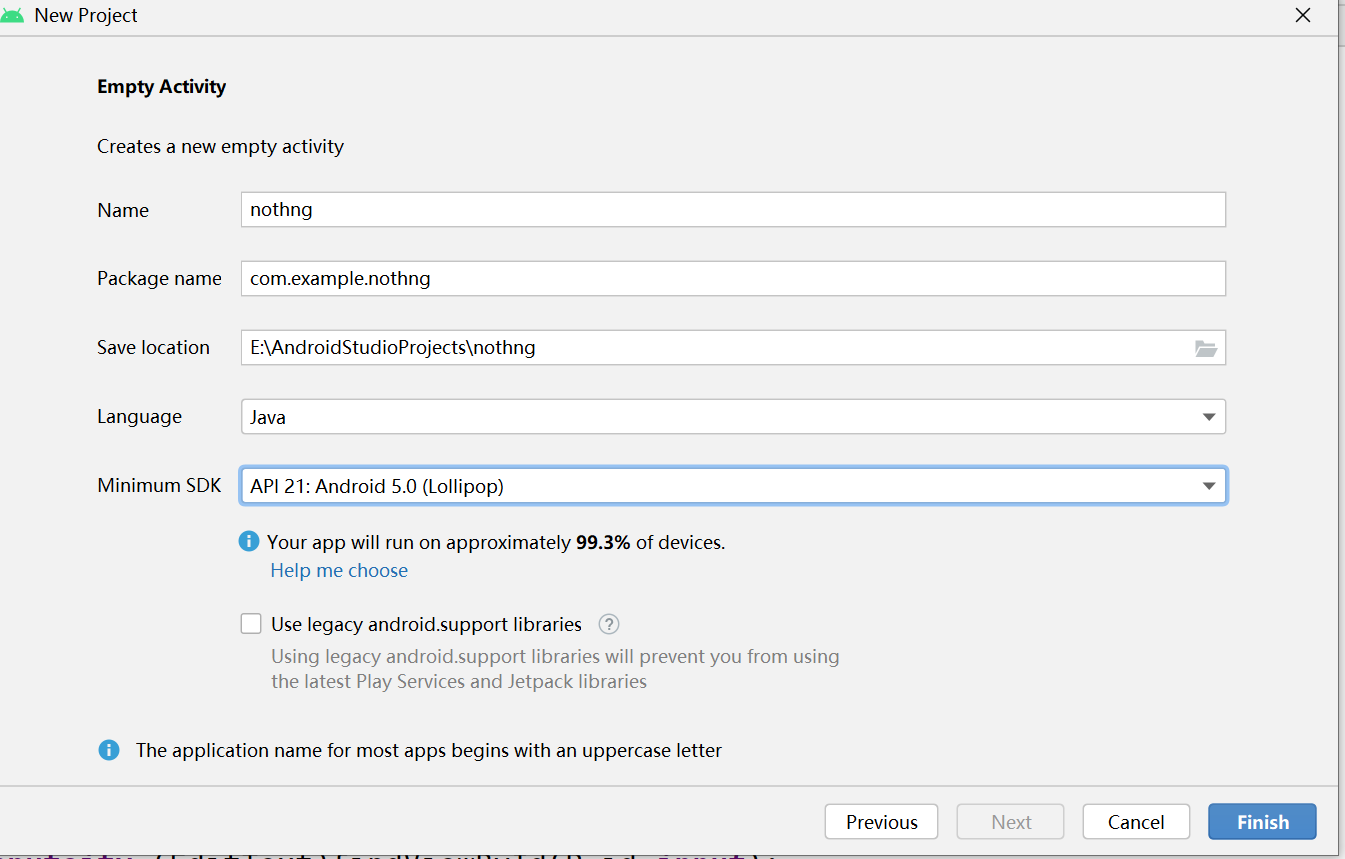
项目名称自选,我写的nothing是为了配合刚才那个和风key.最下面的minimumsdk是指最小兼容版本,看个人需要,这个以后也可以改。点finish完成。
三、项目配置:
城市搜索开发文档:https://dev.qweather.com/docs/android-sdk/geoapi/android-city-lookup/
sdk下载:https://dev.qweather.com/docs/configuration/android-sdk-config/
把下载的sdk文件放到下图的文件夹内:libs必须在project模式下才能看到,可以在系统“文件管理器”打开如下路径:AndroidStudioProjects\nothing\app\libs
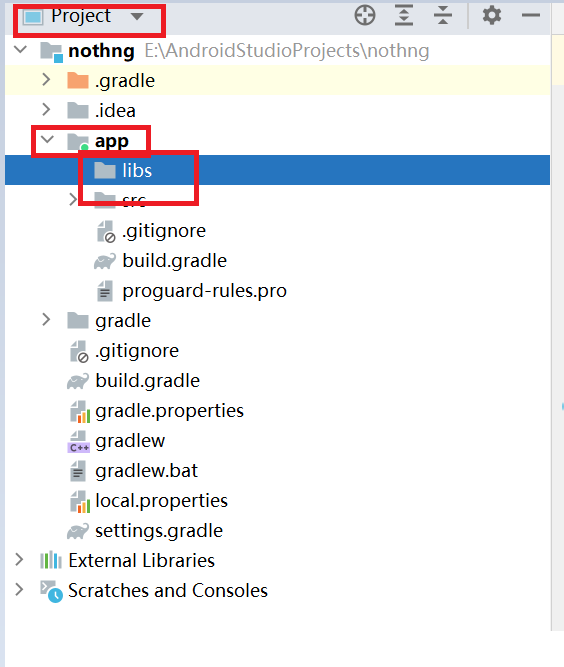
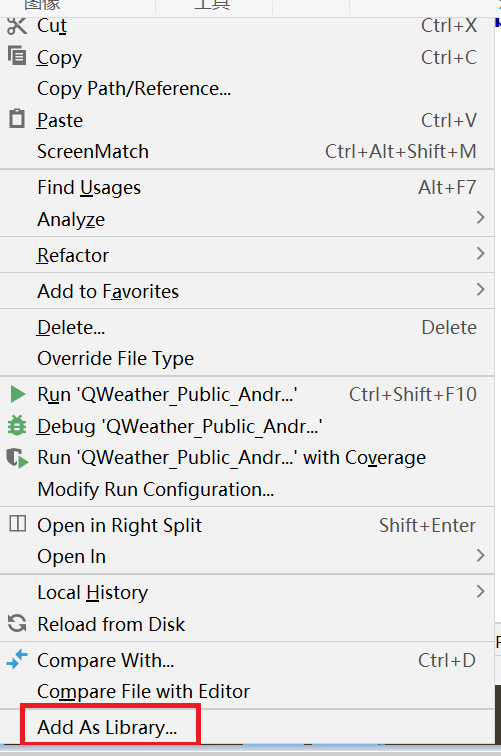
在android studio内打开文件夹在sdk文件上右键,点击最下面add as library完成sdk导入。
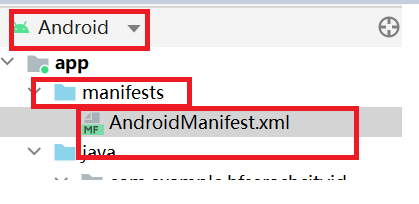
添加权限。打开:androidmanafest.xml文件
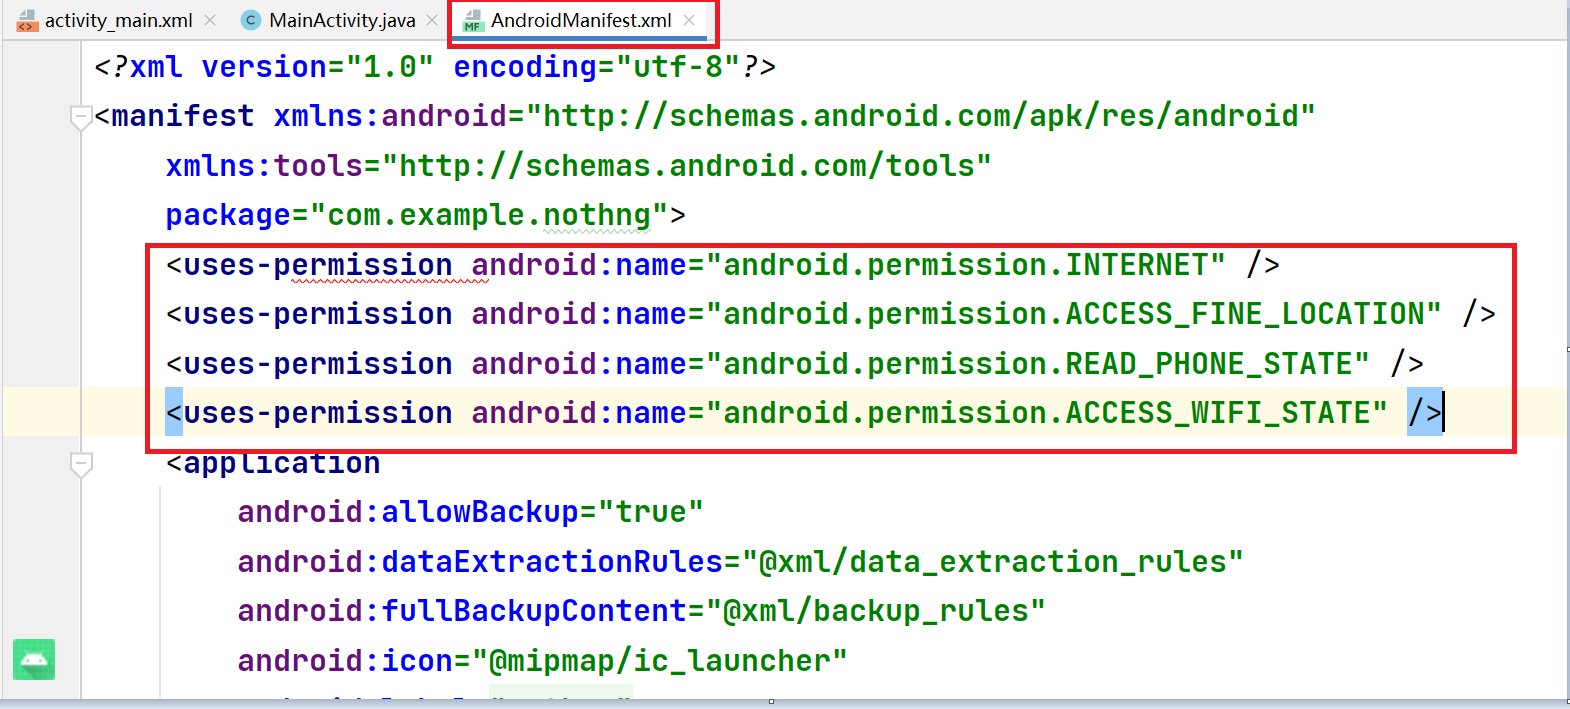
添加如下权限:
    <uses-permission android:name="android.permission.INTERNET" />
    <uses-permission android:name="android.permission.ACCESS_FINE_LOCATION" />
    <uses-permission android:name="android.permission.READ_PHONE_STATE" />
    <uses-permission android:name="android.permission.ACCESS_WIFI_STATE" />
权限意义:

权限添加androidmanafest.xml位置如图示:
引用库。打开如下图build gradle文件,添加如下库:
    compile 'com.squareup.okhttp3:okhttp:3.12.12' (3.12.12+)
    compile 'com.google.code.gson:gson:2.6.2'   (2.6.2+)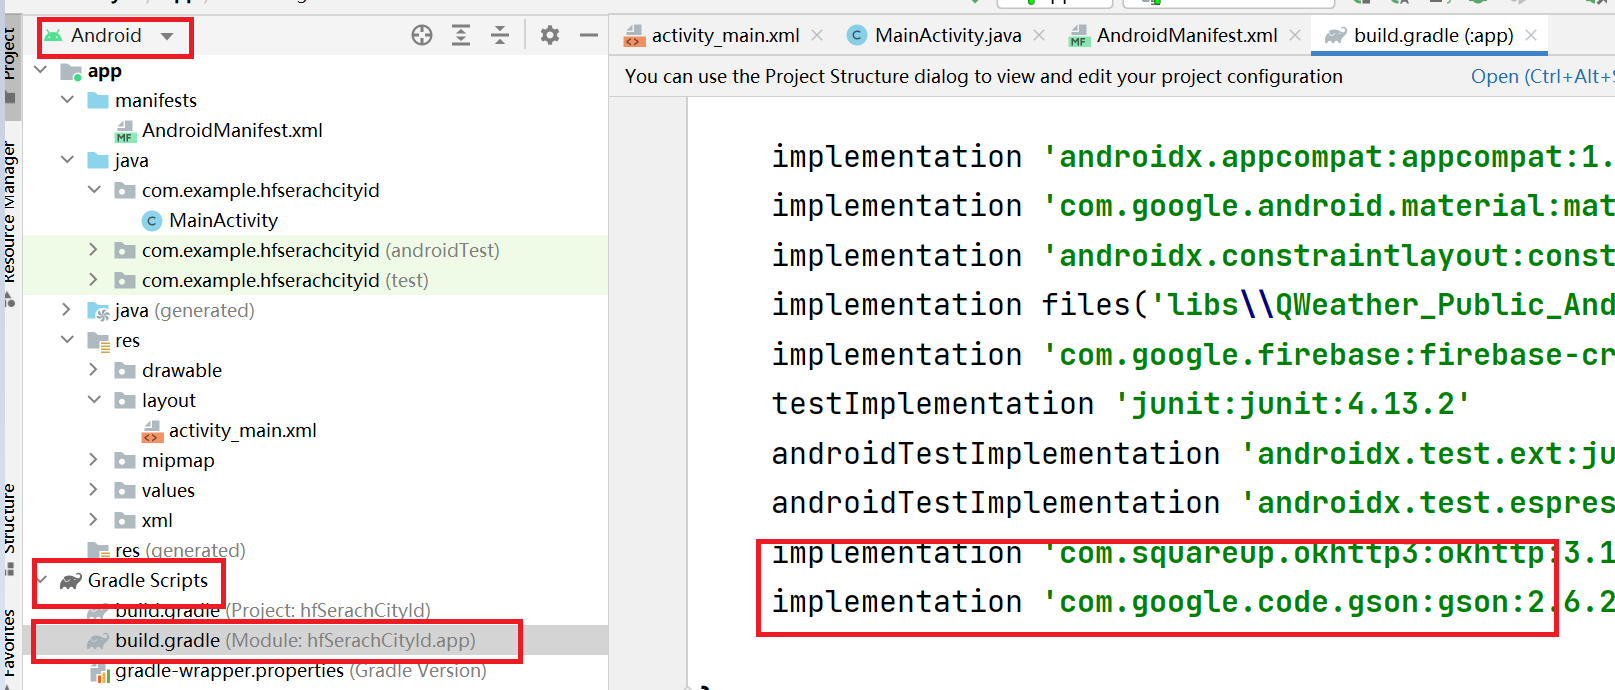
至此项目配置完成。
四、项目代码。主要部分都有注释。注意本代码不是nothing的代码,注意包名。
activity_main.xml(布局根据个人喜好,下面是我使用的相对布局)
<?xml version="1.0" encoding="utf-8"?>
<androidx.constraintlayout.widget.ConstraintLayout xmlns:android="http://schemas.android.com/apk/res/android"
    xmlns:app="http://schemas.android.com/apk/res-auto"
    xmlns:tools="http://schemas.android.com/tools"
    android:layout_width="match_parent"
    android:layout_height="match_parent"
    tools:context=".MainActivity">

    <TextView
        android:id="@+id/title1"
        android:layout_width="wrap_content"
        android:layout_height="wrap_content"
        android:layout_marginTop="76dp"
        android:text="城市ID查询程序"
        android:textColor="@android:color/holo_red_light"
        android:textSize="20sp"
        app:layout_constraintEnd_toEndOf="parent"
        app:layout_constraintHorizontal_bias="0.498"
        app:layout_constraintStart_toStartOf="parent"
        app:layout_constraintTop_toTopOf="parent" />

    <TextView
        android:id="@+id/inputcity"
        android:layout_width="wrap_content"
        android:layout_height="wrap_content"
        android:layout_marginTop="140dp"
        android:text="请输入查询地区/城市:"
        android:textColor="@color/black"
        app:layout_constraintEnd_toEndOf="parent"
        app:layout_constraintHorizontal_bias="0.167"
        app:layout_constraintStart_toStartOf="parent"
        app:layout_constraintTop_toTopOf="parent" />

    <TextView
        android:id="@+id/cityname"
        android:layout_width="wrap_content"
        android:layout_height="wrap_content"
        android:layout_marginTop="96dp"
        android:text="地区/城市名:"
        android:textColor="@color/black"
        app:layout_constraintStart_toStartOf="@+id/inputcity"
        app:layout_constraintTop_toBottomOf="@+id/inputcity" />

    <TextView
        android:id="@+id/cityid"
        android:layout_width="wrap_content"
        android:layout_height="wrap_content"
        android:layout_marginTop="10dp"
        android:text="地区/城市ID:"
        android:textColor="@color/black"
        app:layout_constraintStart_toStartOf="@+id/cityname"
        app:layout_constraintTop_toBottomOf="@+id/cityname" />

    <TextView
        android:id="@+id/belonearea"
        android:layout_width="wrap_content"
        android:layout_height="wrap_content"
        android:layout_marginTop="10dp"
        android:text="所属行政区域:"
        android:textColor="@color/black"
        app:layout_constraintStart_toStartOf="@+id/cityid"
        app:layout_constraintTop_toBottomOf="@+id/cityid" />

    <TextView
        android:id="@+id/textView11"
        android:layout_width="wrap_content"
        android:layout_height="wrap_content"
        android:layout_marginTop="10dp"
        android:text="上级城市:"
        android:textColor="@color/black"
        app:layout_constraintStart_toStartOf="@+id/belonearea"
        app:layout_constraintTop_toBottomOf="@+id/belonearea" />

    <EditText
        android:id="@+id/input"
        android:layout_width="wrap_content"
        android:layout_height="wrap_content"
        android:layout_marginTop="19dp"
        android:ems="8"
        android:inputType="textPersonName"
        android:minHeight="48dp"
        app:layout_constraintEnd_toEndOf="parent"
        app:layout_constraintHorizontal_bias="0.0"
        app:layout_constraintStart_toEndOf="@+id/inputcity"
        app:layout_constraintTop_toBottomOf="@+id/title1"
        tools:ignore="SpeakableTextPresentCheck" />

    <TextView
        android:id="@+id/cityname1"
        android:layout_width="wrap_content"
        android:layout_height="wrap_content"
        android:text="123"
        app:layout_constraintStart_toEndOf="@+id/cityname"
        app:layout_constraintTop_toTopOf="@+id/cityname" />

    <TextView
        android:id="@+id/cityid1"
        android:layout_width="wrap_content"
        android:layout_height="wrap_content"
        android:layout_marginTop="28dp"
        android:text="456"
        app:layout_constraintBottom_toBottomOf="@+id/cityid"
        app:layout_constraintStart_toEndOf="@+id/cityname"
        app:layout_constraintTop_toTopOf="@+id/cityname1" />

    <TextView
        android:id="@+id/area1"
        android:layout_width="wrap_content"
        android:layout_height="wrap_content"
        android:text="456"
        app:layout_constraintBottom_toBottomOf="@+id/belonearea"
        app:layout_constraintStart_toEndOf="@+id/belonearea" />

    <TextView
        android:id="@+id/area"
        android:layout_width="wrap_content"
        android:layout_height="wrap_content"
        android:text="456"
        app:layout_constraintBottom_toBottomOf="@+id/textView11"
        app:layout_constraintStart_toEndOf="@+id/belonearea" />

    <Button
        android:id="@+id/button"
        android:layout_width="wrap_content"
        android:layout_height="wrap_content"
        android:text="确定"
        app:layout_constraintBottom_toBottomOf="parent"
        app:layout_constraintEnd_toEndOf="parent"
        app:layout_constraintHorizontal_bias="0.486"
        app:layout_constraintStart_toStartOf="parent"
        app:layout_constraintTop_toBottomOf="@+id/input"
        app:layout_constraintVertical_bias="0.0" />
</androidx.constraintlayout.widget.ConstraintLayout>
mainactivity.java
package com.example.hfserachcityid;

import android.os.Bundle;
import android.util.Log;
import android.view.View;
import android.widget.Button;
import android.widget.EditText;
import android.widget.TextView;

import androidx.appcompat.app.AppCompatActivity;

import com.google.gson.Gson;
import com.qweather.sdk.bean.base.Code;
import com.qweather.sdk.bean.geo.GeoBean;
import com.qweather.sdk.view.HeConfig;
import com.qweather.sdk.view.QWeather;

public class MainActivity extends AppCompatActivity {
    public TextView viewname,viewid,viewarea,viewarea1;
    private EditText inputcity;
    private Button button;
    @Override
    protected void onCreate(Bundle savedInstanceState) {
        super.onCreate(savedInstanceState);
        setContentView(R.layout.activity_main);
        viewname=(TextView)findViewById(R.id.cityname1);
        viewid=(TextView)findViewById(R.id.cityid1);
        viewarea=(TextView)findViewById(R.id.area);
        viewarea1=(TextView)findViewById(R.id.area1);
        inputcity=(EditText)findViewById(R.id.input);
        button=(Button)findViewById(R.id.button);
        //和风初始化
        HeConfig.init("HE2303010152481612", "3cbc9266e3b24f38afbf182611fc3de4");
        HeConfig.switchToDevService();
        //按钮监听
        button.setOnClickListener(new View.OnClickListener(){
            @Override
            public void onClick(View v) {
                //此处注意,gettext的值如果为空,不可以用inputcity.gettext().tostring()=="",此值永远非空。
                //只能用equals,如果有值可以用==方式。
                String string="";
                //如果为空值无动作,非空开始查询。
                if(string.equals(inputcity.getText().toString())){
                }else{
                    getCity();
                }
            }
        });
    }
    //获取数据及解析关键代码
    public void getCity(){
        //获取输入框内容
        String inputct =inputcity.getText().toString();
        //此方法为和风提供
        QWeather.getGeoCityLookup(MainActivity.this, inputct,  new QWeather.OnResultGeoListener(){
            public static final String TAG="he_feng_city";
            //如果提供数据有问题显示
            @Override
            public void onError(Throwable e) {
                Log.i(TAG, "onError: ", e);
                System.out.println("Weather Now Error:"+new Gson());
            }
            //如果返回结果正确则执行
            @Override
            public void onSuccess(GeoBean geoBean) {
                if (Code.OK == geoBean.getCode()) {//getLocationBean
                    String id=geoBean.getLocationBean().get(0).getId();
                    String name=geoBean.getLocationBean().get(0).getName();
                    String adm2=geoBean.getLocationBean().get(0).getAdm2();
                    String adm1=geoBean.getLocationBean().get(0).getAdm1();
                    //因不可以在非ui线程修改ui线程内容,所以必须使用runOnUiThread或类似方法。
                    //直接使用viewname.setText(name);会导致错误,程序退出。
                    runOnUiThread(new Runnable() {
                        @Override
                        public void run() {
                            viewname.setText(name);
                            viewid.setText(id);
                            viewarea1.setText(adm1);
                            viewarea.setText(adm2);
                        }
                    });
                }else{
                    //在此查看返回数据失败的原因
                    Code code = geoBean.getCode();
                    System.out.println("失败代码: " + code);
                    //Log.i(TAG, "failed code: " + code);
                }
            }
        });
    }
}
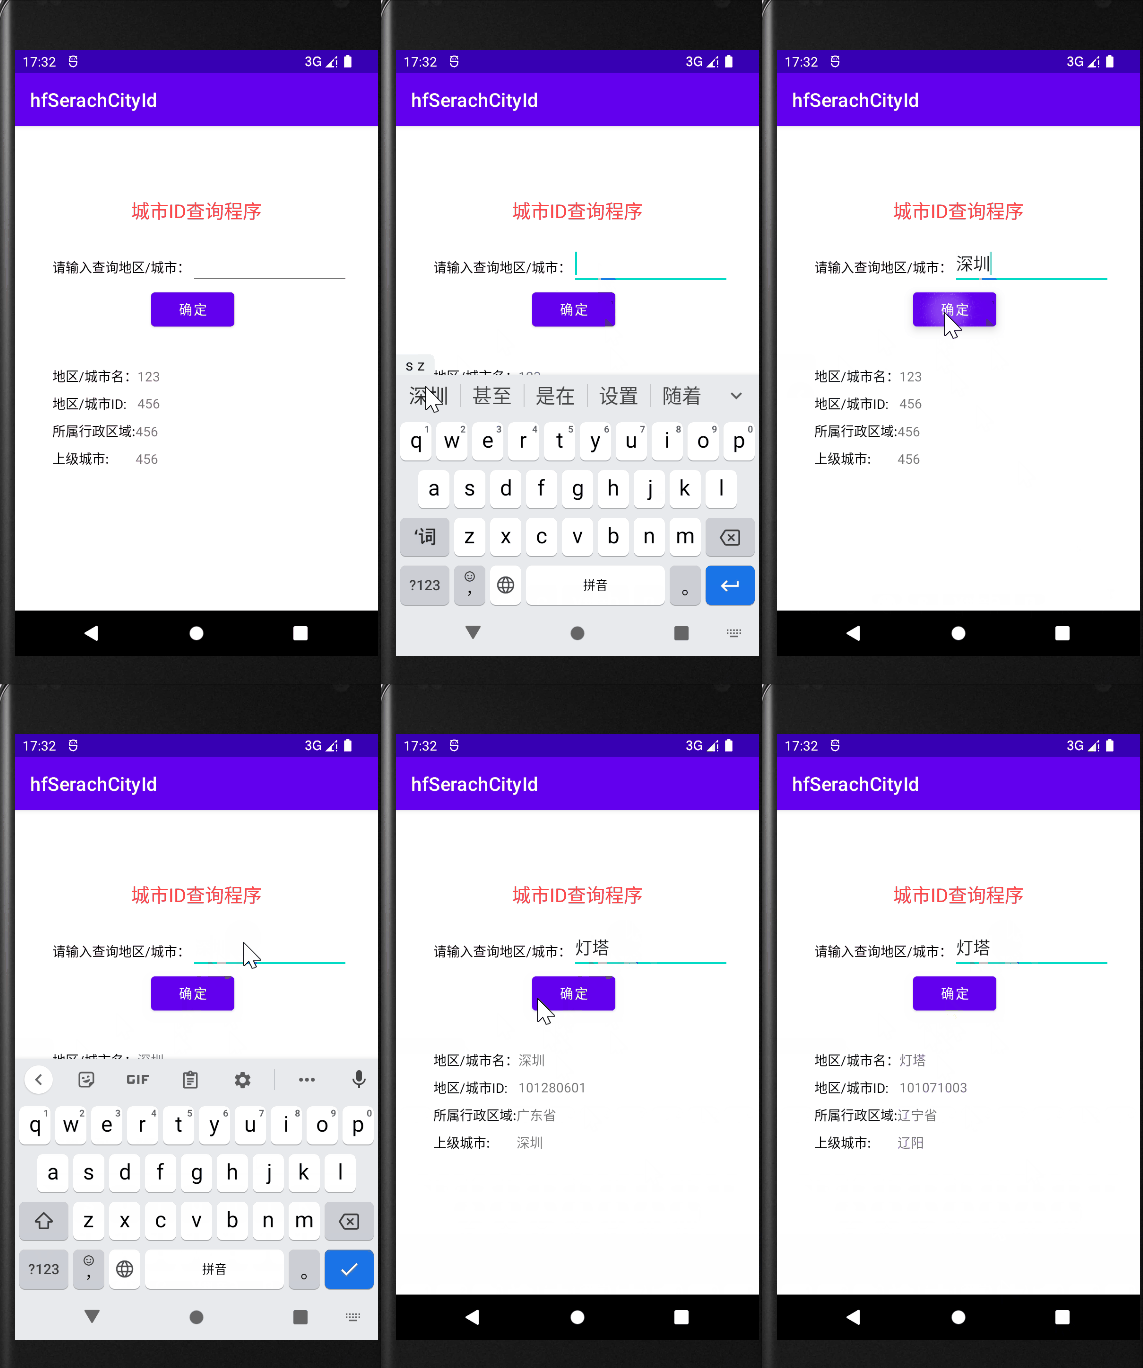
动图演示:
