运行的 Android 手机,虽然配置在不断的提升,但是仍然无法和 PC 相比,无法做到 PC 那样拥有超大内存以及高性能的 CPU。因此在开发 Android 应用程序时也不可能无限制的使用 CPU 和内存,如果对 CPU 和 内存使用不当也会造成应用的卡顿和内存溢出等问题。
1 绘制性能分析
Android 应用需要将自己的洁面展示给用户,用户会和洁面进行交互,界面流畅度至关重要。
1.1 绘制原理
View 的绘制流程有 3 个步骤,分别是 measure、layout 和 draw,它们主要运行在系统的应用框架层,而真正将数据渲染到屏幕上的则是系统 Native 层的 SurfaceFlinger 服务来完成的。
绘制过程主要由 CPU 来进行 Measure、Layout、Record、Execute 的数据计算工作,GPU 负责栅格化、渲染。CPU 和 GPU (图形处理器 graphics processing unit)是通过图形驱动层来进行连接的,图形驱动层维护了一个队列,CPU 将 display list 添加到该队列中,这样 GPU 就可以从这个队列中取出数据进行绘制。
说到绘制性能就需要提到帧这个概念。帧数就是在 1s 时间里传输的图片的量,也可以理解为图形处理器每秒钟能刷新几次,通过用 FPS(Frames Per Second)表示。每一帧其实就是静止的图像,通过快速连续地显示帧便形成了运动的假象。最简单的举例就是我们在玩游戏的时候,如果画面在 60fps 则不会感到卡顿,如果低于 60fps ,比如 50fps 则会感到卡顿。 这是因为人类的大脑会不断的接收并处理眼球看到的信息,单位时间内越多的帧被处理,就越能有效地被大脑识别,大脑能感知的最小的帧数载 10fps ~ 12fps,这个时候大脑就分不清楚这个图像是静止的还是变化的。
要想画面保持在 60fps,需要屏幕在 1s 内刷新 60 次,也就是没 16.6667ms 刷新一次(绘制时长在 16ms 以内)。
Android 系统每隔 16ms 发出 VSYNC 信号,触发对 UI 进行渲染,如果每次渲染都成功,这样就能够达到流畅画面所需要的 60fps,那什么是 VSYNC 呢?VSYNC 就是 Vertical Synchronization(垂直同步)的缩写,是一种定时中断,一旦收到 VSYNC 信号,CPU 就开始处理各帧数据。如果某个操作要花费 24ms,这样系统在得到 VSYNC 信号时无法进行正常的渲染,会发生丢帧。用户会在 32ms 中看到同一帧的画面。
产生卡顿原因有很多,主要有以下几点:
- 布局
Layout过于复杂,无法在16ms内完成渲染; - 同一时间动画执行的次数过多,导致
CPU或GPU负载过重; View过度绘制,导致某些像素在同一帧时间内会被绘制多次;- 在
UI线程中做了稍微耗时的操作; GC回收时暂停时间过长或者频繁GC产生大量的暂停时间;
1.2 工具
1.2.1 Profile GPU Rendering
Profile GPU Rendering 是 Android 4.1 系统提供的开发辅助功能,可以在开发者选项中打开这一功能:设置–>开发者选项–>GPU呈现模式分析–>在屏幕上显示为条形图:
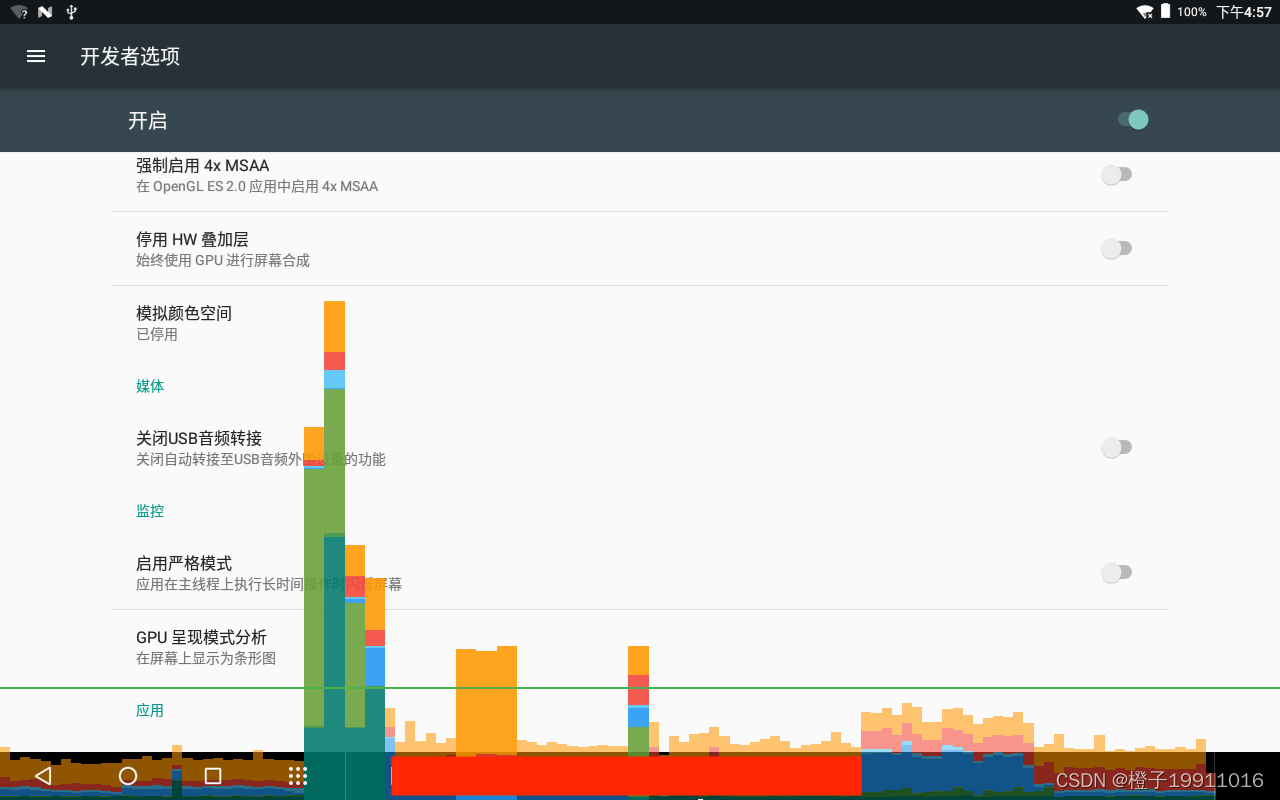
图中横轴代表时间,纵轴表示某一帧的耗时,绿色的横线为警戒线,超过这条线则意味着时长超过了 16ms,尽量要保证垂直的彩色柱状图保持在绿线下面。这些垂直的彩色柱状图代表着一帧,不同颜色的彩色柱状图代表不同的含义:
- 橙色代表处理的时间,是
CPU告诉GPU渲染一帧的地方,这是一个阻塞调用,因为CPU会一直等待GPU发出接到命令的回复,如果橙色柱状图很高,则表明GPU很繁忙; - 红色代表执行的时间,这部分是
Android进行2D渲染Display List的时间,如果红色的柱状图很高,可能由于重新提交了视图而导致的。还有复杂的自定义View也会导致红的柱状图变高; - 蓝色代表测量绘制的时间,也就是需要多长时间去创建和更新
Display List。如果蓝色柱状图很高,可能需要重新绘制,或者View.onDraw()方法处理事情太多;
随着界面的刷新,界面上会以实时柱状图来显示每帧的渲染时间,柱状图越高表示渲染时间越长,每个柱状图偏上都有一根代表16ms基准的绿色横线,每一条竖着的柱状线都包含三部分(蓝色代表测量绘制Display List的时间,红色代表OpenGL渲染Display List所需要的时间,黄色代表CPU等待GPU处理的时间),只要我们每一帧的总时间低于基准线就不会发生UI卡顿问题(个别超出基准线其实也不算什么问题的)。
1.2.2 GPU绘制
对于UI性能的优化还可以通过开发者选项中的GPU过度绘制工具来进行分析。 在设置->开发者选项->调试GPU过度绘制(不同设备可能位置或者叫法不同)中打开调试后可以看见如下图(对settings当前界面过度绘制进行分析):

以下说明:

蓝色(1x过度绘制),淡绿(2x过度绘制),淡红(3x过度绘制),深红(4x过度绘制)代表了4种不同程度的Overdraw情况,我们的目标就是尽量减少红色Overdraw,看到更多的蓝色区域。
Overdraw有时候是因为UI布局存在大量重叠的部分,还有的时候是因为非必须的重叠背景。例如某个Activity有一个背景,然后里面的Layout又有自己的背景,同时子View又分别有自己的背景。仅仅是通过移除非必须的背景图片,这就能够减少大量的红色Overdraw区域,增加蓝色区域的占比。这一措施能够显著提升程序性能。
如果布局中既能采用RealtiveLayout和LinearLayout,那么直接使用LinearLayout,因为Relativelayout的布局比较复杂,绘制的时候需要花费更多的CPU时间。如果需要多个LinearLayout或者Framelayout嵌套,那么可采用Relativelayout。因为多层嵌套导致布局的绘制有大部分是重复的,这会减少程序的性能。
2 布局优化工具 — Layout Inspector
使用布局检查器和布局验证工具调试布局
3 布局优化方法
布局优化方法很多,主要包括合理运用布局、include、merge 和 ViewStub。
3.1 合理运用布局
常用的布局主要有 LinearLayout、RelativeLayout 和 FrameLayout 等,合理地使用它们可以使得 Android 绘制工作量变少,性能得到提高。举例来说:
<?xml version="1.0" encoding="utf-8"?>
<LinearLayout xmlns:android="http://schemas.android.com/apk/res/android"
    xmlns:app="http://schemas.android.com/apk/res-auto"
    xmlns:tools="http://schemas.android.com/tools"
    android:layout_width="match_parent"
    android:layout_height="match_parent"
    android:orientation="horizontal"
    tools:context=".MainActivity">

    <TextView
        android:layout_width="wrap_content"
        android:layout_height="wrap_content"
        android:text="布局优化" />

    <LinearLayout
        android:layout_width="wrap_content"
        android:layout_height="wrap_content"
        android:layout_marginLeft="10dp"
        android:orientation="vertical">

        <TextView
            android:layout_width="wrap_content"
            android:layout_height="wrap_content"
            android:text="Merge" />

        <TextView
            android:layout_width="wrap_content"
            android:layout_height="wrap_content"
            android:text="ViewStub" />

    </LinearLayout>

</LinearLayout>
可以看到布局共三层:

布局共 3 层,一共含有 5 个 View,如果用 RelativeLayout 进行改写,代码如下所示:
<?xml version="1.0" encoding="utf-8"?>
<RelativeLayout xmlns:android="http://schemas.android.com/apk/res/android"
    xmlns:app="http://schemas.android.com/apk/res-auto"
    xmlns:tools="http://schemas.android.com/tools"
    android:layout_width="match_parent"
    android:layout_height="match_parent"
    tools:context=".MainActivity">

    <TextView
        android:id="@+id/tv_text1"
        android:layout_width="wrap_content"
        android:layout_height="wrap_content"
        android:text="布局优化" />

    <TextView
        android:id="@+id/tv_text2"
        android:layout_width="wrap_content"
        android:layout_height="wrap_content"
        android:layout_marginLeft="10dp"
        android:layout_toRightOf="@+id/tv_text1"
        android:text="Merge" />

    <TextView
        android:layout_width="wrap_content"
        android:layout_height="wrap_content"
        android:layout_marginLeft="10dp"
        android:layout_toRightOf="@+id/tv_text1"
        android:layout_below="@+id/tv_text2"
        android:text="ViewStub" />

</RelativeLayout>
可以看到布局有两层:

布局有 2 层,一共有 4 个 View,从这里可以看出 RelativeLayout 减少了一层的布局。如果布局复杂,可以合理的利用 RelativeLayout 来减少布局层次。RelativeLayout 的性能比 LinearLayout 低,因为 RelativeLayout 中的 View 排列方式是基于彼此依赖的。
但是,在实际开发过程中面对的情况比较多,不能轻易说谁的性能更好。在一般情况下,如果布局层数较多时,推荐使用 RelativeLayout,如果布局嵌套较多,推荐使用 LinearLayout 来实现。
3.2 使用 include 标签来进行布局复用
当多个布局需要复用一个相同的布局,比如一个 TitleBar,如果这些洁面都要加上这个相同布局 TitleBar,维护起来很麻烦,需要复制 TitleBar 的布局到每个需要添加的洁面,这样容易发生遗漏。如果修改 TitleBar 则需要去引用 TitleBar 的布局中进行修改。为了解决这些问题,可以用 include 标签来解决。
<?xml version="1.0" encoding="utf-8"?>
<LinearLayout xmlns:android="http://schemas.android.com/apk/res/android"
    android:layout_width="match_parent"
    android:layout_height="40dp">

    <ImageView
        android:layout_width="30dp"
        android:layout_height="30dp"
        android:layout_gravity="center"
        android:src="@drawable/ic_launcher_background"
        android:padding="3dp" />

</LinearLayout>
这个 TitleBar 由 ImageView 和 TextView 组成。下面将 TitleBar 引入到此前用过的布局中,如下所示:
<?xml version="1.0" encoding="utf-8"?>
<LinearLayout xmlns:android="http://schemas.android.com/apk/res/android"
    xmlns:app="http://schemas.android.com/apk/res-auto"
    xmlns:tools="http://schemas.android.com/tools"
    android:layout_width="match_parent"
    android:layout_height="match_parent"
    android:orientation="vertical">

    <include layout="@layout/title_bar" />

    <RelativeLayout
        android:layout_width="match_parent"
        android:layout_height="match_parent"
        tools:context=".MainActivity">

        <TextView
            android:id="@+id/tv_text1"
            android:layout_width="wrap_content"
            android:layout_height="wrap_content"
            android:text="布局优化" />

        <TextView
            android:id="@+id/tv_text2"
            android:layout_width="wrap_content"
            android:layout_height="wrap_content"
            android:layout_marginLeft="10dp"
            android:layout_toRightOf="@+id/tv_text1"
            android:text="Merge" />

        <TextView
            android:layout_width="wrap_content"
            android:layout_height="wrap_content"
            android:layout_below="@+id/tv_text2"
            android:layout_marginLeft="10dp"
            android:layout_toRightOf="@+id/tv_text1"
            android:text="ViewStub" />

    </RelativeLayout>
</LinearLayout>
可以看到布局有两层:

3.3 用 merge 标签去除多余层级
merge 意味着合并,在合适的场景使用 merge 标签可以减少多余的层级。merge 标签一般和 include 标签搭配使用。对于上一节的例子,如果用 merge 标签来替换 LinearLayout,代码如下所示:
<?xml version="1.0" encoding="utf-8"?>
<merge xmlns:android="http://schemas.android.com/apk/res/android"
    android:layout_width="match_parent"
    android:layout_height="40dp">

    <ImageView
        android:layout_width="30dp"
        android:layout_height="30dp"
        android:layout_gravity="center"
        android:padding="3dp"
        android:src="@drawable/ic_launcher_background" />

    <TextView
        android:layout_width="match_parent"
        android:layout_height="wrap_content"
        android:layout_gravity="center"
        android:gravity="center"
        android:text="绘制优化" />

</merge>
布局层次:

可以看到,之前的 LinearLayout 没有了,但是这里有 merge 标签来替代 LinearLayout 会导致 LinearLayout 失效,布局会错乱。merge 标签最好是替代 FrameLayout 或者布局方向一致的 LinearLayout,比如当前父布局的 LinearLayout 的布局方向是垂直的,包含的子布局 LinearLayout 的布局防线也是垂直的,就可以用 merge 标签。但是本场景下 TitleBar 的跟布局 LinearLayout 的布局方向是水平的,显然不符合这一要求。
3.4 使用 ViewStub 来提高加载速度
一个常见的开发场景就是某个布局上并不是所有的控件都要显示出来,而是显示其中的一部分,对于这种情况,一般采用的方法就是使用 View 的 GONE 和 VISIBLE 属性,这种方法效率不高,虽然达到了隐藏的目的,但是仍在布局当中,系统仍会解析它们,可以使用 ViewStub 来解决这一问题。
ViewStub 是轻量级的 View,不可见并且不占据布局位置。当 ViewStub 调用 inflate 方法或者设置可见时,系统会夹在 ViewStub 指定的布局,然后将这个布局添加到 ViewStub 中,在对 ViewStub 调用 inflate 方法或者设置可见之前,它是不占据布局空间和系统资源的,它主要的目的就是为了目标视图占用一个位置。因此,使用 ViewStub 可以提高洁面初始化的性能,从而提高界面的加载速度。首先,在布局中加入 ViewStub 标签:
<?xml version="1.0" encoding="utf-8"?>
<LinearLayout xmlns:android="http://schemas.android.com/apk/res/android"
    xmlns:app="http://schemas.android.com/apk/res-auto"
    xmlns:tools="http://schemas.android.com/tools"
    android:layout_width="match_parent"
    android:layout_height="match_parent"
    android:orientation="vertical">

    <ViewStub
        android:layout_width="match_parent"
        android:layout_height="40dp"
        android:layout="@layout/title_bar" />

</LinearLayout>
在 ViewStub 标签中使用 android:layout 引用了此前写好的布局 title_bar.xml。在运行程序时,ViewStub 标签所引用的布局是显示不出来的,因为该布局还没有加载到 ViewStub 中,接下来在代码中使用 ViewStub:
public class MainActivity extends AppCompatActivity {

    private ViewStub viewStub;

    @Override
    protected void onCreate(Bundle savedInstanceState) {
        super.onCreate(savedInstanceState);
        setContentView(R.layout.activity_main);

        viewStub = findViewById(R.id.view_stub);
        viewStub.inflate(); // 1
        viewStub.setVisibility(View.VISIBLE); // 2
    }
}
注释 1 和注释 2 处的嗲吗用来将 ViewStub 应用的布局家在到 ViewStub 中,这样应用布局就显示出来了。在使用 ViewStub 时需要注意以下问题:
ViewStub只能加载一次,加载后ViewStub对象会被置为空,这样在ViewStub引用的布局被加载后,就不能用用ViewStub来控制引用的布局了。因此,如果一个控件需要不断地显示和隐藏,还是要使用View的Visibility属性;ViewStub不能嵌套merge标签;ViewStub操作的是布局文件,如果只是想操作具体的View,还是要使用View的Visibility属性;
3.5 绘制优化
绘制优化主要是指View.onDraw方法需要避免执行大量的操作:
onDraw方法不需要创建新的局部对象,这是因为onDraw方法是实时执行的,产生大量的临时对象,导致占用了更多内存,并且使系统不断的GC,降低了执行效率;onDraw方法不需要执行耗时操作,在onDraw方法里少使用循环,因为循环会占用CPU的时间。导致绘制不流畅,卡顿等等。 Google官方指出,View的绘制帧率稳定在60dps,这要求每帧的绘制时间不超过16ms(1000/60)。虽然很难保证,但我们需要尽可能的降低;
60dps是目前最合适的图像显示速度,也是绝大部分Android设备设置的调试频率,如果在16ms内顺利完成界面刷新操作可以展示出流畅的画面,而由于任何原因导致接收到VSYNC信号的时候无法完成本次刷新操作,就会产生掉帧的现象,刷新帧率自然也就跟着下降(假定刷新帧率由正常的60fps降到30fps,用户就会明显感知到卡顿)。
