一、Iterator迭代器和for of原理
* 遍历器(Iterator)是一种机制(接口):为各种不同的数据结构提供统一的访问机制,任何数据结构只要部署Iterator接口,就可以完成遍历操作「for of循环」,依次处理该数据结构的所有成员
* + 拥有next方法用于依次遍历数据结构的成员
* + 每一次遍历返回的结果是一个对象 {done:false,value:xxx}
* + done:记录是否遍历完成
* + value:当前遍历的结果
* 拥有Symbol.iterator属性的数据结构(值),被称为可被遍历的,可以基于for of循环处理
* + 数组
* + 部分类数组:arguments/NodeList/HTMLCollection...
* + String
* + Set
* + Map
* + generator object
* + ...
* 对象默认不具备Symbol.iterator,属于不可被遍历的数据结构
自己创建一个Iterator类,来实现ES6中的迭代器规范
class Iterator {
    constructor(assemble) {
        let self = this;
        self.assemble = assemble;
        self.index = 0;
    }
    next() {
        let self = this,
            assemble = self.assemble;
        if (self.index > assemble.length - 1) {
            return {
                done: true,
                value: undefined
            };
        }
        return {
            done: false,
            value: assemble[self.index++]
        };
    }
}

创建一个实例对象,其应该具备迭代器规范的要求
  itor.next() 具备next方法,执行这个方法可以依次获取到数据结构中的每一个成员值
  每一次获取的成员值是一个对象
    + done:是否迭代完毕
    + value:当前获取的那个值
  符合以上两个特点的对象,我们称之为符合迭代器规范的对象!!

let itor = new Iterator([10, 20, 30, 40]);
console.log(itor.next()); //->{value:10,done:false}
console.log(itor.next()); //->{value:20,done:false}
console.log(itor.next()); //->{value:30,done:false}
console.log(itor.next()); //->{value:40,done:false}
console.log(itor.next()); //->{value:undefined,done:true}
/*
在JS中,有很多数据结构,天生具备迭代器规范,例如:
我们主要看数据结构(对象)是否具备 Symbol.iterator 这个属性;有这个属性就具备迭代器规范,没有就不具备;具备这个规范,就可以使用 for/of 循环来迭代数据中的每一项值了!!
+ 数组 Array.prototype[Symbol(Symbol.iterator)]=function...
+ 部分类数组
+ arguments[Symbol(Symbol.iterator)]
+ NodeList.prototype[Symbol(Symbol.iterator)]
+ HTMLCollection.prototype[Symbol(Symbol.iterator)]
+ ...
+ 字符串 String.prototype[Symbol(Symbol.iterator)]
+ Set/Map
+ ...
但是对于纯粹对象「或者自己构建的类数组对象」等来讲,默认是不具备 Symbol.iterator 这个属性的,所以他们不具备迭代器规范!「不能直接使用 for/of 循环」
*/
数组迭代的方式:for、while、forEach/map、for/in、for/of...

let arr = [10, 20, 30, 40];

arr[Symbol.iterator] = function () {
    console.log('FOR/OF START');
    let self = this, //this->arr
        index = -1;
    // 返回具备迭代器规范的对象 -> itor
    return {
        next() {
            index += 2;
            if (index >= self.length) {
                return {
                    done: true,
                    value: undefined
                };
            }
            return {
                done: false,
                value: self[index]
            };
        }
    };
};

for (let val of arr) {
    console.log(val);
}
for of 原理
// for/of循环主要用于获取数据结构中每一项的“值”
for (let val of arr) {
    console.log(val);
}
原理:
  1.迭代执行,先执行数组的Symbol.iterator这个方法,获取一个具备迭代器规范的对象->itor
  2.开始迭代:每一次迭代都是把 itor.next 方法执行
    + 把获取对象中的value属性值,赋值给val这个变量
    + 再看对象中done这个属性的值,如果是false,则继续迭代;如果是true,则结束迭代!!
*/

//============================
// 迭代对象的方式:for/in;获取所有的keys,然后迭代keys;也可以使用for/of(但是需要自己为其设置Symbol.iterator)
/* let obj = {
    name: 'zhufeng',
    age: 13,
    0: 100,
    [Symbol('AA')]: 200
};

Object.prototype[Symbol.iterator] = function iterator() {
    let self = this, //迭代的对象
        index = -1,
        keys = Reflect.ownKeys(self);
    return {
        next() {
            index++;
            if (index >= keys.length) {
                // 这个必须要设置,否则就是死循环了
                return {
                    done: true,
                    value: undefined
                };
            }
            let key = keys[index];
            return {
                done: false,
                value: self[key]
            };
        }
    };
};

for (let val of obj) {
    console.log(val);
}

for (let val of obj) {
    console.log(val); //Uncaught TypeError: obj is not iterable
}
类数组
/* // 如果是类数组,是可以直接借用数组原型上的Symbol.iterator方法的!!
let obj = {
    0: 10,
    1: 20,
    2: 30,
    length: 3
};
obj[Symbol.iterator] = Array.prototype[Symbol.iterator];
for (let val of obj) {
    console.log(val);
} */

/*
if ( typeof Symbol === "function" ) {
    jQuery.fn[ Symbol.iterator ] = arr[ Symbol.iterator ];
}
*/
二、 Genertator基础和 await原理
生成器对象是由一个generator function返回的,并且它符合可迭代协议和迭代器协议
Generator - JavaScript | MDN
讲义示例:
/*
 * 普通函数 VS 生成器函数
 *    生成器函数 [[IsGenerator]]:true
 *
 *   「把它当做一个实例 __proto__」
 *       普通函数是 Function 的实例,普通函数.__proto__===Function.prototype
 *       生成器函数是 GeneratorFunction 的实例
 *           生成器函数.__proto__===GeneratorFunction.prototype
 *           GeneratorFunction.prototype.__proto__===Function.prototype
 *      ({}).toString.call(生成器函数) => "[object GeneratorFunction]"
 *
 *   「把它作为一个构造函数 prototype」
 *      生成器函数不能被new执行  Uncaught TypeError: func is not a constructor
 *      当做普通函数执行,返回的结果就是生成器函数的一个实例
 *      itor.__proto__ -> func.prototype「空对象,没有constructor」 -> Generator.prototype「constructor:GeneratorFunction」{next/return/throw/Symbol(Symbol.toStringTag): "Generator"} -> 一个具备迭代器规范的对象「Symbol(Symbol.iterator)」 -> Object.prototype
 */

// generator函数:function后面加一个*
function* fn() {
    console.log(this);
    return 10;
}
fn.prototype.query = function () {};
let gen = fn();
console.log(gen);
// gen.__proto__ -> fn.prototype「query」 -> GeneratorFunction.prototype「next/return/throw/Symbol.toStringTag」-> xxx.prototype「Symbol.iterator」 -> Object.prototype
console.log(typeof fn); //->"function"
console.log(fn instanceof Function); //->true


function* generator() {
    console.log('A');
    yield 10;
    console.log('B');
    yield 20;
    console.log('C');
    yield 30;
    console.log('D');
    return 100;
}
let itor = generator();
console.log(itor.next()); //->{value:10,done:false}
console.log(itor.next()); //->{value:20,done:false}
console.log(itor.next()); //->{value:30,done:false}
console.log(itor.next()); //->{value:100,done:true}
console.log(itor.next()); //->{value:undefined,done:true}


function* generator() {
    console.log('A');
    yield 10;
    console.log('B');
    yield 20;
    console.log('C');
    return 30;
}
let itor = generator();
console.log(itor.next()); //->{value:10,done:false}
console.log(itor.return('@return')); //->{value:"@return",done:true}
// console.log(itor.throw('@throw'));
console.log(itor.next()); //->{value:undefined,done:true}


// 每一次执行next的传递的值,是作为上一次yeild的返回值处理的
function* generator() {
    let x1 = yield 10;
    console.log(x1);
    let x2 = yield 20;
    console.log(x2);
    return 30;
}
let itor = generator();
itor.next('@1');
itor.next('@2');
itor.next('@3');


// yeild* 后面跟着一个新的itor,后期执行到这的时候,会进入到新的generator中执行
function* generator1() {
    yield 10;
    yield 20;
}

function* generator2() {
    yield 10;
    yield* generator1();
    yield 20;
}
let itor = generator2();
console.log(itor.next()); //value:10  done:false
console.log(itor.next()); //value:10 done:false
console.log(itor.next()); //value:20  done:false
console.log(itor.next()); //value:20 done:false
console.log(itor.next()); //value:undefined done:true
如何创建一个Generator生成器函数?
+ 把创建函数的“function”后面加一个 “*” 即可
+ 箭头函数是无法变为生成器函数的
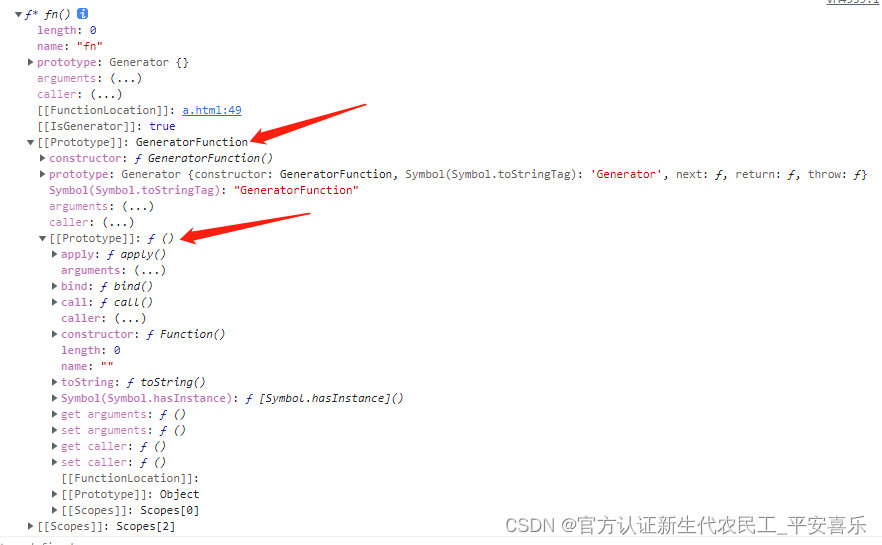
每一个生成器函数,都是GeneratorFunction这个类的实例
fn.__proto__ -> GeneratorFunction.prototype -> Function.prototype
多了这样的一个私有属性 [[IsGenerator]]:true
普通函数的原型链
fn.__proto__ -> Function.prototype
当生成器函数执行:
+ 首先并不会立即把函数体中的代码执行
+ 而是返回一个具备迭代器规范的对象「itor」
itor.__proto__
+ next
+ throw
+ return
+ Symbol(Symbol.iterator) : function...
+ ...
+ 当进行itor.next()执行的时候
+ 把函数体中的代码开始执行
+ 返回一个对象
+ done:记录代码是否执行完毕
+ value:记录本次处理的结果
const fn = function* fn() { console.log("代码运行中:", 10); return 100; }; let itor = fn(); console.log(itor.next()); //-> {done:true,value:100} console.log(itor.next()); //-> {done:true,value:undefined}对于ES6快捷赋值的语法,我们在方法名前面设置*,就可以创建生成器函数了
let obj = {

    // sum:function(){}

    *sum() {

    }

};

console.log(obj.sum());
Generator生成器函数的作用:
可以基于返回的itor(迭代器对象),基于其next方法,控制函数体中的代码,一步步的去执行!!
+ 每一次执行next,控制函数体中的代码开始执行「或者从上一次暂停的位置继续执行」,遇到yield则暂停!!
done:false
value:yield后面的值
+ 当遇到函数体中的return,或者已经执行到函数最末尾的位置了
done:true
value:函数的返回值或者undefined
const fn = function* fn() {
    console.log('A');
    yield 100;
    console.log('B');
    yield 200;
    console.log('C');
    yield 300;
    console.log('D');
    return 400;
};
let itor = fn();
console.log(itor.next()); //->{done:false,value:100}
console.log(itor.next()); //->{done:false,value:200}
console.log(itor.next()); //->{done:false,value:300}
console.log(itor.next()); //->{done:true,value:400}

--------------------------------------------------------

const fn = function* fn() {
    console.log('A');
    yield 100;
    console.log('B');
    yield 200;
    console.log('C');
    yield 300;
    console.log('D');
    return 400;
};
let itor = fn();
console.log(itor.next());  // -> {done:false, value:100}
console.log(itor.return('哈哈哈')); // -> {value:'哈哈哈', done:true} 相当于在函数体中执行遇到了return,结束整个函数的继续执行「done:true」,传递的值相当于return的值!!
console.log(itor.next());  // -> {value:undefined, done:true}


console.log(itor.throw('哈哈哈')); // 手动抛出异常「控制台报红」;生成器函数中的代码,都不会再执行了!!
console.log(itor.next()); // 抛出异常后,它下面的代码也不会执行了
console.log('我是的外边的');
params:生成器函数接收的实参值,它是生成器函数执行时传递的值
fn(10,20,30)
params:[10,20,30]
itor.next(N):每一次执行next方法,传递的值会作为上一个yield的返回值「所以第一次执行next方法,传递的值是没有用的,因为在它之前没有yield」
const fn = function* fn(...params) {
    let x = yield 100;
    console.log(x); //'second:222'
    let y = yield 200;
    console.log(y); //'three:333'
};
let itor = fn(10, 20, 30);
console.log(itor.next('first:111')); //-> {value: 100, done: false}
console.log(itor.next('second:222')); //-> {value: 200, done: false}
console.log(itor.next('three:333')); //-> {value: undefined, done: true}
生成器嵌套问题 yield*
const sum = function* sum() {
    yield 300;
    yield 400;
};
const fn = function* fn() {
    yield 100;
    yield* sum(); // yield*:支持让我们进入另外一个生成器函数中去一步步的执行
    yield 200;
};
let itor = fn();
console.log(itor.next()); //-> {value: 100, done: false}
console.log(itor.next()); //-> {value: 300, done: false}
console.log(itor.next()); //-> {value: 400, done: false}
console.log(itor.next()); //-> {value: 200, done: false}
console.log(itor.next()); //-> {value: undefined, done: true}
// -------------------------
异步
const delay = (interval = 1000) => {
    return new Promise(resolve => {
        setTimeout(() => {
            resolve(`@@${interval}`);
        }, interval);
    });
};
需求:串行请求,有三个请求「请求需要的时间分别是 1000/2000/3000」?
delay(1000)
    .then(value => {
        console.log('第一个请求成功:', value);
        return delay(2000);
    })
    .then(value => {
        console.log('第二个请求成功:', value);
        return delay(3000);
    })
    .then(value => {
        console.log('第三个请求成功:', value);
    })
    .catch(reason => {
        console.log('任何请求失败,都执行这里:', reason);
    });
(async () => { try { let value = await delay(1000); console.log('第一个请求成功:', value); value = await delay(2000); console.log('第二个请求成功:', value); value = await delay(3000); console.log('第三个请求成功:', value); } catch (reason) { console.log('任何请求失败,都执行这里:', reason); } })();基于Generator函数,模拟Await的语法,实现请求的串行
const handle = function* handle() {
    let value = yield delay(1000);
    console.log('第一个请求成功:', value);

    value = yield delay(2000);
    console.log('第二个请求成功:', value);

    value = yield delay(3000);
    console.log('第三个请求成功:', value);
};
编写通知Generator中代码逐一执行的方法
ES8(ECMAScript2017)中,提供了async/await语法:用来简化promise的操作
它是 Promise + Generator 的语法糖
我们自己上边实现的AsyncFunction和Generator函数就是async/await的原理!!
const AsyncFunction = function AsyncFunction(generator, ...params) {
    let itor = generator(...params);
    // 基于递归的方法,通知Generator函数中的代码逐一执行
    const next = x => {
        let { done, value } = itor.next(x);
        if (done) return;
        if (!(value instanceof Promise)) value = Promise.resolve(value);
        value.then(next);
    };
    next();
};

// AsyncFunction(handle);
AsyncFunction(function* (x, y) {
    let total = x + y;
    let value = yield total;
    console.log('@1-->', value);

    yield delay(2000);
    console.log('@2-->', '哈哈哈');
}, 10, 20);

/* (async (x, y) => {
    let total = x + y;
    let value = await total;
    console.log('@1-->', value);

    await delay(2000);
    console.log('@2-->', '哈哈哈');
})(10, 20); */
