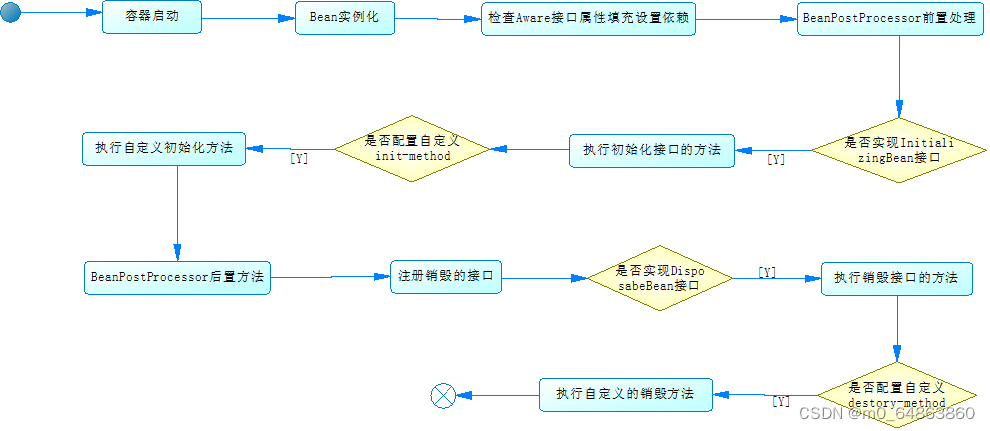
- 1. 生命周期简图
- 2. 扩展接口介绍
- 2.1 Aware接口
- 2.2 BeanPostProcessor接口
- 2.3 InitializingBean
- 2.4 DisposableBean
- 2.5 BeanFactoryPostProcessor接口
- 3. spring的简化配置
- 3.1 项目搭建
- 3.2 Bean的配置和值注入
- 3.3 AOP的示例
1. 生命周期简图

2. 扩展接口介绍
2.1 Aware接口
在spring中Aware接口表示的是感知接口,表示spring框架在Bean实例化过程中以回调的方式将特定在资源注入到Bean中去(如:ApplicationContext, BeanName,BeanFactory等等)。Aware接口本事没有声明任何方法,是一个标记接口,其下有多个子接口,如:BeanNameAware,ApplicationContextAware,BeanFactoryAware等。
每个特定的子接口都会固定一个特定的方法,并注入特定的资源,如BeanFactoryAware接口,定义了setBeanFactory(BeanFactory beanFactory),在spring框架实例化Bean过程中,将回调该接口,并注入BeanFactory对象。再例如:ApplicationContextAware接口,定义了setApplicationContext(ApplicationContext applicationContext) 方法,在spring完成Bean实例化,将回调该接口,并注入ApplicationContext对象(该对象即spring的上下文)。
Aware接口示例(ApplicationContextAware 是 Aware 接口的子接口):
public class ApplicationContextAwareTest implements ApplicationContextAware {

    private static ApplicationContext ctx;

    @Override
    public void setApplicationContext(ApplicationContext applicationContext) throws BeansException {
        ctx = applicationContext;
        System.out.println("---- ApplicationContextAware 示例 -----------");
    }

    public static  <T> T getBean(String beanName) {
        return (T) ctx.getBean(beanName);
    }

}
配置文件:
<bean id="applicationContextAwareTest" class="org.lisen.springstudy.aware.ApplicationContextAwareTest">
</bean>
2.2 BeanPostProcessor接口
Bean在初始化之前会调用该接口的postProcessBeforeInitialization方法,在初始化完成之后会调用
postProcessAfterInitialization方法。
除了我们自己定义的BeanPostProcessor实现外,spring容器也会自动加入几个,如ApplicationContextAwareProcessor、ApplicationListenerDetector,这些都是BeanPostProcessor的实现类。
BeanPostProcessor接口的定义:
public interface BeanPostProcessor {
    Object postProcessBeforeInitialization(Object bean, String beanName) throws BeansException;
    Object postProcessAfterInitialization(Object bean, String beanName) throws BeansException;
}
方法的第一个参数为bean实例,第二个参数为beanName,且返回值类型为Object,所以这给功能扩展留下了很大的空间,比如:我们可以返回bean实例的代理对象。
开发示例:
public class BeanPostProcessorTest implements BeanPostProcessor {

    @Override
    public Object postProcessBeforeInitialization(Object bean, String beanName) throws BeansException {
        System.out.println(beanName + " postProcessBeforeInitialization");
        return bean;
    }

    @Override
    public Object postProcessAfterInitialization(Object bean, String beanName) throws BeansException {
        System.out.println(beanName + " postProcessAfterInitialization");
        return bean;
    }

}
配置文件:
<bean id="beanPostProcessorTest"
class="org.lisen.springstudy.beanpostprocessor.BeanPostProcessorTest"></bean>
2.3 InitializingBean
该接口是Bean初始化过程中提供的扩展接口,接口中只定义了一个afterPropertiesSet方法。如果一个bean实现了InitializingBean接口,则当BeanFactory设置完成所有的Bean属性后,会回调afterPropertiesSet方法,可以在该接口中执行自定义的初始化,或者检查是否设置了所有强制属性等。
也可以通过在配置init-method方法执行自定义的Bean初始化过程。
示例:
public class InitializingBeanTest implements InitializingBean {

    @Override
    public void afterPropertiesSet() throws Exception {
        System.out.println("InitializingBean.afterPropertiesSet() ......");
    }

}
配置文件:
<bean id="initializingBeanTest" class="org.lisen.springstudy.initializingbean.InitializingBeanTest">
</bean>
2.4 DisposableBean
实现了DisposableBean接口的Bean,在该Bean消亡时Spring会调用这个接口中定义的destroy方法。
public class TestService implements DisposableBean {

    public void hello() {
        System.out.println("hello work ... ");
    }

    @Override
    public void destroy() throws Exception {
        System.out.println("TestService destroy ..... ");
    }
}
在Spring的应用上下文关闭时,spring会回调destroy方法, 如果Bean需要自定义清理工作,则可以实现该接口。
除了实现DisposableBean接口外,还可以配置destroy-method方法来实现自定义的清理工作。
2.5 BeanFactoryPostProcessor接口
该接口并没有在上面的流程图上体现出来,因为该接口是在Bean实例化之前调用的(但BeanFactoryPostProcessor接口也是spring容器提供的扩展接口,所以在此处一同列出),如果有实现了BeanFactoryPostProcessor接口,则容器初始化后,并在Bean实例化之前Spring会回调该接口的postProcessorBeanFactory方法,可以在这个方法中获取Bean的定义信息,并执行一些自定义的操作,如属性检查等。
3. spring的简化配置
3.1 项目搭建
启用注解,对spring的配置进行简化。
- 创建一个maven web工程
- 将web改为web3.1,参考第一次课件
- 修改pom.xml文件,引入必要的包
<properties>
		<spring.version>5.3.18</spring.version>
		<junit.version>4.12</junit.version>
	</properties>

	<dependencies>

		<dependency>
			<groupId>org.springframework</groupId>
			<artifactId>spring-context</artifactId>
			<version>${spring.version}</version>
		</dependency>

		<dependency>
			<groupId>org.springframework</groupId>
			<artifactId>spring-web</artifactId>
			<version>${spring.version}</version>
		</dependency>

		<dependency>
			<groupId>org.springframework</groupId>
			<artifactId>spring-webmvc</artifactId>
			<version>${spring.version}</version>
		</dependency>

		<dependency>
			<groupId>org.springframework</groupId>
			<artifactId>spring-orm</artifactId>
			<version>${spring.version}</version>
		</dependency>

		<dependency>
			<groupId>org.springframework</groupId>
			<artifactId>spring-aspects</artifactId>
			<version>${spring.version}</version>
		</dependency>

		<dependency>
			<groupId>org.springframework</groupId>
			<artifactId>spring-test</artifactId>
			<version>${spring.version}</version>
		</dependency>

		<!-- junit 测试 -->
		<dependency>
			<groupId>junit</groupId>
			<artifactId>junit</artifactId>
			<version>${junit.version}</version>
			<scope>test</scope>
		</dependency>


	</dependencies>
- 在resources根目录下添加spring的配置文件 spring.xml
<?xml version="1.0" encoding="UTF-8"?>
 <beans xmlns="http://www.springframework.org/schema/beans"
      xmlns:context="http://www.springframework.org/schema/context"
      xmlns:xsi="http://www.w3.org/2001/XMLSchema-instance"
      xsi:schemaLocation="http://www.springframework.org/schema/beans
      http://www.springframework.org/schema/beans/spring-beans.xsd
      http://www.springframework.org/schema/context
      http://www.springframework.org/schema/context/spring-context.xsd">

	<context:component-scan base-package="com.zking"/>

	<!-- 配置properties文件,与Spring @Value 配合使用   方式一    -->
	<!-- <bean >
		<property name="locations">
			<list>
				<value>classpath:/test.properties</value>
			</list>
		</property>
	</bean>

	<bean >
		<property name="properties" ref="configProp"></property>
	</bean> -->


	<!--
	配置properties文件,与Spring @Value 配合使用   方式二 。
	也可以不使用xml的方式配置,使用程序方式进行配置,可以参考ConfigurationBean  方式三
	-->
	<bean id="propPlaceholder" class="org.springframework.beans.factory.config.PropertyPlaceholderConfigurer">
		<property name="locations">
			<list>
				<value>classpath:/test.properties</value>
			</list>
		</property>
	</bean>

</beans>
程序方式注册如下:
@Configuration
public class ConfigurationBean {

	@Bean
	public static PropertySourcesPlaceholderConfigurer setPropertiesFile() {
		PropertySourcesPlaceholderConfigurer config = new PropertySourcesPlaceholderConfigurer();
		ClassPathResource contextPath = new ClassPathResource("/test.properties");
		config.setLocation(contextPath);
		return config;
	}

}
- 在resources根目录下新建一个test.properties文件,和spring.xml的配置文件中的配置是相对应的
3.2 Bean的配置和值注入
- 创建并注册一个Bean
@Component("stu")
public class Student {

	//@Value("#{configProp['stu.name']}")
	@Value("${stu.name}")
	private String name;

	public String getName() {
		return name;
	}

	public void setName(String name) {
		this.name = name;
	}

	@Override
	public String toString() {
		return "Student [name=" + name + "]";
	}

}
- 通过容器获取Bean
		ClassPathXmlApplicationContext ctx = new ClassPathXmlApplicationContext("spring.xml");
		Student stu = (Student)ctx.getBean("stu");
		//stu.setName("zs");
		System.out.println(stu);
3.3 AOP的示例
1.创建一个切面,记录程序运行时间
@Component
@Aspect
@EnableAspectJAutoProxy
public class ProcessAop {
	//execution(* com.cybx..*.*(..))
	/*@Pointcut("@annotation(com.zking.mavendemo.config.MyAnnotation)")
	public void logPointcut() {
	}*/

	@Around("execution(* com.zking.mavendemo.service..*.hello*(..))")
	public Object around(ProceedingJoinPoint  joinPoint) throws Throwable {

		Class<? extends Signature> signatureClass = joinPoint.getSignature().getClass();
		System.out.println("AOP signatureClass = " + signatureClass);

		Object target = joinPoint.getTarget();
		Class<? extends Object> targetClass = target.getClass();
		System.out.println("AOP targetClass = " + targetClass);

		Object returnValue = joinPoint.proceed(joinPoint.getArgs());

		System.out.println("AOP After ... ");

		return returnValue;
	}

}
2.创建一个service接口和实现类演示AOP且面
接口:
public interface ITestService {
	void helloAop(String msg);
}
实现类:
@Service("testService")
public class TestService implements ITestService {

	@Override
	public void helloAop(String msg) {
		System.out.println("target obj method: " + msg);
	}

}
测试:
		ClassPathXmlApplicationContext ctx = new ClassPathXmlApplicationContext("spring.xml");
		ITestService bean = (ITestService)ctx.getBean("testService");
		bean.helloAop("fdfdfdfdfdfdfdf");

![[计算机网络(第八版)]第二章 物理层(学习笔记)](https://img-blog.csdnimg.cn/9b29482cceba4cf29ad661ba5db5da72.png)