系列文章目录
文章目录
- 系列文章目录
- 前言
- 一、transform
- 二、总结
- 1.标准化
- 2.缩放
- 3.batch
前言
Faster RCNN的源码整体可以分为7个模块,每个模块负责不同的功能。推荐B站up霹雳吧啦Wz讲解的Faster RCNN源码,已经很详细了,这里只是个人的一些理解总结。
一、transform
transform是Faster RCNN框架中的第一个模块,要做的无非就是一件事情:把输入的List(Tensor)进行resize,并返回一个ImageList类型。
import math
from typing import List, Tuple, Dict, Optional
import torch
from torch import nn, Tensor
import torchvision
from .image_list import ImageList
# 推理时调用 缩放图片
@torch.jit.unused
def _resize_image_onnx(image, self_min_size, self_max_size):
# type: (Tensor, float, float) -> Tensor
from torch.onnx import operators
im_shape = operators.shape_as_tensor(image)[-2:]
min_size = torch.min(im_shape).to(dtype=torch.float32)
max_size = torch.max(im_shape).to(dtype=torch.float32)
scale_factor = torch.min(self_min_size / min_size, self_max_size / max_size)
image = torch.nn.functional.interpolate(
image[None], scale_factor=scale_factor, mode="bilinear", recompute_scale_factor=True,
align_corners=False)[0]
return image
def _resize_image(image, self_min_size, self_max_size):
# type: (Tensor, float, float) -> Tensor
# 获取宽高
im_shape = torch.tensor(image.shape[-2:])
min_size = float(torch.min(im_shape)) # 获取高宽中的最小值
max_size = float(torch.max(im_shape)) # 获取高宽中的最大值
# self_min_size指定的缩放最小边长
scale_factor = self_min_size / min_size # 根据指定最小边长和图片最小边长计算缩放比例
# 如果使用该缩放比例计算的图片最大边长大于指定的最大边长
if max_size * scale_factor > self_max_size:
scale_factor = self_max_size / max_size # 将缩放比例设为指定最大边长和图片最大边长之比
# interpolate利用线性插值的方法缩放图片
# image[None]操作是在最前面添加batch维度[C, H, W] -> [1, C, H, W]
# bilinear只支持4D Tensor
image = torch.nn.functional.interpolate(
image[None], scale_factor=scale_factor, mode="bilinear", recompute_scale_factor=True,
align_corners=False)[0]
return image
class GeneralizedRCNNTransform(nn.Module):
"""
Performs input / target transformation before feeding the data to a GeneralizedRCNN
model.
The transformations it perform are:
- input normalization (mean subtraction and std division)
- input / target resizing to match min_size / max_size
It returns a ImageList for the inputs, and a List[Dict[Tensor]] for the targets
"""
def __init__(self, min_size, max_size, image_mean, image_std):
super(GeneralizedRCNNTransform, self).__init__()
# 多尺度 min_size是一个list/tuple
if not isinstance(min_size, (list, tuple)):
min_size = (min_size,)
self.min_size = min_size # 指定图像的最小边长范围
self.max_size = max_size # 指定图像的最大边长范围
self.image_mean = image_mean # 指定图像在标准化处理中的均值
self.image_std = image_std # 指定图像在标准化处理中的方差
def normalize(self, image):
"""标准化处理"""
dtype, device = image.dtype, image.device
mean = torch.as_tensor(self.image_mean, dtype=dtype, device=device)
std = torch.as_tensor(self.image_std, dtype=dtype, device=device)
# [:, None, None]: shape [3] -> [3, 1, 1]
return (image - mean[:, None, None]) / std[:, None, None]
def torch_choice(self, k):
# type: (List[int]) -> int
"""
Implements `random.choice` via torch ops so it can be compiled with
TorchScript. Remove if https://github.com/pytorch/pytorch/issues/25803
is fixed.
"""
# 类似于实现random.choice
# 先生成一个空数组在均匀分布中随机去一个小数用int化整
index = int(torch.empty(1).uniform_(0., float(len(k))).item())
return k[index]
def resize(self, image, target):
# type: (Tensor, Optional[Dict[str, Tensor]]) -> Tuple[Tensor, Optional[Dict[str, Tensor]]]
"""
将图片缩放到指定的大小范围内,并对应缩放bboxes信息
Args:
image: 输入的图片
target: 输入图片的相关信息(包括bboxes信息)
Returns:
image: 缩放后的图片
target: 缩放bboxes后的图片相关信息
"""
# image shape is [channel, height, width]
h, w = image.shape[-2:]
if self.training:
# 由于是多尺度变换所以最小值有多个
size = float(self.torch_choice(self.min_size)) # 指定输入图片的最小边长,注意是self.min_size不是min_size
else:
# FIXME assume for now that testing uses the largest scale
size = float(self.min_size[-1]) # 指定输入图片的最小边长,注意是self.min_size不是min_size
if torchvision._is_tracing():
image = _resize_image_onnx(image, size, float(self.max_size))
else:
# 缩放image
image = _resize_image(image, size, float(self.max_size))
if target is None:
return image, target
bbox = target["boxes"]
# 根据图像的缩放比例来缩放bbox
# return 缩放后的坐标 左上右下
bbox = resize_boxes(bbox, [h, w], image.shape[-2:])
target["boxes"] = bbox
return image, target
# _onnx_batch_images() is an implementation of
# batch_images() that is supported by ONNX tracing.
@torch.jit.unused
def _onnx_batch_images(self, images, size_divisible=32):
# type: (List[Tensor], int) -> Tensor
max_size = []
for i in range(images[0].dim()):
max_size_i = torch.max(torch.stack([img.shape[i] for img in images]).to(torch.float32)).to(torch.int64)
max_size.append(max_size_i)
stride = size_divisible
max_size[1] = (torch.ceil((max_size[1].to(torch.float32)) / stride) * stride).to(torch.int64)
max_size[2] = (torch.ceil((max_size[2].to(torch.float32)) / stride) * stride).to(torch.int64)
max_size = tuple(max_size)
# work around for
# pad_img[: img.shape[0], : img.shape[1], : img.shape[2]].copy_(img)
# which is not yet supported in onnx
padded_imgs = []
for img in images:
padding = [(s1 - s2) for s1, s2 in zip(max_size, tuple(img.shape))]
padded_img = torch.nn.functional.pad(img, [0, padding[2], 0, padding[1], 0, padding[0]])
padded_imgs.append(padded_img)
return torch.stack(padded_imgs)
def max_by_axis(self, the_list):
# the_list 是以列表为元素的列表
# 选出列表元素的每个位置的最大值
# max_by_axis([[9, 5, 34, 2], [2, 23, 24, 22]])
# [9, 23, 34, 22]
# type: # (List[List[int]]) -> List[int]
maxes = the_list[0]
for sublist in the_list[1:]:
for index, item in enumerate(sublist):
maxes[index] = max(maxes[index], item)
return maxes
def batch_images(self, images, size_divisible=32):
# type: (List[Tensor], int) -> Tensor
"""
将一批图像打包成一个batch返回(注意batch中每个tensor的shape是相同的)
Args:
images: 输入的一批图片
size_divisible: 将图像高和宽调整到该数的整数倍
Returns:
batched_imgs: 打包成一个batch后的tensor数据
"""
if torchvision._is_tracing():
# batch_images() does not export well to ONNX
# call _onnx_batch_images() instead
return self._onnx_batch_images(images, size_divisible)
# 分别计算一个batch中所有图片中的最大channel, height, width
# img、max_size的shape [C,W,H]
# 找出batch中的最大宽高
max_size = self.max_by_axis([list(img.shape) for img in images])
stride = float(size_divisible)
# max_size = list(max_size)
# 将height向上调整到stride的整数倍
max_size[1] = int(math.ceil(float(max_size[1]) / stride) * stride)
# 将width向上调整到stride的整数倍
max_size[2] = int(math.ceil(float(max_size[2]) / stride) * stride)
# [batch, channel, height, width]
# 列表相加 组成tensor [B,C,W,H]
batch_shape = [len(images)] + max_size
# 创建shape为batch_shape且值全部为0的tensor
# batch_shape是我们选取的batch的最大宽高 有的image没那么大
# 其实和images[0]无关只是可以共device和detype
batched_imgs = images[0].new_full(batch_shape, 0)
for img, pad_img in zip(images, batched_imgs):
# 将输入images中的每张图片复制到新的batched_imgs的每张图片中,对齐左上角,保证bboxes的坐标不变
# 这样保证输入到网络中一个batch的每张图片的shape相同
# copy_: Copies the elements from src into self tensor and returns self
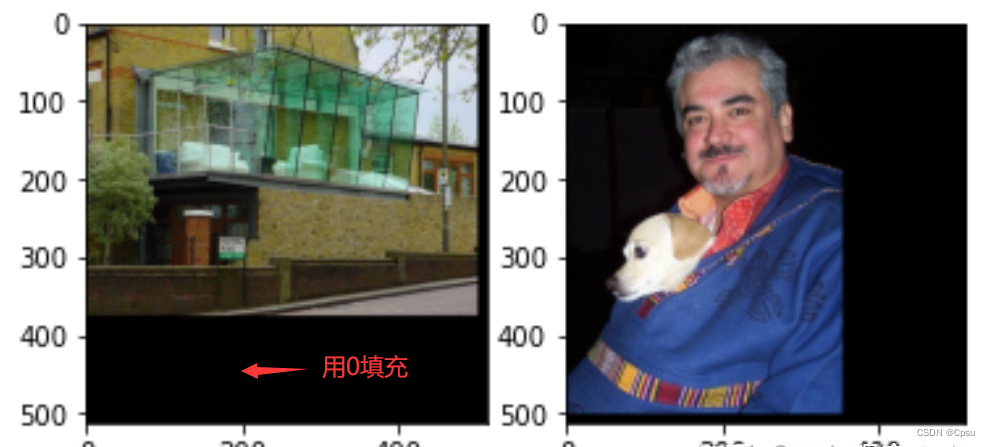
# 比最大宽高小的部分用0填充 这样就可以不改变bboxes的值 因为是左上右下
pad_img[: img.shape[0], : img.shape[1], : img.shape[2]].copy_(img)
# 默认遍历tensor的首个维度
# for i in torch.ones(4, 3):
# print(i)
return batched_imgs
def postprocess(self,
result, # type: List[Dict[str, Tensor]]
image_shapes, # type: List[Tuple[int, int]]
original_image_sizes # type: List[Tuple[int, int]]
):
# type: (...) -> List[Dict[str, Tensor]]
"""
对网络的预测结果进行后处理(主要将bboxes还原到原图像尺度上)
Args:
result: list(dict), 网络的预测结果, len(result) == batch_size
image_shapes: list(torch.Size), 图像预处理缩放后的尺寸, len(image_shapes) == batch_size
original_image_sizes: list(torch.Size), 图像的原始尺寸, len(original_image_sizes) == batch_size
Returns:
"""
# return 后面的代码不会再运行
# 因为box的target已经同等缩放了所以不用后处理
if self.training:
return result
# 遍历每张图片的预测信息,将boxes信息还原回原尺度
for i, (pred, im_s, o_im_s) in enumerate(zip(result, image_shapes, original_image_sizes)):
boxes = pred["boxes"]
boxes = resize_boxes(boxes, im_s, o_im_s) # 将bboxes缩放回原图像尺度上
# 更新result
result[i]["boxes"] = boxes
return result
def __repr__(self):
"""自定义输出实例化对象的信息,可通过print打印实例信息"""
format_string = self.__class__.__name__ + '('
_indent = '\n '
format_string += "{0}Normalize(mean={1}, std={2})".format(_indent, self.image_mean, self.image_std)
format_string += "{0}Resize(min_size={1}, max_size={2}, mode='bilinear')".format(_indent, self.min_size,
self.max_size)
format_string += '\n)'
return format_string
def forward(self,
images, # type: List[Tensor]
targets=None # type: Optional[List[Dict[str, Tensor]]]
):
# type: (...) -> Tuple[ImageList, Optional[List[Dict[str, Tensor]]]]
# 遍历images
images = [img for img in images]
# len(images)=batch_size
for i in range(len(images)):
image = images[i]
target_index = targets[i] if targets is not None else None
if image.dim() != 3:
raise ValueError("images is expected to be a list of 3d tensors "
"of shape [C, H, W], got {}".format(image.shape))
image = self.normalize(image) # 对图像进行标准化处理
image, target_index = self.resize(image, target_index) # 对图像和对应的bboxes缩放到指定范围
# 更新images 将缩放后的images更新到列表
images[i] = image
if targets is not None and target_index is not None:
# 更新缩放后的targets
targets[i] = target_index
# 记录resize后的图像尺寸 记录宽高
image_sizes = [img.shape[-2:] for img in images]
images = self.batch_images(images) # 将images打包成一个batch
image_sizes_list = torch.jit.annotate(List[Tuple[int, int]], [])
for image_size in image_sizes:
assert len(image_size) == 2
image_sizes_list.append((image_size[0], image_size[1]))
# image是padding的图片 image_sizes_list是为padding的图片尺寸
image_list = ImageList(images, image_sizes_list)
return image_list, targets
def resize_boxes(boxes, original_size, new_size):
# type: (Tensor, List[int], List[int]) -> Tensor
"""
将boxes参数根据图像的缩放情况进行相应缩放
Arguments:
original_size: 图像缩放前的尺寸
new_size: 图像缩放后的尺寸
"""
# 列表表达式 计算tensor的缩放比例
# 注意都是batch运算
# bbox = resize_boxes(bbox, [h, w], image.shape[-2:])
ratios = [
torch.tensor(s, dtype=torch.float32, device=boxes.device) /
torch.tensor(s_orig, dtype=torch.float32, device=boxes.device)
for s, s_orig in zip(new_size, original_size)
]
ratios_height, ratios_width = ratios
# Removes a tensor dimension, boxes [minibatch, 4]
# Returns a tuple of all slices along a given dimension, already without it.
# unbind 解绑维度
# dim参数指定解绑的维度 如dim=0表示将tensor按照行分块
# x相减就是宽,y相减就是高
xmin, ymin, xmax, ymax = boxes.unbind(1)
xmin = xmin * ratios_width
xmax = xmax * ratios_width
ymin = ymin * ratios_height
ymax = ymax * ratios_height
# 堆叠起来
return torch.stack((xmin, ymin, xmax, ymax), dim=1)
二、总结
transform模块就是图片的预处理。总结来说就是有三个步骤:
1、进行标准化
2、然后进行image和box的缩放。缩放的规则就是以image的最小边长作为缩放ratio缩放到指定的大小(如果最大边长缩放后超过了最大指定边长则以image的最大边长为准重新计算ratio)
3、针对一个batch的image,选出batch中最大的宽高作为标准并取整成32的整数倍,其他小的image则用0来padding成统一大小
1.标准化
模块中的normalize函数就是用来标准化处理图片的,这是视觉任务的标准步骤。
2.缩放
把图片送入模型之前需要统一成一致大小,缩放的规则就是以image的最小边长作为缩放ratio缩放到指定的大小。
比如一张300*500大小的输入图片,模型指定缩放后的最小值是900,最大值是1200。那么缩放的比例就是900/300=3.但是这时候发现如果缩放比例是3的话,边长为500被缩放到了1500,超过了模型指定的最大值,所以这时候的缩放比例应该以1200/500=2.4为准,而不是3.图片缩放后对应的GT box也会进行相应的坐标缩放。
目标检测中常用多尺度进行训练,也就是resize会对一个batch内的不同图片随机resize成不同大小,所以模型指定缩放后的最小值会有多个。
3.batch
由于多尺度的原因,一个batch里面的图片会被resize成不同的大小,如何保证不同size的图片合并成一个batch送进模型?作者直接选取一个batch中最大的一张图片的shape作为基准,其他图片用0填充即可。这样既统一了大小又不影响GT box的坐标。
源码还有一个小细节,选取batch中最大的图片时,会把获取的shape做一个取整处理,保证batch的最大宽高是32的整数倍,方便后面送入RPN网络。