大家好,我是微学AI,今天给大家带来一个关于虚拟截图识别文字的应用,可以运用在多个领域。
案例主要结合Mediapipe手势识别模型,识别出手势的21个关键点的坐标,计算机的摄像头根据食指的坐标信息获取用户想要截取的图片高度与宽度进行截取图形,截取后的图片我们可以通过OCR识别出里面的文字信息,或者进行图像的识别得到图片中的内容信息。
一、虚拟截图的运用:
通过虚拟截图与OCR结合NLP技术做下游任务,可以用于纸质文件的实体识别,阅读理解,情感分析,机器翻译等。
多领域的应用场景包括:
企业管理领域:可应用于纸质文件中的文字和表格的提取、公司纸质章程完备性识别,纸质合同文件信息提取,实时反馈合同风险信息、企业报表信息提取与分析、重要文件图片截取连接打印机进行局部打印等操作,
教育领域:纸质试卷的批改识别,以及英文论文或书籍的实时翻译等任务。
医学领域:影响报告风险识别、线上视频问诊的药物信息识别采集。
二、应用场景
1.合同风险识别应用场景:
实现步骤:将文件放于摄像头下,用食指定位要截取长方形图片的对角线位置,此时利用Mediapipe手势识别模型可识别出两对角线食指的坐标,系统根据坐标值对图片进行截图操作,获取用户想要识别的文字范围;通过手势识别获取的截图图片,进行图像预处理操作,包括图片模糊处理、图片中扭曲文字处理、图片盖章水印处理等,目的是为了提升OCR的识别准确率;对处理后的图片进行OCR识别,OCR识别采用现有技术,主要使用文字识别套件PaddleOCR,模型架构分为文本检测、文本识别和方向分类器三部分;图片通过识别模型提取出相应的文字信息;OCR识别到的文字进行命名实体识别,抽取识别文字中的实体,根据业务需求识别合同中的签署日期、成交金额、条款信息。关键信息提取后存储到后台数据库,并对比规则库中的相关指标,对签署日期、成交金额、条款信息的合理性进行判断。

2.财务报表信息存储应用场景:
实现步骤:将文件放于摄像头下,用食指定位要截取长方形图片的对角线位置,此时利用Mediapipe手势识别模型可识别出两对角线食指的坐标,系统根据坐标值对图片进行截图操作,获取用户想要识别的文字范围;通过手势识别获取的截图图片,进行图像预处理操作,可识别表格类型的图片;通针对还有表格的图片,利用PPStructure结构模型识别表格信息,并提取表格的内容与表格的结构。系统将识别到的文本信息和表格结构信息保存为excel文件。

3.重要文件部分打印应用场景
实现步骤:将文件放于摄像头下,用食指定位要截取长方形图片的对角线位置,此时利用Mediapipe手势识别模型可识别出两对角线食指的坐标,系统根据坐标值对图片进行截图操作,获取用户想要识别的文字范围;系统收到截图后提示保存成功,用户通过手势,系统识别到手势的数字,并传递打印的张数给系统;通过手势识别获取的截图图片,保存截取的图片可保存本地,用于后续图片调用与管理;启动连接打印机的主函数,将刚刚保存的图片进行打印操作。打印机启动打印用户的截图的文件,并按照传递的张数进行打印。

三、代码实现
# 导入OpenCV
import cv2
# 导入mediapipe
import mediapipe as mp
# 导入PIL
from PIL import Image, ImageDraw, ImageFont
# 导入其他依赖包
import time
import math
import numpy as np
from baidu_pp_wrap import Baidu_PP_Detection,Baidu_PP_OCR
# 画图类
class DrawSomeInfo:
def __init__(self):
# 模式,double: 双手,right,single:右手
self.hand_mode = 'None'
self.hand_num = 0
# 记录左右手的相关信息
# 坐标
self.last_finger_cord_x = {'Left': 0, 'Right': 0}
self.last_finger_cord_y = {'Left': 0, 'Right': 0}
# 圆环度数
self.last_finger_arc_degree = {'Left': 0, 'Right': 0}
# 右手模式
self.right_hand_circle_list = []
# 初始化停留时间
now = time.time()
self.stop_time = {'Left': now, 'Right': now}
# 圆环配色
self.handedness_color = {'Left': (255, 0, 0), 'Right': (255, 0, 255)}
# 手指浮动允许范围,需要自己根据相机校准
self.float_distance = 10
# 触发时间
self.activate_duration = 0.3
# 单手触发识别时间
self.single_dete_duration = 1
self.single_dete_last_time = None
self.last_thumb_img = None
# 导入识别、OCR类
self.pp_ocr = Baidu_PP_OCR()
# ocr.test_ocr()
#self.pp_dete = Baidu_PP_Detection()
# dete.test_predict_video(0)
# 上次检测结果
self.last_detect_res = {'detection':None,'ocr':'无'}
# 添加中文
def cv2AddChineseText(self,img, text, position, textColor=(0, 255, 0), textSize=30):
if (isinstance(img, np.ndarray)): # 判断是否OpenCV图片类型
img = Image.fromarray(cv2.cvtColor(img, cv2.COLOR_BGR2RGB))
# 创建一个可以在给定图像上绘图的对象
draw = ImageDraw.Draw(img)
# 字体的格式
fontStyle = ImageFont.truetype(
"./fonts/simsun.ttc", textSize, encoding="utf-8")
# 绘制文本
draw.text(position, text, textColor, font=fontStyle)
# 转换回OpenCV格式
return cv2.cvtColor(np.asarray(img), cv2.COLOR_RGB2BGR)
# 生成右上角OCR文字区域
def generateOcrTextArea(self,ocr_text,line_text_num,line_num,x, y, w, h,frame):
# First we crop the sub-rect from the image
sub_img = frame[y:y+h, x:x+w]
green_rect = np.ones(sub_img.shape, dtype=np.uint8) * 0
res = cv2.addWeighted(sub_img, 0.5, green_rect, 0.5, 1.0)
for i in range(line_num):
text = ocr_text[(i*line_text_num):(i+1)*line_text_num]
res = self.cv2AddChineseText(res, text, (10,30*i+10), textColor=(255, 255, 255), textSize=18)
return res
# 生成Label区域
def generateLabelArea(self,text,x, y, w, h,frame):
# First we crop the sub-rect from the image
sub_img = frame[y:y+h, x:x+w]
green_rect = np.ones(sub_img.shape, dtype=np.uint8) * 0
res = cv2.addWeighted(sub_img, 0.5, green_rect, 0.5, 1.0)
res = self.cv2AddChineseText(res, text, (10,10), textColor=(255, 255, 255), textSize=30)
return res
# 生成右上角缩略图
def generateThumb(self,raw_img,frame):
# 识别
if self.last_detect_res['detection'] == None:
pass
# im,results = self.pp_dete.detect_img(raw_img)
# # 取识别的第一个物体
# if len(results['boxes'])>0:
#
# label_id = results['boxes'][0][0].astype(int)
# label_en = self.pp_dete.labels_en[label_id]
# label_zh = self.pp_dete.labels_zh[label_id-1]
# self.last_detect_res['detection'] = [label_zh,label_en]
# else:
# self.last_detect_res['detection'] = ['无','None']
# 整图
frame_height, frame_width, _ = frame.shape
#raw_img = frame
# 覆盖
raw_img_h, raw_img_w, _ = raw_img.shape
#raw_img_w =100
print(frame.shape)
thumb_img_w = 300
thumb_img_h = math.ceil( raw_img_h * thumb_img_w / (raw_img_w+1))
thumb_img = cv2.resize(raw_img, (thumb_img_w, thumb_img_h))
rect_weight = 4
# 在缩略图上画框框
thumb_img = cv2.rectangle(thumb_img,(0,0),(thumb_img_w,thumb_img_h),(0, 139, 247),rect_weight)
# 生成label
x, y, w, h = (frame_width - thumb_img_w),thumb_img_h,thumb_img_w,50
# Putting the image back to its position
# frame[y:y+h, x:x+w] = self.generateLabelArea('{label_zh} {label_en}'.format(label_zh=self.last_detect_res['detection'][0],label_en=self.last_detect_res['detection'][1]),x, y, w, h,frame)
# OCR
# 是否需要OCR识别
ocr_text = ''
if self.last_detect_res['ocr'] == '无':
src_im,text_list = self.pp_ocr.ocr_image(raw_img)
thumb_img = cv2.resize(src_im, (thumb_img_w, thumb_img_h))
if len(text_list) > 0 :
ocr_text = ''.join(text_list)
# 记录一下
self.last_detect_res['ocr']= ocr_text
else:
# 检测过,无结果
self.last_detect_res['ocr']= 'checked_no'
else:
ocr_text = self.last_detect_res['ocr']
frame[0:thumb_img_h,(frame_width - thumb_img_w):frame_width,:] = thumb_img
# 是否需要显示
if ocr_text != '' and ocr_text != 'checked_no' :
line_text_num = 15
line_num = math.ceil(len(ocr_text) / line_text_num)
y,h = (y+h+20),(32*line_num)
frame[y:y+h, x:x+w] = self.generateOcrTextArea(ocr_text,line_text_num,line_num,x, y, w, h,frame)
self.last_thumb_img = thumb_img
return frame
# 画圆环
def drawArc(self, frame, point_x, point_y, arc_radius=150, end=360, color = (255, 0, 255),width=20):
img = Image.fromarray(frame)
shape = [(point_x-arc_radius, point_y-arc_radius),
(point_x+arc_radius, point_y+arc_radius)]
img1 = ImageDraw.Draw(img)
img1.arc(shape, start=0, end=end, fill=color, width=width)
frame = np.asarray(img)
return frame
# 清除单手模式
def clearSingleMode(self):
self.hand_mode = 'None'
self.right_hand_circle_list = []
self.last_finger_arc_degree = {'Left': 0, 'Right': 0}
self.single_dete_last_time = None
# 单手模式
def singleMode(self,x_distance,y_distance,handedness, finger_cord, frame, frame_copy):
self.right_hand_circle_list.append( (finger_cord[0],finger_cord[1]) )
for i in range(len(self.right_hand_circle_list)-1) :
# 连续画线
frame = cv2.line(frame,self.right_hand_circle_list[i],self.right_hand_circle_list[i+1],(255,0,0),5)
# 取外接矩形
max_x = max(self.right_hand_circle_list,key=lambda i : i[0])[0]
min_x = min(self.right_hand_circle_list,key=lambda i : i[0])[0]
max_y = max(self.right_hand_circle_list,key=lambda i : i[1])[1]
min_y = min(self.right_hand_circle_list,key=lambda i : i[1])[1]
frame = cv2.rectangle(frame,(min_x,min_y),(max_x,max_y),(0,255,0),2)
frame = self.drawArc(
frame, finger_cord[0], finger_cord[1], arc_radius=50, end=360, color=self.handedness_color[handedness],width=15)
# 未移动
if (x_distance <= self.float_distance) and (y_distance <= self.float_distance):
if (time.time() - self.single_dete_last_time ) > self.single_dete_duration :
if( (max_y - min_y) > 100) and( (max_x-min_x) > 100):
print('激活')
if not isinstance(self.last_thumb_img, np.ndarray):
self.last_detect_res = {'detection':None,'ocr':'无'}
raw_img = frame_copy[min_y:max_y,min_x:max_x,]
frame = self.generateThumb(raw_img,frame)
else:
# 移动,重新计时
self.single_dete_last_time = time.time() # 记录一下时间
return frame
# 检查食指停留是否超过0.3秒,超过即画图,左右手各自绘制
def checkIndexFingerMove(self,handedness, finger_cord, frame,frame_copy):
# 计算距离
x_distance = abs(finger_cord[0] - self.last_finger_cord_x[handedness])
y_distance = abs(finger_cord[1] - self.last_finger_cord_y[handedness])
# 右手锁定模式
if self.hand_mode == 'single':
# 单手模式下遇到双手,释放
if self.hand_num == 2:
self.clearSingleMode()
elif handedness == 'Right':
# 进入单手模式
frame = self.singleMode(x_distance,y_distance,handedness, finger_cord, frame , frame_copy)
else:
# 未移动
if (x_distance <= self.float_distance) and (y_distance <= self.float_distance):
# 时间大于触发时间
if(time.time() - self.stop_time[handedness]) > self.activate_duration:
# 画环形图,每隔0.01秒增大5度
arc_degree = 5 * ((time.time() - self.stop_time[handedness] - self.activate_duration) // 0.01)
if arc_degree <= 360:
frame = self.drawArc(
frame, finger_cord[0], finger_cord[1], arc_radius=50, end=arc_degree, color=self.handedness_color[handedness], width=15)
else:
frame = self.drawArc(
frame, finger_cord[0], finger_cord[1], arc_radius=50, end=360, color=self.handedness_color[handedness],width=15)
# 让度数为360
self.last_finger_arc_degree[handedness] = 360
# 这里执行更多动作
# 两个手指圆环都满了,直接触发识别
if (self.last_finger_arc_degree['Left'] >= 360) and (self.last_finger_arc_degree['Right'] >= 360):
# 获取相应坐标
rect_l = (self.last_finger_cord_x['Left'],self.last_finger_cord_y['Left'])
rect_r = (self.last_finger_cord_x['Right'],self.last_finger_cord_y['Right'])
# 外框框
frame = cv2.rectangle(frame,rect_l,rect_r,(0,255,0),2)
# 框框label
if self.last_detect_res['detection']:
# 生成label
x, y, w, h = self.last_finger_cord_x['Left'],(self.last_finger_cord_y['Left']-50),120,50
frame[y:y+h, x:x+w] = self.generateLabelArea('{label_zh}'.format(label_zh=self.last_detect_res['detection'][0]),x, y, w, h,frame)
# 是否需要重新识别
if self.hand_mode != 'double':
# 初始化识别结果
self.last_detect_res = {'detection':None,'ocr':'无'}
# 传给缩略图
print(self.last_finger_cord_y['Left'],self.last_finger_cord_y['Right'],self.last_finger_cord_x['Left'],self.last_finger_cord_x['Right'])
frame_copy = frame
if self.last_finger_cord_y['Left']>=self.last_finger_cord_y['Right']:
y_min = self.last_finger_cord_y['Right']
y_max = self.last_finger_cord_y['Left']
else:
y_min = self.last_finger_cord_y['Left']
y_max = self.last_finger_cord_y['Right']
if self.last_finger_cord_x['Left'] >= self.last_finger_cord_x['Right']:
x_min = self.last_finger_cord_x['Right']
x_max = self.last_finger_cord_x['Left']
else:
x_min = self.last_finger_cord_x['Left']
x_max = self.last_finger_cord_x['Right']
#raw_img = frame[self.last_finger_cord_y['Left']:self.last_finger_cord_y['Right'],self.last_finger_cord_x['Left']:self.last_finger_cord_x['Right'],]
raw_img = frame[y_min:y_max,x_min:x_max]
#cv2.imshow("raw_img", raw_img)
#cv2.imwrite('result1.png', rotated)
#cv2.waitKey(0)
#print(raw_img)
frame = self.generateThumb(raw_img,frame)
self.hand_mode = 'double'
# 只有右手圆环满,触发描线功能
if (self.hand_num==1) and (self.last_finger_arc_degree['Right'] == 360):
self.hand_mode = 'single'
self.single_dete_last_time = time.time() # 记录一下时间
self.right_hand_circle_list.append( (finger_cord[0],finger_cord[1]) )
else:
# 移动位置,重置时间
self.stop_time[handedness] = time.time()
self.last_finger_arc_degree[handedness] = 0
# 刷新位置
self.last_finger_cord_x[handedness] = finger_cord[0]
self.last_finger_cord_y[handedness] = finger_cord[1]
return frame
# 识别控制类
class VirtualFingerReader:
def __init__(self):
# 初始化medialpipe
self.mp_drawing = mp.solutions.drawing_utils
self.mp_drawing_styles = mp.solutions.drawing_styles
self.mp_hands = mp.solutions.hands
# image实例,以便另一个类调用
self.image=None
# 检查左右手在数组中的index,这里需要注意,Mediapipe使用镜像的
def checkHandsIndex(self,handedness):
# 判断数量
if len(handedness) == 1:
handedness_list = ['Left' if handedness[0].classification[0].label == 'Right' else 'Right']
else:
handedness_list = [handedness[1].classification[0].label,handedness[0].classification[0].label]
return handedness_list
# 主函数
def recognize(self):
# 初始化画图类
drawInfo = DrawSomeInfo()
# 计算刷新率
fpsTime = time.time()
# OpenCV读取视频流
cap = cv2.VideoCapture(0)
# 视频分辨率
resize_w = 960
resize_h = 720
fps = cap.get(cv2.CAP_PROP_FPS)
fps = 18
videoWriter = cv2.VideoWriter('./record_video/out'+str(time.time())+'.mp4', cv2.VideoWriter_fourcc(*'H264'), fps, (resize_w,resize_h))
with self.mp_hands.Hands(min_detection_confidence=0.7,
min_tracking_confidence=0.5,
max_num_hands=2) as hands:
while cap.isOpened():
# 初始化矩形
success, self.image = cap.read()
self.image = cv2.resize(self.image, (resize_w, resize_h))
# 需要根据镜头位置来调整
# self.image = cv2.rotate( self.image, cv2.ROTATE_180)
if not success:
print("空帧.")
continue
# 提高性能
self.image.flags.writeable = False
# 转为RGB
self.image = cv2.cvtColor(self.image, cv2.COLOR_BGR2RGB)
# 镜像,需要根据镜头位置来调整
# self.image = cv2.flip(self.image, 1)
# mediapipe模型处理
results = hands.process(self.image)
self.image.flags.writeable = True
self.image = cv2.cvtColor(self.image, cv2.COLOR_RGB2BGR)
# 保存缩略图
if isinstance(drawInfo.last_thumb_img, np.ndarray):
self.image = drawInfo.generateThumb(drawInfo.last_thumb_img,self.image )
hand_num = 0
# 判断是否有手掌
if results.multi_hand_landmarks:
# 记录左右手index
handedness_list = self.checkHandsIndex(results.multi_handedness)
hand_num = len(handedness_list)
drawInfo.hand_num = hand_num
# 复制一份干净的原始frame
frame_copy = self.image.copy()
# 遍历每个手掌
for hand_index,hand_landmarks in enumerate(results.multi_hand_landmarks):
# 容错
if hand_index>1:
hand_index = 1
# 在画面标注手指
self.mp_drawing.draw_landmarks(
self.image,
hand_landmarks,
self.mp_hands.HAND_CONNECTIONS,
self.mp_drawing_styles.get_default_hand_landmarks_style(),
self.mp_drawing_styles.get_default_hand_connections_style())
# 解析手指,存入各个手指坐标
landmark_list = []
# 用来存储手掌范围的矩形坐标
paw_x_list = []
paw_y_list = []
for landmark_id, finger_axis in enumerate(
hand_landmarks.landmark):
landmark_list.append([
landmark_id, finger_axis.x, finger_axis.y,
finger_axis.z
])
paw_x_list.append(finger_axis.x)
paw_y_list.append(finger_axis.y)
if landmark_list:
# 比例缩放到像素
ratio_x_to_pixel = lambda x: math.ceil(x * resize_w)
ratio_y_to_pixel = lambda y: math.ceil(y * resize_h)
# 设计手掌左上角、右下角坐标
paw_left_top_x,paw_right_bottom_x = map(ratio_x_to_pixel,[min(paw_x_list),max(paw_x_list)])
paw_left_top_y,paw_right_bottom_y = map(ratio_y_to_pixel,[min(paw_y_list),max(paw_y_list)])
# 获取食指指尖坐标
index_finger_tip = landmark_list[8]
index_finger_tip_x =ratio_x_to_pixel(index_finger_tip[1])
index_finger_tip_y =ratio_y_to_pixel(index_finger_tip[2])
# 获取中指指尖坐标
middle_finger_tip = landmark_list[12]
middle_finger_tip_x =ratio_x_to_pixel(middle_finger_tip[1])
middle_finger_tip_y =ratio_y_to_pixel(middle_finger_tip[2])
# 画x,y,z坐标
label_height = 30
label_wdith = 130
cv2.rectangle(self.image,(paw_left_top_x-30,paw_left_top_y-label_height-30),(paw_left_top_x+label_wdith,paw_left_top_y-30),(0, 139, 247),-1)
l_r_hand_text = handedness_list[hand_index][:1]
cv2.putText(self.image, "{hand} x:{x} y:{y}".format(hand=l_r_hand_text,x=index_finger_tip_x,y=index_finger_tip_y) , (paw_left_top_x-30+10,paw_left_top_y-40),
cv2.FONT_HERSHEY_PLAIN, 1, (255, 255, 255), 2)
# 给手掌画框框
cv2.rectangle(self.image,(paw_left_top_x-30,paw_left_top_y-30),(paw_right_bottom_x+30,paw_right_bottom_y+30),(0, 139, 247),1)
# 释放单手模式
line_len = math.hypot((index_finger_tip_x-middle_finger_tip_x),(index_finger_tip_y-middle_finger_tip_y))
if line_len < 50 and handedness_list[hand_index] == 'Right':
drawInfo.clearSingleMode()
drawInfo.last_thumb_img = None
# 传给画图类,如果食指指尖停留超过指定时间(如0.3秒),则启动画图,左右手单独画
self.image = drawInfo.checkIndexFingerMove(handedness_list[hand_index],[index_finger_tip_x,index_finger_tip_y],self.image,frame_copy)
# 显示刷新率FPS
cTime = time.time()
fps_text = 1/(cTime-fpsTime)
fpsTime = cTime
self.image = drawInfo.cv2AddChineseText(self.image, "帧率: " + str(int(fps_text)), (10, 30), textColor=(0, 255, 0), textSize=50)
self.image = drawInfo.cv2AddChineseText(self.image, "手掌: " + str(hand_num) , (10, 90), textColor=(0, 255, 0), textSize=50)
self.image = drawInfo.cv2AddChineseText(self.image, "模式: " + str(drawInfo.hand_mode), (10, 150), textColor=(0, 255, 0), textSize=50)
# 显示画面
# self.image = cv2.resize(self.image, (resize_w//2, resize_h//2))
cv2.imshow('virtual reader', self.image)
videoWriter.write(self.image)
if cv2.waitKey(5) & 0xFF == 27:
break
cap.release()
# 开始程序
control = VirtualFingerReader()
control.recognize()
代码运行, 可以虚拟截图文本信息,然后进行OCR识别。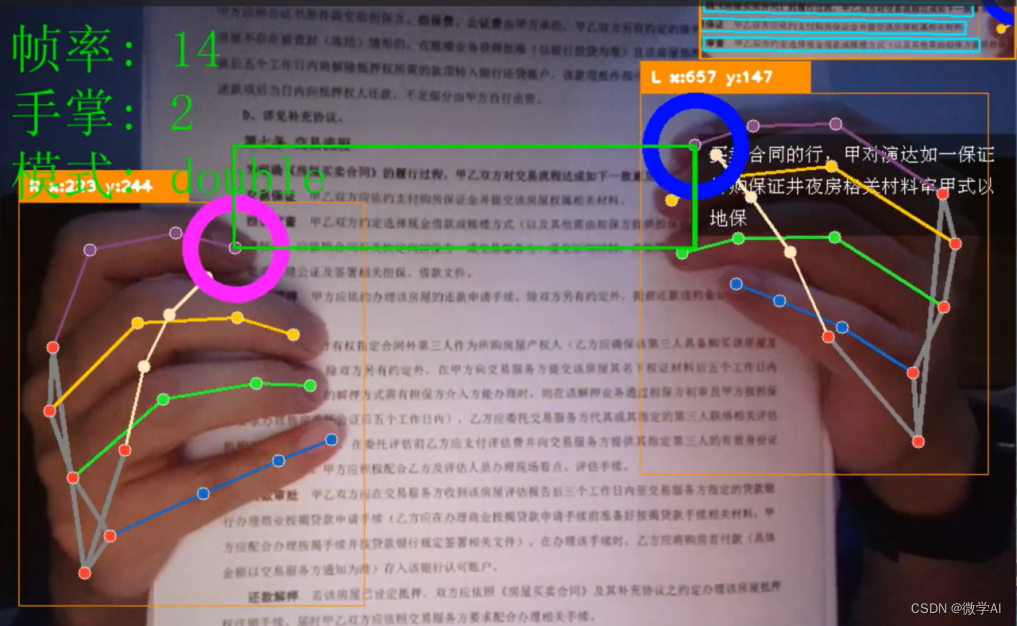
通过OCR识别后的文字,大家可以执行发挥下游的任务,用处很多,完整代码可以私信获取哦。
往期作品:
深度学习实战项目
1.深度学习实战1-(keras框架)企业数据分析与预测
2.深度学习实战2-(keras框架)企业信用评级与预测
3.深度学习实战3-文本卷积神经网络(TextCNN)新闻文本分类
4.深度学习实战4-卷积神经网络(DenseNet)数学图形识别+题目模式识别
5.深度学习实战5-卷积神经网络(CNN)中文OCR识别项目
6.深度学习实战6-卷积神经网络(Pytorch)+聚类分析实现空气质量与天气预测
7.深度学习实战7-电商产品评论的情感分析
8.深度学习实战8-生活照片转化漫画照片应用
9.深度学习实战9-文本生成图像-本地电脑实现text2img
10.深度学习实战10-数学公式识别-将图片转换为Latex(img2Latex)
11.深度学习实战11(进阶版)-BERT模型的微调应用-文本分类案例
12.深度学习实战12(进阶版)-利用Dewarp实现文本扭曲矫正
13.深度学习实战13(进阶版)-文本纠错功能,经常写错别字的小伙伴的福星
14.深度学习实战14(进阶版)-手写文字OCR识别,手写笔记也可以识别了
15.深度学习实战15(进阶版)-让机器进行阅读理解+你可以变成出题者提问
16.深度学习实战16(进阶版)-虚拟截图识别文字-可以做纸质合同和表格识别
17.深度学习实战17(进阶版)-智能辅助编辑平台系统的搭建与开发案例
18.深度学习实战18(进阶版)-NLP的15项任务大融合系统,可实现市面上你能想到的NLP任务
19.深度学习实战19(进阶版)-ChatGPT的本地实现部署测试,自己的平台就可以实现ChatGPT
...(待更新)




![[黑马程序员SSM框架教程]04 IOC-入门案例](https://img-blog.csdnimg.cn/b71b85be7fe54eb190343fbd71730fd2.png)
