引言
为了使我们渲染的模型拥有更多细节,我们可以添加足够多的顶点,然后给每一个顶点都添加顶点颜色。但是这样就会产生很多额外的开销,因此就出现了纹理映射技术,我们通过纹理采样为物体的表面添加更多的细节。
纹理定义
通俗一点:就是我们所说的贴图,
精确点的定义:存储可供着色器读写数据的数据结构。
纹理相关定义
纹素
是纹理读取或者写入的最小单元,纹理相当于存储纹素的一个数据结构。
纹理坐标
为了将纹理映射到模型上,我们需要为模型的每个顶点指定映射到纹理的哪个位置,这个坐标就是纹理坐标,也称uv坐标。uv坐标的范围是(0,1)
纹理采样
使用纹理坐标获取纹理颜色的过程就叫纹理采样。
纹理的基础知识
纹理环绕方式(WrapMode)
我们通过纹理坐标对UV进行采样,u的坐标范围是(0-1),v的坐标范围是(0-1),当我们的纹理坐标不在0-1的范围内时,我们如何进行采样呢?这个时候WrapMode就发挥作用了,WrapMode就是用来处理当纹理坐标不在0-1范围内,我们采取何种方式处理这个坐标。
就Unity里纹理平铺格式常用的有以下几种:
Repeat:重复纹理格式,即对纹理坐标取其小数部分,例如4.5就取0.5,-1.2就取0.2
Clamp:裁剪纹理格式,即对纹理坐标采取类似于clamp(x,0,1),当坐标x>1,x=1,当坐标x<0就取0
Mirror:镜像模式,取小数部分,并翻转像素即 1-x的小数部分
贴图展示
Repeat模式

Clamp模式

Mirror模式
备注:tiling:缩放,offset是偏移,我们通过修改材质的tiling来展示WarpMode的影响
在shader代码中,我们会通过TRANSFORM_TEX方法,将模型顶点的uv和Tiling、Offset两个变量进行运算,计算出实际显示用的定点uv。
#define TRANSFORM_TEX(tex,name) (tex.xy * name##_ST.xy + name##_ST.zw)
FilterMode(滤波方式)
当一张大小为mXn的贴图,由于缩放等原因导致一个屏幕像素和一个纹理像素大小不一致,可能一个屏幕像素只显示了一个纹理像素的很小的部分,或者说一个屏幕像素显示了好几个纹理像素,这个时候,如何显示屏幕像素颜色?
这个时候滤波方式就发挥作用
最邻近滤波:读取像素最邻近的纹素颜色值来显示
双线性滤波:通过寻找距离坐标附近的4个纹素点,对这4个像素点做加权平均来计算该点的像素坐标,权重值为与中心点的距离。
假设一张纹理,分辨率是1024 * 1024,现在渲染一个点:UV坐标是(0.4, 0.3),那么,我们可以这样算(这里只讨论最常用的线性采样,最近点采样更加简单):
x= v * texture_size = 0.4 * 1024 = 409.6;
y = u * texture_size = 0.3 * 1024 = 308.2;
而纹理的像素点都是整数,所以此时如果是邻近滤波方式,就是四舍五入读取纹素点(410,308)存储的颜色值。
而这个像素点的颜色值其实并不怎么精确,我们还可以读取该位置点附近的四个像素点(409,308),(409,309),(410,308),(410,309)的颜色值做线性插值,得到一个均值颜色值,这个就是双线性滤波。
当然我们还可以根据这些像素点距离中心坐标的相对距离来加上权重的影响,距离越近影响权重越大,距离越远影响权重越小。这就是三线性滤波。
纹理过小
当纹理过小,我们需要映射到一个大的屏幕分辨率下显示。相当于我们平常的将图片放大,使用邻近滤波多话,这样很大一块屏幕的像素读取到的纹理像素颜色可能都是一个,从而出现块状、像素化问题。所以放大可以使用双线性滤波方式,这样对纹理像素颜色值进行一个平均,减少像素化程度。
纹理过大
当纹理过大,我们映射到一个比它小的屏幕分辨率下。相当于我们把图片纹理缩小,这样一个屏幕像素的坐标在采样的时候可能覆盖多个纹理像素,而系统只会在片元着色阶段进行一次点采样,因此如果在场景中使用的是透视摄像机。则透视摄像机的近大远小原理,会放大像素与纹素的差距,因此远处的地面会形成一种叫做“摩尔纹”的效果。一般缩小的时候采用邻近滤波方式。
解决锯齿问题
1、超级采样:每个像素仅采样一次不足以覆盖包含的所有纹素,那就多采样几次,将多次采样结果平均,生成最终的像素颜色值。
2、通过后处理:通过寻找屏幕的像素块边界,然后通过边界信息,将两侧像素点颜色进行插值,从而得出比较平滑过渡的边缘,从而实现抗锯齿的效果。
3、多级渐远纹理:通过空间来置换效果。
多级渐远纹理
为一张图片生成多级纹理,后一级是前一级的1/2大小。多级渐远纹理的原理很简单,根据不同距离,选择不同的级别的纹理,距离越远使用的就是分辨率越小的纹理。是为了改善数据频率远高于采样频率 会导致严重的失真(即一个屏幕像素覆盖了很多个纹理像素)。
mipmap会增加缓存命中率,因为采样一次 ,实际上是把纹理这个采样位置周围的纹素数据都加载到缓存。如果没有mipmap, 纹理很大, 采样频率却很小的情况下,相邻的两个屏幕像素采样的纹素差的很远,此时会大大降低缓存命中率。
mipmap会节约带宽,带宽指的是渲染时数据在显存(实际上也不一定是显存 现在GPU基本都支持DMA)和处理单元之间传输所需要的传输量。当使用一些高level的贴图时候,传输的数据就相对减少,从而减小带宽。
因为mipmap会生成多级层级贴图,因此会增加内存及显存空间。
Unity常用的纹理类型
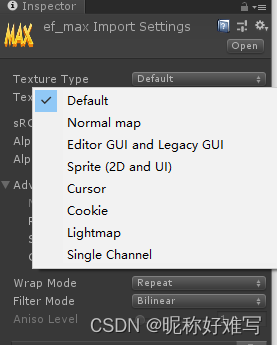
Default:默认最常用的纹理类型
NrmalMap:法线贴图
Editor GUI and Legacy GUI:编辑器GUI和传统GUI。
Sprite(2D and UI):精灵图片,用于2D对象和UGUI贴图。
Cursor:自定义光标。
Cookie:场景光的Cookie。
Lightmap:光照贴图,将贴图编码成特定的格式,并对纹理数据进行后处理。
SingleChannel:单通道
GLSL相关学习代码
顶点着色器代码
#version 330 core
layout (location = 0) in vec3 position;
layout (location = 1) in vec3 color;
layout (location = 2) in vec2 texCoord;

out vec3 ourColor;
out vec2 TexCoord;

void main()
{
	gl_Position = vec4(position, 1.0f);
	ourColor = color;
	// We swap the y-axis by substracing our coordinates from 1. This is done because most images have the top y-axis inversed with OpenGL's top y-axis.
	TexCoord = vec2(texCoord.x, 1.0 - texCoord.y);
}
片段着色器代码
#version 330 core
in vec2 TexCoord;

out vec4 color;

uniform sampler2D ourTexture1;
uniform sampler2D ourTexture2;

void main()
{
    color = mix(texture(ourTexture1, TexCoord), texture(ourTexture2, TexCoord), 0.2);
}
渲染代码
#include <iostream>

// GLEW
#define GLEW_STATIC
#include <GL/glew.h>

// GLFW
#include <GLFW/glfw3.h>

// Other Libs
#include <SOIL.h>

// Other includes
#include "Shader.h"


// Function prototypes
void key_callback(GLFWwindow* window, int key, int scancode, int action, int mode);

// Window dimensions
const GLuint WIDTH = 800, HEIGHT = 600;

// The MAIN function, from here we start the application and run the game loop
int main()
{
    // Init GLFW
    glfwInit();
    // Set all the required options for GLFW
    glfwWindowHint(GLFW_CONTEXT_VERSION_MAJOR, 3);
    glfwWindowHint(GLFW_CONTEXT_VERSION_MINOR, 3);
    glfwWindowHint(GLFW_OPENGL_PROFILE, GLFW_OPENGL_CORE_PROFILE);
    glfwWindowHint(GLFW_RESIZABLE, GL_FALSE);

    // Create a GLFWwindow object that we can use for GLFW's functions
    GLFWwindow* window = glfwCreateWindow(WIDTH, HEIGHT, "LearnOpenGL", nullptr, nullptr);
    glfwMakeContextCurrent(window);

    // Set the required callback functions
    glfwSetKeyCallback(window, key_callback);

    // Set this to true so GLEW knows to use a modern approach to retrieving function pointers and extensions
    glewExperimental = GL_TRUE;
    // Initialize GLEW to setup the OpenGL Function pointers
    glewInit();

    // Define the viewport dimensions
    glViewport(0, 0, WIDTH, HEIGHT);


    // Build and compile our shader program
    Shader ourShader("VertexShaderSource1_3_2.txt", "FragmentShaderSource1_3_2.txt");


    // Set up vertex data (and buffer(s)) and attribute pointers
    GLfloat vertices[] = {
        // Positions          // Colors           // Texture Coords
         0.5f,  0.5f, 0.0f,   1.0f, 0.0f, 0.0f,   1.0f, 1.0f, // Top Right
         0.5f, -0.5f, 0.0f,   0.0f, 1.0f, 0.0f,   1.0f, 0.0f, // Bottom Right
        -0.5f, -0.5f, 0.0f,   0.0f, 0.0f, 1.0f,   0.0f, 0.0f, // Bottom Left
        -0.5f,  0.5f, 0.0f,   1.0f, 1.0f, 0.0f,   0.0f, 1.0f  // Top Left
    };
    GLuint indices[] = {  // Note that we start from 0!
        0, 1, 3, // First Triangle
        1, 2, 3  // Second Triangle
    };
    GLuint VBO, VAO, EBO;
    glGenVertexArrays(1, &VAO);
    glGenBuffers(1, &VBO);
    glGenBuffers(1, &EBO);

    glBindVertexArray(VAO);

    glBindBuffer(GL_ARRAY_BUFFER, VBO);
    glBufferData(GL_ARRAY_BUFFER, sizeof(vertices), vertices, GL_STATIC_DRAW);

    glBindBuffer(GL_ELEMENT_ARRAY_BUFFER, EBO);
    glBufferData(GL_ELEMENT_ARRAY_BUFFER, sizeof(indices), indices, GL_STATIC_DRAW);

    // Position attribute
    glVertexAttribPointer(0, 3, GL_FLOAT, GL_FALSE, 8 * sizeof(GLfloat), (GLvoid*)0);
    glEnableVertexAttribArray(0);
    // Color attribute
    glVertexAttribPointer(1, 3, GL_FLOAT, GL_FALSE, 8 * sizeof(GLfloat), (GLvoid*)(3 * sizeof(GLfloat)));
    glEnableVertexAttribArray(1);
    // TexCoord attribute
    glVertexAttribPointer(2, 2, GL_FLOAT, GL_FALSE, 8 * sizeof(GLfloat), (GLvoid*)(6 * sizeof(GLfloat)));
    glEnableVertexAttribArray(2);

    glBindVertexArray(0); // Unbind VAO


    // Load and create a texture
    GLuint texture1;
    GLuint texture2;
    // ====================
    // Texture 1
    // ====================
    glGenTextures(1, &texture1);
    glBindTexture(GL_TEXTURE_2D, texture1); // All upcoming GL_TEXTURE_2D operations now have effect on our texture object
    // Set our texture parameters
    glTexParameteri(GL_TEXTURE_2D, GL_TEXTURE_WRAP_S, GL_REPEAT);	// Set texture wrapping to GL_REPEAT
    glTexParameteri(GL_TEXTURE_2D, GL_TEXTURE_WRAP_T, GL_REPEAT);
    // Set texture filtering
    glTexParameteri(GL_TEXTURE_2D, GL_TEXTURE_MIN_FILTER, GL_LINEAR);
    glTexParameteri(GL_TEXTURE_2D, GL_TEXTURE_MAG_FILTER, GL_LINEAR);
    // Load, create texture and generate mipmaps
    int width, height;
    unsigned char* image = SOIL_load_image("container.jpg", &width, &height, 0, SOIL_LOAD_RGB);
    glTexImage2D(GL_TEXTURE_2D, 0, GL_RGB, width, height, 0, GL_RGB, GL_UNSIGNED_BYTE, image);
    glGenerateMipmap(GL_TEXTURE_2D);
    SOIL_free_image_data(image);
    glBindTexture(GL_TEXTURE_2D, 0); // Unbind texture when done, so we won't accidentily mess up our texture.
    // ===================
    // Texture 2
    // ===================
    glGenTextures(1, &texture2);
    glBindTexture(GL_TEXTURE_2D, texture2);
    // Set our texture parameters
    glTexParameteri(GL_TEXTURE_2D, GL_TEXTURE_WRAP_S, GL_REPEAT);
    glTexParameteri(GL_TEXTURE_2D, GL_TEXTURE_WRAP_T, GL_REPEAT);
    // Set texture filtering
    glTexParameteri(GL_TEXTURE_2D, GL_TEXTURE_MIN_FILTER, GL_LINEAR);
    glTexParameteri(GL_TEXTURE_2D, GL_TEXTURE_MAG_FILTER, GL_LINEAR);
    // Load, create texture and generate mipmaps
    image = SOIL_load_image("awesomeface.png", &width, &height, 0, SOIL_LOAD_RGB);
    glTexImage2D(GL_TEXTURE_2D, 0, GL_RGB, width, height, 0, GL_RGB, GL_UNSIGNED_BYTE, image);
    glGenerateMipmap(GL_TEXTURE_2D);
    SOIL_free_image_data(image);
    glBindTexture(GL_TEXTURE_2D, 0);


    // Game loop
    while (!glfwWindowShouldClose(window))
    {
        // Check if any events have been activiated (key pressed, mouse moved etc.) and call corresponding response functions
        glfwPollEvents();

        // Render
        // Clear the colorbuffer
        glClearColor(0.2f, 0.3f, 0.3f, 1.0f);
        glClear(GL_COLOR_BUFFER_BIT);

        // Activate shader
        ourShader.Use();

        // Bind Textures using texture units
        glActiveTexture(GL_TEXTURE0);
        glBindTexture(GL_TEXTURE_2D, texture1);
        glUniform1i(glGetUniformLocation(ourShader.Program, "ourTexture1"), 0);
        glActiveTexture(GL_TEXTURE1);
        glBindTexture(GL_TEXTURE_2D, texture2);
        glUniform1i(glGetUniformLocation(ourShader.Program, "ourTexture2"), 1);

        // Draw container
        glBindVertexArray(VAO);
        glDrawElements(GL_TRIANGLES, 6, GL_UNSIGNED_INT, 0);
        glBindVertexArray(0);

        // Swap the screen buffers
        glfwSwapBuffers(window);
    }
    // Properly de-allocate all resources once they've outlived their purpose
    glDeleteVertexArrays(1, &VAO);
    glDeleteBuffers(1, &VBO);
    glDeleteBuffers(1, &EBO);
    // Terminate GLFW, clearing any resources allocated by GLFW.
    glfwTerminate();
    return 0;
}

// Is called whenever a key is pressed/released via GLFW
void key_callback(GLFWwindow* window, int key, int scancode, int action, int mode)
{
    if (key == GLFW_KEY_ESCAPE && action == GLFW_PRESS)
        glfwSetWindowShouldClose(window, GL_TRUE);
}
参考链接:https://doc.yonyoucloud.com/doc/wiki/project/modern-opengl-tutorial/tutorial16.html
参考链接:http://www.luzexi.com/2019/10/26/Unity3D%E9%AB%98%E7%BA%A7%E7%BC%96%E7%A8%8B%E4%B9%8B%E8%BF%9B%E9%98%B6%E4%B8%BB%E7%A8%8B-%E6%B8%B2%E6%9F%93%E7%AE%A1%E7%BA%BF%E4%B8%8E%E5%9B%BE%E5%BD%A2%E5%AD%A67

