之前遇到过“镭神32线激光雷达ROS下运行fromRosMsg()报错 Failed to find match for field “intensity“ 问题”,
当时确定了是镭神C32雷达缺少相应字段,并记录博客【学习记录】镭神32线激光雷达ROS下运行fromRosMsg()报错 Failed to find match for field “intensity“ 问题。
这次写了一个ros的节点代码,接受原始雷达数据,并转化为相应格式。
完整代码:https://github.com/LarryDong/lslidar_PointXYZ2PointXYZIR
说明:是另写了一个节点,接受雷达发出的原始数据,再赋予ring字段的信息,然后再发布带有这个字段的点云。
但原始并没有包括intensity字段,这个信息是丢失的,所以intensity我就瞎补了一个0,至少保证了格式正确。
基本原理
计算每个点对应的角度,看距离激光雷达定义的哪条ring最接近。
如何判断最接近?计算定义的两条ring平均值,如果在左右两个平均值之间,则认为是这个ring。
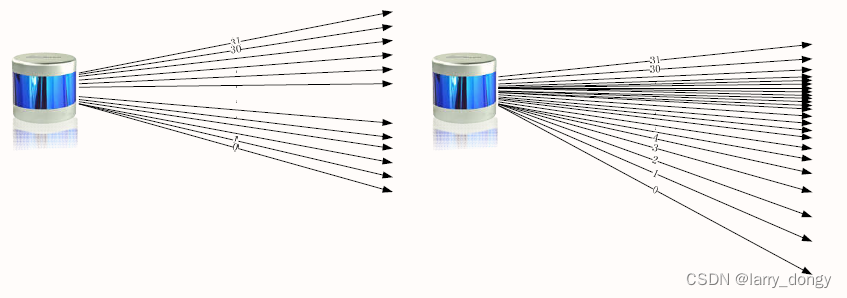
由于镭神32线雷达有两种角度模式,左边这种均匀分布,直接将角度近似取整就可以,比较简单。但右侧这种不均匀分布的,就需要按照手册给出的角度信息去解算到底属于哪根。
代码说明
首先列出雷达定义的角度,并计算与上一个/下一个线束的平均值。
const vector<float> g_ring_angle = {-18, -15, -12, -10, -8, -7, -6, -5,
                              -4, -3.33, -3, -2.66, -2.33, -2, -1.66, -1.33,
                              -1, -0.66, -0.33, 0, 0.33, 0.66, 1, 1.33,
                              1.66, 2, 3, 4, 6, 8, 11, 14};   // ring angles defined by leishen
vector<float> g_angle_range;                                  // define a range between each ring angle.

void initRingAngleRange(void){
    // calculate angle range
    assert(RING_NUMBER==g_ring_angle.size());
    g_angle_range.push_back(-100);            // assign a very large value
    for(int i=0; i<RING_NUMBER-1; ++i){
        float middle_value = (g_ring_angle[i] + g_ring_angle[i + 1]) / 2;   // calculate the average value between two ring.
        g_angle_range.push_back(middle_value);
    }
    g_angle_range.push_back(100);
}
然后计算实际角度,并赋予线束id即可:
void lidarCallback(const sensor_msgs::PointCloud2ConstPtr &msg_pc){
    pcl::PointCloud<pcl::PointXYZ> pc;
    pcl::PointCloud<myPointXYZIR> pc_new;
    pcl::fromROSMsg(*msg_pc, pc);
    // convert to PointXYZIR.
    pc_new.points.reserve(pc.points.size());
    myPointXYZIR pt_new;
    for(const pcl::PointXYZ& p : pc.points){
        float angle = atan(p.z / sqrt(p.x * p.x + p.y * p.y)) * 180 / M_PI;
        if(std::isnan(angle))           // remove nan point.
            continue;
        // int scanID = int(angle + 17);           // 对于1°分辨率的雷达,直接用这行指令就可以了,不需要计算下面的不均匀分布角度。
        // for 0.33 degree mode.
        int scanID = -1;
        for(int i=0; i<RING_NUMBER; ++i){
            if(angle > g_angle_range[i] && angle <= g_angle_range[i+1]){
                scanID = i;
                break;
            }
        }
        pt_new.x = p.x;
        pt_new.y = p.y;
        pt_new.z = p.z;
        pt_new.intensity = 0;       // intensity is not used.
        pt_new.ring = scanID;
        pc_new.points.push_back(pt_new);
    }
    sensor_msgs::PointCloud2 msg_pc_new;
    pcl::toROSMsg(pc_new, msg_pc_new);
    msg_pc_new.header.frame_id = "laser_link";
    msg_pc_new.header.stamp = msg_pc->header.stamp;
    g_pub_pc.publish(msg_pc_new);
    ROS_INFO("Published new pointcloud.");
 }
踩坑记录
- 一开始以为直接将雷达设置为1°模式扫描就可以了,结果发现精度不正常。问了客服才知道1°模式和0.33°模式不能调整。所以无奈,只能再重写这个转换代码。但还行,算的挺对。
- rviz中PointCloud2的
intensity选项,点击后会出现一个channel,还包括XYZ以及intensity等,一开始没搞明白啥意思,说明如下: -
About RViz: If you open a PointCloud2 display and select the “Intensity” color transformer, you can select a channel to display. This doesn’t have to be intensity, it can actually be any channel of your point cloud. If you leave “autocompute intensity bounds” checked, it will compute the min + max for each point cloud separately and scale the color spectrum to that range. If you disable the check box, you can enter min + max intensity manually (good if the min/max varies a lot between point clouds and you want the colors to be consistent between point clouds).

![[AUTOSAR][Fls模块] Flash Driver Module](https://img-blog.csdnimg.cn/b5471d54472a44daa356d613101dbfa2.png)

