2022黑马Redis跟学笔记.实战篇 六
- 4.7.达人探店功能
- 4.7.1.分享探店图文
- 1. 达人探店-发布探店笔记
- 2. 达人探店-查看探店笔记
- 4.7.2.点赞功能
- 4.7.3.基于List实现点赞用户列表TOP10
- 4.7.4.基于SortedSet实现点赞排行榜
- 4.8.关注列表
- 4.8.1.关注列表实现原理
- 4.8.2.添加关注
- 1. 好友关注-关注和取消关注
- 4.8.3.共同关注列表
- 4.8.4.取消关注
- 1.好友关注-Feed流实现方案
- 4.8.5.探店推送功能
- 1. 好友关注-推送到粉丝收件箱
- 2.好友关注-实现分页查询收邮箱

4.7.达人探店功能
4.7.1.分享探店图文
1. 达人探店-发布探店笔记
发布探店笔记
探店笔记类似点评网站的评价,往往是图文结合。对应的表有两个:
tb_blog:探店笔记表,包含笔记中的标题、文字、图片等
tb_blog_comments:其他用户对探店笔记的评价
具体发布流程
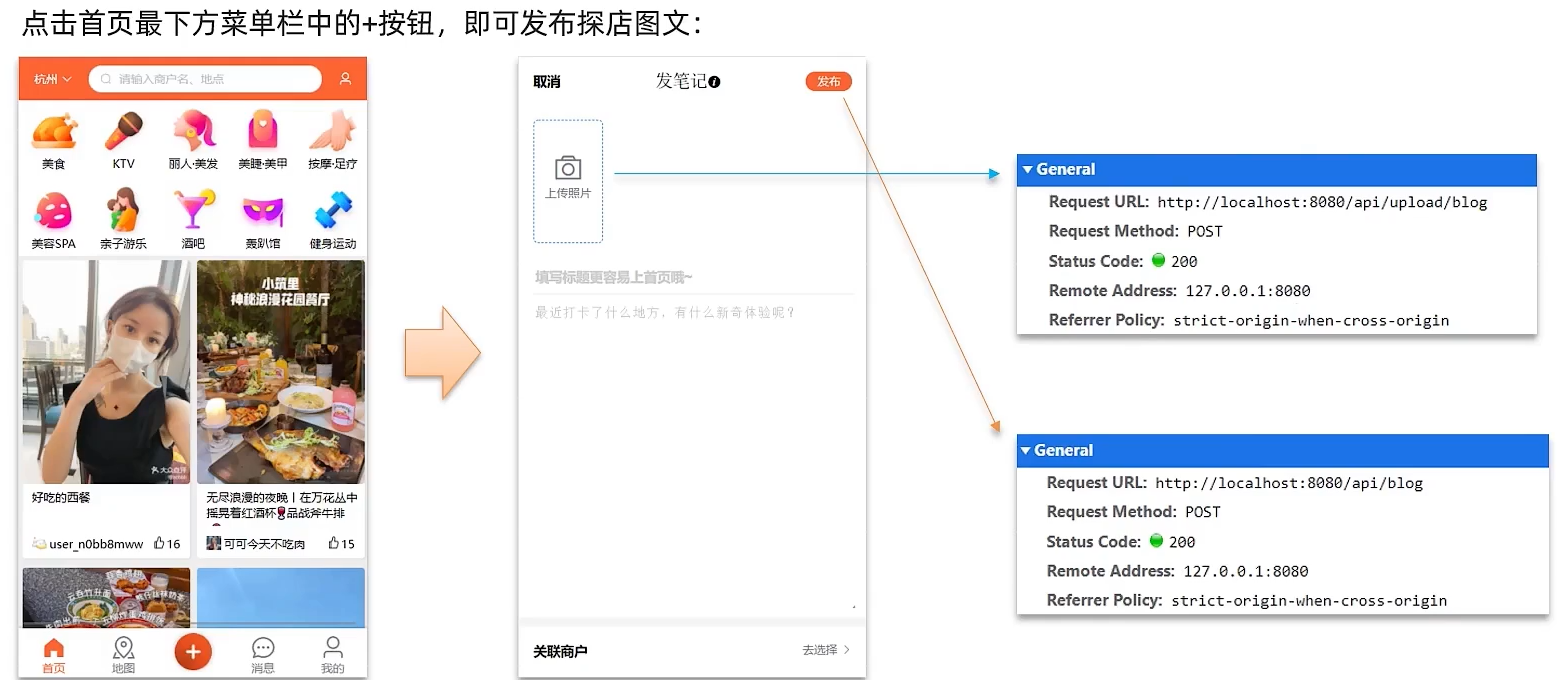
上传接口

```java
@Slf4j
@RestController
@RequestMapping("upload")
public class UploadController {

    @PostMapping("blog")
    public Result uploadImage(@RequestParam("file") MultipartFile image) {
        try {
            // 获取原始文件名称
            String originalFilename = image.getOriginalFilename();
            // 生成新文件名
            String fileName = createNewFileName(originalFilename);
            // 保存文件
            image.transferTo(new File(SystemConstants.IMAGE_UPLOAD_DIR, fileName));
            // 返回结果
            log.debug("文件上传成功,{}", fileName);
            return Result.ok(fileName);
        } catch (IOException e) {
            throw new RuntimeException("文件上传失败", e);
        }
    }

}
注意:同学们在操作时,需要修改SystemConstants.IMAGE_UPLOAD_DIR 自己图片所在的地址,在实际开发中图片一般会放在nginx上或者是云存储上。
修改图片的上传路径到本地的地址

修改类SystemConstants.java
    public static final String IMAGE_UPLOAD_DIR = "F:\\javawebwork\\ty-comment-html\\nginx-1.18.0\\html\\hmdp\\imgs\\";

BlogController
```java
@RestController
@RequestMapping("/blog")
public class BlogController {

    @Resource
    private IBlogService blogService;

    @PostMapping
    public Result saveBlog(@RequestBody Blog blog) {
        //获取登录用户
        UserDTO user = UserHolder.getUser();
        blog.setUpdateTime(user.getId());
        //保存探店博文
        blogService.saveBlog(blog);
        //返回id
        return Result.ok(blog.getId());
    }
}
点击加号上传图片

根据开发者工具看到目录
 上传路径
上传路径

点击发布

发布之后,可以在首页看到相关信息。

再看一下数据库

2. 达人探店-查看探店笔记
实现查看发布探店笔记的接口
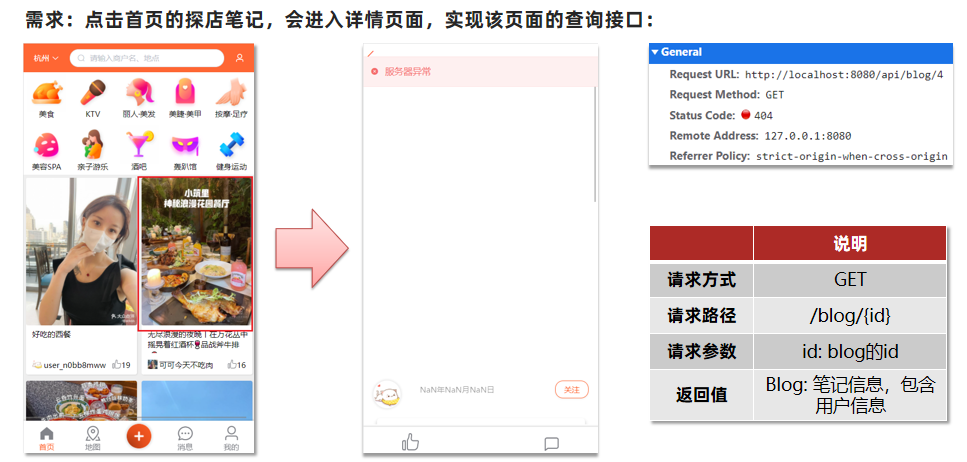
点击笔记详情发现报错了。

修改BlogController.java
@GetMapping("/hot")
    public Result queryHotBlog(@RequestParam(value = "current", defaultValue = "1") Integer current) {
        return blogService.queryHotBlog(current);
    }

    /**
     * @param
     * @return com.hmdp.dto.Result
     * @description //查看笔记详情页面
     * @param: id 笔记id
     * @date 2023/2/17 22:03
     * @author wty
     **/
    @GetMapping("/{id}")
    public Result queryBlogById(@PathVariable("id") Long id) {
        return blogService.queryBlogById(id);
    }
实现代码:
修改接口IBlogService.java
/**
 * <p>
 * 服务类
 * </p>
 *
 * @author wty
 * @since 2021-12-22
 */
public interface IBlogService extends IService<Blog> {

    Result queryHotBlog(Integer current);

    /**
     * @param
     * @return com.hmdp.dto.Result
     * @description //查看笔记详情页面
     * @param: id 笔记id
     * @date 2023/2/17 22:05
     * @author wty
     **/
    Result queryBlogById(Long id);
}
修改BlogServiceImpl
/**
 * <p>
 * 服务实现类
 * </p>
 *
 * @author wty
 * @since 2021-12-22
 */
@Service
public class BlogServiceImpl extends ServiceImpl<BlogMapper, Blog> implements IBlogService {
    @Resource
    private IUserService userService;

    @Override
    public Result queryHotBlog(Integer current) {
        // 根据用户查询
        Page<Blog> page = query()
                .orderByDesc("liked")
                .page(new Page<>(current, SystemConstants.MAX_PAGE_SIZE));
        // 获取当前页数据
        List<Blog> records = page.getRecords();
        // 查询用户
        records.forEach(this::queryBlogUser);
        return Result.ok(records);
    }

    /**
     * @param
     * @return com.hmdp.dto.Result
     * @description //查看笔记详情页面
     * @param: id 笔记id
     * @date 2023/2/17 22:07
     * @author wty
     **/
    @Override
    public Result queryBlogById(Long id) {
        // 1.查询blog
        Blog blog = getById(id);
        if (null == blog) {
            return Result.fail("笔记不存在!");
        }
        // 2.查询blog相关的用户
        queryBlogUser(blog);
        return Result.ok(blog);
    }

    private void queryBlogUser(Blog blog) {
        Long userId = blog.getUserId();
        User user = userService.getById(userId);
        blog.setName(user.getNickName());
        blog.setIcon(user.getIcon());
    }
}
重启应用,发现打开成功了详情页面

4.7.2.点赞功能
初始代码
@GetMapping("/likes/{id}")
public Result queryBlogLikes(@PathVariable("id") Long id) {
    //修改点赞数量
    blogService.update().setSql("liked = liked +1 ").eq("id",id).update();
    return Result.ok();
}
问题分析:这种方式会导致一个用户无限点赞,明显是不合理的
造成这个问题的原因是,我们现在的逻辑,发起请求只是给数据库+1,所以才会出现这个问题。

完善点赞功能
需求:
- 同一个用户只能点赞一次,再次点击则取消点赞
- 如果当前用户已经点赞,则点赞按钮高亮显示(前端已实现,判断字段Blog类的isLike属性)
实现步骤:
- 给Blog类中添加一个isLike字段,标示是否被当前用户点赞
- 修改点赞功能,利用Redis的set集合判断是否点赞过,未点赞过则点赞数+1,已点赞过则点赞数-1
- 修改根据id查询Blog的业务,判断当前登录用户是否点赞过,赋值给isLike字段
- 修改分页查询Blog业务,判断当前登录用户是否点赞过,赋值给isLike字段
为什么采用set集合:
因为我们的数据是不能重复的,其次是一个集合。
具体步骤:
1、在Blog 添加一个字段
@TableField(exist = false)
private Boolean isLike;

2、修改代码
BlogController.java
    @PutMapping("/like/{id}")
    public Result likeBlog(@PathVariable("id") Long id) {
        // 修改点赞数量 update tb_blog set liked = liked where id = ?
        //blogService.update().setSql("liked = liked + 1").eq("id", id).update();
        return blogService.likeBlog(id);
    }
修改IBlogService.java添加方法
    /**
     * @param
     * @return com.hmdp.dto.Result
     * @description //点赞
     * @param: id
     * @date 2023/2/17 22:32
     * @author wty
     **/
    Result likeBlog(Long id);
修改BlogServiceImpl.java
@Service
public class BlogServiceImpl extends ServiceImpl<BlogMapper, Blog> implements IBlogService {
    @Resource
    private IUserService userService;

    @Resource
    StringRedisTemplate stringRedisTemplate;

    @Override
    public Result queryHotBlog(Integer current) {
        // 根据用户查询
        Page<Blog> page = query()
                .orderByDesc("liked")
                .page(new Page<>(current, SystemConstants.MAX_PAGE_SIZE));
        // 获取当前页数据
        List<Blog> records = page.getRecords();
        // 查询用户
        records.forEach(new Consumer<Blog>() {
            @Override
            public void accept(Blog blog) {
                queryBlogUser(blog);
                isBlogLiked(blog);
            }
        });
        //records.forEach(this::queryBlogUser);
        return Result.ok(records);
    }

    /**
     * @param
     * @return com.hmdp.dto.Result
     * @description //查看笔记详情页面
     * @param: id 笔记id
     * @date 2023/2/17 22:07
     * @author wty
     **/
    @Override
    public Result queryBlogById(Long id) {
        // 1.查询blog
        Blog blog = getById(id);
        if (null == blog) {
            return Result.fail("笔记不存在!");
        }
        // 2.查询blog相关的用户
        queryBlogUser(blog);
        // 3.查询blog是否被点赞
        isBlogLiked(blog);
        return Result.ok(blog);
    }

    /**
     * @param
     * @return void
     * @description //当前笔记是否被当前用户点赞
     * @param: blog
     * @date 2023/2/17 22:50
     * @author wty
     **/
    private void isBlogLiked(Blog blog) {
        Long id = blog.getId();
        // 1.获取当前登录用户
        Long userId = UserHolder.getUser().getId();
        // 2.判断当前登录用户是否点赞 key  "blog:liked:" + id
        String key = RedisConstants.BLOG_LIKED_KEY + id;
        Boolean isMember = stringRedisTemplate.opsForSet().isMember(key, userId.toString());
        boolean flag = BooleanUtil.isTrue(isMember);
        blog.setIsLike(flag);
    }

    /**
     * @param
     * @return com.hmdp.dto.Result
     * @description // 点赞
     * @param: id
     * @date 2023/2/17 22:32
     * @author wty
     **/
    @Override
    public Result likeBlog(Long id) {
        // 1.获取当前登录用户
        Long userId = UserHolder.getUser().getId();
        // 2.判断当前登录用户是否点赞 key  "blog:liked:" + id
        String key = RedisConstants.BLOG_LIKED_KEY + id;
        Boolean isMember = stringRedisTemplate.opsForSet().isMember(key, userId.toString());
        boolean flag = BooleanUtil.isTrue(isMember);

        if (!flag) {
            // 3.如果未点赞,可以点赞
            // 3.1数据库点赞数+1
            // 修改点赞数量 update tb_blog set liked = liked where id = ?
            boolean isSuccess = update().setSql("liked = liked + 1").eq("id", id).update();
            if (isSuccess) {
                // 3.2保存用户到Redis的set集合
                stringRedisTemplate.opsForSet().add(key, userId.toString());
            }

        } else {
            // 4.如果已经点赞,取消点赞
            // 4.1数据库点赞数 -1
            boolean isSuccess = update().setSql("liked = liked - 1").eq("id", id).update();

            if (isSuccess) {
                // 4.2把用户从Redis的set集合移除
                stringRedisTemplate.opsForSet().remove(key, userId.toString());
            }
        }

        return null;
    }

    private void queryBlogUser(Blog blog) {
        Long userId = blog.getUserId();
        User user = userService.getById(userId);
        blog.setName(user.getNickName());
        blog.setIcon(user.getIcon());
    }
}
重启应用点赞后,这里感觉前端代码有点问题,点赞后还需要刷新一下页面才会显示高亮。

这里点赞和取消赞后前端会报错,会的小伙伴帮忙解决一下。

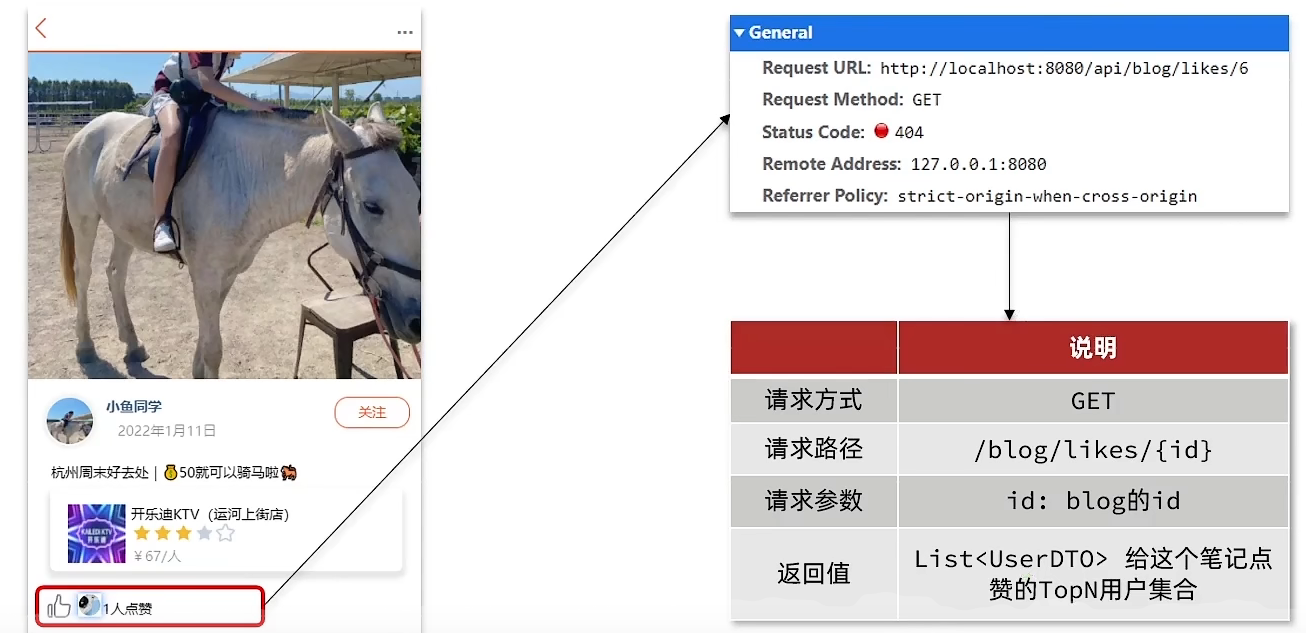
4.7.3.基于List实现点赞用户列表TOP10
4.7.4.基于SortedSet实现点赞排行榜
在探店笔记的详情页面,应该把给该笔记点赞的人显示出来,比如最早点赞的TOP5,形成点赞排行榜:
之前的点赞是放到set集合,但是set集合是不能排序的,所以这个时候,咱们可以采用一个可以排序的set集合,就是咱们的sortedSet
我们接下来来对比一下这些集合的区别是什么
所有点赞的人,需要是唯一的,所以我们应当使用set或者是sortedSet
其次我们需要排序,就可以直接锁定使用sortedSet啦!
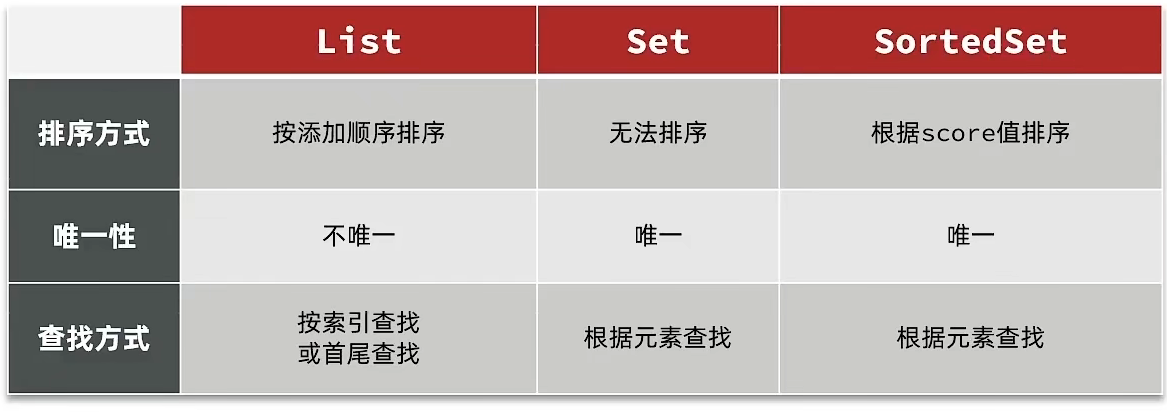
这里注意sortedSet中判断一个元素是否存在是没有像set集合那样的SISMEMBER的,那我们怎么判断呢,这里可以用ZSCORE,获取sorted set中的指定元素的score值,如果能获取到,说明存在,获取不到,说明不存在。

修改代码
BlogServiceImpl
点赞逻辑代码
@Service
public class BlogServiceImpl extends ServiceImpl<BlogMapper, Blog> implements IBlogService {
    @Resource
    private IUserService userService;

    @Resource
    StringRedisTemplate stringRedisTemplate;

    @Override
    public Result queryHotBlog(Integer current) {
        // 根据用户查询
        Page<Blog> page = query()
                .orderByDesc("liked")
                .page(new Page<>(current, SystemConstants.MAX_PAGE_SIZE));
        // 获取当前页数据
        List<Blog> records = page.getRecords();
        // 查询用户
        records.forEach(new Consumer<Blog>() {
            @Override
            public void accept(Blog blog) {
                queryBlogUser(blog);
                isBlogLiked(blog);
            }
        });
        //records.forEach(this::queryBlogUser);
        return Result.ok(records);
    }

    /**
     * @param
     * @return com.hmdp.dto.Result
     * @description //查看笔记详情页面
     * @param: id 笔记id
     * @date 2023/2/17 22:07
     * @author wty
     **/
    @Override
    public Result queryBlogById(Long id) {
        // 1.查询blog
        Blog blog = getById(id);
        if (null == blog) {
            return Result.fail("笔记不存在!");
        }
        // 2.查询blog相关的用户
        queryBlogUser(blog);
        // 3.查询blog是否被点赞
        isBlogLiked(blog);
        return Result.ok(blog);
    }

    /**
     * @param
     * @return void
     * @description //当前笔记是否被当前用户点赞(Set)
     * @param: blog
     * @date 2023/2/17 22:50
     * @author wty
     **/
    private void isBlogLikedSet(Blog blog) {
        Long id = blog.getId();
        // 1.获取当前登录用户
        Long userId = UserHolder.getUser().getId();
        if (null == userId) {
            return;
        }
        // 2.判断当前登录用户是否点赞 key  "blog:liked:" + id
        String key = RedisConstants.BLOG_LIKED_KEY + id;
        Boolean isMember = stringRedisTemplate.opsForSet().isMember(key, userId.toString());
        boolean flag = BooleanUtil.isTrue(isMember);
        blog.setIsLike(flag);
    }

    /**
     * @param
     * @return void
     * @description //当前笔记是否被当前用户点赞(SortedSet)
     * @param: blog
     * @date 2023/2/17 22:50
     * @author wty
     **/
    private void isBlogLiked(Blog blog) {
        Long id = blog.getId();
        // 1.获取当前登录用户
        Long userId = UserHolder.getUser().getId();
        if (null == userId) {
            return;
        }
        // 2.判断当前登录用户是否点赞 key  "blog:liked:" + id
        String key = RedisConstants.BLOG_LIKED_KEY + id;
        Double score = stringRedisTemplate.opsForZSet().score(key, userId.toString());
        blog.setIsLike(null != score);
    }

    /**
     * @param
     * @return com.hmdp.dto.Result
     * @description // 点赞(Set集合)
     * @param: id
     * @date 2023/2/17 22:32
     * @author wty
     **/
    public Result likeBlogSet(Long id) {
        // 1.获取当前登录用户
        Long userId = UserHolder.getUser().getId();
        // 2.判断当前登录用户是否点赞 key  "blog:liked:" + id
        String key = RedisConstants.BLOG_LIKED_KEY + id;
        Boolean isMember = stringRedisTemplate.opsForSet().isMember(key, userId.toString());
        boolean flag = BooleanUtil.isTrue(isMember);

        if (!flag) {
            // 3.如果未点赞,可以点赞
            // 3.1数据库点赞数+1
            // 修改点赞数量 update tb_blog set liked = liked where id = ?
            boolean isSuccess = update().setSql("liked = liked + 1").eq("id", id).update();
            if (isSuccess) {
                // 3.2保存用户到Redis的set集合
                stringRedisTemplate.opsForSet().add(key, userId.toString());
            }

        } else {
            // 4.如果已经点赞,取消点赞
            // 4.1数据库点赞数 -1
            boolean isSuccess = update().setSql("liked = liked - 1").eq("id", id).update();

            if (isSuccess) {
                // 4.2把用户从Redis的set集合移除
                stringRedisTemplate.opsForSet().remove(key, userId.toString());
            }
        }

        return null;
    }

    /**
     * @param
     * @return com.hmdp.dto.Result
     * @description // 点赞(SortedSet集合)
     * @param: id
     * @date 2023/2/17 22:32
     * @author wty
     **/
    @Override
    public Result likeBlog(Long id) {
        // 1.获取当前登录用户
        Long userId = UserHolder.getUser().getId();
        // 2.判断当前登录用户是否点赞 key  "blog:liked:" + id
        String key = RedisConstants.BLOG_LIKED_KEY + id;
        Double score = stringRedisTemplate.opsForZSet().score(key, userId.toString());

        if (null == score) {
            // 3.如果未点赞,可以点赞
            // 3.1数据库点赞数+1
            // 修改点赞数量 update tb_blog set liked = liked where id = ?
            boolean isSuccess = update().setSql("liked = liked + 1").eq("id", id).update();
            if (isSuccess) {
                // 3.2保存用户到Redis的sortedset集合 zadd key score member
                stringRedisTemplate.opsForZSet().add(key, userId.toString(), System.currentTimeMillis());
            }

        } else {
            // 4.如果已经点赞,取消点赞
            // 4.1数据库点赞数 -1
            boolean isSuccess = update().setSql("liked = liked - 1").eq("id", id).update();

            if (isSuccess) {
                // 4.2把用户从Redis的set集合移除
                stringRedisTemplate.opsForZSet().remove(key, userId.toString());
            }
        }

        return null;
    }

    private void queryBlogUser(Blog blog) {
        Long userId = blog.getUserId();
        User user = userService.getById(userId);
        blog.setName(user.getNickName());
        blog.setIcon(user.getIcon());
    }
}
重启应用,删除redis中的liked的元素,然后点赞

看redis中,存储成功

再点击一下,取消点赞

看redis中也没有了。
点赞列表查询列表
修改BlogController
    @GetMapping("/likes/{id}")
    public Result queryBlogLikes(@PathVariable("id") Long id) {
        return blogService.queryBlogLikes(id);
    }
修改接口BlogServiceImpl.java
/**
     * @param
     * @return com.hmdp.dto.Result
     * @description //查询点赞的列表
     * @param: id
     * @date 2023/2/18 1:10
     * @author wty
     **/
    Result queryBlogLikes(Long id);
修改BlogService
/**
     * @param
     * @return com.hmdp.dto.Result
     * @description //查询点赞列表
     * @param: id
     * @date 2023/2/18 1:11
     * @author wty
     **/
    @Override
    public Result queryBlogLikes(Long id) {
        String key = RedisConstants.BLOG_LIKED_KEY + id;
        // 1.查询top5的点赞用户 zrange key 0 4
        Set<String> top5 = stringRedisTemplate.opsForZSet().range(key, 0, 4);
        if (null == top5 || top5.isEmpty()) {
            return Result.ok(Collections.emptyList());
        }

        // 2.解析出其中的用户id
        List<Long> ids = top5.stream().map(Long::valueOf).collect(Collectors.toList());

        // 3.根据用户id查询用户
        List<UserDTO> userDTOS = userService.listByIds(ids).stream().map(user -> BeanUtil.copyProperties(user, UserDTO.class)).collect(Collectors.toList());

        // 4.返回
        return Result.ok(userDTOS);
    }
重启应用
加载出列表

再用另一个号点赞,发现后来的人,点赞顺序竟然是第一个,这明显是顺序反了

原因是sql语句

我们放到sqlyog中查询一下发现顺序确实会重排

sql如下,即可解决
SELECT * FROM tb_user WHERE id IN ('5','1') ORDER BY FIELD(id,5,1);

调整代码BlogServiceImpl.java
// 3.根据用户id查询用户
        //List<UserDTO> userDTOS = userService.listByIds(ids).stream().map(user -> BeanUtil.copyProperties(user, UserDTO.class)).collect(Collectors.toList());
        List<UserDTO> userDTOS = userService.query()
                // SELECT * FROM tb_user WHERE id IN ('5','1') ORDER BY FIELD(id,5,1);
                .in("id", ids)
                .last("order by field (id," + idsStr + ") ").list()
                .stream().map(user -> BeanUtil.copyProperties(user, UserDTO.class))
                .collect(Collectors.toList());
重启应用,发现点赞顺序已经调整了


4.8.关注列表
4.8.1.关注列表实现原理
4.8.2.添加关注
1. 好友关注-关注和取消关注
针对用户的操作:可以对用户进行关注和取消关注功能。
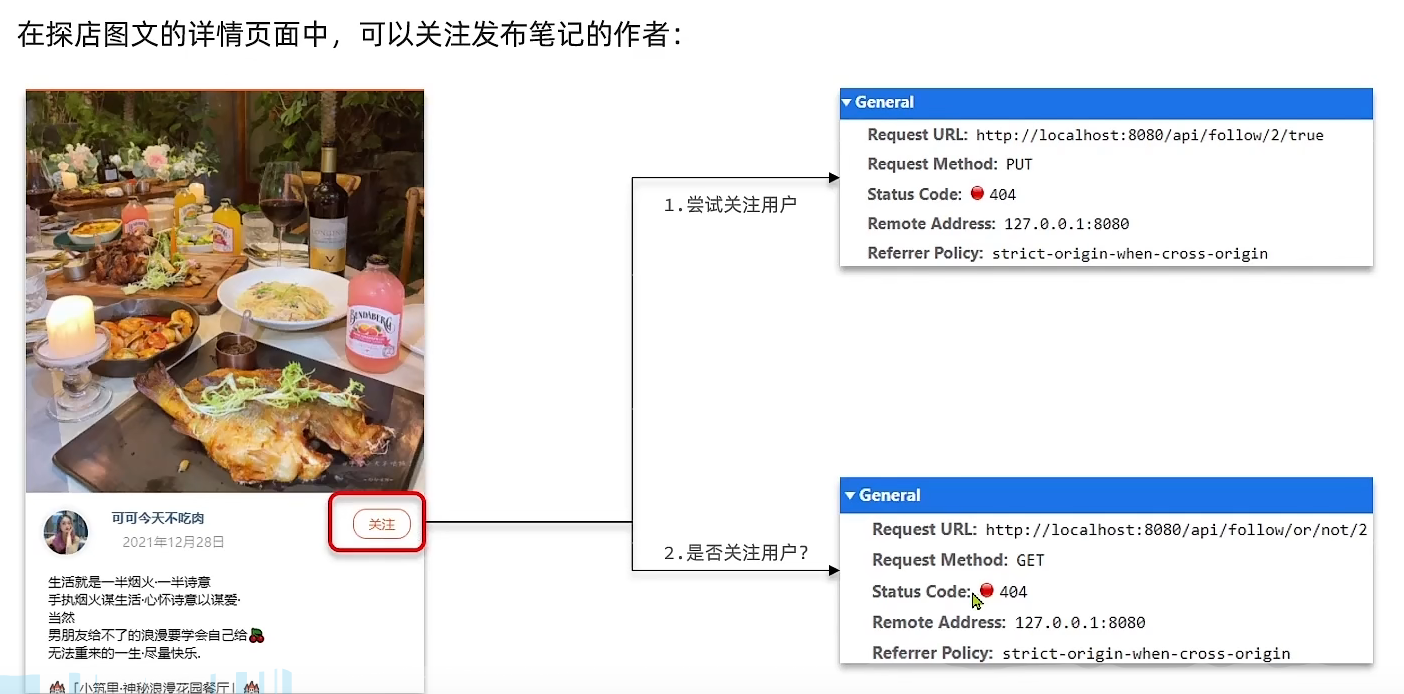
实现思路:
需求:基于该表数据结构,实现两个接口:
- 关注和取关接口
- 判断是否关注的接口
关注是User之间的关系,是博主与粉丝的关系,数据库中有一张tb_follow表来标示:
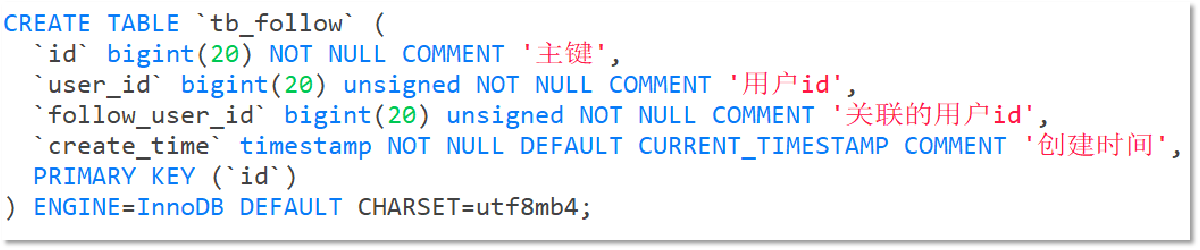
注意: 这里需要把主键修改为自增长,简化开发。

修改FollowController
@RestController
@RequestMapping("/follow")
public class FollowController {
    @Autowired
    private IFollowService iFollowService;

    /**
     * @param
     * @return com.hmdp.dto.Result
     * @description //关注博主
     * @param: followUserId
     * @param: isFollow
     * @date 2023/2/18 10:54
     * @author wty
     **/
    @PutMapping("/{id}/{isFollow}")
    public Result follow(@PathVariable("id") Long followUserId, @PathVariable("isFollow") boolean isFollow) {
        return iFollowService.follow(followUserId, isFollow);
    }

    /**
     * @param
     * @return com.hmdp.dto.Result
     * @description //判断是否关注
     * @param: followUserId
     * @date 2023/2/18 10:54
     * @author wty
     **/
    @GetMapping("/or/not/{id}")
    public Result isFollow(@PathVariable("id") Long followUserId) {
        return iFollowService.isFollow(followUserId);
    }
}
修改接口IFollowService.java
public interface IFollowService extends IService<Follow> {

    Result follow(Long followUserId, boolean isFollow);

    Result isFollow(Long followUserId);
}
修改实现类FollowServiceImpl.java
@Service
public class FollowServiceImpl extends ServiceImpl<FollowMapper, Follow> implements IFollowService {

    /**
     * @param
     * @return com.hmdp.dto.Result
     * @description //关注
     * @param: id
     * @param: isFollow
     * @date 2023/2/18 10:58
     * @author wty
     **/
    @Override
    public Result follow(Long followUserId, boolean isFollow) {
        Long userId = UserHolder.getUser().getId();
        // 1.判断是关注还是取关
        if (isFollow) {
            // 2.关注,新增数据
            Follow follow = new Follow();
            follow.setFollowUserId(followUserId);
            follow.setUserId(userId);
            // insert into tb_follow values()
            save(follow);

        } else {
            // 3.取关,删除
            // delete from follow where user_id = ? and follow_user_id = ?
            LambdaQueryWrapper<Follow> wrapper = new LambdaQueryWrapper<>();
            remove(wrapper.eq(Follow::getUserId, userId).eq(Follow::getFollowUserId, followUserId));

        }

        return Result.ok();
    }

    /**
     * @param
     * @return com.hmdp.dto.Result
     * @description //判断是否关注
     * @param: id
     * @param: followUserId
     * @date 2023/2/18 10:58
     * @author wty
     **/
    @Override
    public Result isFollow(Long followUserId) {
        // 1.获取用户id
        Long userId = UserHolder.getUser().getId();
        // 2.查询是否关注 select * from tb_follow where  user_id = ? and follow_user_id = ?
        Integer count = query().eq("user_id", userId).eq("follow_user_id", followUserId).count();
        return Result.ok(count > 0);
    }
}
重启应用,点击关注

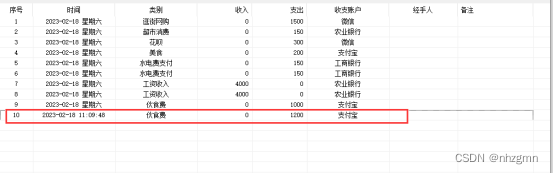
查看数据库

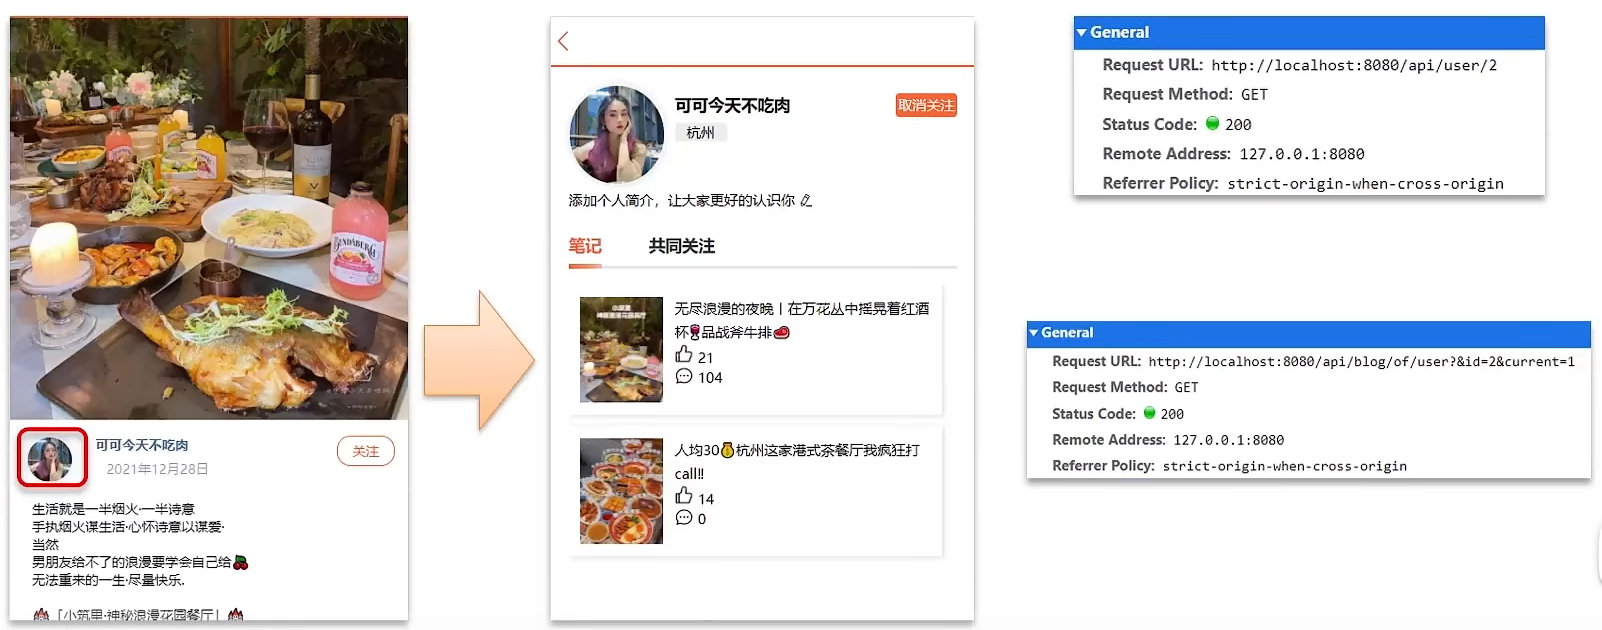
4.8.3.共同关注列表
想要去看共同关注的好友,需要首先进入到这个页面,这个页面会发起两个请求
1、去查询用户的详情
2、去查询用户的笔记
以上两个功能和共同关注没有什么关系,大家可以自行将笔记中的代码拷贝到idea中就可以实现这两个功能了,我们的重点在于共同关注功能。
// UserController 根据id查询用户
@GetMapping("/{id}")
public Result queryUserById(@PathVariable("id") Long userId){
	// 查询详情
	User user = userService.getById(userId);
	if (user == null) {
		return Result.ok();
	}
	UserDTO userDTO = BeanUtil.copyProperties(user, UserDTO.class);
	// 返回
	return Result.ok(userDTO);
}

// BlogController  根据id查询博主的探店笔记
@GetMapping("/of/user")
public Result queryBlogByUserId(
		@RequestParam(value = "current", defaultValue = "1") Integer current,
		@RequestParam("id") Long id) {
	// 根据用户查询
	Page<Blog> page = blogService.query()
			.eq("user_id", id).page(new Page<>(current, SystemConstants.MAX_PAGE_SIZE));
	// 获取当前页数据
	List<Blog> records = page.getRecords();
	return Result.ok(records);
}
完成后,重启应用,点击头像

进入后,可以查看详情

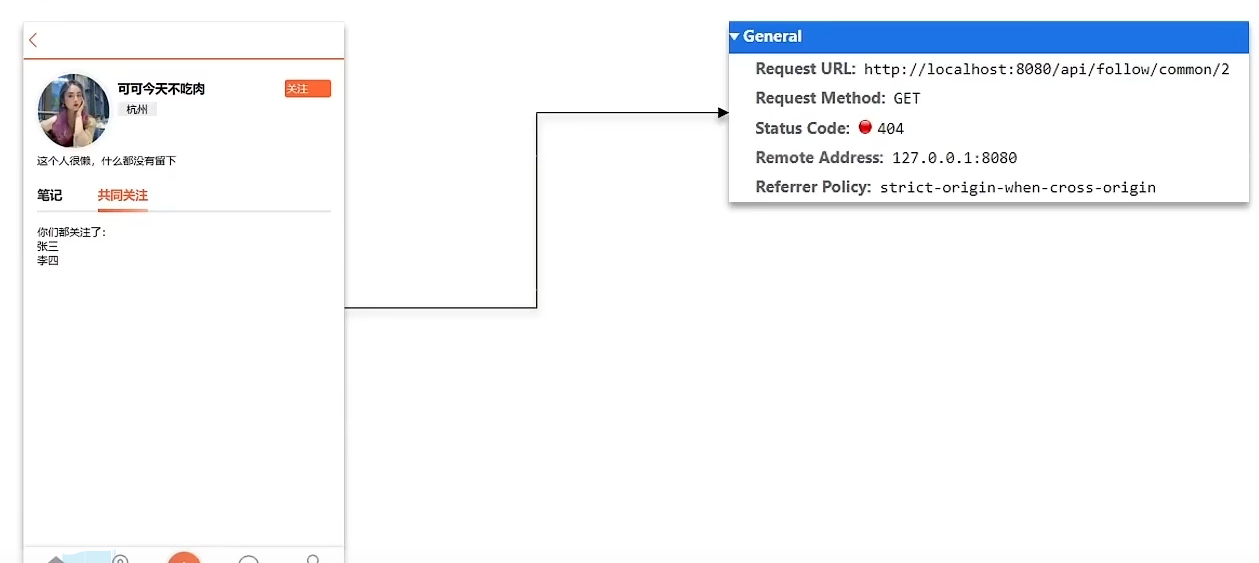
点击共同关注报错

接下来我们来看看共同关注如何实现:
需求:利用Redis中恰当的数据结构,实现共同关注功能。在博主个人页面展示出当前用户与博主的共同关注呢。
当然是使用我们之前学习过的set集合咯,在set集合中,有交集并集补集的api,我们可以把两人的关注的人分别放入到一个set集合中,然后再通过api去查看这两个set集合中的交集数据。
我们先来改造当前的关注列表
改造原因是因为我们需要在用户关注了某位用户后,需要将数据放入到set集合中,方便后续进行共同关注,同时当取消关注时,也需要从set集合中进行删除
将关注的博主放入redis的set列表中
FollowServiceImpl
    /**
     * @param
     * @return com.hmdp.dto.Result
     * @description //关注
     * @param: id
     * @param: isFollow
     * @date 2023/2/18 10:58
     * @author wty
     **/
    @Override
    public Result follow(Long followUserId, boolean isFollow) {
        Long userId = UserHolder.getUser().getId();
        String key = RedisConstants.FOLLOW_USER_LIST + userId;
        // 1.判断是关注还是取关
        if (isFollow) {
            // 2.关注,新增数据
            Follow follow = new Follow();
            follow.setFollowUserId(followUserId);
            follow.setUserId(userId);
            // insert into tb_follow values()
            boolean isSuccess = save(follow);

            // 加入Redis,实现共同关注
            if (isSuccess) {
                // 把关注用户的id,加入redis的set集合  sadd userId followUserId
                stringRedisTemplate.opsForSet().add(key, followUserId.toString());
            }


        } else {
            // 3.取关,删除
            // delete from follow where user_id = ? and follow_user_id = ?
            LambdaQueryWrapper<Follow> wrapper = new LambdaQueryWrapper<>();
            boolean isSuccess = remove(wrapper.eq(Follow::getUserId, userId).eq(Follow::getFollowUserId, followUserId));
            if (isSuccess) {
                // 从Redis中移除,实现取关
                // 把关注用户的id,从redis的set集合中移除  srem userId followUserId
                stringRedisTemplate.opsForSet().remove(key, followUserId.toString());
            }

        }

        return Result.ok();
    }
重启应用,取消关注后重新关注

查看redis

查看数据库

再登录一个用户,去关注前2个账号


关注完后看redis,保存成功

看数据库,也保存成功

下面实现共同关注的功能
具体的关注代码:
修改FollowController.java
    /**
     * @param
     * @return com.hmdp.dto.Result
     * @description //查询共同关注
     * @param: id
     * @date 2023/2/18 13:12
     * @author wty
     **/
    @GetMapping("/common/{id}")
    public Result followCommons(@PathVariable("id") Long id) {
        return iFollowService.followCommons(id);
    }
修改接口
Result followCommons(Long id);
修改实现类FollowServiceImpl.java
    /**
     * @param
     * @return com.hmdp.dto.Result
     * @description //共同关注
     * @param: id
     * @date 2023/2/18 13:13
     * @author wty
     **/
    @Override
    public Result followCommons(Long id) {
        // 1.获取当前用户
        Long userId = UserHolder.getUser().getId();
        String key = RedisConstants.FOLLOW_USER_LIST + userId;

        // 目标用户
        String keyFollow = RedisConstants.FOLLOW_USER_LIST + id;

        // 2.求交集
        Set<String> intersect = stringRedisTemplate.opsForSet().intersect(key, keyFollow);
        if (null == intersect || intersect.isEmpty()) {
            return Result.ok(Collections.emptyList());
        }

        // 3.解析id集合
        List<Long> ids = intersect.stream().map(Long::valueOf).collect(Collectors.toList());
        List<UserDTO> userDTOS = userService.listByIds(ids)
                .stream().map(user -> BeanUtil.copyProperties(user, UserDTO.class)).collect(Collectors.toList());

        // 查询用户
        return Result.ok(userDTOS);
    }
重启应用,此时已经可以查看共同关注了。

查看redis,也存储成功了。

4.8.4.取消关注
1.好友关注-Feed流实现方案
当我们关注了用户后,这个用户发了动态,那么我们应该把这些数据推送给用户,这个需求,其实我们又把他叫做Feed流,关注推送也叫做Feed流,直译为投喂。为用户持续的提供“沉浸式”的体验,通过无限下拉刷新获取新的信息。
对于传统的模式的内容解锁:我们是需要用户去通过搜索引擎或者是其他的方式去解锁想要看的内容

对于新型的Feed流的的效果:不需要我们用户再去推送信息,而是系统分析用户到底想要什么,然后直接把内容推送给用户,从而使用户能够更加的节约时间,不用主动去寻找。

Feed流的实现有两种模式:
Feed流产品有两种常见模式:
Timeline:不做内容筛选,简单的按照内容发布时间排序,常用于好友或关注。例如朋友圈
- 优点:信息全面,不会有缺失。并且实现也相对简单
- 缺点:信息噪音较多,用户不一定感兴趣,内容获取效率低
智能排序:利用智能算法屏蔽掉违规的、用户不感兴趣的内容。推送用户感兴趣信息来吸引用户
- 优点:投喂用户感兴趣信息,用户粘度很高,容易沉迷
- 缺点:如果算法不精准,可能起到反作用
本例中的个人页面,是基于关注的好友来做Feed流,因此采用Timeline的模式。该模式的实现方案有三种:
我们本次针对好友的操作,采用的就是Timeline的方式,只需要拿到我们关注用户的信息,然后按照时间排序即可
,因此采用Timeline的模式。该模式的实现方案有三种:
- 拉模式
- 推模式
- 推拉结合
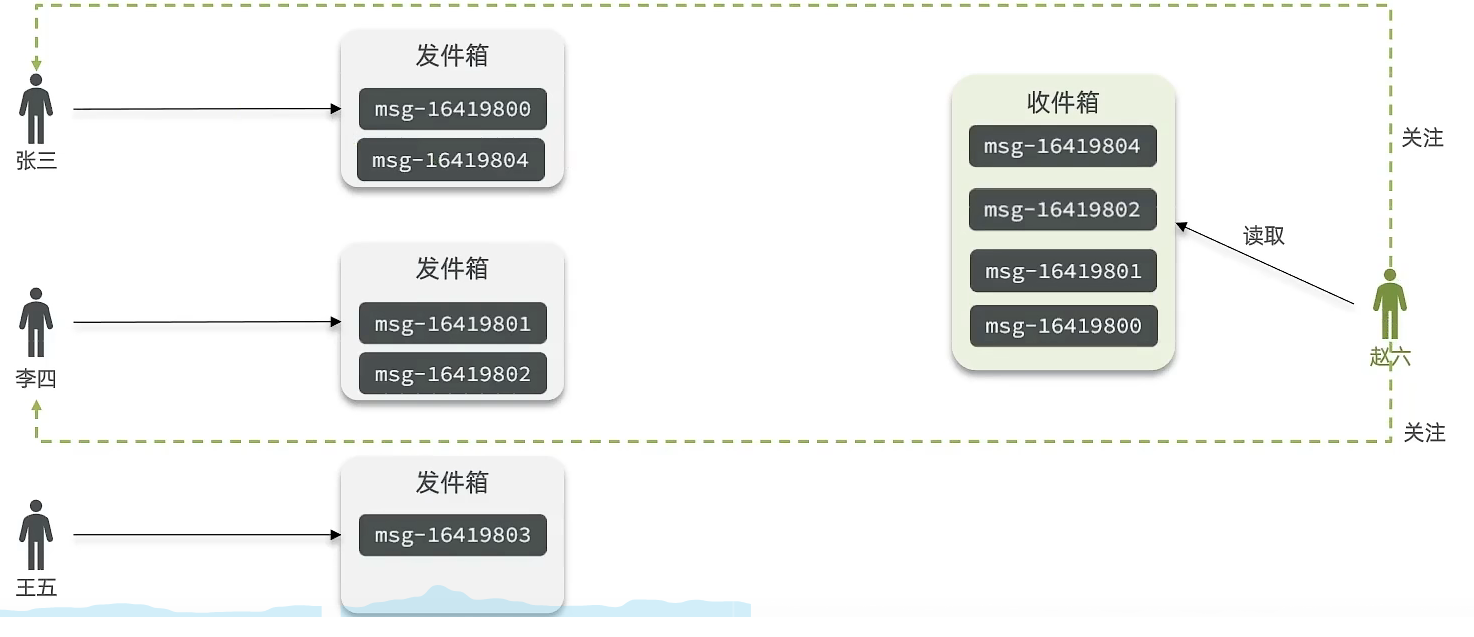
拉模式:也叫做读扩散
该模式的核心含义就是:当张三和李四和王五发了消息后,都会保存在自己的邮箱中,假设赵六要读取信息,那么他会从读取他自己的收件箱,此时系统会从他关注的人群中,把他关注人的信息全部都进行拉取,然后在进行排序
优点:比较节约空间,因为赵六在读信息时,并没有重复读取,而且读取完之后可以把他的收件箱进行清楚。
缺点:比较延迟,当用户读取数据时才去关注的人里边去读取数据,假设用户关注了大量的用户,那么此时就会拉取海量的内容,对服务器压力巨大。
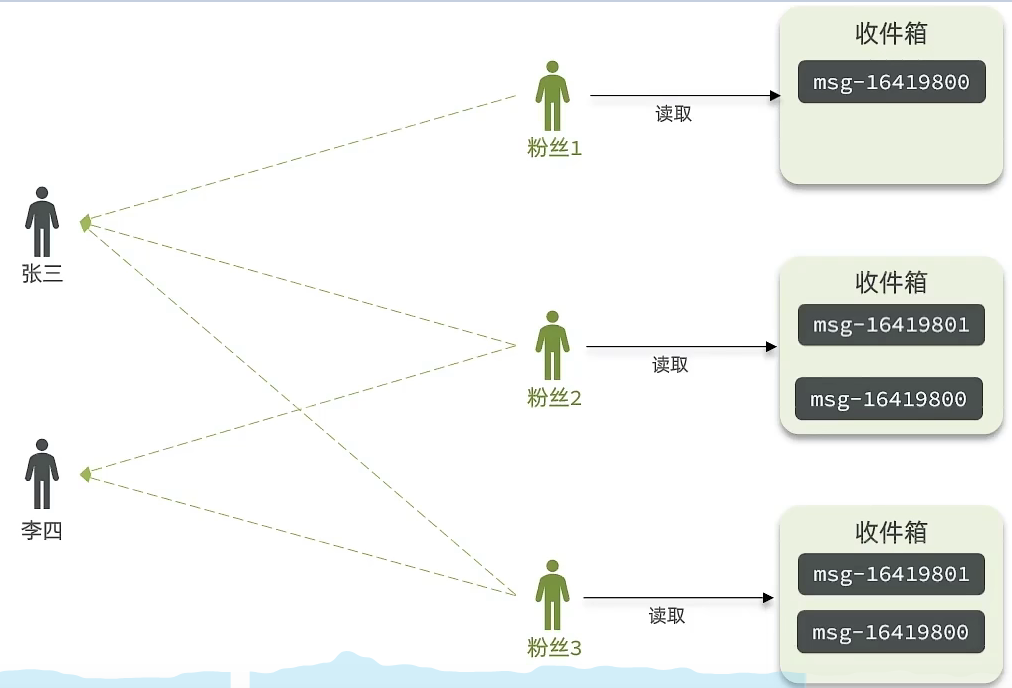
推模式:也叫做写扩散。
推模式是没有写邮箱的,当张三写了一个内容,此时会主动的把张三写的内容发送到他的粉丝收件箱中去,假设此时李四再来读取,就不用再去临时拉取了
优点:时效快,不用临时拉取
缺点:内存压力大,假设一个大V写信息,很多人关注他, 就会写很多分数据到粉丝那边去
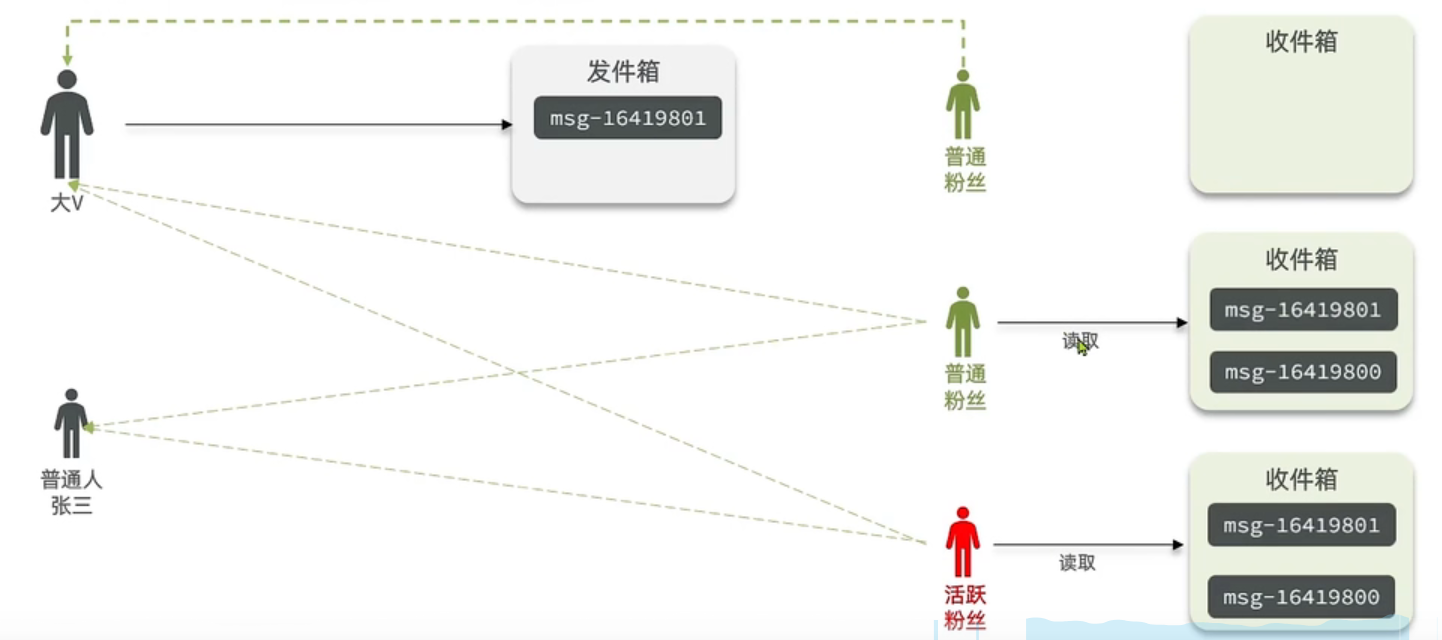
推拉结合模式:也叫做读写混合,兼具推和拉两种模式的优点。
推拉模式是一个折中的方案,站在发件人这一段,如果是个普通的人,那么我们采用写扩散的方式,直接把数据写入到他的粉丝中去,因为普通的人他的粉丝关注量比较小,所以这样做没有压力,如果是大V,那么他是直接将数据先写入到一份到发件箱里边去,然后再直接写一份到活跃粉丝收件箱里边去,现在站在收件人这端来看,如果是活跃粉丝,那么大V和普通的人发的都会直接写入到自己收件箱里边来,而如果是普通的粉丝,由于他们上线不是很频繁,所以等他们上线时,再从发件箱里边去拉信息。
4.8.5.探店推送功能
1. 好友关注-推送到粉丝收件箱
需求:
- 1.修改新增探店笔记的业务,在保存blog到数据库的同时,推送到粉丝的收件箱
- 2.收件箱满足可以根据时间戳排序,必须用Redis的数据结构实现
- 3.查询收件箱数据时,可以实现分页查询
Feed流中的数据会不断更新,所以数据的角标也在变化,因此不能采用传统的分页模式。
传统的分页在feed流是不适用的,因为我们的数据会随时发生变化。
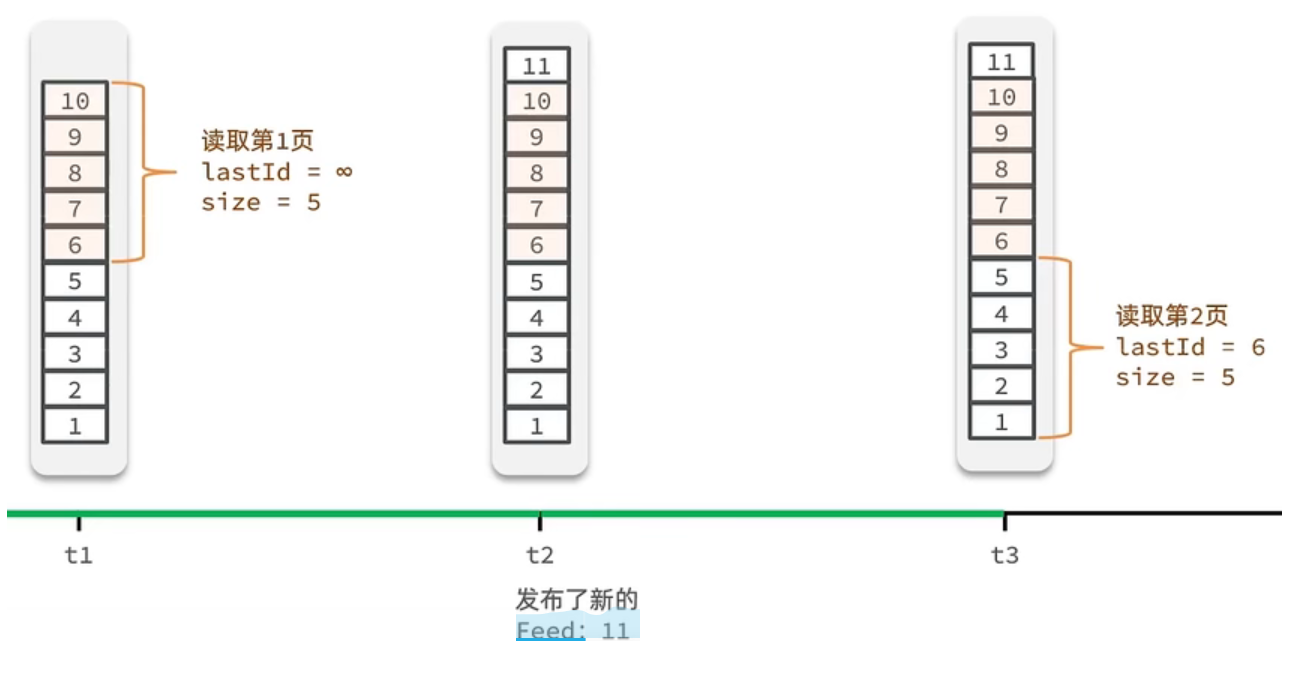
假设在t1 时刻,我们去读取第一页,此时page = 1 ,size = 5 ,那么我们拿到的就是10 ~ 6 这几条记录,假设现在t2时候又发布了一条记录,此时t3 时刻,我们来读取第二页,读取第二页传入的参数是page=2 ,size=5 ,那么此时读取到的第二页实际上是从6 开始,然后是6~2 ,那么我们就读取到了重复的数据,所以feed流的分页,不能采用原始方案来做。
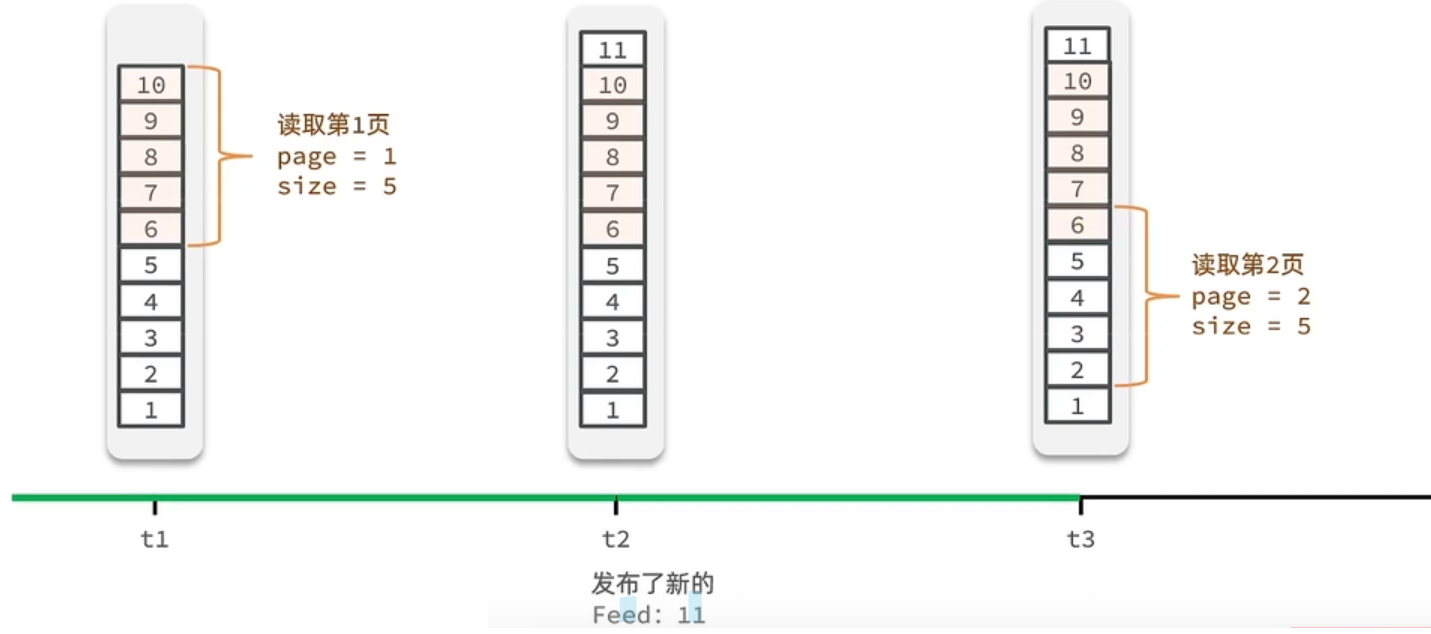
Feed流的滚动分页
我们需要记录每次操作的最后一条,然后从这个位置开始去读取数据
举个例子:我们从t1时刻开始,拿第一页数据,拿到了10~6,然后记录下当前最后一次拿取的记录,就是6,t2时刻发布了新的记录,此时这个11放到最顶上,但是不会影响我们之前记录的6,此时t3时刻来拿第二页,第二页这个时候拿数据,还是从6后一点的5去拿,就拿到了5-1的记录。我们这个地方可以采用sortedSet来做,可以进行范围查询,并且还可以记录当前获取数据时间戳最小值,就可以实现滚动分页了
核心的意思:就是我们在保存完探店笔记后,获得到当前笔记的粉丝,然后把数据推送到粉丝的redis中去。
修改BlogController.java
    @PostMapping
    public Result saveBlog(@RequestBody Blog blog) {
        return blogService.saveBlog(blog);
    }
修改接口IBlogService.java
Result saveBlog(Blog blog);
接口实现类BlogServiceImpl.java
    /**
     * @param
     * @return com.hmdp.dto.Result
     * @description //使用push模式
     * @param: blog
     * @date 2023/2/18 13:54
     * @author wty
     **/
    @Override
    public Result saveBlog(Blog blog) {
        // 1.获取登录用户
        UserDTO user = UserHolder.getUser();

        blog.setUserId(user.getId());
        // 2.保存探店博文
        boolean isSuccess = save(blog);
        if (!isSuccess) {
            return Result.fail("新增笔记失败,请重新发布!");
        }
        // 3.查询笔记作者的所有粉丝
        // select user_id from tb_follow where follow_user_id = ?
        LambdaQueryWrapper<Follow> wrapper = new LambdaQueryWrapper<>();
        wrapper.eq(Follow::getFollowUserId, user.getId());
        List<Follow> follows = followService.list(wrapper);
        // 4.推送笔记id给所有粉丝
        for (Follow follow : follows) {
            // 4.1获取粉丝id
            Long fansId = follow.getUserId();
            // 4.2推送给粉丝
            String key = RedisConstants.FEED_KEY + fansId;
            stringRedisTemplate.opsForZSet().add(key, blog.getId().toString(), System.currentTimeMillis());
        }


        // 5.返回id
        return Result.ok(blog.getId());
    }
重启应用
用可可登录,发布博客

发布成功

看redis,可可的粉丝,收到了消息

2.好友关注-实现分页查询收邮箱
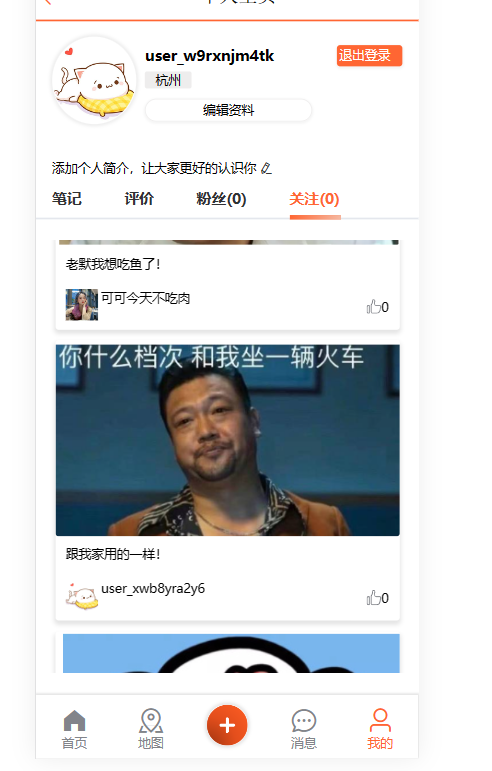
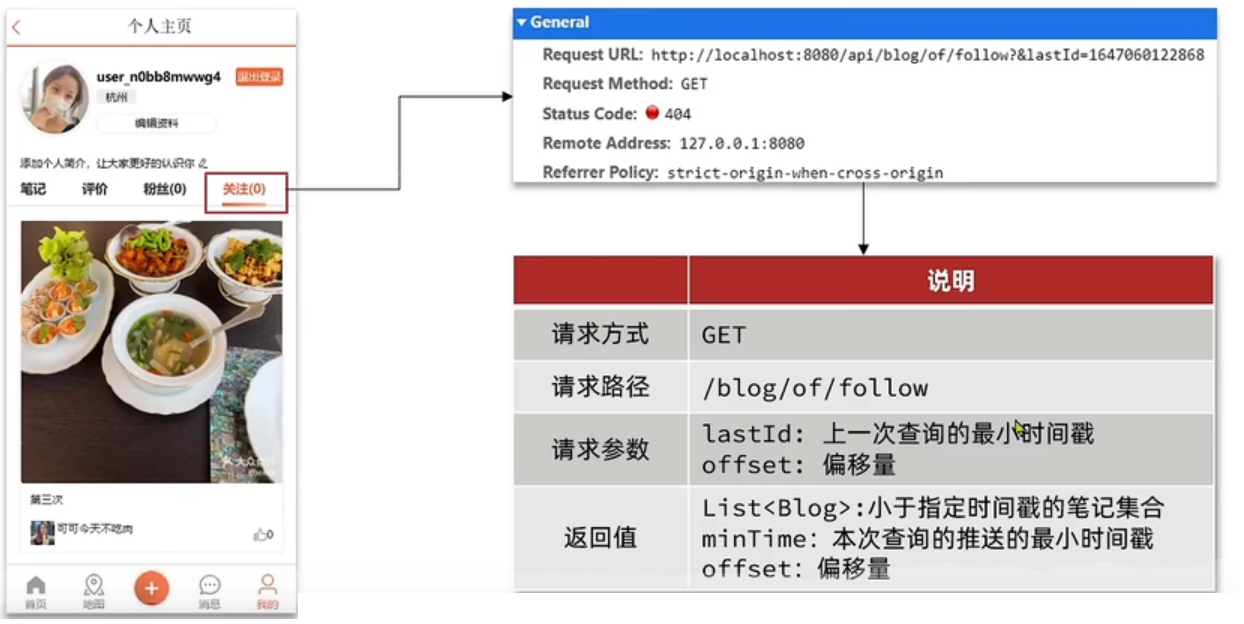
需求:在个人主页的“关注”卡片中,查询并展示推送的Blog信息:
具体操作如下:
1、每次查询完成后,我们要分析出查询出数据的最小时间戳,这个值会作为下一次查询的条件
2、我们需要找到与上一次查询相同的查询个数作为偏移量,下次查询时,跳过这些查询过的数据,拿到我们需要的数据
综上:我们的请求参数中就需要携带 lastId:上一次查询的最小时间戳 和偏移量这两个参数。
这两个参数第一次会由前端来指定,以后的查询就根据后台结果作为条件,再次传递到后台。
先来熟悉一下sortedset的指令
打开命令窗口
zadd z1 1 m1 2 m2 3 m3 4 m4 5 m5 6 m6
zadd z1 7 m7 8 m8 9 m9
ZRANGEBYSCORE z1 0 8

存放了9个元素

假如现在我们想倒叙排列
ZREVRANGE z1 0 9

如果还想带上分数呢
ZREVRANGE z1 0 9 WITHSCORES

按照分数查询,模拟分页
比如以score = 4为分水岭,分割成2页
ZREVRANGEBYSCORE z1 1000 0 WITHSCORES LIMIT 0 3

此时来插入了一条数据
ZADD z1 10 m10

输入以下指令,
注意这里的7是上次查询的最小额score
ZREVRANGEBYSCORE z1 7 0 WITHSCORES LIMIT 1 3

现在我们把redis中2个值更改为一样的,看看会怎么样。

打开命令窗口运行以下命令
ZREVRANGEBYSCORE z1 1000 0 WITHSCORES LIMIT 0 5

接着查询下一页
ZREVRANGEBYSCORE z1 6 0 WITHSCORES LIMIT 1 5

那正确应该写为
ZREVRANGEBYSCORE z1 6 0 WITHSCORES LIMIT 2 5

最后总结规律
滚动分页
-- 第一次
ZREVRANGEBYSCORE key 设定一个最大值 0 WITHSCORES LIMIT 0 每页展示几条
-- 之后
ZREVRANGEBYSCORE key 第一条最小的角标 0 WITHSCORES LIMIT 第一页中与最小值相等的元素的个数 每页展示几条
一、定义出来具体的返回值实体类
新增实体类ScrollResult
@Data
public class ScrollResult {
    private List<?> list;
    private Long minTime;
    private Integer offset;
}
BlogController
注意:RequestParam 表示接受url地址栏传参的注解,当方法上参数的名称和url地址栏不相同时,可以通过RequestParam 来进行指定
@GetMapping("/of/follow")
public Result queryBlogOfFollow(
    @RequestParam("lastId") Long max, @RequestParam(value = "offset", defaultValue = "0") Integer offset){
    return blogService.queryBlogOfFollow(max, offset);
}
接口IBlogService.java中添加
 /**
     * @param
     * @return com.hmdp.dto.Result
     * @description //滚动分页查询关注列表
     * @param: max
     * @param: offset
     * @date 2023/2/18 16:53
     * @author wty
     **/
    Result queryBlogOfFollow(Long max, Integer offset);
BlogServiceImpl
/**
     * @param
     * @return com.hmdp.dto.Result
     * @description //滚动分页查询关注列表
     * @param: max
     * @param: offset
     * @date 2023/2/18 16:54
     * @author wty
     **/
    @Override
    public Result queryBlogOfFollow(Long max, Integer offset) {
        // 1.查询当前用户
        Long userId = UserHolder.getUser().getId();
        // 2.找到收件箱
        String key = RedisConstants.FEED_KEY + userId;

        // 滚动分页查询(第一次查询)
        //ZREVRANGEBYSCORE z1 1000 0 WITHSCORES LIMIT 0 5
        Set<ZSetOperations.TypedTuple<String>> set = stringRedisTemplate
                .opsForZSet()
                .reverseRangeByScoreWithScores(key, 0, max, offset, 2L);

        // 3.非空判断
        if (null == set || set.isEmpty()) {
            return Result.ok();
        }

        // 4.解析收件箱的数据:blogId,minTime(时间戳),offset
        ArrayList<Long> ids = new ArrayList<>(set.size());
        long minTime = Long.MAX_VALUE;
        int off = 1;
        for (ZSetOperations.TypedTuple<String> tuple : set) {
            // 4.1获取id
            ids.add(Long.valueOf(tuple.getValue()));
            // 4.2 获取分数(时间戳)
            long time = tuple.getScore().longValue();
            if (time == minTime) {
                off++;
            } else {
                minTime = minTime < tuple.getScore().longValue() ? minTime : time;
                off = 1;
            }
        }
        //List<Blog> blogs = listByIds(ids);
        // select * from tb_blog where id in () order by field(id,max,min)
        String joinStr = StrUtil.join(",", ids);
        // 5.根据blogId查询blog
        List<Blog> blogs = query().in("id", ids).last("order by field(id," + joinStr + ")").list();
        for (Blog blog : blogs) {
            // 2.查询blog相关的用户
            queryBlogUser(blog);
            // 3.查询blog是否被点赞
            isBlogLiked(blog);
        }

        // 6.封装并返回
        ScrollResult result = new ScrollResult();
        result.setList(blogs);
        result.setOffset(off);
        result.setMinTime(minTime);

        return Result.ok(result);
    }
重启应用,看到可可发的动态了

再换一个人关注发个动态,一样也查询到了

滚动分页也实现了