文章目录
- 学习前言
- OpenAI简介
- Q/A问答接口实现流程
- 1、网络爬虫
- 2、构建嵌入索引
- 3、使用嵌入构建Q/A问答系统
- 4、基于flask框架进行接口封装
- 5、接口测试使用
学习前言
最近ChatGpt太火热了,赶紧来了解一波相关情况…
目前来说ChatGpt只有2021年之前的知识,如果想让它回答比较新的知识或者自己领域内的知识还是不太行的,通过了解发现OpenAI提供了相关的API让我们能够快速实现,真不戳,来吧!!!
对了,还没用过的童鞋赶紧去注册一下 https://chat.openai.com/ ,体验一下Chatgpt的强大的语义理解和回复能力!!!

OpenAI简介
GPT是“Generative Pre-trained Transformer”的缩写,是一种基于Transformer模型的预训练语言模型,由OpenAI公司开发。
OpenAI是一个人工智能研究组织,成立于2015年,总部位于美国旧金山。它由一些全球顶尖的研究者、工程师和企业家共同创立。OpenAI在人工智能研究领域取得了很多重要成果,其中最具代表性的是其开发的GPT和GPT-2语言模型。当然,现在已经是GPT-3.5了。
OpenAI训练了很多擅长理解和生成文本的牛波一语言模型,并对外开放了 API 来供咱们调用这些模型,目前开放的模型api能够解决大部分语言类相关的的任务,666。
赶紧来实操一下吧,这么强大的文本语义理解能力!!!
Q/A问答接口实现流程
我们就简单利用一个网站的知识来让模型学习,并完成对我们问题的回答,并且封装成接口,便于调用…
在操作之前,主要已经注册了OpenAI的账号https://platform.openai.com/,这样才能拿到对应接口调用 Secret key,如下图这样

1、网络爬虫
爬取网站内的所有文本内容,如果担心会爬取到内容太多或者仅做测试。可以加上domain限制,这样不会链接到域外的超链接,下面代码中有些小细节可能需要做一些调整,比如说在爬取中英文的网站,内容的分隔符不同,需要调整;以及有些网站是基于JS的,那基于requests的爬取就无法动态获取JS的内容,可能就需要使用利用一些实例化浏览器的操作,其中还需要主要一些浏览器驱动匹配的问题。
本文的重点不在爬虫,所以这里就不重点的展开看,如果这部分有啥问题,可以评论私信我,尽力解答
import requests
import re
import urllib.request
from bs4 import BeautifulSoup
from collections import deque
from html.parser import HTMLParser
from urllib.parse import urlparse
import os

# Regex pattern to match a URL
HTTP_URL_PATTERN = r'^http[s]*://.+'

domain = "www.runoob.com" # <- put your domain to be crawled
full_url = "https://www.runoob.com/" # <- put your domain to be crawled with https or http

# Create a class to parse the HTML and get the hyperlinks
class HyperlinkParser(HTMLParser):
    def __init__(self):
        super().__init__()
        # Create a list to store the hyperlinks
        self.hyperlinks = []

    # Override the HTMLParser's handle_starttag method to get the hyperlinks
    def handle_starttag(self, tag, attrs):
        attrs = dict(attrs)

        # If the tag is an anchor tag and it has an href attribute, add the href attribute to the list of hyperlinks
        if tag == "a" and "href" in attrs:
            self.hyperlinks.append(attrs["href"])

# 将 URL 作为参数,打开 URL,并读取 HTML 内容。然后,它返回在该页面上找到的所有超链接。
# Function to get the hyperlinks from a URL
def get_hyperlinks(url):

    # Try to open the URL and read the HTML
    try:
        # Open the URL and read the HTML
        with urllib.request.urlopen(url) as response:

            # If the response is not HTML, return an empty list
            if not response.info().get('Content-Type').startswith("text/html"):
                return []

            # Decode the HTML
            html = response.read().decode('utf-8')
    except Exception as e:
        print(e)
        return []

    # Create the HTML Parser and then Parse the HTML to get hyperlinks
    parser = HyperlinkParser()
    parser.feed(html)

    return parser.hyperlinks


# 目标是仅爬取 OpenAI 域下的内容并对其编制索引
# Function to get the hyperlinks from a URL that are within the same domain
def get_domain_hyperlinks(local_domain, url):
    clean_links = []
    for link in set(get_hyperlinks(url)):
        clean_link = None

        # If the link is a URL, check if it is within the same domain
        if re.search(HTTP_URL_PATTERN, link):
            # Parse the URL and check if the domain is the same
            url_obj = urlparse(link)
            if url_obj.netloc == local_domain:
                clean_link = link

        # If the link is not a URL, check if it is a relative link
        else:
            if link.startswith("/"):
                link = link[1:]
            elif link.startswith("#") or link.startswith("mailto:"):
                continue
            clean_link = "https://" + local_domain + "/" + link

        if clean_link is not None:
            if clean_link.endswith("/"):
                clean_link = clean_link[:-1]
            clean_links.append(clean_link)

    # Return the list of hyperlinks that are within the same domain
    return list(set(clean_links))

# 网络抓取任务设置的最后一步。它跟踪访问过的 URL 以避免重复相同的页面,这些页面可能链接到站点上的多个页面。它还从没有 HTML 标记的页面中提取原始文本,并将文本内容写入特定于该页面的本地 .txt 文件
def crawl(url):
    # Parse the URL and get the domain
    local_domain = urlparse(url).netloc

    # Create a queue to store the URLs to crawl
    queue = deque([url])

    # Create a set to store the URLs that have already been seen (no duplicates)
    seen = set([url])

    # Create a directory to store the text files
    if not os.path.exists("text/"):
            os.mkdir("text/")

    if not os.path.exists("text/"+local_domain+"/"):
            os.mkdir("text/" + local_domain + "/")

    # Create a directory to store the csv files
    if not os.path.exists("processed"):
            os.mkdir("processed")

    # While the queue is not empty, continue crawling
    while queue:

        # Get the next URL from the queue
        url = queue.pop()
        print(url) # for debugging and to see the progress

        # Save text from the url to a <url>.txt file
        with open('text/'+local_domain+'/'+url[8:].replace("/", "_") + ".txt", "w", encoding="UTF-8") as f:

            # Get the text from the URL using BeautifulSoup
            soup = BeautifulSoup(requests.get(url).text, "html.parser")

            # Get the text but remove the tags
            text = soup.get_text()

            # If the crawler gets to a page that requires JavaScript, it will stop the crawl
            if ("You need to enable JavaScript to run this app." in text):
                print("Unable to parse page " + url + " due to JavaScript being required")

            # Otherwise, write the text to the file in the text directory
            f.write(text)

        # Get the hyperlinks from the URL and add them to the queue
        for link in get_domain_hyperlinks(local_domain, url):
            if link not in seen:
                queue.append(link)
                seen.add(link)

crawl(full_url)
最后爬取的效果就是生成整个文本文件,所以如果你已经有了自己的文本数据,甚至是可以不用爬虫这部分,直接手动去整理自己的数据都可以
2、构建嵌入索引
构建嵌入索引总体就是将上述爬取到的文本文件进行向量化嵌入。通常来说,一般选用csv文件进行转换嵌入,所以我们来把文本转成Pandas.Dataframe类型吧,这样更好的进行csv文件写入。
首先将文本数据按域为索引转成dataframe,其中要注意的是额外的间距和一些新的行会使文本混乱并使嵌入过程复杂化。因此要使用一些代码有助于删除其中一些字符,
import pandas as pd

def remove_newlines(serie):
    serie = serie.str.replace('\n', ' ')
    serie = serie.str.replace('\\n', ' ')
    serie = serie.str.replace('  ', ' ')
    serie = serie.str.replace('  ', ' ')
    return serie

# Create a list to store the text files
texts=[]

# Get all the text files in the text directory
for file in os.listdir("text/" + domain + "/"):

    # Open the file and read the text
    with open("text/" + domain + "/" + file, "r", encoding="UTF-8") as f:
        text = f.read()

        # Omit the first 11 lines and the last 4 lines, then replace -, _, and #update with spaces.
        texts.append((file[11:-4].replace('-',' ').replace('_', ' ').replace('#update',''), text))

# Create a dataframe from the list of texts
df = pd.DataFrame(texts, columns = ['fname', 'text'])

# Set the text column to be the raw text with the newlines removed
df['text'] = df.fname + ". " + remove_newlines(df.text)
df.to_csv('processed/scraped.csv')
df.head()
接着,将原始文本保存到 dataframe后的下一步是分词。此过程通过分解句子将输入文本拆分为词,这是自然语言处理常用的步骤,主要是因为在词向量转换时会对输入的句子分词数量上有要求,因此要进行分词得到分词的数量,对于一些较长分词数量的句子进行截断或者换行处理。
import tiktoken
# Load the cl100k_base tokenizer which is designed to work with the ada-002 model
tokenizer = tiktoken.get_encoding("cl100k_base")
df = pd.read_csv('processed/scraped.csv', index_col=0)
df.columns = ['title', 'text']
# Tokenize the text and save the number of tokens to a new column
df['n_tokens'] = df.text.apply(lambda x: len(tokenizer.encode(x)))
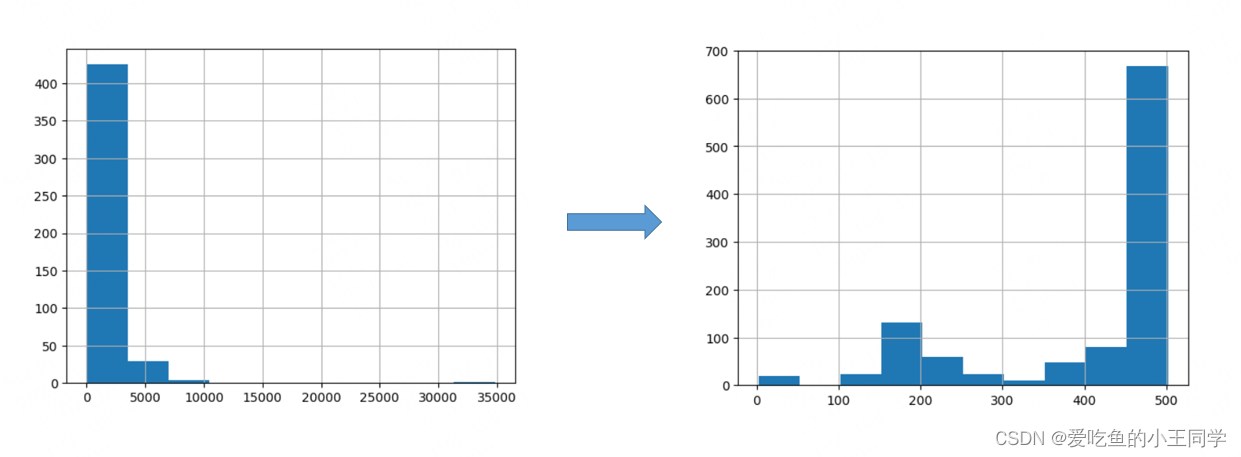
# Visualize the distribution of the number of tokens per row using a histogram
df.n_tokens.hist()
max_tokens = 500
# Function to split the text into chunks of a maximum number of tokens
def split_into_many(text, max_tokens = max_tokens):
# Split the text into sentences
sentences = text.split('. ')
# Get the number of tokens for each sentence
n_tokens = [len(tokenizer.encode(" " + sentence)) for sentence in sentences]
chunks = []
tokens_so_far = 0
chunk = []
# Loop through the sentences and tokens joined together in a tuple
for sentence, token in zip(sentences, n_tokens):
# If the number of tokens so far plus the number of tokens in the current sentence is greater
# than the max number of tokens, then add the chunk to the list of chunks and reset
# the chunk and tokens so far
if tokens_so_far + token > max_tokens:
chunks.append(". ".join(chunk) + ".")
chunk = []
tokens_so_far = 0
# If the number of tokens in the current sentence is greater than the max number of
# tokens, go to the next sentence
if token > max_tokens:
continue
# Otherwise, add the sentence to the chunk and add the number of tokens to the total
chunk.append(sentence)
tokens_so_far += token + 1
return chunks
shortened = []
# Loop through the dataframe
for row in df.iterrows():
# If the text is None, go to the next row
if row[1]['text'] is None:
continue
# If the number of tokens is greater than the max number of tokens, split the text into chunks
if row[1]['n_tokens'] > max_tokens:
shortened += split_into_many(row[1]['text'])
# Otherwise, add the text to the list of shortened texts
else:
shortened.append( row[1]['text'] )
这样的话,具有长分词数量的句子就会被降低,以便更好的进行向量化。
 内容现在被分解的更小,可以向 OpenAI API 发送一个简单的请求,指定使用新的 text-embedding-ada-002 模型来向量化:
import openai

df['embeddings'] = df.text.apply(lambda x: openai.Embedding.create(input=x, engine='text-embedding-ada-002')['data'][0]['embedding'])

df.to_csv('processed/embeddings.csv')
df.head()
如果文本数量较多,需要等待3~5分钟
3、使用嵌入构建Q/A问答系统
首先将得到的向量化数组转成Numpy格式,因为Numpy格式能够更方便,更快速的进行处理
import numpy as np
from openai.embeddings_utils import distances_from_embeddings

df=pd.read_csv('processed/embeddings.csv', index_col=0)
df['embeddings'] = df['embeddings'].apply(eval).apply(np.array)

df.head()
现在数据已准备就绪,需要将问题转换为具有简单函数的嵌入。因为向量化搜索使用余弦距离比较数字向。这些向量可能相关,如果它们的余弦距离接近,则可能是问题的答案。OpenAI python 包有一个内置distances_from_embeddings函数,可以直接调用。
def create_context(
    question, df, max_len=1800, size="ada"
):
    """
    Create a context for a question by finding the most similar context from the dataframe
    """

    # Get the embeddings for the question
    q_embeddings = openai.Embedding.create(input=question, engine='text-embedding-ada-002')['data'][0]['embedding']

    # Get the distances from the embeddings
    df['distances'] = distances_from_embeddings(q_embeddings, df['embeddings'].values, distance_metric='cosine')


    returns = []
    cur_len = 0

    # Sort by distance and add the text to the context until the context is too long
    for i, row in df.sort_values('distances', ascending=True).iterrows():

        # Add the length of the text to the current length
        cur_len += row['n_tokens'] + 4

        # If the context is too long, break
        if cur_len > max_len:
            break

        # Else add it to the text that is being returned
        returns.append(row["text"])

    # Return the context
    return "\n\n###\n\n".join(returns)
文本被分解成更小的标记集,因此按升序循环并继续添加文本是确保完整答案的关键步骤。如果返回的内容多于所需,也可以将 max_len 修改为更小的值。
上一步只检索了与问题语义相关的文本块,因此它们可能包含答案,但不能保证。通过返回前 5 个最有可能的结果,可以进一步增加找到答案的机会。
然后,回答提示将尝试从检索到的上下文中提取相关事实,以便形成连贯的答案。如果没有相关答案,提示将返回“我不知道”。
可以使用完成端点创建问题的真实答案text-davinci-003。
def answer_question(
    df,
    model="text-davinci-003",
    question="Am I allowed to publish model outputs to Twitter, without a human review?",
    max_len=1800,
    size="ada",
    debug=False,
    max_tokens=150,
    stop_sequence=None
):
    """
    Answer a question based on the most similar context from the dataframe texts
    """
    context = create_context(
        question,
        df,
        max_len=max_len,
        size=size,
    )
    # If debug, print the raw model response
    if debug:
        print("Context:\n" + context)
        print("\n\n")

    try:
        # Create a completions using the question and context
        response = openai.Completion.create(
            prompt=f"Answer the question based on the context below, and if the question can't be answered based on the context, say \"I don't know\"\n\nContext: {context}\n\n---\n\nQuestion: {question}\nAnswer:",
            temperature=0,
            max_tokens=max_tokens,
            top_p=1,
            frequency_penalty=0,
            presence_penalty=0,
            stop=stop_sequence,
            model=model,
        )
        return response["choices"][0]["text"].strip()
    except Exception as e:
        print(e)
        return ""
完成了!一个工作的 Q/A 系统已经准备就绪,该系统具有从 OpenAI 网站嵌入的知识。可以进行一些快速测试以查看输出的质量:
answer_question(df, question="What day is it?", debug=False)
> "I don't know."
4、基于flask框架进行接口封装
主要基于上述我们得到的个人领域的向量化文件,然后将question进行接收,并利用answer_question完成回答,简单进行接口的定义:
- 请求url
/get_answer
- 请求方式
post
- Content-type
Json
- 请求参数
{
	'question':'how are you?'
}
- 返回参数
{
  'decs': '成功',
  'code': 9000,
  'msg': 'fine thank you'
}
代码如下:
import pandas as pd
import numpy as np

from flask import Flask,jsonify,request

from create_context import answer_question

df = pd.read_csv('./processed/embeddings.csv', index_col=0)
df['embeddings'] = df['embeddings'].apply(eval).apply(np.array)

#创建一个服务,赋值给APP
app = Flask(__name__)
#指定接口访问的路径,支持什么请求方式get,post
@app.route('/get_answer',methods=['post'])

#json方式传参
def get_ss():
    # 获取带json串请求的username参数传入的值
    question = request.json.get('question')
    # 判断请求传入的参数是否在字典里
    try:
        msg = answer_question(df, question=question)
        code = 1000
        decs = '成功'
    except:
        code = 9000
        msg = None
        decs = 'openai服务返回异常'
    data = {
        'decs': decs,
        'code': code,
        'msg': msg
    }
    return jsonify(data)


app.run(host='0.0.0.0',port=8802,debug=True)
5、接口测试使用
测试正常


![[翻译]GPDB中的文件空间与表空间](https://img-blog.csdnimg.cn/img_convert/a91488ee421d46571d604e1e023b61d9.png)