我们在UG装配的过程中,经常会遇到需要调整组件目录位置,在软件设计过程中可以通过在目录树里面拖动组件来完成。
那么,如果要用程序实现组件的移动/拖动,我们要怎么做呢?
本节就完成了添加/拖动/删除组件方法的实现,先看效果图:
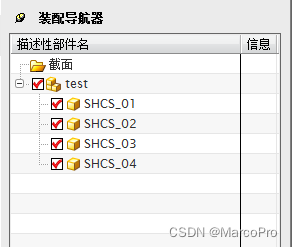
根节点test下,有SHCS_01、SHCS_02、SHCS_03、SHCS_04这四个组件。
下面分别给出了添加组件、移动组件和删除组件的方法。
一、添加组件
1、实现方法
/// <summary>
/// 添加组件
/// </summary>
/// <param name="templatePrt">模板路径</param>
/// <param name="basePoint">中心点坐标位置</param>
/// <param name="orientation">矢量方向</param>
/// <param name="expModel">表达式集</param>
public static void AddComponent(string templatePrt, Point3d basePoint, Matrix3x3 orientation, ExpressionModel expModel)
{
    theUFSession = UFSession.GetUFSession();
    theSession = Session.GetSession();
    displayPart = theSession.Parts.Display;
    workPart = theSession.Parts.Work;
    componentNameList = new List<string>();
    BasePart basePart1;
    PartLoadStatus partLoadStatus1;

step1:
    string fileName = "";
    string newfile = GetNewFile(templatePrt, out fileName); //先拷贝一个备份
    try
    {
        basePart1 = theSession.Parts.OpenBase(newfile, out partLoadStatus1);
    }
    catch (Exception)
    {
        componentNameList.Add(fileName);
        goto step1;
    }
    partLoadStatus1.Dispose();

    #region 修正表达式
    ExpressionCollection expressionCollection = basePart1.Expressions;
    EventHelper.UpdateExpression(expressionCollection, expModel);
    #endregion

    #region 添加属性
    basePart1.SetAttribute("模具编号", "", Update.Option.Now);
    basePart1.SetAttribute("材料标准", "", Update.Option.Now);
    basePart1.SetAttribute("塑胶材料", "", Update.Option.Now);
    basePart1.SetAttribute("缩水率", "", Update.Option.Now);
    basePart1.SetAttribute("穴数", "", Update.Option.Now);
    basePart1.SetAttribute("客户", "", Update.Option.Now);
    basePart1.SetAttribute("项目编号", "", Update.Option.Now);
    basePart1.SetAttribute("产品名称", "", Update.Option.Now);
    basePart1.SetAttribute("产品编号", "", Update.Option.Now);
    basePart1.SetAttribute("设计", "", Update.Option.Now);
    #endregion

    PartLoadStatus partLoadStatus3;
    NXOpen.Assemblies.Component component1;
    component1 = workPart.ComponentAssembly.AddComponent(newfile, "model", fileName, basePoint, orientation, -1, out partLoadStatus3, true);
}

public static string GetNewFile(string fullFileName, out string fileName)
{
    fileName = "";
    string newFullFileName = "";
    displayPart = theSession.Parts.Display;
    FileInfo file = new FileInfo(fullFileName);

    List<Component> allComponents = new List<Component>();
    List<ComponentModel> componentList = new List<ComponentModel>();
    Component root = displayPart.ComponentAssembly.RootComponent;
    if (root != null)
    {
        GetAllComponents(displayPart.ComponentAssembly.RootComponent, allComponents, componentList);
    }
    foreach (ComponentModel model in componentList)
    {
        if (!componentNameList.Contains(model.instanceName))
        {
            componentNameList.Add(model.instanceName.ToLower());
        }
    }

    for (int i = 1; i < 100; i++)
    {
        newFullFileName = AppDomain.CurrentDomain.BaseDirectory.ToString() + "temp\\" + GetCompantName(fullFileName) + "_0" + i.ToString() + ".prt";
        fileName = GetCompantName(fullFileName) + "_0" + i.ToString();
        FileInfo fi = new FileInfo(newFullFileName);
        if (!fi.Exists)
        {
            file.CopyTo(newFullFileName);
        }
        if (componentNameList.Contains(fileName.ToLower()))
        {
            continue;
        }
        else
        {
            break;
        }
    }
    return newFullFileName;
}

/// <summary>
/// 修正表达式,自动完全匹配
/// </summary>
/// <param name="expCol"></param>
/// <param name="expModel"></param>
public static void UpdateExpression(ExpressionCollection expCol, ExpressionModel expModel)
{
    Expression[] expressions = expCol.ToArray();
    foreach (var ex in expressions)
    {
        foreach (PropertyInfo pi in expModel.GetType().GetProperties())
        {
            double value = 0.0;
            var name = pi.Name;
            string strVal = pi.GetValue(expModel, null).ToString();
            if (!string.IsNullOrEmpty(strVal))
            {
                value = double.Parse(strVal);
            }

            if (ex.Name == name)
            {
                ex.Value = value == 0.0 ? ex.Value : value;
            }
        }
    }
}
添加组件,主要使用了workPart.ComponentAssembly.AddComponent方法来实现,需要注意的是:
1、为了实现零件的重复添加,需要在添加组件的方法里做特殊处理,复制多个模板临时文件并实现文件名的递增命名
2、修正表达式是添加组件的一个重要方法,可以通过表达式的修正实现标准件的配置化
3、添加属性,是为了方便组件管理,为后期出图做铺垫
二、移动/拖动组件
1、实现方法
/// <summary>
/// 移动组件
/// </summary>
/// <param name="origName">待移动组件名</param>
/// <param name="newParentName">父组件名</param>
public static void MoveCompant(string origName, string newParentName)
{
    Session theSession = Session.GetSession();
    Part workPart = theSession.Parts.Work;
    Component origComponent = GetComponentByDisplayName(origName);
    Component newParentComponent = GetComponentByDisplayName(newParentName);
    Part part1 = (Part)theSession.Parts.FindObject(newParentComponent.DisplayName);
    NXOpen.Assemblies.Component[] origComponents1 = new NXOpen.Assemblies.Component[1];
    NXOpen.Assemblies.Component component1 = origComponent;
    origComponents1[0] = component1;
    NXOpen.Assemblies.Component component2 = newParentComponent;
    NXOpen.Assemblies.Component[] newComponents1;
    ErrorList errorList1;
    part1.ComponentAssembly.RestructureComponents(origComponents1, component2, true, out newComponents1, out errorList1);
    errorList1.Dispose();
}

public static Component GetComponentByDisplayName(string displayName)
{
    List<Component> compList = new List<Component>();
    List<Body> bodyList = new List<Body>();
    GetBodyListFromComponet(ref compList, ref bodyList);
    foreach (Component comp in compList)
    {
        if (comp.DisplayName == displayName)
            return comp;
    }
    return null;
}

/// <summary>
/// 通过ufun获取组件里的部件信息
/// </summary>
public static void GetBodyListFromComponet(ref List<Component> compList, ref List<Body> bodyList)
{
    theSession = Session.GetSession();
    theUFSession = UFSession.GetUFSession();
    workPart = theSession.Parts.Work;
    compList = new List<Component>();
    bodyList = new List<Body>();
    GetComponentList(workPart, compList);
    ComponentAssembly compAssembly = workPart.ComponentAssembly;
    Component rootComponent = compAssembly.RootComponent;
    foreach (Component c in compList)
    {
        SetWorkPart(c);
        workPart = theSession.Parts.Work;
        Tag objTag = Tag.Null;
        theUFSession.Obj.CycleObjsInPart(workPart.Tag, UFConstants.UF_solid_type, ref objTag);
        while (objTag != Tag.Null)
        {
            int type, subtype;
            theUFSession.Obj.AskTypeAndSubtype(objTag, out type, out subtype);
            if (type == 70 && subtype == 0)
            {
                Body b = (Body)NXOpen.Utilities.NXObjectManager.Get(objTag);
                bodyList.Add(b);
            }
            theUFSession.Obj.CycleObjsInPart(workPart.Tag, UFConstants.UF_solid_type, ref objTag);
        }
    }
    SetWorkPart(rootComponent);
}
通过NXopen的方法part1.ComponentAssembly.RestructureComponents来实现组件移动拖动:
想要移动组件,先要弄清楚移动哪个组件到哪个位置,所以移动组件的在于待移动组件和移动到的父组件的识别
由于装配是一个临时的过程,所以在组件处理的时候我们不能像处理部件那样,组件的每次操作都会引起组件tag的变化。
所以这里,我们移动组件的参数用的是:待移动组件名和父组件名。
通过封装方法GetComponentByDisplayName,我们可以识别到需要的组件。
三、删除组件
1、实现方法
/// <summary>
/// 删除组件
/// </summary>
/// <param name="displayName">待删除组件名称</param>
public static void RemoveComponent(string displayName)
{
    Session theSession = Session.GetSession();
    Component component = GetComponentByDisplayName(displayName);
    NXOpen.Session.UndoMarkId markId2 = theSession.SetUndoMark(NXOpen.Session.MarkVisibility.Visible, "Delete");;
    NXObject[] objects1 = new NXObject[1];
    objects1[0] = component;
    theSession.UpdateManager.AddToDeleteList(objects1);
    bool notifyOnDelete2 = theSession.Preferences.Modeling.NotifyOnDelete;
    int nErrs2 = theSession.UpdateManager.DoUpdate(markId2);
}
删除组件比较简单,是通过NXopen的theSession.UpdateManager对象来实现的,具体操作分一下几步:
1、theSession 的初始化:Session theSession = Session.GetSession()
2、添加删除列表:theSession.UpdateManager.AddToDeleteList(objects1)
3、提交删除:theSession.UpdateManager.DoUpdate(markId2)
