Jenkins & SonarQube
- 5.1 安装SonarQube
- 1. 下载镜像
- 2. 导出到其他服务器
- 3. 准备工作
- 4. docker-compose文件
- 5. 启动容器
- 5.2 登录SonarQube
- 1.登录
- 2. 安装中文语言插件
- 3. 安装其他插件
- 5.3 部署扫描器sonar-scanner
- 1. 部署sonar-scanner
- 2. 新建项目
- 3. 扫描代码
- 4. 查看报告
- 5.4 Jenkins集成SonarQube
- 1. jenkins安装插件
- 2. 配置SonarQube
- 3. 配置jenkins
- 4. 修改jenkins任务
- 5. 运行任务
- 6. 查看报告
- 5.5 pipeline配置sonarqube
- 1. 创建pipeline项目
- 2. 配置jenkins
- 3. 修改任务
- 4. 运行
- 5. 查看报告
- 5.6 jenkins结语
SonarQube 代码质量测试
官方网站:http://www.sonarqube.org/SonarQube
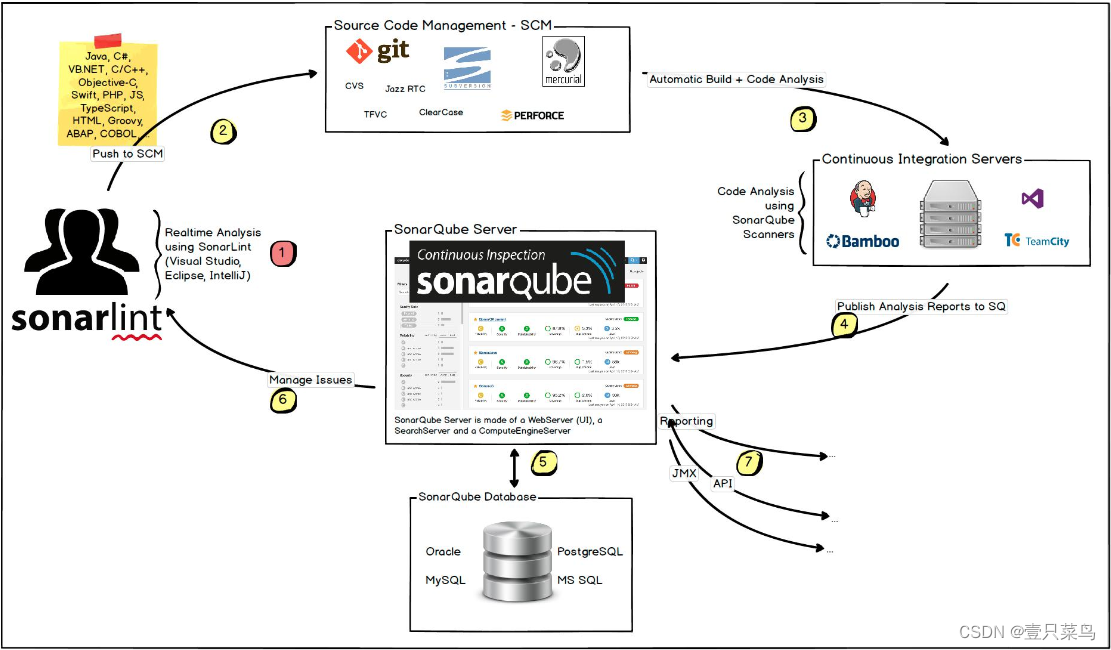
SonarQube是一个用于代码质量管理的开放平台,通过插件机制,SonarQube可以集成不同的测试工具,代码分析工具,以及持续集成工具,例如Hudson/Jenkins等。
下载地址:https://www.sonarqube.org/downloads/
七个维度检测代码质量
- 复杂度分布:代码复杂度过高将难以理解
- 重复代码:程序中包含大量复制、粘贴的代码而导致代码臃肿,sonar可以展示源码中重复严重的地方
- 单元测试统计:统计并展示单元测试覆盖率,开发或测试可以清楚测试代码的覆盖情况代码
- 规则检查:检查代码是否符合规范
- 注释率:若代码注释过少,特别是人员变动后,其他人接手比较难接手;若过多,又不利于阅读
- 潜在的Bug:检测潜在的bug
- 结构与设计:找出循环,展示包与包、类与类之间的依赖、检查程序之间耦合度
5.1 安装SonarQube
本次使用docker-compose安装
1. 下载镜像
由于SonarQube 7.9.XLTS版本不再使用MySQL,所以我们使用postgres数据库
[root@swarm-worker sonarqube]# docker pull postgres
[root@swarm-worker sonarqube]# docker pull sonarqube
[root@swarm-worker sonarqube]# docker images
REPOSITORY                               TAG       IMAGE ID       CREATED         SIZE
postgres                                 latest    ccd94e8b5fd9   27 hours ago    379MB
sonarqube                                latest    27d02b3b63c0   6 days ago      614MB
2. 导出到其他服务器
如果在本机安装,则可以省略此步骤
导出
[root@swarm-worker sonarqube]# docker save sonarqube:latest -o sonar
[root@swarm-worker sonarqube]# docker save postgres:latest -o postgres
拷贝
[root@dbc-server-554 ~]# scp root@192.168.70.183:/root/sonarqube/sonar .
root@192.168.70.183's password:
sonar                                                                                                   100%  591MB  61.9MB/s   00:09
[root@dbc-server-554 ~]# scp root@192.168.70.183:/root/sonarqube/postgres .
root@192.168.70.183's password:
postgres
导入
[root@dbc-server-554 ~]# docker load -i sonar
c5ff2d88f679: Loading layer [==================================================>]  80.33MB/80.33MB
2b1193862943: Loading layer [==================================================>]  50.63MB/50.63MB
b21a8131f99a: Loading layer [==================================================>]  140.4MB/140.4MB
8937a408fb83: Loading layer [==================================================>]   2.56kB/2.56kB
f83c5c49a366: Loading layer [==================================================>]  348.2MB/348.2MB
0b3270b4db9d: Loading layer [==================================================>]  4.096kB/4.096kB
Loaded image: sonarqube:latest
[root@dbc-server-554 ~]# docker load -i postgres
4695cdfb426a: Loading layer [==================================================>]     84MB/84MB
b6ed5f2e01f9: Loading layer [==================================================>]  10.19MB/10.19MB
7cccddc6f072: Loading layer [==================================================>]    340kB/340kB
dac682fc7088: Loading layer [==================================================>]  4.259MB/4.259MB
b33ae74a6a4d: Loading layer [==================================================>]   25.7MB/25.7MB
273c5438a1fe: Loading layer [==================================================>]  3.554MB/3.554MB
ac1e4166d7d5: Loading layer [==================================================>]  2.048kB/2.048kB
b8d11d799bc0: Loading layer [==================================================>]  8.704kB/8.704kB
b4a792488c9f: Loading layer [==================================================>]  258.5MB/258.5MB
191f89fba0f7: Loading layer [==================================================>]  67.58kB/67.58kB
f54e2e550587: Loading layer [==================================================>]  2.048kB/2.048kB
1865a5f167a1: Loading layer [==================================================>]  3.584kB/3.584kB
69457d72c597: Loading layer [==================================================>]  15.87kB/15.87kB
Loaded image: postgres:latest
[root@dbc-server-554 ~]# docker images
REPOSITORY                                          TAG              IMAGE ID       CREATED         SIZE
postgres                                            latest           ccd94e8b5fd9   27 hours ago    379MB
sonarqube                                           latest           27d02b3b63c0   6 days ago      614MB
3. 准备工作
mkdir -p /data/sonar/postgres/postgresql
mkdir -p /data/sonar/postgres/data

mkdir -p /data/sonar/sonarqube
chmod 777 -R /data/sonar/sonarqube
echo "vm.max_map_count=262144" > /etc/sysctl.conf
sysctl -p
4. docker-compose文件
[root@dbc-server-554 sonar]# cat sonar-compose.yml
version: '3'
services:
  postgres:
    image: postgres:latest
    container_name: postgres
    restart: always
    privileged: true
    networks:
      - sonar
    volumes:
      - /data/sonar/postgres/postgresql:/var/lib/postgresql
      - /data/sonar/postgres/data:/var/lib/postgresql/data
      - /etc/localtime:/etc/localtime:ro
    ports:
      - "5432:5432"
    environment:
      POSTGRES_USER: sonar
      POSTGRES_PASSWORD: sonar
      POSTGRES_DB: sonar
      TZ: Asia/Shanghai

  sonar:
    image: sonarqube:latest
    container_name: sonar
    restart: always
    privileged: true
    networks:
      - sonar
    volumes:
      - /data/sonar/sonarqube/logs:/opt/sonarqube/logs
      - /data/sonar/sonarqube/conf:/opt/sonarqube/conf
      - /data/sonar/sonarqube/data:/opt/sonarqube/data
      - /data/sonar/sonarqube/extensions:/opt/sonarqube/extensions
    ports:
      - "9090:9000"
    links:
      - "postgres:postgres"
    environment:
      ALLOW_EMPTY_PASSWORD: "yes"
      SONARQUBE_JDBC_USERNAME: sonar
      SONARQUBE_JDBC_PASSWORD: sonar
      SONARQUBE_JDBC_URL: "jdbc:postgresql://postgres:5432/sonar"

networks:
  sonar:
    driver: bridge
5. 启动容器
[root@dbc-server-554 sonar]# docker-compose -f sonar-compose.yml up -d
[+] Running 2/2
 ⠿ Container postgres  Started                                                                                               4.1s
 ⠿ Container sonar     Started                                                                                                       8.5s
[root@dbc-server-554 sonar]# docker ps
CONTAINER ID   IMAGE                      COMMAND                  CREATED          STATUS                  PORTS                                                                                    NAMES
58ca473cd0d6   sonarqube:latest           "/opt/sonarqube/dock…"   18 minutes ago   Up 12 minutes           0.0.0.0:9090->9000/tcp, :::9090->9000/tcp                                                sonar
09ced20ce5d8   postgres:latest            "docker-entrypoint.s…"   18 minutes ago   Up 12 minutes           0.0.0.0:5432->5432/tcp, :::5432->5432/tcp                                                postgres
89a093a64d8c   beginor/gitlab-ce:latest   "/assets/wrapper"        31 hours ago     Up 31 hours (healthy)   22/tcp, 0.0.0.0:8080->80/tcp, :::8080->80/tcp, 0.0.0.0:8443->443/tcp, :::8443->443/tcp   gitlab1
5.2 登录SonarQube
1.登录
访问http://服务器IP:9090
点击login登录,默认用户名密码都是admin

2. 安装中文语言插件
对于不喜欢英文界面的读者,可以选择安装中文插件
方法1:administration->Marketplace,在后面的搜索框搜索插件Chinese,然后点install安装:
方法2:插件目录/data/sonar/sonarqube/extensions/plugins/ 执行以下命令
[root@dbc-server-554 extensions]# mkdir plugins;cd plugins;
[root@dbc-server-554 plugins]# wget https://github.com/SonarQubeCommunity/sonar-l10n-zh/releases/download/sonar-l10n-zh-plugin-1.11/sonar-l10n-zh-plugin-1.11.jar
[root@dbc-server-554 plugins]# cd /root/docker/sonar
[root@dbc-server-554 sonar]# docker-compose -f sonar-compose.yml restart
[+] Running 2/2
 ⠿ Container postgres  Started                                                                                                       2.0s
 ⠿ Container sonar     Started
3. 安装其他插件
Sonarquebe对代码的扫描都基于插件实现,因此要安装要扫描的开发语言插件:
Php
Java
Python
内存不足的截图:

5.3 部署扫描器sonar-scanner
下载扫描器:https://docs.sonarqube.org/latest/analyzing-source-code/scanners/sonarscanner/
官方文档:https://docs.sonarqube.org/latest/analysis/scan/sonarscanner/
1. 部署sonar-scanner
unzip sonar-scanner-cli-4.7.0.2747-linux.zip
cd sonar-scanner-4.7.0.2747-linux/
vim conf/sonar-scanner.properties
[root@dbc-server-554 sonar-scanner-4.7.0.2747-linux]# cat conf/sonar-scanner.properties
#Configure here general information about the environment, such as SonarQube server connection details for example
#No information about specific project should appear here

#----- Default SonarQube server
sonar.host.url=http://localhost:9090

#----- Default source code encoding
sonar.sourceEncoding=UTF-8
ln -sv /root/docker/sonar/sonar-scanner-4.7.0.2747-linux /usr/local/sonar-scanner
export PATH=/usr/local/sonar-scanner/bin:$PATH
source .bashrc
[root@dbc-server-554 sonar-scanner-4.7.0.2747-linux]# sonar-scanner -h
INFO:
INFO: usage: sonar-scanner [options]
INFO:
INFO: Options:
INFO:  -D,--define <arg>     Define property
INFO:  -h,--help             Display help information
INFO:  -v,--version          Display version information
INFO:  -X,--debug            Produce execution debug output
当看到sonar-scanner的帮助信息,说明已经部署成功
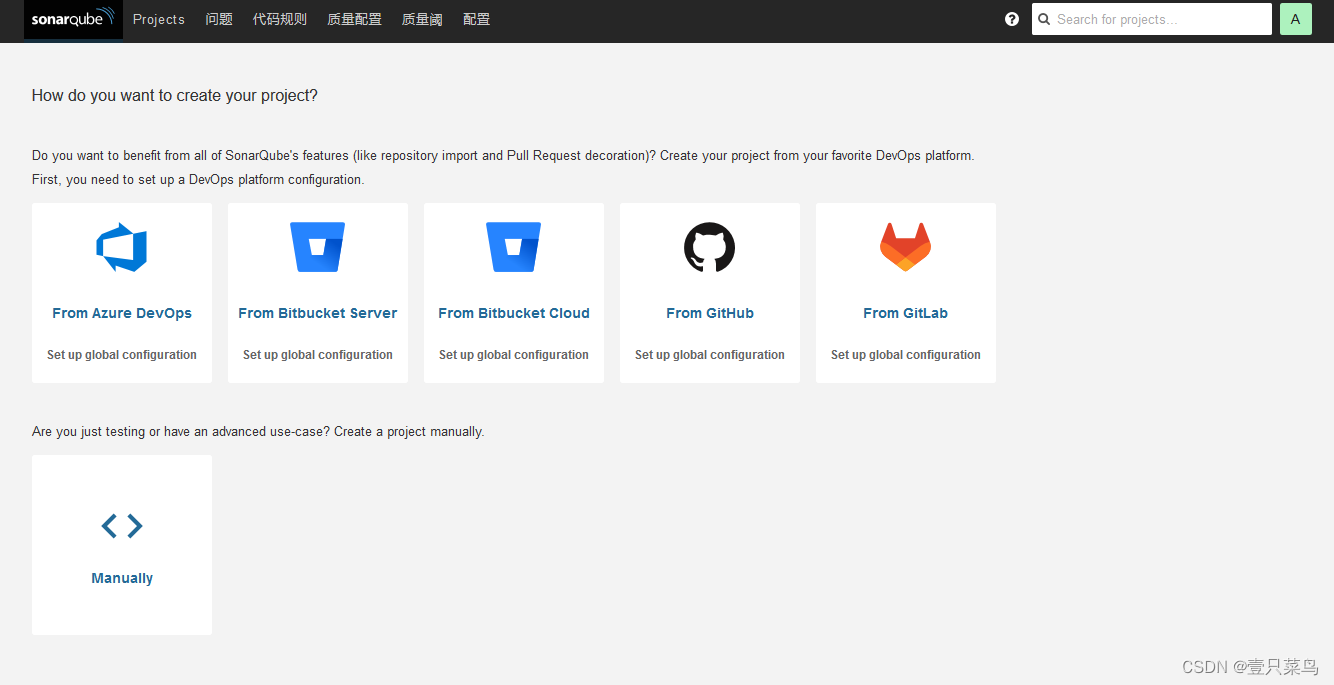
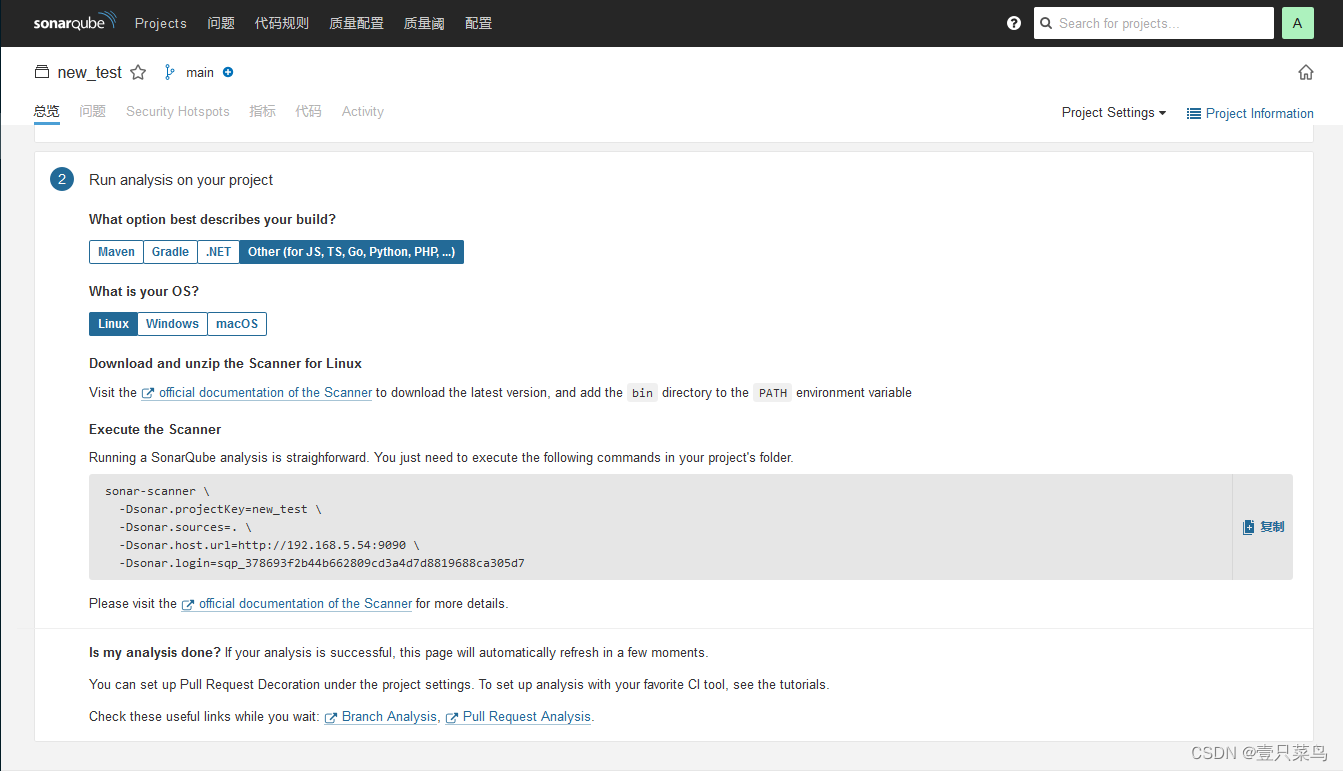
2. 新建项目
在sonarqube管理界面,Projects->create project
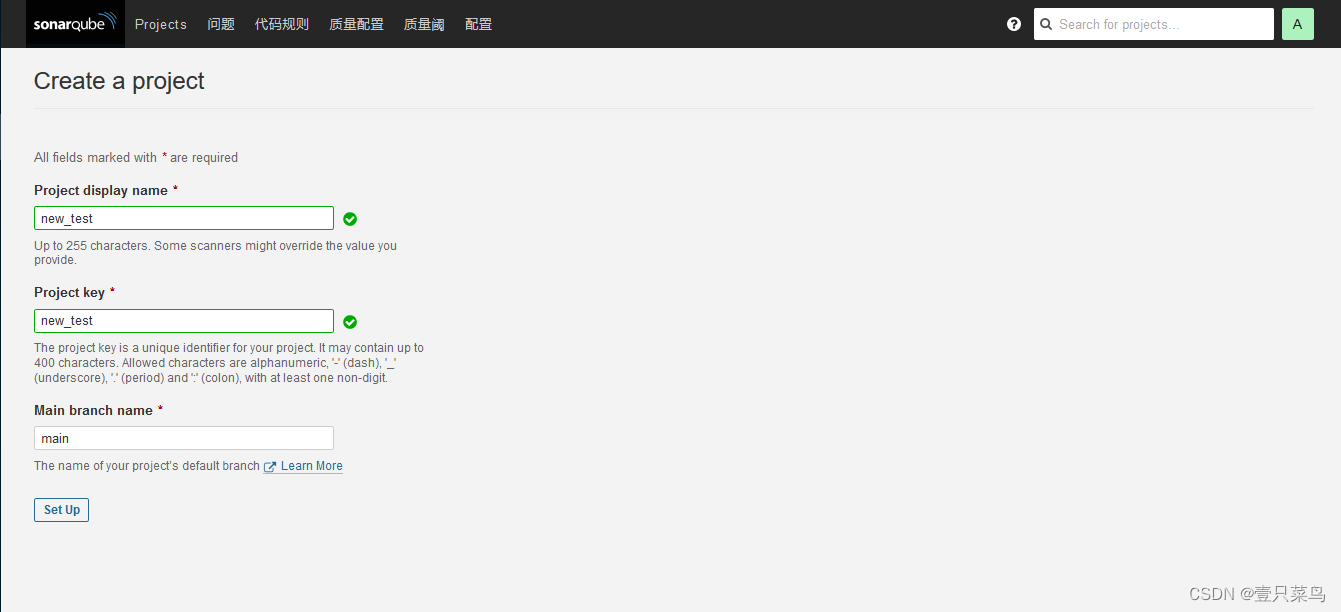
Set Up -> Locally
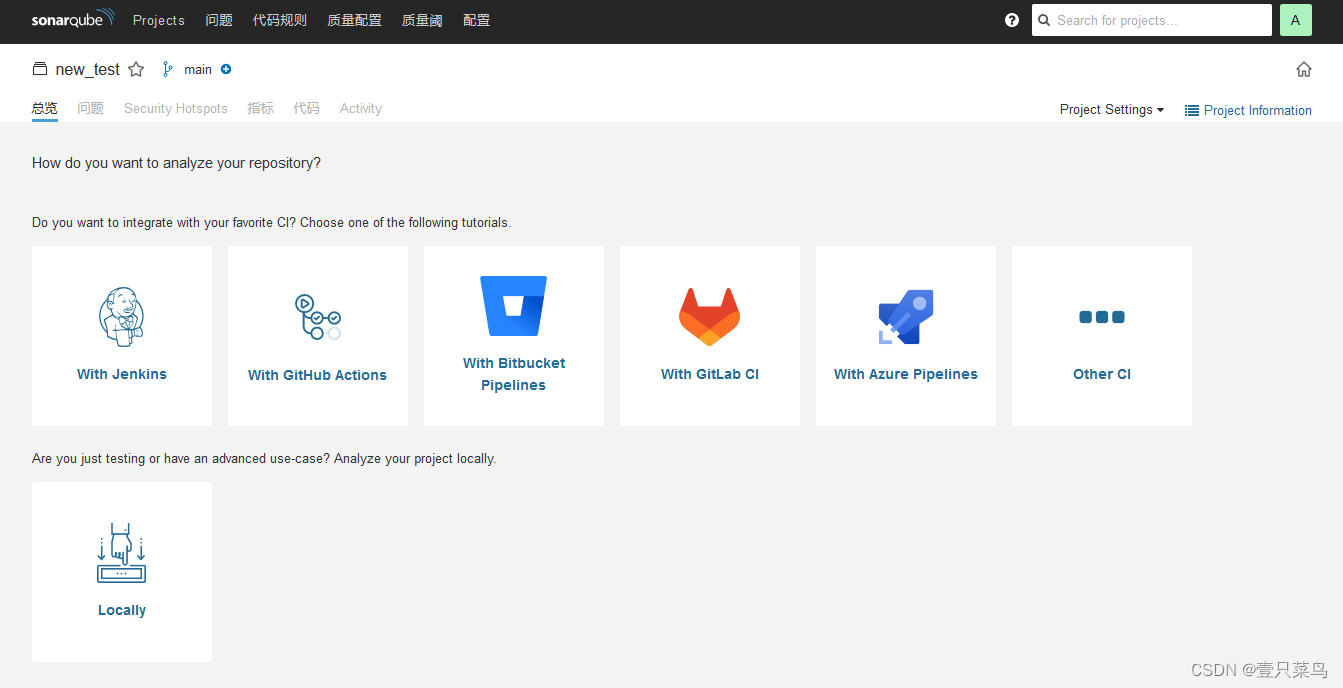
Generate

复制命令
3. 扫描代码
[root@dbc-server-554 sonar-scanner-4.7.0.2747-linux]# mkdir src;cd src;
拷贝代码到src,并非必须src,此处只是配置一个存放代码的路径
把代码文件拷到src,然后执行拷贝的指令
[root@dbc-server-554 sonar-scanner-4.7.0.2747-linux]# sonar-scanner   -Dsonar.projectKey=python_test   -Dsonar.sources=.   -Dsonar.host.url=http://192.168.5.54:9090   -Dsonar.login=sqp_88b6fe0977f60b2989560d57aec12060e9988df7
INFO: Scanner configuration file: /root/docker/sonar/sonar-scanner-4.7.0.2747-linux/conf/sonar-scanner.properties
INFO: Project root configuration file: NONE
INFO: SonarScanner 4.7.0.2747
INFO: Java 11.0.14.1 Eclipse Adoptium (64-bit)
INFO: Linux 3.10.0-1160.83.1.el7.x86_64 amd64
INFO: User cache: /root/.sonar/cache
INFO: Scanner configuration file: /root/docker/sonar/sonar-scanner-4.7.0.2747-linux/conf/sonar-scanner.properties
INFO: Project root configuration file: NONE
INFO: Analyzing on SonarQube server 9.9.0.65466
INFO: Default locale: "en_US", source code encoding: "UTF-8"
INFO: Load global settings
INFO: Load global settings (done) | time=124ms
INFO: Server id: 147B411E-AYY6RuGWR--Ley_TBS9I
INFO: User cache: /root/.sonar/cache
INFO: Load/download plugins
INFO: Load plugins index
INFO: Load plugins index (done) | time=33ms
INFO: Plugin [l10nzh] defines 'l10nen' as base plugin. This metadata can be removed from manifest of l10n plugins since version 5.2.
INFO: Load/download plugins (done) | time=704ms
INFO: Process project properties
INFO: Process project properties (done) | time=8ms
INFO: Execute project builders
INFO: Execute project builders (done) | time=2ms
INFO: Project key: python_test
INFO: Base dir: /root/docker/sonar/sonar-scanner-4.7.0.2747-linux
INFO: Working dir: /root/docker/sonar/sonar-scanner-4.7.0.2747-linux/.scannerwork
INFO: Load project settings for component key: 'python_test'
INFO: Load project settings for component key: 'python_test' (done) | time=267ms
WARN: SCM provider autodetection failed. Please use "sonar.scm.provider" to define SCM of your project, or disable the SCM Sensor in the project settings.
INFO: Load quality profiles
INFO: Load quality profiles (done) | time=377ms
INFO: Load active rules
INFO: Load active rules (done) | time=1253ms
INFO: Load analysis cache
INFO: Load analysis cache | time=37ms
INFO: Load project repositories
INFO: Load project repositories (done) | time=25ms
INFO: Indexing files...
INFO: Project configuration:
WARN: File '/root/docker/sonar/sonar-scanner-4.7.0.2747-linux/jre/lib/server/libjvm.so' is bigger than 20MB and as consequence is removed from the analysis scope.
WARN: File '/root/docker/sonar/sonar-scanner-4.7.0.2747-linux/jre/lib/modules' is bigger than 20MB and as consequence is removed from the analysis scope.
INFO: 266 files indexed
INFO: Quality profile for py: Sonar way
INFO: ------------- Run sensors on module python_test
INFO: Load metrics repository
INFO: Load metrics repository (done) | time=80ms
INFO: Sensor Python Sensor [python]
WARN: Your code is analyzed as compatible with python 2 and 3 by default. This will prevent the detection of issues specific to python 2 or python 3. You can get a more precise analysis by setting a python version in your configuration via the parameter "sonar.python.version"
INFO: Starting global symbols computation
INFO: 2 source files to be analyzed
INFO: 2/2 source files have been analyzed
INFO: Starting rules execution
INFO: 2 source files to be analyzed
INFO: 2/2 source files have been analyzed
INFO: The Python analyzer was able to leverage cached data from previous analyses for 0 out of 2 files. These files were not parsed.
INFO: Sensor Python Sensor [python] (done) | time=1788ms
INFO: Sensor Cobertura Sensor for Python coverage [python]
INFO: Sensor Cobertura Sensor for Python coverage [python] (done) | time=6ms
INFO: Sensor PythonXUnitSensor [python]
INFO: Sensor PythonXUnitSensor [python] (done) | time=4ms
INFO: Sensor JaCoCo XML Report Importer [jacoco]
INFO: 'sonar.coverage.jacoco.xmlReportPaths' is not defined. Using default locations: target/site/jacoco/jacoco.xml,target/site/jacoco-it/jacoco.xml,build/reports/jacoco/test/jacocoTestReport.xml
INFO: No report imported, no coverage information will be imported by JaCoCo XML Report Importer
INFO: Sensor JaCoCo XML Report Importer [jacoco] (done) | time=1ms
INFO: Sensor CSS Rules [javascript]
INFO: No CSS, PHP, HTML or VueJS files are found in the project. CSS analysis is skipped.
INFO: Sensor CSS Rules [javascript] (done) | time=1ms
INFO: Sensor C# Project Type Information [csharp]
INFO: Sensor C# Project Type Information [csharp] (done) | time=5ms
INFO: Sensor C# Analysis Log [csharp]
INFO: Sensor C# Analysis Log [csharp] (done) | time=315ms
INFO: Sensor C# Properties [csharp]
INFO: Sensor C# Properties [csharp] (done) | time=0ms
INFO: Sensor HTML [web]
INFO: Sensor HTML [web] (done) | time=17ms
INFO: Sensor TextAndSecretsSensor [text]
INFO: 226 source files to be analyzed
WARN: Invalid character encountered in file /root/docker/sonar/sonar-scanner-4.7.0.2747-linux/jre/lib/jspawnhelper at line 1 for encoding UTF-8. Please fix file content or configure the encoding to be used using property 'sonar.sourceEncoding'.
WARN: Invalid character encountered in file /root/docker/sonar/sonar-scanner-4.7.0.2747-linux/jre/bin/java at line 1 for encoding UTF-8. Please fix file content or configure the encoding to be used using property 'sonar.sourceEncoding'.
WARN: Invalid character encountered in file /root/docker/sonar/sonar-scanner-4.7.0.2747-linux/jre/lib/jexec at line 1 for encoding UTF-8. Please fix file content or configure the encoding to be used using property 'sonar.sourceEncoding'.
INFO: 226/226 source files have been analyzed
INFO: Sensor TextAndSecretsSensor [text] (done) | time=994ms
INFO: Sensor VB.NET Project Type Information [vbnet]
INFO: Sensor VB.NET Project Type Information [vbnet] (done) | time=19ms
INFO: Sensor VB.NET Analysis Log [vbnet]
INFO: Sensor VB.NET Analysis Log [vbnet] (done) | time=29ms
INFO: Sensor VB.NET Properties [vbnet]
INFO: Sensor VB.NET Properties [vbnet] (done) | time=0ms
INFO: Sensor IaC Docker Sensor [iac]
INFO: 0 source files to be analyzed
INFO: 0/0 source files have been analyzed
INFO: Sensor IaC Docker Sensor [iac] (done) | time=55ms
INFO: ------------- Run sensors on project
INFO: Sensor Analysis Warnings import [csharp]
INFO: Sensor Analysis Warnings import [csharp] (done) | time=1ms
INFO: Sensor Zero Coverage Sensor
INFO: Sensor Zero Coverage Sensor (done) | time=30ms
INFO: SCM Publisher No SCM system was detected. You can use the 'sonar.scm.provider' property to explicitly specify it.
INFO: CPD Executor 1 file had no CPD blocks
INFO: CPD Executor Calculating CPD for 1 file
INFO: CPD Executor CPD calculation finished (done) | time=49ms
INFO: Analysis report generated in 373ms, dir size=196.8 kB
INFO: Analysis report compressed in 151ms, zip size=57.5 kB
INFO: Analysis report uploaded in 805ms
INFO: ANALYSIS SUCCESSFUL, you can find the results at: http://192.168.5.54:9090/dashboard?id=python_test
INFO: Note that you will be able to access the updated dashboard once the server has processed the submitted analysis report
INFO: More about the report processing at http://192.168.5.54:9090/api/ce/task?id=AYY-Th4HRjtTwsXO-RLp
INFO: Analysis total time: 12.573 s
INFO: ------------------------------------------------------------------------
INFO: EXECUTION SUCCESS
INFO: ------------------------------------------------------------------------
INFO: Total time: 15.156s
INFO: Final Memory: 26M/90M
INFO: ------------------------------------------------------------------------
提示SUCCESS,则执行成功
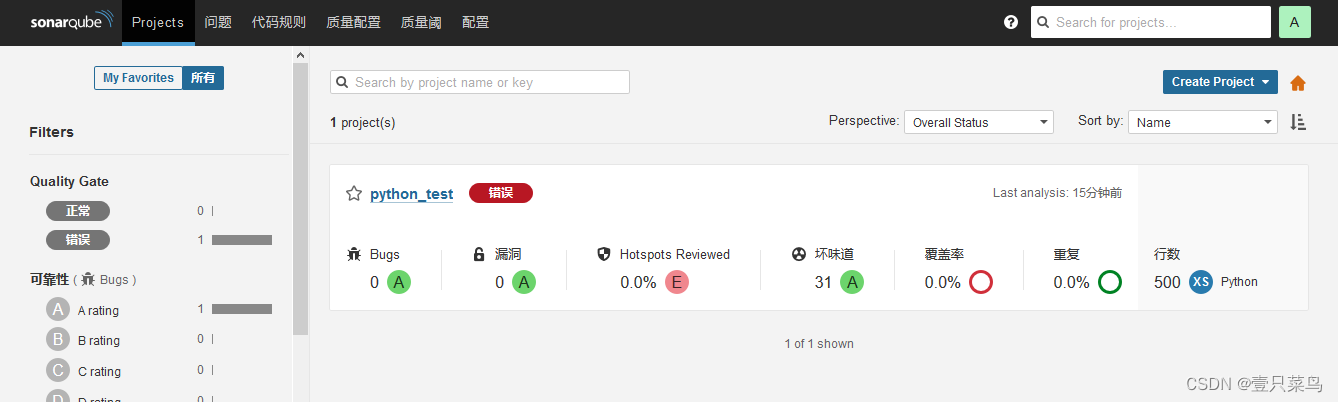
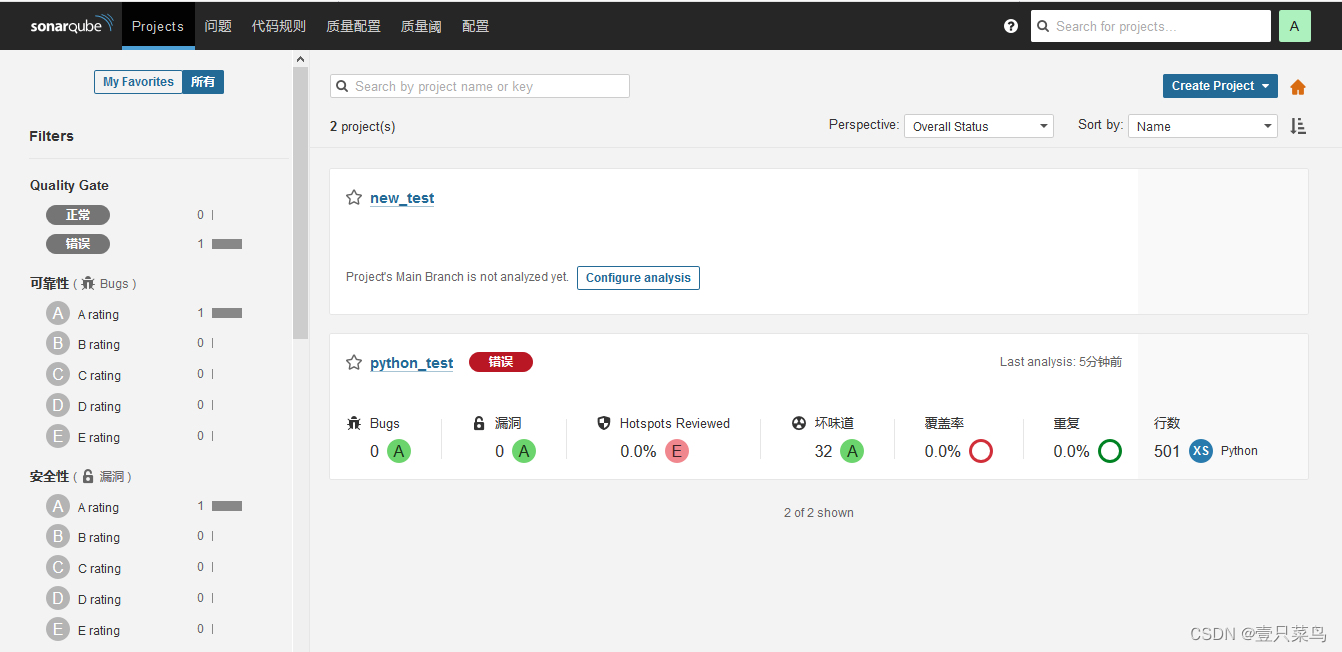
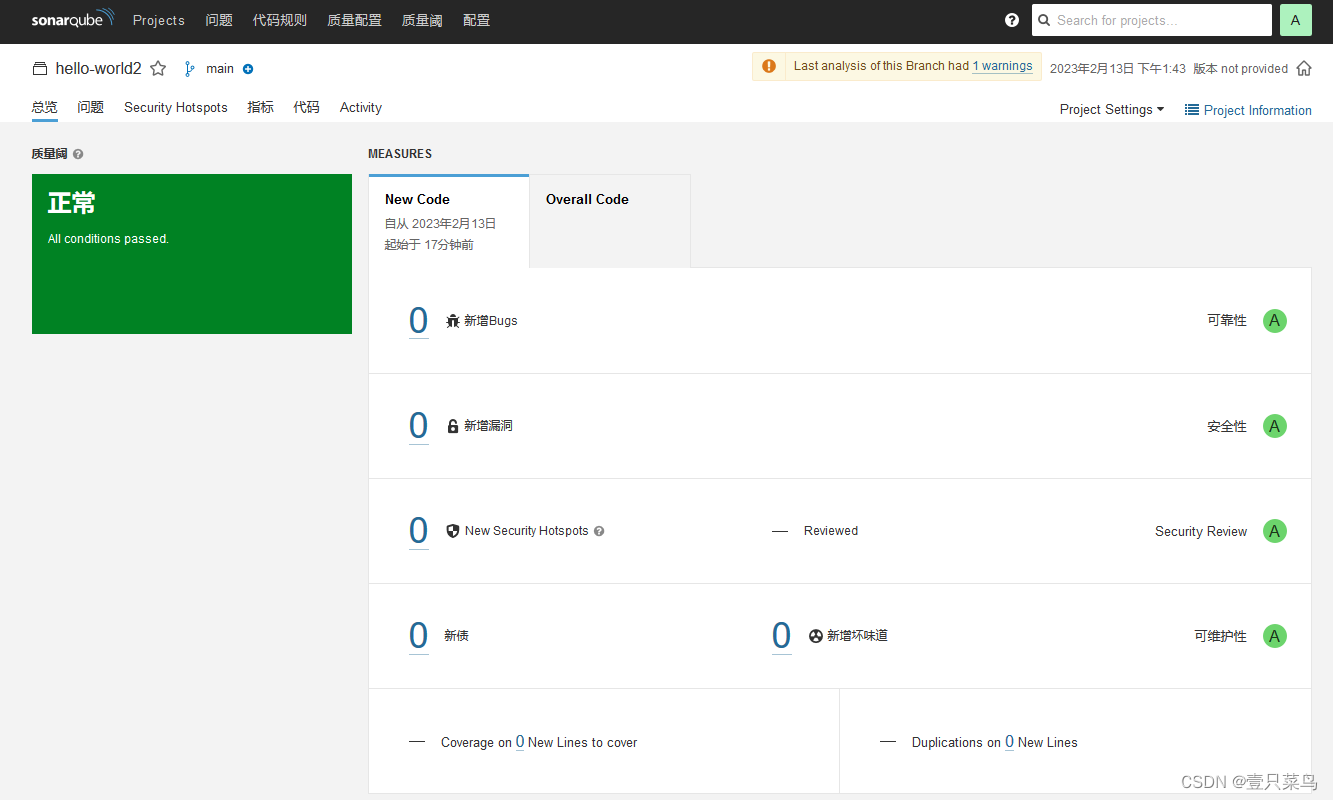
4. 查看报告
回到sonarqube的项目管理页面,查看报告
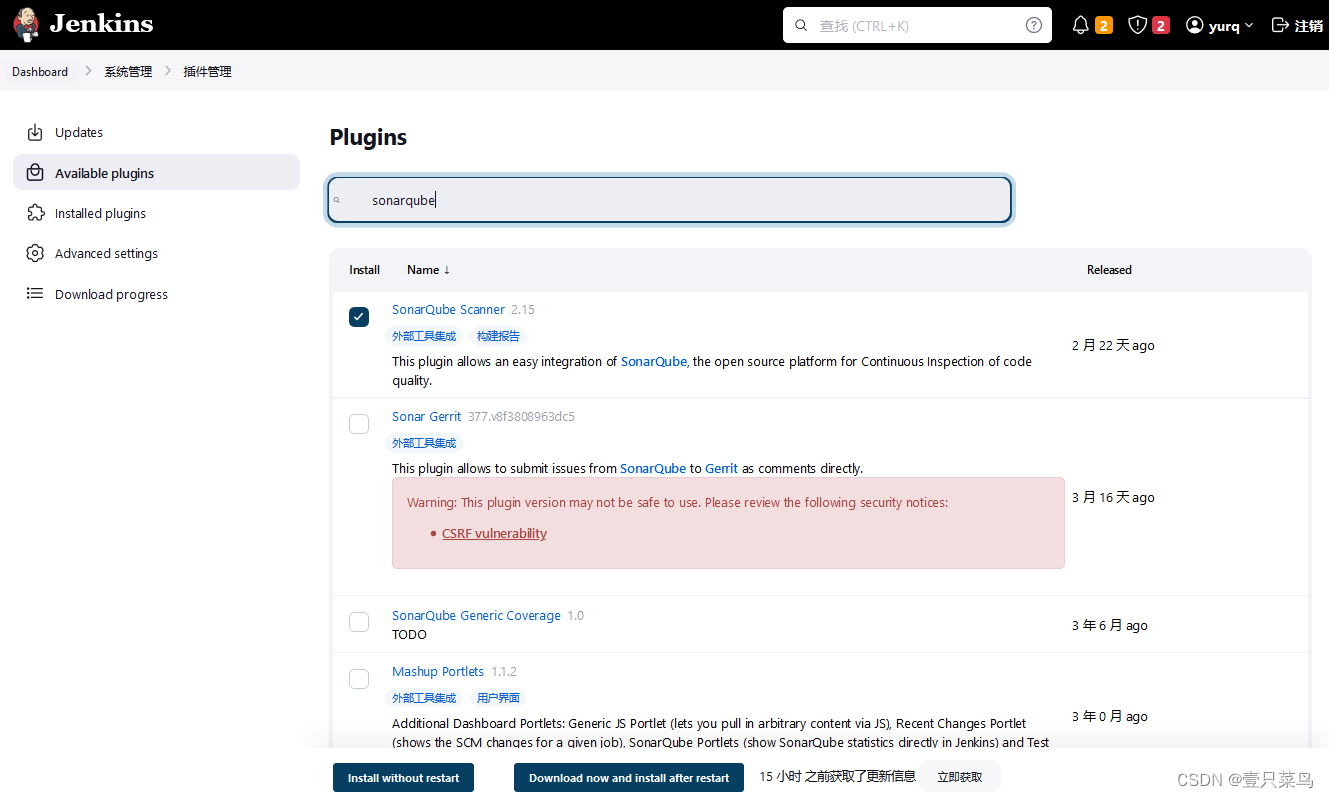
5.4 Jenkins集成SonarQube
1. jenkins安装插件
查找SonarQube Scanner并安装,安装完成后重启
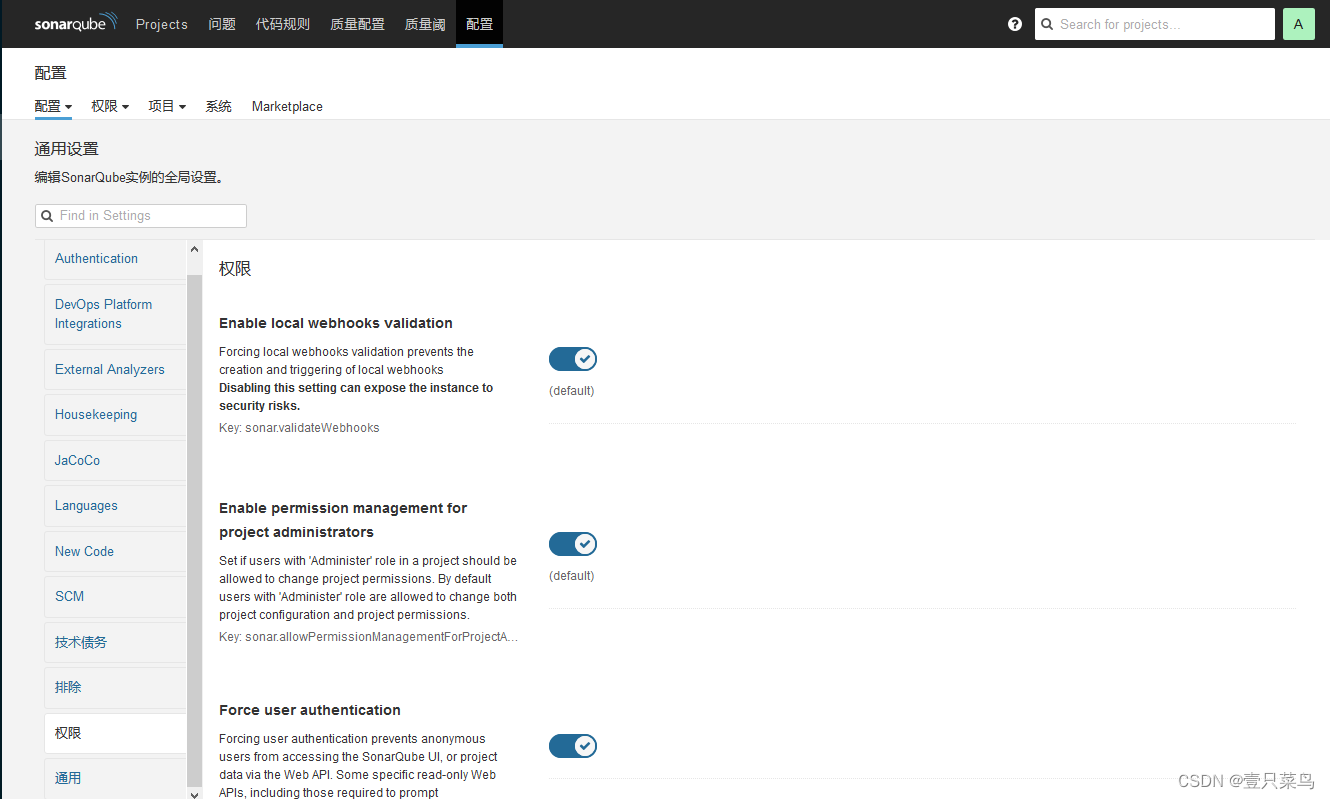
2. 配置SonarQube
开启SonarQube权限验证
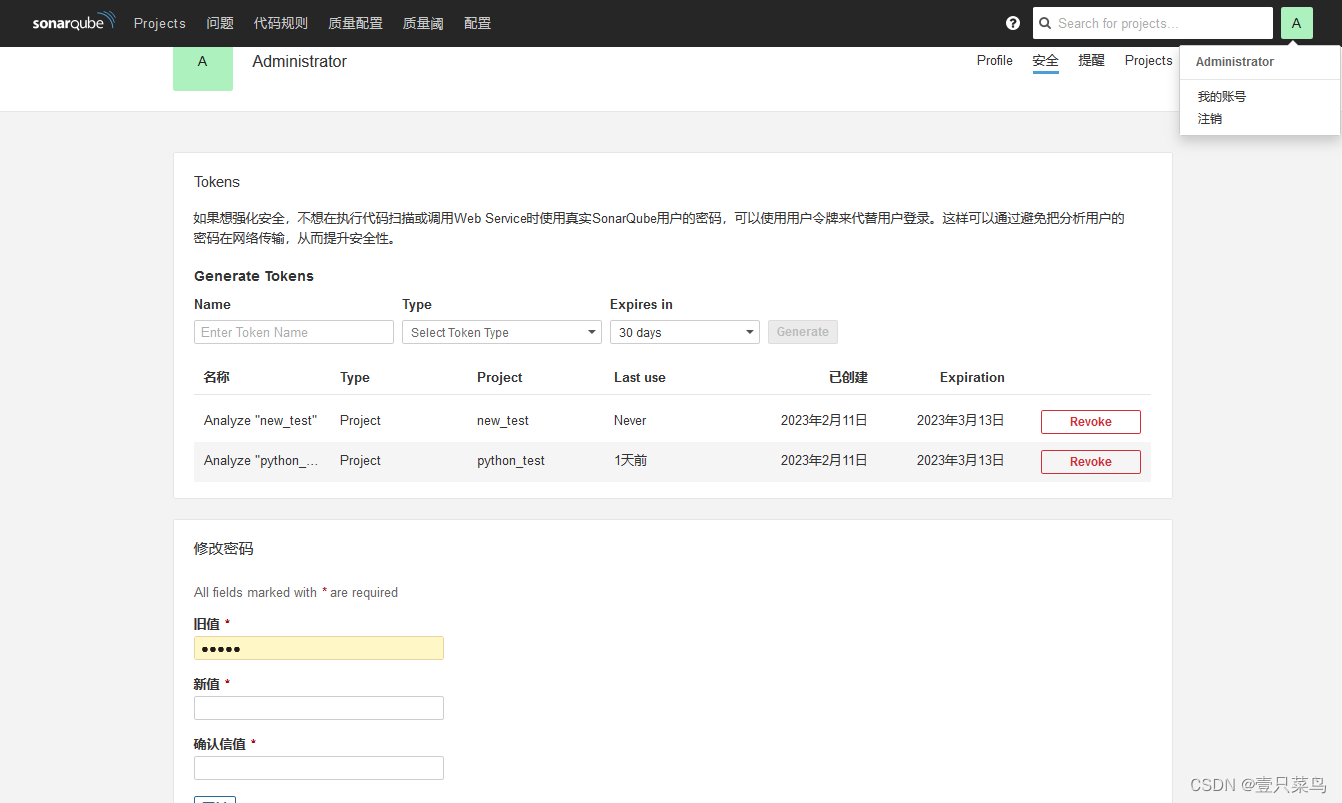
获取Sonar Qube的令牌
我的账号->安全,新建令牌或者复用创建好的令牌
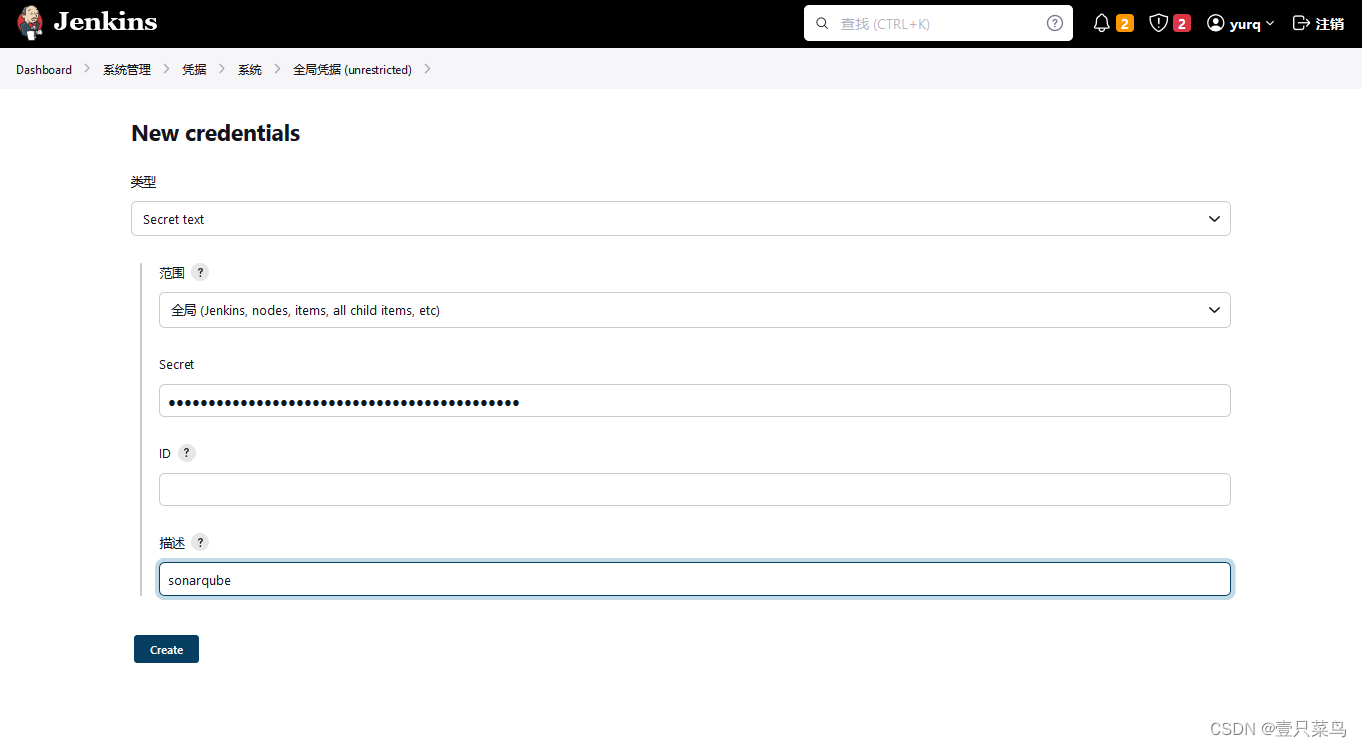
3. 配置jenkins
添加sonarqube凭据
系统管理->凭据->系统->全局凭据
把上一节的令牌,复制在secret中,create凭据
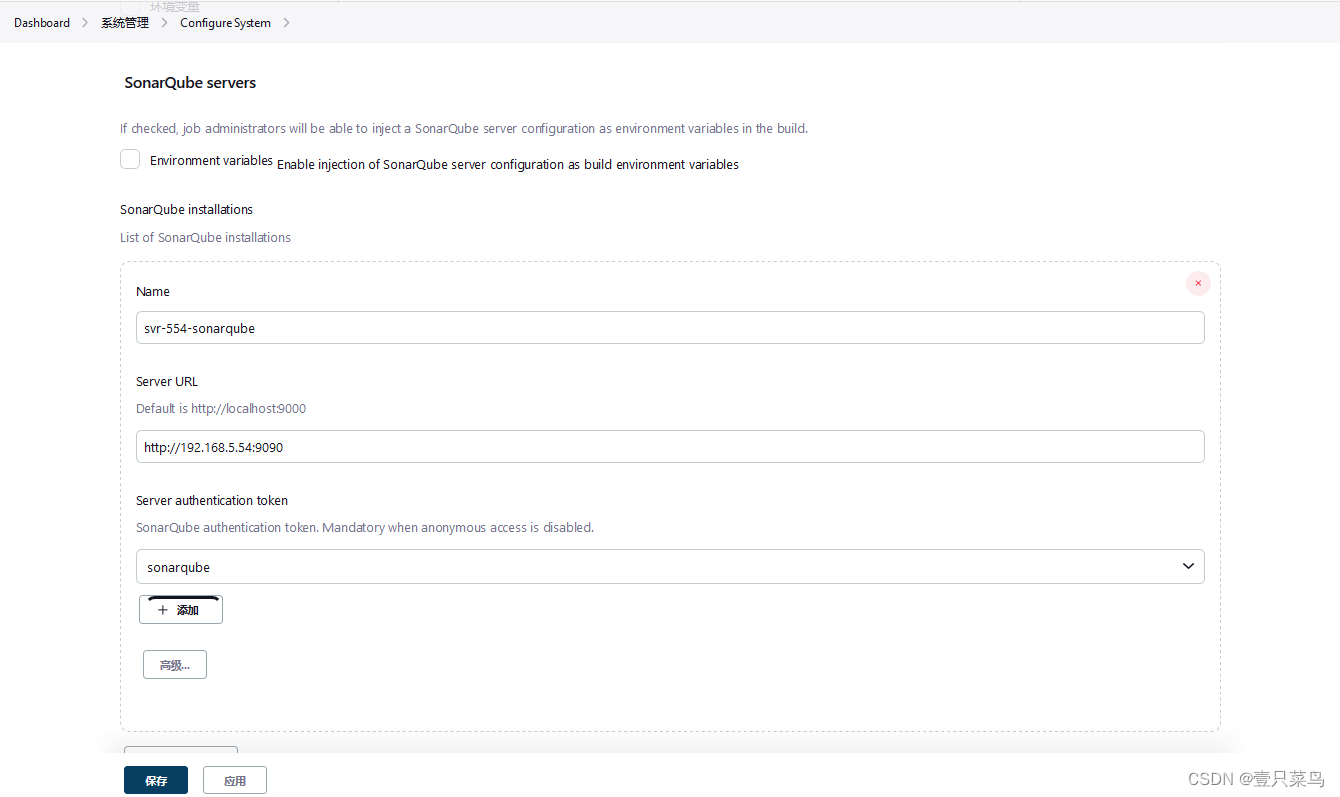
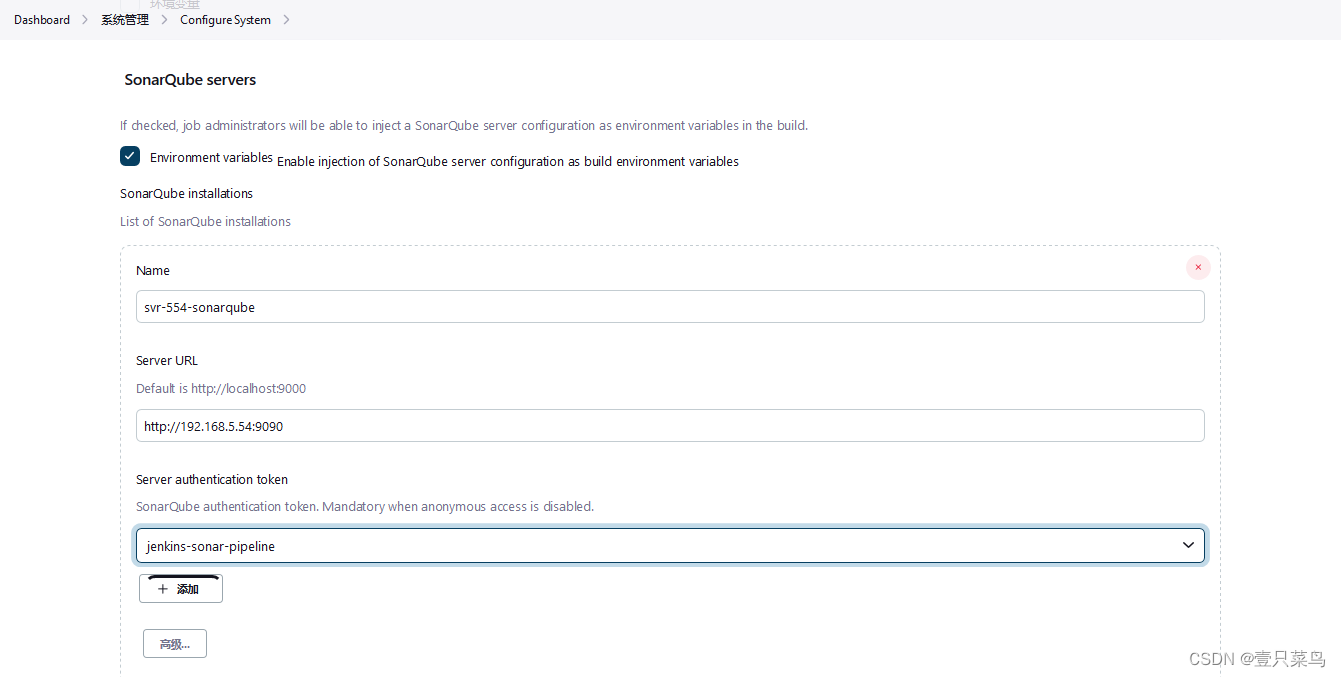
配置SonarQube servers
系统管理->系统配置->SonarQube servers
配置Name,URL及使用前面配置的凭据
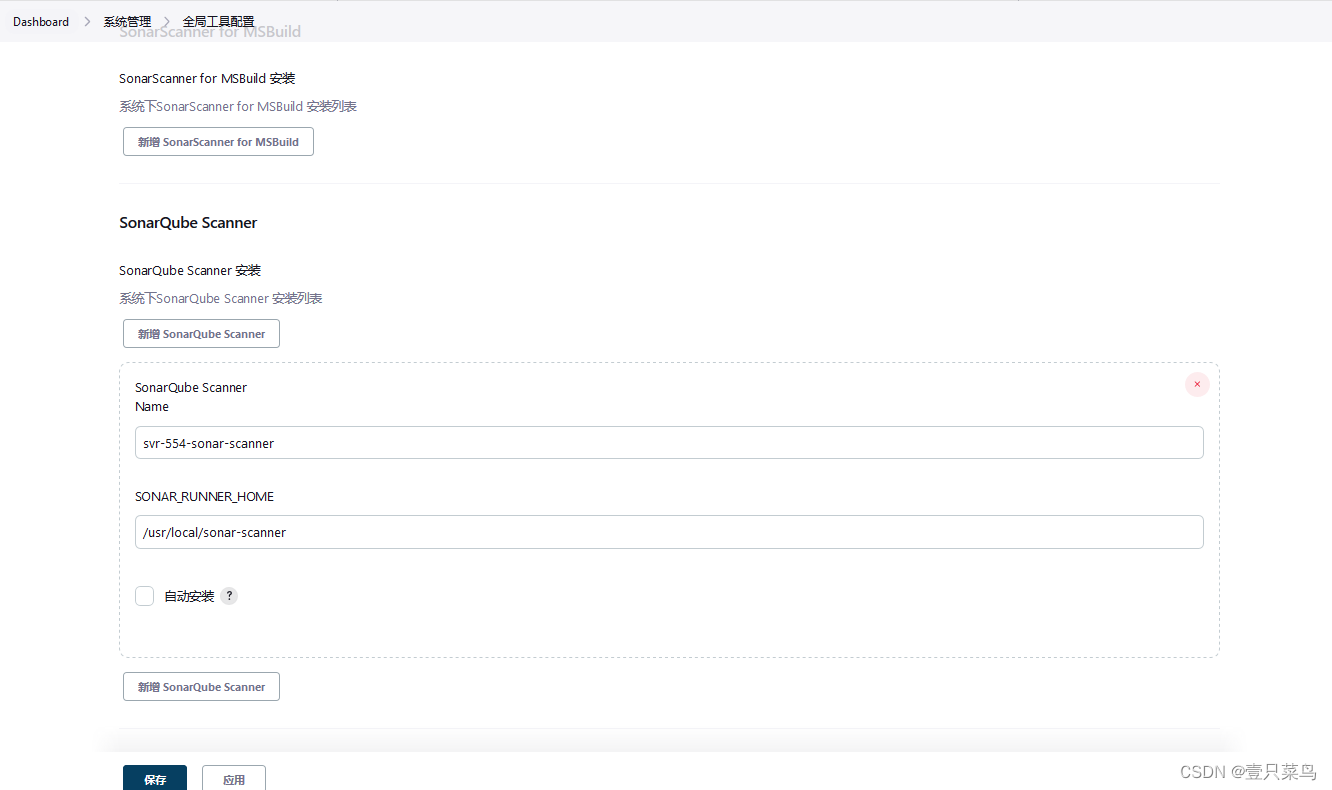
配置Sonar-scanner
4. 修改jenkins任务
在任务中新增构建步骤Excute SonarQube Scanner
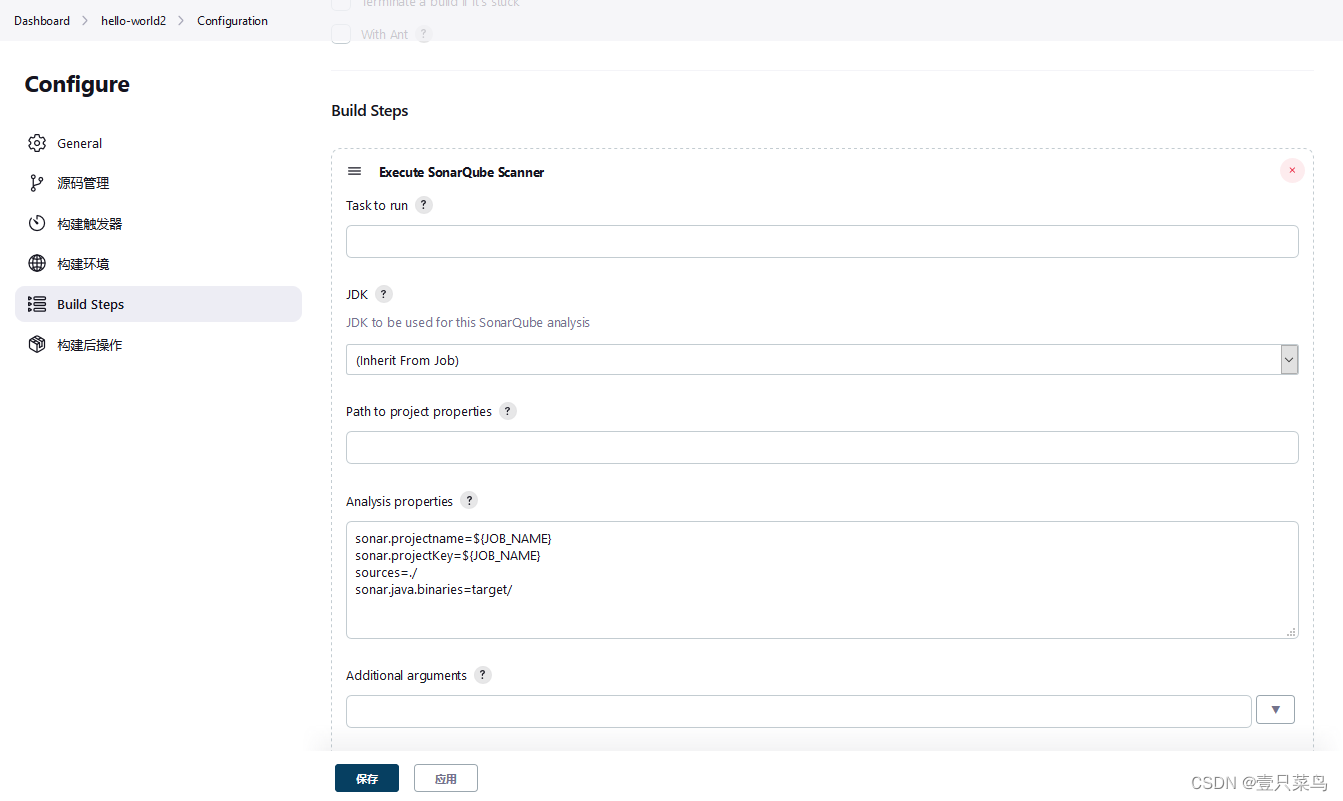
配置如下信息:
sonar.projectname=${JOB_NAME}
sonar.projectKey=${JOB_NAME}
sources=./
sonar.java.binaries=target/
此处需要注意:如果jenkins任务名称和SonarQube项目名称不一致,则需要修改
sonar.projectKey=SonarQube项目名称
否则会报错,如ERROR: You're not authorized to run analysis. Please contact the project administrator.
5. 运行任务
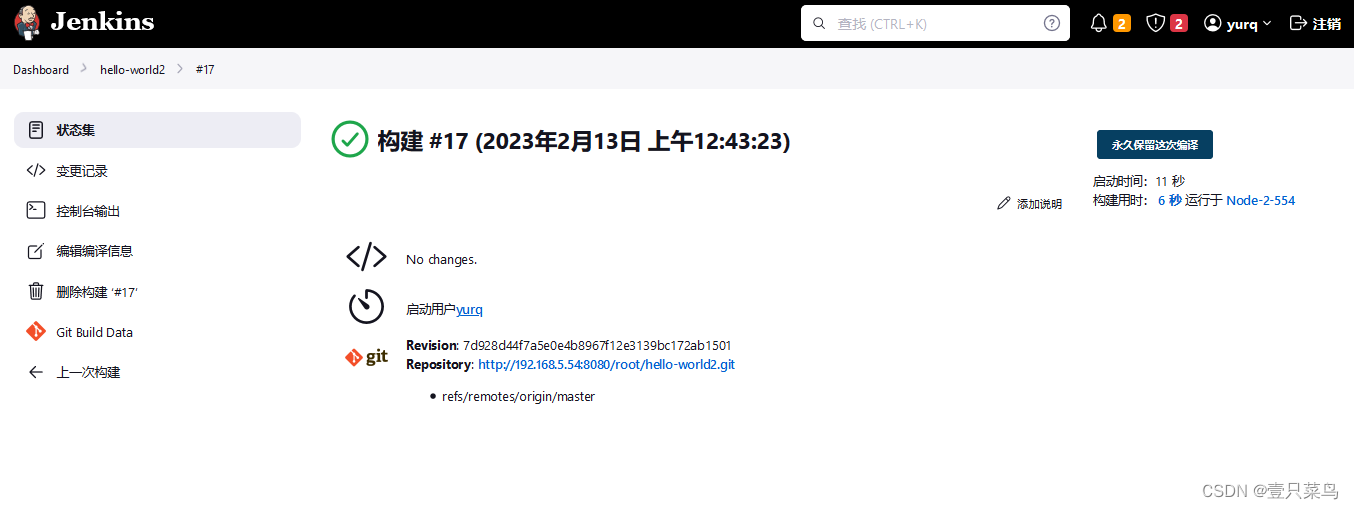
看到任务已变成带有SonarQube标识的任务了
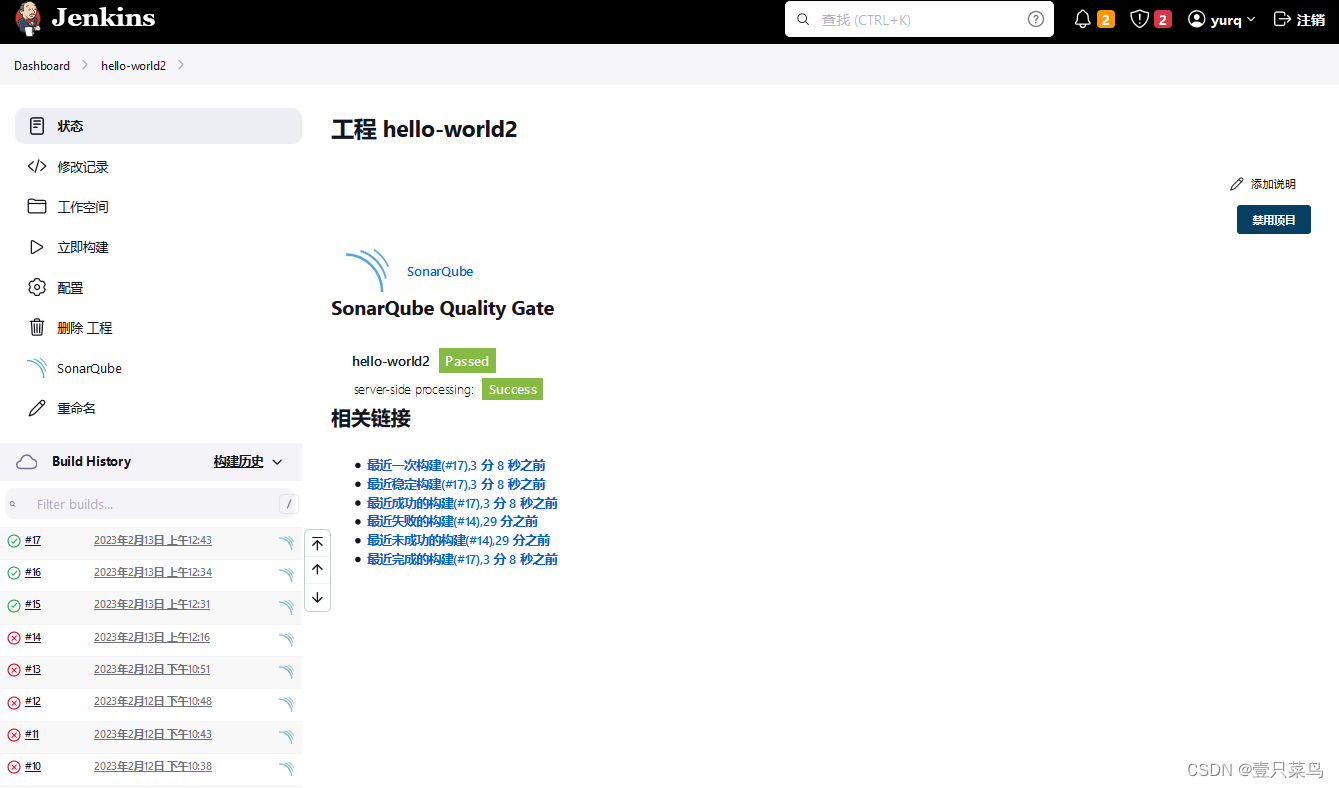
6. 查看报告
登录到sonarqube网页,查看报告
5.5 pipeline配置sonarqube
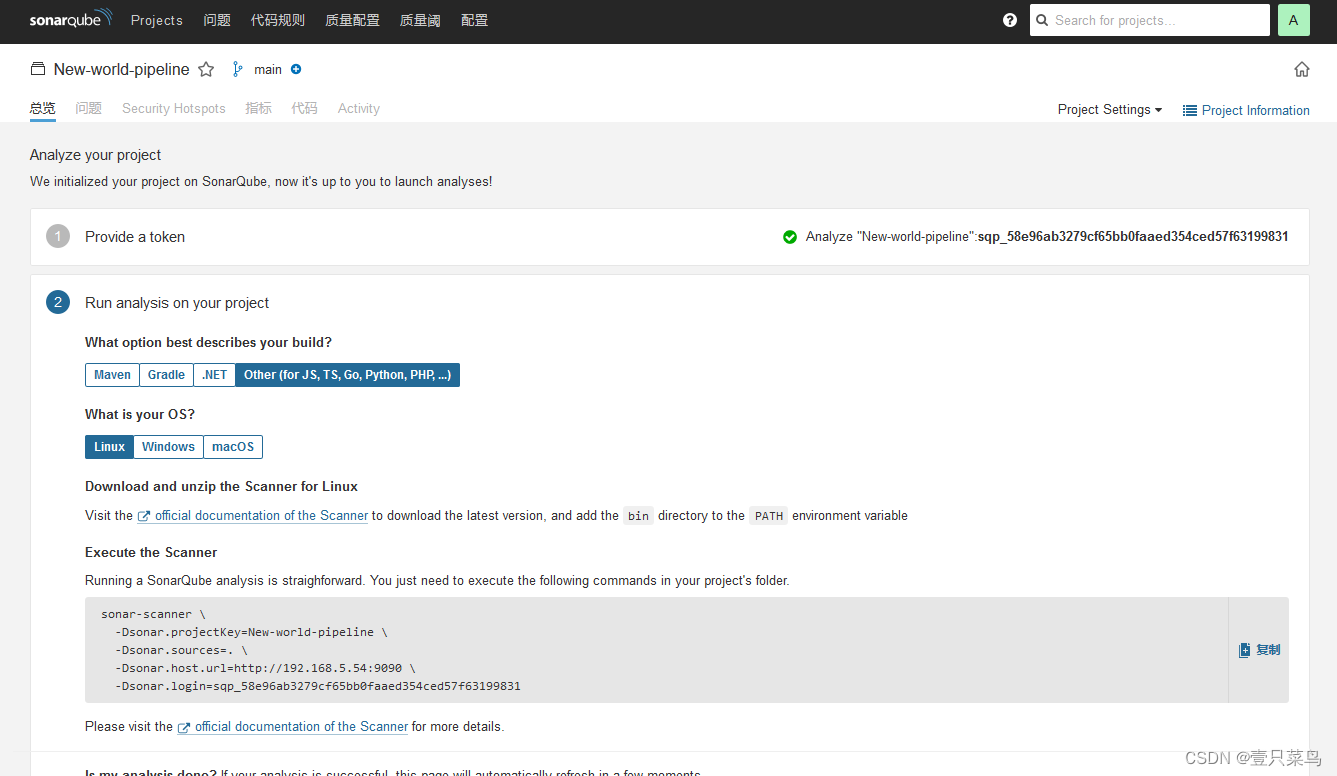
1. 创建pipeline项目
在sonarqube网页创建pipeline项目,和普通创建并没有什么不同,复制指令信息
2. 配置jenkins
创建凭据
这一点我也没太搞清楚,为什么相同的sonarqube,只因为项目不同,需要配置多次凭据去绑定项目
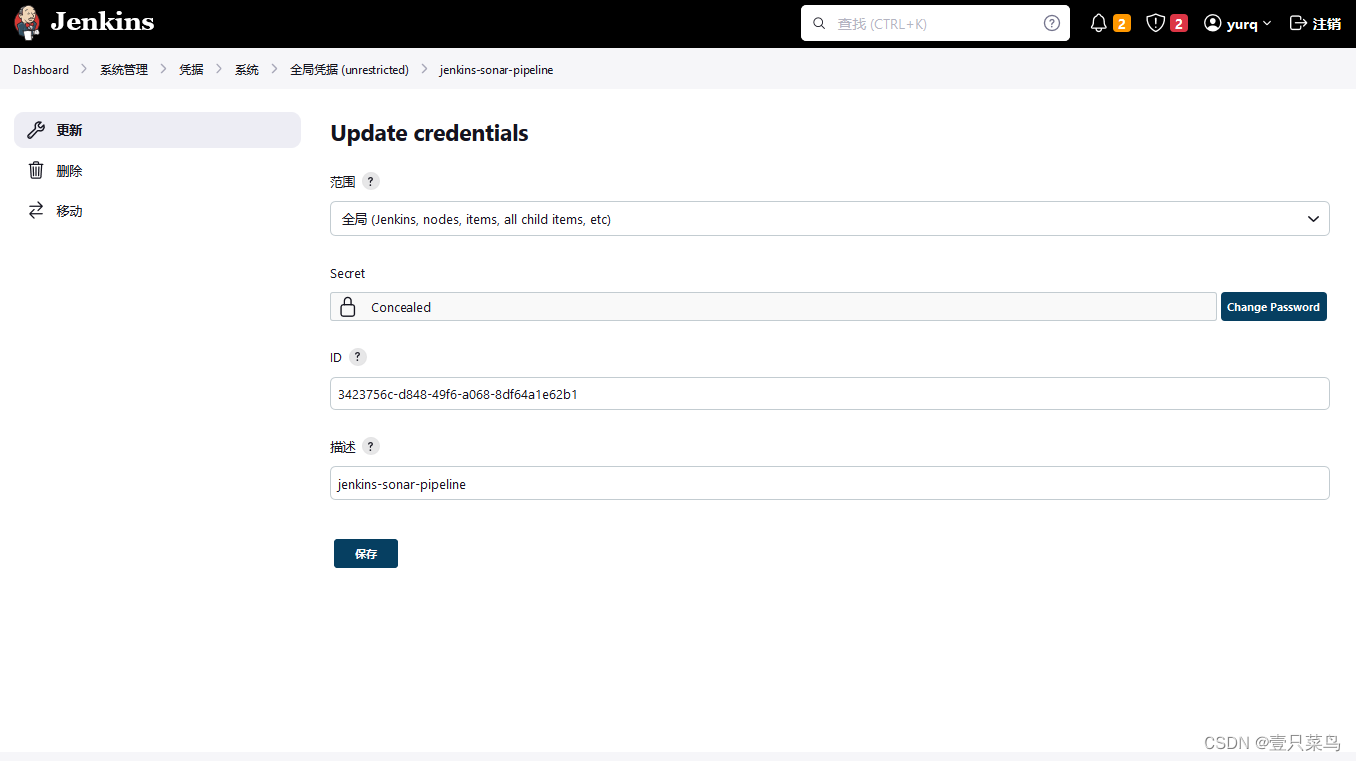
如下修改配置
3. 修改任务
通过流水线语法,生成sonarqube命令
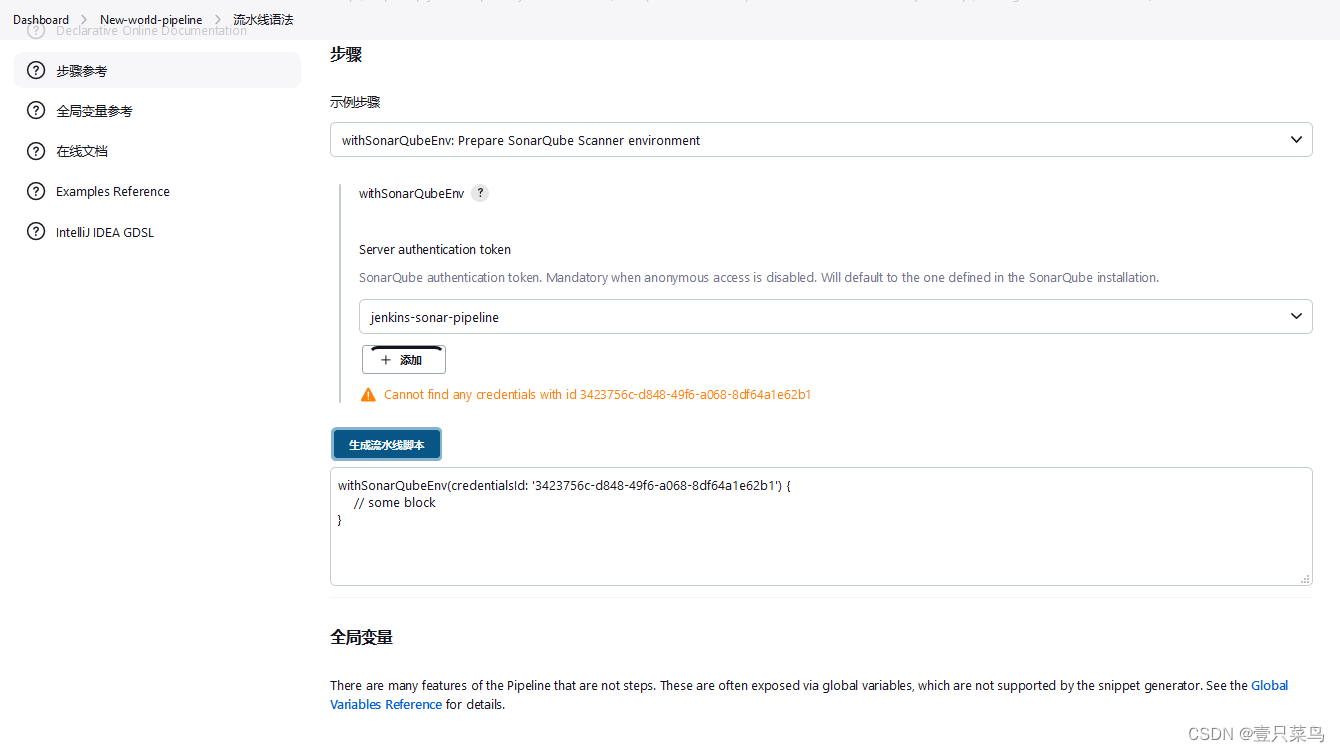
把这部分和前面复制的指令整合到一起
node('Node-2-554'){
    stage("clone代码"){
        echo "代码clone"
        git credentialsId: '46d932dc-47f6-4dcd-b9f4-0d7848ab5ef8', url: 'http://192.168.5.54:8080/root/hello-world2.git'

    }
    stage("代码构建"){
        echo "代码构建"

    }
    stage("代码测试"){
        withSonarQubeEnv(credentialsId: '3423756c-d848-49f6-a068-8df64a1e62b1') {
        sh "/usr/local/sonar-scanner/bin/sonar-scanner \
        -Dsonar.projectKey=New-world-pipeline \
        -Dsonar.sources=. \
        -Dsonar.host.url=http://192.168.5.54:9090 \
        -Dsonar.login=sqp_58e96ab3279cf65bb0faaed354ced57f63199831"
}

    }
    stage("代码部署"){
        echo "代码部署"

    }
}
sh "/usr/local/sonar-scanner/bin/sonar-scanner \ 我这里写的绝对路径,也可以提前定义好环境变量,调度使用,例如
stage('代码质量分析'){
            steps {
                dir("code"){
                    script {
                        def scannerHome = tool name: 'sonarscanner'
                    }
                    withSonarQubeEnv(installationName: 'Sonar',credentialsId: 'sonar'){
                        sh "${scannerHome}/bin/sonar-scanner " +
                           "-Dsonar.branch.name=uat " +
                           "-Dsonar.projectKey=test_java " +
                           "-Dsonar.projectName=test_java " +
                           "-Dsonar.sourceEncoding=UTF-8 " +
                           "-Dsonar.language=java " +
                           "-Dsonar.projectVersion=1.0 " +
                           "-Dsonar.sources=. " +
                           "-Dsonar.java.binaries=."
                    }
                }
            }
        }
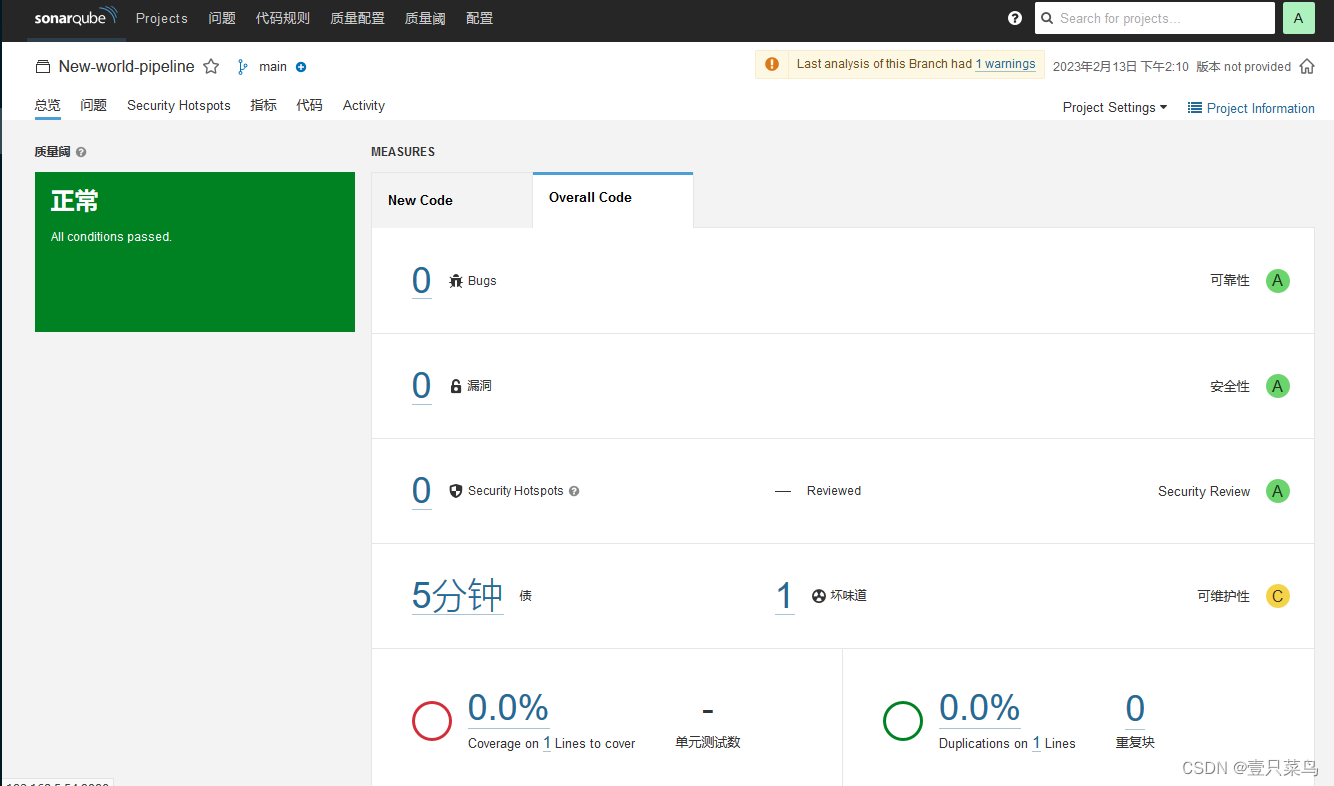
4. 运行
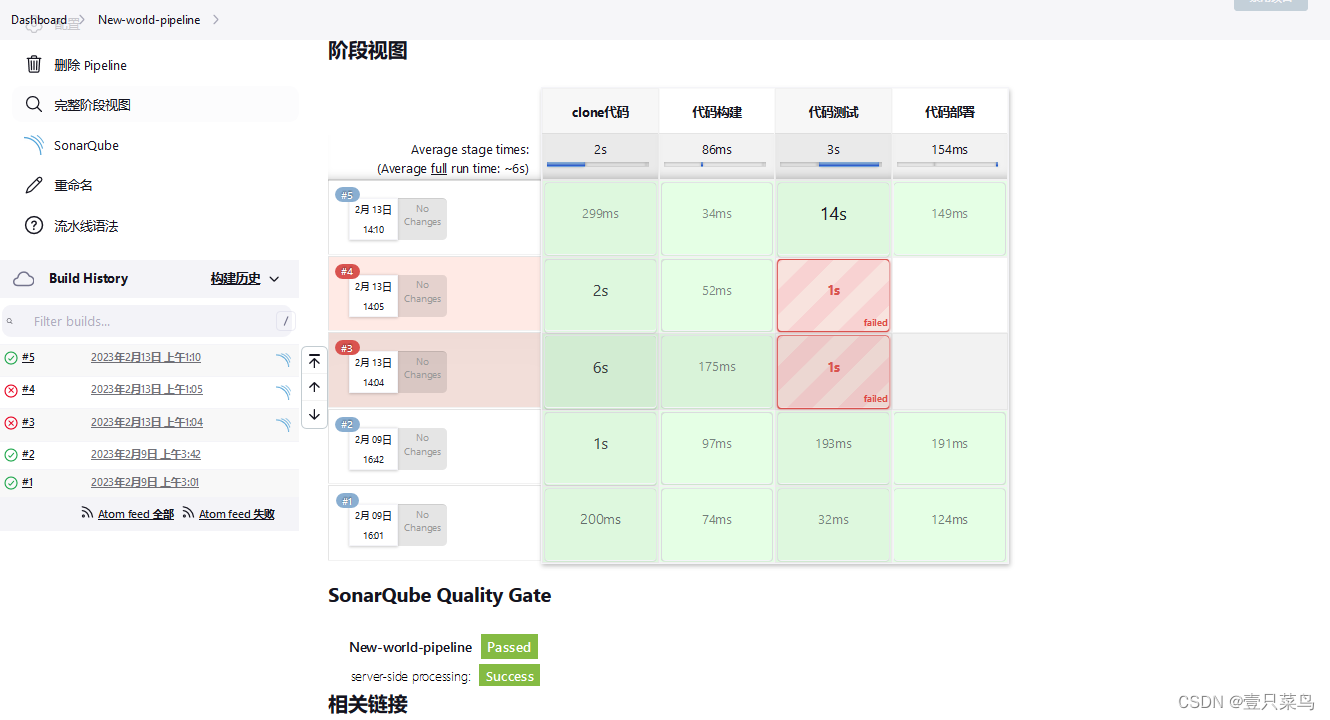
5. 查看报告
5.6 jenkins结语
关于jenkins,本专栏大体介绍了搭建,配置到结合svn,git等scm的使用,以及pipeline简单介绍及使用,到后来的SonarQube的配置使用。
整体介绍的内容可能进占jenkins功能的百分之一,还有些更强大的功能及插件,需要在以后的实践及生产环境中不断的学习夯实。
由于时间有限,像一些配置类的未能详细阐述,像MultiJob等很多使用功能都没有介绍,读者可以自行了解。笔者如果在后续工作中遇到有意思的设置或者功能,还会不断更新该专栏,敬请期待吧。