SpringSecurity前后端分离
从上至下操作,直接上手SpringSecurity
文章目录
- SpringSecurity前后端分离
- 1、项目环境
- maven依赖
- 数据库表
- 2、自定义UserService接口
- 3、屏蔽Spring Security默认重定向登录页面以实现前后端分离功能
- 1、实现登录成功/失败、登出处理逻辑
- 1、表单形式登录
- 一、自定义登录接口
- 二、自定义登录成功,失败的错误逻辑处理
- 三、自定义用户未登录逻辑
- 四、退出登录
- 2、使用JSON格式进行登录
- 4、实现基于数据库的动态权限控制
1、项目环境
maven依赖
使用的是Mybatis-Plus做数据库操作
<parent>
    <groupId>org.springframework.boot</groupId>
    <artifactId>spring-boot-starter-parent</artifactId>
    <version>2.2.1.RELEASE</version>
    <relativePath/> <!-- lookup parent from repository -->
</parent>
<dependencies>
    <dependency>
        <groupId>org.springframework.boot</groupId>
        <artifactId>spring-boot-starter-security</artifactId>
    </dependency>

    <dependency>
        <groupId>com.alibaba</groupId>
        <artifactId>druid</artifactId>
        <version>1.2.1</version>
    </dependency>


    <dependency>
        <groupId>mysql</groupId>
        <artifactId>mysql-connector-java</artifactId>
    </dependency>


    <dependency>
        <groupId>com.baomidou</groupId>
        <artifactId>mybatis-plus-boot-starter</artifactId>
        <version>3.2.0</version>
    </dependency>


    <dependency>
        <groupId>org.projectlombok</groupId>
        <artifactId>lombok</artifactId>
    </dependency>

    <dependency>
        <groupId>com.alibaba</groupId>
        <artifactId>fastjson</artifactId>
        <version>1.2.15</version>
    </dependency>


    <dependency>
        <groupId>org.springframework.boot</groupId>
        <artifactId>spring-boot-starter-web</artifactId>
    </dependency>

    <dependency>
        <groupId>org.springframework.boot</groupId>
        <artifactId>spring-boot-starter-test</artifactId>
        <scope>test</scope>
    </dependency>


</dependencies>
数据库表
1、用户表(sys_user)
密码是加密后的(123456)
/*
 Navicat Premium Data Transfer

 Source Server         : 本机
 Source Server Type    : MySQL
 Source Server Version : 80029
 Source Host           : localhost:3306
 Source Schema         : game

 Target Server Type    : MySQL
 Target Server Version : 80029
 File Encoding         : 65001

 Date: 10/02/2023 17:04:23
*/

SET NAMES utf8mb4;
SET FOREIGN_KEY_CHECKS = 0;

-- ----------------------------
-- Table structure for sys_user
-- ----------------------------
DROP TABLE IF EXISTS `sys_user`;
CREATE TABLE `sys_user`  (
  `id` int NOT NULL AUTO_INCREMENT,
  `account` varchar(32) CHARACTER SET utf8mb4 COLLATE utf8mb4_0900_ai_ci NOT NULL COMMENT '账号',
  `user_name` varchar(32) CHARACTER SET utf8mb4 COLLATE utf8mb4_0900_ai_ci NOT NULL COMMENT '用户名',
  `password` varchar(64) CHARACTER SET utf8mb4 COLLATE utf8mb4_0900_ai_ci NULL DEFAULT NULL COMMENT '用户密码',
  `last_login_time` datetime NULL DEFAULT NULL COMMENT '上一次登录时间',
  `enabled` tinyint(1) NULL DEFAULT 1 COMMENT '账号是否可用。默认为1(可用)',
  `not_expired` tinyint(1) NULL DEFAULT 1 COMMENT '是否过期。默认为1(没有过期)',
  `account_not_locked` tinyint(1) NULL DEFAULT 1 COMMENT '账号是否锁定。默认为1(没有锁定)',
  `credentials_not_expired` tinyint(1) NULL DEFAULT 1 COMMENT '证书(密码)是否过期。默认为1(没有过期)',
  `create_time` datetime NULL DEFAULT NULL COMMENT '创建时间',
  `update_time` datetime NULL DEFAULT NULL COMMENT '修改时间',
  `create_user` int NULL DEFAULT NULL COMMENT '创建人',
  `update_user` int NULL DEFAULT NULL COMMENT '修改人',
  PRIMARY KEY (`id`) USING BTREE
) ENGINE = InnoDB AUTO_INCREMENT = 3 CHARACTER SET = utf8mb4 COLLATE = utf8mb4_0900_ai_ci COMMENT = '用户表' ROW_FORMAT = Dynamic;

-- ----------------------------
-- Records of sys_user
-- ----------------------------
INSERT INTO `sys_user` VALUES (1, 'user1', '用户1', '$2a$10$47lsFAUlWixWG17Ca3M/r.EPJVIb7Tv26ZaxhzqN65nXVcAhHQM4i', '2019-09-04 20:25:36', 1, 1, 1, 1, '2019-08-29 06:28:36', '2019-09-04 20:25:36', 1, 1);
INSERT INTO `sys_user` VALUES (2, 'user2', '用户2', '$2a$10$uSLAeON6HWrPbPCtyqPRj.hvZfeM.tiVDZm24/gRqm4opVze1cVvC', '2019-09-05 00:07:12', 1, 1, 1, 1, '2019-08-29 06:29:24', '2019-09-05 00:07:12', 1, 2);

SET FOREIGN_KEY_CHECKS = 1;
2、权限表(sys_permission)
/*
 Navicat Premium Data Transfer

 Source Server         : 本机
 Source Server Type    : MySQL
 Source Server Version : 80029
 Source Host           : localhost:3306
 Source Schema         : game

 Target Server Type    : MySQL
 Target Server Version : 80029
 File Encoding         : 65001

 Date: 10/02/2023 17:19:56
*/

SET NAMES utf8mb4;
SET FOREIGN_KEY_CHECKS = 0;

-- ----------------------------
-- Table structure for sys_permission
-- ----------------------------
DROP TABLE IF EXISTS `sys_permission`;
CREATE TABLE `sys_permission`  (
  `id` int NOT NULL AUTO_INCREMENT COMMENT '主键id',
  `permission_code` varchar(32) CHARACTER SET utf8mb4 COLLATE utf8mb4_0900_ai_ci NULL DEFAULT NULL COMMENT '权限code',
  `permission_name` varchar(32) CHARACTER SET utf8mb4 COLLATE utf8mb4_0900_ai_ci NULL DEFAULT NULL COMMENT '权限名',
  PRIMARY KEY (`id`) USING BTREE
) ENGINE = InnoDB AUTO_INCREMENT = 5 CHARACTER SET = utf8mb4 COLLATE = utf8mb4_0900_ai_ci COMMENT = '权限表' ROW_FORMAT = Dynamic;

-- ----------------------------
-- Records of sys_permission
-- ----------------------------
INSERT INTO `sys_permission` VALUES (1, 'create_user', '创建用户');
INSERT INTO `sys_permission` VALUES (2, 'query_user', '查看用户');
INSERT INTO `sys_permission` VALUES (3, 'delete_user', '删除用户');
INSERT INTO `sys_permission` VALUES (4, 'modify_user', '修改用户');

SET FOREIGN_KEY_CHECKS = 1;
3、角色表(sys_role)
/*
 Navicat Premium Data Transfer

 Source Server         : 本机
 Source Server Type    : MySQL
 Source Server Version : 80029
 Source Host           : localhost:3306
 Source Schema         : game

 Target Server Type    : MySQL
 Target Server Version : 80029
 File Encoding         : 65001

 Date: 10/02/2023 17:20:23
*/

SET NAMES utf8mb4;
SET FOREIGN_KEY_CHECKS = 0;

-- ----------------------------
-- Table structure for sys_role
-- ----------------------------
DROP TABLE IF EXISTS `sys_role`;
CREATE TABLE `sys_role`  (
  `id` int NOT NULL AUTO_INCREMENT COMMENT '主键id',
  `role_code` varchar(255) CHARACTER SET utf8mb4 COLLATE utf8mb4_0900_ai_ci NULL DEFAULT NULL COMMENT '角色code',
  `role_name` varchar(32) CHARACTER SET utf8mb4 COLLATE utf8mb4_0900_ai_ci NULL DEFAULT NULL COMMENT '角色名',
  `role_description` varchar(64) CHARACTER SET utf8mb4 COLLATE utf8mb4_0900_ai_ci NULL DEFAULT NULL COMMENT '角色说明',
  PRIMARY KEY (`id`) USING BTREE
) ENGINE = InnoDB AUTO_INCREMENT = 3 CHARACTER SET = utf8mb4 COLLATE = utf8mb4_0900_ai_ci COMMENT = '用户角色表' ROW_FORMAT = Dynamic;

-- ----------------------------
-- Records of sys_role
-- ----------------------------
INSERT INTO `sys_role` VALUES (1, 'admin', '管理员', '管理员,拥有所有权限');
INSERT INTO `sys_role` VALUES (2, 'user', '普通用户', '普通用户,拥有部分权限');

SET FOREIGN_KEY_CHECKS = 1;
4、角色权限关系表(sys_role_permission_relation)
/*
 Navicat Premium Data Transfer

 Source Server         : 本机
 Source Server Type    : MySQL
 Source Server Version : 80029
 Source Host           : localhost:3306
 Source Schema         : game

 Target Server Type    : MySQL
 Target Server Version : 80029
 File Encoding         : 65001

 Date: 10/02/2023 17:21:29
*/

SET NAMES utf8mb4;
SET FOREIGN_KEY_CHECKS = 0;

-- ----------------------------
-- Table structure for sys_role_permission_relation
-- ----------------------------
DROP TABLE IF EXISTS `sys_role_permission_relation`;
CREATE TABLE `sys_role_permission_relation`  (
  `id` int NOT NULL AUTO_INCREMENT COMMENT '主键id',
  `role_id` int NULL DEFAULT NULL COMMENT '角色id',
  `permission_id` int NULL DEFAULT NULL COMMENT '权限id',
  PRIMARY KEY (`id`) USING BTREE
) ENGINE = InnoDB AUTO_INCREMENT = 7 CHARACTER SET = utf8mb4 COLLATE = utf8mb4_0900_ai_ci COMMENT = '角色-权限关联关系表' ROW_FORMAT = Dynamic;

-- ----------------------------
-- Records of sys_role_permission_relation
-- ----------------------------
INSERT INTO `sys_role_permission_relation` VALUES (1, 1, 1);
INSERT INTO `sys_role_permission_relation` VALUES (2, 1, 2);
INSERT INTO `sys_role_permission_relation` VALUES (3, 1, 3);
INSERT INTO `sys_role_permission_relation` VALUES (4, 1, 4);

SET FOREIGN_KEY_CHECKS = 1;
5、用户角色关系表(sys_user_role_relation)
/*
 Navicat Premium Data Transfer

 Source Server         : 本机
 Source Server Type    : MySQL
 Source Server Version : 80029
 Source Host           : localhost:3306
 Source Schema         : game

 Target Server Type    : MySQL
 Target Server Version : 80029
 File Encoding         : 65001

 Date: 10/02/2023 17:22:13
*/

SET NAMES utf8mb4;
SET FOREIGN_KEY_CHECKS = 0;

-- ----------------------------
-- Table structure for sys_user_role_relation
-- ----------------------------
DROP TABLE IF EXISTS `sys_user_role_relation`;
CREATE TABLE `sys_user_role_relation`  (
  `id` int NOT NULL AUTO_INCREMENT COMMENT '主键id',
  `user_id` int NULL DEFAULT NULL COMMENT '用户id',
  `role_id` int NULL DEFAULT NULL COMMENT '角色id',
  PRIMARY KEY (`id`) USING BTREE
) ENGINE = InnoDB AUTO_INCREMENT = 3 CHARACTER SET = utf8mb4 COLLATE = utf8mb4_0900_ai_ci COMMENT = '用户角色关联关系表' ROW_FORMAT = Dynamic;

-- ----------------------------
-- Records of sys_user_role_relation
-- ----------------------------
INSERT INTO `sys_user_role_relation` VALUES (1, 1, 1);
INSERT INTO `sys_user_role_relation` VALUES (2, 2, 2);

SET FOREIGN_KEY_CHECKS = 1;
6、请求路径表(sys_request_path)
/*
 Navicat Premium Data Transfer

 Source Server         : 本机
 Source Server Type    : MySQL
 Source Server Version : 80029
 Source Host           : localhost:3306
 Source Schema         : game

 Target Server Type    : MySQL
 Target Server Version : 80029
 File Encoding         : 65001

 Date: 10/02/2023 17:23:23
*/

SET NAMES utf8mb4;
SET FOREIGN_KEY_CHECKS = 0;

-- ----------------------------
-- Table structure for sys_request_path
-- ----------------------------
DROP TABLE IF EXISTS `sys_request_path`;
CREATE TABLE `sys_request_path`  (
  `id` int NOT NULL AUTO_INCREMENT COMMENT '主键id',
  `url` varchar(64) CHARACTER SET utf8mb4 COLLATE utf8mb4_0900_ai_ci NOT NULL COMMENT '请求路径',
  `description` varchar(128) CHARACTER SET utf8mb4 COLLATE utf8mb4_0900_ai_ci NULL DEFAULT NULL COMMENT '路径描述',
  PRIMARY KEY (`id`) USING BTREE
) ENGINE = InnoDB AUTO_INCREMENT = 2 CHARACTER SET = utf8mb4 COLLATE = utf8mb4_0900_ai_ci COMMENT = '请求路径' ROW_FORMAT = Dynamic;

-- ----------------------------
-- Records of sys_request_path
-- ----------------------------
INSERT INTO `sys_request_path` VALUES (1, '/demo/getUser', '查询用户');

SET FOREIGN_KEY_CHECKS = 1;
7、请求路径权限关系表(sys_request_path_permission_relation)
/*
 Navicat Premium Data Transfer

 Source Server         : 本机
 Source Server Type    : MySQL
 Source Server Version : 80029
 Source Host           : localhost:3306
 Source Schema         : game

 Target Server Type    : MySQL
 Target Server Version : 80029
 File Encoding         : 65001

 Date: 10/02/2023 17:23:29
*/

SET NAMES utf8mb4;
SET FOREIGN_KEY_CHECKS = 0;

-- ----------------------------
-- Table structure for sys_request_path_permission_relation
-- ----------------------------
DROP TABLE IF EXISTS `sys_request_path_permission_relation`;
CREATE TABLE `sys_request_path_permission_relation`  (
  `id` int NULL DEFAULT NULL COMMENT '主键id',
  `url_id` int NULL DEFAULT NULL COMMENT '请求路径id',
  `permission_id` int NULL DEFAULT NULL COMMENT '权限id'
) ENGINE = InnoDB CHARACTER SET = utf8mb4 COLLATE = utf8mb4_0900_ai_ci COMMENT = '路径权限关联表' ROW_FORMAT = Dynamic;

-- ----------------------------
-- Records of sys_request_path_permission_relation
-- ----------------------------
INSERT INTO `sys_request_path_permission_relation` VALUES (1, 1, 2);

SET FOREIGN_KEY_CHECKS = 1;
说明:
角色1对应的是管理员角色,有全部权限(这里主要演示的是query_user权限)
角色2对应的是用户,没有任何权限
2、自定义UserService接口
实现从数据库中获取用户的信息,自定义登录逻辑
@Service
public class UserService implements UserDetailsService{

    @Autowired
    private UserMapper userMapper;
    @Autowired
    private UserRoleMapper userRoleMapper;
    @Autowired
    private RolePermissionMapper rolePermissionMapper;
    @Autowired
    private PermissionMapper permissionMapper;
    @Override
    public UserDetails loadUserByUsername(String username) throws UsernameNotFoundException {
        //需要构造出 org.springframework.security.core.userdetails.User 对象并返回
/**
 *         String username:用户名
 *         String password: 密码
 *         boolean enabled: 账号是否可用
 *         boolean accountNonExpired:账号是否没有过期
 *         boolean credentialsNonExpired:密码是否没有过期
 *         boolean accountNonLocked:账号是否没有被锁定
 *         Collection<? extends GrantedAuthority> authorities):用户权限列表
 */
     //1、根据用户名查询用户信息
      QueryWrapper<UserEntity> queryWrapper=new QueryWrapper<>();
        queryWrapper.eq("account",username);
        UserEntity userEntity = userMapper.selectOne(queryWrapper);
     //2、根据用户名查询用户的权限信息
        //查询userId
        Integer id = userEntity.getId();
        //查询权限id
        QueryWrapper<UserRoleRelation> queryWrapper1=new QueryWrapper<>();
         queryWrapper1.eq("user_id", id);
        UserRoleRelation userRoleRelation = userRoleMapper.selectOne(queryWrapper1);
        Integer roleId = userRoleRelation.getRoleId();
        //根据角色信息查询对应的权限信息
           //查询权限id
        QueryWrapper<RolePermissionRelation> rolePermissionRelationQueryWrapper = new QueryWrapper<>();
       rolePermissionRelationQueryWrapper.eq("role_id", roleId);
        List<RolePermissionRelation> rolePermissionRelations = rolePermissionMapper.selectList(rolePermissionRelationQueryWrapper);

        //权限列表
        List<GrantedAuthority> grantedAuthorities = new ArrayList<>();

        for (RolePermissionRelation rolePermissionRelation : rolePermissionRelations) {
            PermissionEntity permissionEntity = permissionMapper.selectById(rolePermissionRelation.getPermissionId());
            GrantedAuthority grantedAuthority = new SimpleGrantedAuthority(permissionEntity.getPermissionCode());
            grantedAuthorities.add(grantedAuthority);
        }

        //3、构造出我们需要的org.springframework.security.core.userdetails.User对象
        User user = new User(userEntity.getUserName(), userEntity.getPassword(), userEntity.getEnabled() == 1 ? true : false, userEntity.getNotExpired() == 1 ? true : false, userEntity.getCredentialsNotExpired() == 1 ? true : false, userEntity.getAccountNotLocked() == 1 ? true : false, grantedAuthorities);
        return user;
    }
进行配置使用我们自定义的UserService,并设置密码加密
/**
 * @ClassName WebSecurityConfig
 * @Author ylh
 * @Date 2023/2/7 21:28
 * @Description
 */
@Configuration
public class WebSecurityConfig extends WebSecurityConfigurerAdapter {

    @Bean
    public UserDetailsService userDetailsService() {
        //获取用户账号密码及权限信息
        return new UserService();
    }

    @Override
    protected void configure(AuthenticationManagerBuilder auth) throws Exception {
        //获取用户账号密码及权限信息
        auth.userDetailsService(userDetailsService());

    }


    // 设置默认的加密方式(强hash方式加密),注入就行
    @Bean
    public BCryptPasswordEncoder passwordEncoder() {
        return new BCryptPasswordEncoder();
    }


}
3、屏蔽Spring Security默认重定向登录页面以实现前后端分离功能
1、实现登录成功/失败、登出处理逻辑
1、表单形式登录
一、自定义登录接口
这里是使用表单进行登录,使用JSON进行登录在下面有介绍
默认的登录接口的/login,下面我们使用自定义的路径
在WebSecurityConfig类中重写configure方法(注意参数是HttpSecurity)
@Override
protected void configure(HttpSecurity http)

测试:
使用postman测试http://localhost:8080/user/login?username=user1&password=123456
注意:要使用post请求
二、自定义登录成功,失败的错误逻辑处理
创建两个Component
/**
 * @Author: ylh
 * @Description: 登录成功处理逻辑
 */
@Component
public class CustomizeAuthenticationSuccessHandler implements AuthenticationSuccessHandler {


    @Override
    public void onAuthenticationSuccess(HttpServletRequest httpServletRequest, HttpServletResponse httpServletResponse, org.springframework.security.core.Authentication authentication) throws IOException, ServletException {

        //此处还可以进行一些处理,比如登录成功之后可能需要返回给前台当前用户有哪些菜单权限,
        //进而前台动态的控制菜单的显示等,具体根据自己的业务需求进行扩展
        //返回json数据
        JsonResult result = ResultTool.success();
        //处理编码方式,防止中文乱码的情况
        httpServletResponse.setContentType("text/json;charset=utf-8");
        //塞到HttpServletResponse中返回给前台
        httpServletResponse.getWriter().write(JSON.toJSONString(result));
    }
}
/**
 * @Author:
 * @Description: 登录失败处理逻辑
 */
@Component
public class CustomizeAuthenticationFailureHandler implements AuthenticationFailureHandler {


    @Override
    public void onAuthenticationFailure(HttpServletRequest httpServletRequest, HttpServletResponse httpServletResponse, AuthenticationException e) throws IOException, ServletException, IOException {
        //返回json数据
        JsonResult result = null;
        if (e instanceof AccountExpiredException) {
            //账号过期
            result = ResultTool.fail(ResultCode.USER_ACCOUNT_EXPIRED);
        } else if (e instanceof BadCredentialsException) {
            //密码错误
            result = ResultTool.fail(ResultCode.USER_CREDENTIALS_ERROR);
        } else if (e instanceof CredentialsExpiredException) {
            //密码过期
            result = ResultTool.fail(ResultCode.USER_CREDENTIALS_EXPIRED);
        } else if (e instanceof DisabledException) {
            //账号不可用
            result = ResultTool.fail(ResultCode.USER_ACCOUNT_DISABLE);
        } else if (e instanceof LockedException) {
            //账号锁定
            result = ResultTool.fail(ResultCode.USER_ACCOUNT_LOCKED);
        } else if (e instanceof InternalAuthenticationServiceException) {
            //用户不存在
            result = ResultTool.fail(ResultCode.USER_ACCOUNT_NOT_EXIST);
        }else{
            //其他错误
            result = ResultTool.fail(ResultCode.COMMON_FAIL);
        }
        //处理编码方式,防止中文乱码的情况
        httpServletResponse.setContentType("text/json;charset=utf-8");
        //塞到HttpServletResponse中返回给前台
        httpServletResponse.getWriter().write(JSON.toJSONString(result));
    }
}
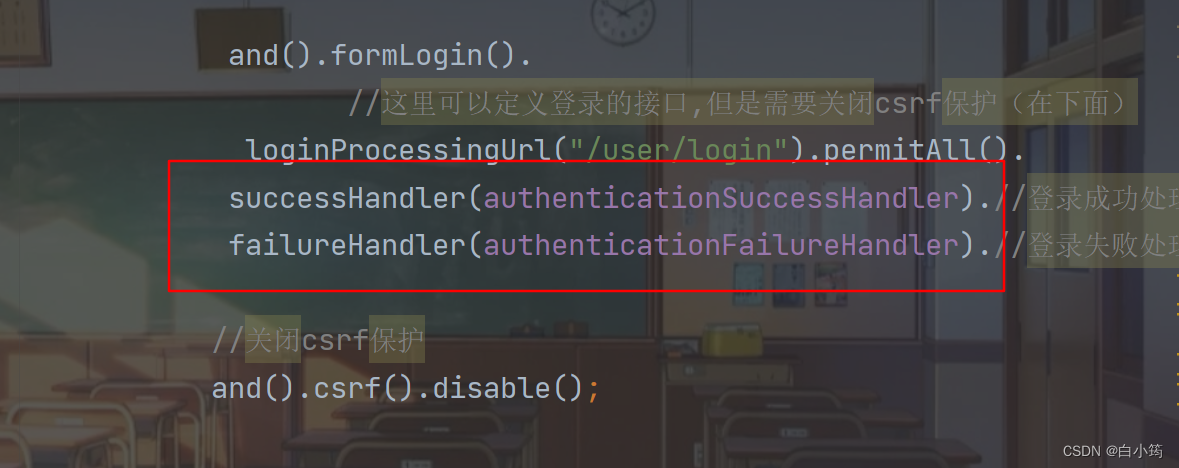
在配置类中进行配置
先注入进来
@Autowired
private CustomizeAuthenticationSuccessHandler authenticationSuccessHandler;
@Autowired
private CustomizeAuthenticationFailureHandler authenticationFailureHandler;
设置
替换原来的拦截器,使用我们自定义的
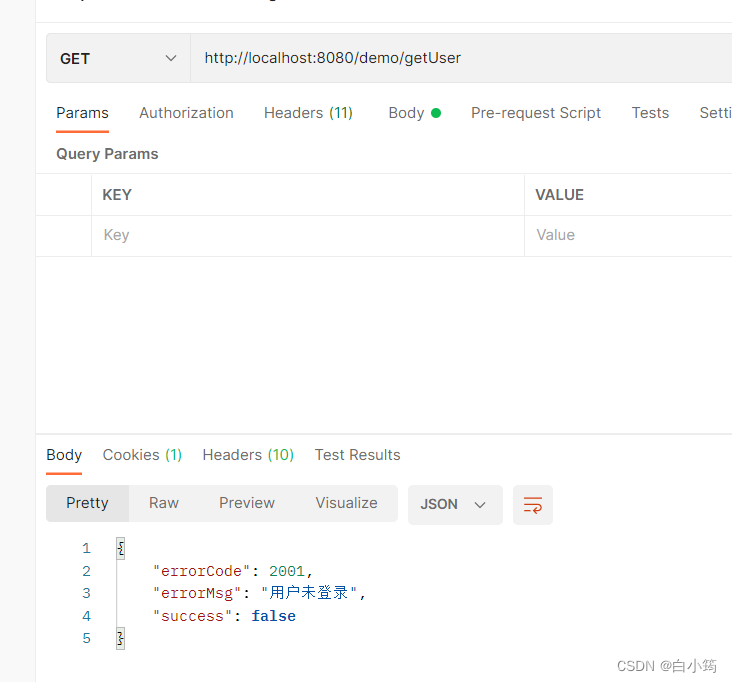
三、自定义用户未登录逻辑
创建一个接口
@GetMapping("/getUser")
public String getUser(){
    return "查询用户";
}
自定义component
/**
 * @Author: ylh
 * @Description: 未登录的异常处理
 */
@Component
public class CustomizeAuthenticationEntryPoint implements AuthenticationEntryPoint {
    @Override
    public void commence(HttpServletRequest httpServletRequest, HttpServletResponse httpServletResponse, AuthenticationException e) throws IOException, ServletException {
        //自定义返回信息返回
        JsonResult result = ResultTool.fail(ResultCode.USER_NOT_LOGIN);
        httpServletResponse.setContentType("text/json;charset=utf-8");
        httpServletResponse.getWriter().write(JSON.toJSONString(result));
    }
}
注入到配置类中
@Autowired
private CustomizeAuthenticationEntryPoint authenticationEntryPoint;
进行相关 配置
设置权限,如果不设置,不用登录也可以访问(因为被我们重写了void configure(HttpSecurity http)这个方法)
http.authorizeRequests().antMatchers("/demo/getUser").hasAuthority("query_user")//为getUser接口设置权限
  .and()
 //异常处理(权限拒绝、登录失效等)
  //匿名用户访问无权限资源时的异常处理
        .exceptionHandling().authenticationEntryPoint(authenticationEntryPoint).
返回结果:
四、退出登录
springsecurity默认退出登录的url地址为http://localhost:8080/logout
创建Component
/**
 * @Author: ylh
 * @Description: 登出成功处理逻辑
 */
@Component
public class CustomizeLogoutSuccessHandler implements LogoutSuccessHandler {
    @Override
    public void onLogoutSuccess(HttpServletRequest httpServletRequest, HttpServletResponse httpServletResponse, Authentication authentication) throws IOException, ServletException, IOException {
        JsonResult result = ResultTool.success();
        httpServletResponse.setContentType("text/json;charset=utf-8");
        httpServletResponse.getWriter().write(JSON.toJSONString(result));
    }
}
在配置类中
将CustomizeLogoutSuccessHandler注入进来
设置
//登出
                   and().logout().
                       permitAll().//允许所有用户
                       logoutSuccessHandler(logoutSuccessHandler).//登出成功处理逻辑
                       deleteCookies("JSESSIONID").//登出之后删除cookie
2、使用JSON格式进行登录
继承UsernamePasswordAuthenticationFilter,重写attemptAuthentication方法
/**
 * @ClassName CustomAuthenticationFilter
 * @Author ylh
 * @Date 2023/2/9 21:39
 * @Description
 */
public class CustomAuthenticationFilter extends UsernamePasswordAuthenticationFilter {
    @Override
    public Authentication attemptAuthentication(HttpServletRequest request, HttpServletResponse response) throws AuthenticationException {
        if (request.getContentType().equals(MediaType.APPLICATION_JSON_UTF8_VALUE)
                || request.getContentType().equals(MediaType.APPLICATION_JSON_VALUE)) {
            ObjectMapper mapper = new ObjectMapper();
            UsernamePasswordAuthenticationToken authRequest = null;
            try (InputStream is = request.getInputStream()) {
                Map<String,String> authenticationBean = mapper.readValue(is, Map.class);
                authRequest = new UsernamePasswordAuthenticationToken(
                        authenticationBean.get("username"), authenticationBean.get("password"));
            } catch (IOException e) {
                e.printStackTrace();
                authRequest = new UsernamePasswordAuthenticationToken(
                        "", "");
            } finally {
                setDetails(request, authRequest);
                return this.getAuthenticationManager().authenticate(authRequest);
            }
        }
        else {
            return super.attemptAuthentication(request, response);
        }
    }
}
配置类中,创建一个Bean
@Bean
CustomAuthenticationFilter customAuthenticationFilter() throws Exception {
    CustomAuthenticationFilter filter = new CustomAuthenticationFilter();
    filter.setAuthenticationSuccessHandler(new AuthenticationSuccessHandler() {
        @Override
        public void onAuthenticationSuccess(HttpServletRequest req, HttpServletResponse resp, Authentication authentication) throws IOException, ServletException {
            resp.setContentType("application/json;charset=utf-8");
            PrintWriter out = resp.getWriter();
            //登录成功的返回
            JsonResult result = ResultTool.success();
            out.write(new ObjectMapper().writeValueAsString(result));
            out.flush();
            out.close();
        }
    });
    filter.setAuthenticationFailureHandler(new AuthenticationFailureHandler() {
        @Override
        public void onAuthenticationFailure(HttpServletRequest req, HttpServletResponse resp, AuthenticationException e) throws IOException, ServletException {
            resp.setContentType("application/json;charset=utf-8");
            PrintWriter out = resp.getWriter();
            //设置登录失败的返回结果
            JsonResult result = ResultTool.fail();
            out.write(new ObjectMapper().writeValueAsString(result));
            out.flush();
            out.close();
        }
    });
    filter.setAuthenticationManager(authenticationManagerBean());
    return filter;
}
在configure(HttpSecurity http)方法中,替换原有的过滤器,使用我们自定义的过滤器
http.addFilterAt(customAuthenticationFilter(), UsernamePasswordAuthenticationFilter.class);
使用JSON进行登录配置类中就不需要formLogin(),退出登录的方法是一样的
目前configure的内容
   @Override
    protected void configure(HttpSecurity http) throws Exception {

        http.authorizeRequests()
                .antMatchers("/demo/getUser").hasAuthority("query_user").//为getUser接口设置权限

                and()
//                //异常处理(权限拒绝、登录失效等)页面不能进行重定向到登录页面了,
//                //匿名用户访问无权限资源时的异常处理
                .exceptionHandling().authenticationEntryPoint(authenticationEntryPoint)
//
        //登出
                .and().logout().
                permitAll().//允许所有用户
                logoutSuccessHandler(logoutSuccessHandler).//登出成功处理逻辑
                deleteCookies("JSESSIONID")//登出之后删除cookie

                .and()
                .csrf().disable();

        http.addFilterAt(customAuthenticationFilter(), UsernamePasswordAuthenticationFilter.class);
        }
4、实现基于数据库的动态权限控制
前面是直接在配置类中添加的权限控制
    http.authorizeRequests()
            .antMatchers("/demo/getUser").hasAuthority("query_user").//为
现在是基于数据库实现,将配置类中的权限配置删除
1、编写权限拦截器
/**
 * @Author: ylh
 * @Description: 权限拦截器
 */
@Service
public class CustomizeAbstractSecurityInterceptor extends AbstractSecurityInterceptor implements Filter {

    @Autowired
    private FilterInvocationSecurityMetadataSource securityMetadataSource;

    @Autowired
    public void setMyAccessDecisionManager(CustomizeAccessDecisionManager accessDecisionManager) {
        super.setAccessDecisionManager(accessDecisionManager);
    }

    @Override
    public Class<?> getSecureObjectClass() {
        return FilterInvocation.class;
    }

    @Override
    public SecurityMetadataSource obtainSecurityMetadataSource() {
        return this.securityMetadataSource;
    }

    @Override
    public void doFilter(ServletRequest servletRequest, ServletResponse servletResponse, FilterChain filterChain) throws IOException, ServletException {
        FilterInvocation fi = new FilterInvocation(servletRequest, servletResponse, filterChain);
        invoke(fi);
    }

    public void invoke(FilterInvocation fi) throws IOException, ServletException {
        //fi里面有一个被拦截的url
        //里面调用MyInvocationSecurityMetadataSource的getAttributes(Object object)这个方法获取fi对应的所有权限
        //再调用MyAccessDecisionManager的decide方法来校验用户的权限是否足够
        InterceptorStatusToken token = super.beforeInvocation(fi);
        try {
            //执行下一个拦截器
            fi.getChain().doFilter(fi.getRequest(), fi.getResponse());
        } finally {
            super.afterInvocation(token, null);
        }
    }
}
2、安全元数据源FilterInvocationSecurityMetadataSource
package com.example.demo.service;

import com.example.demo.entity.PermissionEntity;
import org.springframework.beans.factory.annotation.Autowired;
import org.springframework.security.access.ConfigAttribute;
import org.springframework.security.access.SecurityConfig;
import org.springframework.security.web.FilterInvocation;
import org.springframework.security.web.access.intercept.FilterInvocationSecurityMetadataSource;
import org.springframework.stereotype.Component;
import org.springframework.util.AntPathMatcher;

import java.util.Collection;
import java.util.List;

/**
 * @Author: Hutengfei
 * @Description:
 * @Date Create in 2019/9/3 21:06
 */
@Component
public class CustomizeFilterInvocationSecurityMetadataSource implements FilterInvocationSecurityMetadataSource {
//    AntPathMatcher antPathMatcher = new AntPathMatcher();
    @Autowired
    SysPermissionService sysPermissionService;
    @Override
    public Collection<ConfigAttribute> getAttributes(Object o) throws IllegalArgumentException {
        //获取请求地址
        String requestUrl = ((FilterInvocation) o).getRequestUrl();
        //查询具体某个接口的权限
        List<PermissionEntity> permissionList =  sysPermissionService.selectListByPath(requestUrl);
        if(permissionList == null || permissionList.size() == 0){
            //请求路径没有配置权限,表明该请求接口可以任意访问
            return null;
        }
        //请求路径配置了权限
        String[] attributes = new String[permissionList.size()];
        for(int i = 0;i<permissionList.size();i++){
            attributes[i] = permissionList.get(i).getPermissionCode();
        }
        return SecurityConfig.createList(attributes);
    }

    @Override
    public Collection<ConfigAttribute> getAllConfigAttributes() {
        return null;
    }

    @Override
    public boolean supports(Class<?> aClass) {
        return true;
    }
}
这里是sysPermissionService是查询路径所需要的权限,这里贴出来供大家参考
/**
 * @ClassName SysPermissionService
 * @Author ylh
 * @Date 2023/2/10 15:05
 * @Description
 */
@Service
public class SysPermissionService {
    @Autowired
    private RequestUrlMapper requestUrlMapper;
    @Autowired
    private RequestPermissionMapper requestPermissionMapper;
    @Autowired
    private PermissionMapper permissionMapper;

    public List<PermissionEntity> selectListByPath(String requestUrl){
        //根据URL查询对应权限
        List<PermissionEntity> list=new ArrayList<>();
        QueryWrapper<RequestUrlEntity> queryWrapper=new QueryWrapper();
        queryWrapper.eq("url",requestUrl);
        RequestUrlEntity requestUrlEntity = requestUrlMapper.selectOne(queryWrapper);
       if (requestUrlEntity!=null){
           //查询权限id
           QueryWrapper<RequestPermissionEntity> requestPermissionEntityQueryWrapper=new QueryWrapper();
           requestPermissionEntityQueryWrapper.eq("url_id",requestUrlEntity.getId());
           List<RequestPermissionEntity> requestPermissionEntities = requestPermissionMapper.selectList(requestPermissionEntityQueryWrapper);
           //查询权限具体信息
           for (RequestPermissionEntity requestPermissionEntity : requestPermissionEntities) {
               PermissionEntity permissionEntity = permissionMapper.selectById(requestPermissionEntity.getPermissionId());
               list.add(permissionEntity);
           }

       }


        return list;


    }
}
3、访问决策管理器AccessDecisionManager
package com.example.demo.service;

import com.example.demo.common.PermissionException;
import org.springframework.security.access.AccessDecisionManager;
import org.springframework.security.access.AccessDeniedException;
import org.springframework.security.access.ConfigAttribute;
import org.springframework.security.authentication.InsufficientAuthenticationException;
import org.springframework.security.core.Authentication;
import org.springframework.security.core.GrantedAuthority;
import org.springframework.stereotype.Component;

import java.util.Collection;
import java.util.Iterator;

/**
 * @Author: ylh
 * @Description: 访问决策管理器
 * @Date Create in 2019/9/3 20:38
 */
@Component
public class CustomizeAccessDecisionManager implements AccessDecisionManager {
    @Override
    public void decide(Authentication authentication, Object o, Collection<ConfigAttribute> collection) throws AccessDeniedException, InsufficientAuthenticationException {
        Iterator<ConfigAttribute> iterator = collection.iterator();
        while (iterator.hasNext()) {
            ConfigAttribute ca = iterator.next();
            //当前请求需要的权限
            String needRole = ca.getAttribute();
            //当前用户所具有的权限
            Collection<? extends GrantedAuthority> authorities = authentication.getAuthorities();
            for (GrantedAuthority authority : authorities) {
                if (authority.getAuthority().equals(needRole)) {
                    return;
                }
            }
        }
        //权限不足抛出异常,会被AccessDeniedHandler拦截
        throw new AccessDeniedException("权限不足!");
    }

    @Override
    public boolean supports(ConfigAttribute configAttribute) {
        return true;
    }

    @Override
    public boolean supports(Class<?> aClass) {
        return true;
    }
}
4、在WebSecurityConfig中声明
http.authorizeRequests().
        withObjectPostProcessor(new ObjectPostProcessor<FilterSecurityInterceptor>() {
            @Override
            public <O extends FilterSecurityInterceptor> O postProcess(O o) {
                o.setAccessDecisionManager(accessDecisionManager);//决策管理器
                o.setSecurityMetadataSource(securityMetadataSource);//安全元数据源
                return o;
            }
        }).
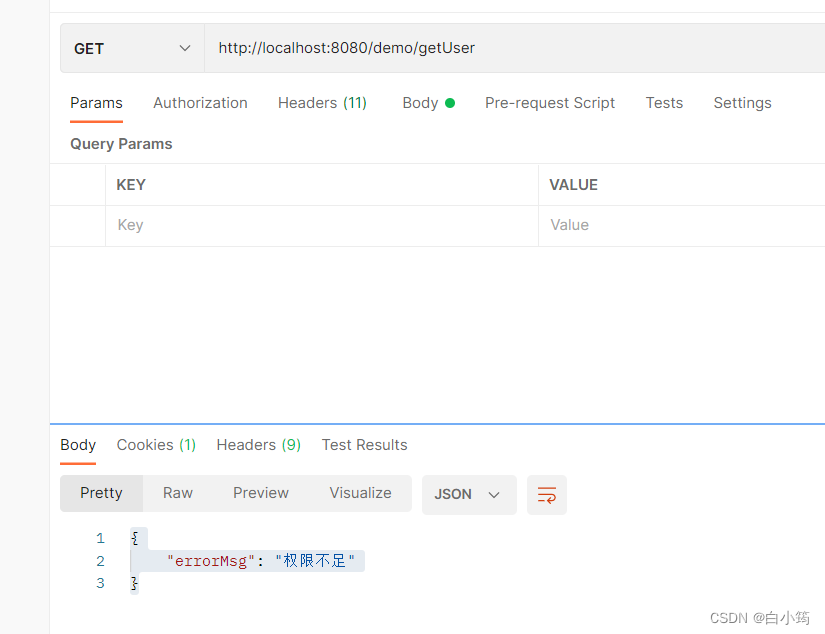
5、重写AccessDeniedHandler拦截器,变成我们自定义返回的内容
package com.example.demo.config;

import com.alibaba.fastjson.JSON;
import com.example.demo.common.JsonResult;
import org.springframework.security.access.AccessDeniedException;
import org.springframework.security.web.access.AccessDeniedHandler;
import org.springframework.stereotype.Service;

import javax.servlet.ServletException;
import javax.servlet.http.HttpServletRequest;
import javax.servlet.http.HttpServletResponse;
import java.io.IOException;

/**
 * @Author: ylh
 */
@Service
public class CustomAccessDeniedHandler implements AccessDeniedHandler {


    @Override
    public void handle(HttpServletRequest request, HttpServletResponse response, AccessDeniedException accessDeniedException) throws IOException, ServletException, IOException {
        response.setContentType("application/json;charset=UTF-8");
        JsonResult jsonResult=new JsonResult<>();
        jsonResult.setErrorCode(403);
        jsonResult.setErrorMsg("权限不足");
        response.setContentType("application/json");
        response.setStatus(HttpServletResponse.SC_OK);
        String s = JSON.toJSONString(jsonResult);
        response.getWriter().write(s);
    }
}
使用user2进行访问,提示权限不足
附上项目源码地址:
https://gitee.com/bai-xiaoyun/spring-security-entry-use-case.git
制作不易,觉得有用的话,留个赞再走吧