问题描述:前端 本地页面 正常展示 、部署后刷新浏览器如上:
vue-router(前端路由)有两种模式,hash模式和history模式
原理的区别(原理)
1、hash ——即地址栏URL中的#符号。
hash 虽然出现URL中,但不会被包含在HTTP请求中,对后端完全没有影响,因此改变hash不会重新加载页面。
2、history ——利用了HTML5 History Interface 中新增的pushState() 和replaceState() 方法。需要特定浏览器支持;hash 能兼容到IE8, history 只能兼容到 IE10;
history模式,会出现404 的情况,需要后台配置。
3、hash模式下,仅hash符号之前的内容会被包含在请求中,如 http://www.baidu.com, 因此对于后端来说,即使没有做到对路由的全覆盖,也不会返回404错误;
history模式下,前端的url必须和实际向后端发起请求的url 一致,如http://www.baidu.com/a/ 。如果后端缺少对/a 的路由处理,将返回404错误。
hash模式: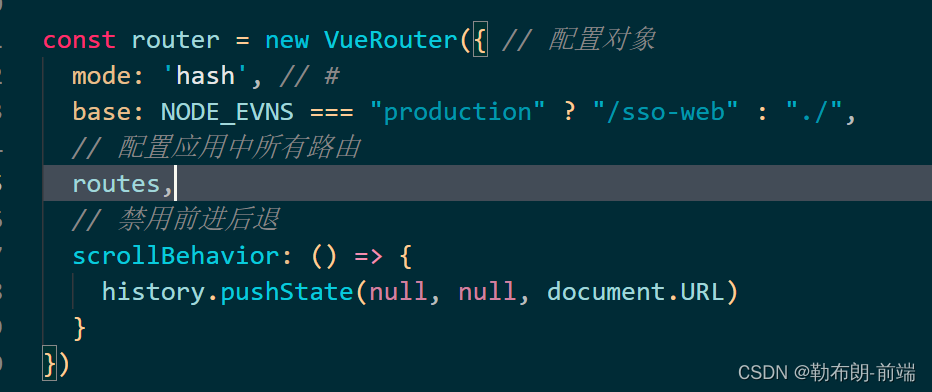
history模式:
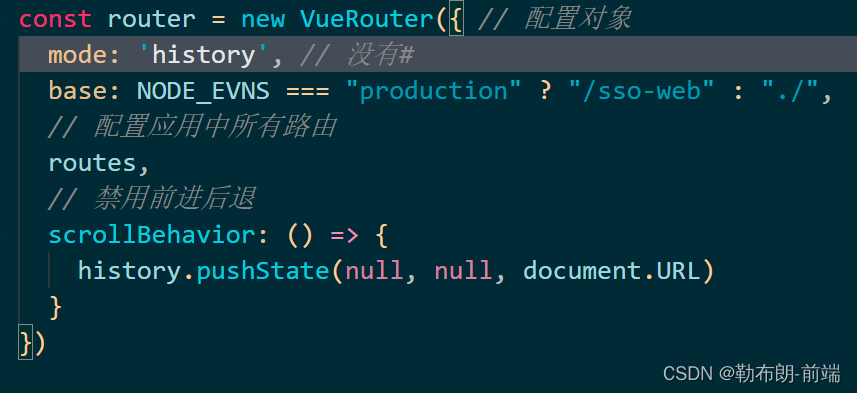
history模式下配置nginx
location / {
try_files $uri $uri/ /index.html;
}
history模式下配置Apache
<IfModule mod_rewrite.c>
RewriteEngine On
RewriteBase /
RewriteRule ^index\.html$ - [L]
RewriteCond %{REQUEST_FILENAME} !-f
RewriteCond %{REQUEST_FILENAME} !-d
RewriteRule . /index.html [L]
</IfModule>
history模式下配置Node.js
const http = require('http')
const fs = require('fs')
const httpPort = 80

http.createServer((req, res) => {
fs.readFile('index.htm', 'utf-8', (err, content) => {
if (err) {
console.log('We cannot open "index.htm" file.')
}

res.writeHead(200, {
'Content-Type': 'text/html; charset=utf-8'
})

res.end(content)
})
}).listen(httpPort, () => {
console.log('Server listening on: http://localhost:%s', httpPort)
})
1.项目发布后通常有两种访问方式,
第一种: IP+端口直接访问的方式,如 http://192.168.1.107:8080/
第二种:IP+端口+项目名,如 http://192.168.1.107:8080/saas/
2.第一种方式:ip+端口(前端后端修改)
范例:vue-cli项目使用路由,tomcat作为服务器,项目文件夹名 saas
步骤:
1.修改配置文件 router.js
export default new Router({
      mode: 'history', // 将mode值改为history routes: [ { path: '/', name: 'HelloWorld',
      component: HelloWorld } ]
})
2.1将tomcat下的ROOT文件中的内容替换(选择其一)
(此种方式需要删除ROOT文件夹下的全部内容,将打包的文件放进去,无需修改配置文件)
找到tomcat目录,将tomcat->ROOT文件夹中文件全部删除,将打包好的dist文件夹中的文件全部放到ROOT文件夹中。

2.2修改tomcat->conf/server.xml配置(选择其一)
(此种方式无需删除ROOT文件夹中的内容,只需修改serve.xml中的配置)
找到tomcat目录,修改tomcat->conf/server.xml,增加Context节点。设置 docBase="/saas" 。其中的saas就是webapps目录下的项目名称(文件夹名)
**

3.第二种方式:ip+端口+项目名(前端修改)
范例:vue-cli项目使用路由,tomcat作为服务器,项目文件夹名 saas
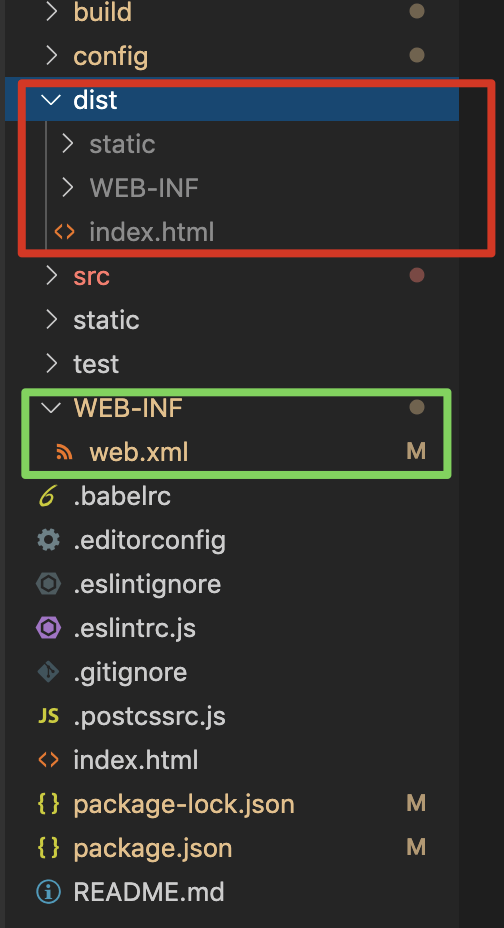
1.首先创建WEB-INF文件,文件夹中创建web.xml文件:
因为是history模式, 要防止在路由下刷新变成404错误,这需要让tomcat都定位到首页,也就是index.html页,以往我们使用Java写web项目部署在tomcat时,通常都会有一个WEB-INF文件夹,并包含一个web.xml文件,而vue项目build之后只是纯静态资源项目,所以我们需要在build之后的dist文件夹里新增一个WEB-INF文件夹,并新建web.xml文件。

在项目目录下新建WEB-INF文件夹, 接着在WEB-INF文件夹下新建 web.xml文件,内容如下:
< ? xml version = '1.0' encoding = 'UTF-8' ? >
 < web - app xmlns : xsi = "http://www.w3.org/2001/XMLSchema-instance"
     xmlns = "http://xmlns.jcp.org/xml/ns/javaee"
     xsi: schemaLocation = "http://xmlns.jcp.org/xml/ns/javaee/web-app_2_5.xsd"
     id = "scplatform" version = "2.5" >
            < display - name > /</display - name >
            < error - page >
            < error - code > 404 < /error-code>
            <location>/index.html < /location>
            </error - page >
 < /web-app>
2.修改配置文件 router.js
export default new Router({ mode: 'history', // 开启history模式需要后端配置
404时返回/index.html base: '/saas/',
 //当项目不在根目录时,必须添加子目录路径,否则空白页面 routes: [ {path: "/home",
 // '/saas/home' name: "home", component: home }] })
3.修改 config文件夹下的 index.js中配置
build: { // Template for index.html index: path.resolve(__dirname, "../dist/index.html"), // Paths assetsRoot: path.resolve(__dirname, "../dist"),//构建输出目录,也就是构建后的东西都扔这里 assetsSubDirectory: "static",//源子目录 除了index.html,其余的js img css都分在这里 /**添加开始**/ //tomcat webapps/sass/ assetsPublicPath: "/saas/", //需要加上这一行项目目录,一个 / 表示根目录 /**添加结束**/ }4.webpack设置不打包文件WEB-INF
到此处已经可以成功配置一个 tomcat 服务下的vue 的 history 模式的项目,但是不能每次打包去手动添加和更改新建WEB-INF文件夹吧,遇到过设置不打包文件 WEB-INF 文件时的配置未生效,导致WEB-INF 下的 web.xml文件被打包成js 文件,导致当前路由刷新报 404 错误。
(这个错误找了 好久,以为配置好了,就 Ok 了,由于代码同步问题,没注意可能就发生问题,所以上传服务器前一定要记得检查下WEB-INF文件夹是否存在 web.xml文件)
修改webpack.prod.conf.js配置
build: { // Template for index.html index: path.resolve(__dirname, "../dist/index.html"),
   // Paths assetsRoot: path.resolve(__dirname, "../dist"),
   //构建输出目录,也就是构建后的东西都扔这里 assetsSubDirectory: "static",
   //源子目录 除了index.html,其余的js img css都分在这里 /**添加开始**/
   //tomcat webapps/sass/ assetsPublicPath: "/saas/",
   //需要加上这一行项目目录,一个 / 表示根目录 /**添加结束**/
  }
的的设置不打包问题可以自行搜索,关键词:webpack 设置不打包文件
5.到此处前端已经成功配置了tomcat 下 vue 的 history模式
项目最终目录如下图
6.注意vue-cli 3.x vue-cli打包配置还需要设置以下内容:
module.exports = {
  publicPath: "/saas",
  configureWebpack: {
    performance: {
      hints: false
    }
  }
};




![[Python]Django 配置](https://img-blog.csdnimg.cn/d31a25179e8942708dea11db5486e66d.png)
