QCustomPlot 使用图层(QCPLayer)系统来组织绘图元素的绘制顺序和可见性。下面详细介绍如何自定义图层并将可绘制对象关联到特定图层。
1. 理解 QCustomPlot 的图层系统
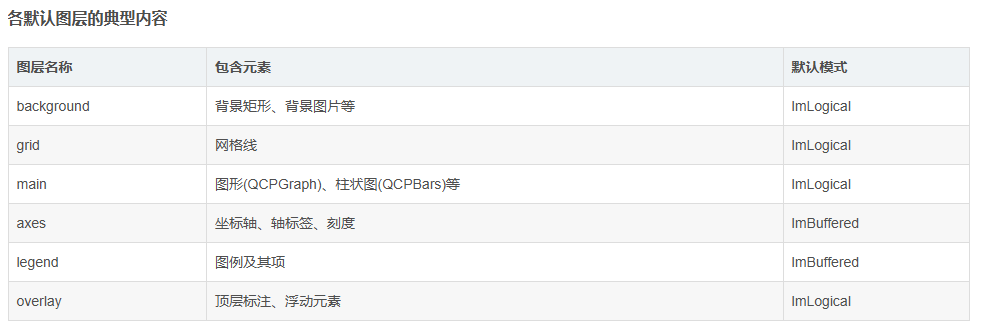
QCustomPlot 的图层系统具有以下特点:
-
图层按顺序排列,后绘制的图层会覆盖前面的图层
-
每个图层可以包含多个可绘制对象(QCPLayerable)
-
图层可以单独设置为可见或不可见
-
默认有两个图层:"background" 和 "main"
2. 创建自定义图层
cpp
// 创建新图层
QCPLayer *customLayer = customPlot->addLayer("customLayer");

// 设置图层位置(默认添加到最上层)
customPlot->moveLayer(customPlot->layer("main"), customLayer); // 将customLayer移到main层下面

// 设置图层模式(决定如何与下层混合)
customLayer->setMode(QCPLayer::lmBuffered); // 缓冲模式,适合复杂图层
3. 将可绘制对象关联到图层
3.1 创建时指定图层
cpp
// 创建图形并直接指定图层
QCPGraph *graph = customPlot->addGraph(customPlot->xAxis, customPlot->yAxis);
graph->setLayer("customLayer");

// 创建文本项并指定图层
QCPItemText *textLabel = new QCPItemText(customPlot);
textLabel->setLayer("customLayer");
3.2 将现有对象移动到图层
cpp
// 获取现有对象
QCPGraph *graph = customPlot->graph(0);

// 移动到指定图层
graph->setLayer("customLayer");

// 或者使用图层指针
graph->setLayer(customLayer);
示例代码:
// 创建图表和图层
QCustomPlot *customPlot = new QCustomPlot(this);
QCPLayer *backgroundLayer = customPlot->addLayer("background");
QCPLayer *dataLayer = customPlot->addLayer("data");
QCPLayer *annotationLayer = customPlot->addLayer("annotations");

// 设置图层顺序(从下到上)
customPlot->moveLayer(backgroundLayer, customPlot->layer("grid")); // 背景层在grid层下面
customPlot->moveLayer(dataLayer, customPlot->layer("main"));
customPlot->moveLayer(annotationLayer, customPlot->layer("axes"));

// 添加背景元素到背景层
QCPItemRect *bgRect = new QCPItemRect(customPlot);
bgRect->setLayer(backgroundLayer);
bgRect->setBrush(QBrush(QColor(240, 240, 255)));

// 添加图形到数据层
QCPGraph *graph = customPlot->addGraph();
graph->setLayer(dataLayer);
graph->setData(xData, yData);

// 添加标注到注释层
QCPItemText *textLabel = new QCPItemText(customPlot);
textLabel->setLayer(annotationLayer);
textLabel->setText("重要数据点");
textLabel->position->setCoords(5, 10);  // 数据坐标

// 控制图层可见性
annotationLayer->setVisible(false);  // 隐藏注释层
4. 自定义图层绘制顺序
cpp
// 将图层移到最顶层
customPlot->moveLayer(customPlot->layer("customLayer"), customPlot->layer("overlay"));

// 将图层移到最底层
customPlot->moveLayer(customPlot->layer("background"), customPlot->layer("customLayer"));

// 交换两个图层位置
customPlot->moveLayer(customPlot->layer("layer1"), customPlot->layer("layer2"));
5. 控制图层可见性
cpp
// 隐藏图层
customPlot->layer("customLayer")->setVisible(false);

// 显示图层
customPlot->layer("customLayer")->setVisible(true);

// 切换图层可见性
customPlot->layer("customLayer")->setVisible(!customPlot->layer("customLayer")->visible());
6. 完整示例:创建多层图表
cpp
// 创建三个自定义图层
QCPLayer *backgroundLayer = customPlot->addLayer("background");
QCPLayer *dataLayer = customPlot->addLayer("data");
QCPLayer *annotationLayer = customPlot->addLayer("annotations");

// 设置图层顺序(从下到上)
customPlot->moveLayer(customPlot->layer("background"), backgroundLayer);
customPlot->moveLayer(customPlot->layer("main"), dataLayer);
customPlot->moveLayer(customPlot->layer("annotations"), annotationLayer);

// 在背景层添加网格
customPlot->xAxis->grid()->setLayer("background");
customPlot->yAxis->grid()->setLayer("background");

// 在数据层添加曲线
QCPGraph *graph = customPlot->addGraph();
graph->setLayer("data");
graph->setData(x, y);

// 在注释层添加文本和箭头
QCPItemText *text = new QCPItemText(customPlot);
text->setLayer("annotations");
text->setText("重要峰值");
text->position->setCoords(5.2, 0.8);

QCPItemLine *arrow = new QCPItemLine(customPlot);
arrow->setLayer("annotations");
arrow->start->setCoords(5.2, 0.75);
arrow->end->setCoords(5.0, 0.6);
arrow->setHead(QCPLineEnding::esSpikeArrow);

// 控制图层可见性
void toggleAnnotations(bool show) {
    customPlot->layer("annotations")->setVisible(show);
    customPlot->replot();
}
7. 高级技巧:自定义图层绘制
您可以继承 QCPLayer 来完全控制图层的绘制行为:
cpp
class CustomLayer : public QCPLayer
{
public:
    CustomLayer(QCustomPlot *parentPlot, const QString &layerName) :
        QCPLayer(parentPlot, layerName) {}

protected:
    virtual void draw(QCPPainter *painter) override {
        // 先绘制所有层内容
        QCPLayer::draw(painter);

        // 然后添加自定义绘制
        painter->setPen(QPen(Qt::red, 2));
        painter->drawLine(QPointF(0,0), QPointF(100,100));
    }
};

// 使用自定义图层
CustomLayer *customLayer = new CustomLayer(customPlot, "custom");
customPlot->addLayer(customLayer);
8. 性能考虑
-
图层缓冲:
cpp
// 对复杂图层启用缓冲 customPlot->layer("complexLayer")->setMode(QCPLayer::lmBuffered); -
选择性重绘:
cpp
// 只重绘特定图层 customPlot->layer("data")->replot(); -
图层合并:
cpp
// 对不需要独立控制的元素使用同一图层
customPlot->graph(0)->setLayer("main");
customPlot->graph(1)->setLayer("main");
9. 调试图层系统
cpp
// 打印所有图层信息
qDebug() << "Layers in order:";
foreach (QCPLayer *layer, customPlot->layers()) {
    qDebug() << layer->name()
             << "visible:" << layer->visible()
             << "children:" << layer->children().size();
}

// 检查对象的图层
qDebug() << "Graph layer:" << customPlot->graph(0)->layer()->name();
通过合理使用 QCustomPlot 的图层系统,您可以:
-
精确控制绘图元素的叠放顺序
-
批量管理相关元素的可见性
-
优化绘图性能
-
创建复杂的多层可视化效果


![[Swift]Xcode模拟器无法请求http接口问题](https://i-blog.csdnimg.cn/direct/31cfc77051954e119b8b388ef13a5eb7.png)