随着无线网络的普及,网络攻击风险也日益严峻。本项目旨在构建一个实时监测、智能识别、高效防护的无线网络安全平台,通过结合前后端技术与安全算法,实现对常见攻击行为的有效监控和防御。
一、项目简介与功能目的
本系统是一款基于 React 前端 + Python 后端 架构开发的无线网络入侵检测系统 V1.0,专注于无线网络安全领域的可视化平台建设。平台集成了 DDoS 防御、异常流量识别、漏洞扫描、日志分析、黑名单管理等核心功能模块,帮助用户从设备层到数据层全面掌握网络安全状态。
🧾 功能目标:
-
实时监测无线网络活动与异常行为
-
提供清晰、可交互的数据可视化展示
-
辅助用户快速定位安全隐患与潜在攻击源
-
支持日志溯源与安全报告生成
-
适用于校园网络、企业内网、实验室网络等应用场景
二、背景分析:为什么要做这类系统?
在现代办公和日常生活中,无线网络已成为信息传输的重要载体。然而其开放性与可被感知的特性,也使其暴露在更多攻击风险下:
-
🕵️ DDoS洪水攻击、ARP欺骗、端口扫描等日益频繁
-
🔓 企业常规防火墙难以精准应对新型攻击行为
-
⚠️ 安全日志分析、漏洞感知能力在传统系统中缺失
因此,本项目以“智能监测 + 可视化感知 + 实时响应”为核心目标,力图构建一个可控、可查、可溯源的无线网络防护系统。
三、项目整体架构说明
项目采用 前后端分离 架构,结合现代 Web 技术与网络安全分析框架:
🖥 前端:React + Chart.js + Recharts
-
构建响应式界面
-
实时展示网络流量、入侵事件、设备状态等
-
使用 Socket.IO 与后端通信,实现实时数据同步
🔧 后端:Python + Flask + Scapy
-
提供 REST API 接口
-
网络数据包捕获与解析(基于 scapy)
-
异常流量检测、黑名单管理、漏洞分析
-
使用机器学习/规则引擎实现行为识别
🗂 数据存储:MySQL
-
存储用户信息、网络日志、设备数据等
-
支持高效查询与日志导出
🔐 安全机制:
-
HTTPS 传输加密
-
登录认证 + 权限分级控制
-
日志记录与操作审计
四、项目代码结构
📁 前端目录结构(React)
wireless-security-platform/
├── public/                 # 静态资源
├── src/
│   ├── components/         # 功能组件(Dashboard/NetFilter/PDF等)
│   ├── App.jsx             # 主组件
│   └── styles.css          # 全局样式
├── package.json            # 项目依赖
└── README.md
📁 后端目录结构(Python)
backend/
├── app/                    # 主应用代码
│   └── utils/              # 工具函数
├── run.py                 # 启动入口
├── config.py              # 配置文件
├── requirements.txt       # 第三方依赖
├── traffic.json           # 流量分析数据样本
└── wsgi.py                # WSGI 服务入口
五、核心功能模块详解
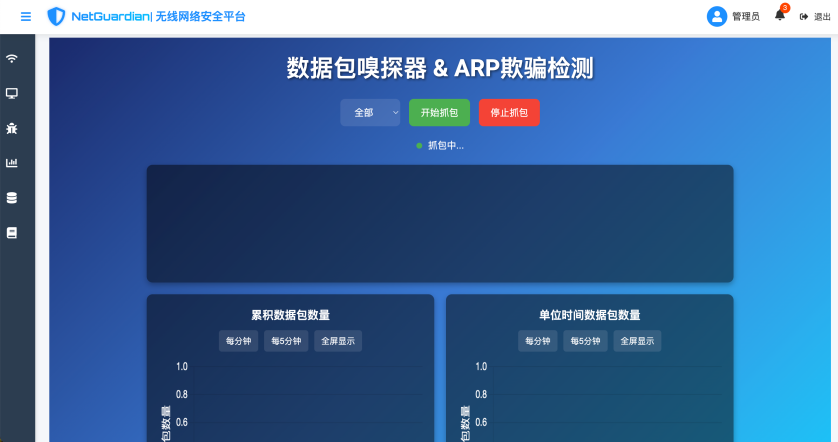
1️⃣ 数据包嗅探器 & ARP欺骗检测
-
实时抓包、统计包数量
-
支持分钟级、秒级数据可视化展示
-
检测是否存在 ARP 欺骗行为
import React, { useEffect, useRef, useState } from 'react';
import io from 'socket.io-client';
import { Chart, CategoryScale, LinearScale, LineController, LineElement, PointElement } from 'chart.js';
import './NetFilter.css';

// 注册必要的比例尺、控制器和元素
Chart.register(CategoryScale, LinearScale, LineController, LineElement, PointElement);

const NetFilter = () => {
  const [isSniffing, setIsSniffing] = useState(false);
  const [filter, setFilter] = useState('All');
  const logDivRef = useRef(null);
  const cumulativeChartRef = useRef(null);
  const unitTimeChartRef = useRef(null);
  const socket = useRef(null);

  useEffect(() => {
    socket.current = io('http://127.0.0.1:5555', {
      transports: ['websocket', 'polling'],
      pingTimeout: 60000,
      pingInterval: 25000,
      withCredentials: true,
      reconnection: true,
      reconnectionAttempts: 5,
      reconnectionDelay: 3000,
      debug: true,  // 启用调试模式
    });

    socket.current.on('connect', () => {
      console.log('已经与后端建立了连接');  // 确保连接成功
    });

    socket.current.on('connect_error', (error) => {
      console.error('Connection error:', error);  // 检查连接错误
    });

    socket.current.on('disconnect', (reason) => {
      console.log('Disconnected:', reason);
    });

    // 确保事件监听器在连接成功后立即注册
    socket.current.on('packet', (log_entry) => {
        console.log('Received packet log:', log_entry);  // 调试信息
        logDivRef.current.innerHTML += `<p>${log_entry}</p>`;
        logDivRef.current.scrollTop = logDivRef.current.scrollHeight;
      }
    );

    const cumulativeCtx = document.getElementById('cumulativeChart')?.getContext('2d');
    const unitTimeCtx = document.getElementById('unitTimeChart')?.getContext('2d');

    if (!cumulativeCtx || !unitTimeCtx) {
      console.error('Canvas context not found');
      return;
    }

    // 销毁旧图表
    if (cumulativeChartRef.current) {
      cumulativeChartRef.current.destroy();
    }
    if (unitTimeChartRef.current) {
      unitTimeChartRef.current.destroy();
    }

    // 初始化新图表
    cumulativeChartRef.current = new Chart(cumulativeCtx, {
      type: 'line',
      data: {
        labels: [],
        datasets: [{
          label: '累积数据包数量',
          data: [],
          borderColor: '#00d2ff',
          fill: false
        }]
      },
      options: {
        scales: {
          x: {
            type: 'category',
            title: { display: true, text: '时间', color: 'white', font: { size: 16 } },
            ticks: { color: 'white', font: { size: 14 } }
          },
          y: {
            type: 'linear',
            title: { display: true, text: '数据包数量', color: 'white', font: { size: 16 } },
            beginAtZero: true,
            ticks: { color: 'white', font: { size: 14 } }
          }
        },
        plugins: {
          legend: { display: false },
          tooltip: { enabled: true }
        }
      }
    });

    unitTimeChartRef.current = new Chart(unitTimeCtx, {
      type: 'line',
      data: {
        labels: [],
        datasets: [{
          label: '单位时间数据包数量',
          data: [],
          borderColor: '#ff6384',
          fill: false
        }]
      },
      options: {
        scales: {
          x: {
            type: 'category',
            title: { display: true, text: '时间', color: 'white', font: { size: 16 } },
            ticks: { color: 'white', font: { size: 14 } }
          },
          y: {
            type: 'linear',
            title: { display: true, text: '数据包数量', color: 'white', font: { size: 16 } },
            beginAtZero: true,
            ticks: { color: 'white', font: { size: 14 } }
          }
        },
        plugins: {
          legend: { display: false },
          tooltip: { enabled: true }
        }
      }
    });

    socket.current.on('arp_alert', (alert) => {
      alert(alert);
    });

    socket.current.on('sniffing_status', (data) => {
      console.log('Sniffing status:', data);
      setIsSniffing(data.status === 'started');
      updateGuiLog(data.status === 'started' ? "[+] 抓包已开始" : "[!] 抓包已停止");
    });

    socket.current.on('packet_stats', (stats) => {
      if (cumulativeChartRef.current && unitTimeChartRef.current) {
        cumulativeChartRef.current.data.labels = stats.labels;
        cumulativeChartRef.current.data.datasets[0].data = stats.cumulative;
        cumulativeChartRef.current.update();

        unitTimeChartRef.current.data.labels = stats.labels;
        unitTimeChartRef.current.data.datasets[0].data = stats.unit_time;
        unitTimeChartRef.current.update();
      }
    });

    return () => {
      // 组件卸载时销毁图表并断开连接
      if (cumulativeChartRef.current) {
        cumulativeChartRef.current.destroy();
      }
      if (unitTimeChartRef.current) {
        unitTimeChartRef.current.destroy();
      }
      if (socket.current) {
        socket.current.disconnect();
      }
      // 组件卸载时移除事件监听器
      if (socket.current) {
        socket.current.off('packet_log');
      }
    };
  }, []);

  const handleStart = () => {
    if (socket.current) {
      console.log('正在开始对:', filter,'数据包信息进行记录');  // 调试日志
      socket.current.emit('start_sniffing', { filter_option: filter }, (response) => {
          console.log('已向发送')
        if (response) {
          console.log('后端的响应为:', response);  // 后端响应日志
        } else {
          console.error('后端无任何响应');  // 无响应日志
        }
      });
      setIsSniffing(true);  // 更新 isSniffing 为 true
    } else {
      console.error('Socket is not connected');
    }
  };

  const handleStop = () => {
    if (socket.current) {
      console.log('已经停止监控');  // 调试日志
      socket.current.emit('stop_sniffing');
      setIsSniffing(false);  // 更新 isSniffing 为 false
    } else {
      console.error('Socket is not connected');
    }
  };

  const updateGuiLog = (message) => {
    if (logDivRef.current) {
      logDivRef.current.innerHTML += `<p>${message}</p>`;
      logDivRef.current.scrollTop = logDivRef.current.scrollHeight;
    }
  };

  const handleFilterChange = (e) => {
    setFilter(e.target.value);
    if (isSniffing) {
      socket.current.emit('update_filter', e.target.value);
      updateGuiLog(`[+] 过滤器已更新为: ${e.target.value}`);
    }
  };

  const handleIntervalChange = (interval) => {
    socket.current.emit('set_interval', interval);
  };

  const handleFullscreen = (chartType) => {
    const chartContainer = chartType === 'cumulative'
      ? cumulativeChartRef.current.canvas.parentElement
      : unitTimeChartRef.current.canvas.parentElement;
    chartContainer.classList.add('fullscreen');
    addExitButton(chartContainer);
  };

  const addExitButton = (container) => {
    const exitButton = document.createElement('button');
    exitButton.className = 'exit-fullscreen';
    exitButton.innerText = '退出全屏';
    exitButton.addEventListener('click', () => {
      container.classList.remove('fullscreen');
      exitButton.remove();
    });
    container.appendChild(exitButton);
  };

  return (
    <div className="net-filter-container">
      <h1>数据包嗅探器 & ARP欺骗检测</h1>
      <div className="controls">
        <select id="filter" value={filter} onChange={handleFilterChange}>
          <option value="All">全部</option>
          <option value="ARP">ARP</option>
          <option value="DNS">DNS</option>
          <option value="TCP">TCP</option>
          <option value="UDP">UDP</option>
          <option value="HTTP">HTTP</option>
        </select>
        <button id="start" onClick={handleStart} disabled={isSniffing}>开始抓包</button>
        <button id="stop" onClick={handleStop} disabled={!isSniffing}>停止抓包</button>
      </div>
      <div className={`status-indicator ${isSniffing ? 'active' : ''}`}>
        <div className="dot"></div>
        <span id="status-text">{isSniffing ? '抓包中...' : '抓包已停止'}</span>
      </div>
      <div id="log" ref={logDivRef}></div>
      <div className="chart-container">
        <div className="chart-box">
          <h2>累积数据包数量</h2>
          <div className="chart-controls">
            <button onClick={() => handleIntervalChange(60)}>每分钟</button>
            <button onClick={() => handleIntervalChange(300)}>每5分钟</button>
            <button onClick={() => handleFullscreen('cumulative')}>全屏显示</button>
          </div>
          <canvas id="cumulativeChart" key="cumulativeChart"></canvas>
        </div>
        <div className="chart-box">
          <h2>单位时间数据包数量</h2>
          <div className="chart-controls">
            <button onClick={() => handleIntervalChange(60)}>每分钟</button>
            <button onClick={() => handleIntervalChange(300)}>每5分钟</button>
            <button onClick={() => handleFullscreen('unitTime')}>全屏显示</button>
          </div>
          <canvas id="unitTimeChart" key="unitTimeChart"></canvas>
        </div>
      </div>
    </div>
  );
};

export default NetFilter;
2️⃣ 漏洞扫描模块
-
一键启动漏洞扫描流程
-
分类展示高风险/处理中/已修复漏洞
-
提供 CVE 编号、风险等级、修复建议等技术说明
-
自动生成漏洞检测报告(PDF导出)
import React, { useState } from 'react';
import { FaBug, FaShieldAlt, FaChartBar, FaSearch, FaExclamationTriangle } from 'react-icons/fa';

function VulnerabilityScan() {
  const [scanResults, setScanResults] = useState([
    { id: 1, name: 'CVE-2023-1234', severity: 'high', description: '远程代码执行漏洞', status: '未修复' },
    { id: 2, name: 'CVE-2023-5678', severity: 'medium', description: '权限提升漏洞', status: '已修复' },
    { id: 3, name: 'CVE-2023-9101', severity: 'low', description: '信息泄露漏洞', status: '未修复' }
  ]);

  const [selectedVulnerability, setSelectedVulnerability] = useState(null);

  const handleScan = () => {
    // 模拟扫描结果
    setScanResults([
      ...scanResults,
      { id: 4, name: 'CVE-2023-1122', severity: 'high', description: 'SQL注入漏洞', status: '未修复' }
    ]);
  };

  return (
    <section className="vulnerability-scan-section">
      <h2><FaBug /> 漏洞扫描</h2>

      <div className="scan-controls">
        <button className="scan-btn" onClick={handleScan}>
          <FaSearch />
          <span>开始扫描</span>
        </button>
      </div>

      <div className="scan-results">
        <div className="results-overview">
          <div className="overview-card">
            <div className="card-header">
              <FaExclamationTriangle />
              <h3>高风险漏洞</h3>
            </div>
            <div className="card-content">
              <span className="count">2</span>
              <p>需要立即处理</p>
            </div>
          </div>

          <div className="overview-card">
            <div className="card-header">
              <FaShieldAlt />
              <h3>已修复漏洞</h3>
            </div>
            <div className="card-content">
              <span className="count">1</span>
              <p>已处理完成</p>
            </div>
          </div>

          <div className="overview-card">
            <div className="card-header">
              <FaChartBar />
              <h3>总漏洞数</h3>
            </div>
            <div className="card-content">
              <span className="count">3</span>
              <p>已检测到</p>
            </div>
          </div>
        </div>

        <div className="results-details">
          <h3>漏洞详情</h3>
          <table className="vulnerabilities-table">
            <thead>
              <tr>
                <th>漏洞编号</th>
                <th>严重程度</th>
                <th>描述</th>
                <th>状态</th>
              </tr>
            </thead>
            <tbody>
              {scanResults.map(vuln => (
                <tr
                  key={vuln.id}
                  className={`${vuln.severity} ${selectedVulnerability?.id === vuln.id ? 'selected' : ''}`}
                  onClick={() => setSelectedVulnerability(vuln)}
                >
                  <td>{vuln.name}</td>
                  <td>
                    <span className={`severity-badge ${vuln.severity}`}>
                      {vuln.severity === 'high' ? '高' : vuln.severity === 'medium' ? '中' : '低'}
                    </span>
                  </td>
                  <td>{vuln.description}</td>
                  <td>{vuln.status}</td>
                </tr>
              ))}
            </tbody>
          </table>
        </div>
      </div>

      {selectedVulnerability && (
        <div className="vulnerability-details">
          <h4>漏洞详情:{selectedVulnerability.name}</h4>
          <div className="details-content">
            <p><strong>严重程度:</strong>
              <span className={`severity-badge ${selectedVulnerability.severity}`}>
                {selectedVulnerability.severity === 'high' ? '高' :
                 selectedVulnerability.severity === 'medium' ? '中' : '低'}
              </span>
            </p>
            <p><strong>描述:</strong>{selectedVulnerability.description}</p>
            <p><strong>状态:</strong>{selectedVulnerability.status}</p>
            <p><strong>建议:</strong>请及时更新相关软件版本或应用安全补丁。</p>
          </div>
        </div>
      )}
    </section>
  );
}

export default VulnerabilityScan;
3️⃣ 黑名单管理与网络状态可视化
-
支持手动/自动添加恶意IP
-
核心网络设备状态实时监控(如路由器/交换机/服务器)
-
动态折线图展示网络流量趋势
import React from 'react';
import { FaDesktop, FaBug, FaKey } from 'react-icons/fa';
function HostVulnerability() {
return (
<section className="host-vulnerability-section">
<h2>主机与漏洞概览</h2>
<div className="overview-cards">
<div className="card">
<div className="card-header">
<FaDesktop />
<h3>主机发现</h3>
</div>
<div className="card-content">
<div className="stat">24</div>
<p>最近扫描到的主机数量</p>
<button className="view-details-btn">查看详情</button>
</div>
</div>
<div className="card">
<div className="card-header">
<FaBug />
<h3>漏洞扫描</h3>
</div>
<div className="card-content">
<div className="stat">7</div>
<p>最近检测到的漏洞数量</p>
<div className="vulnerability-levels">
<span className="level high">高: 2</span>
<span className="level medium">中: 3</span>
<span className="level low">低: 2</span>
</div>
<button className="view-details-btn">查看详情</button>
</div>
</div>
<div className="card">
<div className="card-header">
<FaKey />
<h3>弱密码检测</h3>
</div>
<div className="card-content">
<div className="stat">5</div>
<p>检测到的弱密码设备数量</p>
<button className="view-details-btn">查看详情</button>
</div>
</div>
</div>
</section>
);
}
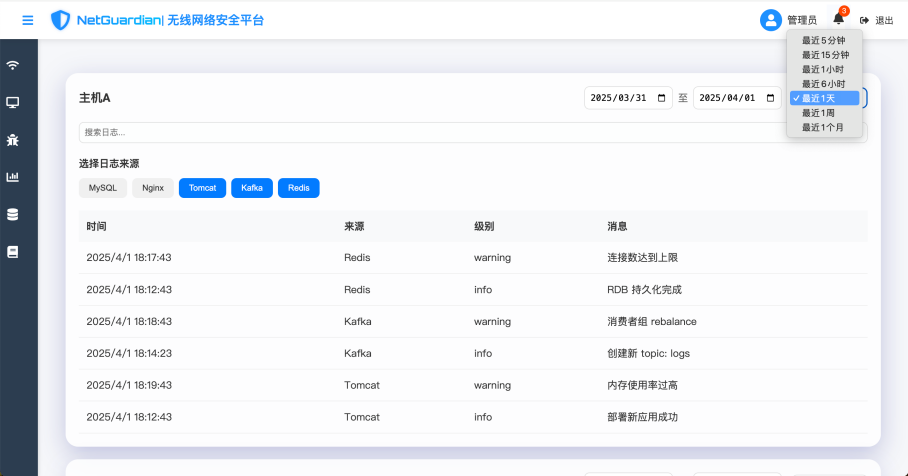
export default HostVulnerability;4️⃣ 日志分析模块
-
支持多主机日志对比(主机A / 主机B)
-
日志来源支持 MySQL / Nginx / Tomcat 等
-
时间范围筛选、日志等级过滤、关键词搜索
-
保留6个月历史记录,满足安全审计需求
import React, { useState, useEffect } from 'react';
import styled from 'styled-components';
import './Knowledge.css'; // 引入CSS文件

// 使用styled-components定义样式
const Loading = styled.div`
  margin-top: 10px;
  padding: 10px;
  border-radius: 4px;
  font-size: 14px;
  text-align: center;
  background-color: #f8f9fa;
  color: #666;
`;

// 新增卡片样式
const Card = styled.div`
  background: rgba(255, 255, 255, 0.8);
  border-radius: 20px;
  padding: 20px;
  margin: 15px 0;
  box-shadow: 0 8px 32px 0 rgba(31, 38, 135, 0.15);
  backdrop-filter: blur(10px);
  border: 1px solid rgba(255, 255, 255, 0.18);
  transition: all 0.3s ease;

  &:hover {
    transform: translateY(-5px);
    box-shadow: 0 12px 40px 0 rgba(31, 38, 135, 0.25);
  }
`;

// 日志解析器
const getLogParser = (source) => {
  const parsers = {
    mysql: (log) => ({
      timestamp: new Date(log.timestamp),
      message: log.message,
      level: log.level || 'info',
      source: 'MySQL'
    }),
    mongodb: (log) => ({
      timestamp: new Date(log.timestamp),
      message: log.message,
      level: log.level || 'info',
      source: 'MongoDB'
    }),
    tomcat: (log) => ({
      timestamp: new Date(log.timestamp),
      message: log.message,
      level: log.level || 'info',
      source: 'Tomcat'
    }),
    nginx: (log) => ({
      timestamp: new Date(log.timestamp),
      message: log.message,
      level: log.level || 'info',
      source: 'Nginx'
    }),
    kafka: (log) => ({
      timestamp: new Date(log.timestamp),
      message: log.message,
      level: log.level || 'info',
      source: 'Kafka'
    }),
    redis: (log) => ({
      timestamp: new Date(log.timestamp),
      message: log.message,
      level: log.level || 'info',
      source: 'Redis'
    })
  };
  return parsers[source] || (log => log);
};

// 封装模块组件
const LogModule = ({ hostName, apiEndpoint }) => {
  const [logData, setLogData] = useState([]);
  const [filteredData, setFilteredData] = useState([]);
  const [searchTerm, setSearchTerm] = useState('');
  const [dateRange, setDateRange] = useState([null, null]);
  const [timeInterval, setTimeInterval] = useState('1h');
  const [isLoading, setIsLoading] = useState(false);
  const [selectedSources, setSelectedSources] = useState([]);

  // 中间件选项
  const middlewareOptions = [
    { value: 'mysql', label: 'MySQL' },
    { value: 'nginx', label: 'Nginx' },
    { value: 'tomcat', label: 'Tomcat' },
    { value: 'kafka', label: 'Kafka' },
    { value: 'redis', label: 'Redis' }
  ];

  // 根据时间间隔更新日期范围
  const updateDateRange = (interval) => {
    const now = new Date();
    let startDate = new Date(now);

    switch (interval) {
      case '5m':
        startDate.setMinutes(now.getMinutes() - 5);
        break;
      case '15m':
        startDate.setMinutes(now.getMinutes() - 15);
        break;
      case '1h':
        startDate.setHours(now.getHours() - 1);
        break;
      case '6h':
        startDate.setHours(now.getHours() - 6);
        break;
      case '1d':
        startDate.setDate(now.getDate() - 1);
        break;
      case '1w':
        startDate.setDate(now.getDate() - 7);
        break;
      case '1mo':
        startDate.setMonth(now.getMonth() - 1);
        break;
      default:
        startDate = null;
    }

    setDateRange([startDate, now]);
  };

  // 处理时间间隔变化
  const handleTimeIntervalChange = (e) => {
    const newInterval = e.target.value;
    setTimeInterval(newInterval);
    updateDateRange(newInterval);
  };

  // 获取日志数据
  useEffect(() => {
    const mockLogs = {
      mysql: [
        { timestamp: new Date().toISOString(), message: '数据库连接成功', level: 'info' },
        { timestamp: new Date(Date.now() - 300000).toISOString(), message: '查询执行时间过长', level: 'warning' },
        { timestamp: new Date(Date.now() - 600000).toISOString(), message: '数据库备份完成', level: 'info' }
      ],
      nginx: [
        { timestamp: new Date().toISOString(), message: '200 GET /index.html', level: 'info' },
        { timestamp: new Date(Date.now() - 120000).toISOString(), message: '404 GET /nonexistent', level: 'error' },
        { timestamp: new Date(Date.now() - 300000).toISOString(), message: '502 Bad Gateway', level: 'error' }
      ],
      tomcat: [
        { timestamp: new Date().toISOString(), message: '服务器启动完成', level: 'info' },
        { timestamp: new Date(Date.now() - 180000).toISOString(), message: '内存使用率过高', level: 'warning' },
        { timestamp: new Date(Date.now() - 600000).toISOString(), message: '部署新应用成功', level: 'info' }
      ],
      kafka: [
        { timestamp: new Date().toISOString(), message: '新消息到达 topic: test', level: 'info' },
        { timestamp: new Date(Date.now() - 240000).toISOString(), message: '消费者组 rebalance', level: 'warning' },
        { timestamp: new Date(Date.now() - 500000).toISOString(), message: '创建新 topic: logs', level: 'info' }
      ],
      redis: [
        { timestamp: new Date().toISOString(), message: '内存使用量: 512MB', level: 'info' },
        { timestamp: new Date(Date.now() - 300000).toISOString(), message: '连接数达到上限', level: 'warning' },
        { timestamp: new Date(Date.now() - 600000).toISOString(), message: 'RDB 持久化完成', level: 'info' }
      ]
    };

    const fetchLogs = async () => {
      if (selectedSources.length === 0) {
        setLogData([]);
        return;
      }

      setIsLoading(true);

      try {
        // 模拟API请求延迟
        await new Promise(resolve => setTimeout(resolve, 500));

        const allLogs = selectedSources.map(source => {
          const parser = getLogParser(source);
          return mockLogs[source].map(parser);
        });

        setLogData(allLogs.flat());
      } catch (err) {
        console.error('获取日志失败:', err);
      } finally {
        setIsLoading(false);
      }
    };

    fetchLogs();
  }, [hostName, selectedSources, apiEndpoint, timeInterval]);

  // 过滤日志
  useEffect(() => {
    let filtered = logData.filter(log => {
      const matchesSearch = log.message.toLowerCase().includes(searchTerm.toLowerCase());
      const matchesDate = (!dateRange[0] || log.timestamp >= dateRange[0]) &&
                         (!dateRange[1] || log.timestamp <= dateRange[1]);
      return matchesSearch && matchesDate;
    });
    setFilteredData(filtered);
  }, [searchTerm, dateRange, logData]);

  return (
    <Card>
      {/* 主机名称和时间范围 */}
      <div style={{ display: 'flex', alignItems: 'center', justifyContent: 'space-between', marginBottom: '20px' }}>
        <h3 style={{ margin: 0 }}>{hostName}</h3>
        <div style={{ display: 'flex', alignItems: 'center', gap: '16px' }}>
          <div style={{ display: 'flex', alignItems: 'center', gap: '8px' }}>
            <input
              type="date"
              value={dateRange[0] ? dateRange[0].toISOString().split('T')[0] : ''}
              onChange={(e) => setDateRange([new Date(e.target.value), dateRange[1]])}
              disabled={isLoading}
              style={{
                padding: '8px',
                borderRadius: '8px',
                border: '1px solid #ddd',
                color: '#000',
                backgroundColor: '#fff',
                fontSize: '14px'
              }}
            />
            <span style={{ color: '#666' }}>至</span>
            <input
              type="date"
              value={dateRange[1] ? dateRange[1].toISOString().split('T')[0] : ''}
              onChange={(e) => setDateRange([dateRange[0], new Date(e.target.value)])}
              disabled={isLoading}
              style={{
                padding: '8px',
                borderRadius: '8px',
                border: '1px solid #ddd',
                color: '#000',
                backgroundColor: '#fff',
                fontSize: '14px'
              }}
            />
          </div>
          <select
            value={timeInterval}
            onChange={handleTimeIntervalChange}
            disabled={isLoading}
            style={{
              padding: '8px 16px',
              borderRadius: '8px',
              border: '1px solid #ddd',
              backgroundColor: '#fff',
              color: '#000',
              fontSize: '14px',
              cursor: 'pointer',
              appearance: 'none',
              backgroundImage: `url("data:image/svg+xml;charset=UTF-8,%3csvg xmlns='http://www.w3.org/2000/svg' viewBox='0 0 24 24' fill='none' stroke='currentColor' stroke-width='2' stroke-linecap='round' stroke-linejoin='round'%3e%3cpolyline points='6 9 12 15 18 9'%3e%3c/polyline%3e%3c/svg%3e")`,
              backgroundRepeat: 'no-repeat',
              backgroundPosition: 'right 8px center',
              backgroundSize: '16px',
              minWidth: '120px'
            }}
          >
            <option value="5m">最近5分钟</option>
            <option value="15m">最近15分钟</option>
            <option value="1h">最近1小时</option>
            <option value="6h">最近6小时</option>
            <option value="1d">最近1天</option>
            <option value="1w">最近1周</option>
            <option value="1mo">最近1个月</option>
          </select>
        </div>
      </div>

      {/* 搜索日志 */}
      <div style={{ marginBottom: '20px' }}>
        <input
          type="text"
          value={searchTerm}
          onChange={(e) => setSearchTerm(e.target.value)}
          placeholder="搜索日志..."
          disabled={isLoading}
          style={{ width: '100%', padding: '8px', borderRadius: '8px', border: '1px solid #ddd' }}
        />
      </div>

      {/* 选择日志来源 */}
      <div style={{ marginBottom: '20px' }}>
        <h4 style={{ marginBottom: '10px' }}>选择日志来源</h4>
        <div style={{ display: 'flex', gap: '8px', flexWrap: 'wrap' }}>
          {middlewareOptions.map(option => (
            <button
              key={option.value}
              style={{
                padding: '8px 16px',
                borderRadius: '8px',
                border: 'none',
                background: selectedSources.includes(option.value) ? '#007bff' : '#f0f0f0',
                color: selectedSources.includes(option.value) ? '#fff' : '#333',
                cursor: 'pointer',
                transition: 'all 0.2s ease'
              }}
              onClick={() => setSelectedSources(prev =>
                prev.includes(option.value)
                  ? prev.filter(item => item !== option.value)
                  : [...prev, option.value]
              )}
            >
              {option.label}
            </button>
          ))}
        </div>
      </div>

      {/* 日志显示区域 */}
      <div style={{ maxHeight: '400px', overflowY: 'auto' }}>
        <table style={{ width: '100%', borderCollapse: 'collapse' }}>
          <thead>
            <tr style={{ background: '#f8f9fa' }}>
              <th style={{ padding: '12px', textAlign: 'left' }}>时间</th>
              <th style={{ padding: '12px', textAlign: 'left' }}>来源</th>
              <th style={{ padding: '12px', textAlign: 'left' }}>级别</th>
              <th style={{ padding: '12px', textAlign: 'left' }}>消息</th>
            </tr>
          </thead>
          <tbody>
            {filteredData.map((log, index) => (
              <tr key={index} style={{ borderBottom: '1px solid #eee' }}>
                <td style={{ padding: '12px' }}>{new Date(log.timestamp).toLocaleString()}</td>
                <td style={{ padding: '12px' }}>{log.source}</td>
                <td style={{ padding: '12px' }}>{log.level}</td>
                <td style={{ padding: '12px' }}>{log.message}</td>
              </tr>
            ))}
          </tbody>
        </table>
      </div>

      {isLoading && <Loading>加载中...</Loading>}
    </Card>
  );
};

// 主组件
const Knowledge = () => {
  const hosts = [
    { name: '主机A' },
    { name: '主机B' },
    { name: '主机C' }
  ];

  return (
    <div style={{ padding: '20px' }}>
      {hosts.map(host => (
        <LogModule
          key={host.name}
          hostName={host.name}
          apiEndpoint="/api/logs"
        />
      ))}
    </div>
  );
};

export default Knowledge;
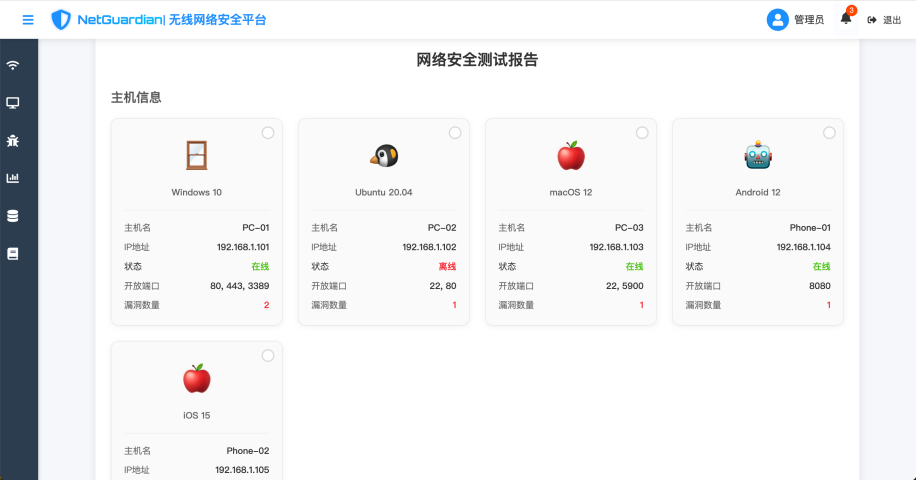
5️⃣ 报告导出功能
-
一键生成完整安全分析报告
-
导出格式:PDF / CSV
-
内容包括:设备状态、漏洞信息、黑名单记录、日志摘要等
-
import React from 'react';
import { PDFDownloadLink, Document, Page, Text, View, StyleSheet, Font } from '@react-pdf/renderer';

// 注册中文字体
Font.register({
  family: 'SimSun',
  src: '/fonts/SimSun.ttf', // 确保路径正确
});

// 定义PDF样式
const styles = StyleSheet.create({
  page: {
    padding: 30,
    fontFamily: 'SimSun', // 使用中文字体
  },
  section: {
    marginBottom: 20,
    borderBottom: '1px solid #eee',
    paddingBottom: 10,
  },
  title: {
    fontSize: 24,
    marginBottom: 20,
    color: '#333',
    fontWeight: 'bold',
  },
  subtitle: {
    fontSize: 18,
    marginBottom: 15,
    color: '#555',
  },
  text: {
    fontSize: 14,
    marginBottom: 8,
    color: '#666',
  },
  table: {
    display: 'table',
    width: '100%',
    marginTop: 20,
  },
  tableRow: {
    display: 'table-row',
  },
  tableCell: {
    display: 'table-cell',
    padding: '8px 12px',
    border: '1px solid #ddd',
  },
  tableHeader: {
    backgroundColor: '#f5f5f5',
    fontWeight: 'bold',
  }
});

// 主机信息组件
const HostInfo = ({ host, selected, onChange }) => {
  // 根据操作系统类型获取图标
  const getOSIcon = (os) => {
    const iconStyle = {
      fontSize: 48,
      color: '#666'
    };

    if (os.includes('Windows')) {
      return <span style={iconStyle}>🪟</span>; // Windows 图标
    } else if (os.includes('Android')) {
      return <span style={iconStyle}>🤖</span>; // Android 图标
    } else if (os.includes('macOS') || os.includes('iOS')) {
      return <span style={iconStyle}>🍎</span>; // 苹果系统图标
    } else if (os.includes('Linux') || os.includes('Ubuntu')) {
      return <span style={iconStyle}>🐧</span>; // Linux 图标
    } else {
      return <span style={iconStyle}>💻</span>; // 默认图标
    }
  };

  return (
    <div style={{
      position: 'relative',
      padding: 20,
      backgroundColor: selected ? '#e6f7ff' : '#fafafa',
      borderRadius: 12,
      border: `1px solid ${selected ? '#40a9ff' : '#e8e8e8'}`,
      cursor: 'pointer',
      transition: 'all 0.3s ease',
      boxShadow: '0 2px 8px rgba(0,0,0,0.05)',
      ':hover': {
        boxShadow: '0 4px 12px rgba(0,0,0,0.1)',
        transform: 'translateY(-2px)'
      }
    }} onClick={() => onChange()}>
      {/* 选择按钮 */}
      <div style={{
        position: 'absolute',
        top: 12,
        right: 12,
        width: 20,
        height: 20,
        borderRadius: '50%',
        border: `2px solid ${selected ? '#40a9ff' : '#d9d9d9'}`,
        backgroundColor: selected ? '#40a9ff' : '#fff',
        display: 'flex',
        alignItems: 'center',
        justifyContent: 'center',
        transition: 'all 0.3s ease'
      }}>
        {selected && (
          <span style={{
            color: '#fff',
            fontSize: 12,
            lineHeight: 1
          }}>✓</span>
        )}
      </div>

      {/* 系统图标 */}
      <div style={{
        textAlign: 'center',
        marginBottom: 16
      }}>
        <div style={{
          display: 'flex',
          justifyContent: 'center',
          marginBottom: 8
        }}>
          {getOSIcon(host.os)}
        </div>
        <div style={{
          fontSize: 14,
          color: '#666',
          fontWeight: 500
        }}>
          {host.os}
        </div>
      </div>

      {/* 主机信息 */}
      <div style={{
        borderTop: '1px solid #eee',
        paddingTop: 16
      }}>
        <div style={{
          display: 'flex',
          justifyContent: 'space-between',
          marginBottom: 8
        }}>
          <div style={{ fontSize: 14, color: '#666' }}>主机名</div>
          <div style={{ fontSize: 14, fontWeight: 500 }}>{host.name}</div>
        </div>
        <div style={{
          display: 'flex',
          justifyContent: 'space-between',
          marginBottom: 8
        }}>
          <div style={{ fontSize: 14, color: '#666' }}>IP地址</div>
          <div style={{ fontSize: 14, fontWeight: 500 }}>{host.ip}</div>
        </div>
        <div style={{
          display: 'flex',
          justifyContent: 'space-between',
          marginBottom: 8
        }}>
          <div style={{ fontSize: 14, color: '##666' }}>状态</div>
          <div style={{
            fontSize: 14,
            fontWeight: 500,
            color: host.status === '在线' ? '#52c41a' : '#f5222d'
          }}>
            {host.status}
          </div>
        </div>
        <div style={{
          display: 'flex',
          justifyContent: 'space-between',
          marginBottom: 8
        }}>
          <div style={{ fontSize: 14, color: '#666' }}>开放端口</div>
          <div style={{ fontSize: 14, fontWeight: 500 }}>{host.openPorts.join(', ')}</div>
        </div>
        <div style={{
          display: 'flex',
          justifyContent: 'space-between'
        }}>
          <div style={{ fontSize: 14, color: '#666' }}>漏洞数量</div>
          <div style={{
            fontSize: 14,
            fontWeight: 500,
            color: host.vulnerabilities.length > 0 ? '#f5222d' : '#52c41a'
          }}>
            {host.vulnerabilities.length}
          </div>
        </div>
      </div>
    </div>
  );
};

// 漏洞分析卡片组件
const VulnerabilityCard = ({ host, vuln, selected, onChange }) => {
  return (
    <div style={{
      position: 'relative',
      padding: 16,
      backgroundColor: selected ? '#e6f7ff' : vuln.severity === '高危' ? '#fff1f0' : '#fff7e6',
      borderRadius: 8,
      boxShadow: '0 2px 8px rgba(0,0,0,0.05)',
      cursor: 'pointer',
      transition: 'all 0.3s ease',
      ':hover': {
        boxShadow: '0 4px 12px rgba(0,0,0,0.1)',
        transform: 'translateY(-2px)'
      }
    }} onClick={() => onChange()}>
      {/* 选择按钮 */}
      <div style={{
        position: 'absolute',
        top: 12,
        right: 12,
        width: 20,
        height: 20,
        borderRadius: '50%',
        border: `2px solid ${selected ? '#40a9ff' : '#d9d9d9'}`,
        backgroundColor: selected ? '#40a9ff' : '#fff',
        display: 'flex',
        alignItems: 'center',
        justifyContent: 'center',
        transition: 'all 0.3s ease'
      }}>
        {selected && (
          <span style={{
            color: '#fff',
            fontSize: 12,
            lineHeight: 1
          }}>✓</span>
        )}
      </div>

      <div style={{ fontSize: 16, fontWeight: 500, marginBottom: 8 }}>
        {host.name} ({host.ip})
      </div>
      <div style={{ color: '#666', marginBottom: 4 }}>漏洞类型: {vuln.type}</div>
      <div style={{ color: '#666', marginBottom: 4 }}>风险等级: {vuln.severity}</div>
      <div style={{ color: '#666', marginBottom: 4 }}>描述: {vuln.description || '暂无详细描述'}</div>
      <div style={{ color: '#666' }}>建议措施: {vuln.recommendation}</div>
    </div>
  );
};

// PDF内容组件
const MyDocument = ({
  wifiSignal,
  vulnerabilities,
  hostCount,
  selectedHosts,
  selectedVulnerabilities,
  networkInfo,
  securityIssues
}) => {
  console.log('Selected Hosts:', selectedHosts);
  console.log('Selected Vulnerabilities:', selectedVulnerabilities);

  // PDF中的图标映射
  const getOSIcon = (os) => {
    if (os.includes('Windows')) {
      return '🪟';
    } else if (os.includes('Android')) {
      return '🤖';
    } else if (os.includes('macOS') || os.includes('iOS')) {
      return '🍎';
    } else if (os.includes('Linux') || os.includes('Ubuntu')) {
      return '🐧';
    } else {
      return '💻';
    }
  };

  return (
    <Document>
      <Page size="A4" style={styles.page}>
        <View style={styles.section}>
          <Text style={styles.title}>网络安全测试报告</Text>
          <Text style={styles.subtitle}>网络概况</Text>
          <Text style={styles.text}>• 当前WiFi信号强度: {wifiSignal}</Text>
          <Text style={styles.text}>• 网络类型: {networkInfo.type}</Text>
          <Text style={styles.text}>• 局域网内部主机数量: {hostCount}</Text>
        </View>

        <View style={styles.section}>
          <Text style={styles.subtitle}>主机信息</Text>
          <View style={styles.table}>
            <View style={[styles.tableRow, styles.tableHeader]}>
              <Text style={styles.tableCell}>图标</Text>
              <Text style={styles.tableCell}>主机名</Text>
              <Text style={styles.tableCell}>IP地址</Text>
              <Text style={styles.tableCell}>状态</Text>
              <Text style={styles.tableCell}>操作系统</Text>
              <Text style={styles.tableCell}>开放端口</Text>
              <Text style={styles.tableCell}>漏洞数量</Text>
            </View>
            {selectedHosts.map((host, index) => (
              <View key={index} style={styles.tableRow}>
                <Text style={styles.tableCell}>{getOSIcon(host.os)}</Text>
                <Text style={styles.tableCell}>{host.name}</Text>
                <Text style={styles.tableCell}>{host.ip}</Text>
                <Text style={styles.tableCell}>{host.status}</Text>
                <Text style={styles.tableCell}>{host.os}</Text>
                <Text style={styles.tableCell}>{host.openPorts.join(', ')}</Text>
                <Text style={styles.tableCell}>{host.vulnerabilities.length}</Text>
              </View>
            ))}
          </View>
        </View>

        <View style={styles.section}>
          <Text style={styles.subtitle}>漏洞分析</Text>
          <View style={styles.table}>
            <View style={[styles.tableRow, styles.tableHeader]}>
              <Text style={styles.tableCell}>主机名</Text>
              <Text style={styles.tableCell}>漏洞类型</Text>
              <Text style={styles.tableCell}>风险等级</Text>
              <Text style={styles.tableCell}>建议措施</Text>
            </View>
            {selectedVulnerabilities.map((vuln, index) => (
              <View key={index} style={styles.tableRow}>
                <Text style={styles.tableCell}>{vuln.host.name}</Text>
                <Text style={styles.tableCell}>{vuln.type}</Text>
                <Text style={styles.tableCell}>{vuln.severity}</Text>
                <Text style={styles.tableCell}>{vuln.recommendation}</Text>
              </View>
            ))}
          </View>
        </View>
      </Page>
    </Document>
  );
};

// 主组件
const MakePDF = ({ wifiSignal = "强", vulnerabilities = 3, hostCount = 5 }) => {
  const [hosts, setHosts] = React.useState([
    {
      name: 'PC-01',
      ip: '192.168.1.101',
      status: '在线',
      os: 'Windows 10',
      openPorts: [80, 443, 3389],
      vulnerabilities: [
        { type: 'SMB漏洞', severity: '高危', recommendation: '更新系统补丁' },
        { type: '弱密码', severity: '中危', recommendation: '加强密码策略' }
      ],
      selected: false
    },
    {
      name: 'PC-02',
      ip: '192.168.1.102',
      status: '离线',
      os: 'Ubuntu 20.04',
      openPorts: [22, 80],
      vulnerabilities: [
        { type: 'SSH弱密码', severity: '高危', recommendation: '使用密钥认证' }
      ],
      selected: false
    },
    {
      name: 'PC-03',
      ip: '192.168.1.103',
      status: '在线',
      os: 'macOS 12',
      openPorts: [22, 5900],
      vulnerabilities: [
        { type: 'VNC未加密', severity: '中危', recommendation: '启用加密' }
      ],
      selected: false
    },
    {
      name: 'Phone-01',
      ip: '192.168.1.104',
      status: '在线',
      os: 'Android 12',
      openPorts: [8080],
      vulnerabilities: [
        { type: '未加密通信', severity: '中危', recommendation: '启用HTTPS' }
      ],
      selected: false
    },
    {
      name: 'Phone-02',
      ip: '192.168.1.105',
      status: '在线',
      os: 'iOS 15',
      openPorts: [443],
      vulnerabilities: [
        { type: '越狱检测', severity: '低危', recommendation: '检查设备完整性' }
      ],
      selected: false
    }
  ]);

  const [selectedVulnerabilities, setSelectedVulnerabilities] = React.useState([]);

  const handleHostSelect = (index) => {
    const newHosts = [...hosts];
    newHosts[index].selected = !newHosts[index].selected;
    setHosts(newHosts);
  };

  const handleVulnerabilitySelect = (hostIndex, vulnIndex) => {
    const host = hosts[hostIndex];
    const vuln = host.vulnerabilities[vulnIndex];
    const isSelected = selectedVulnerabilities.some(
      v => v.host.name === host.name && v.type === vuln.type
    );

    if (isSelected) {
      setSelectedVulnerabilities(prev =>
        prev.filter(v => !(v.host.name === host.name && v.type === vuln.type))
      );
    } else {
      setSelectedVulnerabilities(prev => [...prev, { ...vuln, host }]);
    }
  };

  const selectedHosts = hosts.filter(host => host.selected);

  const networkInfo = {
    type: '有线网络',
    ip: '192.168.1.1',
    subnetMask: '255.255.255.0',
    gateway: '192.168.1.1'
  };

  const securityIssues = {
    openPorts: [80, 443, 22],
    threats: ['未加密的WiFi', '未更新的设备', '未配置的安全策略']
  };

  return (
    <div style={{
      padding: 24,
      maxWidth: 1200,
      margin: '0 auto',
      backgroundColor: '#fff',
      borderRadius: 12,
      boxShadow: '0 4px 12px rgba(0,0,0,0.1)'
    }}>
      <h2 style={{
        color: '#333',
        marginBottom: 24,
        fontSize: 24,
        fontWeight: 600,
        textAlign: 'center'
      }}>网络安全测试报告</h2>

      <div style={{ marginBottom: 32 }}>
        <h3 style={{
          color: '#555',
          marginBottom: 16,
          fontSize: 20,
          fontWeight: 500
        }}>主机信息</h3>
        <div style={{
          display: 'grid',
          gridTemplateColumns: 'repeat(auto-fit, minmax(240px, 1fr))',
          gap: 24
        }}>
          {hosts.map((host, index) => (
            <HostInfo
              key={index}
              host={host}
              selected={host.selected}
              onChange={() => handleHostSelect(index)}
            />
          ))}
        </div>
      </div>

      <div style={{ marginBottom: 32 }}>
        <h3 style={{
          color: '#555',
          marginBottom: 16,
          fontSize: 20
        }}>漏洞分析</h3>
        <div style={{
          display: 'grid',
          gridTemplateColumns: 'repeat(auto-fit, minmax(300px, 1fr))',
          gap: 16
        }}>
          {hosts.map((host, hostIndex) => (
            host.vulnerabilities.map((vuln, vulnIndex) => {
              const isSelected = selectedVulnerabilities.some(
                v => v.host.name === host.name && v.type === vuln.type
              );
              return (
                <VulnerabilityCard
                  key={`${hostIndex}-${vulnIndex}`}
                  host={host}
                  vuln={vuln}
                  selected={isSelected}
                  onChange={() => handleVulnerabilitySelect(hostIndex, vulnIndex)}
                />
              );
            })
          ))}
        </div>
      </div>

      <div style={{
        textAlign: 'center',
        marginTop: 32,
        paddingTop: 24,
        borderTop: '1px solid #eee'
      }}>
        <PDFDownloadLink
          document={<MyDocument
            wifiSignal={wifiSignal}
            vulnerabilities={vulnerabilities}
            hostCount={hostCount}
            selectedHosts={selectedHosts}
            selectedVulnerabilities={selectedVulnerabilities}
            networkInfo={networkInfo}
            securityIssues={securityIssues}
          />}
          fileName="security_report.pdf"
        >
          {({ loading }) => (
            <button style={{
              padding: '12px 32px',
              backgroundColor: '#1890ff',
              color: '#fff',
              border: 'none',
              borderRadius: 8,
              cursor: 'pointer',
              fontSize: 16,
              fontWeight: 500,
              transition: 'all 0.3s ease',
              ':hover': {
                backgroundColor: '#40a9ff',
                transform: 'translateY(-2px)',
                boxShadow: '0 4px 12px rgba(24,144,255,0.3)'
              }
            }}>
              {loading ? '生成PDF中...' : '生成PDF'}
            </button>
          )}
        </PDFDownloadLink>
      </div>
    </div>
  );
};

export default MakePDF;
六、使用方式简要说明
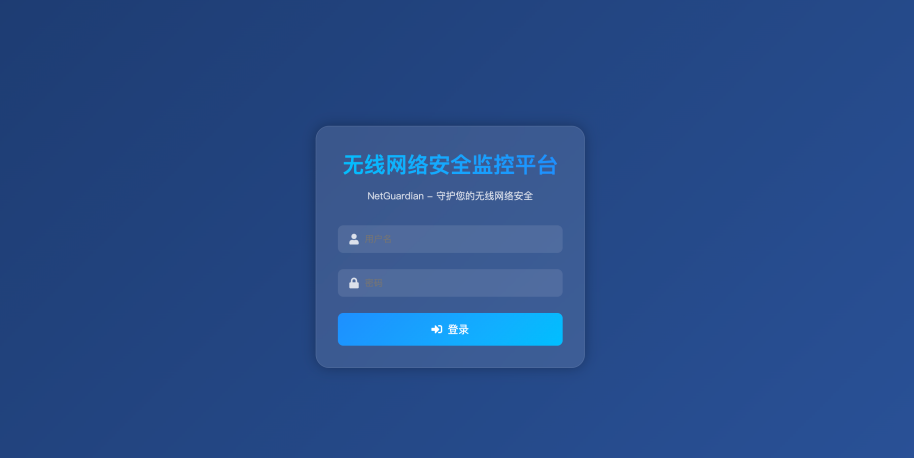
👤 登录流程
-
注册+登录验证(用户名/密码)
-
权限控制区分不同用户视图
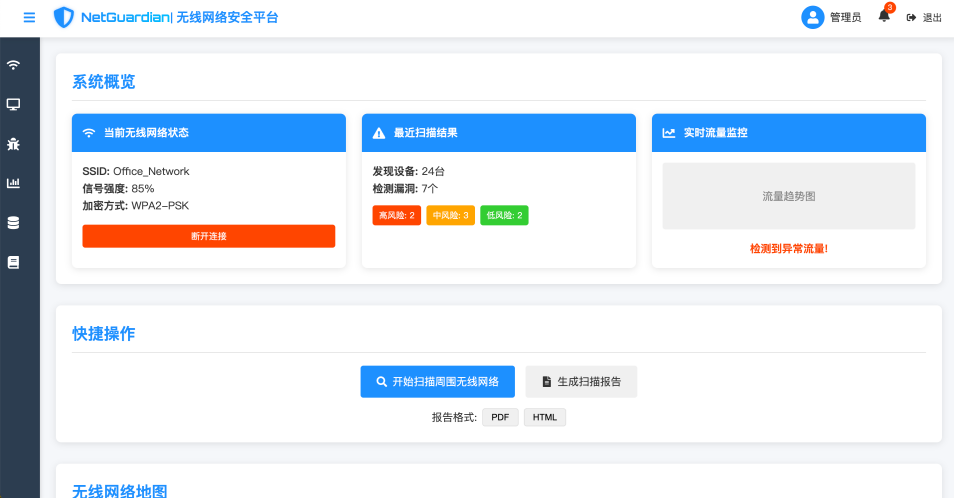
🔍 功能入口导航
-
仪表盘:首页实时状态概览
-
数据包检测:开始/停止抓包
-
漏洞扫描:点击一键检测
-
黑名单管理:IP添加/删除
-
日志中心:按主机分类分析日志
![[经验总结]Linux双机双网卡Keepalived高可用配置及验证细节](https://i-blog.csdnimg.cn/direct/bdcacfb5977c4f098e27596e28d0e0f2.png)