问卷编辑器
Date: February 20, 2025 4:17 PM (GMT+8)
目标
- 完成问卷编辑器的设计和开发
- 完成复杂系统的 UI 组件拆分
- 完成复杂系统的数据结构设计
内容
- 需求分析
- 技术方案设计
- 开发
注意事项:
- 需求指导设计,设计指导开发。前两步很重要
- 页面复杂的话,可以设计边开发
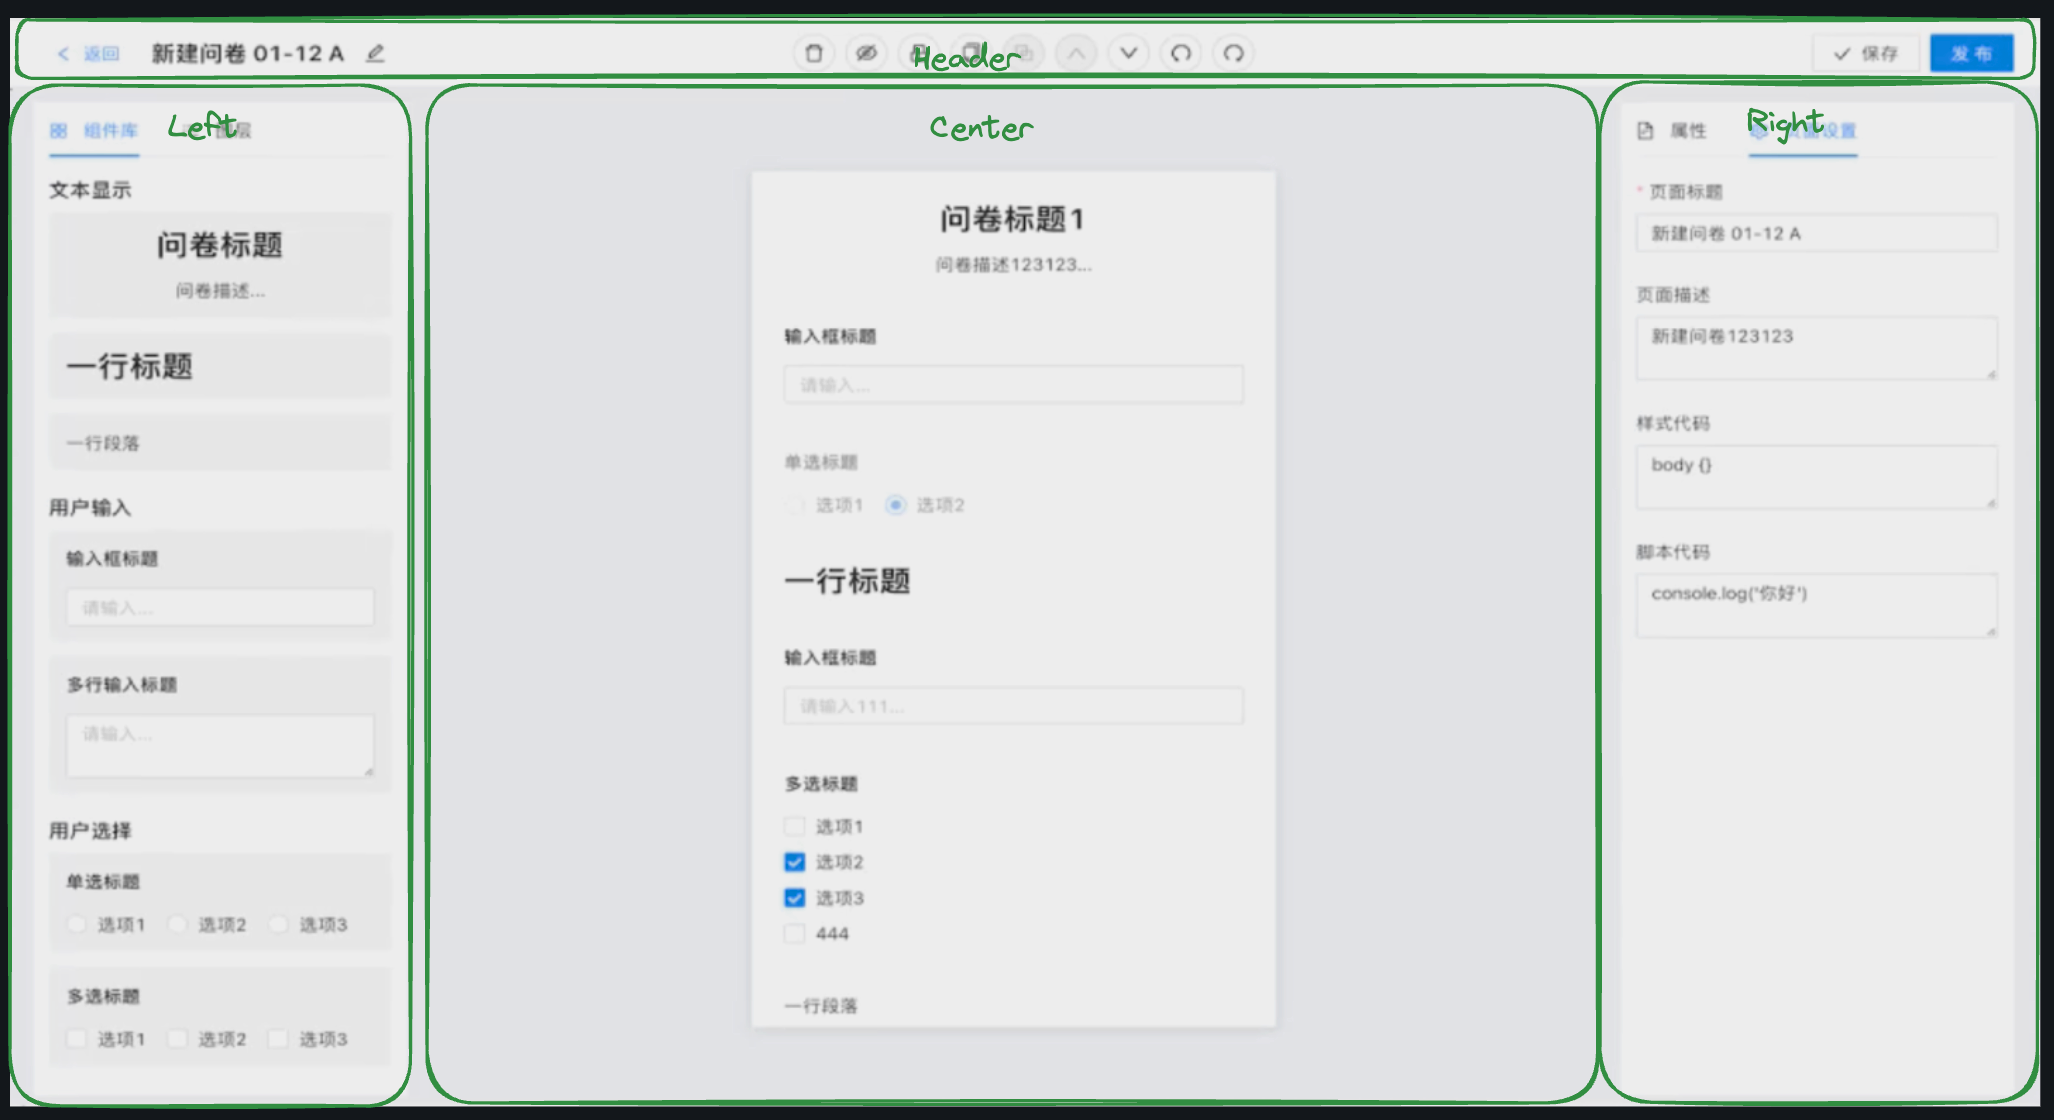
画布 UI 分析
画布UI组成:
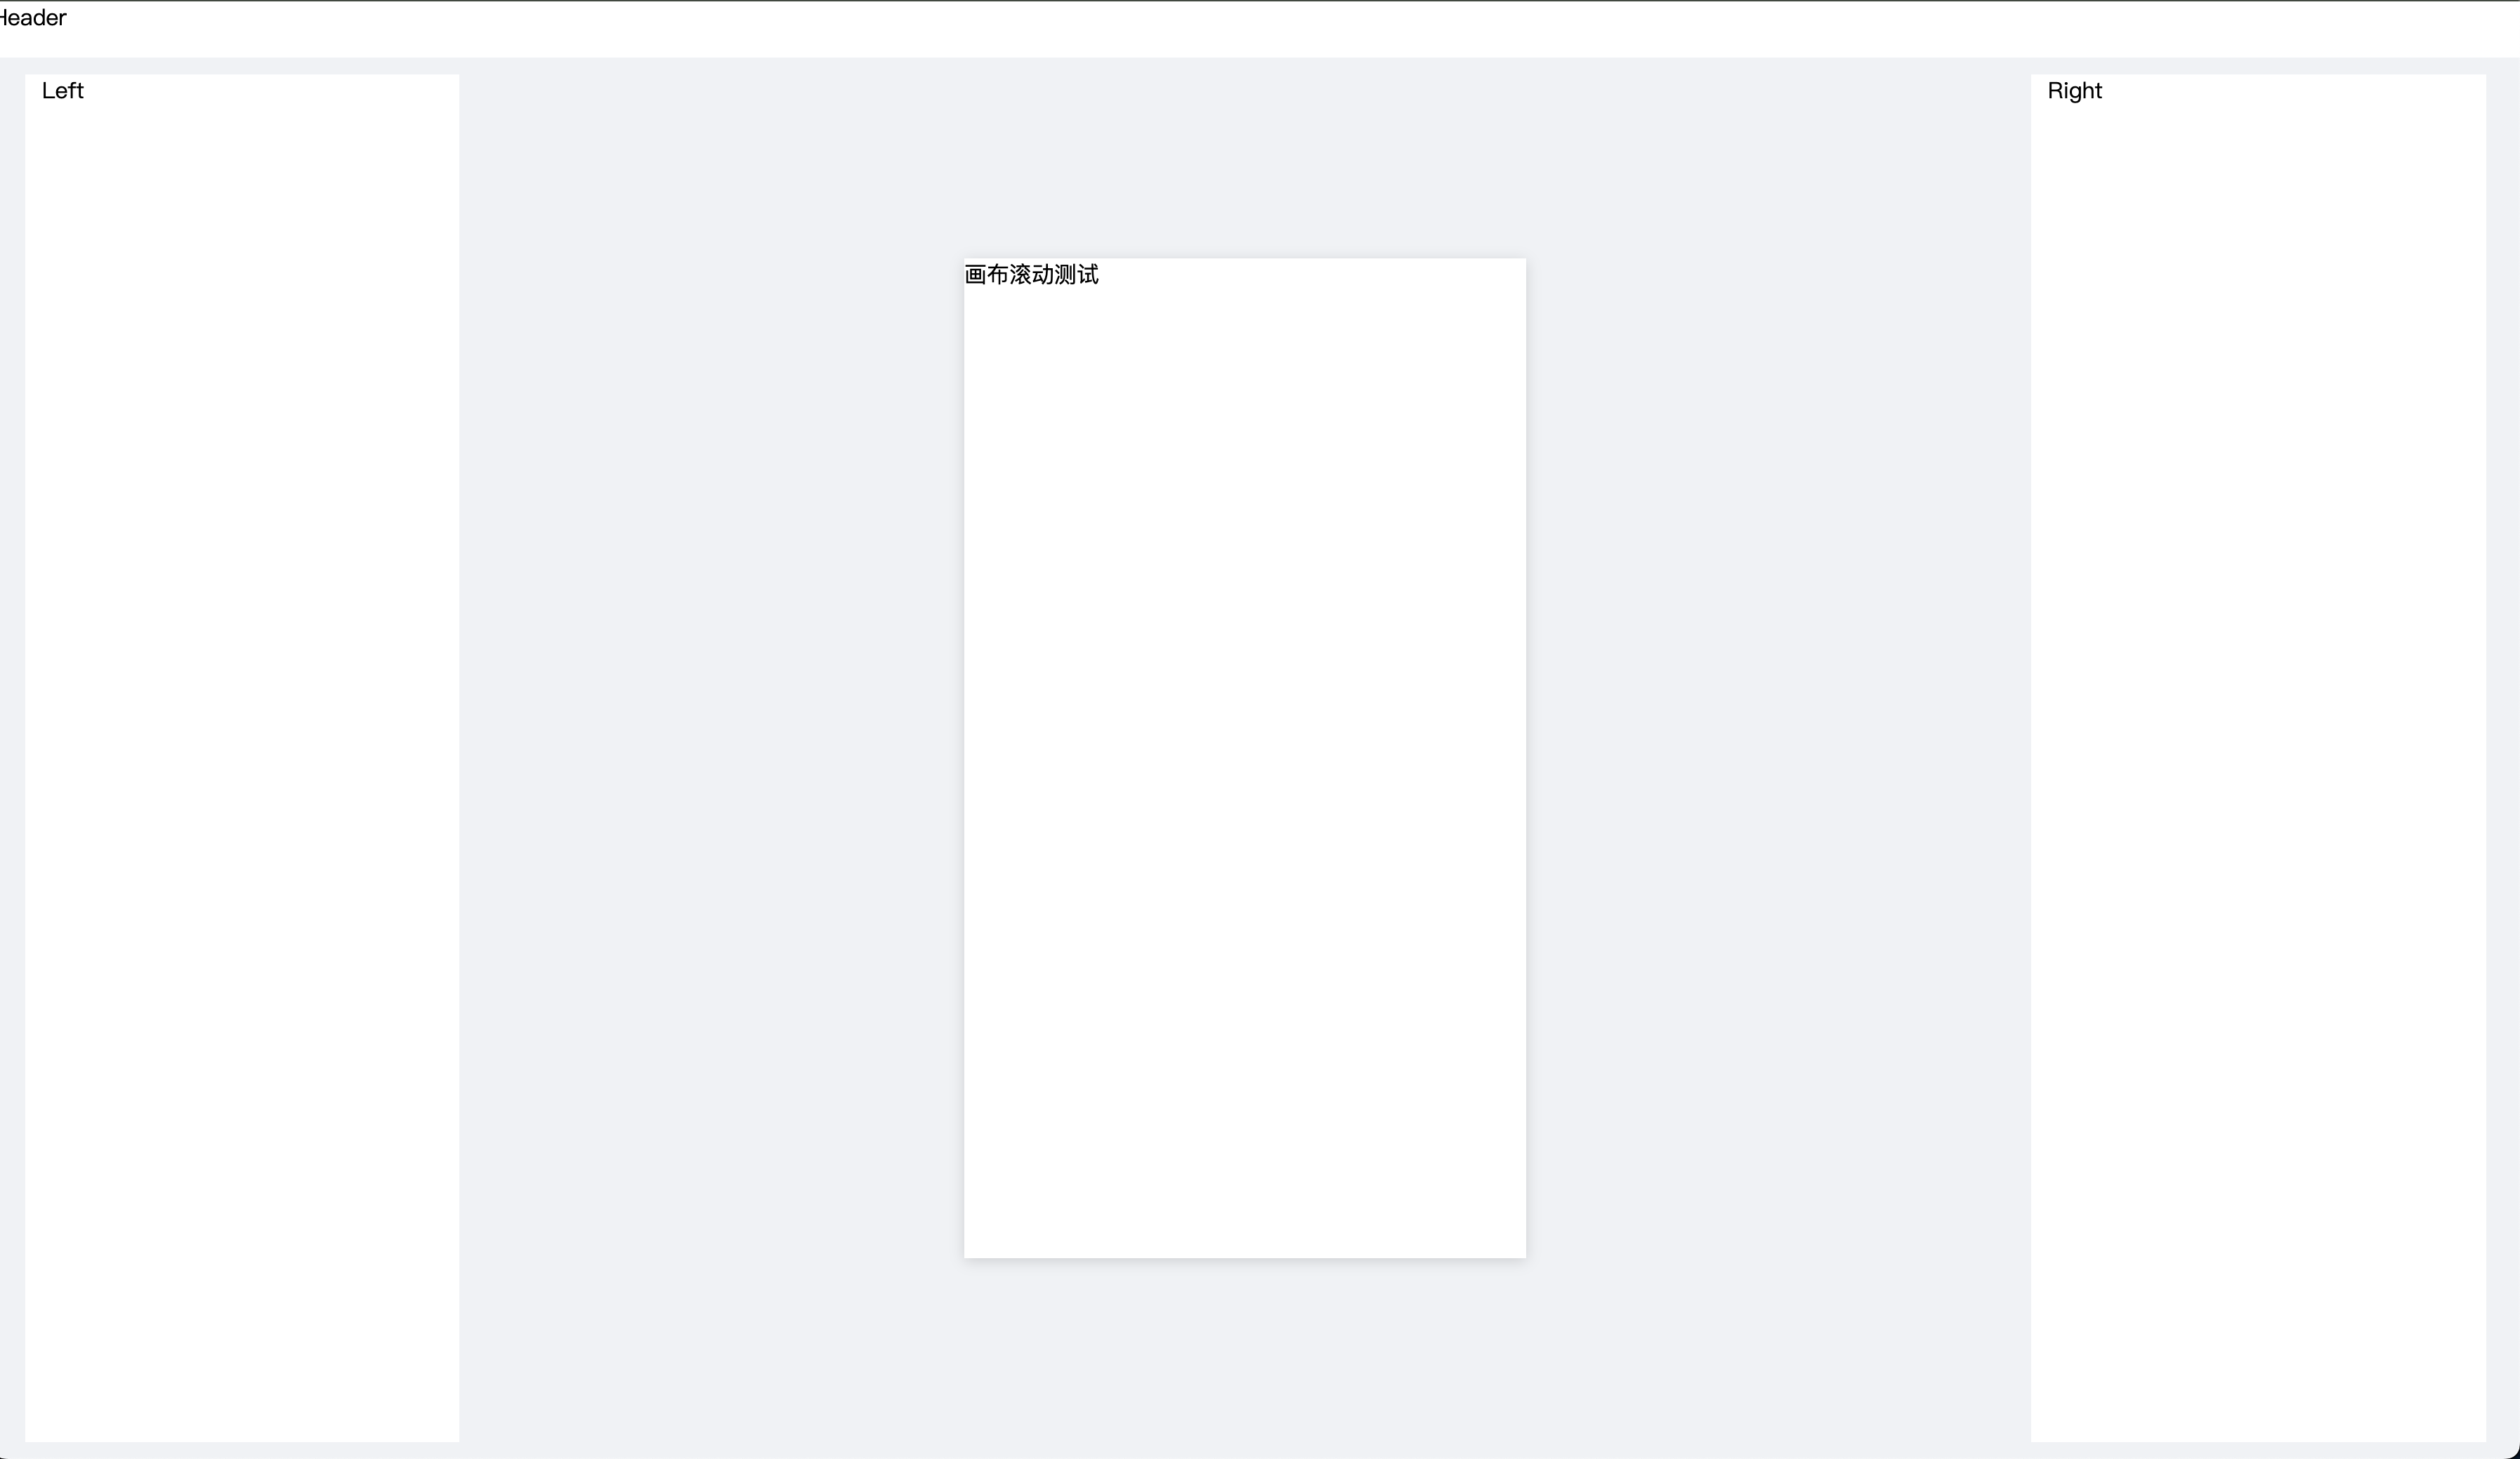
画布基础构建
画布Y轴滚动
要点:
- flex 布局
- 居中对齐
- 画布 Y 向滚动
效果:
question/Edit/index.tsx
import React, { FC } from 'react'
import styles from './index.module.scss'
// import { useParams } from 'react-router-dom'
// import useLoadQuestionData from '../../../hooks/useLoadQuestionData'

const Edit: FC = () => {
  // const { id = '' } = useParams()
  // const { loading, data } = useLoadQuestionData()

  return (
    <div className={styles.container}>
      <div style={{ backgroundColor: '#fff', height: '40px' }}>Header</div>
      <div className={styles['content-wrapper']}>
        <div className={styles.content}>
          <div className={styles.left}>Left</div>
          <div className={styles.main}>
            <div className={styles['canvas-wrapper']}>
              <div style={{ height: '900px' }}>画布滚动测试</div>
            </div>
          </div>
          <div className={styles.right}>Right</div>
        </div>
      </div>
    </div>
  )
}

export default Edit
question/Edit/index.module.scss
.container {
  display: flex;
  flex-direction: column;
  height: 100vh;
  background-color: #f0f2f5;
}

.content-wrapper {
  flex: auto;
  padding: 12px 0;
}

.content {
  display: flex;
  margin: 0 24px;
  height: 100%;
  .left {
    width: 285px;
    background-color: #fff;
    padding: 0 12px;
  }

  .main {
    flex: 1;
    position: relative;
    overflow: hidden;
    .canvas-wrapper {
      position: absolute;
      top: 50%;
      left: 50%;
      transform: translate(-50%, -50%);
      width: 400px;
      height: 712px;
      background-color: #fff;
      overflow: auto;
      box-shadow: 0 2px 10px rgba(0, 0, 0, 0.15);
    }
  }

  .right {
    width: 300px;
    background-color: #fff;
    padding: 0 12px;
  }
}
开发问卷组件:Title 和 Input
开发组件 Title
目标:
要点:
- 组件默认参数设置
{ ...QuestionInputDefaultProps, ...props }
Component.ts
import React, { FC } from 'react'
import { Typography, Input } from 'antd'
import { QuestionTitleProps, QuestionInputDefaultProps } from './interface'

const { Paragraph } = Typography
const QuestionTitle: FC<QuestionTitleProps> = (props: QuestionTitleProps) => {
  const { title = '', placeholder = '' } = {
    ...QuestionInputDefaultProps,
    ...props,
  }
  return (
    <div>
      <Paragraph strong>{title}</Paragraph>
      <div>
        <Input placeholder={placeholder}></Input>
      </div>
    </div>
  )
}
export default QuestionTitle
interface.ts
export type QuestionTitleProps = {
  title?: string
  placeholder?: string
}

export const QuestionInputDefaultProps: QuestionTitleProps = {
  title: '输入框标题',
  placeholder: '请输入内容',
}
开发组件 Input
目标:

要点:
- Input标题样式函数设计
genFontSize
Component.ts
import React, { FC } from 'react'
import { Typography } from 'antd'
import { QuestionTitleProps, defaultQuestionTitleProps } from './interface'

const { Title } = Typography
const QuestionTitle: FC<QuestionTitleProps> = (props: QuestionTitleProps) => {
  const {
    text = '',
    level = 1,
    isCenter = false,
  } = { ...defaultQuestionTitleProps, ...props }
  const genFontSize = (level: number) => {
    if (level === 1) return '24px'
    if (level === 2) return '20px'
    if (level === 3) return '16px'
    if (level === 4) return '14px'
    if (level === 5) return '12px'
    return '24px'
  }
  return (
    <Title
      level={level}
      style={{
        textAlign: isCenter ? 'center' : 'left',
        marginBottom: '0px',
        fontSize: genFontSize(level),
      }}
    >
      {text}
    </Title>
  )
}

export default QuestionTitle
interface.ts
export type QuestionTitleProps = {
  text?: string
  level?: 1 | 2 | 3 | 4 | 5
  isCenter?: boolean
}

export const defaultQuestionTitleProps: QuestionTitleProps = {
  text: '一行标题',
  level: 1,
  isCenter: false,
}
画布集成组件测试
目标:
要点:
- 画布元素禁止点击,样式设计
.componet - 标题样式上方多余空距问题处理(见下方)
EditCanvas.tsx
import React, { FC } from 'react'
import styles from './EditCanvas.module.scss'
import QuestionTitle from '../../../component/QuestionComponents/QuestionTitle/Component'
import QuestionInput from '../../../component/QuestionComponents/QuestionInput/Component'

const EditCanvas: FC = () => {
  return (
    <div className={styles.canvas}>
      <div className={styles['component-wrapper']}>
        <div className={styles.component}>
          <QuestionTitle />
        </div>
      </div>
      <div className={styles['component-wrapper']}>
        <div className={styles.component}>
          <QuestionInput />
        </div>
      </div>
    </div>
  )
}

export default EditCanvas
EidtCanvas.module.scss
.canvas {
  min-height: 100%;
  background-color: #fff;
  overflow: hidden;
}

.component-wrapper {
  margin: 12px;
  border: 1px solid #fff;
  padding: 12px;
  border-radius: 3px;

  // 新增修复代码(推荐方案)
  :global(.ant-typography) {
    margin-block-start: 0 !important;
    margin-block-end: 0 !important;
  }

  &:hover {
    border: 1px solid #d9d9d9;
  }
}

.componet {
  pointer-events: none; // 禁止点击
}
问卷数据获取与存储
问卷信息存储在 Redux 中的原因:
组件间需要不断联动,如下所示,段落的选中以及修改,都涉及到相同的数据的访问。因此,建议把问卷信息存储在 Redux 中,便于组件间共享使用。
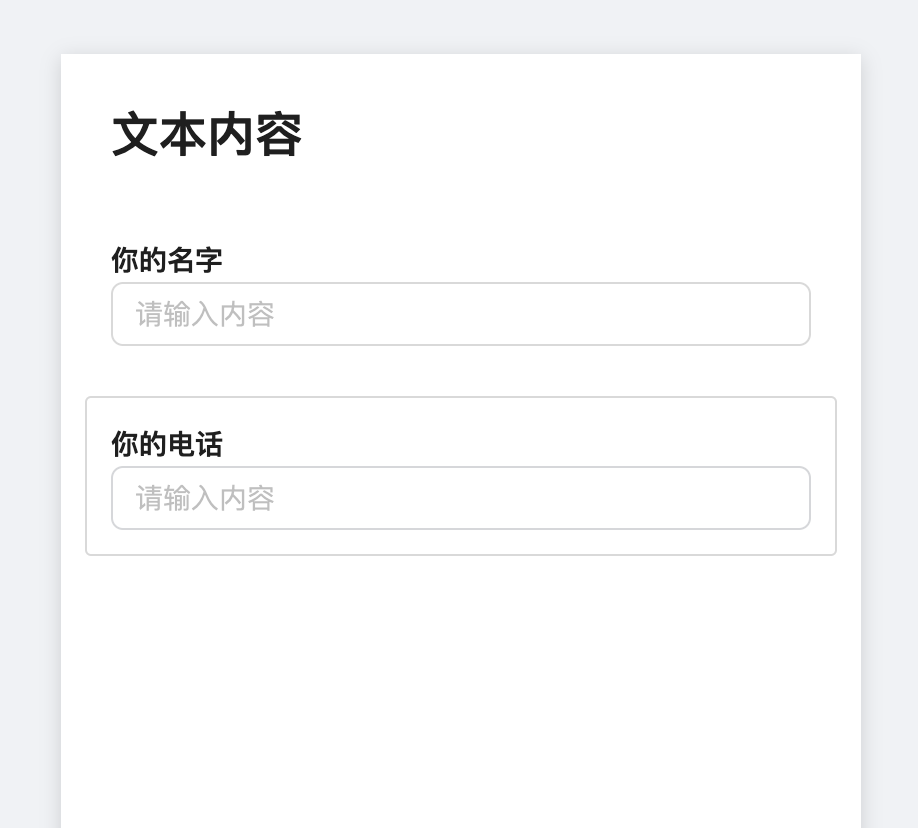
组件数据结构设计
服务端mock数据:
	{
		url: '/api/question/:id',
		method: 'get',
		response() {
			return {
				errno: 0,
				data: {
					id: Random.id(),
					title: Random.ctitle(),
					componentList: [
            {
              id: Random.id(),
              type: 'questionTitle',  // 组件类型,不能重复,前后端统一好
              title: '这是一个文本组件',
              props: {
                text: '文本内容',
                level1,
                isCenter: false
              }
            },
            {
              id: Random.id(),
              type: 'questionInput',
              title: '这是一个输入框组件',
              props: {
                title: '你的名字',
                placeholder: '请输入内容'
              }
            },
            {
              id: Random.id(),
              type: 'questionInput',
              title: '这是一个输入框组件',
              props: {
                title: '你的电话',
                placeholder: '请输入内容'
              }
            }
          ],
				}
			}
		}
	},
Ajax 加载数据
要点:
- Hook
useLoadQuestionData设计- 问卷信息获取函数
- id 变化,更新问卷信息
- 数据更新后,存储在 Redux 中
useLoadQuestionData.ts
import { useEffect } from 'react'
import { useParams } from 'react-router-dom'
import { useDispatch } from 'react-redux'
import { getQuestionService } from '../services/question'
import { useRequest } from 'ahooks'
import { resetComponentList } from '../store/componentReducer'

function useLoadQuestionData() {
  const { id = '' } = useParams()
  const dispatch = useDispatch()

  // 问卷信息获取函数
  const { data, loading, error, run } = useRequest(
    async (id: string) => {
      const data = await getQuestionService(id)
      return data
    },
    {
      manual: true,
    }
  )

	// 数据更新后,存储在 Redux 中
  useEffect(() => {
    if (!data) return
    const { title = '', componentList } = data
    if (!componentList || componentList.length === 0) return
    const action = resetComponentList({ componentList })
    dispatch(action)
  }, [data])

	// id 变化,更新问卷信息
  useEffect(() => {
    run(id)
  }, [id])

  return {
    loading,
    error,
  }
}

export default useLoadQuestionData
Redux 数据存储
要点:
- 设计 componentReducer,定义类型以及切片
- 设计 index,作为各个切片 类型 和 reducer 的统一收口
文件树:
│   ├── store
│   │   ├── componentReducer
│   │   │   └── index.ts
│   │   ├── index.ts
│   │   └── userReducer.ts
componentReducer/index.ts
import { createSlice, PayloadAction } from '@reduxjs/toolkit'
import { ComponentPropsType } from '../../component/QuestionComponents'

export type ComponentInfoType = {
  fe_id: string
  type: string
  title: string
  props: ComponentPropsType
}

export type ComponentsStateType = {
  componentList: Array<ComponentInfoType>
}

const INIT_STATE: ComponentsStateType = {
  componentList: [],
  // 其他拓展
}

export const componentsSlice = createSlice({
  name: 'component',
  initialState: INIT_STATE,
  reducers: {
    resetComponentList: (
      state: ComponentsStateType,
      action: PayloadAction<ComponentsStateType>
    ) => {
      return action.payload
    },
  },
})

export const { resetComponentList } = componentsSlice.actions
export default componentsSlice.reducer
index.ts
import { configureStore } from '@reduxjs/toolkit'
import userReducer, { UserStateType } from './userReducer'
import componentReducer, { ComponentsStateType } from './componentReducer'

export type StateType = {
  user: UserStateType
  components: ComponentsStateType
}

export default configureStore({
  reducer: {
    user: userReducer,
    components: componentReducer,
    // 组件列表
    // 问卷信息
  },
})
画布显示问卷列表
组件类型设定
要点:
- 整合各组件 prop type
- 整合各组件 配置列表
文件树:
│   │   ├── QuestionComponents
│   │   │   ├── QuestionInput
│   │   │   │   ├── Component.tsx
│   │   │   │   ├── index.ts
│   │   │   │   └── interface.ts
│   │   │   ├── QuestionTitle
│   │   │   │   ├── Component.tsx
│   │   │   │   ├── index.ts
│   │   │   │   └── interface.ts
│   │   │   └── index.ts
QuestionComponents/index.ts
import QuestionInputConf, { QuestionInputPropsType } from './QuestionInput'
import QuestionTitleConf, { QuestionTitlePropsType } from './QuestionTitle'

// 各个组件的 prop type
export type ComponentPropsType = QuestionInputPropsType & QuestionTitlePropsType

// 组件的配置
export type ComponentConfType = {
  title: string
  type: string
  Component: React.FC<ComponentPropsType>
  defaultProps: ComponentPropsType
}

// 全部组件配置的列表
const componentConfList: ComponentConfType[] = [
  QuestionInputConf,
  QuestionTitleConf,
]

export function getComponentConfByType(type: string) {
  return componentConfList.find(c => c.type === type)
}
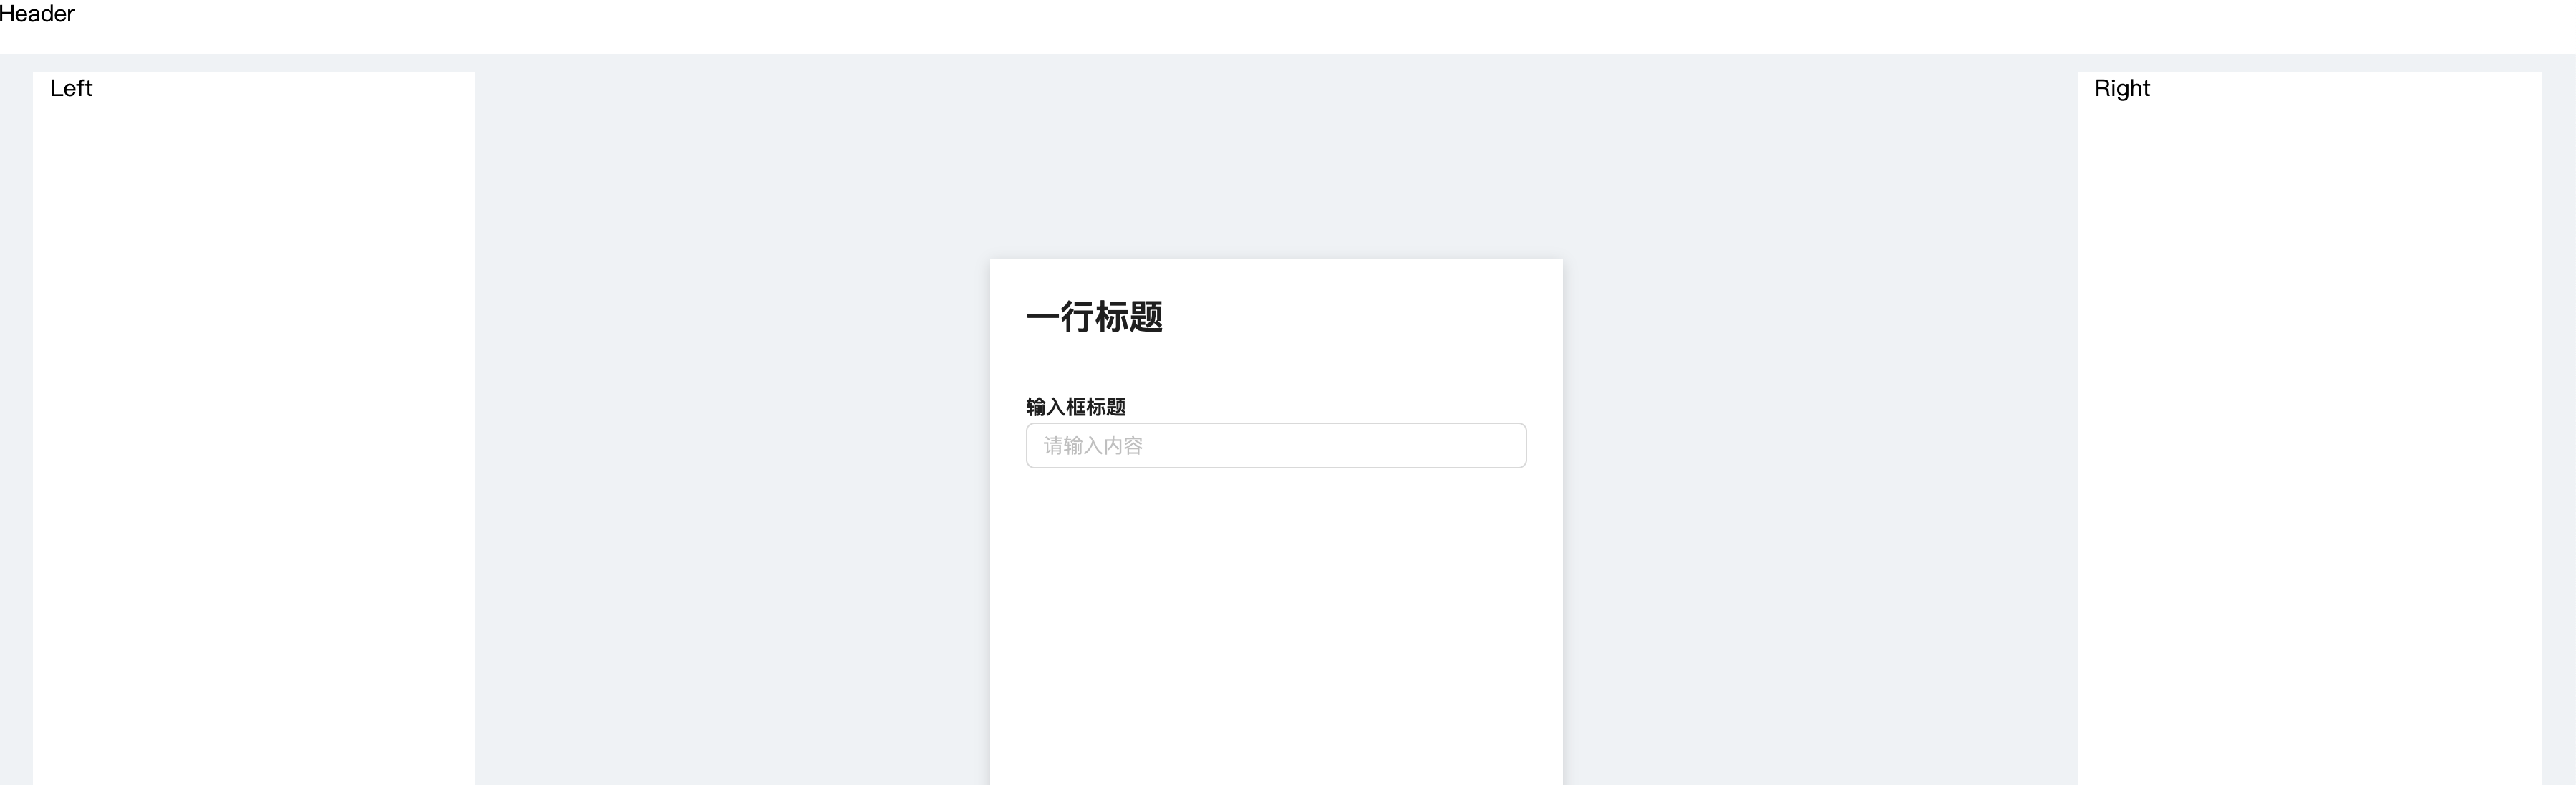
画布动态显示组件列表
效果:
要点:
- 根据组件类型动态渲染指定组件
- 返回组件函数实现:
getComponent用于根据组件类型返回指定组件
- 返回组件函数实现:
question/Edit/EditCanvas.tsx
import React, { FC } from 'react'
import styles from './EditCanvas.module.scss'
// import QuestionTitle from '../../../component/QuestionComponents/QuestionTitle/Component'
// import QuestionInput from '../../../component/QuestionComponents/QuestionInput/Component'
import { Spin } from 'antd'
import useGetComponentInfo from '../../../hooks/useGetComponentInfo'
import { getComponentConfByType } from '../../../component/QuestionComponents'
import { ComponentInfoType } from '../../../store/componentReducer'

type PropsType = {
  loading: boolean
}

function getComponent(componentInfo: ComponentInfoType) {
  const { type, props } = componentInfo
  const componentConf = getComponentConfByType(type)
  if (!componentConf) {
    return null
  }
  const { Component } = componentConf
  return <Component {...props} />
}

const EditCanvas: FC<PropsType> = ({ loading }) => {
  const { componentList } = useGetComponentInfo()
  if (loading) {
    return (
      <div style={{ textAlign: 'center', padding: '20px' }}>
        <Spin />
      </div>
    )
  }
  return (
    <div className={styles.canvas}>
      {componentList.map(c => {
        const { fe_id } = c
        return (
          <div key={fe_id} className={styles['component-wrapper']}>
            <div className={styles.component}>{getComponent(c)}</div>
          </div>
        )
      })}
    </div>
  )

  // <div className={styles.canvas}>
  //   <div className={styles['component-wrapper']}>
  //     <div className={styles.component}>
  //       <QuestionTitle />
  //     </div>
  //   </div>
  //   <div className={styles['component-wrapper']}>
  //     <div className={styles.component}>
  //       <QuestionInput />
  //     </div>
  //   </div>
  // </div>
}

export default EditCanvas
点击画布选中组件
效果:
要点:
- 选中画布中组件显示
- 点击画布组件选中,点击空白不选中。
clearSelectedId()和handleClick()实现- 冒泡机制实现
- 组件 selectedId 与 Redux 绑定
- ComponentsStateType 设定 selectedId
useLoadQuestionData设定进入画布时默认选中组件
- 点击画布组件选中,点击空白不选中。
- 处理 Immer 中 draft 为空的问题
EditCanvas.tsx
import React, { FC, MouseEvent } from 'react'
import styles from './EditCanvas.module.scss'
import { useDispatch } from 'react-redux'
import useGetComponentInfo from '../../../hooks/useGetComponentInfo'
import { getComponentConfByType } from '../../../component/QuestionComponents'
import classNames from 'classnames'
import {
  ComponentInfoType,
  changeSelectedId,
} from '../../../store/componentReducer'

type PropsType = {
  loading: boolean
}

function getComponent(componentInfo: ComponentInfoType) {
  const { type, props } = componentInfo
  const componentConf = getComponentConfByType(type)
  if (!componentConf) {
    return null
  }
  const { Component } = componentConf
  return <Component {...props} />
}

const EditCanvas: FC<PropsType> = ({ loading }) => {
  const { componentList, selectedId } = useGetComponentInfo()
  const dispatch = useDispatch()
  // 点击冒泡机制实现
  function handleClick(event: MouseEvent, id: string) {
    event.stopPropagation()
    dispatch(changeSelectedId(id))
  }
  if (loading) {
    return (
      <div style={{ textAlign: 'center', padding: '20px' }}>
        <Spin />
      </div>
    )
  }
  return (
    <div className={styles.canvas}>
      {componentList.map(c => {
        const { fe_id } = c
        // 拼接 class name
        const wrapperDefaultClassName = styles['component-wrapper']
        const selectedClassName = styles.selected
        const wrapperClassName = classNames({
          [wrapperDefaultClassName]: true,
          [selectedClassName]: fe_id === selectedId,
        })

        return (
          <div
            key={fe_id}
            className={wrapperClassName}
            onClick={e => handleClick(e, fe_id || '')}
          >
            <div className={styles.component}>{getComponent(c)}</div>
          </div>
        )
      })}
    </div>
  )
}

export default EditCanvas
/Edit/index.tsx
import React, { FC } from 'react'
import styles from './index.module.scss'
import EditCanvas from './EditCanvas'
import { changeSelectedId } from '../../../store/componentReducer'
import { useDispatch } from 'react-redux'
import useLoadQuestionData from '../../../hooks/useLoadQuestionData'

const Edit: FC = () => {
  const { loading } = useLoadQuestionData()
  const dispatch = useDispatch()
  function clearSelectedId() {
    dispatch(changeSelectedId(''))
  }
  return (
    <div className={styles.container}>
      <div style={{ backgroundColor: '#fff', height: '40px' }}>Header</div>
      <div className={styles['content-wrapper']}>
        <div className={styles.content}>
          <div className={styles.left}>Left</div>
          <div className={styles.main} onClick={clearSelectedId}>
            <div className={styles['canvas-wrapper']}>
              <div style={{ height: '900px' }}>
                <EditCanvas loading={loading} />
              </div>
            </div>
          </div>
          <div className={styles.right}>Right</div>
        </div>
      </div>
    </div>
  )
}

export default Edit
store/componentReducer/index.ts
import { createSlice, PayloadAction } from '@reduxjs/toolkit'
import { ComponentPropsType } from '../../component/QuestionComponents'

export type ComponentInfoType = {
  fe_id: string
  type: string
  title: string
  props: ComponentPropsType
}

// ComponentsStateType 设定 selectedId
export type ComponentsStateType = {
  selectedId: string
  componentList: Array<ComponentInfoType>
}

const INIT_STATE: ComponentsStateType = {
  selectedId: '',
  componentList: [],
  // 其他拓展
}

export const componentsSlice = createSlice({
  name: 'component',
  initialState: INIT_STATE,
  reducers: {
    resetComponentList: (
      state: ComponentsStateType,
      action: PayloadAction<ComponentsStateType>
    ) => {
      return action.payload
    },
    changeSelectedId: (
      draft: ComponentsStateType,
      action: PayloadAction<string>
    ) => {
      draft.selectedId = action.payload || ''
    },
  },
})

export const { resetComponentList, changeSelectedId } = componentsSlice.actions
export default componentsSlice.reducer
useLoadQuestionData.ts
useEffect(() => {
  if (!data) return
  const { componentList } = data
  // 获取默认的 id
  let selectedId = ''
  if (componentList.length > 0) {
    const { fe_id } = componentList[0]
    selectedId = fe_id
  }

  if (!componentList || componentList.length === 0) return
  const action = resetComponentList({ componentList, selectedId })
  dispatch(action)
}, [data])
fix:immer draft 为空
**问题:**draft打印出来为null,请问是什么原因?
// ... 其他代码保持不变 ...

export const componentsSlice = createSlice({
  name: 'component',
  initialState: INIT_STATE,
  reducers: {
    // 错误写法:多层嵌套 produce
    changeSelectedId: produce( // 需移除外层 produce
      (draft: ComponentsStateType, action: PayloadAction<string>) => {
        console.log('payload', action.payload)
        console.log(draft) // 此时 draft 为 null
        draft.selectedId = action.payload || ''
      }
    ),
  },
})
原因:
- Redux Toolkit 已内置 Immer 集成,无需额外使用
produce包装 - 双重 Immer 包装会导致状态代理失效,此时
draft参数无法正确接收 Redux 状态树 - 直接通过
state参数操作即可实现安全的不可变更新
方案:
export const componentsSlice = createSlice({
  name: 'component',
  initialState: INIT_STATE,
  reducers: {
    // 正确写法:直接使用 Immer(Redux Toolkit 已内置)
    changeSelectedId: (state: ComponentsStateType, action: PayloadAction<string>) => {
      console.log('payload', action.payload)
      state.selectedId = action.payload || ''
    },
    // ...其他 reducer 保持不变...
  },
})
注意点:
- RTK 从 1.0 版本开始内置 Immer。
- Immer 默认用于
createSlice和createReducer,允许开发者以“可变”的方式更新状态。 - 如果需要,可以通过配置禁用 Immer,但绝大多数情况下,默认启用 Immer 是推荐的做法。
组件库面板
组件分组显示
需求:
要点:
- 组件库配置
- 组件库组件列表渲染显示
- 组件库组件点击框图、鼠标样式设计
思路:
先对组件库进行配置,然后在页面中对应位置进行渲染组件即可。
QuestionComponents/index.ts
import QuestionInputConf, { QuestionInputPropsType } from './QuestionInput'
import QuestionTitleConf, { QuestionTitlePropsType } from './QuestionTitle'

export type ComponentPropsType = QuestionInputPropsType & QuestionTitlePropsType

export type ComponentConfType = {
  title: string
  type: string
  Component: React.FC<ComponentPropsType>
  defaultProps: ComponentPropsType
}

const componentConfList: ComponentConfType[] = [
  QuestionInputConf,
  QuestionTitleConf,
]

// 组件库配置
export const componentConfGroup = [
  {
    groupId: 'textGroup',
    groupName: '文本显示',
    components: [QuestionTitleConf],
  },
  {
    groupId: 'inputGroup',
    groupName: '用户输入',
    components: [QuestionInputConf],
  },
]

export function getComponentConfByType(type: string) {
  return componentConfList.find(c => c.type === type)
}
ComponentLib.tsx
import React, { FC } from 'react'
import { componentConfGroup } from '../../../component/QuestionComponents'
import { Typography } from 'antd'
import { ComponentConfType } from '../../../component/QuestionComponents'
import styles from './ComponentLib.module.scss'

const { Title } = Typography

function genComponent(c: ComponentConfType) {
  const { Component } = c
  return (
    <div className={styles.wrapper}>
      <div className={styles.component}>
        <Component />
      </div>
    </div>
  )
}

const Lib: FC = () => {
  return (
    <>
      {componentConfGroup.map((item, index) => {
        const { groupId, groupName } = item
        return (
          <div key={groupId}>
            <Title
              level={3}
              style={{ fontSize: '16px', marginTop: index > 0 ? '20px' : '0' }}
            >
              {groupName}
            </Title>
            <div>{item.components.map(c => genComponent(c))}</div>
          </div>
        )
      })}
    </>
  )
}
export default Lib
ComponentLib.scss
.wrapper {
  padding: 12px;
  margin-bottom: 12px;
  cursor: cursor;
  border: 1px solid #fff;
  border-radius: 3px;
  background-color: #fff;
  &:hover {
    border-color: #d9d9d9;
  }
}

.component {
  pointer-events: none; // 屏蔽鼠标
}
 No newline at end of file
组件库添加到画布
需求:
要点:
- 组件与画布交互逻辑
- 组件默认插入画布末尾
- 画布中组件选定后,组件插入会在其之后
- 交互逻辑数据实现
ComponentLib组件插入画布位置逻辑实现addComponent通过 selected 判断组件插入画布位置
ComponentLib.tsx
import React, { FC } from 'react'
import { componentConfGroup } from '../../../component/QuestionComponents'
import { Typography } from 'antd'
import { ComponentConfType } from '../../../component/QuestionComponents'
import styles from './ComponentLib.module.scss'
import { useDispatch } from 'react-redux'
import { addComponent } from '../../../store/componentReducer'
import { nanoid } from '@reduxjs/toolkit'

const { Title } = Typography

const Lib: FC = () => {
  const dispatch = useDispatch()
  function genComponent(c: ComponentConfType) {
    const { type, Component } = c

    function handleClick(c: ComponentConfType) {
      const { title, type, defaultProps } = c

      dispatch(
        addComponent({
          fe_id: nanoid(),
          type,
          title,
          props: defaultProps,
        })
      )
    }

    return (
      <div key={type} className={styles.wrapper} onClick={() => handleClick(c)}>
        <div className={styles.component}>
          <Component />
        </div>
      </div>
    )
  }
  return (
    <>
      {componentConfGroup.map((item, index) => {
        const { groupId, groupName } = item
        return (
          <div key={groupId}>
            <Title
              level={3}
              style={{ fontSize: '16px', marginTop: index > 0 ? '20px' : '0' }}
            >
              {groupName}
            </Title>
            <div>{item.components.map(c => genComponent(c))}</div>
          </div>
        )
      })}
    </>
  )
}
export default Lib
componentReducer/index.ts
import { createSlice, PayloadAction } from '@reduxjs/toolkit'
import { ComponentPropsType } from '../../component/QuestionComponents'

export type ComponentInfoType = {
  fe_id: string
  type: string
  title: string
  props: ComponentPropsType
}

export type ComponentsStateType = {
  selectedId: string
  componentList: Array<ComponentInfoType>
}

const INIT_STATE: ComponentsStateType = {
  selectedId: '',
  componentList: [],
  // 其他拓展
}

export const componentsSlice = createSlice({
  name: 'component',
  initialState: INIT_STATE,
  reducers: {
	  ......
    addComponent: (
      draft: ComponentsStateType,
      action: PayloadAction<ComponentInfoType>
    ) => {
      const newCompontent = action.payload
      const { selectedId, componentList } = draft
      const index = componentList.findIndex(c => c.fe_id === selectedId)
      if (index < 0) {
        draft.componentList.push(newCompontent)
      } else {
        draft.componentList.splice(index + 1, 0, newCompontent)
      }
      draft.selectedId = newCompontent.fe_id
    },
  },
})

export const { resetComponentList, changeSelectedId, addComponent } =
  componentsSlice.actions
export default componentsSlice.reducer
注意:fe_id 和 _id 区别
要点:
- _id是服务端的数据,_是因为 mongodb 会为每条数据生成id,这是不重复的,由 _id 表示
- fe_id 是前端用于区分组件是否被选中的标记,用于组件库与画布的交互
QuestionCart.tsx
type PropsType = {
  _id: string
  title: string
  isPublished: boolean
  isStar: boolean
  answerCount: number
  createdAt: string
}
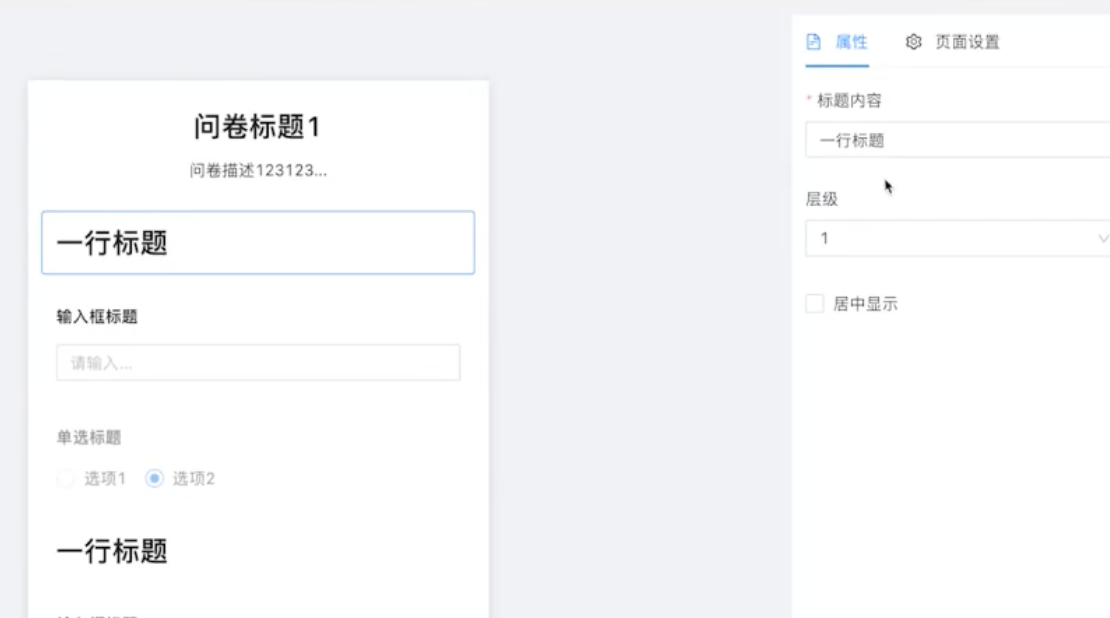
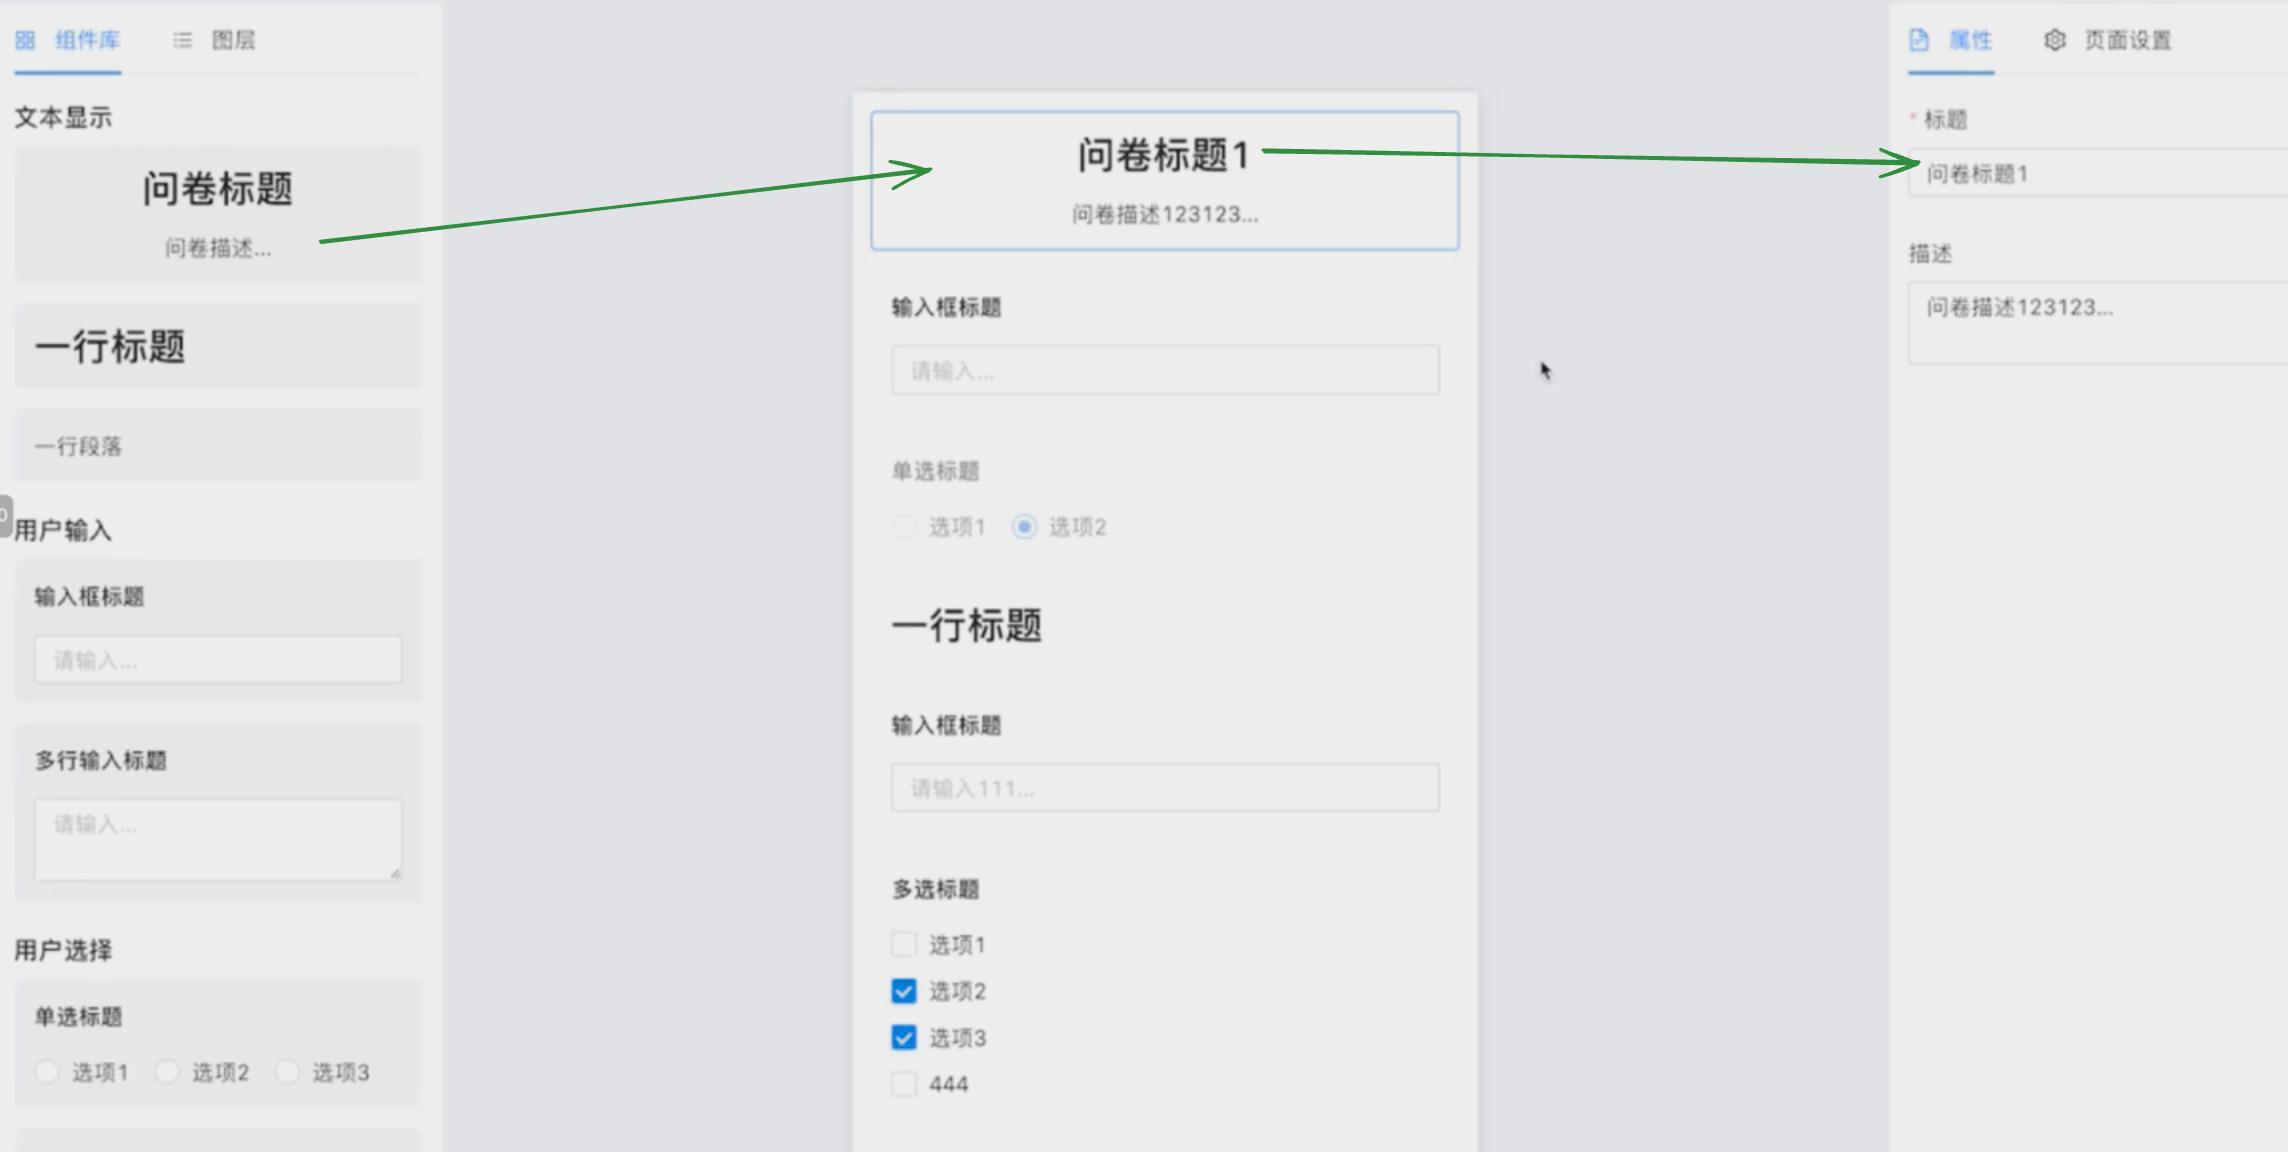
组件属性面板
点击组件显示属性
需求:
要点:
- 构建属性面板
- 构造组件属性模块
PropComponet,用于配制组件属性
│   │   ├── QuestionComponents
│   │   │   ├── QuestionInput
│   │   │   │   ├── Component.tsx
│   │   │   │   ├──+ PropComponent.tsx
│   │   │   │   ├── index.ts
│   │   │   │   └── interface.ts
│   │   │   ├── QuestionTitle
│   │   │   │   ├── Component.tsx
│   │   │   │   ├──+ PropComponent.tsx
│   │   │   │   ├── index.ts
│   │   │   │   └── interface.ts
│   │   │   └──m index.ts
思路:
- 当我们点击画布中的组件后,更新组件
selectedId - 属性面板通过
useGetComponentInfo获取selectedComponent-
从
selectedComponent中层层解构出组件参数props和参数组件PropComponent,返回
<PropComponent {...props} />传参后的组件即可。
-

构建属性面板
RightPanel.tsx
import React, { FC } from 'react'
import { Tabs } from 'antd'
import { FileTextOutlined, SettingOutlined } from '@ant-design/icons'
import ComponentProp from './componentProp'

const RightPanel: FC = () => {
  const tabsItems = [
    {
      key: 'prop',
      label: (
        <span>
          <FileTextOutlined />
          属性
        </span>
      ),
      children: <ComponentProp />,
    },
    {
      key: 'setting',
      label: (
        <span>
          <SettingOutlined />
          页面设置
        </span>
      ),
      children: <div>页面设置</div>,
    },
  ]
  return <Tabs defaultActiveKey="prop" items={tabsItems} />
}

export default RightPanel
构造组件属性模块 PropComponet ,用于配制组件属性
question/Edit/ComponentProp.tsx
import React, { FC } from 'react'
import useGetComponentInfo from '../../../hooks/useGetComponentInfo'
import { getComponentConfByType } from '../../../component/QuestionComponents'

const NoProp = () => {
  return <div style={{ textAlign: 'center' }}>请先选择组件</div>
}

const ComponentProp: FC = () => {
  const { selectedComponent } = useGetComponentInfo()
  if (!selectedComponent) return <NoProp />
  const { type, props } = selectedComponent
  const componentConf = getComponentConfByType(type)
  if (!componentConf) return <NoProp />
  const { PropComponent } = componentConf

  return <PropComponent {...props} />
}
export default ComponentProp
QuestionComponents/index.ts 新增 PropComponent
import QuestionInputConf, { QuestionInputPropsType } from './QuestionInput'
import QuestionTitleConf, { QuestionTitlePropsType } from './QuestionTitle'
import { FC } from 'react'

export type ComponentPropsType = QuestionInputPropsType & QuestionTitlePropsType

// 组件的配置: 新增 PropComponent
export type ComponentConfType = {
  title: string
  type: string
  Component: FC<ComponentPropsType>
  PropComponent: FC<ComponentPropsType> // Here
  defaultProps: ComponentPropsType
}

const componentConfList: ComponentConfType[] = [
  QuestionInputConf,
  QuestionTitleConf,
]

export const componentConfGroup = [
  {
    groupId: 'textGroup',
    groupName: '文本显示',
    components: [QuestionTitleConf],
  },
  {
    groupId: 'inputGroup',
    groupName: '用户输入',
    components: [QuestionInputConf],
  },
]

export function getComponentConfByType(type: string) {
  return componentConfList.find(c => c.type === type)
}
QuestionInput/PropComponent.tsx
import React, { FC } from 'react'
import { useEffect } from 'react'
import { Form, Input } from 'antd'
import { QuestionInputPropsType } from './interface'

const PropComponent: FC<QuestionInputPropsType> = (
  props: QuestionInputPropsType
) => {
  const { title, placeholder } = props
  const [form] = Form.useForm()
  useEffect(() => {
    form.setFieldsValue({ title, placeholder })
  }, [title, placeholder])
  return (
    <Form layout="vertical" initialValues={{ title, placeholder }} form={form}>
      <Form.Item
        label="标题"
        name="title"
        rules={[{ required: true, message: '请输入标题' }]}
      >
        <Input />
      </Form.Item>
      <Form.Item label="Placeholder" name="placeholder">
        <Input />
      </Form.Item>
    </Form>
  )
}

export default PropComponent
QuestionTitle/PropComponent.tsx
import React, { FC } from 'react'
import { useEffect } from 'react'
import { Form, Input, Select, Checkbox } from 'antd'
import { QuestionTitlePropsType } from './interface'

const PropComponent: FC<QuestionTitlePropsType> = (
  props: QuestionTitlePropsType
) => {
  const { text, level, isCenter } = props
  const [form] = Form.useForm()
  useEffect(() => {
    form.setFieldsValue({ text, level, isCenter })
  }, [text, level, isCenter])
  return (
    <Form
      layout="vertical"
      initialValues={{ text, level, isCenter }}
      form={form}
    >
      <Form.Item
        label="标题内容"
        name="text"
        rules={[{ required: true, message: '请输入标题内容' }]}
      >
        <Input />
      </Form.Item>
      <Form.Item label="标题级别" name="level">
        <Select
          options={[
            { value: 1, label: '一级标题' },
            { value: 2, label: '二级标题' },
            { value: 3, label: '三级标题' },
          ]}
        />
      </Form.Item>
      <Form.Item name="isCenter" valuePropName="checked">
        <Checkbox>居中显示</Checkbox>
      </Form.Item>
    </Form>
  )
}

export default PropComponent
组件属性数据同步画布
需求:
要点:
componentProp统一更新组件数据,更新方式传递给PropComponent- Redux 设计
changeComponentProps参数更新函数
思路:
- 用户选择画布组件后,传递
selectedId到Redux中 - 用户更新组件属性面板数值,会通过
onChange事件传递参数到Redux,采用changeComponentProps对画布中组件数据进行修改
Edit/componentProp.tsx
import React, { FC } from 'react'
import useGetComponentInfo from '../../../hooks/useGetComponentInfo'
import {
  getComponentConfByType,
  ComponentPropsType,
} from '../../../component/QuestionComponents'
import { useDispatch } from 'react-redux'
import { changeComponentProps } from '../../../store/componentReducer'

const NoProp = () => {
  return <div style={{ textAlign: 'center' }}>请先选择组件</div>
}

const ComponentProp: FC = () => {
  const dispatch = useDispatch()
  const { selectedComponent } = useGetComponentInfo()
  if (!selectedComponent) return <NoProp />
  const { type, props } = selectedComponent
  const componentConf = getComponentConfByType(type)
  if (!componentConf) return <NoProp />
  const { PropComponent } = componentConf
  // 组件参数更新:传递组件参数到 Redux 进行更新
  function changeProps(newProps: ComponentPropsType) {
    if (!selectedComponent) return
    dispatch(changeComponentProps({ fe_id: selectedComponent.fe_id, newProps }))
  }

  return <PropComponent {...props} onChange={changeProps} />
}
export default ComponentProp
store/componentReducer/index.tsx
import { createSlice, PayloadAction } from '@reduxjs/toolkit'
import { ComponentPropsType } from '../../component/QuestionComponents'

......
export const componentsSlice = createSlice({
  name: 'component',
  initialState: INIT_STATE,
  reducers: {
  ......
    changeComponentProps: (
      draft: ComponentsStateType,
      action: PayloadAction<{ fe_id: string; newProps: ComponentPropsType }>
    ) => {
      const { fe_id, newProps } = action.payload
      const component = draft.componentList.find(c => c.fe_id === fe_id)
      if (component) {
        component.props = {
          ...component.props,
          ...newProps,
        }
      }
    },
  },
})

export const {
  resetComponentList,
  changeSelectedId,
  addComponent,
  changeComponentProps,
} = componentsSlice.actions
export default componentsSlice.reducer


