React核心价值与前置知识
时刻保持对知识的渴望 家人们 开学!!!
核心价值
组件化(易开发易维护)
数据驱动视图 :定义好数据和ui的显示规则 即
UI=f(state)
- 只关注业务数据修改,不在操作DOM 增加开发效率
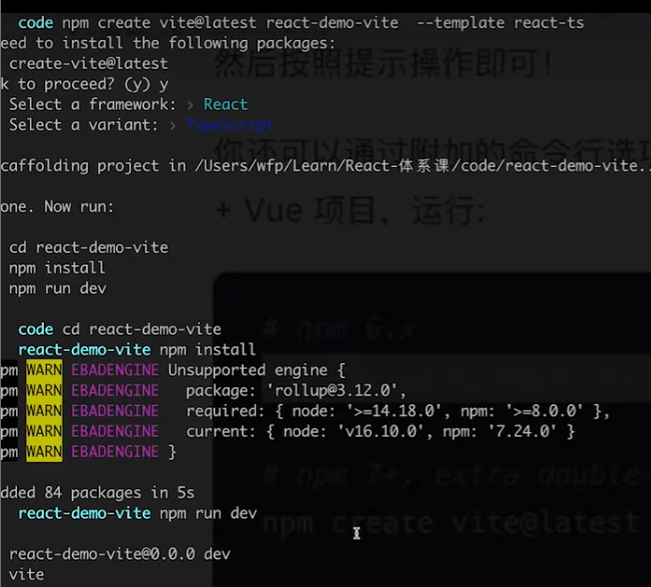
使用vite创建Recat项目
开发规范
使用 prettier & eslint 规范开发
- eslint 检查语法语义
- prettier 检查代码风格
#eslint :
npm install eslint@typescript-eslint/parser @typescript-eslint/eslint-plugin --save-dev

#prettier:
npm install prettier eslint-config-prettier eslint-plugin-prettier --save-dev
vite和 webpack的区别
webpack是一个非常流行的前端打包工具 比较经典 Create-React-App 是使用webpack作为打包工具的
vite 既是构建工具 又是打包工具
vite的特点:
- Vite打包项目 在启动和代码更新时更快
- vite使用了
es Module语法(仅开发环境)
React JSX语法
内容 :
- JSX语法
- 组件和props
- 实战: 列表页
JSX特点:
- JSX是js的扩展 写在js代码里面 组件的ui结构
- 语法和html很相似
- 不只是React独有
标签
- 首字母大小写的区别 , 大写字母是自定义组件
- 标签必须闭合 如
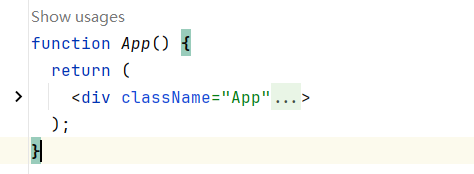
<input>在jsx是非法的 - 每段JSX中只有一个根节点
属性
和html基本相似
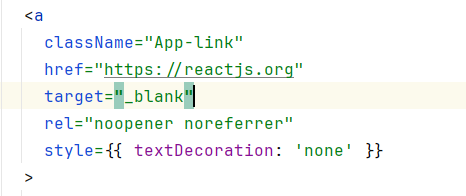
- class要改为 className
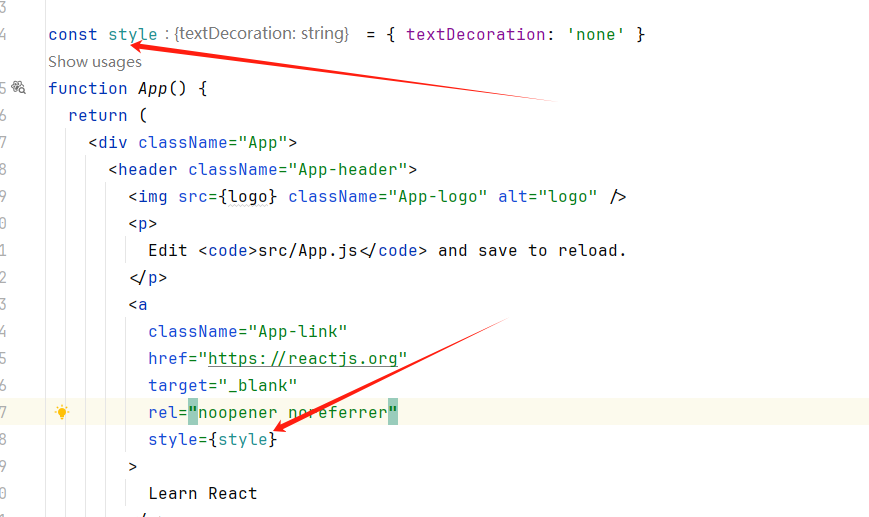
- style要使用js对象 不能是string 而且key需要使用驼峰写法
如下
在JSX中插入js变量
- 使用
{}可以插入JS变量 函数 表达式 - 可以插入文本 属性
- 可以用于注释
代码案例
条件判断
常见的if else 可以通过{}的方式实现,但是在JSX中代码一多就显得不够实用了 以下三种方法可以解决:
- 使用
&& - 使用三元表达式
- 使用函数来判断
比如这样:反之如果flag等于false 就不会出现hello
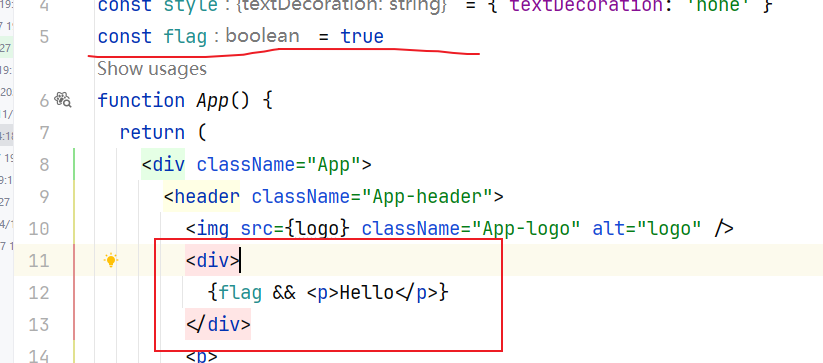
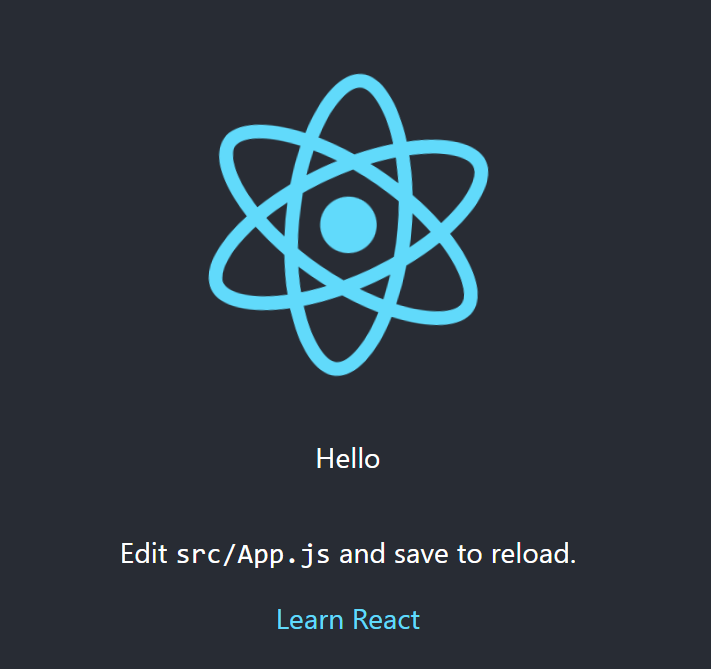
效果:
三元运算符:flag为判断条件 来控制标签的显示
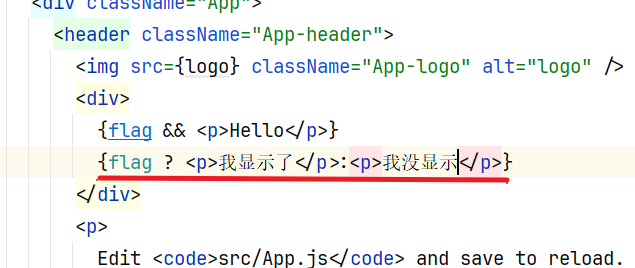
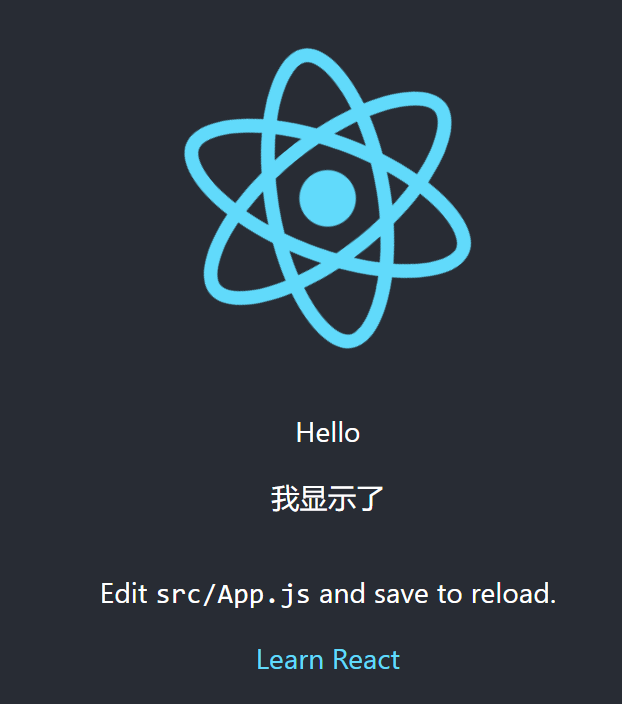
效果:
函数:
function isShowHello(){
  if (flag)return <p>show hello</p>
  return <p>defaultHello</p>
}
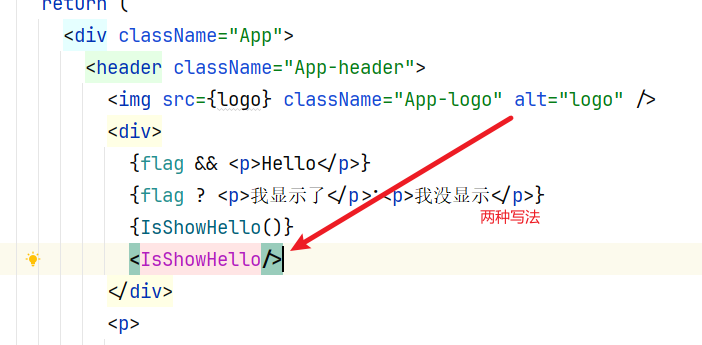
效果 :
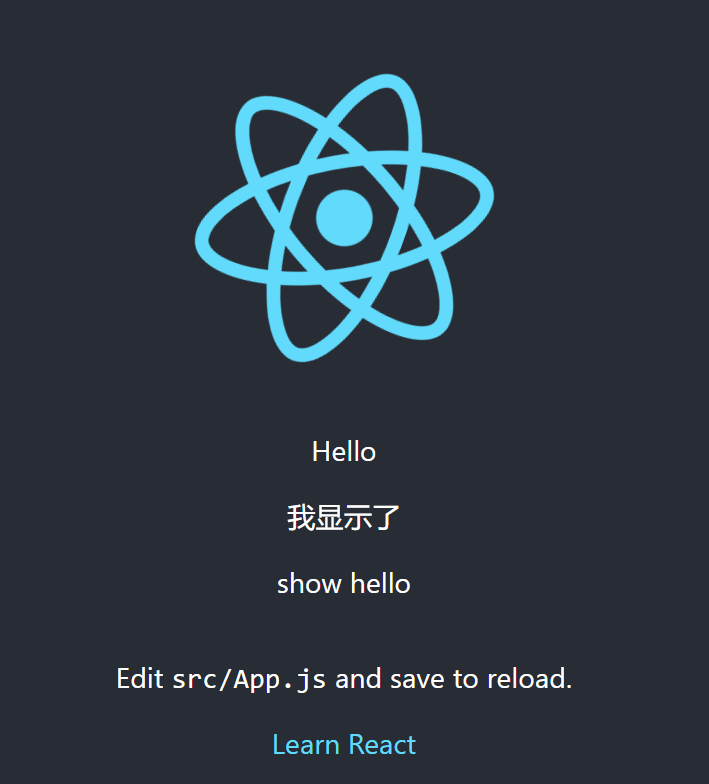
循环
- 使用map来循环
- 每一个循环项(item)都要有key
- key需要具有唯一性
实现
const list = [
  {username:'zhangsan', name:"张三"},
  {username:'shuangyue', name:"双月"},
  {username:'lisi', name:"李四"},
]

     {/*循环*/}
        <div>
          {list.map(user=>{
            const {username,name} = user
           return <li key={username}>{name}</li>
          })}
        </div>
效果:
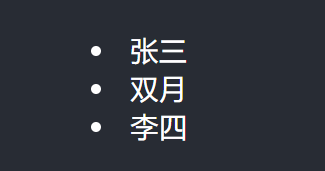
PS : 不建议使用 index 如 :

因为我们的key 需要具有唯一性
小结实战 列表页
开发一个列表页

调整一下显示的jsx
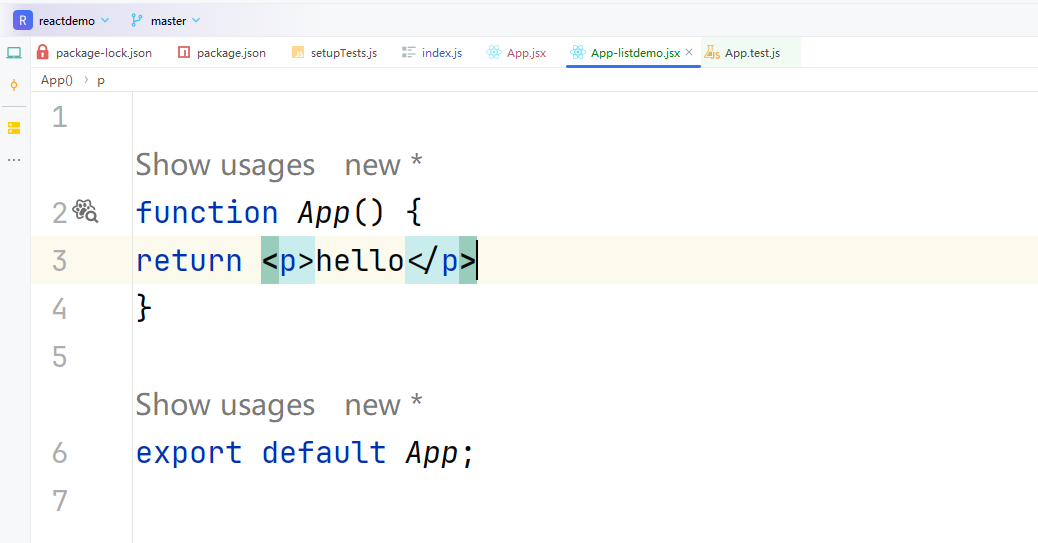
保证这个代码结构简洁 ,然后就可以开始开发了
import React from 'react';
import './App1.css';
function App() {
const questionList = [
{id: 'q1', title: '问卷1', isPublished: true},
{id: 'q2', title: '问卷2', isPublished: true},
{id: 'q3', title: '问卷3', isPublished: true},
{id: 'q4', title: '问卷4', isPublished: false}
]
function edit(id) {
console.log('edit', id);
}
return (<div>
<h1>列表详情页</h1>
<div>
{questionList.map(question => {
const {id, title, isPublished} = question;
return <div key={id} className="list-item">
<strong>{title}</strong>
{isPublished ? <span style={{color: "green"}}>已发布</span> : <span>未发布</span>}
<button onClick={() => edit(id)}>编辑问卷</button>
</div>
})}
</div>
</div>)
}
export default App;
css
.list-item {
    border: 1px solid #ccc;
    padding: 10px;
    margin-bottom: 16px;
    display: flex;
    justify-content: center;
}
效果

组件
react 一切皆是组件
- 组件拥有一个ui片段
- 拥有独立的逻辑和显示
- 可大可小 可以嵌套
组件拆分的价值和意义
- 组件嵌套来组织的 ui 结构 和 html 一样没有学习成本
- 良好的拆分组件利于代码维护和多人协同开发
- 封装公共组件或者直接使用第三方组件复用代码
好的组件化 逻辑是清晰的 更能提升开发效率并且更加的美观易读
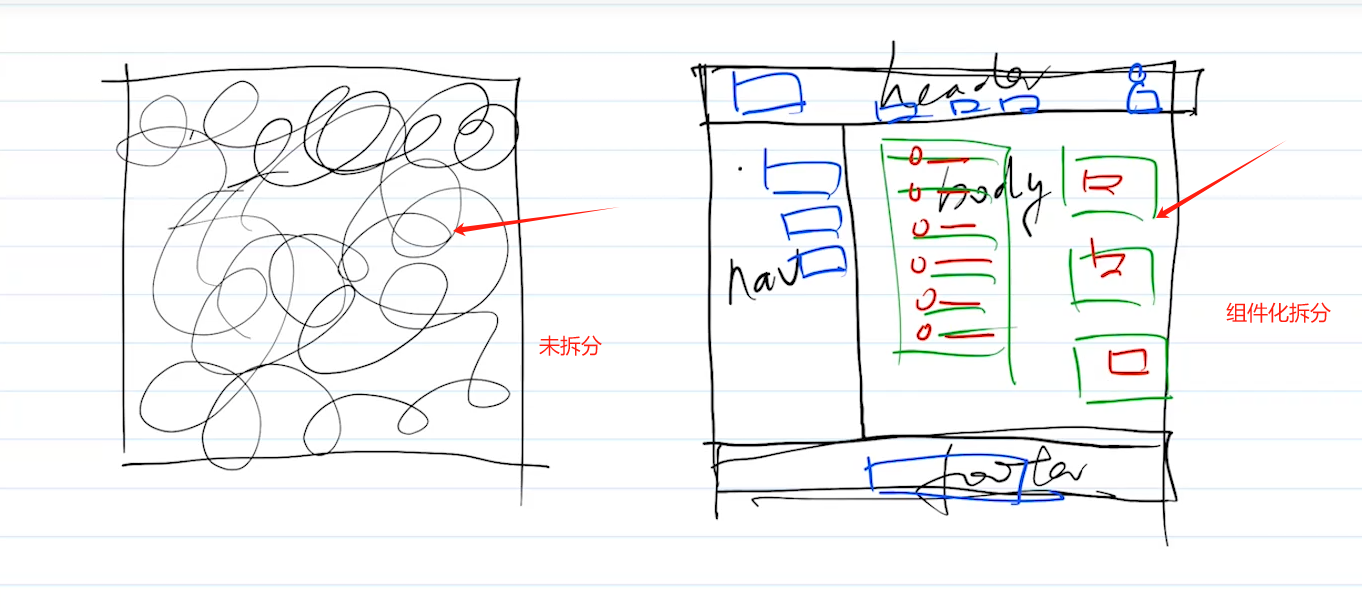
我们可以将组件理解成一个一个的函数
使用我们之前的列表页代码 拆分成组件 list1
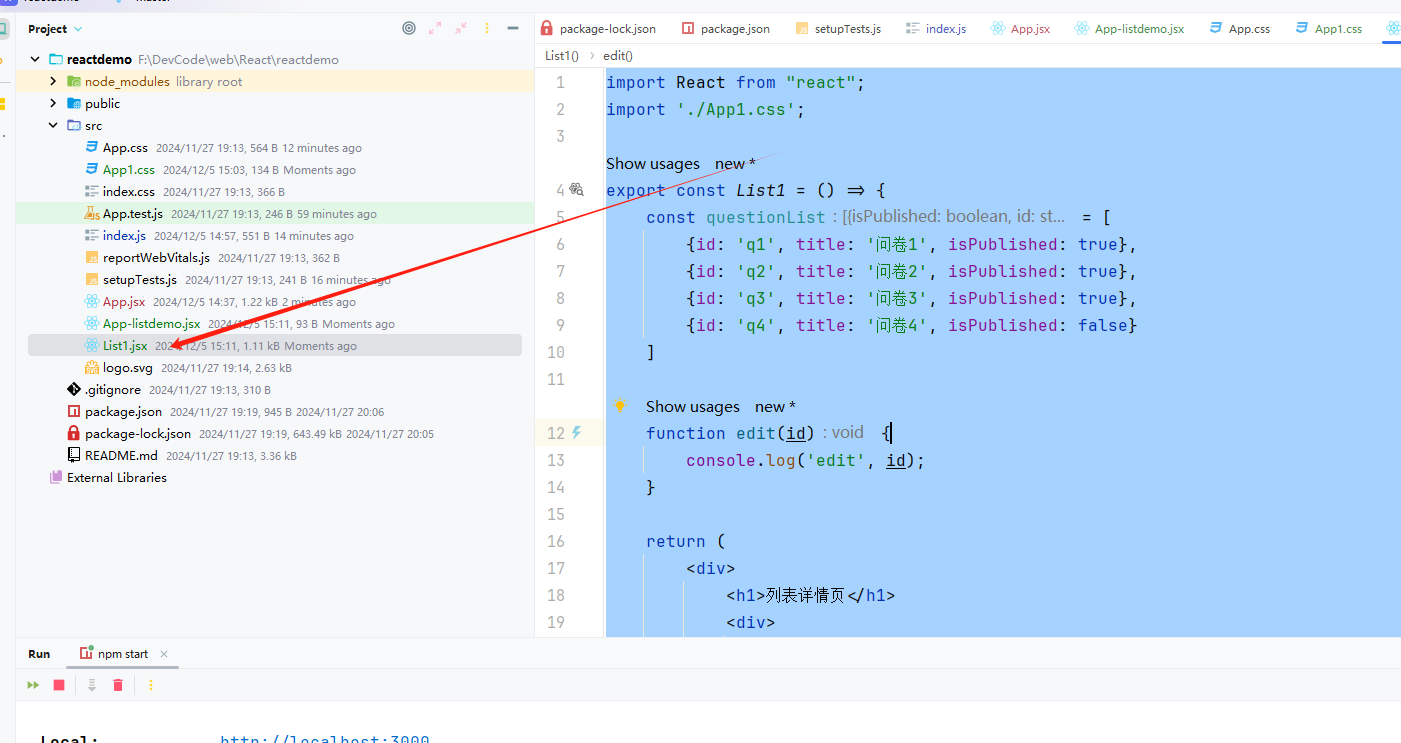
然后用improt的方式 引入到listdemo中
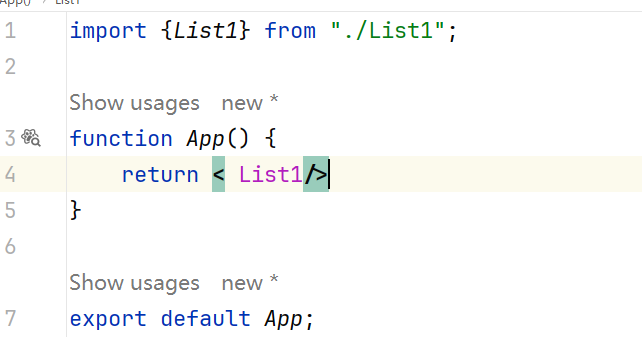
这样我们的总框架就没有那么多的代码冗余 需要修改对应的代码 只需要寻找对应的组件文件即可
属性 props
- 组件可以嵌套 有层级关系
- 父组件可以向子组件传递数据
- props是只读对象
props 其实就是实现差异化组件信息传递的一种手段
实践
将之前循环内显示数据的div拆出来抽象成组件:QuestCard.tsx 。 CSS还是和之前的内容一样
使用 ts主要是方便传入泛型
QuestCard.tsx
import React, {FC} from "react";
import './QuestCard.css'
type proptype = {
id: string,
title: string,
isPublished: boolean
}
export const QuestCard: FC<proptype> = (props) => {
const {id, title, isPublished} = props;
function edit(id) {
console.log('edit', id);
}
return (
<div key={id} className="list-item">
<strong>{title}</strong>
{isPublished ? <span style={{color: "green"}}>已发布</span> : <span>未发布</span>}
<button onClick={() => edit(id)}>编辑问卷</button>
</div>)
}
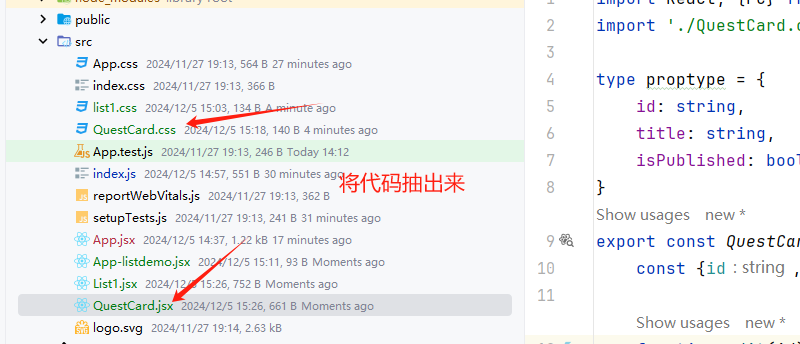
改造list1.jsx 这样就将显示问卷卡片抽取出来为一个独立的组件了
import React from "react";
import './list1.css';
import {QuestCard} from "./QuestCard";

export const List1 = () => {
    const questionList = [
        {id: 'q1', title: '问卷1', isPublished: true},
        {id: 'q2', title: '问卷2', isPublished: true},
        {id: 'q3', title: '问卷3', isPublished: true},
        {id: 'q4', title: '问卷4', isPublished: false}
    ]


    return (
        <div>
            <h1>列表详情页</h1>
            <div>
                {questionList.map(question => {
                    const {id, title, isPublished} = question;
                    return <QuestCard key={id} id={id} title={title} isPublished={isPublished}/>
                })}
            </div>
        </div>)

}
小结:
- 如何定义和使用组件
- props-父组件给子组件传递数据
- 重构列表页 抽象出
QuestionCard
效果

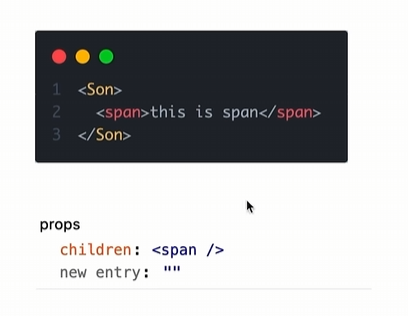
children
场景: 当我们把内容签到在子组件标签中时,父组件会自动的在名为 children的prop中接受内容
子组件传递父组件
顾名思义 其实就是子组件给父组件传递信息
function Son({onGetSonMsg}) {
//     son 中的数据
    const sonMsg = 'this is son msg';
    return <div>this is son
        <button onClick={() => onGetSonMsg(sonMsg)}>sendMsg</button>
    </div>
}

function AppDemo() {
    const [msg, setMsg] = useState('')
    const getMsg = (msg) => {
        console.log(msg)
        // msg = '我是信息'  这么改是无效的
        setMsg(msg)
    }
    return <div>
        this is APP Son send msg =>{msg}
        <Son onGetSonMsg={getMsg}/>
    </div>
}
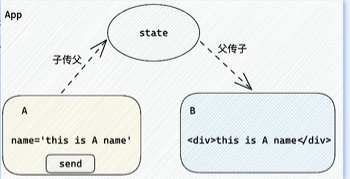
兄弟组件传递
使用状态提升实现兄弟组件通信
- 其实就是有共同父组件的两个子组件传递信息
- a 传递给父组件 然后由父组件 传递给 b
代码
import {useState} from "react";

function A({onGetAName}) {
    const name = "a name"
    return <div>this is A
        <button onClick={() => onGetAName(name)}>send</button>
    </div>
}

function B({pushAName}) {
    return <div>this is B
        {pushAName}
    </div>
}

function AppDemo() {
    const [aName, setAName] = useState('');
    const getAName = (name) => {
        console.log(name)
        setAName(name)
    }
    return <div>
        this is app
        <A onGetAName={getAName}/>
        <B pushAName={aName}/>
    </div>
}


export default AppDemo;
function A({onGetAName}) {
    const name = "a name"
    return <div>this is A
        <button onClick={() => onGetAName(name)}>send</button>
    </div>
}

function B({pushAName}) {
    return <div>this is B
        {pushAName}
    </div>
}

function AppDemo() {
    const [aName, setAName] = useState('');
    const getAName = (name) => {
        console.log(name)
        setAName(name)
    }
    return <div>
        this is app
        <A onGetAName={getAName}/>
        <B pushAName={aName}/>
    </div>
}
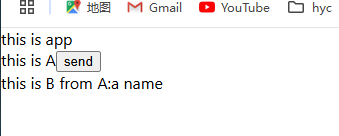
效果
React 拓展
React.memo
允许组件在Props没有改变的情况下 跳过渲染
react组件默认的渲染机制 : 父组件重新渲染的时候子组件也会重新渲染
import React, {useState} from 'react';

function Son() {
    console.log('子组件被重新渲染了')
    return <div>this is son</div>
}

const ReactMemoDemo = () => {
    const [, forceUpdate] = useState()
    console.log('父组件重新渲染了')
    return (
        <>
            <Son/>
            <button onClick={() => forceUpdate(Math.random())}>update</button>
        </>
    )
};

export default ReactMemoDemo;
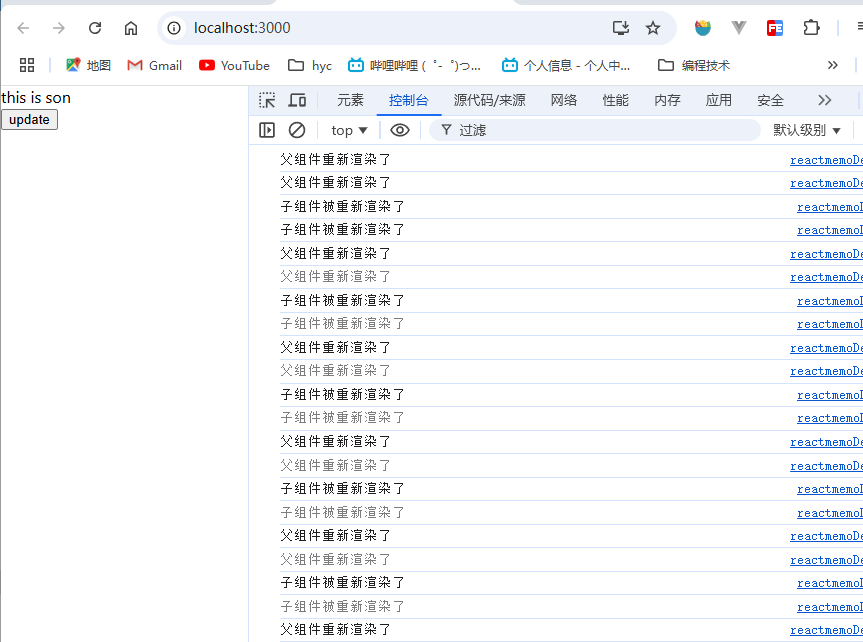
这个时候使用 memo包裹住组件 就可以避免 但是 注意 只考虑props变化才能使用\
import React, {memo, useState} from 'react';

// function Son() {
//     console.log('子组件被重新渲染了')
//     return <div>this is son</div>
// }

const MemoSon = memo(function Son() {
    console.log("我是子组件 我被渲染了")
    return <div>this is son</div>
})
const ReactMemoDemo = () => {
    const [, forceUpdate] = useState()
    console.log('父组件重新渲染了')
    return (
        <>
            <MemoSon/>
            <button onClick={() => forceUpdate(Math.random())}>update</button>
        </>
    )
};

export default ReactMemoDemo;
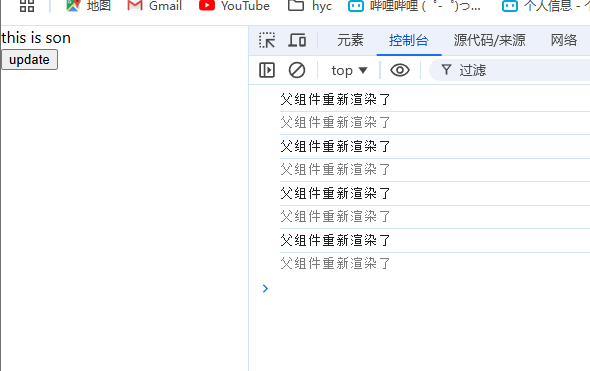
React.memo 比较机制
React会对每一个prop进行 object.is比较 返回true 表示没有变化
PS: 对于引用类型 React只关心引用是否变化
HOOKS
useState
这是React 中的一个hook 函数 它允许我们向组件添加一个状态变脸,从而控制组件的渲染结果
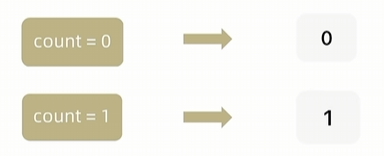
const [msg, setMsg] = useState('')
- useState是一个函数 返回值是一个数组
- 数组中的第一个参数是状态变量,第二个参数是set函数用于修改状态
- useState的参数将作为状态变量的初始值
修改规则
在React 中 状态被认为是只读的 我们应该替换而不是修改 直接修改状态不会得到视图的更新
    const [msg, setMsg] = useState('')
    const getMsg = (msg) => {
        console.log(msg)
        // msg = '我是信息'  这么改是无效的
        setMsg(msg)
    }

    //如果是对象作为参数
      const [msg, setMsg] = useState({id:'122ds'})
    const getMsg = (msg) => {
        console.log(msg)
        // msg = '我是信息'  这么改是无效的
        setMsg({
            ...msg,
        	id:'123'})
    }
useContext 组件通信
- 使用createContext 方法创建一个上下文对象 ctx=
- 在顶层组件 app 中 通过 ctx.Provider提供数据
- 在底层组件 通过 useContext钩子函数获取消费数据
案例 :
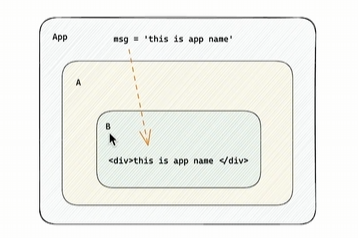
我们需要将app的消息传递到b
const MsgContext = createContext()

function A() {
    return <div>this is A
        <B/>
    </div>
}

function B() {
    const msg = useContext(MsgContext)
    return <div>this is B from APP:{msg}
    </div>
}

function AppDemo() {
    const msg = "this is app msg"
    return (<div>
        <MsgContext.Provider value={msg}>
            this is app
            <A/>
        </MsgContext.Provider>
    </div>)
}
useEffect
这是React中的一个 hook 函数 ,用于在React 中创建不是由事件引起而是由渲染本身引起的操作,比如发送 AJAX请求 更改DOM等
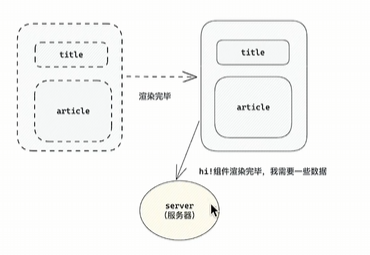
基础使用
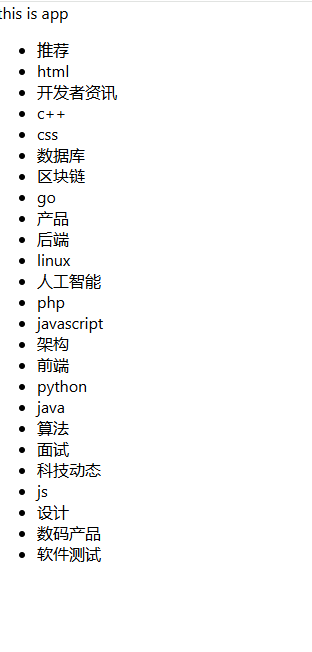
需求: 在组件渲染完毕后,从服务器获得列表数据展示
语法:
useEffect(()=>{},[])
- 参数1是一个函数,可以把它叫做副作用函数,函数内部可以放置要执行的操作
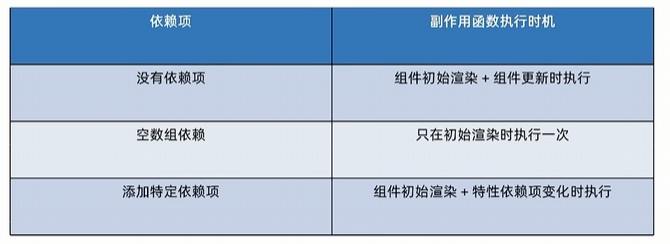
- 参数2是一个数组 ,数组里放置依赖项,不同依赖项会影响第一个参数的执行,当该参数是一个空数组的时候,副作用函数只会在组件渲染完毕后执行一次
import {useEffect, useState} from "react";

const URL = 'http://geek.itheima.net/v1_0/channels'

function AppDemo() {
    const [list, setList] = useState([]);
    useEffect(() => {
        async function getList() {
            const res = await fetch(URL)
            const jsonRes = await res.json()
            console.log(jsonRes)
            setList(jsonRes.data.channels)
        }

        getList()
        console.log("list", list)
    }, []);
    return (<div>
        this is app
        <ul>
            {list.map(item => <li key={item.id}>{item.name}</li>)}
        </ul>
    </div>)
}


export default AppDemo;
效果
依赖项参数
function AppDemo() {
    /*1. 没有依赖项*/
    const [count, setCount] = useState(0);
    // useEffect(() => {
    //     console.log("副作用函数执行了")
    // });
    /*2 传入空数组依赖*/
    // useEffect(() => {
    //     console.log("副作用函数执行了")
    // }, []);
    useEffect(() => {
        console.log("副作用函数执行了")
    }, [count]);
    return <div>this is app
        <button onClick={() => setCount(count + 1)}>+{count}</button>
    </div>
}
清除副作用
在useEffect中编写的由渲染本身引起的对接组件外部的操作,社区也经常把它叫做副作用操作,我们想在组件卸载时把这个定时器清理掉,这个过程就是清理副作用
import {useEffect, useState} from "react";

function Son() {
    useEffect(() => {
        const timer = setInterval(() => {
            console.log("定时器执行中...")
        }, 1000)
        return () => {
            //     清楚副作用
            clearInterval(timer)
        }
    }, []);
    return <div>this is son</div>
}

function AppDemo() {
    const [show, setShow] = useState(true)
    return <div>this is app
        {show && <Son/>}
        <button onClick={() => setShow(false)}>卸载组件</button>
    </div>
}

export default AppDemo;
useReducer
- 定义
redcuer函数 (根据不同的action 返回不同的新状态) - 在组件中调用 useReducer 传入reducer函数和初始状态
- 事件触发的时候,通过 dispatch函数 通过reducer要返回什么状态并且渲染UI
import React, {useReducer} from 'react';

// 根据不同的case 返回不同的状态
function reducer(state, action) {
    switch (action.type) {
        case 'INC':
            return state + 1
        case 'DEC':
            return state - 1
        case 'SET':
            return state = action.payload
        default:
            return state
    }
}

const ReducerDemo = () => {
    // 使用 use reducer
    const [state, dispatch] = useReducer(reducer, 0)
    return (
        <div>
            <button onClick={() => dispatch({type: 'INC'})}>+</button>
            {state}
            <button onClick={() => dispatch({type: 'DEC'})}>-</button>
            <button onClick={() => dispatch({type: 'SET', payload: 100})}>Set</button>
        </div>
    );
};

export default ReducerDemo;
这个钩子相当于 一个可以有多个修改state方法的 usestate
useMemo
作用:它在每次重新渲染的时候能够缓存计算的结果
小案例
- 我们设置一个计算结果的方法 这个方法直接用 大括号的方式渲染
- 设置两个按钮 每次usestate发生变化 都会渲染页面 会导致两个按钮无论点击哪一个都会导致计算结果方法的内容出现变化
import React, {useState} from 'react';

function factorialOf(n) {
    console.log('斐波那契函数执行了')
    return n <= 0 ? 1 : n * factorialOf(n - 1)
}

const MemoDemo = () => {
    const [count, setCount] = useState(0)
    // 计算斐波那契之和
    const sumByCount = factorialOf(count)

    const [num, setNum] = useState(0)

    return (
        <>
            {sumByCount}
            <button onClick={() => setCount(count + 1)}>+count:{count}</button>
            <button onClick={() => setNum(num + 1)}>+num:{num}</button>
        </>
    )
};

export default MemoDemo;
useMemo 就是用来解决这种问题的
import React, {useMemo, useState} from 'react';

function factorialOf(n) {
    console.log('斐波那契函数执行了')
    return n <= 0 ? 1 : n * factorialOf(n - 1)
}

const MemoDemo = () => {
    const [count, setCount] = useState(0)
    // 计算斐波那契之和
    // const sumByCount = factorialOf(count)
    const sumByCount = useMemo(() => {
        return factorialOf(count)
    }, [count])

    const [num, setNum] = useState(0)

    return (
        <>
            {sumByCount}
            <button onClick={() => setCount(count + 1)}>+count:{count}</button>
            <button onClick={() => setNum(num + 1)}>+num:{num}</button>
        </>
    )
};

export default MemoDemo;
就不会出现 点击num按钮也会触发求和方法情况了
useCallback
作用 在组件多次重新渲染的时候 缓存函数
自定义hook
暂时没有什么很好的例子 写一个比较简单的 之后再拓展
import {useState} from "react";

function useToggle() {
// 可复用代码
    const [value, setValue] = useState(true);
    const toggle = () => {
        setValue(!value)
    }
    return {value, toggle}
}

function AppDemo() {
    const {value, toggle} = useToggle()
    return <div>this is app
        {value && <div>this is show Toggle</div>}
        <button onClick={toggle}>Toggle</button>
    </div>
}

export default AppDemo;
效果

点击

Redux
完整代码案例仓库 :https://gitee.com/cold-abyss_admin/react-redux-meituan
Redux是 React 最常用的集中状态管理工具,类似与VUE的pinia(vuex) 可以独立于框架运行
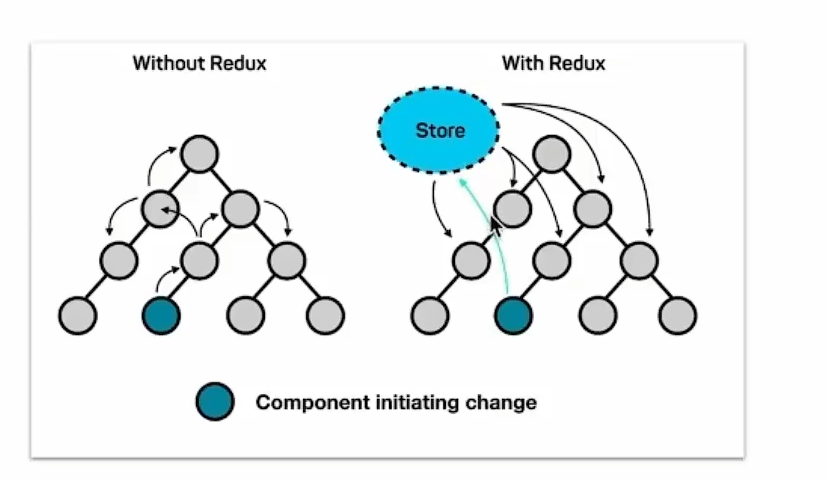
使用思路:
- 定义一个
reducer函数 根据当前想要做的修改返回一个新的状态 - 使用createStore方法传入reducer函数 生成一个store实例对象
- subscribe方法 订阅数据的变化(数据一旦变化,可以得到通知)
- dispatch方法提交action对象 告诉reducer你想怎么改数据
- getstate方法 获取最新的状态数据更新到视图中
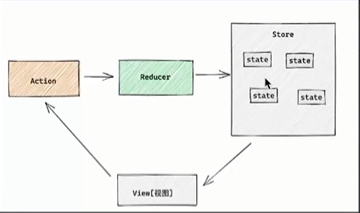
配置Redux
在React中使用redux,官方要求安装俩个其他插件-和react-redux
官方推荐我们使用 RTK(ReduxToolkit) 这是一套工具集合 可以简化书写方式
- 简化store配置
- 内置immer可变式状态修改
- 内置thunk更好的异步创建
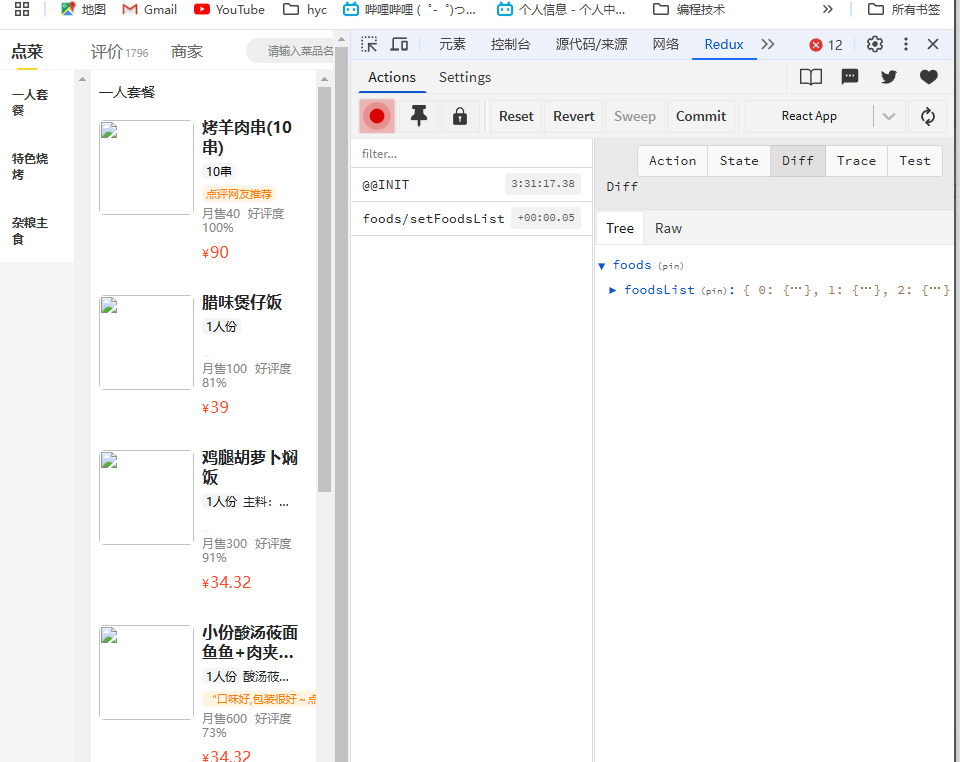
调试工具安装
谷歌浏览器搜索 redux-devtool安装 工具
依赖安装
#redux工具包
npm i @reduxjs/toolkit react-redux
#调试工具包
npm install --save-dev redux-devtools-extension
store目录机构设计
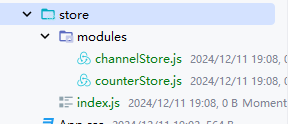
- 通常集中状态管理的部分都会单独创建一个
store目录 - 应用通常会有多个子store模块,所以创建一个
modules进行内部业务的区分 - store中的入口文件index.js 的作用是组合所有
modules的子模块 并且导出store
快速上手
使用react+redux 开发一个计数器 熟悉一下技术
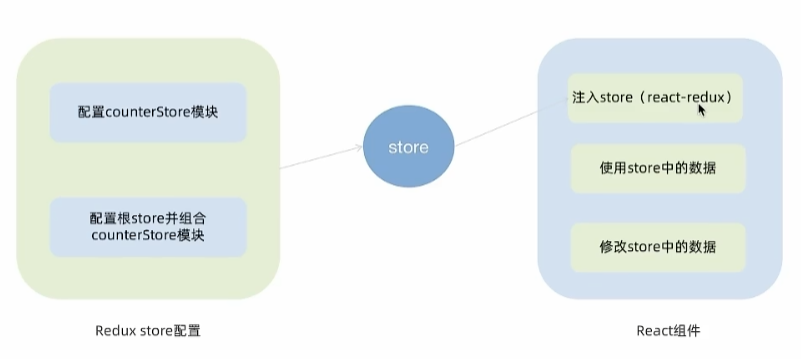
-
使用
Reacttoolkit创建 counterStoreimport {createSlice} from "@reduxjs/toolkit"; const counterStore= createSlice({ name: "counter", // 初始化 state initialState: { count: 0 }, // 修改状态的方法 reducers:{ increment(state){ state.count++ }, decrement(state){ state.count-- } } }) // 解构函数 const {increment,decrement}= counterStore.actions // 获取reducer const reducer = counterStore.reducer; export {increment,decrement} export default reducer -
在
index.js集合counterimport {configureStore} from "@reduxjs/toolkit"; import counterStore from "./modules/counterStore"; const store = configureStore({ reducer:{ couner: counterStore, } }) export default store -
为React 注入
store,react-redux负责把Redux和React链接 起来,内置Provider组件 通过store参数把创建好的store实例注入到应用中 找到项目中的index.jsconst root = ReactDOM.createRoot(document.getElementById('root')); root.render( <React.StrictMode> <Provider store={store}> <App /> </Provider> </React.StrictMode> ); -
使用useSelector 获取到数据
import {useSelector} from "react-redux"; function App() { const {count} = useSelector(state => state.counter); return ( <div className="App"> {count} </div> ); } -
使用 钩子函数
useDispatchimport {useDispatch, useSelector} from "react-redux"; import {inscrement,descrement} from "./store/modules/counterStore" function App() { const {count} = useSelector(state => state.counter); const dispatch = useDispatch() return ( <div className="App"> <button onClick={()=>dispatch(inscrement())}>+</button> {count} <button onClick={()=>dispatch(descrement())}>-</button> </div> ); } export default App; -
查看效果

提交acntion传参
在reducers的同步修改方法中添加action对象参数,在调用actionCreater参数的时候传递参数,参数会被传递到action对象的payload属性上
我们继续的改造一下counterStore
action这个对象参数有个固定的属性叫payload用来接收传参
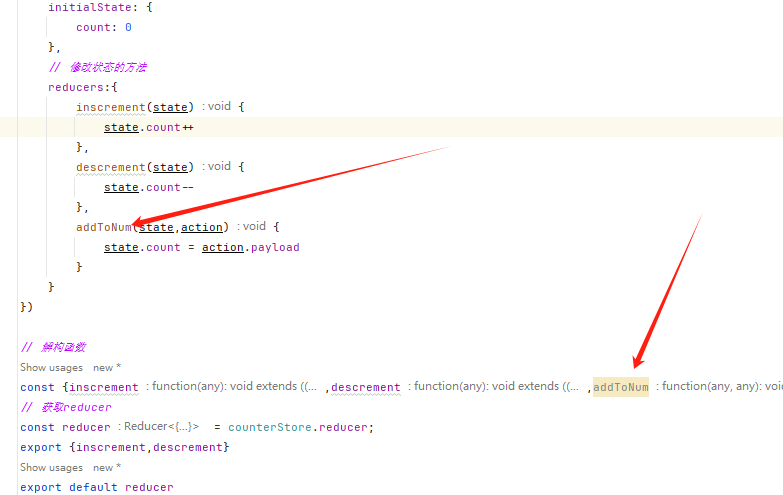
然后 app.js 添加两个按钮 用来传递参数

效果

Reudx action异步操作
区分同步和异步action
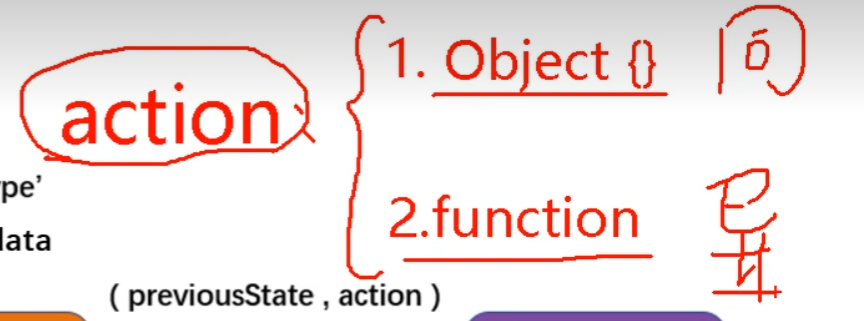
如果action的内容是 object对象那就是同步action,如果是函数 那就是异步action
为什么我们需要异步action操作来使用请求 ?
例子:
我们有两种方式可以实现 隔五分钟 上蛋炒饭
一种是客人自己思考五分钟
一种是客人点好 叫服务员五分钟之后上
这个服务员就是 redux 我们刚希望相关aciton的操作都在redux里完成这个时候同步action就不能满足我们的需求了 所以需要使用异步action
异步操作的代码变化不大,我们创建store的写法保持不变 ,但是在函数中用异步操作的时候需要一个能异步执行函数return出一个新的函数而我们的异步操作卸载新的函数中.
异步action中一般都会调用一个同步action
案例: 从后端获取到列表展示到页面
新建一个文件叫做 ChannelStore.js 然后编写对应的创建代码
import {createSlice} from "@reduxjs/toolkit";
import axios from "axios";
const channelStore = createSlice({
name: "channel",
initialState: {
channelList:[]
},
reducers:{
setChannel(state, action){
state.channelList=action.payload
}
}
})
const {setChannel}= channelStore.actions
// 异步请求
const fetchChannelList = ()=>{
return async (dispatch)=>{
const res = await axios.get('http://geek.itheima.net/v1_0/channels')
dispatch(setChannel(res.data.data.channels))
}
}
const reducer = channelStore.reducer;
export {fetchChannelList}
export default reducer
然后去store入口加入channelStore
import {configureStore} from "@reduxjs/toolkit";
import counterStore from "./modules/counterStore";
import channelStore from "./modules/channelStore";
const store = configureStore({
reducer:{
counter: counterStore,
channel: channelStore,
}
})
export default store
之后就可以在app.js加入代码
import {useDispatch, useSelector} from "react-redux";
import {useEffect} from "react";
import {fetchChannelList} from "./store/modules/channelStore";
function App() {
const {channelList} = useSelector(state => state.channel);
const dispatch = useDispatch()
useEffect(() => {
dispatch(fetchChannelList())
}, [dispatch]);
return (
<div className="App">
<ul>
{channelList.map(item =><li key={item.id}>{item.name}</li>)}
</ul>
</div>
);
}
export default App;
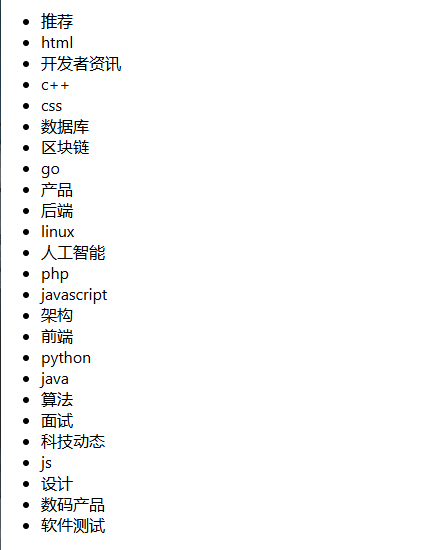
代码效果
redux hooks
useSelector
它的作用是吧store中的数据映射到组件中
const {count} = useSelector(state => state.counter);
这里的count其实对应的就是
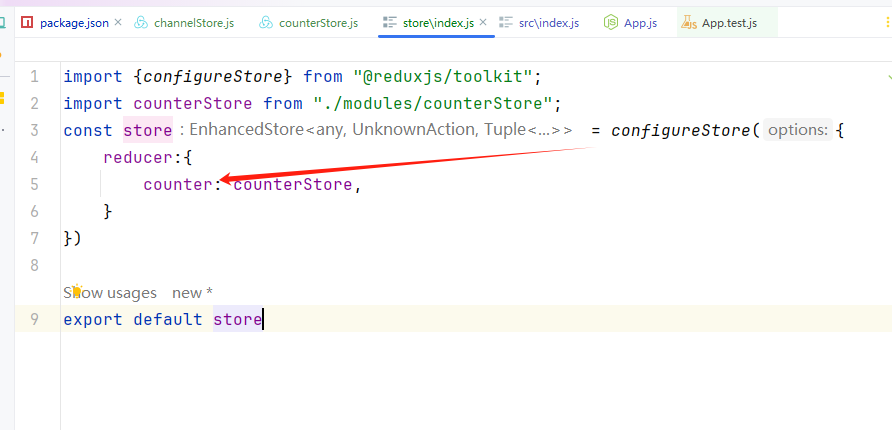
useDispatch
它的作用是生成提交 action对象的dispatch函数
import {useDispatch, useSelector} from "react-redux";
import {inscrement,descrement} from "./store/modules/counterStore"
function App() {
  const {count} = useSelector(state => state.counter);
 const dispatch = useDispatch()
  return (
    <div className="App">
        <button onClick={()=>dispatch(inscrement())}>+</button>
        {count}
        <button onClick={()=>dispatch(descrement())}>-</button>
    </div>
  );
}

export default App;
美团点餐界面小案例
下载模板地址:
git clone http://git.itcast.cn/heimaqianduan/redux-meituan.git
效果与功能列表展示
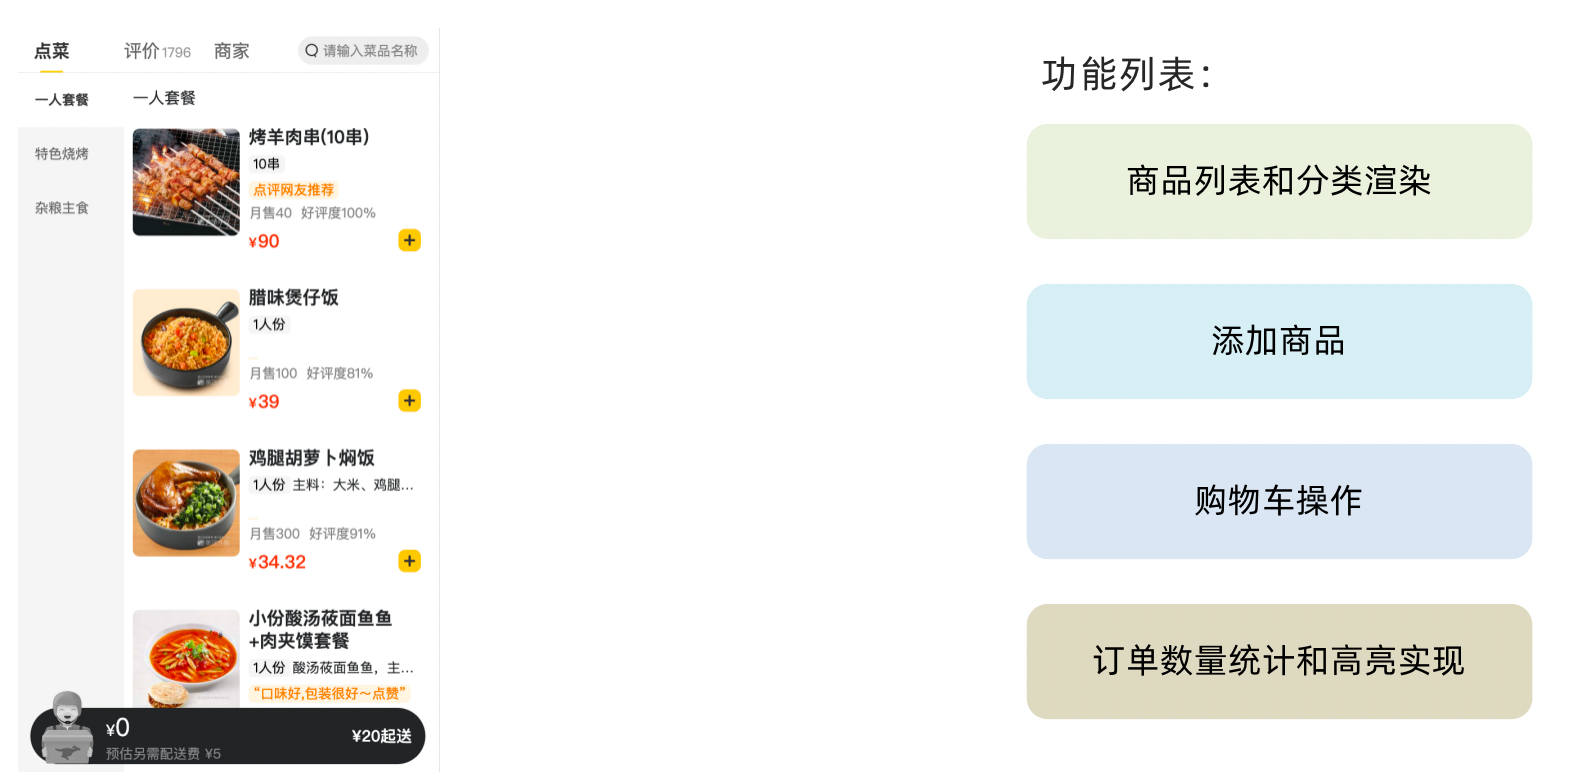
基本的思路就是使用 RTK 来做状态管理,组件负责数据渲染和操作action
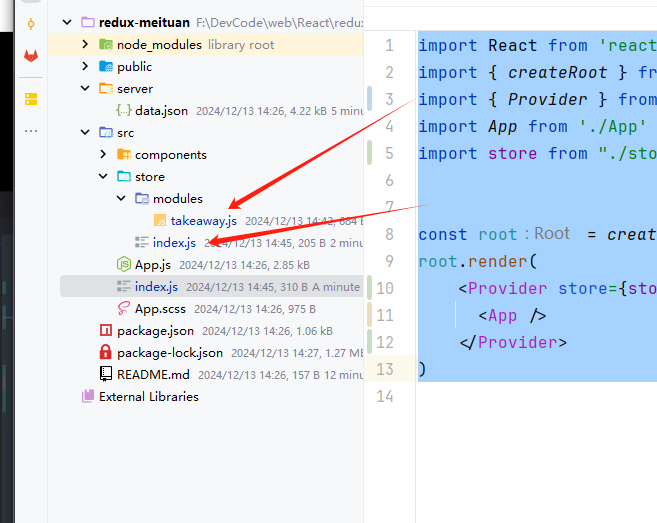
我们在store文件夹下开始配置和编写store的使用逻辑
分类渲染
先编写对应的reducer 和异步请求逻辑
takeaway.js
用于异步请求列表数据
import {createStore} from './store';
import axios from "axios";
const foodsState = createStore({
    name:'foods',
    initialState: {
        foodsList:[]
    },
    reducers:{
        setFoodsList(state, action){
            state.foodsList=action.payload
        }
    }
});
const {setFoodsList} = foodsState.actions;
//异步获取部分
const fetchFoodsList = () => {
    return async dispatch => {
    //     异步逻辑
       const res =  await axios.get(' http://localhost:3004/takeaway\n')
    //     调用dispatch
        dispatch(setFoodsList(res.data))
    }
}
const reducer = foodsState.reducer
export {fetchFoodsList}
export default reducer
将子store管理起来 在store文件夹下编写一个index.js作为访问store的入口
import {configureStore} from "@reduxjs/toolkit";
import foodsReducer from './modules/takeaway'
const  store= configureStore({
    reducer:{
        foods:foodsReducer
    }
})

export default store
然后将redux和react连接起来 将store 注入进去 选择根目录的index.js
import React from 'react'
import { createRoot } from 'react-dom/client'
import { Provider } from 'react-redux'
import App from './App'
import store from "./store";


const root = createRoot(document.getElementById('root'))
root.render(
    <Provider store={store}>
      <App />
    </Provider>
)
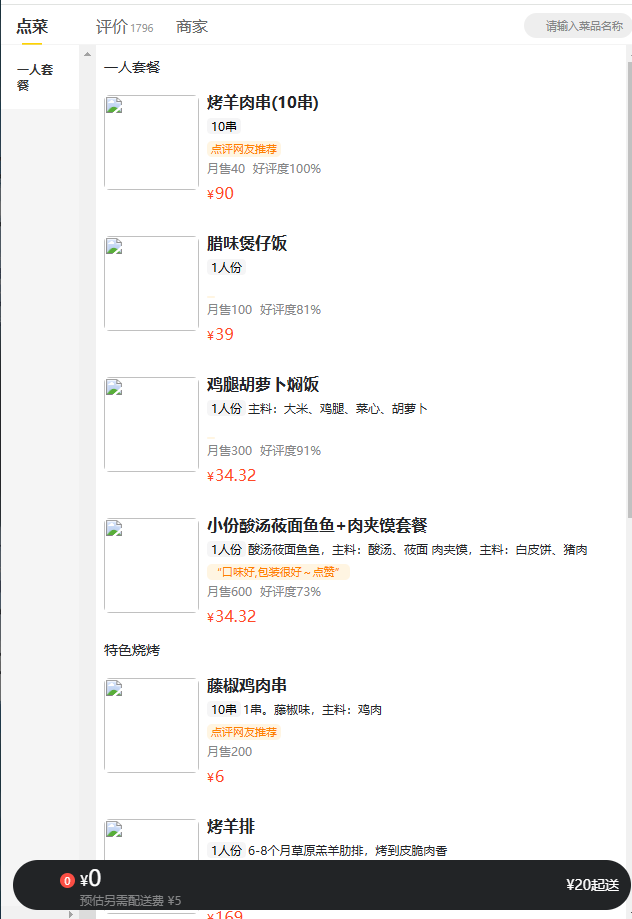
编写渲染页面
在app.js里 遵循步骤开始操作store
- 使用
useDispatch函数取得对象 - 使用
useEffect调用异步函数获取服务器数据 - 使用
useSelector拿到数据并且循环展示
import NavBar from './components/NavBar'
import Menu from './components/Menu'
import Cart from './components/Cart'
import FoodsCategory from './components/FoodsCategory'
import './App.scss'
import {useSelector} from "react-redux";

const App = () => {
 // 访问store拿到数据
 const {foodsList} = useSelector(state => state.foods)
  return (
    <div className="home">
      {/* 导航 */}
      <NavBar />

      {/* 内容 */}
      <div className="content-wrap">
        <div className="content">
          <Menu />

          <div className="list-content">
            <div className="goods-list">
              {/* 外卖商品列表 */}
              {foodsList.map(item => {
                return (
                  <FoodsCategory
                    key={item.tag}
                    // 列表标题
                    name={item.name}
                    // 列表商品
                    foods={item.foods}
                  />
                )
              })}
            </div>
          </div>
        </div>
      </div>

      {/* 购物车 */}
      <Cart />
    </div>
  )
}

export default App
效果
侧边栏渲染.交互
我们需要在获取列表解构的时候 拿到属于左侧列表的数据
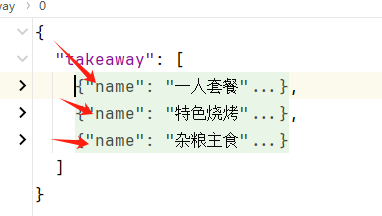
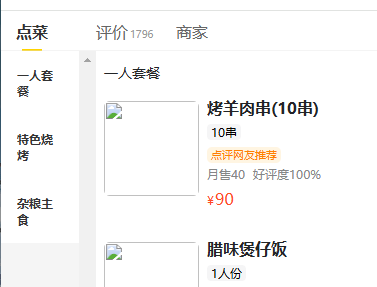
然后循环的展示在menu组件中 只需要把异步请求的数据放到menu组件中就可以展示侧边栏了
import classNames from 'classnames'
import './index.scss'
import {useDispatch, useSelector} from "react-redux";
const Menu = () => {
  //    获取dispatch
  const  dispatch = useDispatch()
  // 访问store拿到数据
  const {foodsList} = useSelector(state => state.foods)
  const menus = foodsList.map(item => ({ tag: item.tag, name: item.name }))
  return (
    <nav className="list-menu">
      {/* 添加active类名会变成激活状态 */}
      {menus.map((item, index) => {
        return (
          <div
            key={item.tag}
            className={classNames(
              'list-menu-item',
              'active'
            )}
          >
            {item.name}
          </div>
        )
      })}
    </nav>
  )
}

export default Menu
效果
接下来编写交互操作 使用RTK来管理activeindex
- 新增
activeIndex并且设置好对应的同步操作action方法以及导出
import {createSlice} from '@reduxjs/toolkit';
import axios from "axios";
const foodsState = createSlice({
    name:'foods',
    initialState: {
        // 商品列表
        foodsList:[],
     // 菜单激活值
        activeIndex:0,
    },
    reducers:{
        setFoodsList(state, action){
            state.foodsList=action.payload
        },
        changeActiveIndex(state, action){
            state.activeIndex=action.payload
        }
    }
});
const {setFoodsList,changeActiveIndex} = foodsState.actions;
//异步获取部分
const fetchFoodsList = () => {
    return async dispatch => {
    //     异步逻辑
       const res =  await axios.get(' http://localhost:3004/takeaway\n')
    //     调用dispatch
        dispatch(setFoodsList(res.data))
        console.log(res.data)
    }
}
const reducer = foodsState.reducer
export {fetchFoodsList,changeActiveIndex}
export default reducer
然后开始编写menu组件的点击效果
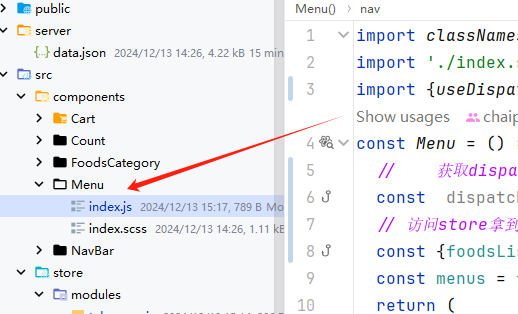
代码修改
menu/index.js
import classNames from 'classnames'
import './index.scss'
import {useDispatch, useSelector} from "react-redux";
import {changeActiveIndex} from "../../store/modules/takeaway";
const Menu = () => {
  //    获取dispatch
  const  dispatch = useDispatch()
  // 访问store拿到数据
  const {foodsList,activeIndex} = useSelector(state => state.foods)
  const menus = foodsList.map(item => ({ tag: item.tag, name: item.name }))
  return (
    <nav className="list-menu">
      {/* 添加active类名会变成激活状态 */}
      {menus.map((item, index) => {
        return (
          <div
              onClick={()=>dispatch(changeActiveIndex(index))}
            key={item.tag}
            className={classNames(
              'list-menu-item',
                activeIndex===index&& 'active'
            )}
          >
            {item.name}
          </div>
        )
      })}
    </nav>
  )
}

export default Menu
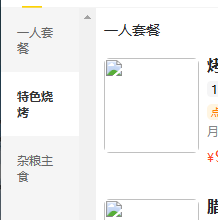
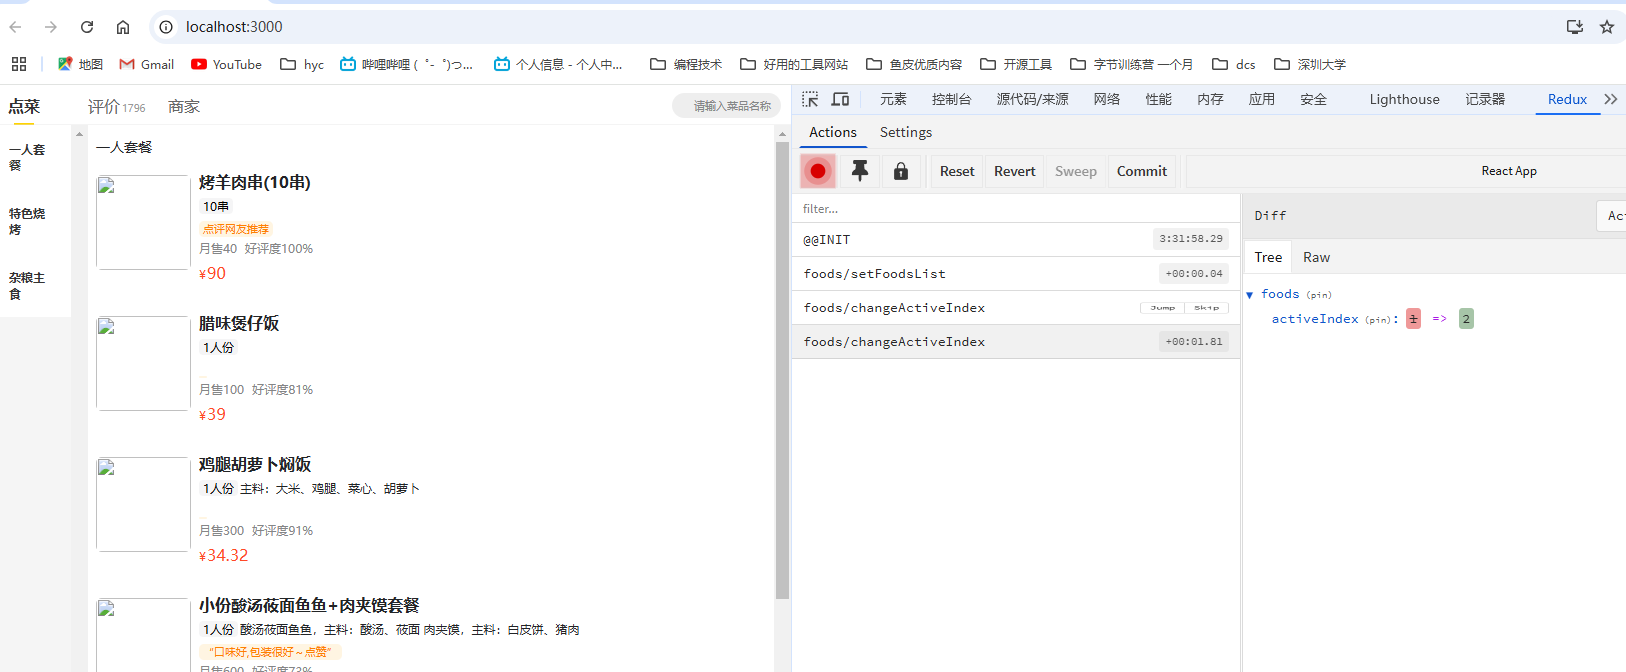
效果
当点击的时候index就会切换到对应的index上 并且在点击当前index的时候选项高亮
商品列表的切换显示
点击侧边栏的时候 菜单栏需要显示对应侧边栏index的菜单
修改 app.js菜单栏标签的显示规则就行
const App = () => {
 //    获取dispatch
 const  dispatch = useDispatch()
  //   异步请求数据
  useEffect(() => {
    dispatch(fetchFoodsList())
  }, [dispatch]);
 // 访问store拿到数据
 const {foodsList,activeIndex} = useSelector(state => state.foods)
  return (
    <div className="home">
      {/* 导航 */}
      <NavBar />

      {/* 内容 */}
      <div className="content-wrap">
        <div className="content">
          <Menu />

          <div className="list-content">
            <div className="goods-list">
              {/* 外卖商品列表 */}
              {foodsList.map((item,index) => {
                return (
                index===activeIndex&&  <FoodsCategory
                    key={item.tag}
                    // 列表标题
                    name={item.name}
                    // 列表商品
                    foods={item.foods}
                  />
                )
              })}
            </div>
          </div>
        </div>
      </div>

      {/* 购物车 */}
      <Cart />
    </div>
  )
}
添加购物车
首先找到fooditem中的food对象 一会我们使用cartlist的时候要用到 id 和count
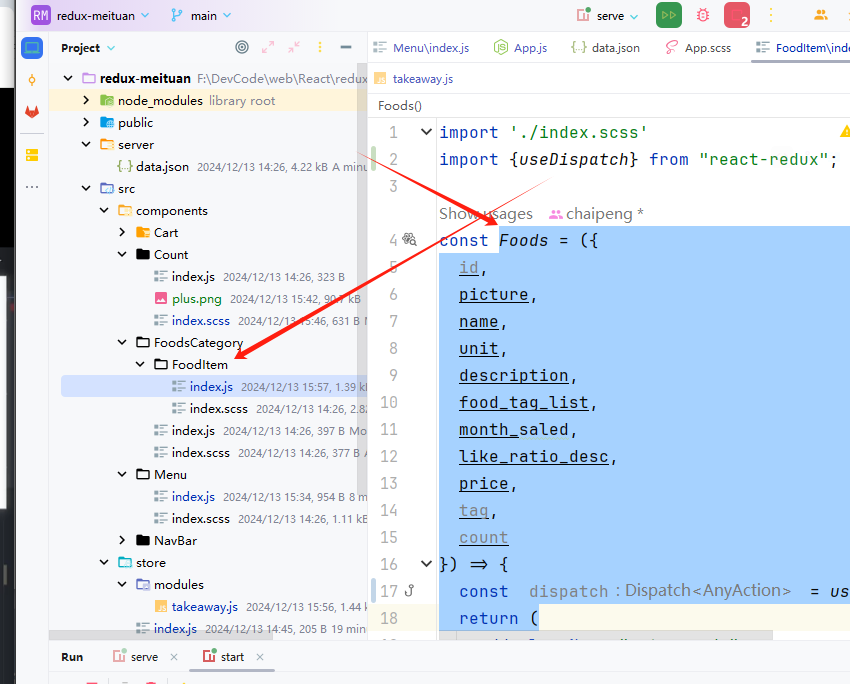
使用 RTK管理 状态cartlist
import {createSlice} from '@reduxjs/toolkit';
import axios from "axios";
const foodsState = createSlice({
    name:'foods',
    initialState: {
        // 商品列表
        foodsList:[],
     // 菜单激活值
        activeIndex:0,
        // 购物车列表
        cartList:[]
    },
    reducers:{
        // 修改商品列表
        setFoodsList(state, action){
            state.foodsList=action.payload
        },
        // 更改activeIndex
        changeActiveIndex(state, action){
            state.activeIndex=action.payload
        },
        // 添加购物车
        addCart(state, action){
        //    通过payload.id去匹配cartList匹配,匹配到代表添加过
           const  item = state.cartList.find(item=>item.id ===action.payload.id)
            if (item){
                item.count++
            }else{
                state.cartList.push(action.payload)
            }
        }
    }
});
const {setFoodsList,changeActiveIndex,addCart} = foodsState.actions;
//异步获取部分
const fetchFoodsList = () => {
    return async dispatch => {
    //     异步逻辑
       const res =  await axios.get(' http://localhost:3004/takeaway\n')
    //     调用dispatch
        dispatch(setFoodsList(res.data))
        console.log(res.data)
    }
}
const reducer = foodsState.reducer
export {fetchFoodsList,changeActiveIndex,addCart}
export default reducer
在fooditem.jsx编写cartList触发操作
- 要记得给 count一个默认值 不然会是 null
- 修改 classname为plus的span标签新增点击事件
import './index.scss'
import {useDispatch} from "react-redux";
import {addCart} from "../../../store/modules/takeaway";

const Foods = ({
  id,
  picture,
  name,
  unit,
  description,
  food_tag_list,
  month_saled,
  like_ratio_desc,
  price,
  tag,
  count =1
}) => {
  const  dispatch = useDispatch()
  return (
    <dd className="cate-goods">
      <div className="goods-img-wrap">
        <img src={picture} alt="" className="goods-img" />
      </div>
      <div className="goods-info">
        <div className="goods-desc">
          <div className="goods-title">{name}</div>
          <div className="goods-detail">
            <div className="goods-unit">{unit}</div>
            <div className="goods-detail-text">{description}</div>
          </div>
          <div className="goods-tag">{food_tag_list.join(' ')}</div>
          <div className="goods-sales-volume">
            <span className="goods-num">月售{month_saled}</span>
            <span className="goods-num">{like_ratio_desc}</span>
          </div>
        </div>
        <div className="goods-price-count">
          <div className="goods-price">
            <span className="goods-price-unit">¥</span>
            {price}
          </div>
          <div className="goods-count">
            <span className="plus" onClick={()=>{dispatch(addCart({
              id,
              picture,
              name,
              unit,
              description,
              food_tag_list,
              month_saled,
              like_ratio_desc,
              price,
              tag,
              count
            }))}}></span>
          </div>
        </div>
      </div>
    </dd>
  )
}

export default Foods
效果
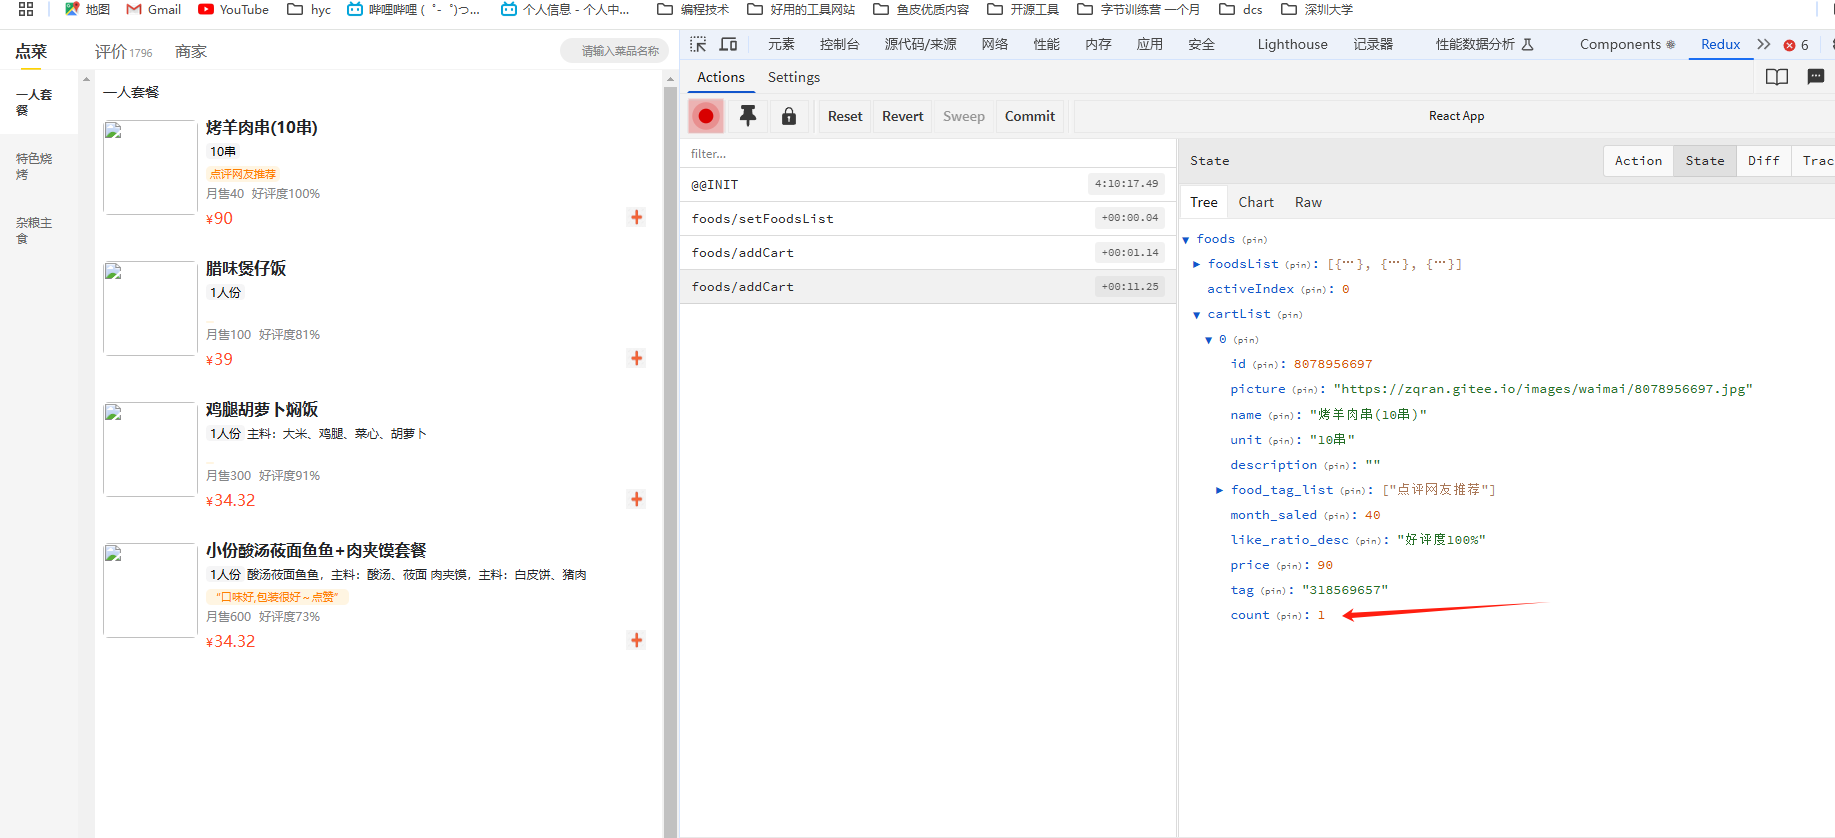
统计订单区域
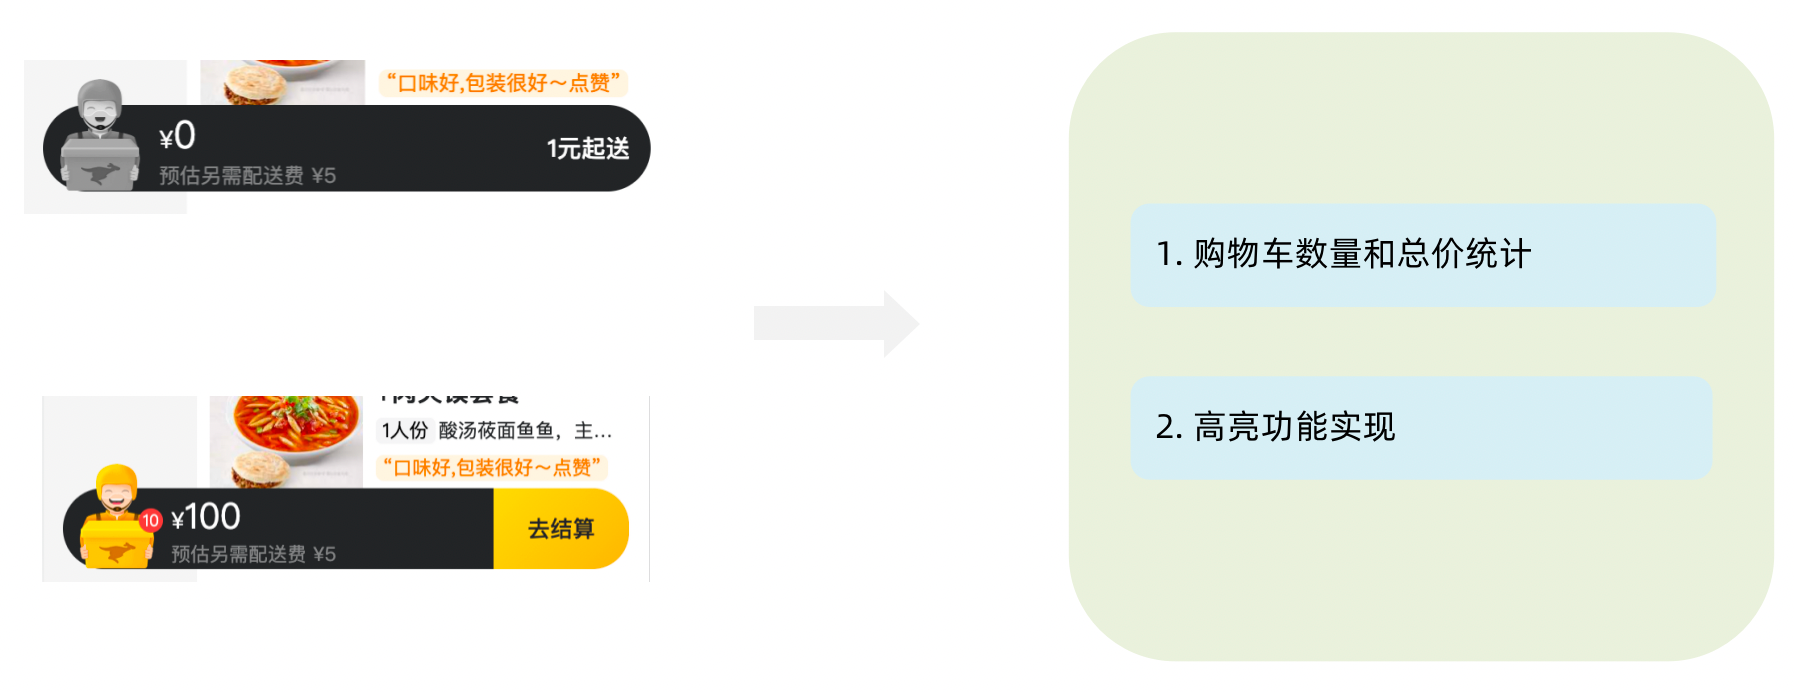
实现思路
- 基于store中的cartList的length渲染数量
- 基于store中的cartList累加price * count
- 购物车cartList的length不为零则高亮
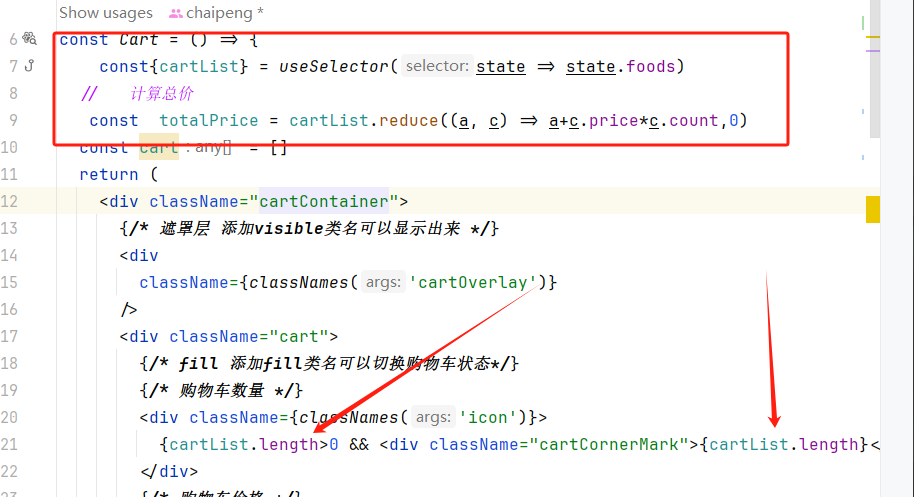
- 设置总价
// 计算总价
const totalPrice = cartList.reduce((a, c) => a + c.price * c.count, 0)

{/* fill 添加fill类名购物车高亮*/}
{/* 购物车数量 */}
<div onClick={onShow} className={classNames('icon', cartList.length > 0 && 'fill')}>
  {cartList.length > 0 && <div className="cartCornerMark">{cartList.length}</div>}
</div>
效果
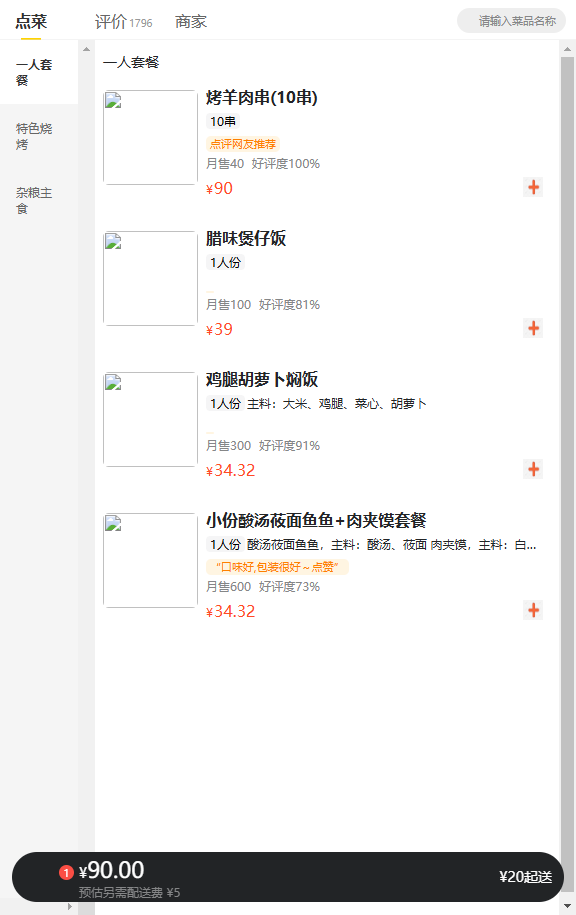
cart.jsx全部代码
import classNames from 'classnames'
import Count from '../Count'
import './index.scss'
import {useSelector} from "react-redux";
import {fill} from "lodash/array";

const Cart = () => {
    const{cartList} = useSelector(state => state.foods)
  //   计算总价
   const  totalPrice = cartList.reduce((a, c) => a+c.price*c.count,0)
  const cart = []
  return (
    <div className="cartContainer">
      {/* 遮罩层 添加visible类名可以显示出来 */}
      <div
        className={classNames('cartOverlay')}
      />
      <div className="cart">
        {/* fill 添加fill类名可以切换购物车状态*/}
        {/* 购物车数量 */}
        <div className={classNames('icon')}>
          {cartList.length>0 && <div className="cartCornerMark">{cartList.length}</div>}
        </div>
        {/* 购物车价格 */}
        <div className="main">
          <div className="price">
            <span className="payableAmount">
              <span className="payableAmountUnit">¥</span>
              {totalPrice.toFixed(2)}
            </span>
          </div>
          <span className="text">预估另需配送费 ¥5</span>
        </div>
        {/* 结算 or 起送 */}
        {cartList.length > 0 ? (
          <div className="goToPreview">去结算</div>
        ) : (
          <div className="minFee">¥20起送</div>
        )}
      </div>
      {/* 添加visible类名 div会显示出来 */}
      <div className={classNames('cartPanel')}>
        <div className="header">
          <span className="text">购物车</span>
          <span className="clearCart">
            清空购物车
          </span>
        </div>

        {/* 购物车列表 */}
        <div className="scrollArea">
          {cart.map(item => {
            return (
              <div className="cartItem" key={item.id}>
                <img className="shopPic" src={item.picture} alt="" />
                <div className="main">
                  <div className="skuInfo">
                    <div className="name">{item.name}</div>
                  </div>
                  <div className="payableAmount">
                    <span className="yuan">¥</span>
                    <span className="price">{item.price}</span>
                  </div>
                </div>
                <div className="skuBtnWrapper btnGroup">
                  <Count
                    count={item.count}
                  />
                </div>
              </div>
            )
          })}
        </div>
      </div>
    </div>
  )
}

export default Cart
购物车列表功能
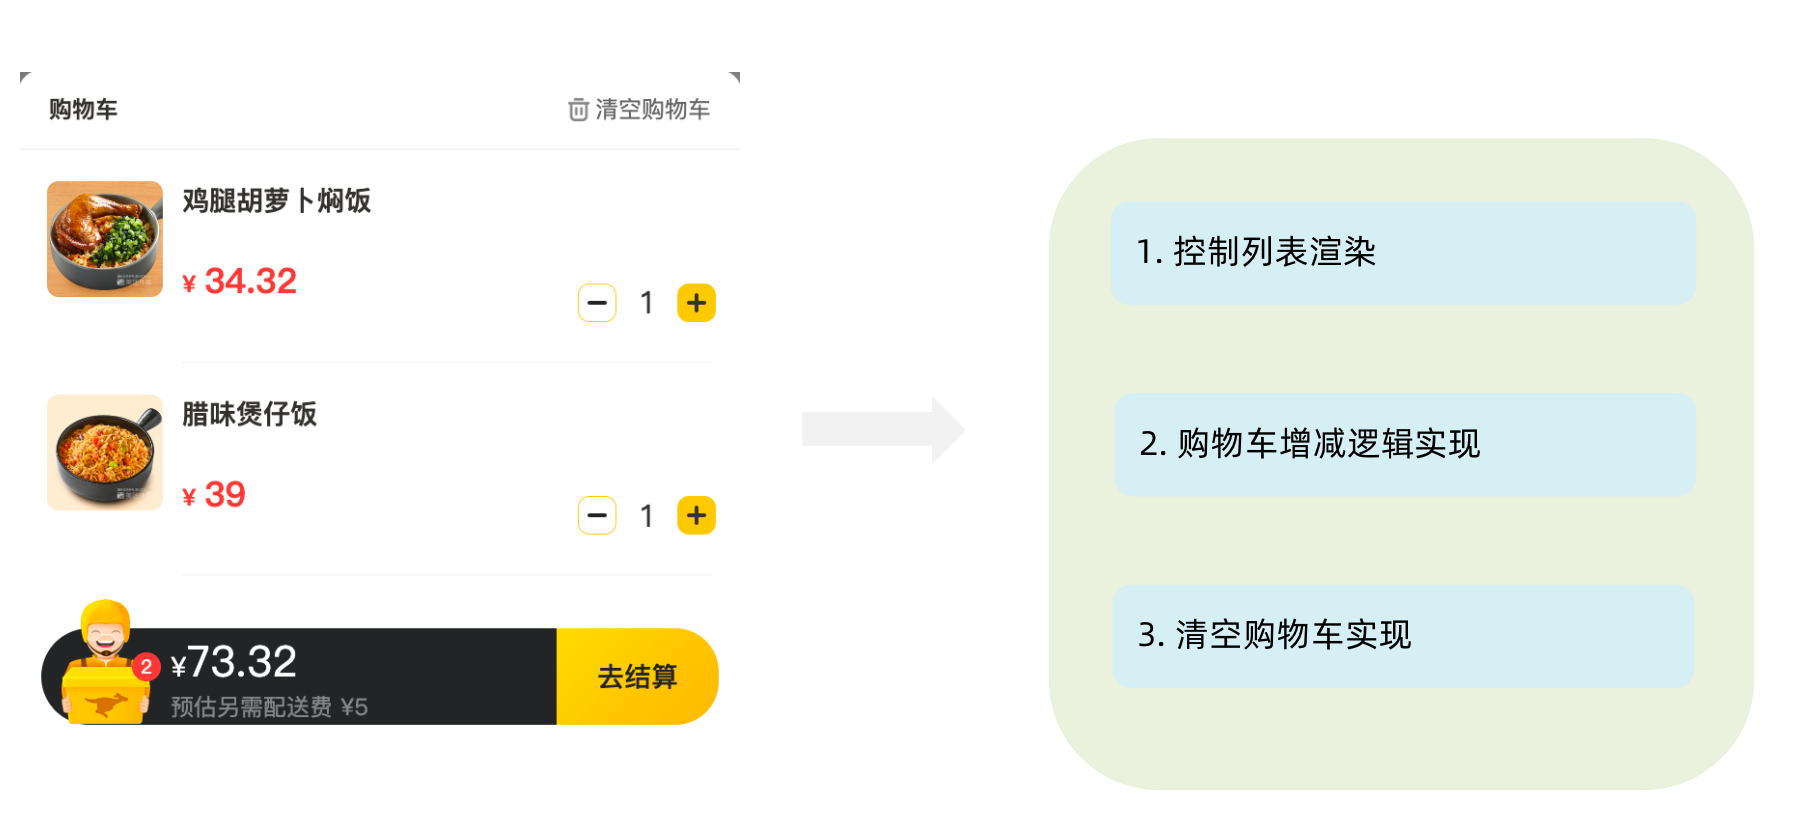
修改
takeaway.js内容如下 :
- 新增加减购物车内的视频数量
- 清楚购物车
- 只有一项时删除商品选择
import {createSlice} from '@reduxjs/toolkit';
import axios from "axios";
const foodsState = createSlice({
    name:'foods',
    initialState: {
        // 商品列表
        foodsList:[],
     // 菜单激活值
        activeIndex:0,
        // 购物车列表
        cartList:[]
    },
    reducers:{
        // 修改商品列表
        setFoodsList(state, action){
            state.foodsList=action.payload
        },
        // 更改activeIndex
        changeActiveIndex(state, action){
            state.activeIndex=action.payload
        },
        // 添加购物车
        addCart(state, action){
        //    通过payload.id去匹配cartList匹配,匹配到代表添加过
           const  item = state.cartList.find(item=>item.id ===action.payload.id)
            if (item){
                item.count++
            }else{
                state.cartList.push(action.payload)
            }
        },
    //     count增
        increCount(state, action){
            const  item = state.cartList.find(item=>item.id ===action.payload.id)
            item.count++
        },
    //     count减
        decreCount(state, action){
            const  item = state.cartList.find(item=>item.id ===action.payload.id)
             // 只有一项的时候将商品移除购物车
            if (item.count <=1){
                state.cartList=  state.cartList.filter(item=>item.id !=action.payload.id)
                return
            }
            item.count--
        },
    //     清除购物车
        clearCart(state){
            state.cartList=[]
        }
    }
});
const {clearCart,decreCount,increCount,setFoodsList,changeActiveIndex,addCart} = foodsState.actions;
//异步获取部分
const fetchFoodsList = () => {
    return async dispatch => {
    //     异步逻辑
       const res =  await axios.get(' http://localhost:3004/takeaway\n')
    //     调用dispatch
        dispatch(setFoodsList(res.data))
        console.log(res.data)
    }
}
const reducer = foodsState.reducer
export {fetchFoodsList,changeActiveIndex,addCart,clearCart,decreCount,increCount}
export default reducer
购物车列表的显示和隐藏
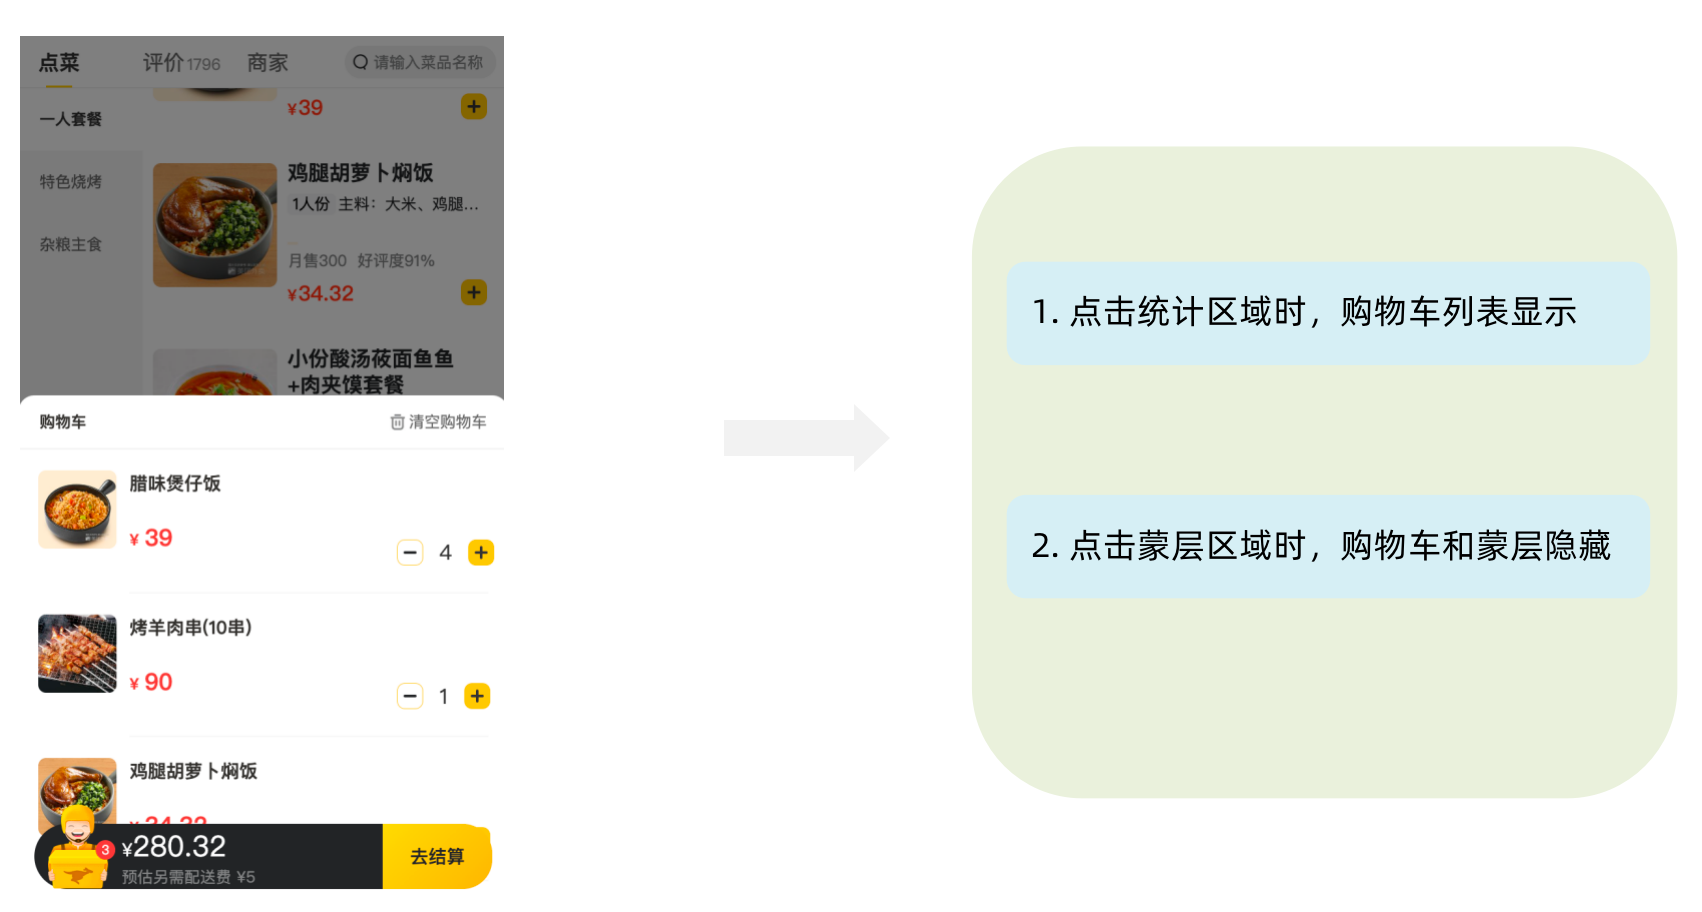
- 使用usestate设置一个状态
- 点击统计的时候就展示
- 点击蒙层就不显示
import classNames from 'classnames'
import Count from '../Count'
import './index.scss'
import {useDispatch, useSelector} from "react-redux";
import {clearCart, decreCount, increCount} from "../../store/modules/takeaway";
import {useState} from "react";

const Cart = () => {
    const  dispatch =useDispatch()
    const{cartList} = useSelector(state => state.foods)
  //   计算总价
   const  totalPrice = cartList.reduce((a, c) => a+c.price*c.count,0)
 const[visible,setVisible]=useState(false)
  return (
    <div className="cartContainer">
      {/* 遮罩层 添加visible类名可以显示出来 */}
      <div
          onClick={()=>setVisible(false)}
        className={classNames('cartOverlay',visible&&'visible')}
      />
      <div className="cart">
        {/* fill 添加fill类名可以切换购物车状态*/}
        {/* 购物车数量 */}
        <div onClick={()=>setVisible(cartList.length!=0)} className={classNames('icon')}>
          {cartList.length>0 && <div className="cartCornerMark">{cartList.length}</div>}
        </div>
        {/* 购物车价格 */}
        <div className="main">
          <div className="price">
            <span className="payableAmount">
              <span className="payableAmountUnit">¥</span>
              {totalPrice.toFixed(2)}
            </span>
          </div>
          <span className="text">预估另需配送费 ¥5</span>
        </div>
        {/* 结算 or 起送 */}
        {cartList.length > 0 ? (
          <div className="goToPreview">去结算</div>
        ) : (
          <div className="minFee">¥20起送</div>
        )}
      </div>
      {/* 添加visible类名 div会显示出来 */}
      <div className={classNames('cartPanel',visible&&'visible')}>
        <div className="header">
          <span className="text">购物车</span>
          <span onClick={()=>dispatch(clearCart())} className="clearCart">
            清空购物车
          </span>
        </div>

        {/* 购物车列表 */}
        <div className="scrollArea">
          {cartList.map(item => {
            return (
              <div className="cartItem" key={item.id}>
                <img className="shopPic" src={item.picture} alt="" />
                <div className="main">
                  <div className="skuInfo">
                    <div className="name">{item.name}</div>
                  </div>
                  <div className="payableAmount">
                    <span className="yuan">¥</span>
                    <span className="price">{item.price}</span>
                  </div>
                </div>
                <div className="skuBtnWrapper btnGroup">
                  <Count
                      onPlus={()=>dispatch(increCount({id:item.id}))}
                    count={item.count}
                      onMinus={()=>dispatch(decreCount({id:item.id}))}
                  />
                </div>
              </div>
            )
          })}
        </div>
      </div>
    </div>
  )
}

export default Cart
到这里redux的入门, 实践, 小案例就完成了 之后可能会更新一些关于redux底层原理的文章 会加入到其中
zustand
轻量级的状态管理工具
引入 :npm install zustand
使用一个异步请求的方式 看看如何快速上手
import React, {useEffect} from 'react';
import {create} from "zustand";

const URL = 'http://geek.itheima.net/v1_0/channels'

const useStore = create((set) => {
    return {
        count: 0,
        ins: () => {
            // 使用参数set 参数为对象 或者方法就可以操作状态
            return set(state => ({count: state.count + 1}))
        },
        channelList: [],
        // 异步请求方式
        fetchChannelList: async () => {
            const res = await fetch(URL)
            const jsonData = await res.json()
            set({channelList: jsonData.data.channels})
        }
    }
})
const ZustandDemo = () => {
    const {channelList, fetchChannelList} = useStore()
    useEffect(() => {
        fetchChannelList()
    }, [fetchChannelList])
    return (
        <ul>
            {channelList.map((item) => (
                <li key={item.id}>{item.name}</li>
            ))}
        </ul>
    );
};

export default ZustandDemo;
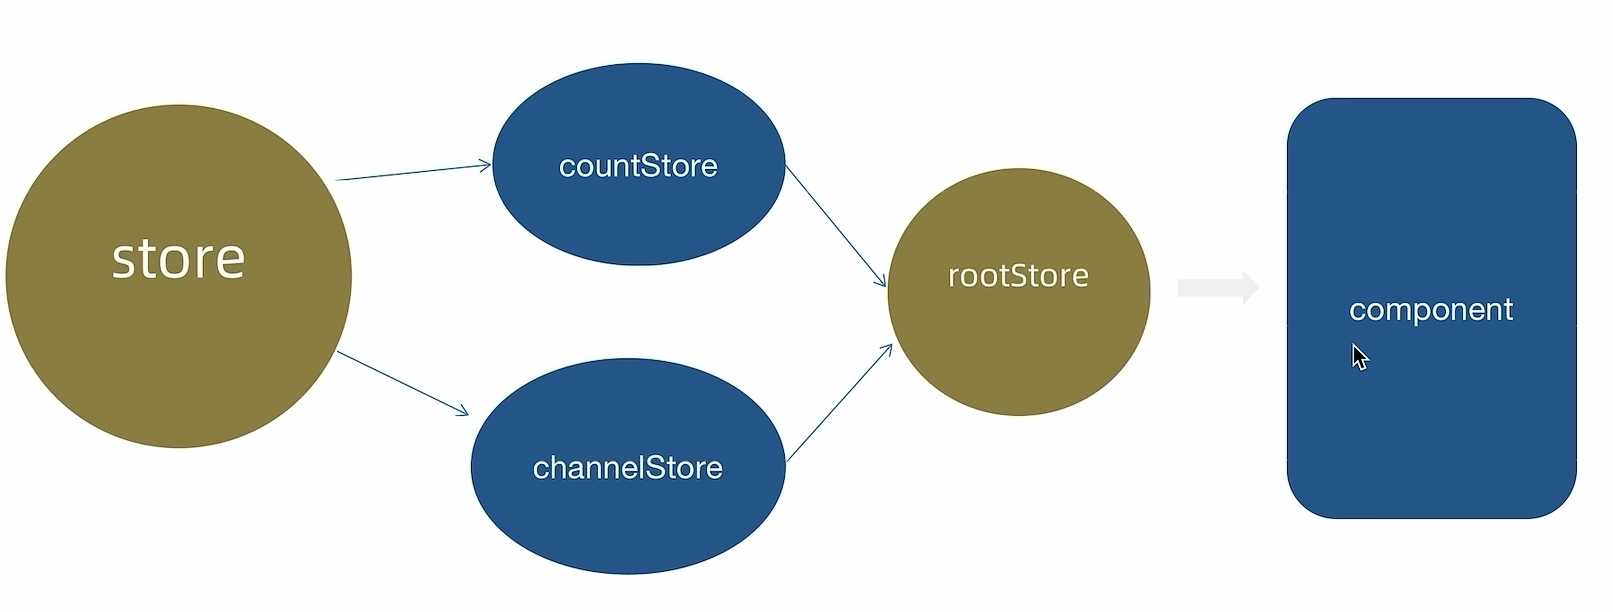
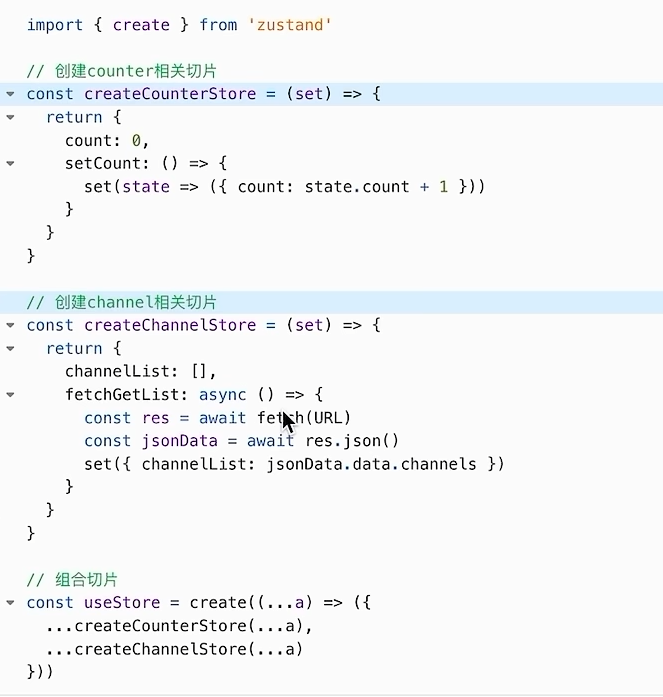
切片模式
当一个store过于大的时候 可以采用切片的方式 进行区分 并且以一个root引入用于使用
React 路由
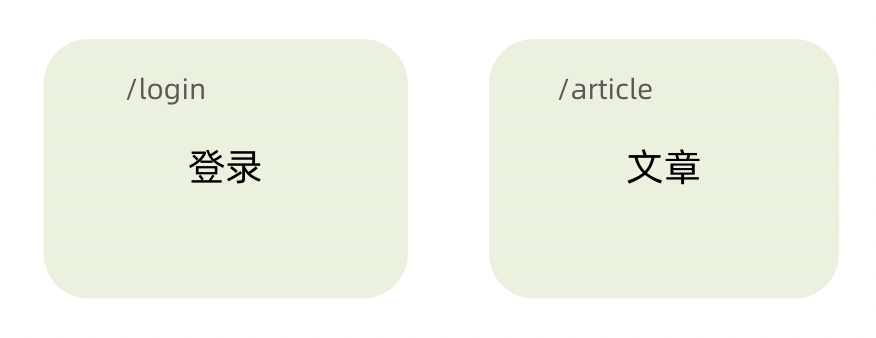
路由就是关键字和组件的映射关系,我们可以用关键字访问和展示对应组件
安装环境
npm i react-router-dom
快速上手 demo
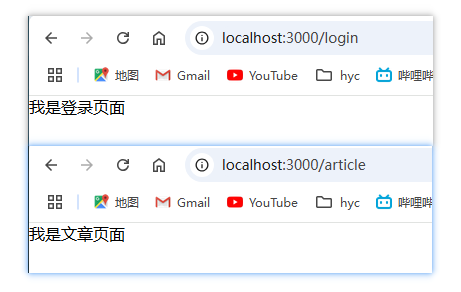
需求: 创建一个可以切换登录页和文章页的路由系统
找到 index.js 创建路由实例对象
语法: 链接组件可以使jsx 也可以是导出的组件 path是访问的路径
createBrowserRouter([
  {
    path:'/login',
    element: <div>登录</div>
  })
代码:
index.jsPS : 这里没有app的原因其实就是路由可以自己选择 有没有app作为入口完全看心情 之后会有路由默认设置所以不误在意
const router = createBrowserRouter([{
    path:'/login',
    element: <div>我是登录页面</div>
},{
    path:'/article',
    element: <div>我是文章页面</div>
}
])

const root = ReactDOM.createRoot(document.getElementById('root'));
root.render(
  <React.StrictMode>
      <RouterProvider router={router}>
      </RouterProvider>
  </React.StrictMode>
);
效果
抽象路由模块
之前的快速上手 简单的了解了一下路由的语法和使用 ,现在模拟一下日常的开发使用 ,我们需要将路由模块抽象出来

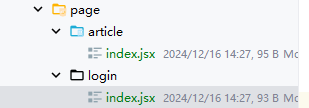
我们创建路由需要对应的文件夹 放入page文件夹下 一般我们路由的文件夹还会存放一些组件需要的其他资源,内容还是刚才的内容
之后创建 router文件夹存放路由js文件
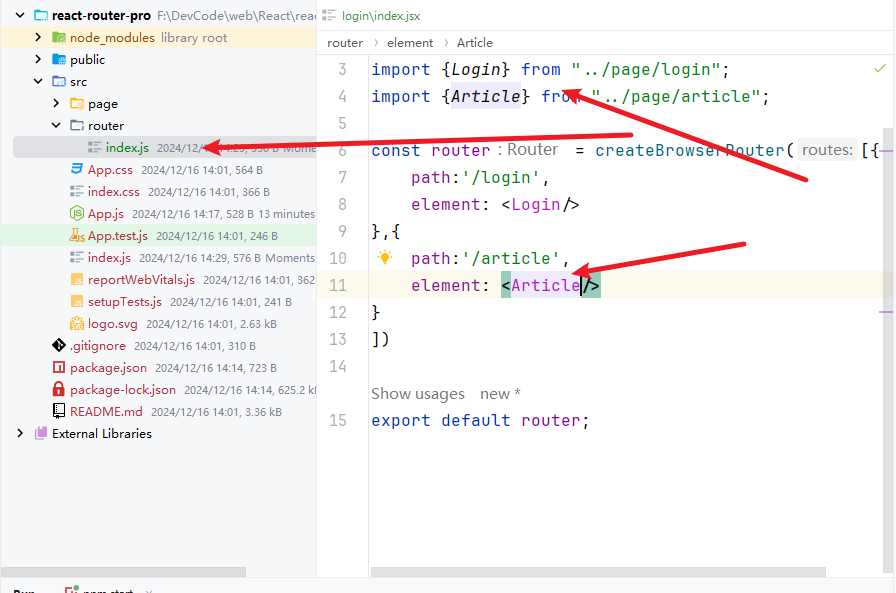
之后只需要在 根目录下的index.js中把路由引入进来 就完成了抽象效果
路由导航
路由系统中的多个路由之间需要进行路由跳转,并且在跳转的同时有可能需要传递参数进行通信

声明式导航
声明式导航是指在代码中 通过 <Link/>标签去设置要跳转去哪里
语法 : <Linl to="/article">文章</Link>
Login组件内容
import {Link} from "react-router-dom";

export const Login = () => {
    return (
        <div>
            <div>我是登录页面</div>
        <Link to="/article">文章</Link>
        </div>
    )
}
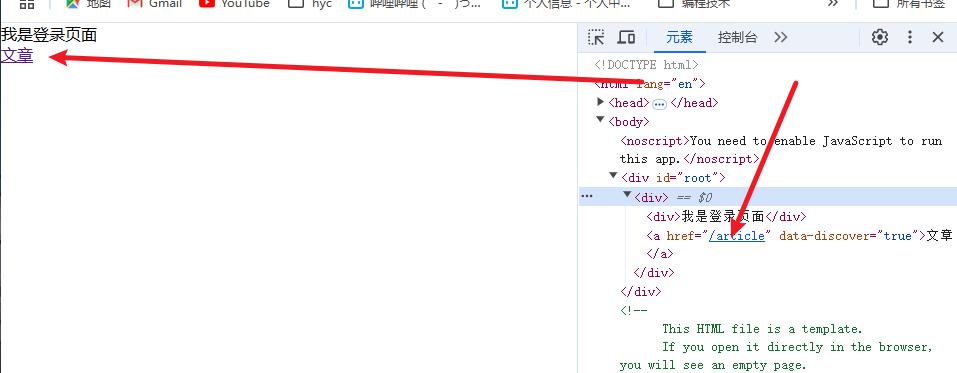
它其实被解析成一个a链接 指向文章页的访问地址(path)
编程式导航
编程式导航是指通过 useNavigate 钩子得到导航方法,以参数+触发事件来控制跳转比起声明式要更加灵活
import {Link, useNavigate} from "react-router-dom";

export const Login = () => {
   const nav =  useNavigate()

    return (
        <div>
            <div>我是登录页面</div>
        {/*    声明式*/}
        <Link to="/article">文章</Link>
        {/*    编程式*/}
        <button onClick={()=>nav("/article")}>文章</button>
        </div>
    )
}
传参
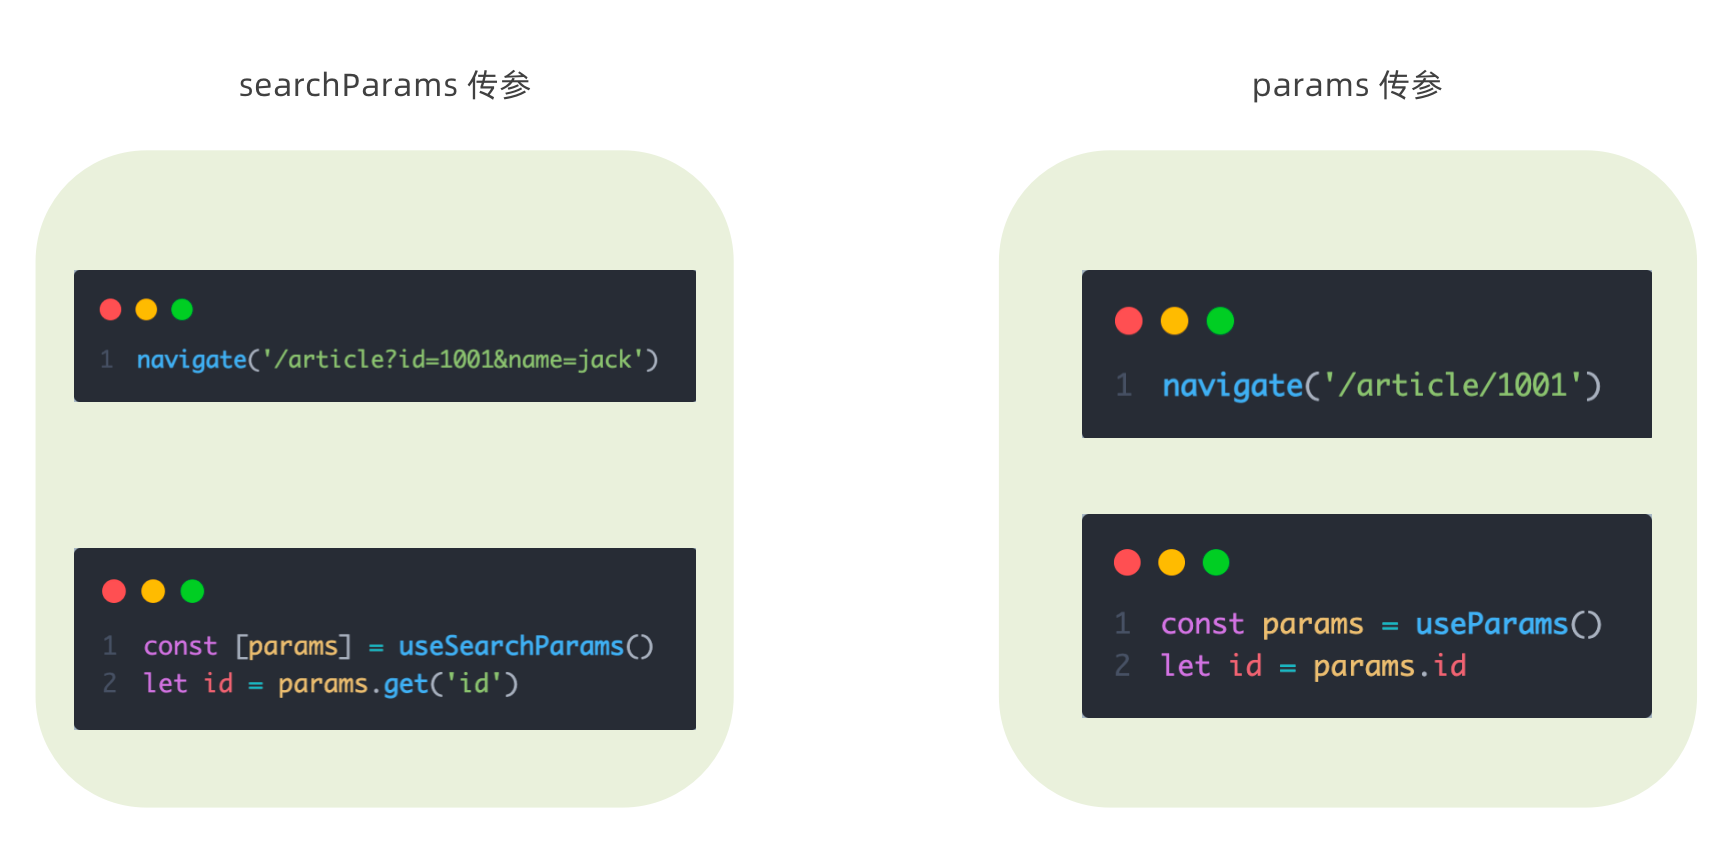
useSearchParams
代码
Login.jsx
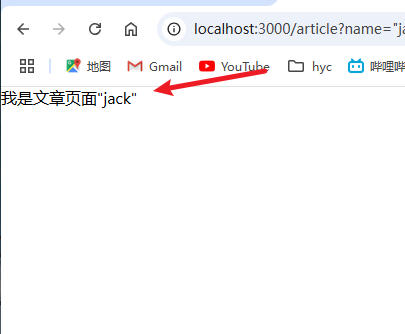
<button onClick={()=>nav('/article?name="jack"')}>文章</button>
Article.jsx
import {useSearchParams} from "react-router-dom";

export const Article = () => {
    const [params] = useSearchParams()
   const  name = params.get('name')
    return (
        <div>我是文章页面
            {name}
        </div>
    )
}
效果
useParams
这种方式类似 vue的动态路由传参,
-
我们需要再路由页面给路径一个占位符

-
之后编写代码
Login传参 :
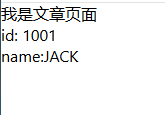
<button onClick={()=>nav('/article/1001/JACK')}>文章</button>Article接受:
    const params = useParams();
    return (
        <div>我是文章页面
         <div>  id: {params.id}</div>
         <div>  name:{params.name}</div>
        </div>
效果
嵌套路由
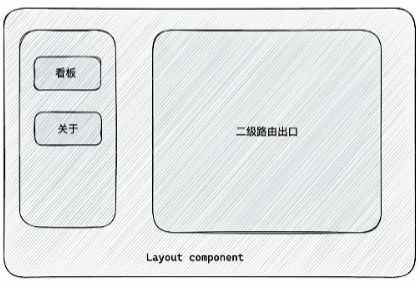
就是多级路由的嵌套 在开发中往往需要来回的跳转 有一级路由包含多个二级路由等等嵌套情况
比如下图:
看成一个管理系统 一个一级路由包含两个二级路由
左侧的列表用于展示路由关键字
右边的路由出口展示点击对应关键字出现的内容
- 使用
children属性配置路由嵌套关系 - 使用
<Outlet>组件配置子路由渲染位置
案例
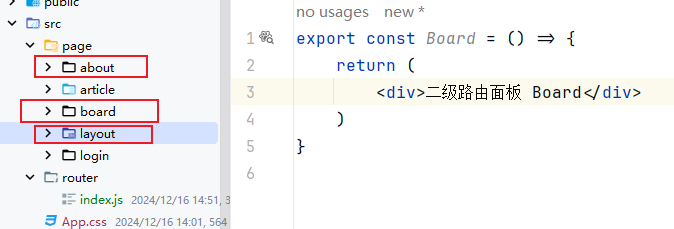
分别创建内容 一级路由 layout 和两个二级路由
然后编写嵌套路由需要的 router
{
        path: '/',
        element: <Layout/>,
        children: [
            {
                path: 'board',
                element: <Board/>
            },
            {
                path: 'about',
                element: <About/>
            }
        ]
    }
layout代码
import {Link, Outlet} from "react-router-dom";

export const Layout = () => {
    return (
        <div>一级路由 layout
            <div><Link to="/board">面板</Link></div>
            <div><Link to="/about">关于</Link></div>
            <Outlet/>
        </div>
    )
}
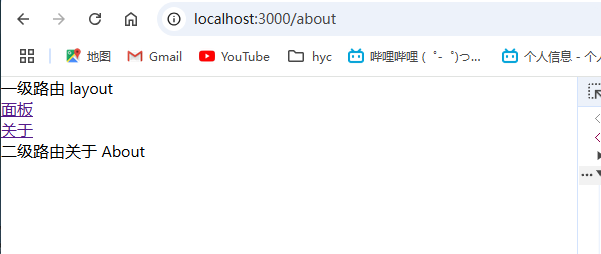
效果
默认二级路由
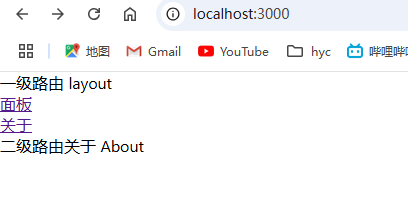
当访问的是一级路由的时候 默认的二级路由可以得到渲染
语法:
layout
export const Layout = () => {
    return (
        <div>一级路由 layout
            <div><Link to="/board">面板</Link></div>
            <div><Link to="/">关于</Link></div>
            <Outlet/>
        </div>
    )
}
router.js
    {
        path: '/',
        element: <Layout/>,
        children: [
            {
                path: 'board',
                element: <Board/>
            },
            {
                index: true,
                element: <About/>
            }
        ]
    }
效果
404路由
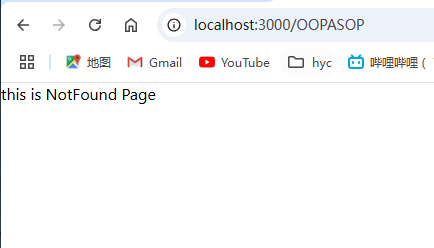
当浏览器输入的路径在路由中无法找到或者不存在 我们就需要一个可以兜底的组件 来提升用户体验
- 准备一个
NotFound的组件 - 在路由表数组末尾 用
*号座位path配置路由
NOTFOUND JS
export const Notfound = () => {
    return (
        <div>
            this is NotFound Page
        </div>
    )
}
router
{
    path: '*',
    element: <Notfound/>
}
效果
路由模式
各个主流框架的路由常用的路由模式有俩种,history模式和hash模式, ReactRouter分别由 createBrowerRouter 和 createHashRouter 函数负责创建
| 路由模式 | url表现 | 底层原理 | 是否需要后端支持 |
|---|---|---|---|
| history | url/login | history对象 + pushState事件 | 需要 |
| hash | url/#/login | 监听hashChange事件 | 不需要 |
Hooks
useNavigate
用于编程式导航
语法:
  const nav =  useNavigate()
   <button onClick={()=>nav("/article")}>文章</button>
useSearchParams
用于路由跳转的时候接受传递的参数
<button onClick={()=>nav('/article?name="jack"')}>文章</button>
这个时候我们在文章组件中编写
import {useSearchParams} from "react-router-dom";

export const Article = () => {
    const [params] = useSearchParams()
   const  name = params.get('name')
    return (
        <div>我是文章页面
            {name}
        </div>
    )
}
useParams
这种方式类似 vue的动态路由传参,
-
我们需要再路由页面给路径一个占位符

-
之后编写代码
Login传参 :
<button onClick={()=>nav('/article/1001/JACK')}>文章</button>Article接受:
    const params = useParams();
    return (
        <div>我是文章页面
         <div>  id: {params.id}</div>
         <div>  name:{params.name}</div>
        </div>
极客博客
项目配置
初始化项目 这里依赖的使用:
- react & react-dom 18
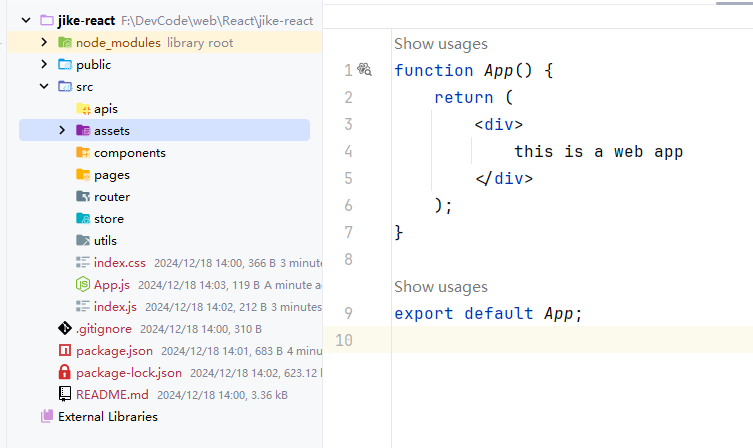
规范src目录
-src
  -apis           项目接口函数
  -assets         项目资源文件,比如,图片等
  -components     通用组件
  -pages          页面组件
  -store          集中状态管理
  -utils          工具,比如,token、axios 的封装等
  -App.js         根组件
  -index.css      全局样式
  -index.js       项目入口
路径别名
项目背景:在业务开发过程中文件夹的嵌套层级可能会比较深,通过传统的路径选择会比较麻烦也容易出错,设置路径别名可以简化这个过程
安装 npm i @craco/craco -D
然后创建 craco.config.js
const path = require('path')

module.exports = {
  // webpack 配置
  webpack: {
    // 配置别名
    alias: {
      // 约定:使用 @ 表示 src 文件所在路径
      '@': path.resolve(__dirname, 'src')
    }
  }
}
替换packge.json的启动方式 就可以使用了
  "scripts": {
    "start": "craco start",
    "build": "craco build",
    "test": "craco test",
    "eject": "react-scripts eject"
  }
配置代码编辑器识别
在跟目录创建 jsconfig.json
{
  "compilerOptions": {
    "baseUrl": ".",
    "paths": {
      "@/*": [
        "src/*"
      ]
    }
  }
}
这样就有路径提示了
安装scss
- 安装解析 sass 的包:
npm i sass -D - 创建全局样式文件:
index.scss
安装完之后在index.scss中写下样式查看是否安装成功

组件库antd
组件库帮助我们提升开发效率,其中使用最广的就是antD
导入依赖: npm i antd
安装图标库: npm install @ant-design/icons --save
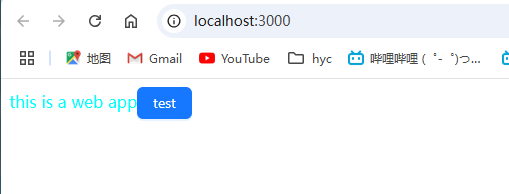
测试
import {Button} from "antd";

function App() {
    return (
        <div>
            this is a web app
            <Button type='primary'>test</Button>
        </div>
    );
}

export default App;
效果
配置路由
导入依赖
- 安装路由包
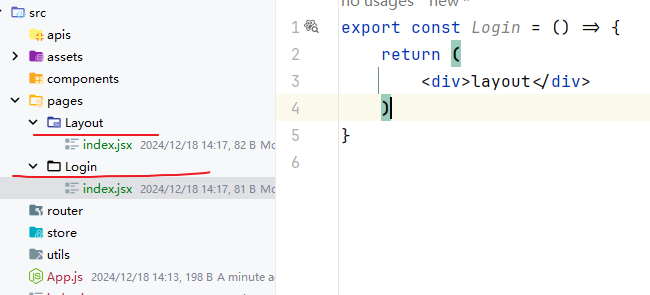
react-router-dom - 准备基础路由组件
Layout和Login - 编写配置
在pages中创建好对应的文件夹和组件
然后配置对应的路由文件
- 在
router文件夹中创建 index.js - 配置对应的组件路由映射
import {createBrowserRouter} from "react-router-dom";
import {Layout} from "../pages/Layout";
import {Login} from "../pages/Login";

const router = createBrowserRouter([
    {
        path: '/',
        element: <Layout/>
    },
    {
        path: '/login',
        element: <Login/>
    }
])
之后使用 provider 将路由放入根文件 使用
index.js:
import React from 'react';
import ReactDOM from 'react-dom/client';
import './index.scss';
import {RouterProvider} from "react-router-dom";
import router from "./router";

const root = ReactDOM.createRoot(document.getElementById('root'));
root.render(
    <RouterProvider router={router}>
    </RouterProvider>
);
配置完重启 这样基础的路由就配置好了
封装requset请求模块
因为项目中会发送很多网络请求,所以我们可以将 axios做好统一封装 方便统一管理和复用

导入依赖
npm i axios
然后在utils中编写 request配置js
import axios from 'axios'

const request = axios.create({
    baseURL: 'http://geek.itheima.net/v1_0',
    timeout: 5000
})

// 添加请求拦截器
request.interceptors.request.use((config) => {
    return config
}, (error) => {
    return Promise.reject(error)
})

// 添加响应拦截器
request.interceptors.response.use((response) => {
    // 2xx 范围内的状态码都会触发该函数。
    // 对响应数据做点什么
    return response.data
}, (error) => {
    // 超出 2xx 范围的状态码都会触发该函数。
    // 对响应错误做点什么
    return Promise.reject(error)
})

export {request}
在utils中创建 index.js 作为统一的工具类使用入口,方便管理工具类
import {request} from "@/utils/request";

export {request}
登录模块
@/pages/login/index.jsx 使用 antd 创建登录页面的内容解构
import './index.sass'
import {Button, Card, Form, Input} from "antd";
import logo from "@/assets/logo.png"

export const Login = () => {
    return (
        <div className="login">
            <Card className="login-container">
                <img className="login-logo" src={logo} alt=""/>
                {/* 登录表单 */}
                <Form>
                    <Form.Item>
                        <Input size="large" placeholder="请输入手机号"/>
                    </Form.Item>
                    <Form.Item>
                        <Input size="large" placeholder="请输入验证码"/>
                    </Form.Item>
                    <Form.Item>
                        <Button type="primary" htmlType="submit" size="large" block>
                            登录
                        </Button>
                    </Form.Item>
                </Form>
            </Card>
        </div>
    )
}
样式文件 index.css
.login {
  width: 100%;
  height: 100%;
  position: absolute;
  left: 0;
  top: 0;
  background: center/cover url('~@/assets/login.png');

  .login-logo {
    width: 200px;
    height: 60px;
    display: block;
    margin: 0 auto 20px;
  }

  .login-container {
    width: 440px;
    height: 360px;
    position: absolute;
    left: 50%;
    top: 50%;
    transform: translate(-50%, -50%);
    box-shadow: 0 0 50px rgb(0 0 0 / 10%);
  }

  .login-checkbox-label {
    color: #1890ff;
  }
}
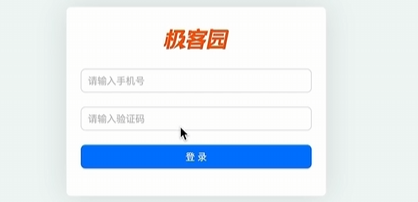
表单校验
使用 antd form组件中的表单校验属性来完成 表单校验
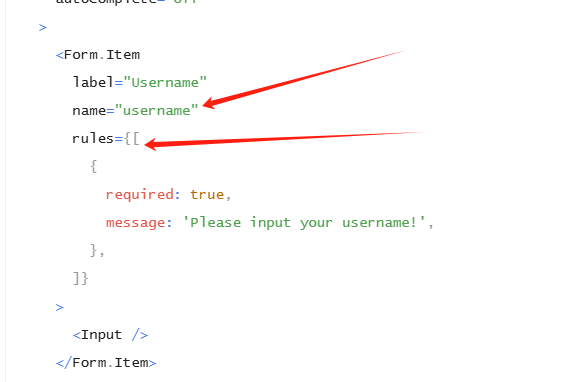
现在在login组件中加入基础的表单校验
  {/* 登录表单 */}
                <Form>
                    <Form.Item
                        name="mobile"
                        rules={[
                            {
                                required: true,
                                message: '请输入11位手机号'
                            }
                        ]}>
                        <Input size="large" placeholder="请输入手机号"/>
                    </Form.Item>
                    <Form.Item
                        name="code"
                        rules={[
                            {
                                required: true,
                                message: '请输入验证码'
                            }
                        ]}>
                        <Input size="large" placeholder="请输入验证码"/>
                    </Form.Item>
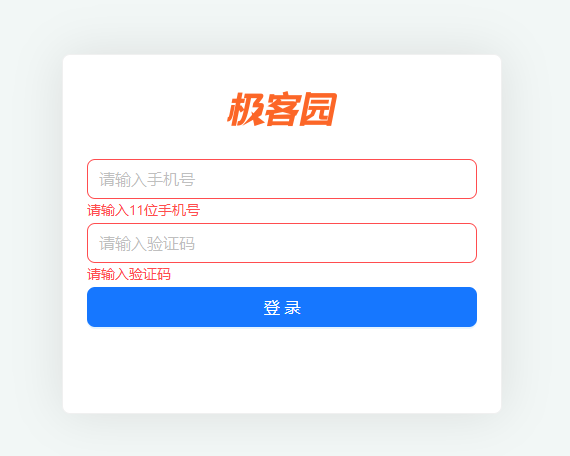
基础校验设置好之后 我们需要根据业务来设计定制校验 如
- 手机号必须是11位并且必须是数字 正则表达式
- 并且输入框失去焦点也出发校验 在Form标签添加属性
validateTrigger="onBlur"
                  <Form.Item
                        name="mobile"
                        rules={[
                            {
                                required: true,
                                message: '请输入手机号'
                            },
                            {
                                pattern: /^1[3-9]\d{9}$/,
                                message: '请输入正确的手机号'
                            }
                        ]}>
                        <Input size="large" placeholder="请输入手机号"/>
                    </Form.Item>
提交数据
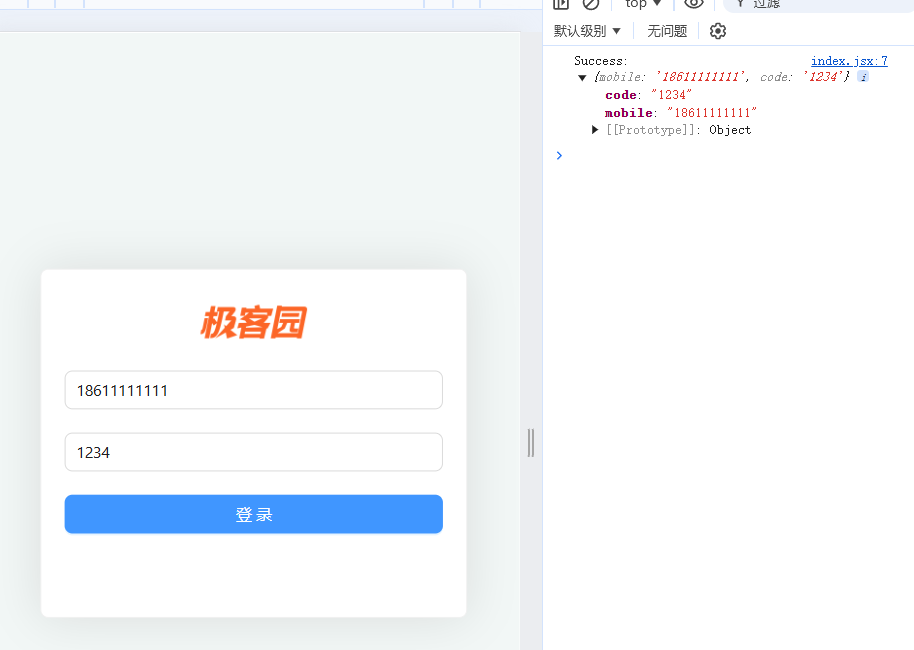
继续查看官方文档 案例 里面有一个 onFinish 的回调方法 ,并且放到form组件的属性里就可以看到传递的信息了

代码修改
  const onFinish = (values) => {
        console.log('Success:', values);
    };

 <Form onFinish={onFinish} validateTrigger="onBlur"></Form>
设置好之后我们再次点击登录按钮就可以在控制台看到传递的json信息了
使用Redux管理token
token可以作为用户表示数据 其实一般我们的登录操作就是为了获取对应账号下的token权限,这个token需要我们在前端全局化的共享 所以需要使用 redux来管理
依赖
npm i react-redux @reduxjs/toolkit
配置redux
在store文件夹创建对应的文件结构
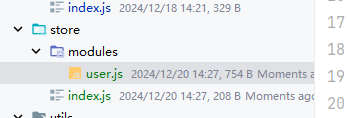
然后编写 user.js
import {createSlice} from '@reduxjs/toolkit'
import {request} from '@/utils'

const userStore = createSlice({
    name: 'user',
    // 数据状态
    initialState: {
        token: ''
    },
    // 同步修改方法
    reducers: {
        setToken(state, action) {
            state.userInfo = action.payload
        }
    }
})

// 解构出actionCreater
const {setToken} = userStore.actions

// 获取reducer函数
const userReducer = userStore.reducer

// 异步方法封装
const fetchLogin = (loginForm) => {
    return async (dispatch) => {
        const res = await request.post('/authorizations', loginForm)
        dispatch(setToken(res.data.token))
    }
}

export {fetchLogin}

export default userReducer
在index.js配置统一管理reducer
import {configureStore} from '@reduxjs/toolkit'

import userReducer from './modules/user'

export default configureStore({
    reducer: {
        // 注册子模块
        user: userReducer
    }
})
在src下目录中的index.js注入store
import {Provider} from "react-redux";
import store from "./store";

const root = ReactDOM.createRoot(document.getElementById('root'));
root.render(
    <Provider store={store}>
        <RouterProvider router={router}/>
    </Provider>
);
触发登录操作
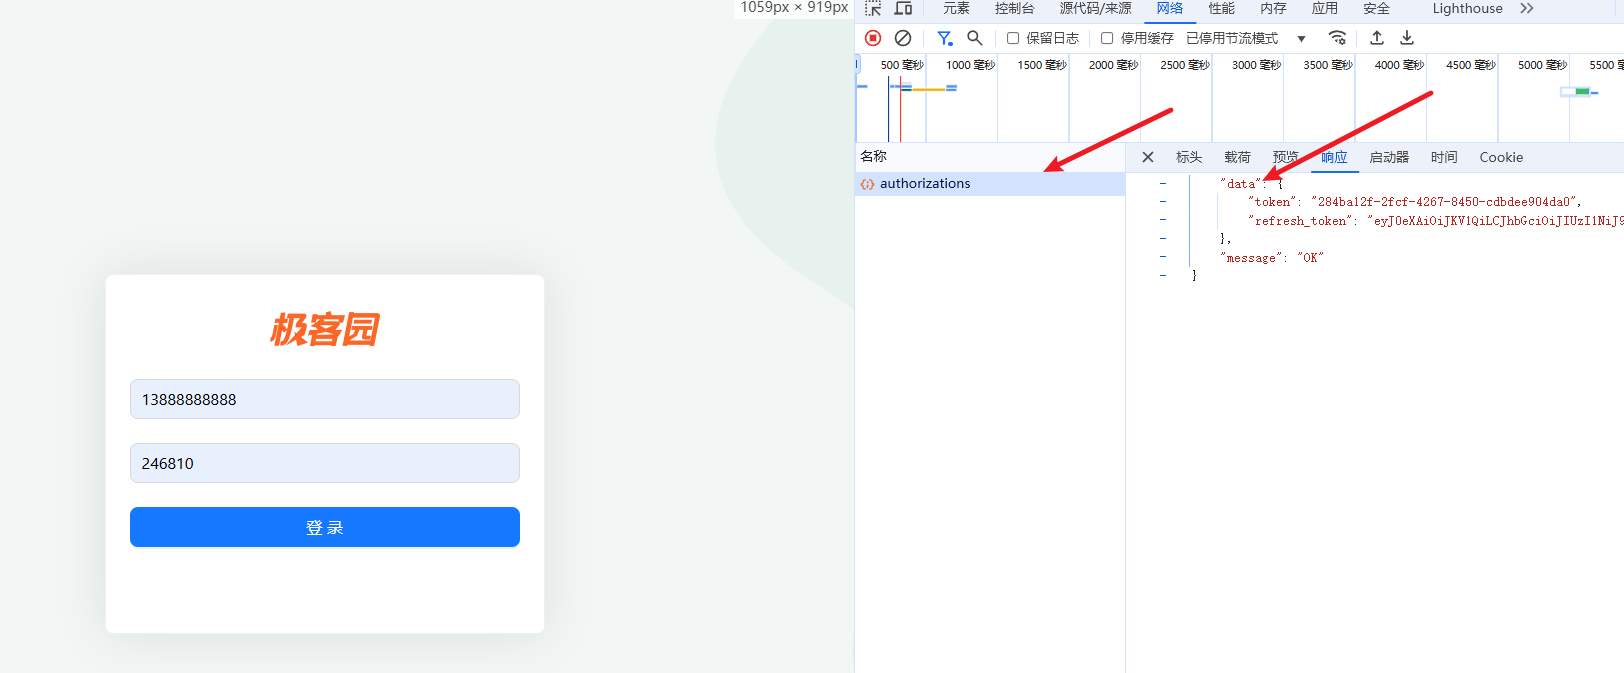
我们使用的是黑马的后端模版 所以需要使用它提供的数据
手机号 13888888888
code 246810
输入之后就可以看到成功的拿到了 该用户的 token
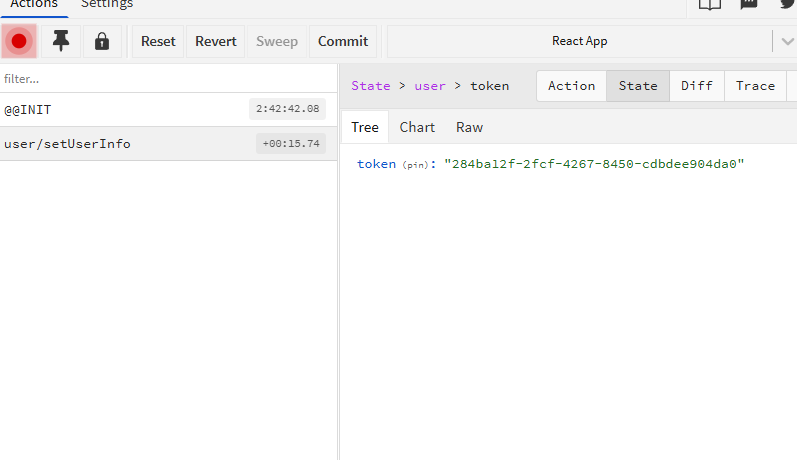
redux也成功的保存的token数据
登陆后的操作
- 我们需要跳转到主页
- 提示用户登录状态
在login jsx中修改onfinish方法内容实现跳转
PS: 篇幅问题只展示了js代码 return中的样式就不再过多展示
import './index.scss'
import {Button, Card, Form, Input, message} from "antd";
import logo from "@/assets/logo.png"
import {useDispatch} from "react-redux";
import {fetchLogin} from "@/store/modules/user";
import {useNavigate} from "react-router-dom";

export const Login = () => {
    const dispatch = useDispatch();
    const navigate = useNavigate();
    const onFinish = async (values) => {
        await dispatch(fetchLogin(values))
        //     跳转到主页
        navigate('/')
        message.success('登陆成功')
    };
}
效果

token持久化
使用localStorage+redux管理token
编写逻辑 :先查询本地有没有 如果没有就请求,然后保存在本地
修改reducer请求token的方法内容
这里为什么没有用sessionStorage而是选择用localStorage呢 因为我们需要更长时间的持久化 session关闭浏览器就被清空了,之后登出的时候会显式的清除token
const userStore = createSlice({
    name: 'user',
    // 数据状态
    initialState: {
        token: sessionStorage.getItem('token_key') || ''
    },
    // 同步修改方法
    reducers: {
        setToken(state, action) {
            state.token = action.payload
            sessionStorage.setItem('token_key', state.token)
        }
    }
})
封装token操作方法
创建工具类
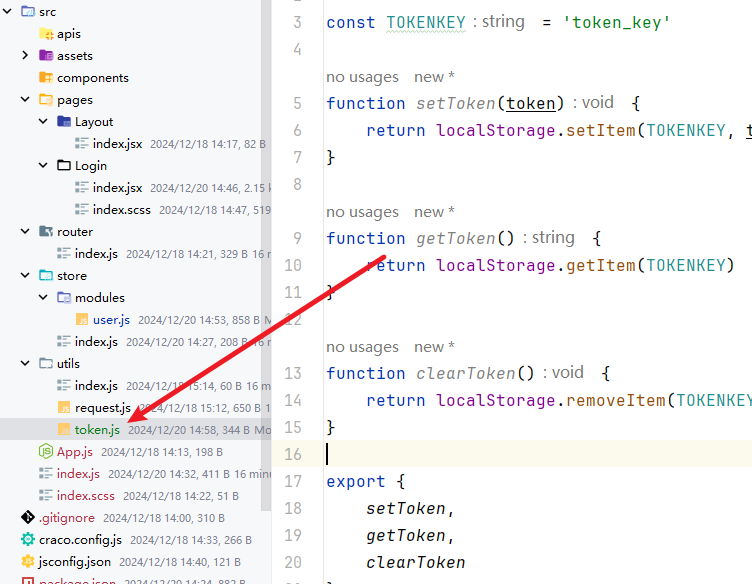
// 封装存取方法

const TOKENKEY = 'token_key'

function setToken (token) {
  return localStorage.setItem(TOKENKEY, token)
}

function getToken () {
  return localStorage.getItem(TOKENKEY)
}

function clearToken () {
  return localStorage.removeItem(TOKENKEY)
}

export {
  setToken,
  getToken,
  clearToken
}
然后在入口index导入工具类
import {request} from "@/utils/request";
import {clearToken, getToken, setToken} from "@/utils/token";

export {request, getToken, setToken, clearToken}
修改获取的token的代码改为使用工具类
const userStore = createSlice({
    name: 'user',
    // 数据状态
    initialState: {
        token: getToken() || ''
    },
    // 同步修改方法
    reducers: {
        setToken(state, action) {
            state.token = action.payload
            //这里是使用别名的setToken方法 是再import setToken as _setToken
            _setToken(action.payload)
        }
    }
})
在Axios请求中携带token
后端需要token来判断是否能够使用接口 ,所以我们需要修改request工具来让他携带token请求
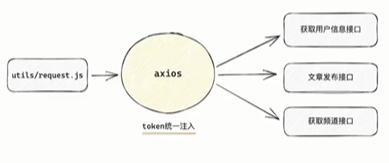
在请求拦截其中拿到token并且注入token
// 添加请求拦截器
request.interceptors.request.use((config) => {
    // 如果有token就携带没有就正常
    const token = getToken()
    // 按照后端的要求加入token
    if (token) {
        config.headers.Authorization = `Bearer ${token}`
    }
    return config
}, (error) => {
    return Promise.reject(error)
})
测试

使用token做路由权限控制
在没有token的时候 不允许访问需要权限的路由
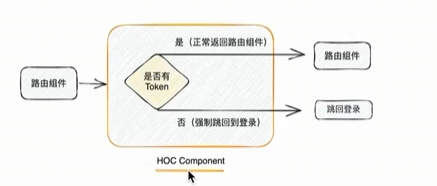
创建组件 AuthRoute
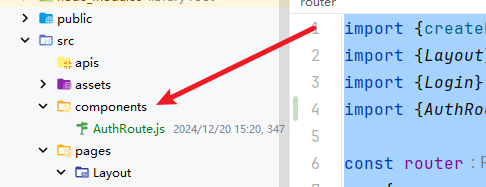
// 封装高级组件
//核心逻辑:根据token控制跳转
import {getToken} from "@/utils";
import {Navigate} from "react-router-dom";

export function AuthRoute({children}) {
    const token = getToken();
    if (token) {
        return <>{children}</>
    } else {
        return <Navigate to={'/login'} replace={true}/>
    }
}
修改router.js
import {createBrowserRouter} from "react-router-dom";
import {Layout} from "../pages/Layout";
import {Login} from "../pages/Login";
import {AuthRoute} from "@/components/AuthRoute";

const router = createBrowserRouter([
    {
        path: '/',
        element: <AuthRoute><Layout/></AuthRoute>
    },
    {
        path: '/login',
        element: <Login/>
    }
])
export default router
删除token 之后刷新界面 就会被强制定向到 login
主页面
依赖
用来初始化样式的第三方库
npm install normalize.css
然后将其引入到程序入门 index.js
实现步骤
- 打开 antd/Layout 布局组件文档,找到示例:顶部-侧边布局-通栏
- 拷贝示例代码到我们的 Layout 页面中
- 分析并调整页面布局
主页面模版
import {Layout, Menu, Popconfirm} from 'antd'
import {DiffOutlined, EditOutlined, HomeOutlined, LogoutOutlined,} from '@ant-design/icons'
import './index.scss'
import {Outlet, useNavigate} from "react-router-dom";

const {Header, Sider} = Layout

const items = [
    {
        label: '首页',
        key: '/',
        icon: <HomeOutlined/>,
    },
    {
        label: '文章管理',
        key: '/article',
        icon: <DiffOutlined/>,
    },
    {
        label: '创建文章',
        key: '/publish',
        icon: <EditOutlined/>,
    },
]

const GeekLayout = () => {
    const navigate = useNavigate();
    const onMenuClick = (router) => {
        console.log(router)
        navigate(router.key)
    }
    return (
        <Layout>
            <Header className="header">
                <div className="logo"/>
                <div className="user-info">
                    <span className="user-name">冷环渊</span>
                    <span className="user-logout">
            <Popconfirm title="是否确认退出?" okText="退出" cancelText="取消">
              <LogoutOutlined/> 退出
            </Popconfirm>
          </span>
                </div>
            </Header>
            <Layout>
                <Sider width={200} className="site-layout-background">
                    <Menu
                        mode="inline"
                        theme="dark"
                        defaultSelectedKeys={['1']}
                        items={items}
                        onClick={onMenuClick}
                        style={{height: '100%', borderRight: 0}}></Menu>
                </Sider>
                <Layout className="layout-content" style={{padding: 20}}>
                    <Outlet/>
                </Layout>
            </Layout>
        </Layout>
    )
}
export default GeekLayout
主页面样式文件
.ant-layout {
  height: 100%;
}

.header {
  padding: 0;
}

.logo {
  width: 200px;
  height: 60px;
  background: url('~@/assets/logo.png') no-repeat center / 160px auto;
}

.layout-content {
  overflow-y: auto;
}

.user-info {
  position: absolute;
  right: 0;
  top: 0;
  padding-right: 20px;
  color: #fff;

  .user-name {
    margin-right: 20px;
  }

  .user-logout {
    display: inline-block;
    cursor: pointer;
  }
}

.ant-layout-header {
  padding: 0 !important;
}
二级路由设置
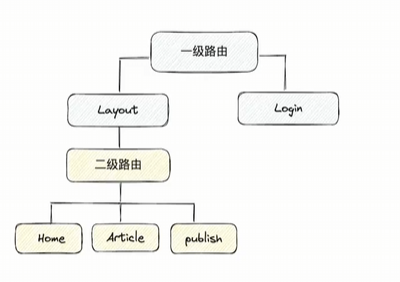
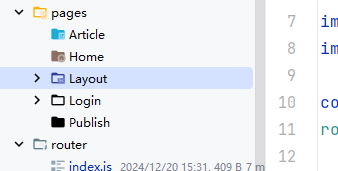
配置二级路由
const router = createBrowserRouter([
    {
        path: '/',
        element: <AuthRoute><GeekLayout/></AuthRoute>,
        children: [{
            path: '/',
            element: <Home></Home>
        }, {
            path: 'article',
            element: <Article></Article>
        }, {
            path: 'publish',
            element: <Publish></Publish>
        }]
    },
     <!--....省略-->
渲染对应关系
     <Layout className="layout-content" style={{padding: 20}}>
                    <Outlet></Outlet>
                </Layout>
路由联动
将路由的key设置成路由的跳转地址
const items = [
    {
        label: '首页',
        key: '/',
        icon: <HomeOutlined/>,
    },
    {
        label: '文章管理',
        key: '/article',
        icon: <DiffOutlined/>,
    },
    {
        label: '创建文章',
        key: '/publish',
        icon: <EditOutlined/>,
    },
]
const GeekLayout = () => {
    const navigate = useNavigate();
    const onMenuClick = (router) => {
        console.log(router)
        navigate(router.key)
    }
    return (
        <Layout>
            <!--省略-->
            <Layout>
                <Sider width={200} className="site-layout-background">
                    <Menu
                        mode="inline"
                        theme="dark"
                        defaultSelectedKeys={['1']}
                        items={items}
                        onClick={onMenuClick}
                        style={{height: '100%', borderRight: 0}}></Menu>
                </Sider>
                <Layout className="layout-content" style={{padding: 20}}>
                    <Outlet/>
                </Layout>
            </Layout>
        </Layout>
    )
}
菜单点击高亮
ueslocation获取当前的路由位置,并且将MENU中的属性defaultSelectedKeys -> SelectedKeys内容为获取到的pathname
const GeekLayout = () => {
    const navigate = useNavigate();
    const onMenuClick = (router) => {
        console.log(router)
        navigate(router.key)
    }
    // 获取到当前点击的路由
    const location = useLocation();
    const selectedKey = location.pathname;
    return (
        <Layout>
            <Header className="header">
          <!--省略-->
            </Header>
            <Layout>
                <Sider width={200} className="site-layout-background">
                    <Menu
                        mode="inline"
                        theme="dark"
                        SelectedKeys={selectedKey}
                        items={items}
                        onClick={onMenuClick}
                        style={{height: '100%', borderRight: 0}}></Menu>
                </Sider>
  <!--省略-->
            </Layout>
        </Layout>
    )
}
export default GeekLayout
效果
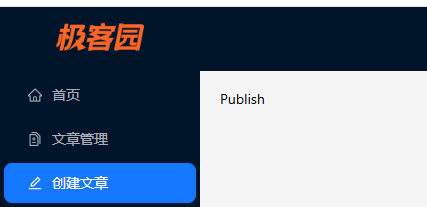
展示个人信息
实现步骤
- 在Redux的store中编写获取用户信息的相关逻辑
- 在Layout组件中触发action的执行
- 在Layout组件使用使用store中的数据进行用户名的渲染
修改
store/module/user.js
import {createSlice} from '@reduxjs/toolkit'
import {getToken, request, setToken as _setToken} from '@/utils'

const userStore = createSlice({
    name: 'user',
    // 数据状态
    initialState: {
        token: getToken() || '',
        userInfo: {}
    },
    // 同步修改方法
    reducers: {
        setToken(state, action) {
            state.token = action.payload
            _setToken(action.payload)
        },
        setUserInfo(state, action) {
            state.userInfo = action.payload
        }
    }
})

// 解构出actionCreater
const {setToken, setUserInfo} = userStore.actions

// 获取reducer函数
const userReducer = userStore.reducer

// 异步方法封装
const fetchLogin = (loginForm) => {
    return async (dispatch) => {
        const res = await request.post('/authorizations', loginForm)
        dispatch(setToken(res.data.token))
    }
}
const fetchUserInfo = () => {
    return async (dispatch) => {
        const res = await request.get('/user/profile')
        dispatch(setUserInfo(res.data))
    }
}
export {fetchLogin, fetchUserInfo}

export default userReducer
主页面布局显示
这里展示的是新增的代码 需要去修改header里的user-name的内容改为我们获取到的username
    const dispatch = useDispatch()
    const name = useSelector(state => state.user.userInfo.name)
    useEffect(() => {
        dispatch(fetchUserInfo())
    }, [dispatch])

<Header className="header">
                <div className="logo"/>
                <div className="user-info">
                    <span className="user-name">{name}</span>
                    <span className="user-logout">
            <Popconfirm title="是否确认退出?" okText="退出" cancelText="取消">
              <LogoutOutlined/> 退出
            </Popconfirm>
          </span>
                </div>
            </Header>

退出登录
- 需要二次确认退出登录
- 清除用户信息
- 跳转回login页面
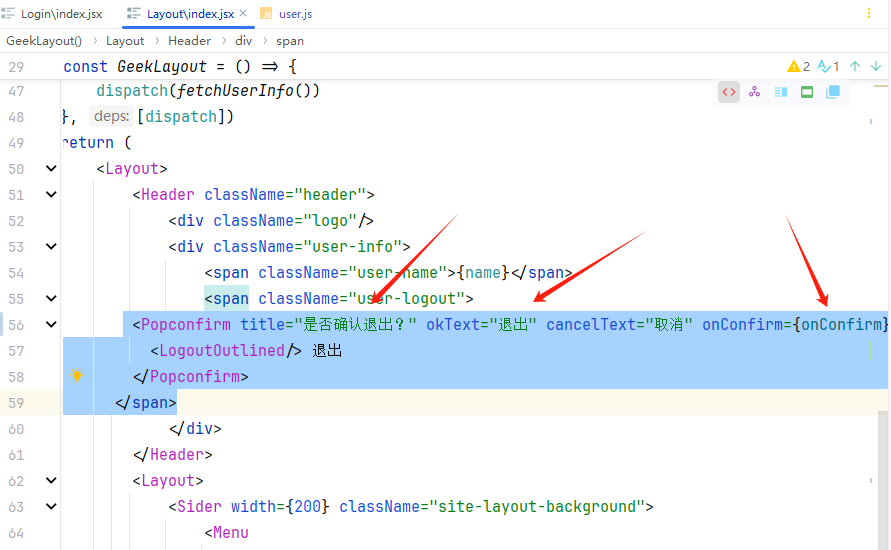
绑定事件
在
layout.jsx中找到退出相关的组件Popconfirm这个组件有是否确认事件的绑定方法
onConfirm={onConfirm}
在store文件夹下user.js的reducer中增加清除用户信息的方法
// 同步修改方法
    reducers: {
        clearUserInfo(state) {
            state.token = ''
            state.userInfo = {}
            clearToken()
        }
在响应事件方法中调用方法 清除用户信息
   const onConfirm = () => {
        dispatch(clearUserInfo())
        navigate('/login')
    }
效果
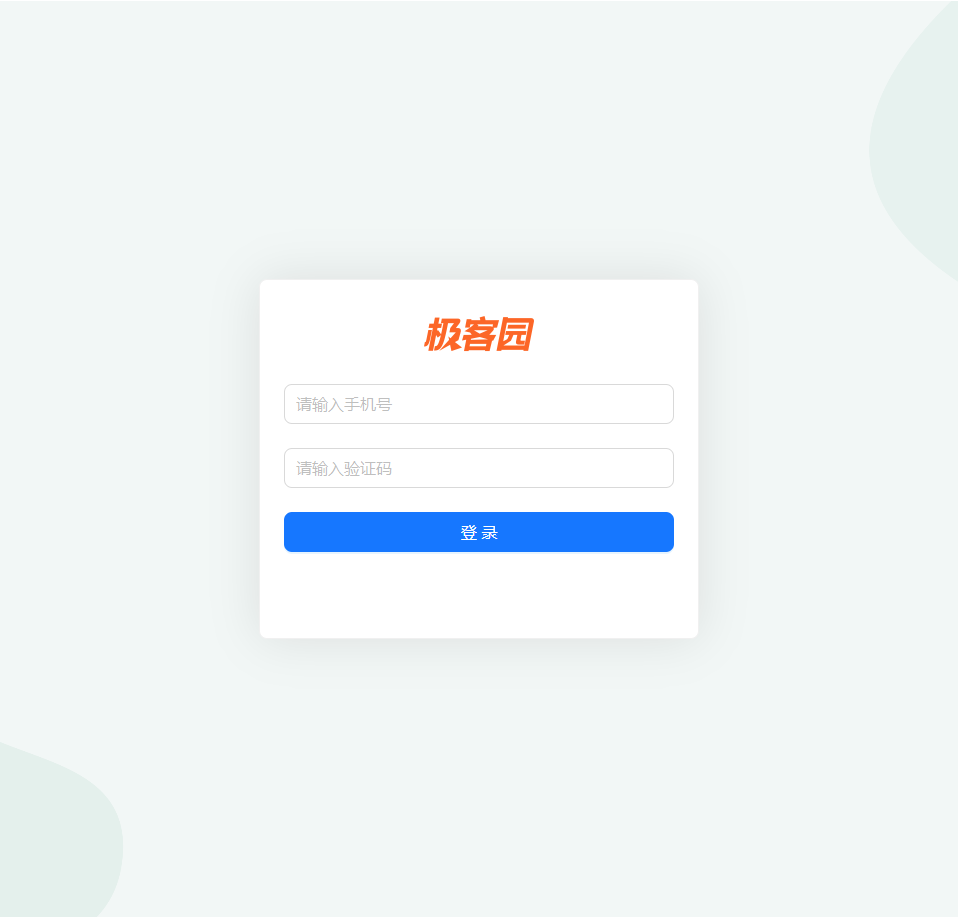
点击确认退出后 成功被定向到登录页面
处理失效token
为了方便管理以及控制性能 token一般都会有一个有效时间, 通常后端token失效都会返回401 所以我们可以监控后端返回的状态码 来做后续操作 如 退出登录 或 续费token

来到 request工具类中的响应拦截器 拿到响应结果并且校验状态码是否是401
request.interceptors.response.use((response) => {
    // 2xx 范围内的状态码都会触发该函数。
    // 对响应数据做点什么
    return response.data
}, (error) => {
    // 超出 2xx 范围的状态码都会触发该函数。
    // 401代表token失效 需要清除当前token
    if (error.response.status === 401) {
        clearToken()
        // 这里有问题 是因为使用createBrownRouter创建的实例无法使用navigate,暂时先这么写 后续会修改
        router.navigate('/login').then(() => {
            window.location.reload()
        })
    }
    return Promise.reject(error)
})
如何查看效果?
在控制台将本地的token修改几位 刷新就可以触发401 之后查看效果是否成功
主页可视化图表
使用 echarts
npm i echarts
基础demo
从官方文档复制个demo进来
import {useEffect, useRef} from "react";
import * as echarts from 'echarts'

export const Home = () => {
    const chartRef = useRef(null)
    useEffect(() => {
        // 1. 生成实例
        const myChart = echarts.init(chartRef.current)
        // 2. 准备图表参数
        const option = {
            xAxis: {
                type: 'category',
                data: ['Mon', 'Tue', 'Wed', 'Thu', 'Fri', 'Sat', 'Sun']
            },
            yAxis: {
                type: 'value'
            },
            series: [
                {
                    data: [120, 200, 150, 80, 70, 110, 130],
                    type: 'bar'
                }
            ]
        }
        // 3. 渲染参数
        myChart.setOption(option)
    }, [])

    return (
        <div>
            <div ref={chartRef} style={{width: '400px', height: '300px'}}/>
        </div>
    )

}
封装echarts组件
将内容抽象出来,将不一样的部分抽象为参数适配
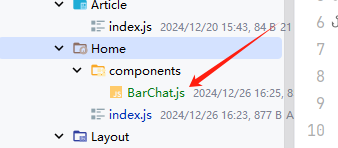
然后将图标代码提取出来 开始修改: 将title, x数据, y数据, 样式作为参数
import {useEffect, useRef} from 'react'
import * as echarts from 'echarts'

const BarChart = ({title, xData, sData, style = {width: '400px', height: '300px'}}) => {
    const chartRef = useRef(null)
    useEffect(() => {
        // 1. 生成实例
        const myChart = echarts.init(chartRef.current)
        // 2. 准备图表参数
        const option = {
            title: {
                text: title
            },
            xAxis: {
                type: 'category',
                data: xData
            },
            yAxis: {
                type: 'value'
            },
            series: [
                {
                    data: sData,
                    type: 'bar'
                }
            ]
        }
        // 3. 渲染参数
        myChart.setOption(option)
    }, [sData, xData])
    return <div ref={chartRef} style={style}></div>
}

export {BarChart}
修改home内容
import {BarChart} from "@/pages/Home/components/BarChat";

export const Home = () => {
    return (
        <div>
            <BarChart
                title={'三个框架满意度'}
                xData={['Vue', 'React', 'Angular']}
                sData={[2000, 5000, 1000]}/>

            <BarChart
                title={'三个框架使用数量'}
                xData={['Vue', 'React', 'Angular']}
                sData={[200, 500, 100]}
                style={{width: '500px', height: '400px'}}/>
        </div>
    )

}
API封装
我们需要优化项目格式, 需要将接口请求维护在一个固定的模块里,但是如何编写每个团队都有区别 仅提供参考


// 用户相关的所有请求
import {request} from "@/utils";

//登录请求
export function loginAPI(formData) {
    return request({
        url: '/authorizations',
        method: 'POST',
        data: formData
    })
}

// 获取用户信息
export function getProfileAPI() {
    return  request({
        url: '/user/profile',
        method: 'GET',
    })
}
修改 store中user.js的调用方式
// 异步方法封装
const fetchLogin = (loginForm) => {
    return async (dispatch) => {
        const res = await loginAPI(loginForm)
        dispatch(setToken(res.data.token))
    }
}
const fetchUserInfo = () => {
    return async (dispatch) => {
        const res = await getProfileAPI()
        dispatch(setUserInfo(res.data))
    }
}
文章发布
基础文章结构
开发三个步骤:
- 基础的文章发布
- 封面上传
- 带封面的文章
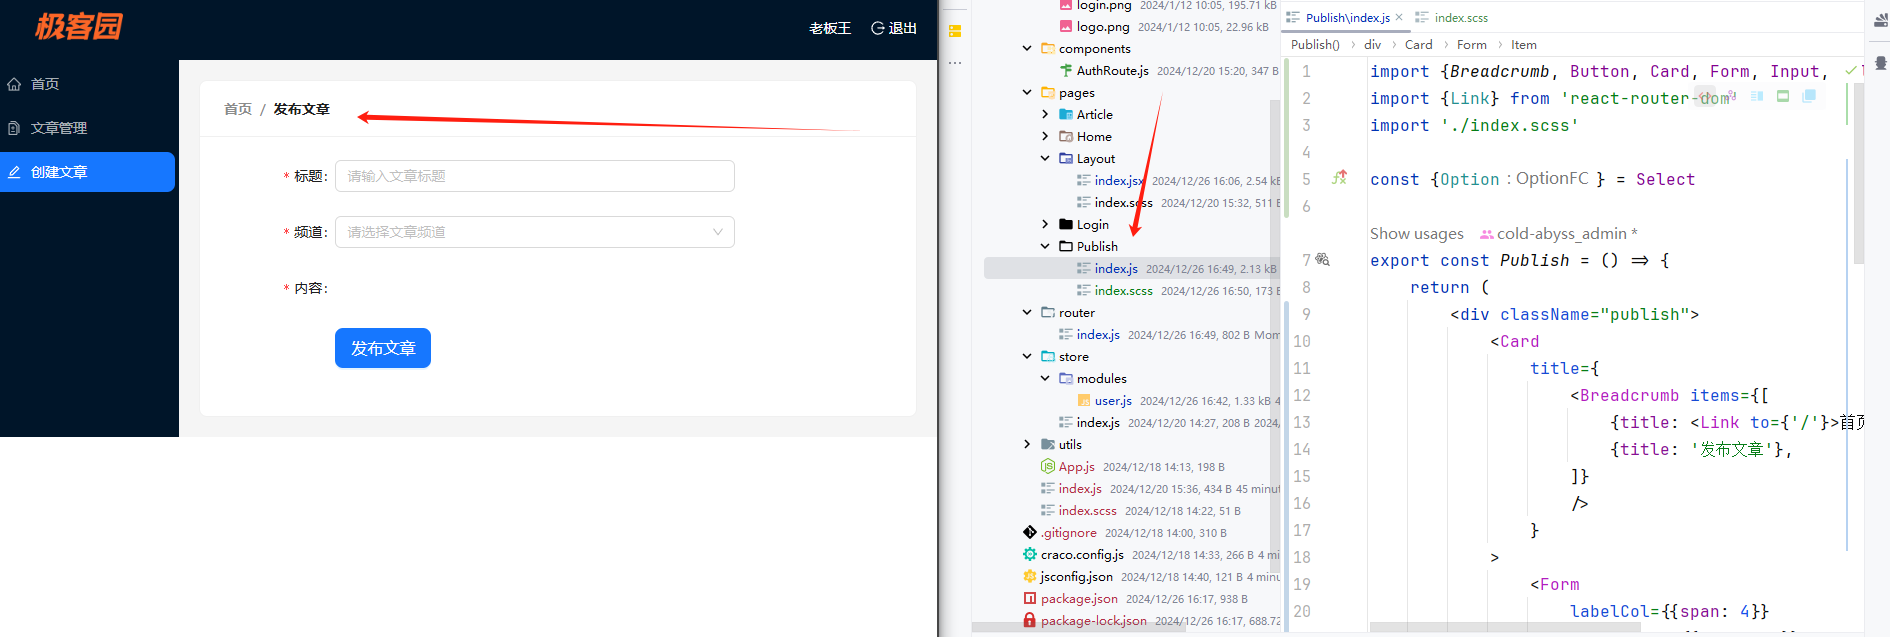
静态结构
publish/index.js
import {
  Card,
  Breadcrumb,
  Form,
  Button,
  Radio,
  Input,
  Upload,
  Space,
  Select
} from 'antd'
import { PlusOutlined } from '@ant-design/icons'
import { Link } from 'react-router-dom'
import './index.scss'

const { Option } = Select

const Publish = () => {
  return (
    <div className="publish">
      <Card
        title={
          <Breadcrumb items={[
            { title: <Link to={'/'}>首页</Link> },
            { title: '发布文章' },
          ]}
          />
        }
      >
        <Form
          labelCol={{ span: 4 }}
          wrapperCol={{ span: 16 }}
          initialValues={{ type: 1 }}
        >
          <Form.Item
            label="标题"
            name="title"
            rules={[{ required: true, message: '请输入文章标题' }]}
          >
            <Input placeholder="请输入文章标题" style={{ width: 400 }} />
          </Form.Item>
          <Form.Item
            label="频道"
            name="channel_id"
            rules={[{ required: true, message: '请选择文章频道' }]}
          >
            <Select placeholder="请选择文章频道" style={{ width: 400 }}>
              <Option value={0}>推荐</Option>
            </Select>
          </Form.Item>
          <Form.Item
            label="内容"
            name="content"
            rules={[{ required: true, message: '请输入文章内容' }]}
          ></Form.Item>

          <Form.Item wrapperCol={{ offset: 4 }}>
            <Space>
              <Button size="large" type="primary" htmlType="submit">
                发布文章
              </Button>
            </Space>
          </Form.Item>
        </Form>
      </Card>
    </div>
  )
}

export default Publish
index.scss
.publish {
  position: relative;
}

.ant-upload-list {
  .ant-upload-list-picture-card-container,
  .ant-upload-select {
    width: 146px;
    height: 146px;
  }
}

.publish-quill {
  .ql-editor {
    min-height: 300px;
  }
}
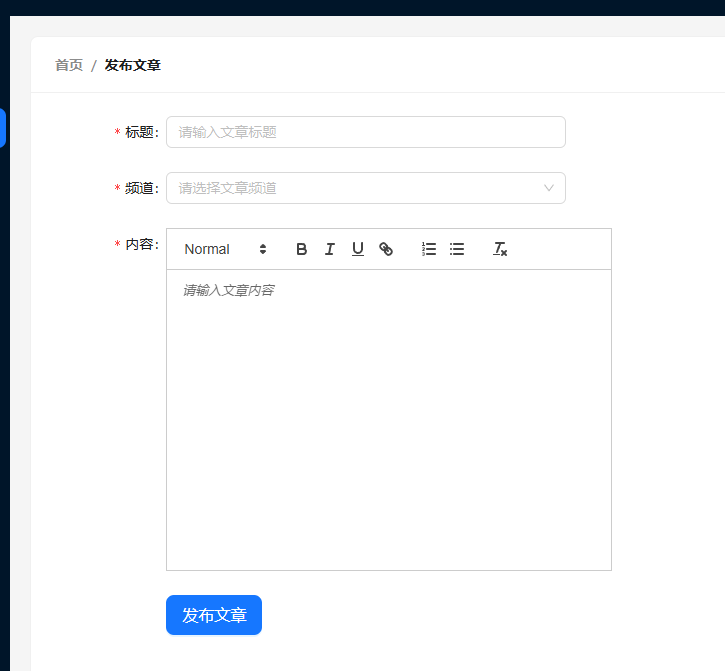
效果
富文本编辑器
导入依赖:
npm i react-quill@2.0.0-beta.2
开发方式:
- 安装依赖 导入编辑器和配置文件
- 渲染组件调整编辑器样式和数据链接
在需要放入富文本编辑器的位置放入代码
//在文章头部导入需要的样式
import 'react-quill/dist/quill.snow.css'

{/*富文本编辑器*/}
                    <Form.Item
                        label="内容"
                        name="content"
                        rules={[{required: true, message: '请输入文章内容'}]}
                    > <ReactQuill
                        className="publish-quill"
                        theme="snow"
                        placeholder="请输入文章内容"
                    /></Form.Item>
效果
频道数据渲染
- 添加新的接口到
apis - 使用 useState维护数据
- 使用
useEffect将数据存入state - 绑定到下拉框
添加apis
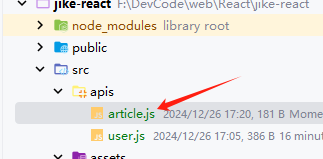
import {request} from "@/utils";

// 获取文章频道列表
export function getChannels() {
    return request({
        url: '/channels',
        method: 'GET'
    })

}
发布界面
- 使用 usestate维护列表 并且使用 useEffect请求数据
- 渲染数据
    const [channels, setChannels] = useState([]);
    useEffect(() => {
        async function getChannelList() {
            const res = await getChannels();
            setChannels(res.data.channels)
        }

        getChannelList()
    }, []);

  return (    <Form.Item
                 label="频道"
                 name="channel_id"
                 rules={[{required: true, message: '请选择文章频道'}]}
                >
                        <Select placeholder="请选择文章频道" style={{width: 300}}>
                            {channels.map((item) => (
                                <Option key={item.id} value={item.id}>{item.name}</Option>
                            ))}
                        </Select>
               </Form.Item>)
提交接口
- 使用 form组件收集数据
- 根据文档处理表单数据
这里由于react和富文本的兼容问题 我们需要手动的获取到富文本的内容将他放入到对应表单属性的value中
    const [form] = Form.useForm();
    const onFinish = (formValue) => {
        console.log(formValue)
    }
    const onRichTextChange = (value) => {
        form.setFieldsValue({content: value});
    };
return(
           {/*富文本编辑器*/}
                    <Form.Item
                        label="内容"
                        name="content"
                        rules={[{required: true, message: '请输入文章内容'}]}
                    > <ReactQuill
                        className="publish-quill"
                        theme="snow"
                        placeholder="请输入文章内容"
                        onChange={onRichTextChange}
                    ></ReactQuill></Form.Item>)
效果

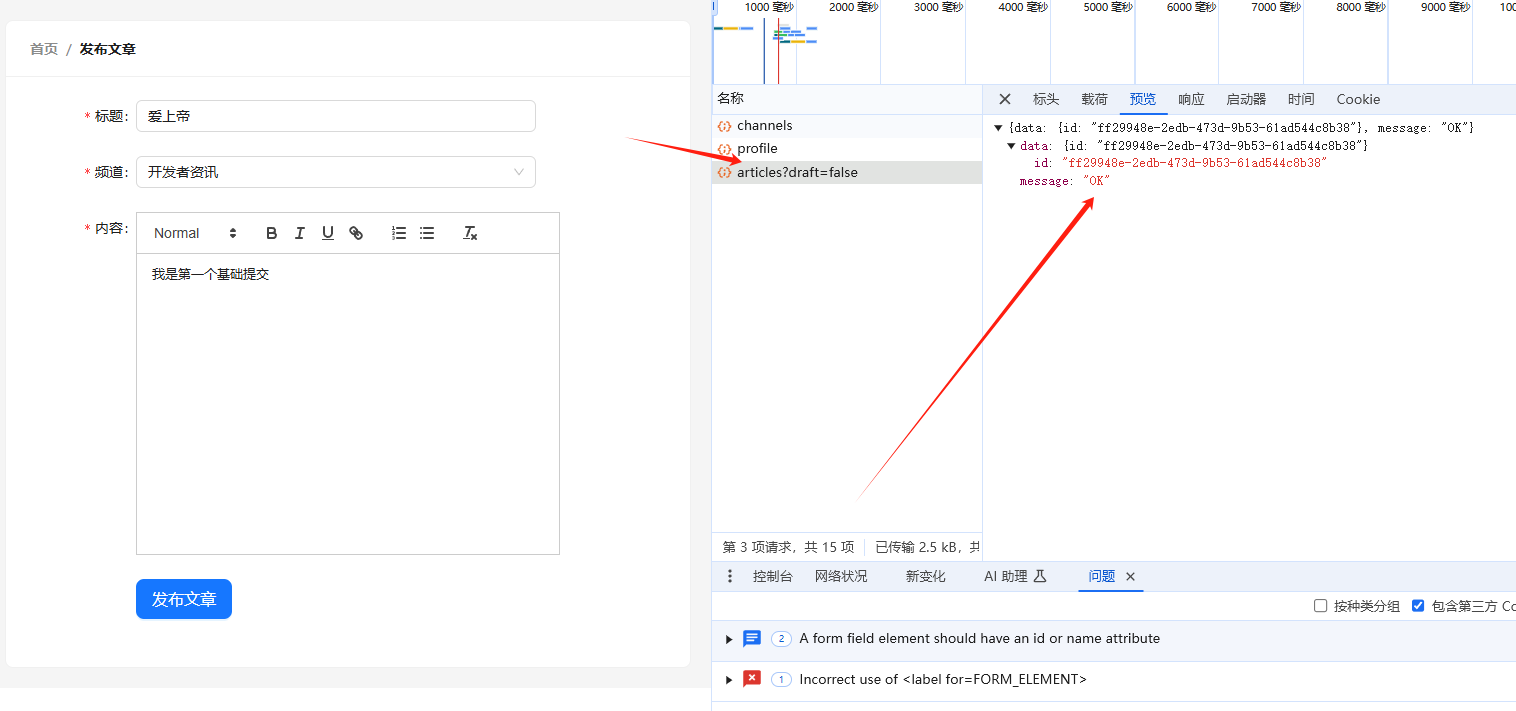
发布基础文章
在文章apis中新增请求方法
// 提交文章表单
export function createArticleAPI(data) {
    return request({
        url: '/mp/articles?draft=false',
        method: 'POST',
        data
    })
}
提交表单
    const onFinish = (formValue) => {
        const {channel_id, content, title} = formValue
        const reqData = {
            content,
            title,
            cover: {
                type: 0,
                images: []
            }, channel_id
        }
        //   提交数据
        createArticleAPI(reqData)
    }
效果
上传封面
基础上传
我们需要一个上传小组件 类似下图:
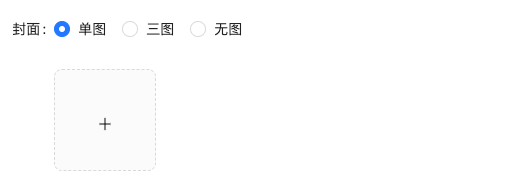
结构代码
将代码放入 publish组件内容标签的上面 ,
- 这里我们需要编写upload的上传地址
- 上传后后端回给到我们一个文件列表我们需要保存用于添加文章信息
import { useState } from 'react'

const Publish = () => {
  // 上传图片
  const [imageList, setImageList] = useState([])
  const onUploadChange = (info) => {
      setImageList(info.fileList)
  }
  return (
   	<Form.Item label="封面">
      <Form.Item name="type">
        <Radio.Group>
          <Radio value={1}>单图</Radio>
          <Radio value={3}>三图</Radio>
          <Radio value={0}>无图</Radio>
        </Radio.Group>
      </Form.Item>
      <Upload
        name="image"
        listType="picture-card"
        showUploadList
        action={'http://geek.itheima.net/v1_0/upload'}
        onChange={onUploadChange}
      >
        <div style={{ marginTop: 8 }}>
          <PlusOutlined />
        </div>
      </Upload>
    </Form.Item>
  )
}
效果
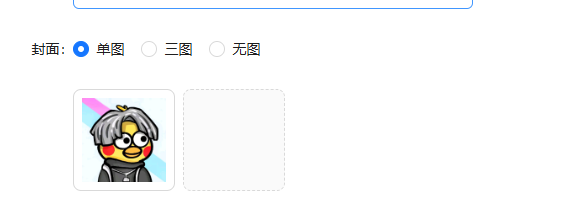
上传成功了
切换封面类型
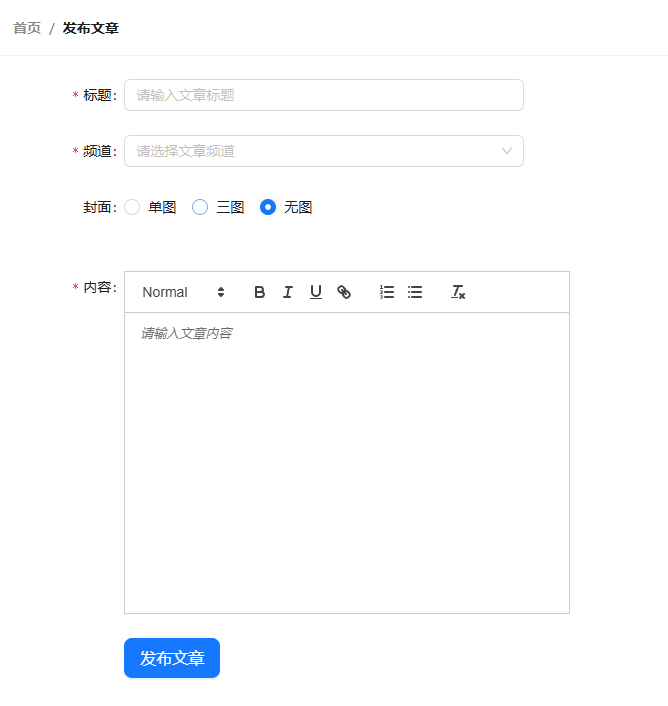
我们需要根据封面的是三个单选框的选项来决定是否需要显示上传图标
- 选择单图或者三图就展示上传图标
- 选择无图 就隐藏
通过 Radio组件的onChange回调函数就可以拿到我们的对应选项 ,
这样在选择无图的时候 上传组件就会隐藏
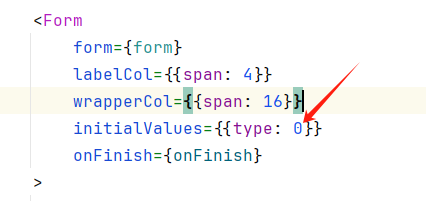
// 记录图片上传类型选择
    const [imageType, setImageType] = useState(0)
    // 类型选择回调
    const onTypeChange = (value) => {
        setImageType(value.target.value)
    }

<Form.Item label="封面">
         <Form.Item name="type">
                 <Radio.Group onChange={onTypeChange}>
                                <Radio value={1}>单图</Radio>
                                <Radio value={3}>三图</Radio>
                                <Radio value={0}>无图</Radio>
                            </Radio.Group>
                        </Form.Item>
                        {imageType > 0 && <Upload
                            name="image"
                            listType="picture-card"
                            showUploadList
                            action=                  {'http://geek.itheima.net/v1_0/upload'}
                            onChange={onUploadChange}
                        >
                            <div style={{marginTop: 8}}>

                            </div>
                        </Upload>}
                    </Form.Item>
效果
无图:
有图:
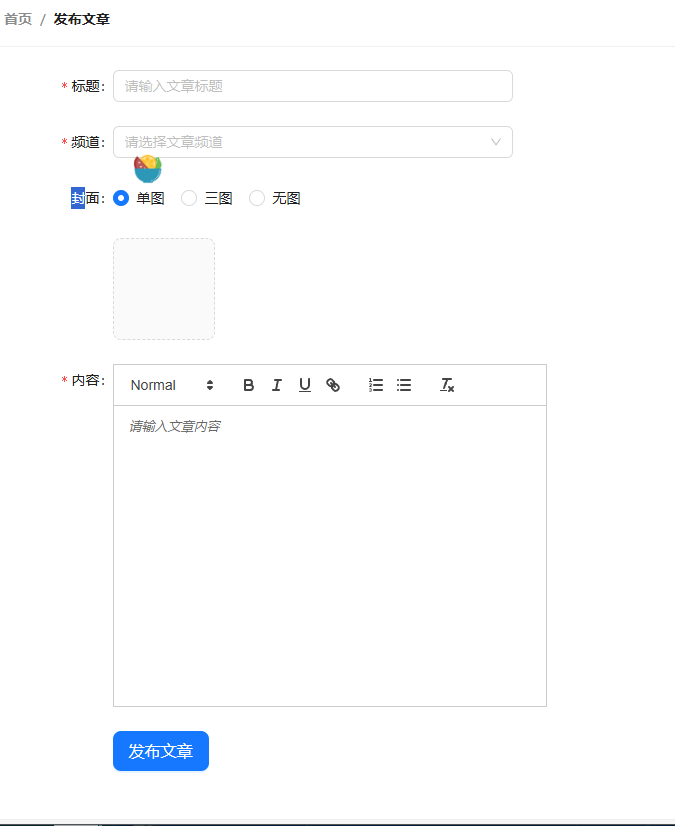
这里需要注意就是我们之前的静态模版有一个默认属性 type是1 这会导致上传组件的显示有问题,改为和 state一样的 0 即可
控制上传图片的数量
我们需要控制 如:
- 单图:就一张
- 三图:就三张
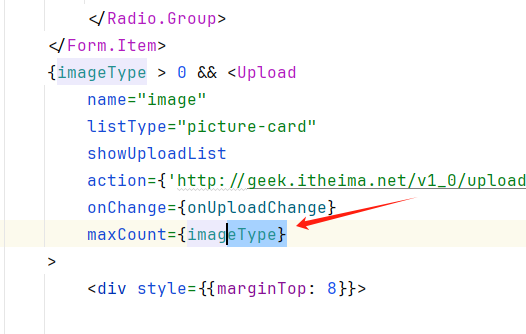
只需要将上传绑定的type显示他的最大数量就行了,
ps: 问题 安全性不高 而且之前替换掉的图片还是会占用信息
发表带图片的文章
我们之前上传基础文章的时候 有一个属性 : cover是空白的 现在我们需要将imagelist和这个cover绑定 就可以上传封面了
- 我们需要从新组装一下图片列表的信息 上传只需要我们提供 url
修改方法
onFinish
    const onFinish = (formValue) => {
        // 判断type和图片数量是否相等
        if (imageList.length !== imageType) {
            return message.warning('封面类型和图片数量不匹配')
        }
        const {channel_id, content, title} = formValue
        const reqData = {
            content,
            title,
            cover: {
                type: imageType,
                images: imageList.map(item => item.response.data.url)
            }, channel_id
        }
        //   提交数据
        createArticleAPI(reqData).then(data => {
            if (data.message === 'OK') {
                message.success('文章发布成功')
                form.resetFields()
                setImageType(0)
            }
        })
    }
效果
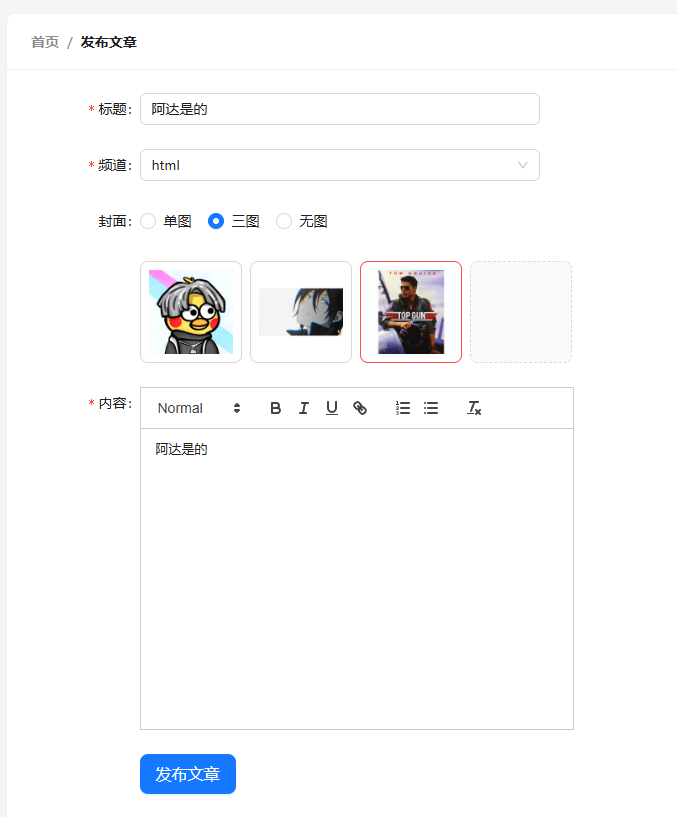
提交之后的信息
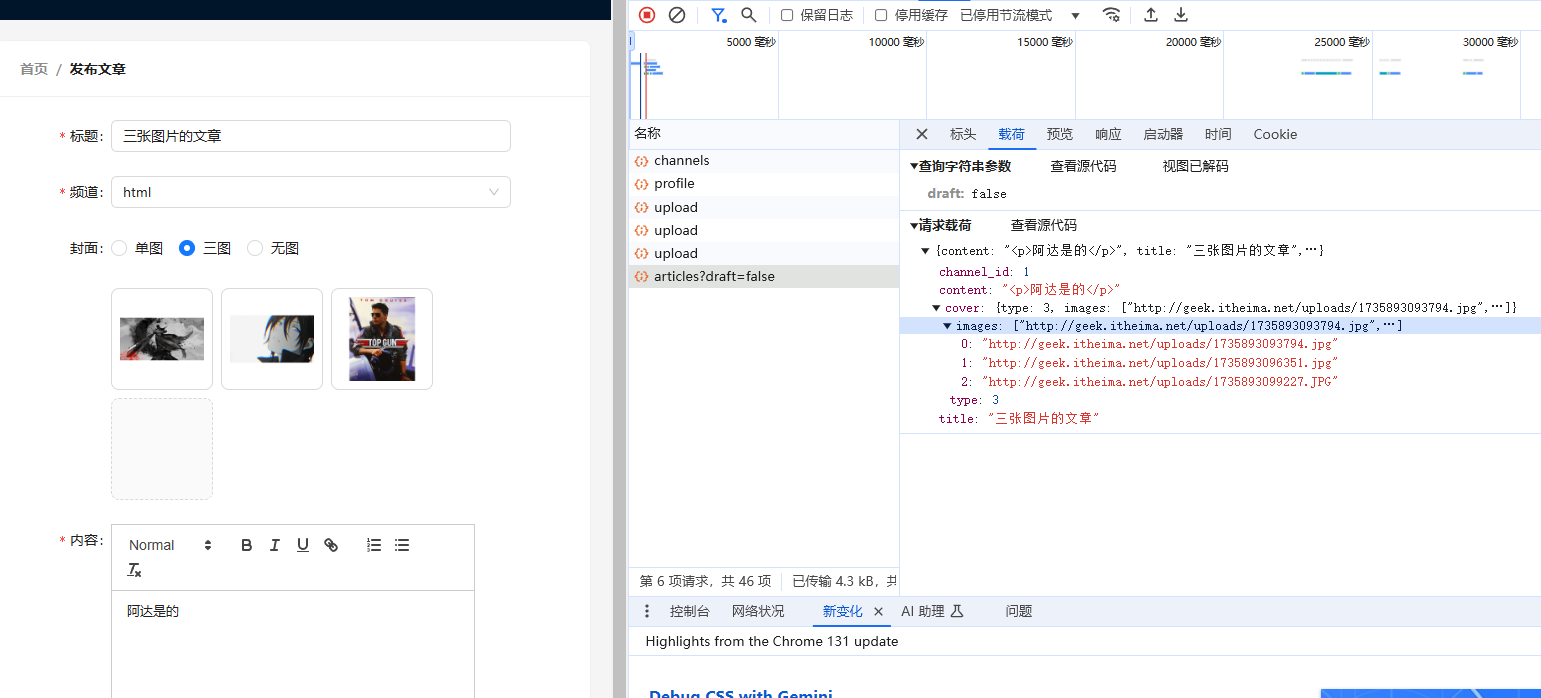
上传成功
校验类型
我们需要避免 三图封面只上传了两张图片的情况 所以还需要在上传方法中增加一些判断
 const onFinish = (formValue) => {
        // 判断type和图片数量是否相等
        if (imageList.length !== imageType) {
            return message.warning('封面类型和图片数量不匹配')
        }
        const {channel_id, content, title} = formValue
        const reqData = {
            content,
            title,
            cover: {
                type: imageType,
                images: imageList.map(item => item.response.data.url)
            }, channel_id
        }
        //   提交数据
        createArticleAPI(reqData)
    }
文章列表
放入结构
小细节:
- 导入语言包 让日期选择可以识别中文
- Select组件配合Form.Item使用时,如何配置默认选中项
<Form initialValues={{ status: null }} >
import {Link} from 'react-router-dom'
// 导入资源
import {Breadcrumb, Button, Card, DatePicker, Form, Radio, Select, Space, Table, Tag} from 'antd'
import locale from 'antd/es/date-picker/locale/zh_CN'
import {DeleteOutlined, EditOutlined} from "@ant-design/icons";

const {Option} = Select
const {RangePicker} = DatePicker

export const Article = () => {
    // 准备列数据
    const columns = [
        {
            title: '封面',
            dataIndex: 'cover',
            width: 120,
            render: cover => {
                return <img src={cover.images[0] || 'img404'} width={80} height={60} alt=""/>
            }
        },
        {
            title: '标题',
            dataIndex: 'title',
            width: 220
        },
        {
            title: '状态',
            dataIndex: 'status',
            render: data => <Tag color="green">审核通过</Tag>
        },
        {
            title: '发布时间',
            dataIndex: 'pubdate'
        },
        {
            title: '阅读数',
            dataIndex: 'read_count'
        },
        {
            title: '评论数',
            dataIndex: 'comment_count'
        },
        {
            title: '点赞数',
            dataIndex: 'like_count'
        },
        {
            title: '操作',
            render: data => {
                return (
                    <Space size="middle">
                        <Button type="primary" shape="circle" icon={<EditOutlined/>}/>
                        <Button
                            type="primary"
                            danger
                            shape="circle"
                            icon={<DeleteOutlined/>}
                        />
                    </Space>
                )
            }
        }
    ]
    // 准备表格body数据
    const data = [
        {
            id: '8218',
            comment_count: 0,
            cover: {
                images: [],
            },
            like_count: 0,
            pubdate: '2019-03-11 09:00:00',
            read_count: 2,
            status: 2,
            title: 'wkwebview离线化加载h5资源解决方案'
        }
    ]
    return (
        <div>
            <Card
                title={
                    <Breadcrumb items={[
                        {title: <Link to={'/'}>首页</Link>},
                        {title: '文章列表'},
                    ]}/>
                }
                style={{marginBottom: 20}}
            >
                <Form initialValues={{status: ''}}>
                    <Form.Item label="状态" name="status">
                        <Radio.Group>
                            <Radio value={''}>全部</Radio>
                            <Radio value={0}>草稿</Radio>
                            <Radio value={2}>审核通过</Radio>
                        </Radio.Group>
                    </Form.Item>

                    <Form.Item label="频道" name="channel_id">
                        <Select
                            placeholder="请选择文章频道"
                            defaultValue="lucy"
                            style={{width: 120}}
                        >
                            <Option value="jack">Jack</Option>
                            <Option value="lucy">Lucy</Option>
                        </Select>
                    </Form.Item>

                    <Form.Item label="日期" name="date">
                        {/* 传入locale属性 控制中文显示*/}
                        <RangePicker locale={locale}></RangePicker>
                    </Form.Item>

                    <Form.Item>
                        <Button type="primary" htmlType="submit" style={{marginLeft: 40}}>
                            筛选
                        </Button>
                    </Form.Item>
                </Form>
            </Card>
            {/*表格区域*/}
            <Card title={`根据筛选条件共查询到 count 条结果:`}>
                <Table rowKey="id" columns={columns} dataSource={data}/>
            </Card>
        </div>
    )
}
频道模块渲染
我们这次采用 自定义业务hook的方式实现获取频道信息
- 创建一个use打头的函数
- 在函数中封装业务逻辑并且导出状态数据
- 组件中导入函数和执行解构状态数据使用
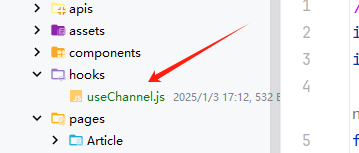
代码
// 封装获取频道列表的逻辑
import {useEffect, useState} from "react";
import {getChannels} from "@/apis/article";

function useChannel() {
//     1. 获取频道列表的所有逻辑
    const [channels, setChannels] = useState([]);
    useEffect(() => {
        async function getChannelList() {
            const res = await getChannels();
            setChannels(res.data.channels)
        }

        getChannelList()
    }, [])
//     2. 把数据导出
    return {channels};
}

export {useChannel}
这样就可以去改造一下之前的publish获取频道的逻辑 也可以在新的组件中直接使用频道数据
将数据放入文章编辑中
找到频道标签 修改options
{channels.map(item => <Option value={item.id}>{item.name}</Option>)}
效果
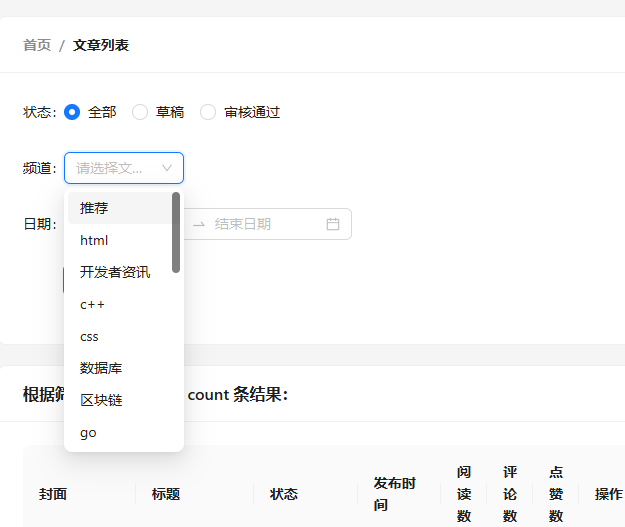
渲染文章列表数据
- 声明请求方法
- useEffect拿到数据
- 渲染数据
请求方法
/apis/article.js
//获取文章列表
export function getArticleAPI(params) {
    return request({
        url: '/mp/articles',
        method: 'GET',
        params
    })
}
Article 组件
import {Link} from 'react-router-dom'
// 导入资源
import {Breadcrumb, Button, Card, DatePicker, Form, Radio, Select, Space, Table, Tag} from 'antd'
import locale from 'antd/es/date-picker/locale/zh_CN'
import {useChannel} from "@/hooks/useChannel";
import {useEffect, useState} from "react";
import {getArticleAPI} from "@/apis/article";
import {DeleteOutlined, EditOutlined} from "@ant-design/icons";

const {Option} = Select
const {RangePicker} = DatePicker

export const Article = () => {
    // 获取频道数据
    const {channels} = useChannel()
    // 准备列数据
    const columns = [
        {
            title: '封面',
            dataIndex: 'cover',
            width: 120,
            render: cover => {
                return <img src={cover.images[0] || 'img404'} width={80} height={60} alt=""/>
            }
        },
        {
            title: '标题',
            dataIndex: 'title',
            width: 220
        },
        {
            title: '状态',
            dataIndex: 'status',
            render: data => <Tag color="green">审核通过</Tag>
        },
        {
            title: '发布时间',
            dataIndex: 'pubdate'
        },
        {
            title: '阅读数',
            dataIndex: 'read_count'
        },
        {
            title: '评论数',
            dataIndex: 'comment_count'
        },
        {
            title: '点赞数',
            dataIndex: 'like_count'
        },
        {
            title: '操作',
            render: data => {
                return (
                    <Space size="middle">
                        <Button type="primary" shape="circle" icon={<EditOutlined/>}/>
                        <Button
                            type="primary"
                            danger
                            shape="circle"
                            icon={<DeleteOutlined/>}
                        />
                    </Space>
                )
            }
        }
    ]
    // 获取文章列表
    const [list, setList] = useState([])
    useEffect(() => {
        async function getList() {
            const res = await getArticleAPI();
            setList(res.data.results)
        }

        getList()
    }, []);
    return (
        <div>
            <Card
                title={
                    <Breadcrumb items={[
                        {title: <Link to={'/'}>首页</Link>},
                        {title: '文章列表'},
                    ]}/>
                }
                style={{marginBottom: 20}}
            >
                <Form initialValues={{status: ''}}>
                    <Form.Item label="状态" name="status">
                        <Radio.Group>
                            <Radio value={''}>全部</Radio>
                            <Radio value={0}>草稿</Radio>
                            <Radio value={2}>审核通过</Radio>
                        </Radio.Group>
                    </Form.Item>

                    <Form.Item label="频道" name="channel_id">
                        <Select
                            placeholder="请选择文章频道"
                            style={{width: 120}}
                        >
                            {channels.map(item => <Option value={item.id}>{item.name}</Option>)}
                        </Select>
                    </Form.Item>

                    <Form.Item label="日期" name="date">
                        {/* 传入locale属性 控制中文显示*/}
                        <RangePicker locale={locale}></RangePicker>
                    </Form.Item>

                    <Form.Item>
                        <Button type="primary" htmlType="submit" style={{marginLeft: 40}}>
                            筛选
                        </Button>
                    </Form.Item>
                </Form>
            </Card>
            {/*表格区域*/}
            <Card title={`根据筛选条件共查询到 ${list.length} 条结果:`}>
                <Table rowKey="id" columns={columns} dataSource={list}/>
            </Card>
        </div>
    )
}
文章状态
我们需要根据不同的文章状态显示不同的tag , 我们在用枚举渲染的方式实现这个多种状态的显示,
我们之前的代码中有专门控制每一列显示的数组
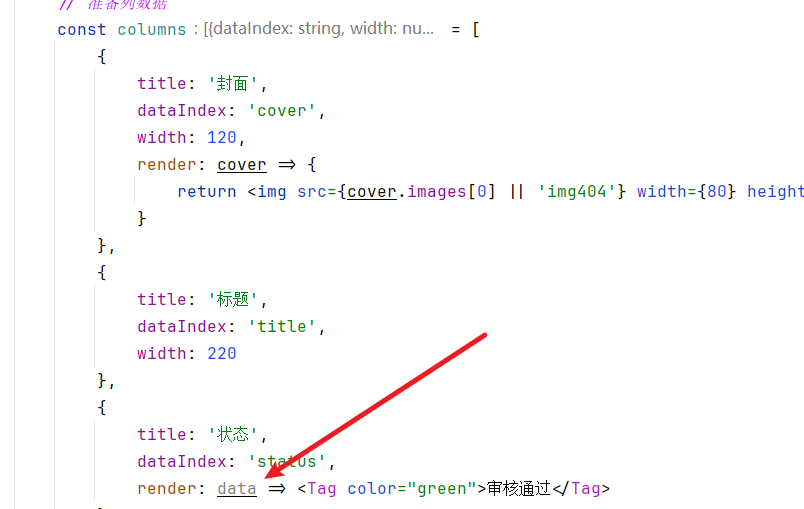
这里我们就可以根据 拿到的数据 利用 render属性 来渲染出来需要的tag
通过接口文档我们知道目前支持两种状态 :
- 1 待审核
- 2 通过
文章列表组件中添加
- 枚举代码
- 并且将状态对象的 render 关联到输出枚举内容即可
    // 文章状态枚举
    const status = {
        1:<Tag color={"warning"}>待审核</Tag>,
        2:<Tag color={"success"}>审核通过</Tag>
    }

            {

            title: '状态',
            dataIndex: 'status',
            render: data => status[data]
        }
效果

文章筛选
我们需要根据 :
- 频道
- 日期
- 状态
来筛选需要的文章
本质就是给请求列表的接口传递不同的参数
接口文档的参数
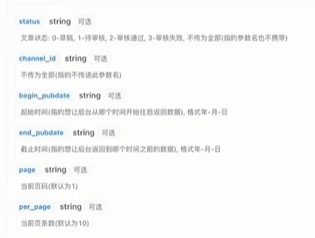
    // 查询筛选参数
    const [reqData, setReqData] = useState(
        {
            status: '',
            channel_id: '',
            begin_pubdate: '',
            end_pubdate: '',
            page: 1,
            per_page: 4,
        }
    );
这里我们利用 useEffect的机制 维护的依赖项有变动 就会重新执行内部代码 ,拉取文章数据 所以我们需要将reqdata放入之前请求列表的参数中个,之前这个参数是没有传递的
完整代码
  // 查询筛选参数
    const [reqData, setReqData] = useState(
        {
            status: '',
            channel_id: '',
            begin_pubdate: '',
            end_pubdate: '',
            page: 1,
            per_page: 4,
        }
    );
    const onReqFinish = (formValue) => {
        // 1. 准备参数
        const {channel_id, date, status} = formValue
        setReqData({
            status,
            channel_id,
            begin_pubdate: date[0].format('YYYY-MM-DD'),
            end_pubdate: date[1].format('YYYY-MM-DD'),
        })
    }
    // 获取频道数据
    const {channels} = useChannel()
    // 获取文章列表
    const [list, setList] = useState([])
    useEffect(() => {
        async function getList() {
            const res = await getArticleAPI(reqData);
            setList(res.data.results)
        }

        getList()
    }, [reqData]);
效果
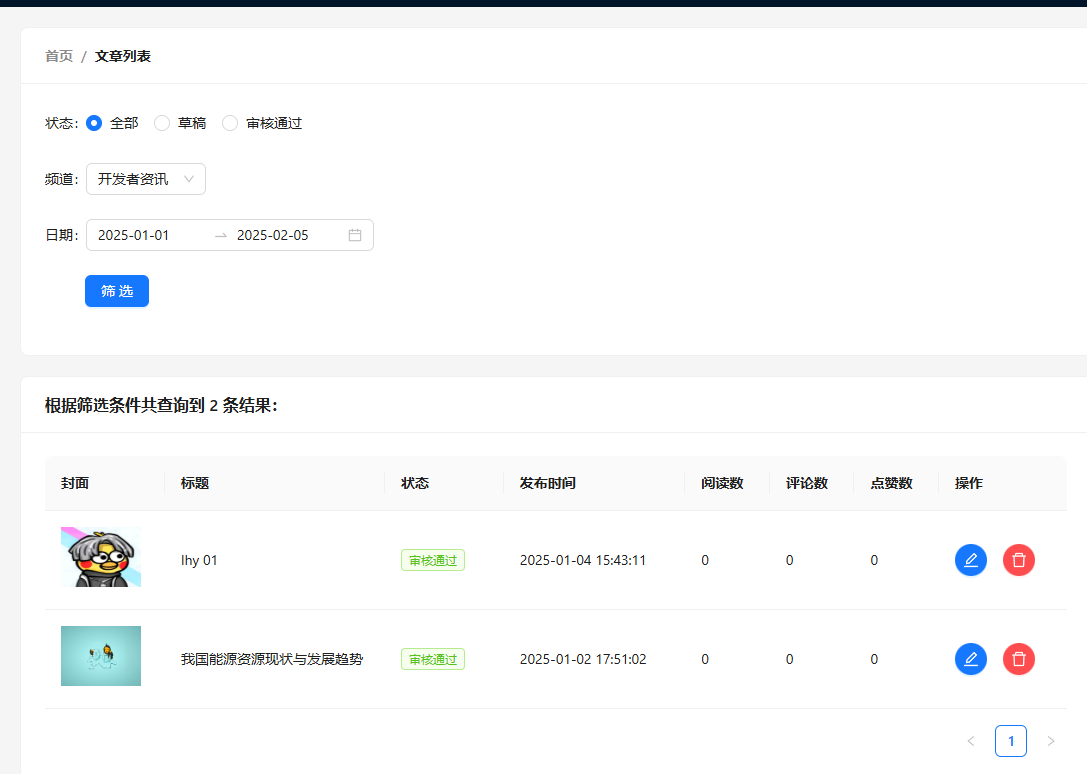
分页实现
分页公式 : 页数 = 总数/每条数
思路 : 将页数作为请求参数从新渲染文章列表
找到文章列表对应的table标签 配置 pagination属性
补充 维护一个count
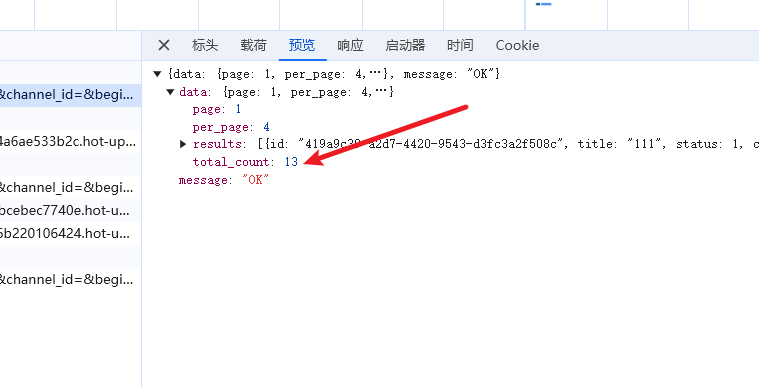
在请求文章列表的时候 把这个属性放入count维护即可
    useEffect(() => {
        async function getList() {
            const res = await getArticleAPI(reqData);
            setList(res.data.results)
            setCount(res.data.total_count)
        }

        getList()
    }, [reqData]);
代码
简单的分页就完成了 :
- 设置总数
- 每页数量
            {/*表格区域*/}
            <Card title={`根据筛选条件共查询到 ${count} 条结果:`}>
                <Table rowKey="id" columns={columns} dataSource={list} pagination={{
                    total: count,
                    pageSize: reqData.per_page,
                }}/>
            </Card>
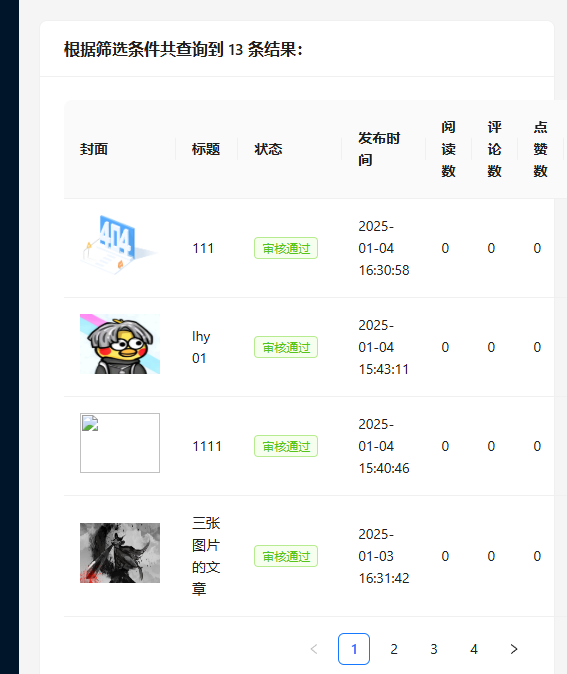
根据对应的页数来请求对应文章
pagination中使用 onchange 事件来完成对应页数的请求
标签改动:
               <Table rowKey="id" columns={columns} dataSource={list} pagination={{
                    total: count,
                    pageSize: reqData.per_page,
                    onChange: onPageChange
                }}/>
新增方法:
page 参数会拿到点击的对应页数 ,根据特性我们只需要改变参数 就会触发useEffect来更新数据
    const onPageChange = (page) => {
        setReqData({
            ...reqData,
            page: page
        })
    }
文章删除
在 /APIS/Article.js新增请求方法
//删除文章
export function deleteArticleAPI(data) {
    return request({
        url: `/mp/articles/${data.id}`,
        method: 'DELETE',
    })
}
添加静态文件
在行数据数组中找到 操作 添加确认组件 绑定onConfirm事件
             <Popconfirm
                            title="确认删除该条文章吗?"
                            onConfirm={() => delArticle(data)}
                            okText="确认"
                            cancelText="取消"
                        >
                            <Button
                                type="primary"
                                danger
                                shape="circle"
                                icon={<DeleteOutlined/>}
                            />
                        </Popconfirm>
事件代码
    const delArticle = async (data) => {
        await deleteArticleAPI(data)
        // 更新列表
        setReqData({
            ...reqData
        })
    }
编辑文章
我们点击编辑按钮的时候 需要携带文章id 跳转到文章编写页面,
 const navigate = useNavigate();
//样式代码
<Button type="primary" shape="circle" icon={<EditOutlined/>} onClick={() => navigate(`/publish?id=${data.id}`)}/>
效果
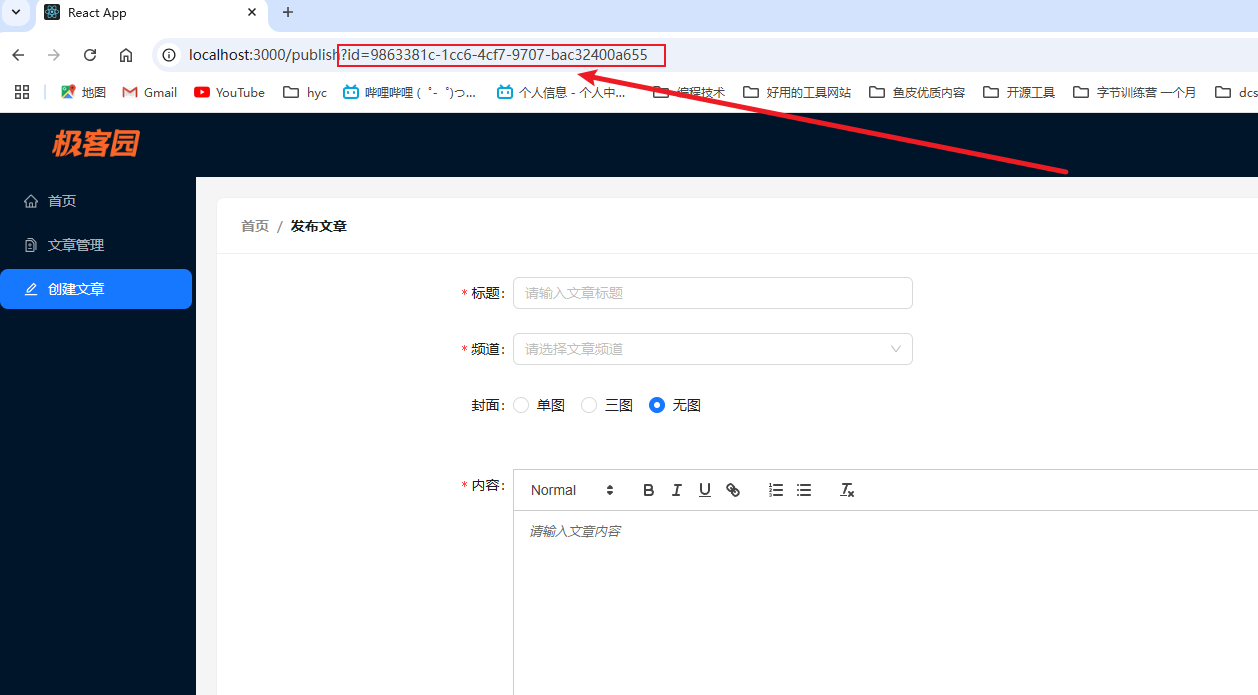
载入文章数据
通过传入的id获取到文章数据 使用表单组件的实例方法 setFieldsValue填进去即可
在 /APIS/Article.js新增请求方法
//获取文章数据
export function getArticleById(id) {
    return request({
        url: `/mp/articles/${id}`,
    })
}
使用 钩子来做到刷新就回填数据
    // 载入文章数据
    const [searchParams] = useSearchParams();
    // 文章数据
    const articleId = searchParams.get('id');
    useEffect(() => {
        async function getArticleDetail() {
            const res = await getArticleById(articleId)
            const {cover, ...infoValue} = res.data
            form.setFieldsValue({...infoValue, type: cover.type})
            setImageType(cover.type)
            setImageList(cover.images.map(url => ({url})))
        }

        if (articleId) {
            getArticleDetail()
        }
    }, [articleId, form])
这里需要在 上传框加入一个属性 fileList
{imageType > 0 && <Upload
                            name="image"
                            listType="picture-card"
                            showUploadList
                            action={'http://geek.itheima.net/v1_0/upload'}
                            onChange={onUploadChange}
                            maxCount={imageType}
                            fileList={imageList}
                        >
                            <div style={{marginTop: 8}}>
                                <PlusOutlined/>
                            </div>
                        </Upload>}
根据id 展示状态
找到 title中的发布文章 判断是否有id
            <Card
                title={
                    <Breadcrumb items={[
                        {title: <Link to={'/'}>首页</Link>},
                        {title: `${articleId ? '编辑文章' : '发布文章'}`}
                    ]}
                    />
                }
            >
更新文章
做完内容修改后 需要确认更新文章内容 并且校对文章数据 然后更新文章
我们需要适配url参数 因为我们的图片每个接口的传递需要的格式不同
新增更新文章方法
/apis/article.js
// 修改文章表单
export function updateArticleAPI(data) {
    return request({
        url: `/mp/articles/${data.id}?draft=false`,
        method: 'PUT',
        data
    })
}
修改 onfinish方法
    const onFinish = (formValue) => {
        // 判断type和图片数量是否相等
        if (imageList.length !== imageType) {
            return message.warning('封面类型和图片数量不匹配')
        }
        const {channel_id, content, title} = formValue
        const reqData = {
            content,
            title,
            cover: {
                type: imageType,
                // 编辑url的时候也需要做处理
                images: imageList.map(item => {
                    if (item.response) {
                        return item.response.data.url
                    } else {
                        return item.url
                    }
                })
            }, channel_id
        }
        //   提交数据
        // 需要判断 新增和修改接口的调用
        if (articleId) {
            updateArticleAPI({...reqData, id: articleId}).then(data => {
                if (data.message === 'OK') {
                    message.success('文章修改成功')
                }
            })
        } else {
            createArticleAPI(reqData).then(data => {
                if (data.message === 'OK') {
                    message.success('文章发布成功')
                    form.resetFields()
                    setImageType(0)
                }
            })
        }

    }
效果
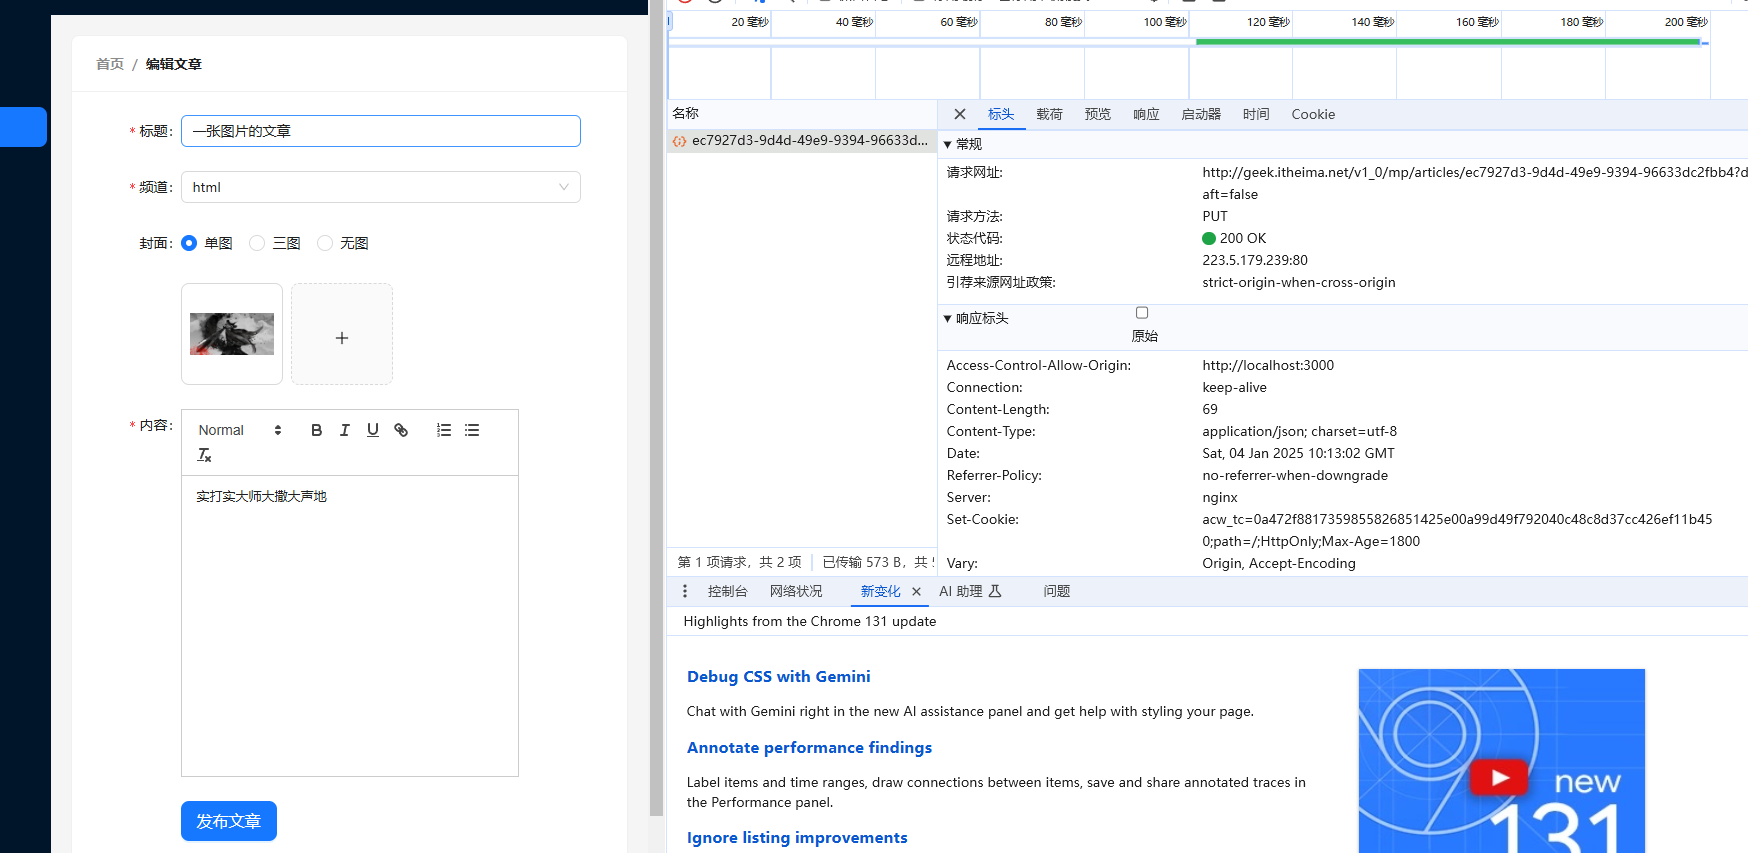
打包优化
CRA自带的打包命令
npm run build

# 静态服务器
npm install -g serve
#启动
serve -s build
之后就可以在项目文件夹看到
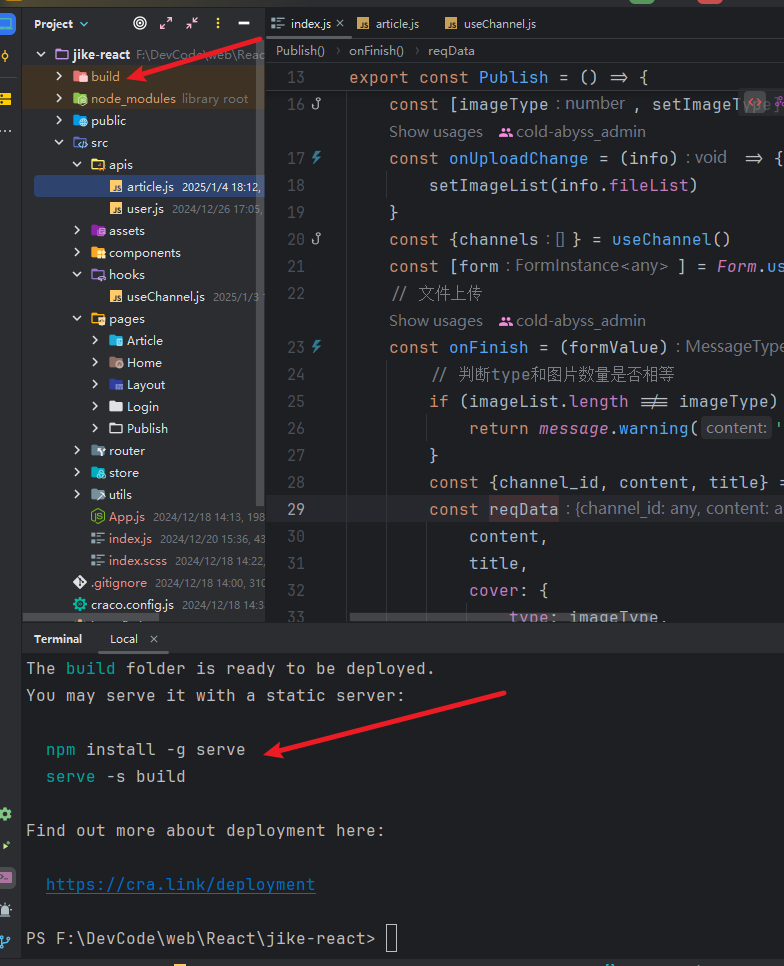
我们需要安装一个本地服务器 就可以跑起来打包好的项目了
配置路由懒加载
就是使路由在需要js的时候 才会获取 可以提高项目的首次启动时间
- 把路由修改为React提供的 lazy函数进行动态导入
- 使用 react 内置的 Suspense组件 包裹路由中的element
将路由中组件的导入方式改为lazy
import {createBrowserRouter} from "react-router-dom";

import {Login} from "@/pages/Login";
import {AuthRoute} from "@/components/AuthRoute";
import GeekLayout from "@/pages/Layout";
import {lazy, Suspense} from "react";

// 使用 lazy进行导入

const Home = lazy(() => import("@/pages/Home"));
const Article = lazy(() => import('@/pages/Article'))
const Publish = lazy(() => import('@/pages/Publish'))

const router = createBrowserRouter([
    {
        path: '/',
        element: <AuthRoute><GeekLayout/></AuthRoute>,
        children: [{
            path: '/',
            element: <Suspense fallback={'加载中'}><Home></Home></Suspense>
        }, {
            path: 'article',
            element: <Suspense fallback={'加载中'}><Article></Article></Suspense>
        }, {
            path: 'publish',
            element: <Suspense fallback={'加载中'}><Publish></Publish></Suspense>
        }]
    },
    {
        path: '/login',
        element: <Login/>
    }
])
export default router
只能看看语法了 目前有React18 不知道为什么提示我使用的不对
CDN
意义就是 加载离本地最近的服务器上的文件
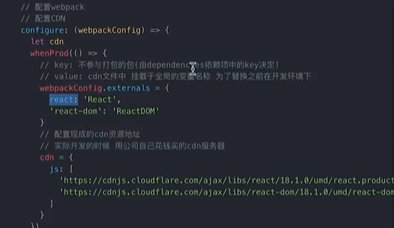
Hooks
ueslocation获取当前的路由位置
 // 获取到当前点击的路由
    const location = useLocation();
    const selectedKey = location.pathname;


