目录
0、弹性盒子、布局
0.1.弹性盒子的基本概念
0.2.弹性盒子的主轴和交叉轴
0.3.弹性盒子的属性
flex-direction
row
row-reverse
column
column-reverse
flex-wrap
nowrap
wrap
wrap-reverse
flex-dirction和flex-wrap的组合简写模式
justify-content
flex-start
flex-end
center
space-between
space-around
space-evenly
align-items
flex-start
flex-end
center
baseline
stretch
align-content
flex-start
flex-end
center
space-between
space-around
stretch
space-evenly
align-self
auto
order
flex-grow
flex-shrink
flex-basis
0.4.弹性盒子的使用场景
一、动画
1.1.动画序列与关键帧
1.2.动画属性详解
1.3.动画简写
1.4.使用动画库
1.5.动画事件
二、CSS3 3D转换
2.1. 3D变换函数
2.2. 3D变换与动画结合
2.3. 3D变换的浏览器兼容性
三、calc函数在动画中的应用
0、弹性盒子、布局
弹性盒子(Flex Box)是CSS3引入的一种新的布局模式,旨在提供一种更有效的方式来布局、对齐和分配在容器中项目的空间,即使它们的大小未知或是动态变化的。以下是对弹性盒子的超级详解:
0.1.弹性盒子的基本概念
弹性容器(Flex Container):通过设置display属性的值为flex或inline-flex,将一个元素定义为弹性容器。弹性容器内包含了一个或多个弹性子元素。
弹性子元素(Flex Items):弹性容器的子元素。弹性子元素在弹性容器内按照弹性盒子的规则进行布局。
0.2.弹性盒子的主轴和交叉轴
主轴(Main Axis):弹性元素排列的主要方向,可以是水平方向或垂直方向。该轴的开始和结束被称为main start和main end。
交叉轴(Cross Axis):垂直于主轴的方向。该轴的开始和结束被称为cross start和cross end。
0.3.弹性盒子的属性
没有添加弹性盒子的属性
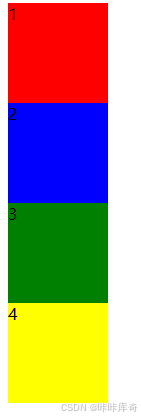
<html>
	<head>
		<style>
			.box {
				width: 1000px;
				height: 1000px;

			}

			.b1 {
				width: 100px;
				height: 100px;
				background-color: red;
			}

			.b2 {
				width: 100px;
				height: 100px;
				background-color: blue;
			}

			.b3 {
				width: 100px;
				height: 100px;
				background-color: green;
			}

			.b4 {
				width: 100px;
				height: 100px;
				background-color: yellow;
			}
		</style>
	</head>
	<body>
		<body>
			<div class="box">
				<div class="b1">1</div>
				<div class="b2">2</div>
				<div class="b3">3</div>
				<div class="b4">4</div>
			</div>
		</body>

	</body>
</html>
flex-direction
设置弹性子元素的排列方向。
row
row:从左到右水平排列(默认值)。

.box {
	width: 1000px;
    height: 1000px;
	display: flex;
    flex-direction: row;
}
row-reverse
row-reverse:从右到左水平排列。

.box {
	width: 1000px;
    height: 1000px;
	display: flex;
    flex-direction: row-reverse;
}
column
column:从上到下垂直排列。

        .box{
            width: 1000px;
            height: 1000px;
            display: flex;
            flex-direction: column;
        }
column-reverse
column-reverse:从下到上垂直排列。

        .box{
            width: 1000px;
            height: 1000px;
            display: flex;
            flex-direction: column-reverse;
        }
flex-wrap
设置弹性子元素是否换行。
nowrap
nowrap:不换行(默认值)。
如果所有子元素的宽/高总值大于父元素的宽/高,那么为了子元素不溢出,会把内容挤压变形到自适应的宽高。
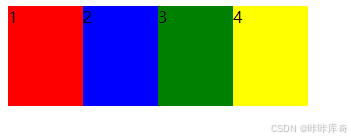
.box {
    width: 300px;
    height: 200px;
    display: flex;
    flex-wrap: nowrap;
}
wrap
wrap:换行。
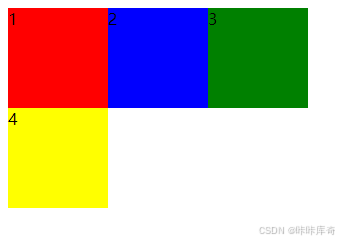
.box {
    width: 300px;
    height: 200px;
    display: flex;
    flex-wrap: nowrap;
}
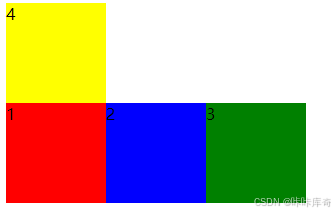
wrap-reverse
wrap-reverse:反向换行。
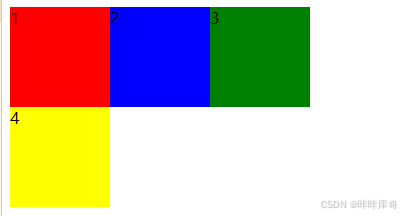
flex-dirction和flex-wrap的组合简写模式
.box{
    width: 300px;
    height: 200px;
    display: flex;
    flex-flow: row wrap;
}
justify-content
定义弹性子元素在主轴上的对齐方式。
flex-start
flex-start:靠主轴起点对齐。
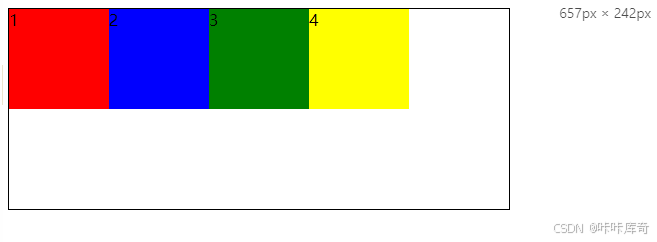
.box{
    width: 500px;
    height: 200px;
    border: 1px solid black;

    display: flex;
    justify-content: flex-start;

}
flex-end
flex-end:靠主轴终点对齐。
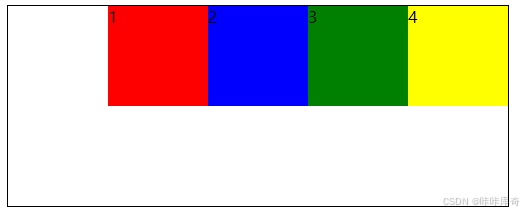
.box{
    width: 500px;
    height: 200px;
    display: flex;
    justify-content: flex-end;
    border: 1px solid black;
}
center
center:居中对齐。
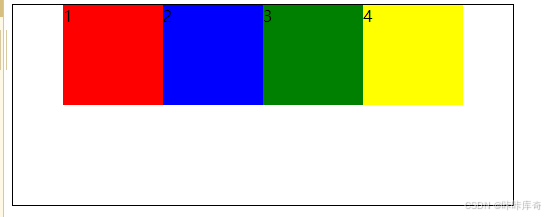
.box{
	width: 500px;
	height: 200px;
	display: flex;
	justify-content: center;
	border: 1px solid black;
}
space-between
space-between:两端对齐,元素之间的间隔相等。

.box{
	width: 500px;
	height: 200px;
	display: flex;
	justify-content: space-between;
	border: 1px solid black;
}
space-around
space-around:元素两侧的间距相同,元素之间的间距比两侧的间距大一倍。
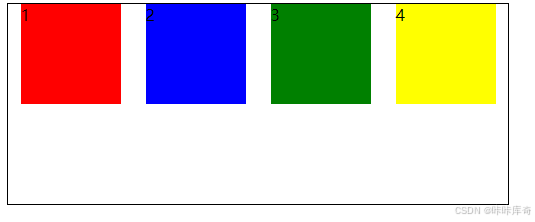
.box{
	width: 500px;
	height: 200px;
	display: flex;
	justify-content: space-around;
	border: 1px solid black;
}
space-evenly
space-evenly:元素间距离平均分配。
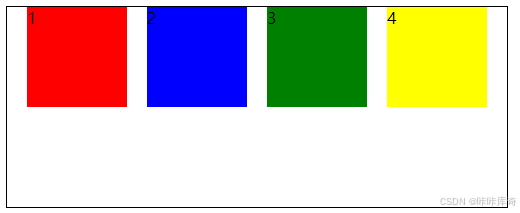
.box{
	width: 500px;
	height: 200px;
	display: flex;
	justify-content: space-evenly;
	border: 1px solid black;
}
align-items(单行)
定义弹性子元素在交叉轴上的对齐方式(适用于单行)。
flex-start
flex-start:交叉轴起点对齐。
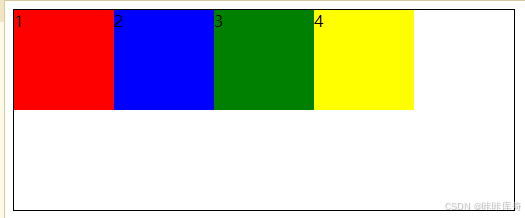
.box{
	width: 500px;
	height: 200px;
	display: flex;
	align-items: flex-start;
	border: 1px solid black;
}
flex-end
flex-end:交叉轴终点对齐。
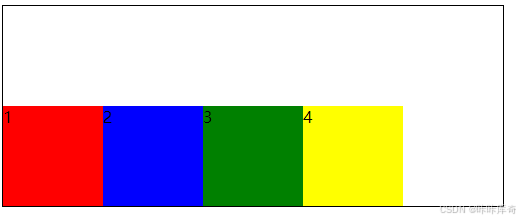
.box{
	width: 500px;
	height: 200px;
	display: flex;
	align-items: flex-end;
	border: 1px solid black;
}
center
center:交叉轴中点对齐。
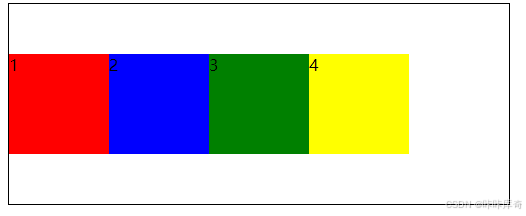
.box{
	width: 500px;
	height: 200px;
	display: flex;
	align-items: center;
	border: 1px solid black;
}
baseline
baseline:元素的第一行文字的基线对齐。
改变了每个盒子字体的大小这样看基线比较直观
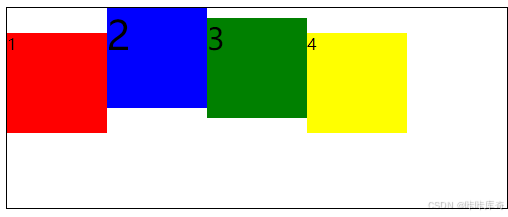
.box{
	width: 500px;
	height: 200px;
	display: flex;
	align-items: baseline;
	border: 1px solid black;
}
stretch
stretch:默认值,如果元素未设置高度或者为auto,将占满整个容器的高度。
红盒子不设置高度,容器的填充方向是按照侧轴方向填充的
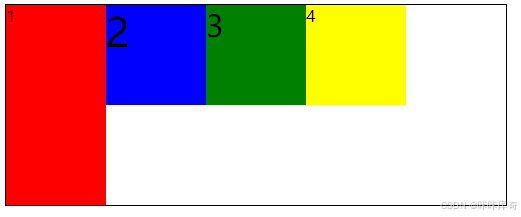
.box{
	width: 500px;
	height: 200px;
	display: flex;
	align-items: stretch;
	border: 1px solid black;
}
align-content(多行)
定义多行弹性子元素在交叉轴上的对齐方式(适用于多行)。
flex-start
flex-start:交叉轴的起点对齐。
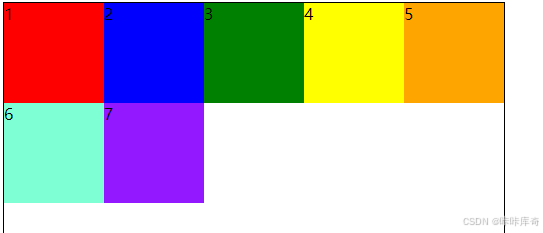
.box{
	width: 500px;
	height: 600px;
	display: flex;
	align-content: flex-start;
	flex-wrap: wrap;
	border: 1px solid black;
}
flex-end
flex-end:交叉轴的终点对齐。
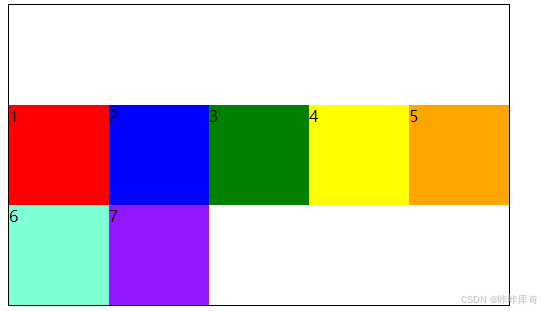
.box{
	width: 500px;
	height: 300px;
	display: flex;
	align-content: flex-end;
	flex-wrap: wrap;
	border: 1px solid black;
}
center
center:交叉轴的中点对齐。
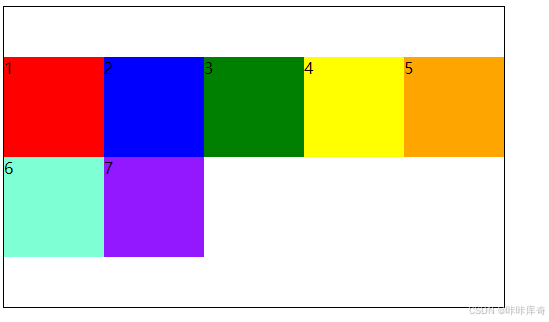
.box{
	width: 500px;
	height: 300px;
	display: flex;
	align-content: center;
	flex-wrap: wrap;
	border: 1px solid black;
}
space-between
space-between:交叉轴两端对齐之间间隔平分。
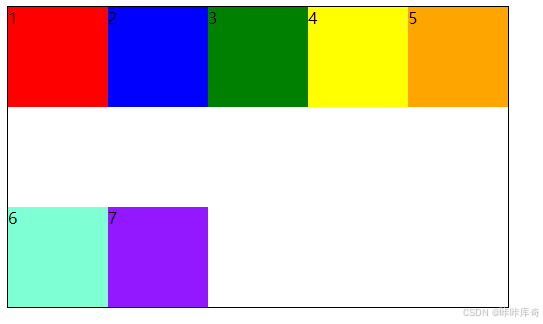
.box{
	width: 500px;
	height: 300px;
	display: flex;
	align-content: space-between;
	flex-wrap: wrap;
	border: 1px solid black;
}
space-around
space-around:元素两侧的间距相同,元素之间的间距比两侧的间距大一倍。
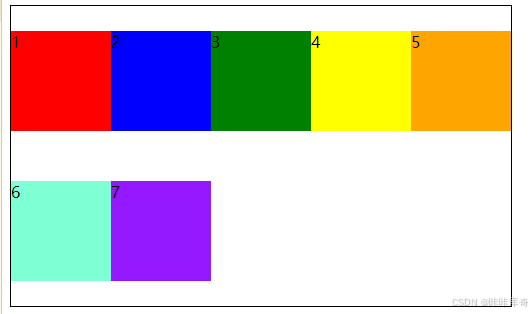
.box{
	width: 500px;
	height: 300px;
	display: flex;
	align-content: space-around;
	flex-wrap: wrap;
	border: 1px solid black;
}
stretch
stretch:默认值,轴线占满整个交叉轴。
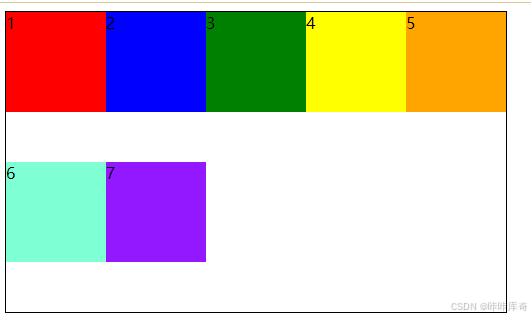
.box{
	width: 500px;
	height: 300px;
	display: flex;
	align-content: stretch;
	flex-wrap: wrap;
	border: 1px solid black;
}
space-evenly
space-evenly:在交叉轴上平均分配空间。
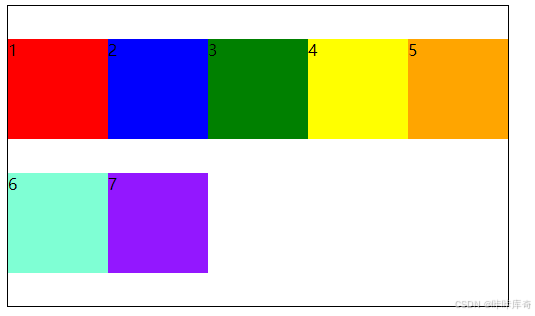
.box{
	width: 500px;
	height: 300px;
	display: flex;
	align-content: space-evenly;
	flex-wrap: wrap;
	border: 1px solid black;
}
align-self
允许单个弹性子元素有与其他子元素不同的对齐方式,可覆盖align-items属性。
auto
auto:默认值,表示继承父容器的align-items属性。如果没有父元素,则等同于stretch
其他值(如flex-start、flex-end、center、baseline、stretch)与align-items相同。
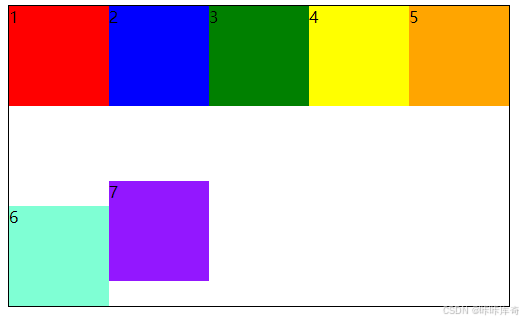
.box{
	width: 500px;
	height: 300px;
	display: flex;
	align-items: flex-start;
	flex-wrap: wrap;
	border: 1px solid black;
}
/*6号盒子靠底部*/
.b6 {
    align-self: flex-end;
    width: 100px;
    height: 100px;
    background-color: aquamarine;
}
/*7号盒子单行居中*/
.b7 {
    align-self: center;
    width: 100px;
    height: 100px;
    background-color: #9317ff;
}
order
order:设置弹性子元素的排列顺序(数值越小,排列越靠前;默认为0)。
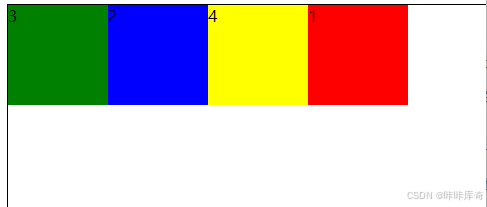
.box{
	width: 500px;
	height: 300px;
	display: flex;
	align-content: stretch;
	flex-wrap: wrap;
	border: 1px solid black;
}

.b1 {
	width: 100px;
	height: 100px;
	background-color: red;
	order: 3;
}

.b2 {
	width: 100px;
	height: 100px;
	background-color: blue;
	order: 1;
}

.b3 {
	width: 100px;
	height: 100px;
	background-color: green;
	order: 0;
}
.b4 {
	width: 100px;
	height: 100px;
	background-color: yellow;
	order: 2;
}
flex-grow
flex-grow:定义弹性子元素的伸展系数(默认值为0,即如果存在剩余空间,也不伸展)。
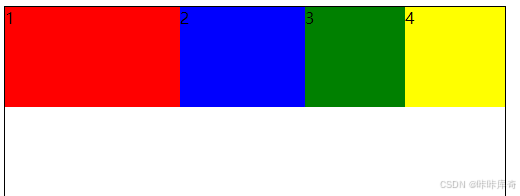
.box{
	width: 500px;
	height: 300px;
	display: flex;
	align-content: stretch;
	flex-wrap: wrap;
	border: 1px solid black;
}

.b1 {
	width: 100px;
	height: 100px;
	background-color: red;
	flex-grow: 3;
}

.b2 {
	width: 100px;
	height: 100px;
	background-color: blue;
	flex-grow: 1;
}

.b3 {
	width: 100px;
	height: 100px;
	background-color: green;
}
.b4 {
	width: 100px;
	height: 100px;
	background-color: yellow;
}
flex-shrink
flex-shrink:定义了弹性子元素的收缩系数(默认值为1,即如果空间不足,该项目将等比例缩小)。
flex-basis
flex-basis:定义弹性子元素在主轴上的基础长度(默认值auto,即项目的本来大小)。
该属性可以单独使用,也可以与flex-grow和flex-shrink一起使用,简写为flex属性(如flex: 1 1 auto)。
0.4.弹性盒子的使用场景
响应式布局:弹性盒子可以根据容器的大小和内容的变化自动调整布局,使得页面在不同的屏幕尺寸和设备上都能够适应。
复杂的布局:弹性盒子提供了多种对齐和分布元素的方式,可以方便地实现复杂的布局。
简化代码:与浮动布局相比,弹性布局减少了代码量和复杂度,提高了可读性和可维护性。
一、动画
1.1.动画序列与关键帧
1.@keyframes:
定义动画的关键帧,通过指定0%到100%之间的百分比来定义动画的各个阶段
在每个关键帧中,可以设置元素的样式属性,如位置、大小、颜色等。
/* 创建关键帧动画 动画名字叫one */
@keyframes one {
  /* 从什么到什么 */
  /* 0% */
  from {}
  /* 100% */
  to {}
}
1.2.动画属性详解
1.animation-name:
指定要应用于元素的动画名称,该名称必须与@keyframes中定义的动画名称相匹配
2.animation-duration
定义动画的持续时间,即动画从开始到结束所需要的时间。
单位可以是秒或毫秒(ms)
3.animation-timing-function:
控制动画的缓冲行为,即动画的速度曲线
属性值:ease(逐渐慢下来)、linear(匀速)、ease-in(加速)、ease-out(减速)等,还可以使用cubic-bezier函数指定以速度曲线
4.animation-delay:
指定动画开始前的延迟时间
单位:m或者ms
5.animation-iteration-count:
指定动画应该播放的次数
属性值:数字表示播放次数,infinite表示无限次播放
6.animation-direction:
指定动画的播放方向。
属性值:normal(正常)、reverse(反向)、alternate(奇数次正向播放,偶数次反向播放)等。
7.animation-fill-mode:
定义动画在开始或结束时元素的状态。
属性值:none(不改变元素状态)、forwards(动画结束时保持最后一帧的状态)、backwards(动画开始前保持第一帧的状态)等。
8.animation-play-state:
控制动画的播放状态。
属性值:running(播放)和paused(暂停)。
1.3.动画简写
上述动画属性可简写为一个属性
animation: name duration timing-function delay iteration-count direction fill-mode;
1.4.使用动画库
<link rel="stylesheet" href="https://cdnjs.cloudflare.com/ajax/libs/animate.css/4.1.1/animate.min.css" />
<link rel="stylesheet" href="./iconfont.css">
<style>
  h1 {
    animation-iteration-count: infinite;
  }
</style>
<h1 class="animate__animated animate_bounce">我是动画库</h1>
<!-- animate_ _animated基础类名-->
<!-- animate_bounce动画效果-->
1.5.动画事件
使用JavaScript可以监听动画的开始(animationstart)、结束(animationend)、迭代(animationiteration)等事件。
例:
html文件
<!DOCTYPE html>
<html lang="en">
<head>
    <meta charset="UTF-8">
    <meta name="viewport" content="width=device-width, initial-scale=1.0">
    <title>Animation Events</title>
    <style>
        .animated-box {
            width: 100px;
            height: 100px;
            background-color: red;
            position: relative;
            animation: moveBox 2s infinite;
        }

        @keyframes moveBox {
            0% { left: 0; }
            50% { left: 200px; }
            100% { left: 0; }
        }
    </style>
</head>
<body>
    <div class="animated-box" id="box"></div>

    <script src="script.js"></script>
</body>
</html>
js文件
// 获取动画元素
const box = document.getElementById('box');

// 监听动画开始事件
box.addEventListener('animationstart', function(event) {
    console.log('Animation started:', event.animationName);
    // 可以在这里添加额外的逻辑,比如改变背景颜色
    box.style.backgroundColor = 'blue';
});

// 监听动画结束事件
box.addEventListener('animationend', function(event) {
    console.log('Animation ended:', event.animationName);
    // 可以在这里添加额外的逻辑,比如重置背景颜色
    box.style.backgroundColor = 'red';
});

// 监听动画迭代事件
box.addEventListener('animationiteration', function(event) {
    console.log('Animation iterated:', event.animationName, 'Iteration count:', event.iterationCount);
    // 可以在这里添加额外的逻辑,比如改变透明度
    box.style.opacity = '0.5';
    // 可以设置一个延时来恢复透明度,避免一直半透明
    setTimeout(() => {
        box.style.opacity = '1';
    }, 100); // 延时100毫秒
});
二、CSS3 3D转换
CSS3的3D转换属性允许开发者对网页元素进行3D空间中的移动、旋转、缩放等操作。
2.1. 3D变换函数
translate3d(tx, ty, tz):在3D空间中移动元素。
rotate3d(x, y, z, angle):围绕3D空间中的某个轴旋转元素。
scale3d(sx, sy, sz):在3D空间中缩放元素。
perspective(d):为3D元素添加透视效果,使元素看起来更加立体。通常应用于父元素。
transform-style:控制子元素是否开启三维立体环境,如flat(默认,不开启3D立体空间)、preserve-3d(开启3D立体空间)。
2.2. 3D变换与动画结合
可以将3D变换与动画属性结合使用,创建复杂的3D动画效果。
例如,使用rotate3d和animation属性创建一个旋转的3D立方体。
<!DOCTYPE html>
<html lang="en">
<head>
<meta charset="UTF-8">
<meta name="viewport" content="width=device-width, initial-scale=1.0">
<title>3D Cube Animation</title>
<style>
  body {
    margin: 0;
    perspective: 1000px; /* 为整个场景添加透视效果 */
    display: flex;
    justify-content: center;
    align-items: center;
    height: 100vh;
    background-color: #f0f0f0;
  }
  .scene {
    width: 200px;
    height: 200px;
    position: relative;
    transform-style: preserve-3d; /* 开启3D立体空间 */
    animation: rotateCube 5s infinite linear; /* 应用旋转动画 */
  }
  .cube {
    width: 100%;
    height: 100%;
    position: absolute;
    transform-style: preserve-3d; /* 开启3D立体空间 */
  }
  .face {
    position: absolute;
    width: 200px;
    height: 200px;
    background: rgba(255, 255, 255, 0.9);
    border: 1px solid #ccc;
    box-sizing: border-box;
    font-size: 20px;
    font-weight: bold;
    color: #333;
    text-align: center;
    line-height: 200px;
    user-select: none; /* 禁止用户选择文本 */
  }
  .front  { transform: translateZ(100px); } /* 前面 */
  .back   { transform: rotateY(180deg) translateZ(100px); } /* 后面 */
  .right  { transform: rotateY(90deg) translateZ(100px); } /* 右面 */
  .left   { transform: rotateY(-90deg) translateZ(100px); } /* 左面 */
  .top    { transform: rotateX(90deg) translateZ(100px); } /* 上面 */
  .bottom { transform: rotateX(-90deg) translateZ(100px); } /* 下面 */

  @keyframes rotateCube {
    from { transform: rotateX(0deg) rotateY(0deg); } /* 动画开始时的状态 */
    to   { transform: rotateX(360deg) rotateY(360deg); } /* 动画结束时的状态 */
  }
</style>
</head>
<body>
<div class="scene">
  <div class="cube">
    <div class="face front">Front</div>
    <div class="face back">Back</div>
    <div class="face right">Right</div>
    <div class="face left">Left</div>
    <div class="face top">Top</div>
    <div class="face bottom">Bottom</div>
  </div>
</div>
</body>
</html>
2.3. 3D变换的浏览器兼容性
大多数现代浏览器都支持CSS3的3D变换,但为了确保兼容性,最好检查并测试在不同浏览器上的表现。
解决方案
1.使用css前缀
可以针对不同浏览器添加相应的CSS前缀(例如-moz-、-ms-、-webkit-等)。
2.使用JavaScript库:
可以使用一些JavaScript库(如Three.js、Babylon.js等)来实现跨浏览器的3D变换效果。
这些库封装了底层的浏览器兼容性处理,简化了开发过程,并提供了丰富的3D图形功能。
3.检测浏览器支持:
通过JavaScript代码检测浏览器是否支持CSS3的3D变换属性。
如果浏览器不支持3D变换,则提供替代方案或降级处理,以确保用户体验的连续性。
4.考虑使用其他技术:
如果3D变换效果在特定浏览器中无法实现,开发者可以考虑使用其他技术来实现相似的效果。
例如,可以使用SVG、Canvas等技术来绘制和渲染3D图形。
三、calc函数在动画中的应用
calc()函数允许开发者在CSS中执行一些计算,以动态地设置元素的属性。在动画中,calc()函数可以用于计算元素的位移、大小等属性,从而创建更复杂的动画效果。
1、基本用法:
calc()函数支持四则运算和混合单位,如百分比、px、em等。
在使用calc()函数时,需要注意运算符两侧的空格要求。
2、在动画中的应用:
可以使用calc()函数来计算元素的位移量,以实现更平滑的动画过渡效果。
例如,可以使用calc(50% - 50px)来设置一个元素相对于其父元素宽度的一半再减去50px的位置。
注意:- + * / 四种运算的运算符两边必须有空格,不然不执行
感恩家人们点点赞


![简单实现QT对象的[json]序列化与反序列化](https://i-blog.csdnimg.cn/direct/a471c3bca6934b36b2edb7b662d6f128.gif)
