前言
本文会以Qwen2-0.5B模型为例,从使用者的角度,从零开始一步一步的探索语言模型的推理过程。主要内容如下:
- 从使用的角度来接触模型
- 本地运行的方式来认识模型
- 以文本生成过程来理解模型
- 以内部窥探的方式来解剖模型
1. 模型前台使用
1.1 可视化UI的方式使用模型
大部分用户接触大语言模型都是从一个聊天框开始,用户输入一个问题,AI输出一个回答,如下所示。

1.2 使用openai库来访问模型
如果是编程人员使用模型,则会编写程序通过开放API来访问模型,以便将模型能力集成到自己的程序中,最常见的就是用openai库。
from openai import OpenAI

def predict(prompt):
    client = OpenAI(api_key="0",base_url="http://127.0.0.1:8000/v1")
    messages = [{"role": "user", "content": prompt}]
    result = client.chat.completions.create(messages=messages, model="Qwen2-0.5B-Instruct")
    return result.choices[0].message.content

predict("详细介绍下你自己。")
上述代码执行后的输出:
'我是阿里云研发的超大规模语言模型,我叫通义千问。'
上面的client.chat.completions.create方法调用本质上是发送了类似下面一个请求。
!curl -s http://127.0.0.1:8000/v1/chat/completions \
    -H "Content-Type: application/json" \
    -d '{ \
        "model": "Qwen2-0.5B-Instruct",\
        "messages": [{"role": "user", "content": "详细介绍下你自己。"}],\
        "max_tokens": 512,\
        "temperature": 0.7  \
    }' | jq
- models: 表示要访问的模型名称;
- messages: 要发送的提示语,格式需要遵循相应模型的提示词模板,不同模型提示词模型可能不同;
- max_tokens:最大输出token数量;
- temperature: 温度参数,控制着token选取的随机性,取值范围0-2,值越小越固定,越大越随机。
注:最后用管道符
|连接的jq命令,作用是将输出内容进行json格式化。
这个http请求的原始输出如下:
{
  "id": "chat-373150f974fd4367b53632817ed44cbc",
  "object": "chat.completion",
  "created": 1730414253,
  "model": "Qwen2-0.5B-Instruct",
  "choices": [
    {
      "index": 0,
      "message": {
        "role": "assistant",
        "content": "我是阿里云开发的一款超大规模语言模型,我叫通义千问。",
        "tool_calls": []
      },
      "logprobs": null,
      "finish_reason": "stop",
      "stop_reason": null
    }
  ],
  "usage": {
    "prompt_tokens": 23,
    "total_tokens": 41,
    "completion_tokens": 18
  },
  "prompt_logprobs": null
}
上面是OpenAI接口的完整response,在聊天窗口中显示的推理结果只是取了
response['choices'][0]['message']['content']。
相信通过上面的演示,我们已经了解如何在前端通过http接口来访问模型的能力。那这个http请求在服务器后台是怎么运行的呢?
2. 模型后台运行
模型的后台运行我们可以简单分为如下四步:
- 标准化提示语
- 序列化提示语
- 模型推理
- 反序列化为文本
但在处理我们从前端发送的请求之前,需要先加载模型。
2.1 加载模型
加载模型最基本的方式是使用 transformers 库,它是由 Hugging Face 开发的一个开源库,提供了很方便的方式来访问和使用各种自然语言处理(NLP)模型,也提供了便捷的API来微调和训练开源模型。
目前业界开源的语言模型基本都会发布到HuggingFace,也都支持transformers库来加载。huggingface上不仅提供模型、开发库,还提供数据集甚至算力。
先来看下要加载的模型文件。
!ls -l /data2/anti_fraud/models/modelscope/hub/Qwen/Qwen2-0___5B-Instruct
total 976188
-rw-rw-r-- 1 xiaoguanghua xiaoguanghua       659 Aug  1 18:26 config.json
-rw-rw-r-- 1 xiaoguanghua xiaoguanghua        48 Aug  1 18:26 configuration.json
-rw-rw-r-- 1 xiaoguanghua xiaoguanghua       242 Aug  1 18:26 generation_config.json
-rw-rw-r-- 1 xiaoguanghua xiaoguanghua     11344 Aug  1 18:26 LICENSE
-rw-rw-r-- 1 xiaoguanghua xiaoguanghua   1671839 Aug  1 18:26 merges.txt
-rw-rw-r-- 1 xiaoguanghua xiaoguanghua 988097824 Aug  1 18:31 model.safetensors
-rw-rw-r-- 1 xiaoguanghua xiaoguanghua      3551 Aug  1 18:31 README.md
-rw-rw-r-- 1 xiaoguanghua xiaoguanghua      1287 Aug  1 18:31 tokenizer_config.json
-rw-rw-r-- 1 xiaoguanghua xiaoguanghua   7028015 Aug  1 18:31 tokenizer.json
-rw-rw-r-- 1 xiaoguanghua xiaoguanghua   2776833 Aug  1 18:31 vocab.json
上面输出中的model.safetensors就是要加载的模型参数,约988MB,而
tokenizer.json、vocab.json、merges.txt则是分词器相关的词表和词条合并记录。
导入常用库,并加载模型和分词器。
import os
import torch
from transformers import AutoModelForCausalLM, AutoTokenizer

# 定义模型本地路径和要加载到的目标设备
device = "cuda:4"
model_path = "/data2/anti_fraud/models/modelscope/hub/Qwen/Qwen2-0___5B-Instruct"

model = AutoModelForCausalLM.from_pretrained(model_path, torch_dtype=torch.bfloat16).to(device)
tokenizer = AutoTokenizer.from_pretrained(model_path, use_fast=False, trust_remote_code=True)
-
AutoModelForCausalLM用于加载因果语言模型,“因果”的含义是指模型在生成新词时只依赖于之前生成的词,而不考虑未来的词。
-
AutoTokenizer用于加载分词器,它能根据模型路径自动加载词表。
2.2 标准化提示语
每个模型都有一套提示词模板,这个提示词模板是被模型训练过的,只要按这个模板来组织提示语,模型就能够有效识别并遵循你的指令。
prompt = "详细介绍下你自己。"
messages = [
    {"role": "system", "content": "You are a helpful assistant."},
    {"role": "user", "content": prompt}
]
# 将消息应用到标准模板,使结构一致
input_text = tokenizer.apply_chat_template(
    messages,
    tokenize=False,
    add_generation_prompt=True,
)
print(f"{input_text}")
上面messages中的json格式是面向应用侧的提示语模板,经过模型的标准化处理后变为:
    <|im_start|>system
    You are a helpful assistant.<|im_end|>
    <|im_start|>user
    详细介绍下你自己。<|im_end|>
    <|im_start|>assistant
可以看到,应用聊天模板后的变化,就是把json格式的分隔符替换成了一套特殊的<|im_start|>和<|im_end|>标记,用于标记一段完整文本的开始和结束。
为什么不使用原先的json分隔符,而要单独定义一套标记作为分隔符呢?
如果拿json中的这些符号
{}、[]、"去标记文本的开始和结束,就会和json格式中的这些符号的原本定义冲突,相当于一符多义。而<|im_start|>和<|im_end|>这类特殊标记因为不常用,所以区分度更好,更适合用来标记文本的开始和结束。
2.3 提示语序列化
序列化就是用分词器把人类输入的文本转换为语言模型可以处理的数字。
tokenizer内置的__call__方法就可以实现序列化,它支持的是对多个文本进行批量处理,因此传参使用数组。
model_inputs = tokenizer([input_text], return_tensors="pt").to(device)
print(f"{model_inputs}")
{'input_ids': tensor([[151644,   8948,    198,   2610,    525,    264,  10950,  17847,     13,
         151645,    198, 151644,    872,    198, 113511,  16872, 107828,   1773,
         151645,    198, 151644,  77091,    198]], device='cuda:4'), 'attention_mask': tensor([[1, 1, 1, 1, 1, 1, 1, 1, 1, 1, 1, 1, 1, 1, 1, 1, 1, 1, 1, 1, 1, 1, 1]],
       device='cuda:4')}
-
return_tensors=‘pt’表示以pytorch张量的形式返回,并通过’.to(device)'来将数据移动到指定的GPU设备上,便于后续计算。
-
attention_mask主要用于批量预测场景,用于计算注意力时屏蔽填充token。
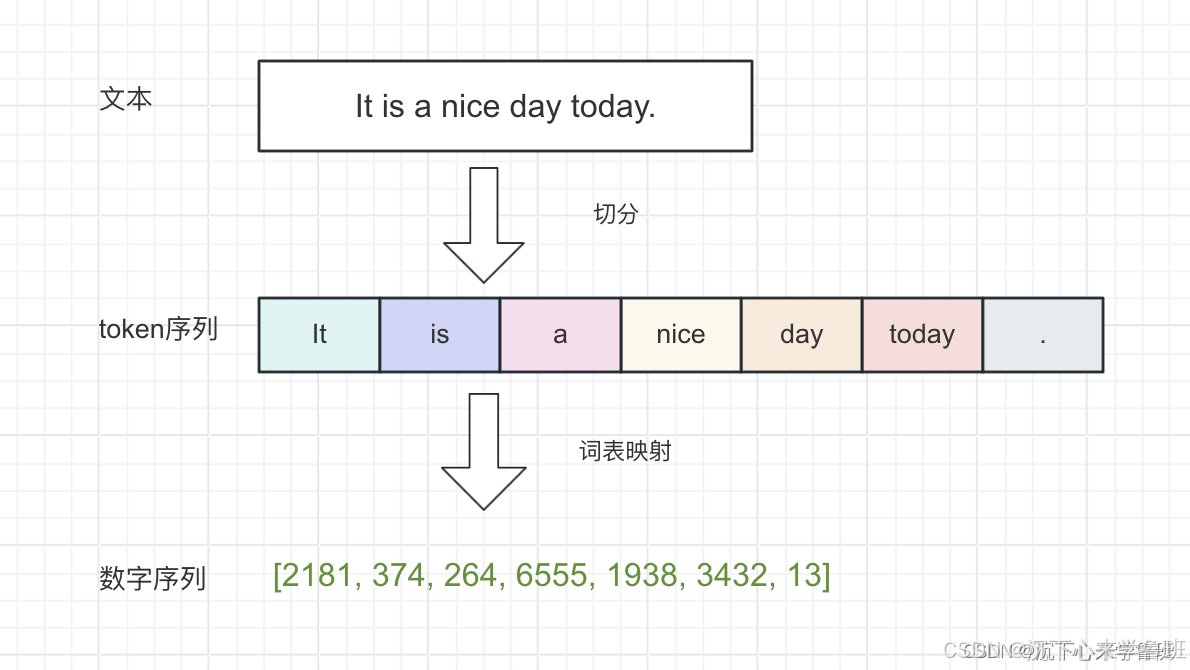
序列化的过程可以简单理解为:先将文本切分成一个词列表(即token序列),再通过词表映射将词转换为数字ID,这个数字ID可以理解成词在词表中的唯一编号(如下图所示)。
2.4 模型推理
model.generate函数用于对一个输入的序列进行推理,并输出预测的新序列。
response_ids = model.generate(
    model_inputs.input_ids,
    max_new_tokens=512,
)
print(f"response_ids: {response_ids}")
response_ids: tensor([[151644,   8948,    198,   2610,    525,    264,  10950,  17847,     13,
         151645,    198, 151644,    872,    198, 113511,  16872, 107828,   1773,
         151645,    198, 151644,  77091,    198, 104198, 101919, 102661,  99718,
         104197, 100176, 102064, 104949,   3837,  35946,  99882,  31935,  64559,
          99320,  56007,   1773, 151645]], device='cuda:4')
推理的结果是一串数字,表示模型预测出的token ID序列,我们需要将其转换为文本,才能供人类阅读。
2.5 反序列化为文本
反序列化操作与上面提示语序列化正好相反,目的是将计算机认识的token ID转换为人类能理解的文本。
上面的推理结果中,前半部分151644, 8948, 198, 2610, 525, 264, 10950, 17847, 13, 151645, 198, 151644, 872, 198, 113511, 16872, 107828, 1773, 151645, 198, 151644, 77091, 198 为原始的输入序列,后面才是真正的输出序列。因此,在反序列化之前,需要先通过切片操作得到真正的输出序列。
response_ids = [
    output_ids[len(input_ids):] for input_ids, output_ids in zip(model_inputs.input_ids, response_ids)
]
print(f"response_ids: {response_ids}")
response_text = tokenizer.batch_decode(response_ids, skip_special_tokens=True)[0]
print(f"{response_text}")
response_ids: [tensor([104198, 101919, 102661,  99718, 104197, 100176, 102064, 104949,   3837,
         35946,  99882,  31935,  64559,  99320,  56007,   1773, 151645],
       device='cuda:4')]
我是来自阿里云的大规模语言模型,我叫通义千问。
模型的输出结果中会包含特殊token(例如:<|im_end|>),需要通过skip_special_tokens=False过滤,只保留真正有效的文本。
上面是模型生成文本的一个过程,从结果看起来模型一次性就生成了整个序列,但真的是这样吗?
3. model.generate探究
实际上model.generate并不是pytorch的标准API,而是为了方便调用而高度封装过的,model.forward才是pytorch模型标准调用方法。
PyTorch 是Facebook开发一个深度学习框架,它相比于Tensorflow来说更加容易学习和上手,其发展速度已经超过了Tensorflow。
3.1 手动模拟
我们尝试还原一下model.generate方法的运行过程。
先定义最终的序列,初始值为输入序列。
generate_ids = model_inputs.input_ids
定义一个函数generate_next_token,作用是预测一个token。
def generate_next_token(model, generate_ids, temperature=0.7, debug=False):
    print("input_ids:", generate_ids) if debug else None
    logits = model.forward(generate_ids).logits
    print("logits: ", logits) if debug else None

    if temperature > 0:
        probs = torch.softmax(logits[:, -1] / temperature, dim = -1)
        print("probs: ", len(probs[0]), probs) if debug else None
        next_token = torch.multinomial(probs[-1], num_samples=1)  # 按照概率采样得到下一个token
    else:
        next_token = torch.argmax(logits[:, -1], dim=-1)

    print("next_id: ", next_token, ", token: ", tokenizer.decode(next_token)) if debug else None
    return next_token.reshape(-1, 1)
model.forward是为了执行矩阵运算,得到未归一化的概率。torch.softmax是为了得到归一化的概率(所有可能值的概率之和为1),logits[:, -1]表示取三维张量的第二维最后一列,即最后一个token的张量,用于预测下一个token。temperature在这里起到的作用是:温度越高(大于1),概率分布越平滑,温度越低(小于1),概率分布越尖锐。torch.multinomial:按照概率大小进行随机加权采样,num_samples=1表示只采样一个值作为结果返回。
next_token = generate_next_token(model, generate_ids, debug=True)
generate_ids = torch.cat((generate_ids, next_token), dim=1)
tokenizer.batch_decode(generate_ids[:, len(model_inputs.input_ids[0]):], skip_special_tokens=True)[0]
上面这段代码每运行一次,就会生成一个新的next_token,并把新生成的next_token追加到generate_ids的末尾,下一次运行时会作为新的输入序列。
    input_ids: tensor([[151644,   8948,    198,   2610,    525,    264,  10950,  17847,     13,
             151645,    198, 151644,    872,    198, 113511,  16872, 107828,   1773,
             151645,    198, 151644,  77091,    198, 104198, 101919]],
           device='cuda:4')
    logits:  tensor([[[ 2.4219,  2.6250,  2.9531,  ..., -3.3281, -3.3281, -3.3281],
             [ 0.5938,  1.8359,  3.6250,  ..., -4.5000, -4.5000, -4.5000],
             [ 8.0625,  4.5938, 10.8125,  ..., -3.4531, -3.4531, -3.4531],
             ...,
             [ 6.0312, 10.1250,  5.4062,  ..., -3.4062, -3.3906, -3.3906],
             [ 2.5781,  6.5000,  3.3906,  ..., -5.1562, -5.1562, -5.1562],
             [ 2.0781,  6.0938,  3.8438,  ..., -5.9062, -5.8750, -5.8750]]],
           device='cuda:4', grad_fn=<ToCopyBackward0>)
    probs:  151936 tensor([[5.4616e-10, 1.6931e-07, 6.8037e-09,  ..., 6.0764e-15, 6.3538e-15,
             6.3538e-15]], device='cuda:4', grad_fn=<SoftmaxBackward0>)
    next_id:  tensor([102661], device='cuda:4') , token:  阿里

     '我是来自阿里'
通过打印的中间结果可以理解next_token的生成过程。
- input_ids:是我们的输入序列,它会不断更新,上面示例中最后的
104198, 101919就是新生成后追加到末尾的两个token我是和来自。 - logits: 是模型对下一个token_id的预测,有151396(词表长度)种可能,元素值表示每个token的可能值大小。
- probs:logtis的概率化表示,所有可能性总和为1。
- next_id: 根据概率大小采样得到的下一个token。
torch.cat是用于将下一个token追加到序列的末尾,作为新的上下文重新输入给模型。
通过generate_next_token产生一个新token后,需要将这个token追加到输入序列的结尾,继续预测下一个token,等预测出来后,还是继续追加到输入序列的结尾……如此循环,来逐步生成一个完整的序列。
3.2 自动化
将上面一次次手动运行的过程,写成一个循环,一次性输出整个序列。
import time
max_new_tokens = 128
end_token_id = 151645
generate_ids = model_inputs.input_ids

for _ in range(max_new_tokens):
    next_token = generate_next_token(model, generate_ids, debug=False)
    generate_ids = torch.cat((generate_ids, next_token), dim=1)
    if next_token.item() == end_token_id:
        break
    print(tokenizer.decode(next_token[0], skip_special_tokens=False), end='')
    time.sleep(0.1)
运行上述代码,就能输出完整的序列,看起来就和model.generate函数的效果是一样。
作为一个人工智能,我是一个计算机程序,没有情感、意识或身体,因此我无法有自己的思想、感情或身体。我被设计为帮助用户解答问题、提供信息和完成任务。我每天都会不断学习和更新,以便更好地服务用户。
像上面这样,每生成一个token,都追加到上下文的末尾,作为新的输入序列来预测下一个token这种生成方式,就叫自回归解码。自回归的过程类似下图所示:
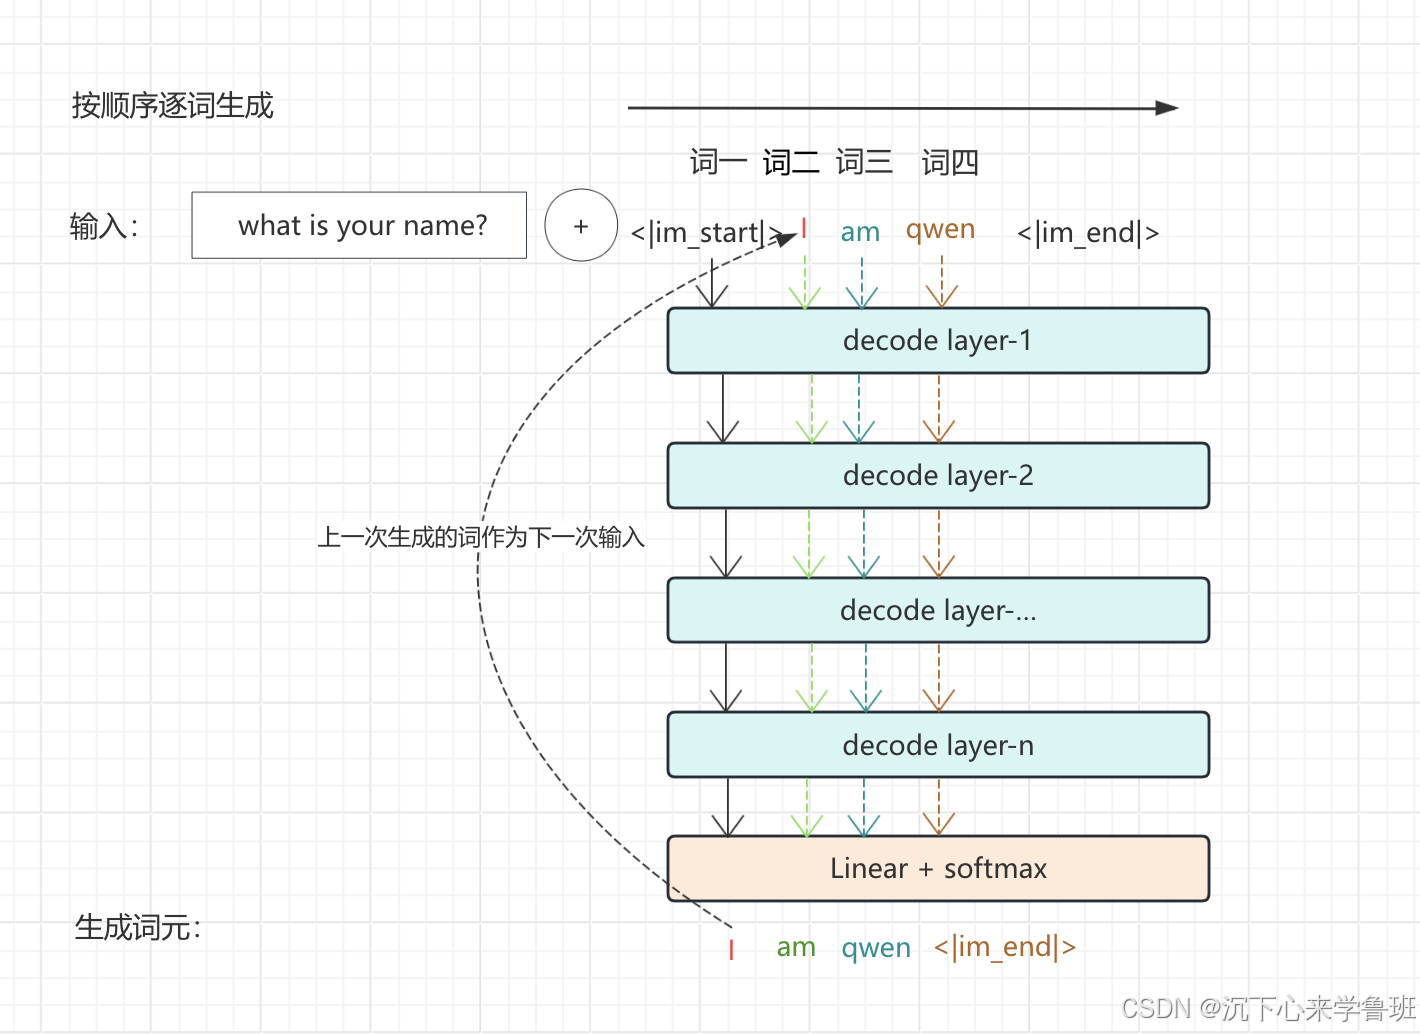
采用自回归解码的模型被称为因果语言模型,这类模型预测下一个token只依赖前面的token,也是上面
AutoModelForCausalLM这个名字的由来。
4. model内部探究
4.1 主体结构
上面的推理过程是将模型对象作为一个整体来调用的,下面来看下模型的内部结构。
print(model)
Qwen2ForCausalLM(
  (model): Qwen2Model(
    (embed_tokens): Embedding(151936, 896)
    (layers): ModuleList(
      (0-23): 24 x Qwen2DecoderLayer(
        (self_attn): Qwen2SdpaAttention(
          (q_proj): Linear(in_features=896, out_features=896, bias=True)
          (k_proj): Linear(in_features=896, out_features=128, bias=True)
          (v_proj): Linear(in_features=896, out_features=128, bias=True)
          (o_proj): Linear(in_features=896, out_features=896, bias=False)
          (rotary_emb): Qwen2RotaryEmbedding()
        )
        (mlp): Qwen2MLP(
          (gate_proj): Linear(in_features=896, out_features=4864, bias=False)
          (up_proj): Linear(in_features=896, out_features=4864, bias=False)
          (down_proj): Linear(in_features=4864, out_features=896, bias=False)
          (act_fn): SiLU()
        )
        (input_layernorm): Qwen2RMSNorm()
        (post_attention_layernorm): Qwen2RMSNorm()
      )
    )
    (norm): Qwen2RMSNorm()
  )
  (lm_head): Linear(in_features=896, out_features=151936, bias=False)
)
- embed_tokens: 嵌入层,每个token嵌入到896维的向量空间。
- self_attn:自注意力层,用以捕获每个token在上下文中的含义,由q、k、v、o 四个线性层组成。
- mlp: 前馈神经网络层,通过维度缩放来捕获更丰富的信息和不同层次的抽象特征。
- layers: 多层解码器堆叠而成,每层解码器都由一个attention和一个mlp组成。
4.2 模型参数
通过上面的模型结构可以估算模型参数量。
Attention+MLP参数量估算:
- W(q)参数量 = 896 × 896 + 896 = 803712
- W(k)参数量 = 896 × 128 + 128 = 115584
- W(v)参数量 = 896 × 128 + 128 = 115584
- W(o)参数量 = 896 × 896 = 802816
- W(gate)参数量 = 896 × 4864 = 4358144
- W(up)参数量 = 896 × 4864 = 4358144
- W(down)参数量 = 4864 × 896 = 4358144
DecoderLayer参数量估算
- W(DecoderLayer) = W(q) + W(k) + W(v) + W(o) + W(gate) + W(up) + W(down) = 14911928
- W(lm_head)参数量 = 896 × 151936 = 136134656
每生成一个token,都要进行24层的解码器运算,每层解码器都要有14911928个参数进行运算,所以语言模型的推理功能对GPU运算的消耗是巨大的。
模型总参数量估算:
- W(model) = W(Decoderlayer) * 24 + W(lm_head) = 357886272 + 136134656 = 494020928
通过上面的计算,模型的总参数量大概为494M,即4.94亿参数量,与模型上标注的0.5B(5亿)参数量非常接近。
通过model.state_dict()可以获得整个模型的状态,即所有的权重参数。并能进一步查看每一层的具体参数值,如下示例。
params = model.state_dict()
params['model.layers.0.self_attn.q_proj.weight']
    tensor([[-0.0024, -0.0156,  0.0229,  ..., -0.0079, -0.0128,  0.0023],
            [ 0.0200,  0.0100, -0.0208,  ...,  0.0234,  0.0090, -0.0013],
            [-0.0151, -0.0035,  0.0219,  ..., -0.0092, -0.0283,  0.0043],
            ...,
            [-0.0415, -0.0522, -0.0233,  ...,  0.0427, -0.0374,  0.0063],
            [-0.0398, -0.0284, -0.0083,  ...,  0.0378, -0.0408, -0.0204],
            [ 0.0491, -0.0129,  0.0015,  ..., -0.0439,  0.0197,  0.0352]],
           device='cuda:4', dtype=torch.bfloat16)
小结:本文以使用模型作为起点,由前台到后台,由外及里,逐层解开模型生成文本的整个过程,目的是让学习者快速理解生成式语言模型的生成文本原理。在这个过程中,我们详细讨论了文本生成的细节,并提供了可操作的代码块,以方便感兴趣的同学自己动手尝试。
相关阅读
- 复现LLM:带你从零训练tokenizer




![CSP/信奥赛C++刷题训练:经典例题 - 栈(2):洛谷P1981 :[NOIP2013 普及组] 表达式求值](https://i-blog.csdnimg.cn/direct/f89c03d1fa7140cd87a41e8cead94e91.png#pic_center)




![[ Linux 命令基础 7 ] Linux 命令详解-磁盘管理相关命令](https://i-blog.csdnimg.cn/direct/7d6662bba48d47388d63ee52225e8016.png)


