课程介绍
本次课属于【大模型本地部署应用】,基于Chinese-LLaMA-Alpaca-3(GitHub - ymcui/Chinese-LLaMA-Alpaca-3: 中文羊驼大模型三期项目 (Chinese Llama-3 LLMs) developed from Meta Llama 3)项目,介绍如何封装一个私有的兼容openai api的大模型接口,并使用ChatGPTNextWeb开源工具调用此接口。
(1) 在前述课程,我们了解了多机多卡微调、本地调用国外/国内大模型API以及对训练好的模型进行部署推理;
(2) 本次课程,主要侧重大模型本地部署及应用,对已经开源的发布的大模型进行本地私有化部署,不需要接入公网,保障数据传输安全,在局域网内部署即可上线应用。以llama3-8b模型为例,仿openai发布接口进行对话问答系统发布,完成实战,部署完之后的应用完全不依赖互联网,直接在内网环境下应用。
(3)本地部署的客户端多操作系统适用,windows/macos,都可以用来做本次的实验。
计算端部署在同一局域网内的带显卡的机器上或者cpu计算也可,看大家的硬件选择,无显卡也可以做实验,但需要内存(保底24G)较大。
云平台用来训练、微调等,本地部署的实验需要用大家自己的机器。
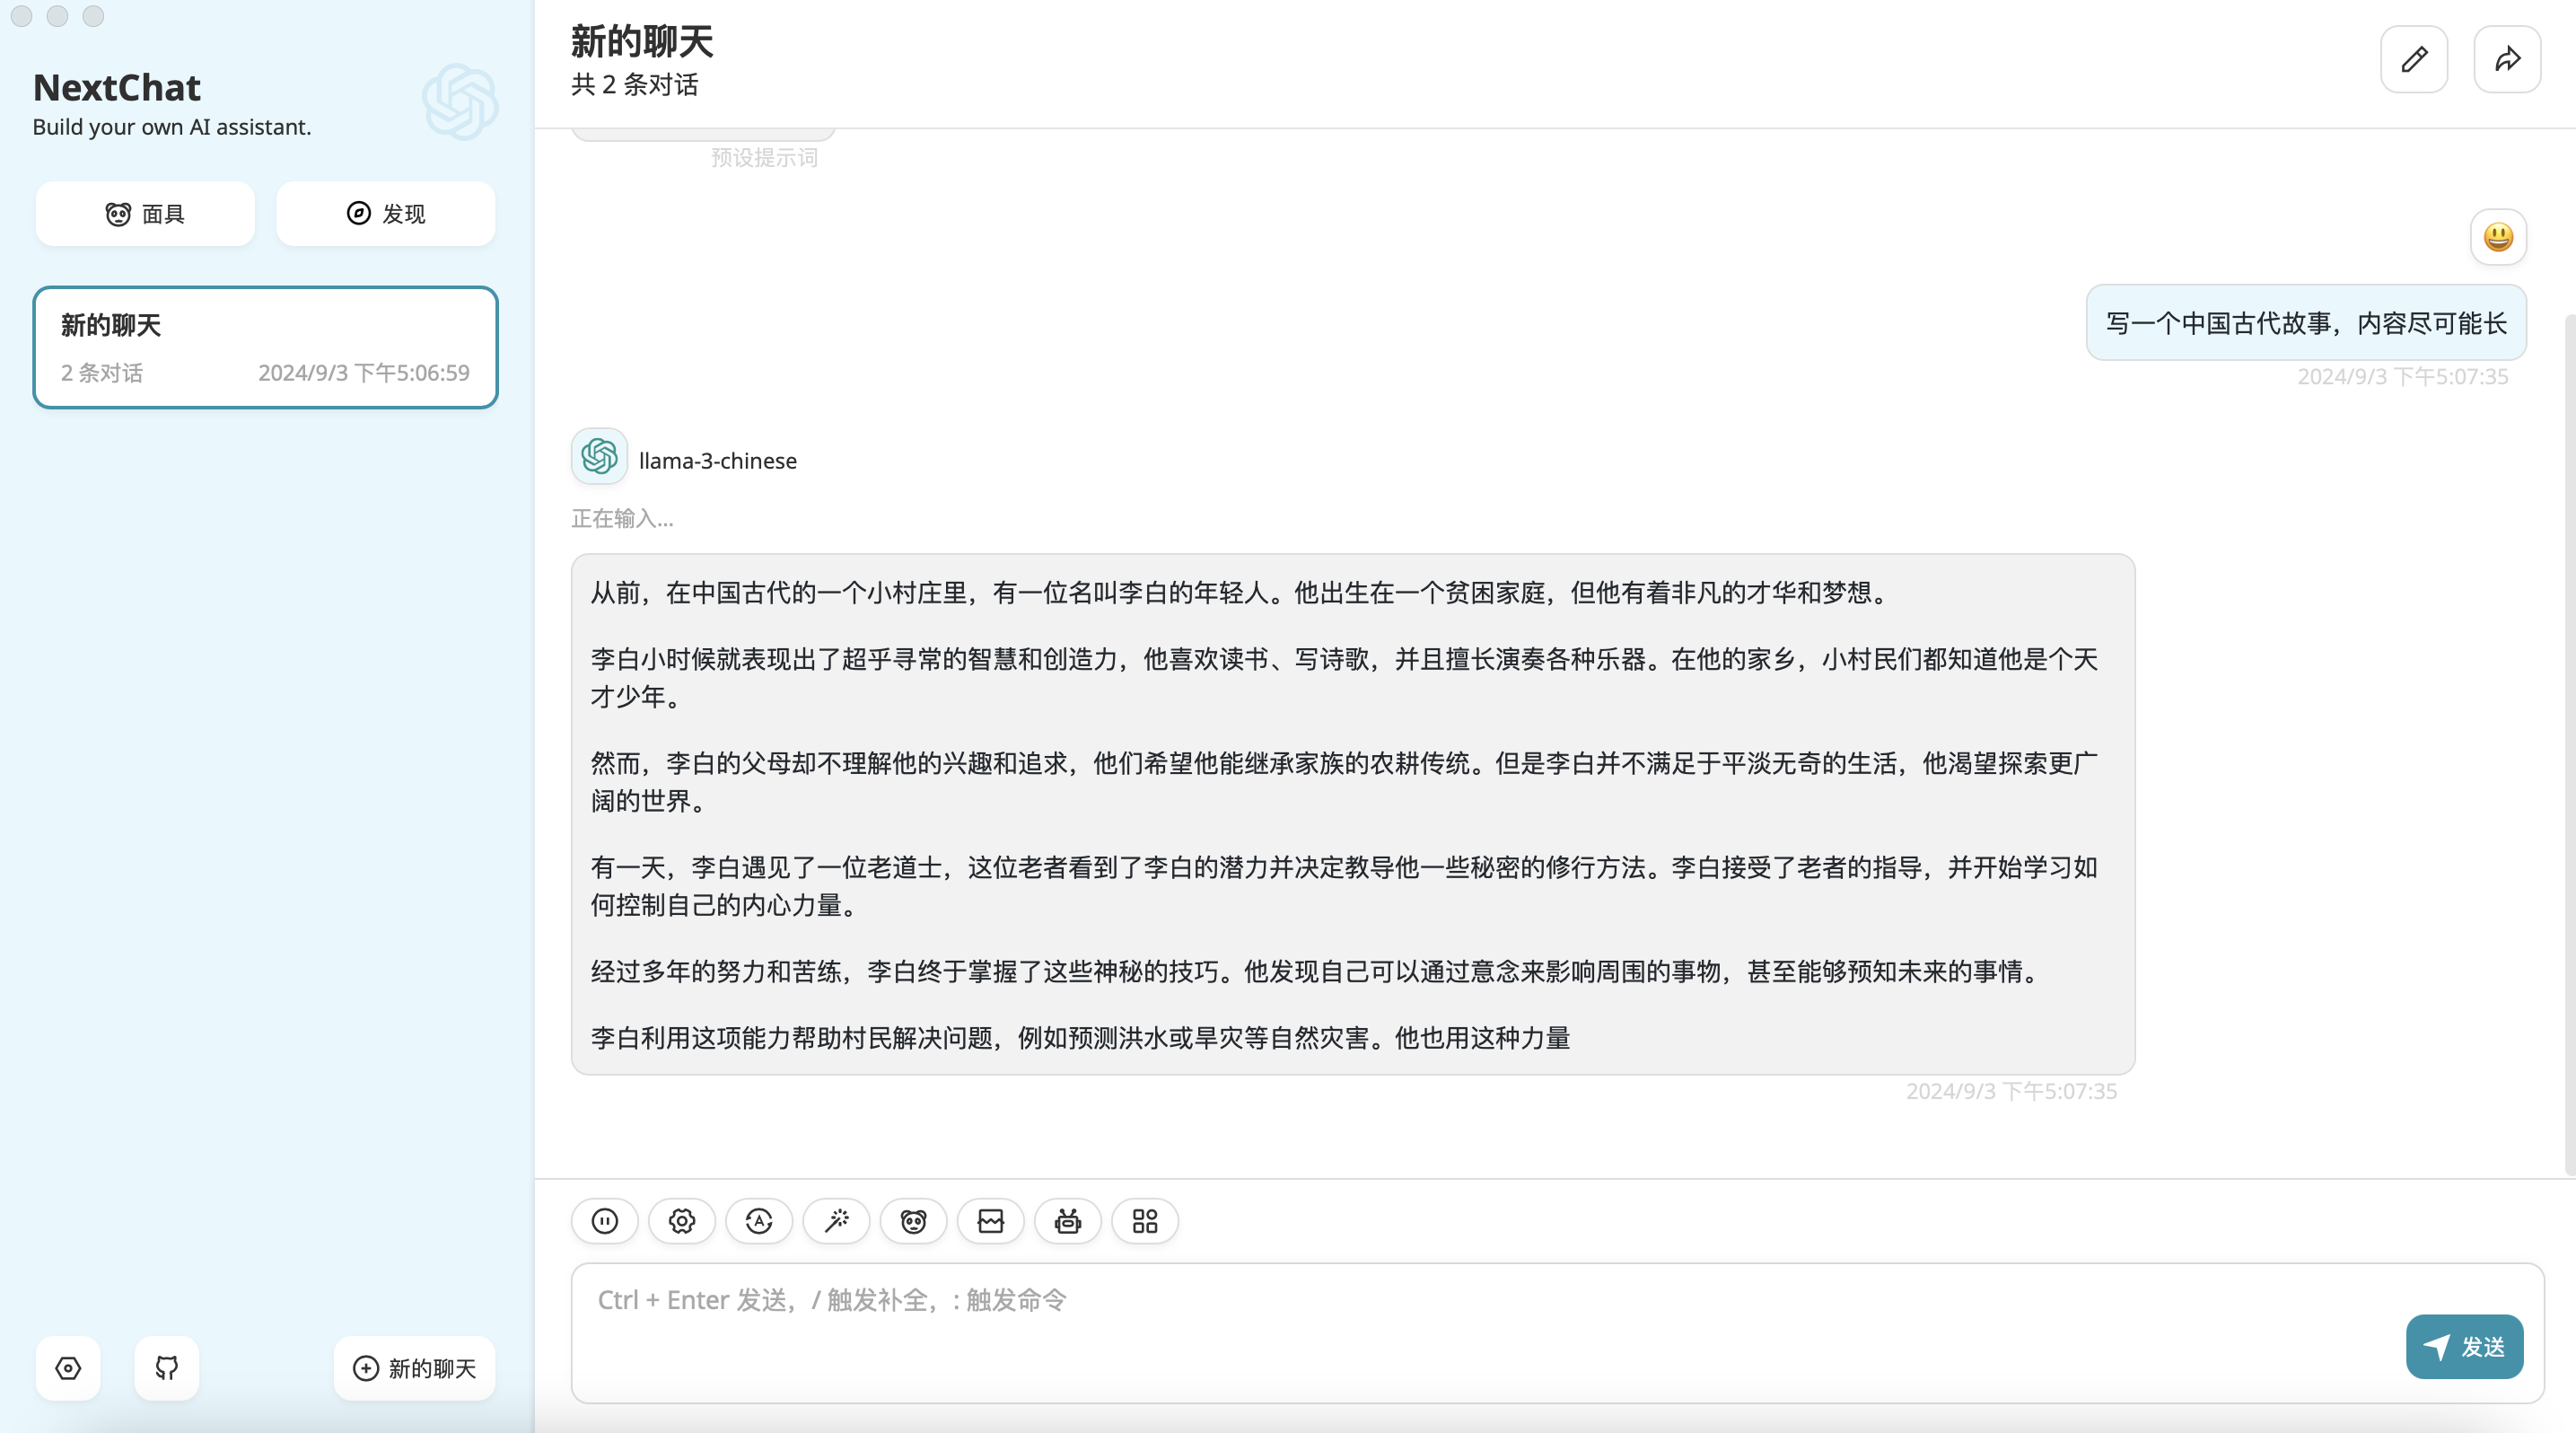
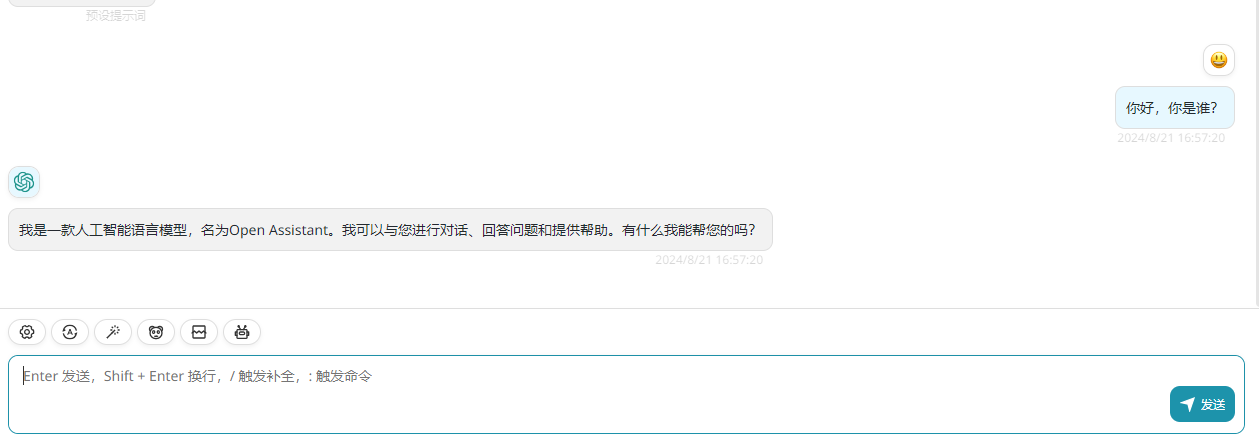
llama3-8b仿openai发布的应用效果演示,本次实验,我们搭建了客户端进行演示:
实验环境
本文的基础环境如下
操作系统:ubuntu20.04
CUDA:12.2
英伟达显卡驱动版本:535.183.01
显卡型号:本实验用英伟达3090(全模型(未开量化)需要单张显存大于20GB的英伟达显卡;
**开量化之后的模型可以使用11GB显存的英伟达显卡,基本市面上大部分消费级显卡可以满足实验要求,
大家根据自己的显卡进行选择实验)
本文默认您在操作系统的用户名为:llm_course,如果您使用的是其他用户名,请更改涉及到用户名的地址。
下载源码
取出从 https://download.csdn.net/download/fanghailiang2016/89846332 下载的压缩包中的 Chinese-LLaMA-Alpaca-3-3.0.tar.gz 文件
tar -xvf Chinese-LLaMA-Alpaca-3-3.0.tar.gz本教程使用的是3.0版本
安装miniconda
我们将使用miniconda发行版python进行后续开发,如果您已经安装miniconda或者conda,可以跳过该章节。
cd ~/ && wget https://repo.anaconda.com/miniconda/Miniconda3-py38_23.5.2-0-Linux-x86_64.sh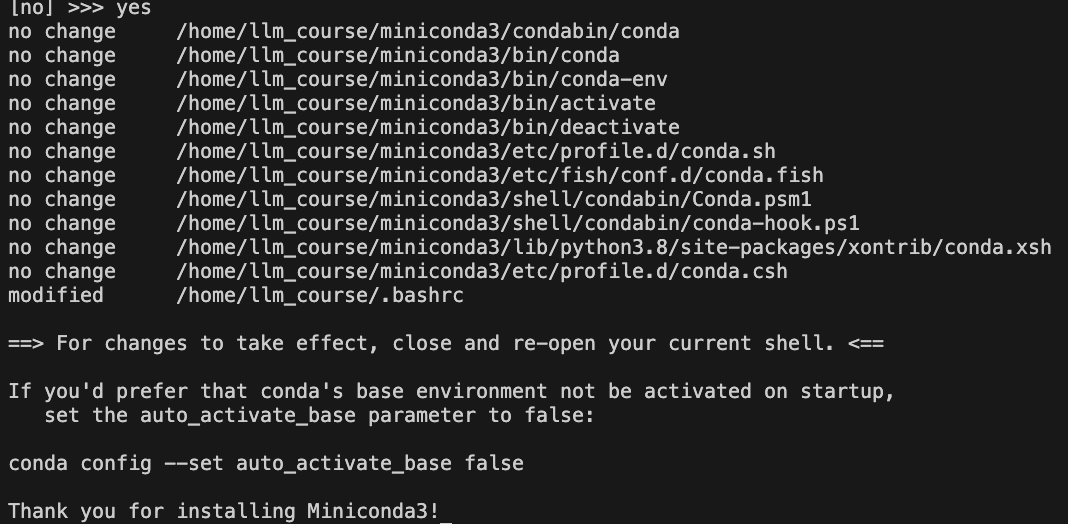
bash Miniconda3-py38_23.5.2-0-Linux-x86_64.sh输入上述命令后,一直按回车,直到出现下面的内容:

输入yes,然后,按回车,当出现下面的内容:

输入yes,当出现下面的内容时,代表安装完毕:
创建虚拟环境
关闭刚才的终端,然后重新打开终端,连入服务器,创建一个虚拟环境,用于后续开发(什么是conda虚拟环境?):
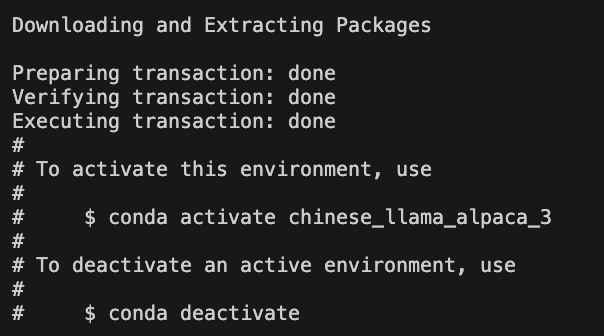
conda create -n chinese_llama_alpaca_3 python=3.8.17 pip -y出现下面的信息,代表虚拟环境安装完毕:
模型下载
我们通过modelscope下载基座模型。首先激活刚才创建的虚拟环境:conda activate chinese_llama_alpaca_3,然后通过下面命令安装modelscope核心组件:pip install modelscope -i https://mirrors.aliyun.com/pypi/simple
直接使用命令下载
使用下面命令下载模型:
conda activate chinese_llama_alpaca_3
pip install modelscope -i https://mirrors.aliyun.com/pypi/simple
modelscope download --model ChineseAlpacaGroup/llama-3-chinese-8b-instruct-v3
模型较大,可能需要下载30分钟-60分钟,在此期间不要断开与服务器的连接。
基于screen下载
由于模型较大,可能需要下载30分钟-60分钟,如果在此期间,你与服务器之间的ssh链接断开了,整个下载就中断了,所以我们推荐你使用screen的方式(什么是screen?)下载,命令如下:
screen -R model_download
conda activate chinese_llama_alpaca_3
pip install modelscope -i https://mirrors.aliyun.com/pypi/simple
modelscope download --model ChineseAlpacaGroup/llama-3-chinese-8b-instruct-v3如果在操作过程中断开了服务器连接,可以使用screen -r model_download恢复操作窗口。
模型存储位置
使用modelscope下载完毕后,模型会存储在如下位置:~/.cache/modelscope/hub/ChineseAlpacaGroup/llama-3-chinese-8b-instruct-v3,正常情况下,可以看到如下内容:
ls -alhrt ~/.cache/modelscope/hub/ChineseAlpacaGroup/llama-3-chinese-8b-instruct-v3
开源版openai接口启动
中文llama3的开源版本实现在以下目录:/home/llm_course/Chinese-LLaMA-Alpaca-3-3.0/scripts/oai_api_demo,下面分别是GPU和CPU版本的启动流程
推理脚本BUG修复
在启动GPU或者CPU版本的仿openai接口(stream流式方式,类似openai打字机回复效果)脚本之前,我们需要修复一个bug,打开/home/llm_course/Chinese-LLaMA-Alpaca-3-3.0/scripts/oai_api_demo/openai_api_server.py文件,找到如下内容:
def stream_predict(
    input,
    max_new_tokens=1024,
    top_p=0.9,
    temperature=0.2,
    top_k=40,
    num_beams=4,
    repetition_penalty=1.1,
    do_sample=True,
    model_id="llama-3-chinese",
    **kwargs,
):
    choice_data = ChatCompletionResponseStreamChoice(
        index=0, delta=DeltaMessage(role="assistant"), finish_reason=None
    )
    chunk = ChatCompletionResponse(
        model=model_id,
        choices=[choice_data],
        object="chat.completion.chunk",
    )
    yield "{}".format(chunk.json(exclude_unset=True, ensure_ascii=False))

    if isinstance(input, str):
        prompt = generate_completion_prompt(input)
    else:
        prompt = generate_chat_prompt(input)
    inputs = tokenizer(prompt, return_tensors="pt")
    input_ids = inputs["input_ids"].to(device)
    generation_config = GenerationConfig(
        temperature=temperature,
        top_p=top_p,
        top_k=top_k,
        num_beams=num_beams,
        do_sample=do_sample,
        **kwargs,
    )

    streamer = TextIteratorStreamer(tokenizer, skip_prompt=True, skip_special_tokens=True)
    generation_kwargs = dict(
        streamer=streamer,
        input_ids=input_ids,
        generation_config=generation_config,
        return_dict_in_generate=True,
        output_scores=False,
        max_new_tokens=max_new_tokens,
        repetition_penalty=float(repetition_penalty)
)将generation_kwargs改为如下值:
generation_kwargs = dict(
    streamer=streamer,
    input_ids=input_ids,
    generation_config=generation_config,
    return_dict_in_generate=True,
    output_scores=False,
    max_new_tokens=max_new_tokens,
    repetition_penalty=float(repetition_penalty),
    pad_token_id=tokenizer.eos_token_id, # 新添加的参数
    eos_token_id=[tokenizer.eos_token_id, tokenizer.convert_tokens_to_ids("<|eot_id|>")] # 新添加的参数
)
加入上面的参数主要是为了兼容llama3特有的停止token,不然流式接口返回的内容会不断的自动重复,不停止。
GPU版本
备份脚本
使用如下命令备份/home/llm_course/Chinese-LLaMA-Alpaca-3-3.0/requirements.txt文件:
mv /home/llm_course/Chinese-LLaMA-Alpaca-3-3.0/requirements.txt /home/llm_course/Chinese-LLaMA-Alpaca-3-3.0/requirements.bk.txt安装依赖
通过如下命令创建新的requirements.txt
cat <<EOF > /home/llm_course/Chinese-LLaMA-Alpaca-3-3.0/requirements.txt
accelerate==0.30.0
aiohttp==3.9.5
aiosignal==1.3.1
annotated-types==0.6.0
anyio==4.3.0
async-timeout==4.0.3
attrs==23.2.0
bitsandbytes==0.43.1
certifi==2024.2.2
charset-normalizer==3.3.2
click==8.1.7
datasets==2.20.0
deepspeed==0.13.1
dill==0.3.7
dnspython==2.6.1
einops==0.8.0
email_validator==2.1.1
exceptiongroup==1.2.1
fastapi==0.109.2
fastapi-cli==0.0.3
filelock==3.14.0
frozenlist==1.4.1
fsspec==2023.10.0
h11==0.14.0
hjson==3.1.0
httpcore==1.0.5
httptools==0.6.1
httpx==0.27.0
huggingface-hub==0.23.3
idna==3.7
Jinja2==3.1.4
joblib==1.4.2
markdown-it-py==3.0.0
MarkupSafe==2.1.5
mdurl==0.1.2
modelscope==1.17.1
mpmath==1.3.0
multidict==6.0.5
multiprocess==0.70.15
networkx==3.1
ninja==1.11.1.1
numpy==1.24.4
nvidia-cublas-cu12==12.1.3.1
nvidia-cuda-cupti-cu12==12.1.105
nvidia-cuda-nvrtc-cu12==12.1.105
nvidia-cuda-runtime-cu12==12.1.105
nvidia-cudnn-cu12==8.9.2.26
nvidia-cufft-cu12==11.0.2.54
nvidia-curand-cu12==10.3.2.106
nvidia-cusolver-cu12==11.4.5.107
nvidia-cusparse-cu12==12.1.0.106
nvidia-nccl-cu12==2.18.1
nvidia-nvjitlink-cu12==12.4.127
nvidia-nvtx-cu12==12.1.105
orjson==3.10.3
packaging==24.0
pandas==2.0.3
peft==0.7.1
psutil==5.9.8
py-cpuinfo==9.0.0
pyarrow==16.0.0
pyarrow-hotfix==0.6
pydantic==1.10.11
pydantic_core==2.18.2
Pygments==2.18.0
pynvml==11.5.0
python-dateutil==2.9.0.post0
python-decouple==3.8
python-dotenv==1.0.1
python-multipart==0.0.9
pytz==2024.1
PyYAML==6.0.1
regex==2024.4.28
requests==2.32.3
rich==13.7.1
safetensors==0.4.3
scikit-learn==1.3.2
scipy==1.10.1
shellingham==1.5.4
shortuuid==1.0.13
six==1.16.0
sniffio==1.3.1
sse-starlette==2.1.0
starlette==0.36.3
sympy==1.12
threadpoolctl==3.5.0
tokenizers==0.19.1
torch==2.1.2
tqdm==4.66.4
transformers==4.41.2
triton==2.1.0
typer==0.12.3
typing_extensions==4.11.0
tzdata==2024.1
ujson==5.9.0
urllib3==2.2.1
uvicorn==0.29.0
uvloop==0.19.0
watchfiles==0.21.0
websockets==12.0
xxhash==3.4.1
yarl==1.9.4
EOF
安装依赖:
pip install -r requirements.txt -i https://mirrors.aliyun.com/pypi/simple启动服务
通过如下命令启动服务:
python openai_api_server.py --gpus 0 --base_model /home/llm_course/.cache/modelscope/hub/ChineseAlpacaGroup/llama-3-chinese-8b-instruct-v3请注意--gpus后面的参数0,代表我们要使用第一块GPU卡运行大模型服务,如果您的机器只有一块卡,您需要将该参数始终设置为0,也就是--gpus 0
使用--load_in_8bit或者--load_in_4bit可以开启量化加载。
(***这一步,大家根据自己的显卡显存大小进行选择***)
测试效果
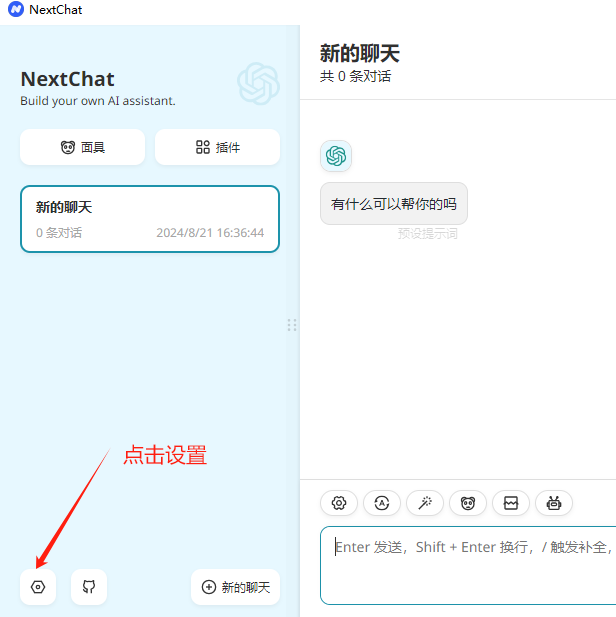
我们使用ChatGPTNextWeb工具测试我们的接口,如果您没有下载客户端,可以通过下面地址下载:
NextChat 文件在 https://download.csdn.net/download/fanghailiang2016/89846332 压缩包中,包含 windows 和 mac 版,根据需要使用
下载后,安装即可。下面开始设置接入我们刚才部署的大模型服务:


CPU版本
创建CPU版本专用虚拟环境
conda create -n chinese_llama_alpaca_3_cpu python=3.8.17 pip -y安装依赖
pip3 install torch==2.3.0 --index-url https://download.pytorch.org/whl/cpu
pip3 install fastapi==0.111.0 peft==0.7.1 pydantic==1.10.11 pydantic_core==2.18.2 shortuuid==1.0.13 sse-starlette==2.1.0 starlette==0.37.2 transformers==4.41.2 -i https://mirrors.aliyun.com/pypi/simple
启动服务
python openai_api_server.py --only_cpu --base_model /home/llm_course/.cache/modelscope/hub/ChineseAlpacaGroup/llama-3-chinese-8b-instruct-v3测试效果
可以使用GPU版本同样的方法测试即可。
常见问题
19327 端口冲突
启动脚本时,19327端口冲突,需要修改脚本。找到第394行,如下内容:
uvicorn.run(app, host="0.0.0.0", port=19327, workers=1, log_config=log_config)其中port=19327就是web服务启动的端口号,将19327改成其他数字即可。


![手机使用技巧:8 个 Android 锁屏移除工具 [解锁 Android]](https://i-blog.csdnimg.cn/direct/8b6411b466684cf9aa5f5e4964664740.png)


