目录
- 问题思考
- 课程目标
- Web Component
- 类型说明
- 定义组件
- 属性添加
- Shadow DOM
- Template and Slot
- Exparser 框架原理
- 自定义组件
- 内置组件
- 下周计划
问题思考
首先,给大家抛出去几个问题:
- 前端框架
VueReact都有自己的组件库,但是并不兼容,那么 不依赖框架能自定义组件吗? - 微信小程序开发的时候都会自定义组件是吧,那么调试控制台出现的
shadow-root是什么,有注意吗? - 微信小程序编写
wxml的时候,为什么和html语法不一致,多出来viewtext这些标签,里面究竟是如何实现的,彼此有什么关联?
课程目标
通过本节课程的学习,希望大家掌握如下的目标:
- 弄懂上述问题背后的执行逻辑
- 能够利用原生
Web Component自定义一个简易的组件
Web Component
使用自定义元素 - Web API | MDN
Web Component直译过来就是 web 组件的意思,就是说明离开了前端框架的帮助,我们依然可以用原生组件来进行开发复用。
类型说明

如同官网所说,继承特定元素类得到的组件是 自定义内置元素组件(可以得到特定类型的属性和方法),继承元素基类得到的组件是 独立自定义元素,本质上两种没什么区别,接下来我们重点就放在第二个上面。
定义组件
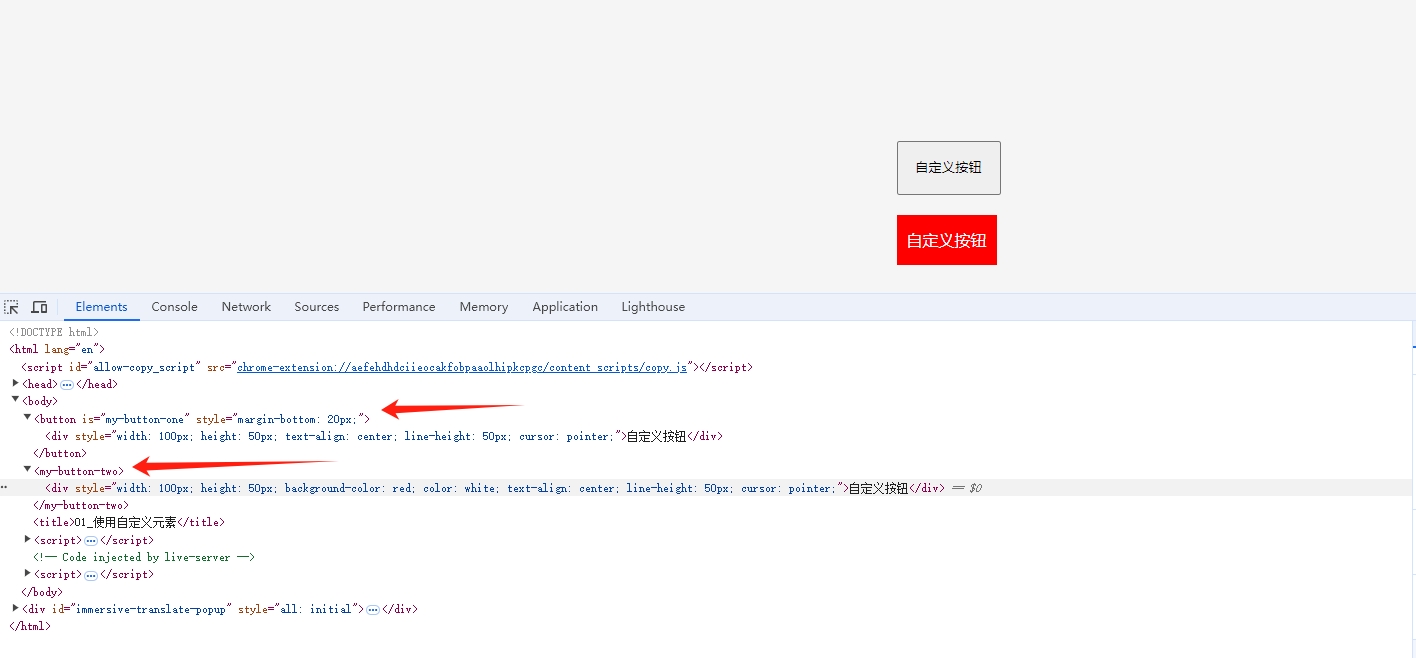
<button is="my-button-one">内置按钮</button>
<my-button-two></my-button-two>


// 01 定义一个内置元素的按钮
class MyButtonOne extends HTMLButtonElement {
  constructor() {
    self = super();
  }

  // 元素添加到文档调用
  connectedCallback() {
    // 1.创建一个 div
    const div = document.createElement("div");

    // 2.设置 div 的样式
    div.style.width = "100px";
    div.style.height = "50px";
    div.style.textAlign = "center";
    div.style.lineHeight = "50px";
    div.style.cursor = "pointer";
    self.style.marginBottom = "20px";

    // 3.设置 div 的内容
    div.innerHTML = "自定义按钮";

    // 4.将 div 添加到页面
    self.appendChild(div);
  }
}

// 02 定义一个自定义的按钮
class MyButtonTwo extends HTMLElement {
  constructor() {
    // 先调用父类构造器,实例化 HTMLElement ,这样才能有 html 元素的基本属性
    super();
  }

  // 元素添加到文档调用
  connectedCallback() {
    console.log("自定义元素添加到页面", this);

    // 1.创建一个 div
    const div = document.createElement("div");

    // 2.设置 div 的样式
    div.style.width = "100px";
    div.style.height = "50px";
    div.style.backgroundColor = "red";
    div.style.color = "white";
    div.style.textAlign = "center";
    div.style.lineHeight = "50px";
    div.style.cursor = "pointer";

    // 3.设置 div 的内容
    div.innerHTML = "自定义按钮";

    // 4.将 div 添加到页面
    this.appendChild(div);
  }

  // 元素从文档中移除时调用
  disconnectedCallback() {
    console.log("自定义元素从页面移除");
  }

  // 元素被移动到新文档时调用
  adoptedCallback() {
    console.log("自定义元素被移动到新文档");
  }

  // 监听属性变化
  attributeChangedCallback(name, oldValue, newValue) {
    console.log(`属性 ${name} 已由 ${oldValue} 变更为 ${newValue}`);
  }
}

// 组件注册
customElements.define("my-button-one", MyButtonOne, { extends: "button" });
customElements.define("my-button-two", MyButtonTwo);

// 监听组件状态
customElements.whenDefined("my-button-two").then(() => {
  console.log("my-button-two 组件已定义");
});
自定义组件的命名规则是有限制的:
- 自定义元素的名称,必须包含短横线(-)。它可以确保html解析器能够区分常规元素和自定义元素,还能确保html标记的兼容性。
- 自定义元素只能一次定义一个,一旦定义无法撤回。
- 自定义元素不能单标记封闭。比如
<custom-component />,必须写一对开闭标记。比如<custom-component></custom-component>。
上面两个就是最基本的自定义组件,但是这个也没有样式 class 属性传值 事件方法都没有,下面我们一步步加上。
属性添加
<!DOCTYPE html>
<html lang="en">
  <head>
    <meta charset="UTF-8" />
    <meta name="viewport" content="width=device-width, initial-scale=1.0" />
    <style>
      * {
        margin: 0;
        padding: 0;
      }

      body {
        width: 100px;
        margin: 200px auto;
        background-color: #f5f5f5;
      }

      .my-button-two {
        width: 180px;
        height: 50px;
        background-color: red;
        color: white;
        text-align: center;
        line-height: 50px;
        cursor: pointer;
      }
    </style>
    <my-button-two color="pink" text="Custom Component" @click="clickButton()"></my-button-two>
    <title>02_属性添加</title>
  </head>
  <body>
    <script>
      // 自定义方法
      const clickButton = () => {
        alert("点击了自定义按钮");
      };

      class MyButtonTwo extends HTMLElement {
        // 监控属性变化
        static observedAttributes = ["color", "text", "@click"];

        constructor() {
          // 先调用父类构造器,实例化 HTMLElement ,这样才能有 html 元素的基本属性
          super();
        }

        // 元素添加到文档调用
        connectedCallback() {
          // 1.创建一个 div
          const div = document.createElement("div");

          // 2.设置 div 的样式
          div.className = "my-button-two";

          // 3.设置 div 的内容
          const bgColor = this.getAttribute("color");
          const textValue = this.getAttribute("text");
          const clickValue = this.getAttribute("@click");

          // 需要在同一个 js 执行环境内部执行
          div.addEventListener("click", () => {
            eval(clickValue);
          });

          div.style.backgroundColor = bgColor;
          div.innerHTML = textValue;

          // 4.将 div 添加到页面
          this.appendChild(div);
        }

        // 元素从文档中移除时调用
        disconnectedCallback() {
          console.log("自定义元素从页面移除");
        }

        // 元素被移动到新文档时调用
        adoptedCallback() {
          console.log("自定义元素被移动到新文档");
        }

        // 监听属性变化
        attributeChangedCallback(name, oldValue, newValue) {
          console.log(`属性 ${name} 已由 ${oldValue} 变更为 ${newValue}`);
        }
      }

      customElements.define("my-button-two", MyButtonTwo);

      // 监听组件状态
      customElements.whenDefined("my-button-two").then(() => {
        console.log("my-button-two 组件已定义");
      });
    </script>
  </body>
</html>
对着调试控制台我们可以发现,当前 html 写的样式可以影响到组件内部,这并不符合我们之前说的组件和外部彼此 属性隔离 的特点,这就需要了解到下一个概念了。
Shadow DOM
使用影子 DOM - Web API | MDN
影子 DOM(Shadow DOM)允许你将一个 DOM 树附加到一个元素上,并且使该树的内部对于在页面中运行的 JavaScript 和 CSS 是隐藏的。

有一些 影子 DOM 术语 需要注意:
- 影子宿主(Shadow host):影子 DOM 附加到的常规 DOM 节点。
- 影子树(Shadow tree):影子 DOM 内部的 DOM 树。
- 影子边界(Shadow boundary):影子 DOM 终止,常规 DOM 开始的地方。
- 影子根(Shadow root):影子树的根节点。
这里的 影子宿主(Shadow host) 可以选取普通的 div 标签,但是由于我们是自定义元素,这里的 挂载节点 就是 自定义组件 Web Component 了,接下来我们举一个例子:
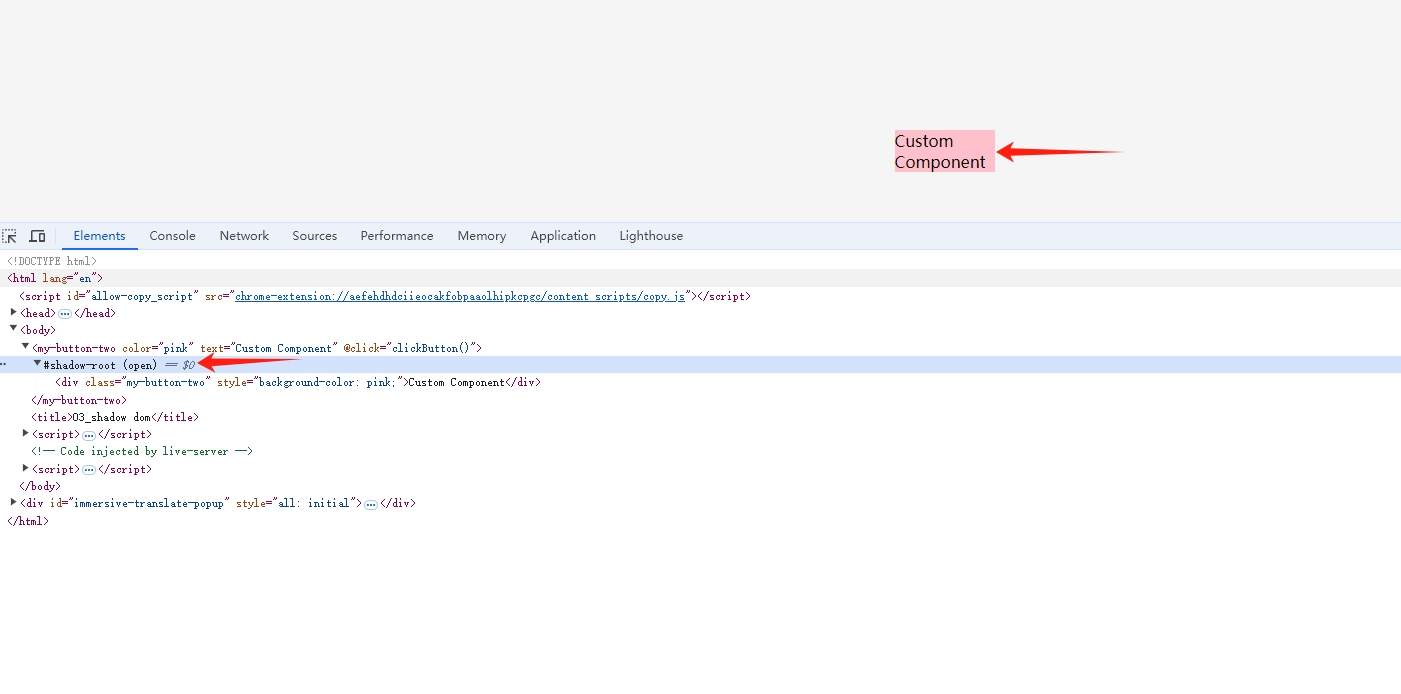
const shadow = this.attachShadow({ mode: "open" });


// 这里的 this 就是标识 自定义组件 DOM 元素
// mode 分为 open closed 表示能否通过 dom.shadowRoot 获取
// 不能获取的话,只能在内部通过 shadow 访问了
<!DOCTYPE html>
<html lang="en">
  <head>
    <meta charset="UTF-8" />
    <meta name="viewport" content="width=device-width, initial-scale=1.0" />
    <style>
      * {
        margin: 0;
        padding: 0;
      }

      body {
        width: 100px;
        margin: 200px auto;
        background-color: #f5f5f5;
      }

      .my-button-two {
        width: 180px;
        height: 50px;
        background-color: red;
        color: white;
        text-align: center;
        line-height: 50px;
        cursor: pointer;
      }
    </style>
    <my-button-two color="pink" text="Custom Component" @click="clickButton()"></my-button-two>
    <title>03_shadow dom</title>
  </head>
  <body>
    <script>
      // 自定义方法
      const clickButton = () => {
        alert("点击了自定义按钮");
      };

      class MyButtonTwo extends HTMLElement {
        // 监控属性变化
        static observedAttributes = ["color", "text", "@click"];

        constructor() {
          // 先调用父类构造器,实例化 HTMLElement ,这样才能有 html 元素的基本属性
          super();
        }

        // 元素添加到文档调用
        connectedCallback() {
          // 隔离 DOM
          const shadow = this.attachShadow({ mode: "open" });

          // 1.创建一个 div
          const div = document.createElement("div");

          // 2.设置 div 的样式
          div.className = "my-button-two";

          // 3.设置 div 的内容
          const bgColor = this.getAttribute("color");
          const textValue = this.getAttribute("text");
          const clickValue = this.getAttribute("@click");

          // 需要在同一个 js 执行环境内部执行
          div.addEventListener("click", () => {
            eval(clickValue);
          });

          div.style.backgroundColor = bgColor;
          div.innerHTML = textValue;

          // 4.将 div 添加到页面
          shadow.appendChild(div);
        }

        // 元素从文档中移除时调用
        disconnectedCallback() {
          console.log("自定义元素从页面移除");
        }

        // 元素被移动到新文档时调用
        adoptedCallback() {
          console.log("自定义元素被移动到新文档");
        }

        // 监听属性变化
        attributeChangedCallback(name, oldValue, newValue) {
          console.log(`属性 ${name} 已由 ${oldValue} 变更为 ${newValue}`);
        }
      }

      customElements.define("my-button-two", MyButtonTwo);

      // 监听组件状态
      customElements.whenDefined("my-button-two").then(() => {
        console.log("my-button-two 组件已定义");
      });
    </script>
  </body>
</html>
这里我们可以看到 文档的样式已经无法影响我们的自定义组件了,这是因为被 shadow 阻隔了,接下来就可以继续完善这段逻辑了。
Template and Slot
使用模板和插槽 - Web API | MDN
前端组件开发中有两套我们熟悉的 Template(模板)和 Slot(插槽),接下来就利用这两个功能继续完善一下我们的代码逻辑。
<!DOCTYPE html>
<html lang="en">
  <head>
    <meta charset="UTF-8" />
    <meta name="viewport" content="width=device-width, initial-scale=1.0" />
    <style>
      * {
        margin: 0;
        padding: 0;
      }

      body {
        width: 100px;
        margin: 200px auto;
        background-color: #f5f5f5;
      }

      .my-button-two {
        width: 180px;
        height: 50px;
        background-color: red;
        color: white;
        text-align: center;
        line-height: 50px;
        cursor: pointer;
      }
    </style>
    <template id="button-template">
      <style>
        .my-button-two {
          width: 180px;
          height: 50px;
          background-color: red;
          color: white;
          text-align: center;
          line-height: 50px;
          cursor: pointer;
        }
      </style>
      <div class="my-button-two">
        <slot name="text"></slot>
      </div>
    </template>
    <my-button-two id="my-button-two" color="pink" @click="clickButton()"
      ><span slot="text">Custom Component</span></my-button-two
    >
    <title>04_Tempalte and Slot</title>
  </head>
  <body>
    <script>
      // 自定义方法
      const clickButton = () => {
        alert("点击了自定义按钮");
      };

      class MyButtonTwo extends HTMLElement {
        // 监控属性变化
        static observedAttributes = ["color", "text", "@click"];

        constructor() {
          // 先调用父类构造器,实例化 HTMLElement ,这样才能有 html 元素的基本属性
          super();
        }

        // 元素添加到文档调用
        connectedCallback() {
          // 隔离 DOM
          const shadow = this.attachShadow({ mode: "closed" });

          // 1.获取模板
          const template = document.querySelector("#button-template");

          // 2.克隆模板
          const content = template.content.cloneNode(true);

          // 3.显示文本
          const clickValue = this.getAttribute("@click");

          // 4.执行函数
          const clickEvent = content.querySelector(".my-button-two");
          clickEvent.addEventListener("click", () => {
            eval(clickValue);
          });

          // 5.将 template 添加到页面
          shadow.appendChild(content);
        }

        // 元素从文档中移除时调用
        disconnectedCallback() {
          console.log("自定义元素从页面移除");
        }

        // 元素被移动到新文档时调用
        adoptedCallback() {
          console.log("自定义元素被移动到新文档");
        }

        // 监听属性变化
        attributeChangedCallback(name, oldValue, newValue) {
          console.log(`属性 ${name} 已由 ${oldValue} 变更为 ${newValue}`);
        }
      }

      customElements.define("my-button-two", MyButtonTwo);

      // 监听组件状态
      customElements.whenDefined("my-button-two").then(() => {
        console.log("my-button-two 组件已定义");
      });
    </script>
  </body>
</html>
艺龙酒店科技官网
举例 video 标签就是利用这套机制封装的…
Exparser 框架原理
Exparser 是微信小程序的组件组织框架,内置在小程序基础库中,为小程序提供各种各样的组件支撑。内置组件和自定义组件都有 Exparser 组织管理。
Exparser 的组件模型与 WebComponents 标准中的 Shadow DOM 高度相似,Exparser 会维护整个页面的节点树相关信息,包括节点的属性、事件绑定等,相当于一个简化版的 Shadow DOM 实现。Exparser 的主要特点包括以下几点:
- 基于 Shadow DOM 模型:模型上与
WebComponents的Shadow DOM高度相似,但不依赖浏览器的原生支持,也没有其他依赖库;实现时,还针对性地增加了其他 API 以支持小程序组件编程。 - 可在纯 JS 环境中运行:这意味着逻辑层也具有一定的组件树组织能力。
- 高效轻量:性能表现好,在组件实例极多的环境下表现尤其优异,同时代码尺寸也较小。
自定义组件

上图是小程序利用 shadow dom 实现 样式和JS 逻辑隔离的组件,这只是第一层,里面的 view text 也是由 Exparser 从普通 div span 封装得来的,接下来让我们深入了解下:
内置组件
接下来带大家一步步过一遍微信小程序内置组件是如何渲染的
// 1.在微信开发工具找到解析命令 wcc
// wcc 是将 wxml 解析为 js 文件,然后逻辑线程注入 webview 执行的
微信web开发者工具\code\package.nw\node_modules\wcc-exec

// 2.将命令文件移动到文件目录下,开始执行解析
./wcc -js index.wxml >> dom.js
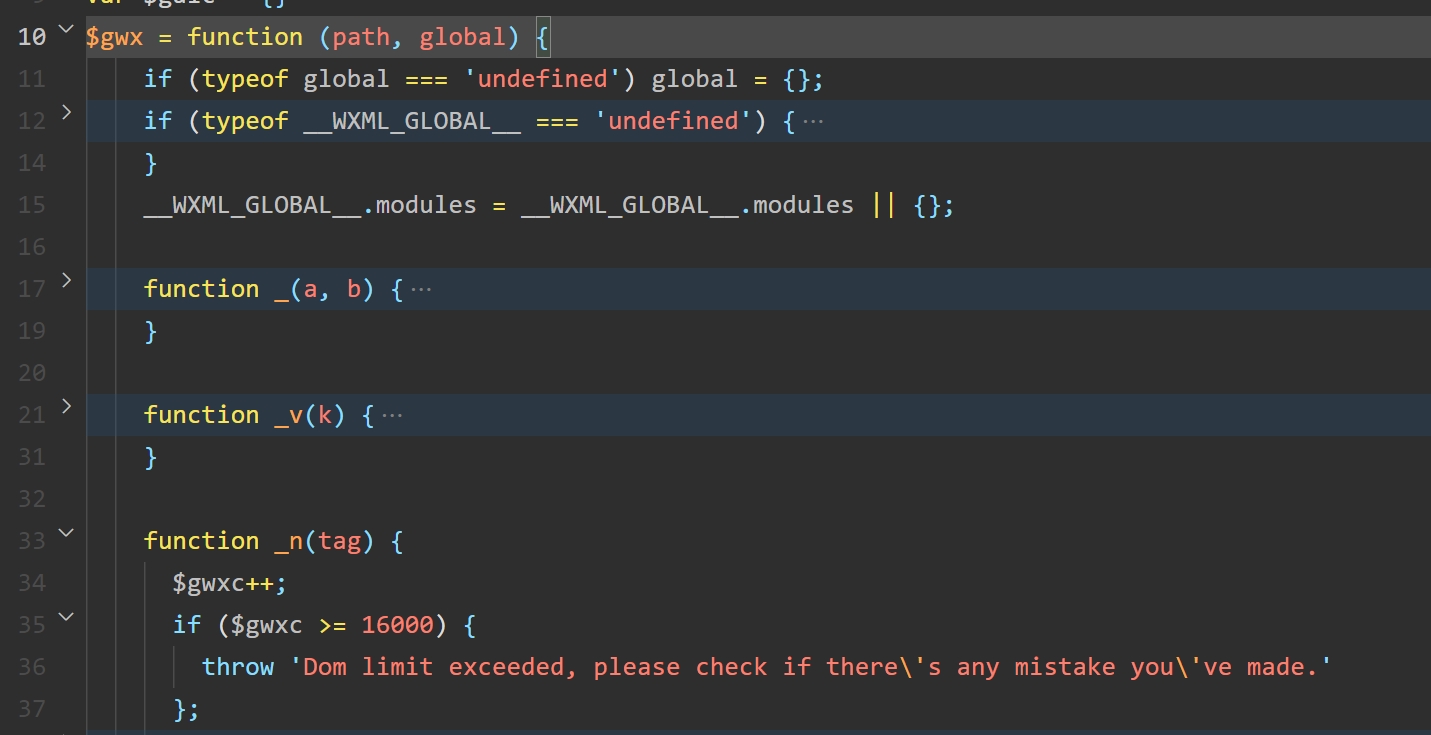
- 可以看到本质上就是一个封装好的 $gwx 函数,它的作用是生成微信自定义的组件和虚拟 dom 节点( diff 算法),用来给后面的 Exparser 生成真实的 DOM 节点
- 那这个函数是在哪里调用的呢,我们继续向下看
// 1. 调试控制台打开当前页面的 webview
document.getElementsByTagName('webview')
document.getElementsByTagName('webview')[0].showDevTools(true, null)

// 2. 可以发现编译后的 wxml 会利用 js 脚本以一定格式插入到页面中执行
var decodeName = decodeURI("./pages/command_component/index.wxml")
var generateFunc = $gwx(decodeName)

generateFunc()

// 3.传入数据
generateFunc({logs:[1,2,3]})

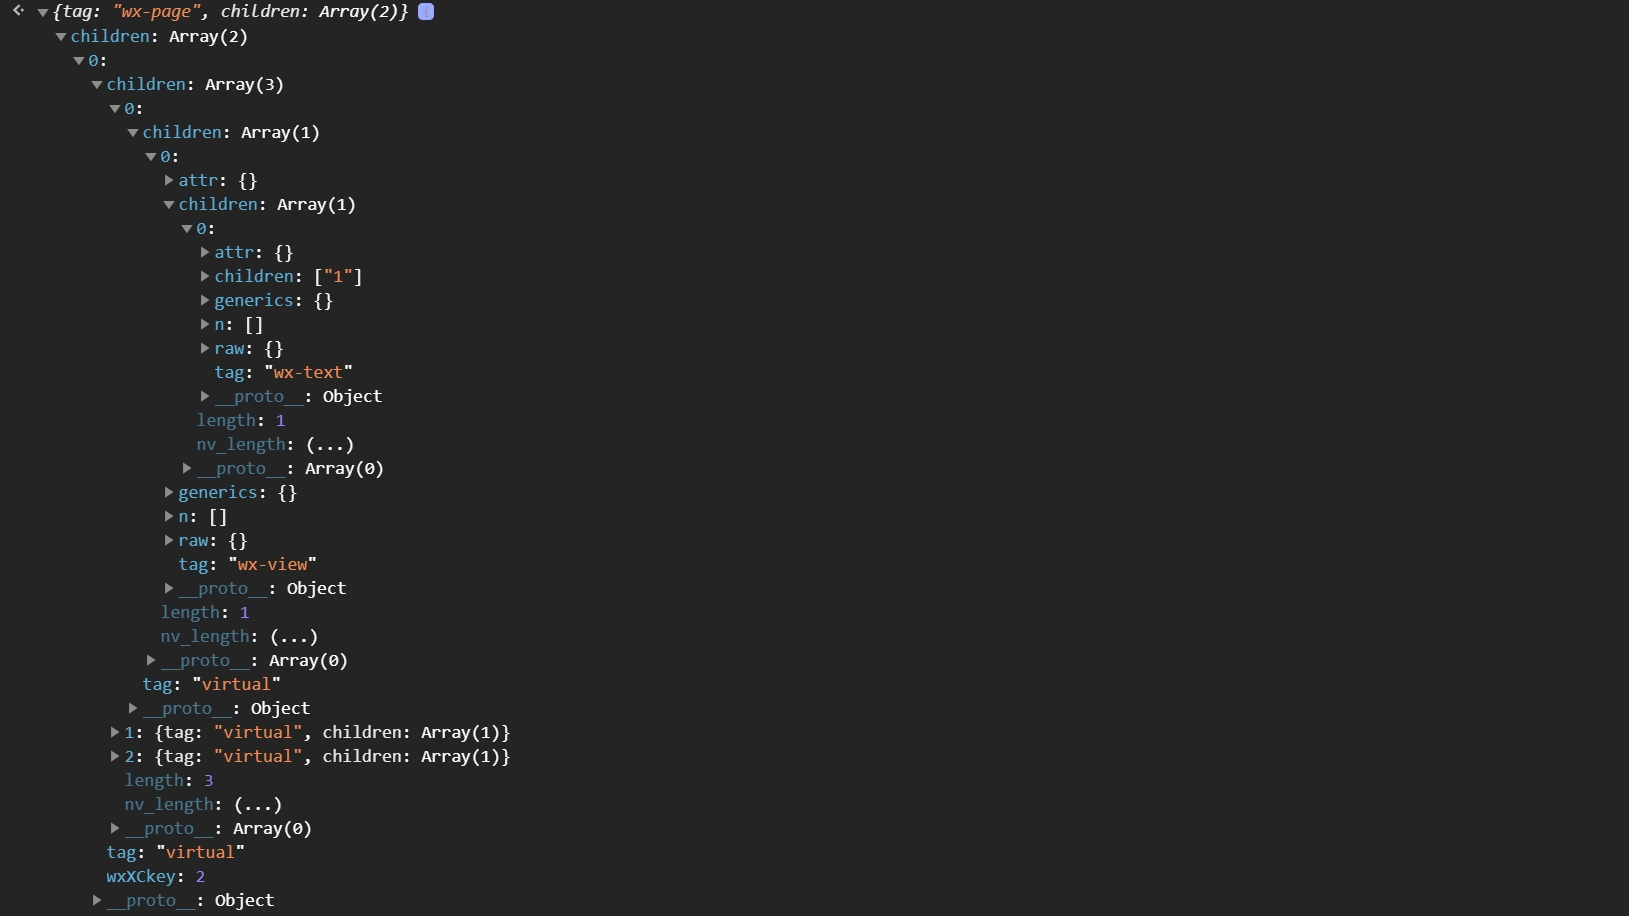
<view wx:for="{{ logs }}" wx:key="index">
  <text>{{ item }}</text>
</view>
可以看到如上图所示的虚拟节点数组,接下来我们详细剖析一下
$gwx(decodeName)不直接返回 dom 树,而是返回一个函数的原因是因为需要动态注入和相关配置,函数能够很好的把控时机- 利用动态传参我们发现,包含循环数组和 key 的会带有
virtual标识,用来后面的DIff算法比较 document.dispatchEvent触发自定义事件 将generateFunc当作参数传递给底层渲染库
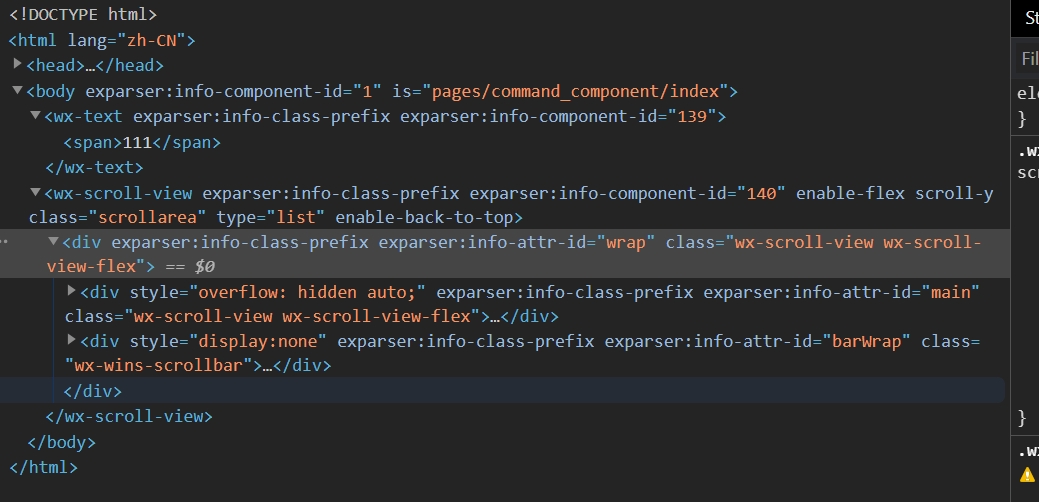
- 可以看得到无论是
view还是text底层都是通过divspan的自定义组件构成的 - 这一切来源于
Exparser框架,在 渲染层 会内置一系列方法,大致和上面自定义web component一致,进行对组件的定义,注册后将js脚本引入页面,那么当前页面就可用了 - 接下来带大家进行源码的拆解
下周计划
- 继续深入小程序原理(收益不高)
- 扩展前端其他的技术方向(感兴趣建议)
- 前端组件库实现拆解
- 前端调试能力提升
- 前端工程化能够了解


