Setting Up to Use Windows Subsystem For Linux (WSLv2)
1,Win+R,运行ver命令:
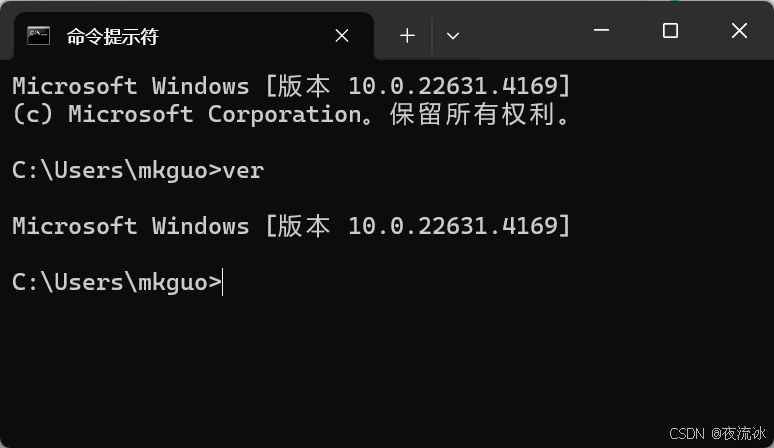
我的是Win11系统,但版本还是10.xx的。要求
Windows 10 builds > 18917,才能使用WSLv2。
如果需要版本升级,请参照:
Install WSL | Microsoft Learn
2,准备工作。
Win+R, 输入optionalfeatures.exe。或者搜索“启用或关闭Windows功能”。
勾选“Windows Subsystem for Linux”。然后需要重启电脑。
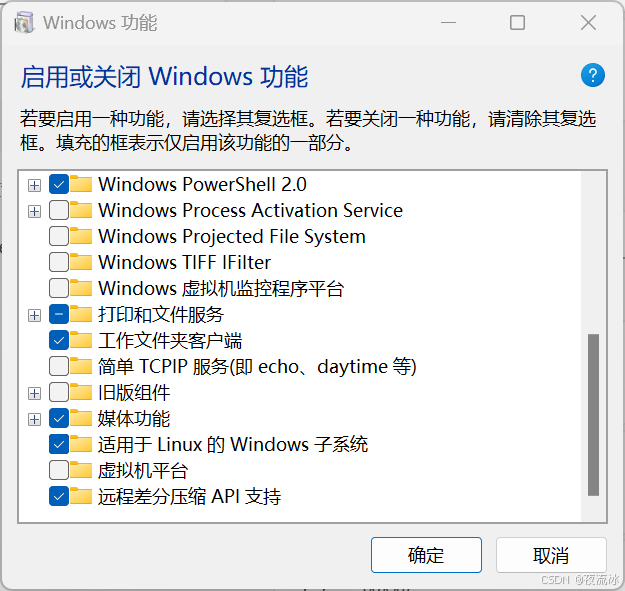
同样的操作,可以在PowerShell里完成(Win+R,输入powershell 或开始菜单栏里搜索powershell):
Enable-WindowsOptionalFeature -Online -FeatureName Microsoft-Windows-Subsystem-Linux
Win+R,输入services.msc,打开Windows服务设置对话框。
找到LxssManager服务,确定已经启动,或者选择重启(restart)。
打开PowerShell,更新wsl。
wsl --update
3,安装
Win+S, 或Win+Q,输入Store,打
开微软商店Microsoft Store,搜索Linux,选择你想安装的的版本。
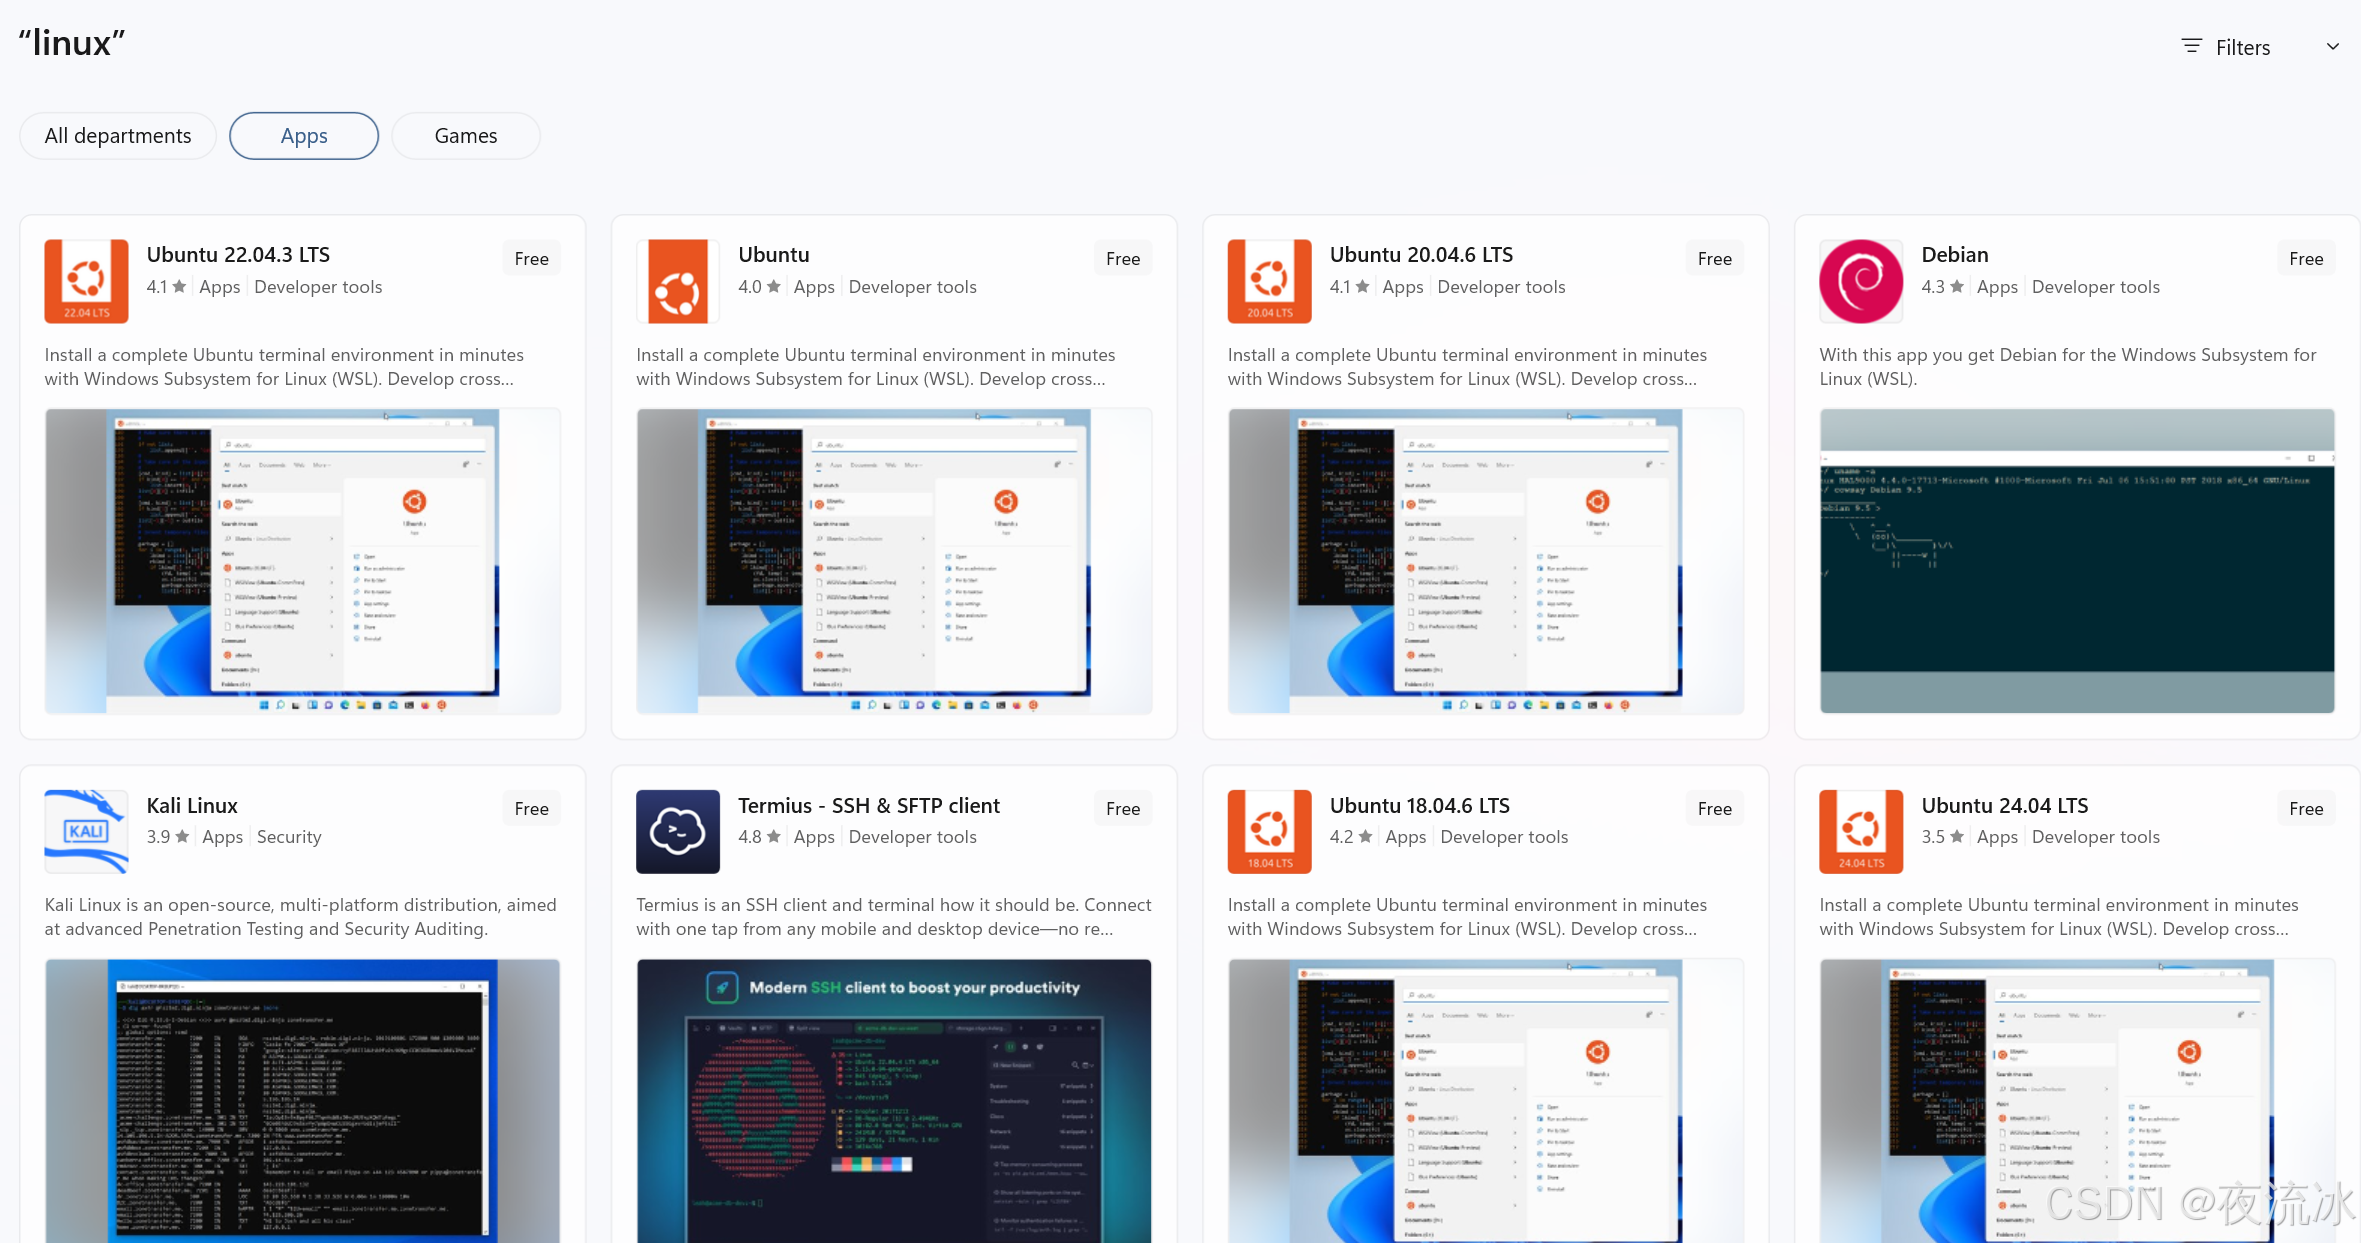
我这里选择Ubuntu 22.04 LTS版本。点击Get开始下载和安装。
除此之外,还可以在使用管理员权限在powershell中安装默认版本Ubuntu:
wsl --install
下面命令查询所有可用的线上版本:
wsl --list --online
以下是可安装的有效分发的列表。
使用 'wsl.exe --install <Distro>' 安装。
NAME FRIENDLY NAME
Ubuntu Ubuntu
Debian Debian GNU/Linux
kali-linux Kali Linux Rolling
Ubuntu-18.04 Ubuntu 18.04 LTS
Ubuntu-20.04 Ubuntu 20.04 LTS
Ubuntu-22.04 Ubuntu 22.04 LTS
Ubuntu-24.04 Ubuntu 24.04 LTS
OracleLinux_7_9 Oracle Linux 7.9
OracleLinux_8_7 Oracle Linux 8.7
OracleLinux_9_1 Oracle Linux 9.1
openSUSE-Leap-15.6 openSUSE Leap 15.6
SUSE-Linux-Enterprise-15-SP5 SUSE Linux Enterprise 15 SP5
SUSE-Linux-Enterprise-15-SP6 SUSE Linux Enterprise 15 SP6
openSUSE-Tumbleweed openSUSE Tumbleweed
比如安装Ubuntu-24.04:
wsl --install Ubuntu-24.04
使用下面命令查看已安装的版本:
wsl -l -v
4,打开和关闭
如果是在商店里安装的,直接点击Open打开,
或在商店里的Library里找到Ubuntu并打开。
无论安装方式,也可以在搜索栏中输入Ubuntu找到应用并打开。
在powershell中也可以打开,直接输入Linux版本名称即可,全小写字幕,特殊符号都去掉:
ubuntu2404.exe
5,设置用户名和升级软件包
打开Ubuntu后,进入Linux终端,会提示输入用户名和密码,这是Linux的用户密码,与Windows系统无关。
然后启动Ubuntu,建议先把软件包升级一下:
sudo apt update
sudo apt full-upgrade -y
6,卸载和清除
若想卸载的话,在添加或删除程序里卸载相应版本Linux即可。
如果已经删除了,在“wsl -l -v” 命令时还显示其版本,可以在powershell中使用下面命令清除:
wsl --unregister <distribution name>
上面命令会注销并卸载 WSL 发行版。
7,具体使用
经常优化 WSLv2 存储: 由于 WSLv2 处理存储空间的方式,Linux 发行版所使用的存储空间不会立即反映出来,而且 bitbake 会大量使用存储空间,因此在多次构建后,您可能会意识不到自己的存储空间已经用完。WSLv2 使用 VHDX 文件进行存储,经常手动优化该文件可以轻松避免这一问题,具体方法如下:
Optimize your WSLv2 storage often: Due to the way storage is handled on WSLv2, the storage space used by the undelying Linux distribution is not reflected immedately, and since bitbake heavily uses storage, after several builds, you may be unaware you are running out of space. WSLv2 uses a VHDX file for storage, this issue can be easily avoided by manually optimizing this file often, this can be done in the following way:
首先需要找到发行版应用程序软件包目录,为此请以管理员身份打开 Windows Powershell 并运行:
First you need to find the distro app package directory, to achieve this open a Windows Powershell as Administrator and run:
C:\WINDOWS\system32> Get-AppxPackage -Name "*Ubuntu*" | Select PackageFamilyName
PackageFamilyName
-----------------
CanonicalGroupLimited.Ubuntu22.04LTS_79rhkp1fndgsc
现在,你应该在以下路径中替换 PackageFamilyName 和你的用户,以找到你的 VHDX 文件:
You should now replace the PackageFamilyName and your user on the following path to find your VHDX file:
ls C:\Users\mkguoqx\AppData\Local\Packages\CanonicalGroupLimited.Ubuntu22.04LTS_79rhkp1fndgsc\LocalState\
Mode LastWriteTime Length Name
---- ------------- ------ ----
-a---- 2024/9/21 13:42 1204813824 ext4.vhdx
Your VHDX file path is: C:\Users\mkguoqx\AppData\Local\Packages\CanonicalGroupLimited.Ubuntu22.04LTS_79rhkp1fndgsc\LocalState\ext4.vhdx
第一种存储优化方法:
使用 Windows Powershell 优化 VHDX 文件:
要使用下面的 optimize-vhd cmdlet,首先要在 Windows 上安装 Hyper-V 选项。然后,以管理员身份打开 Windows Powershell,优化 VHDX 文件,先关闭 WSL:
Optimize your VHDX file using Windows Powershell:
To use the optimize-vhd cmdlet below, first install the Hyper-V option on Windows. Then, open a Windows Powershell as Administrator to optimize your VHDX file, shutting down WSL first:
C:\WINDOWS\system32> wsl --shutdown
C:\WINDOWS\system32> optimize-vhd -Path C:\Users\myuser\AppData\Local\Packages\CanonicalGroupLimited.UbuntuonWindows_79abcdefgh\LocalState\ext4.vhdx -Mode full
优化 VHDX 文件时应显示进度条,现在应能在 Windows 资源管理器中正确反映存储情况。
A progress bar should be shown while optimizing the VHDX file, and storage should now be reflected correctly on the Windows Explorer.
第二种存储优化方法:
使用 DiskPart 优化 VHDX 文件:
上述 optimize-vhd cmdlet 由 Hyper-V 提供。并非所有 Windows SKU 都能安装 Hyper-V。作为替代,可以使用 DiskPart 工具。首先,以管理员身份打开 Windows 命令提示符,优化 VHDX 文件,然后关闭 WSL:
Optimize your VHDX file using DiskPart:
The optimize-vhd cmdlet noted above is provided by Hyper-V. Not all SKUs of Windows can install Hyper-V. As an alternative, use the DiskPart tool. To start, open a Windows command prompt as Administrator to optimize your VHDX file, shutting down WSL first:
C:\WINDOWS\system32> wsl --shutdown
C:\WINDOWS\system32> diskpart
DISKPART> select vdisk file="<path_to_VHDX_file>"
DISKPART> attach vdisk readonly
DISKPART> compact vdisk
DISKPART> exit
注意事项
WSLv2 目前的实现无法直接访问外部设备(如通过 USB 端口连接的设备),但它会自动将 C: 驱动器挂载到 /mnt/c/(及其他),你可以使用它来共享部署工件,以便随后通过 Windows系统烧写硬件,但你的构建目录不应位于此挂载点内。
Note
The current implementation of WSLv2 does not have out-of-the-box access to external devices such as those connected through a USB port, but it automatically mounts your C: drive on /mnt/c/ (and others), which you can use to share deploy artifacts to be later flashed on hardware through Windows, but your build directory should not reside inside this mountpoint.
8,其他wsl的powershell命令
WSL 的基本命令 | Microsoft Learn
检查 WSL 状态
wsl --status
检查 WSL 版本
wsl --version
关闭
wsl --shutdown
Terminate
wsl --terminate <Distribution Name>
导出分发版
wsl --export <Distribution Name> <FileName>
导入分发版
wsl --import <Distribution Name> <InstallLocation> <FileName>
就地导入发行版
wsl --import-in-place <Distribution Name> <FileName>
更多关
于WSL的信息可查阅:
Comparing WSL Versions | Microsoft Learn
参考:
2 Setting Up to Use the Yocto Project — The Yocto Project ® 4.0.4 documentation
Fix: WSLRegisterDistribution Failed with Error 0x8007019e (thegeekpage.com)
Install Ubuntu on WSL2 - Ubuntu WSL documentation


