文章目录
- 🌈 一、创建线程
- ⭐ 1. 线程创建函数
- ⭐ 2. 创建单线程
- ⭐ 3. 给线程传参
- ⭐ 4. 创建多线程
- ⭐ 5. 获取线程 ID
- 🌈 二、终止线程
- ⭐1. 使用 return 终止线程
- ⭐ 2. 使用 pthread_exit 函数终止线程
- ⭐ 3. 使用 pthread_cancel 函数终止线程
- 🌈 三、等待线程
- ⭐ 1. 线程等待函数
- ⭐ 2. 获取返回值
- 🌈 四、分离线程
- ⭐ 1. 线程分离概念
- ⭐ 2. 线程分离函数
- 引入线程库:要使用线程相关的函数,需要使用
#include <pthread.h>引入原生线程库。 - 链接线程库:引入线程库后,在编译程序时还需要使用
-lpthread选项链接原生线程库。
🌈 一、创建线程
⭐ 1. 线程创建函数
- 线程创建成功时返回 0,创建失败时返回错误码。
#include <pthread.h>

int pthread_create(
    	pthread_t *thread, 					/* 输出型参数,用以获取创建成功的线程 ID */
    	const pthread_attr_t *attr,			/* 设置创建线程的属性,使用 nullptr 表示使用默认属性 */
    	void *(*start_routine) (void *), 	/* 函数地址,该线程启动后需要去执行的函数 */
    	void *arg);							/* 线程要去执行的函数的形参,没参数时可填写 nullptr */
⭐ 2. 创建单线程
- 当一个程序启动时,其中至少有一个线程在工作,这个线程就叫做主线程。
- 主线程是产生其他子线程的线程,通常主线程必须最后完成某些执行操作。
- 让主线程调用 pthread_create 函数创建一个新线程,然后让新线程跑去执行 thread_run 函数,而主线程则继续执行后续代码。
#include <unistd.h>
#include <iostream>
#include <pthread.h>

using std::cout;
using std::endl;

// 新线程
void* thread_run(void* args)
{
    while (true)
    {
        cout << "新 线程正在运行" << endl;
        sleep(1);
    }
}

// 主线程
int main()
{
    // 记录线程 id
    pthread_t tid;

    // 创建新线程,并让新线程去执行 thread_run 函数
    pthread_create(&tid, nullptr, thread_run, nullptr);

    // 主线程继续执行自己后续的代码
    while (true)
    {
        cout << "主 线程正在运行" << endl;
        sleep(1);
    }

    return 0;
}
- 运行代码后会发现,主线程和新线程会交替执行自己的任务。
- 在程序运行过程中,新开一个窗口使用
ps axj命令查看当前进程的信息时,由于这两个线程都属于同一个进程,因此只能看到一个进程的信息。

- 如果想要查看线程 (轻量级进程) 的相关信息,可以使用
ps -aL查看指定进程内部的轻量级进程的信息。- LWP (Light Weight Process) 表示的就是线程 (轻量级进程) 的 ID,其中主线程的 LWP 值等同于进程的 PID 值。

⭐ 3. 给线程传参
- 由于
pthread_create函数创建出来的线程所执行的函数的形参类型是 void* 的,可以传递任何类型的参数,也能传对象给线程使用。
#include <unistd.h>
#include <iostream>
#include <pthread.h>

using std::cout;
using std::endl;

class thread_data
{
public:
    thread_data(const string& thread_name)
        :_thread_name(thread_name)
        {}

    string thread_name()
    {
        return _thread_name;
    }

private:
    string _thread_name;
};

void* thread_run(void* args)
{
    thread_data* td = static_cast<thread_data*>(args);

    while (true)
    {
        cout << "新线程 " << td->thread_name() << " 正在运行" << endl;
        sleep(1);
    }
}

int main()
{
    thread_data* td = new thread_data("thread 1");

    // 创建新线程,将 td 对象作为 thread_tun 函数的参数
    pthread_t tid;
    pthread_create(&tid, nullptr, thread_run, td);

    while (true)
    {
        cout << "主线程正在运行" << endl;
        sleep(1);
    }

    return 0;
}

⭐ 4. 创建多线程
- 每个线程都由各自的线程 ID 所管理着,创建多线程时可以使用一个数据结构将每个创建出来的线程的 ID 管理起来。
举个例子
- 创建 5 个线程,使用数组将这些线程的线程 ID 管理起来,让这些线程都去执行 thread_run 函数。
#include <string>
#include <vector>
#include <unistd.h>
#include <iostream>
#include <pthread.h>

using std::cout;
using std::endl;
using std::string;
using std::vector;
using std::to_string;

class thread_data
{
public:
    thread_data(const string& thread_name)
        :_thread_name(thread_name)
        {}

    string thread_name()
    {
        return _thread_name;
    }

private:
    string _thread_name;
};

void* thread_run(void* args)
{
    thread_data* td = static_cast<thread_data*>(args);

    while (true)
    {
        cout << "新线程 " << td->thread_name() << " 正在运行" << endl;
        sleep(1);
    }
}

const int thread_num = 5;   // 创建 5 个线程

int main()
{
    // 存储创建的所有线程的线程 ID
    vector<pthread_t> tids(thread_num);

    // 创建 5 个线程并给每个线程传递一个 thread_data 对象
    for (size_t i = 0; i < thread_num; i++)
    {
        string thread_name = "thread " + to_string(i + 1);
        thread_data* td = new thread_data(thread_name);
        pthread_create(&tids[i], nullptr, thread_run, td);
    }

    while (true)
    {
        cout << "主线程正在运行" << endl;
        sleep(1);
    }

    return 0;
}
- 再使用
ps -aL指令可以查到 主 + 新 这 6 个线程的情况。

⭐ 5. 获取线程 ID
- 可通过
pthread_create函数的第一个输出型参数获得创建的线程的 ID。 - 让线程执行的函数调用
pthread_self函数获取调用该函数的线程的 ID。- 哪个线程调用该函数就返回哪个线程的线程 ID。
#include <pthread.h>

pthread_t pthread_self(void);
- 注:pthread_self 函数获得的线程 ID 不等于内核的 LWP 值,pthread_self 函数获得的是用户级原生线程库的线程 ID,而 LWP 是内核的轻量级进程ID,它们之间是一对一的关系。
🌈 二、终止线程
- 如果只是想终止某个线程而不是整个进程,可以有如下 3 种方法。
- 使用
return终止线程:非主线程可以在执行的函数中使用 return 终止当前线程。 - 使用
pthread_exit终止线程:线程自己可以调用该函数终止自己。 - 使用
pthread_cancel终止线程:该函数能通线程 ID 终止任意线程。
⭐1. 使用 return 终止线程
- 在线程调用的函数中使用 return 退出当前线程,但是在main函数中使用return代表整个进程退出,也就是说只要主线程退出了那么整个进程就退出了,此时该进程曾经申请的资源就会被释放,而其他线程会因为没有了资源,自然而然的也退出了。
举个例子
#include <string>
#include <unistd.h>
#include <iostream>
#include <pthread.h>

using std::cout;
using std::endl;
using std::string;

void* thread_run(void* args)
{
    string thread_name = static_cast<const char*>(args);

    // 让新线程运行 5 秒之后退出
    for (size_t i = 0; i < 5; i++)
    {
        cout << thread_name << " 正在运行" << endl;
        sleep(1);
    }

    return nullptr;
}

int main()
{
    pthread_t tid;
    pthread_create(&tid, nullptr, thread_run, (void*)"thread 1");

    while (true)
    {
        cout << "主线程正在运行" << endl;
        sleep(1);
    }

    return 0;
}

⭐ 2. 使用 pthread_exit 函数终止线程
#include <pthread.h>

void pthread_exit(void *retval);	// retval 是线程在退出时,线程所调用函数的返回值
- pthread_exit 或者 return 返回的指针所指向的内存单元必须是全局的或者是用malloc 分配的,不能在线程函数的栈上分配,因为当其他线程得到这个返回指针时,线程函数已经退出了。
举个例子
#include <string>
#include <unistd.h>
#include <iostream>
#include <pthread.h>

using std::cout;
using std::endl;
using std::string;

void* thread_run(void* args)
{
    string thread_name = static_cast<const char*>(args);

    // 让新线程运行 5 秒之后退出
    for (size_t i = 0; i < 5; i++)
    {
        cout << thread_name << " 正在运行" << endl;
        sleep(1);
    }

    pthread_exit(nullptr);
}

int main()
{
    pthread_t tid;
    pthread_create(&tid, nullptr, thread_run, (void*)"thread 1");

    while (true)
    {
        cout << "主线程正在运行" << endl;
        sleep(1);
    }

    return 0;
}

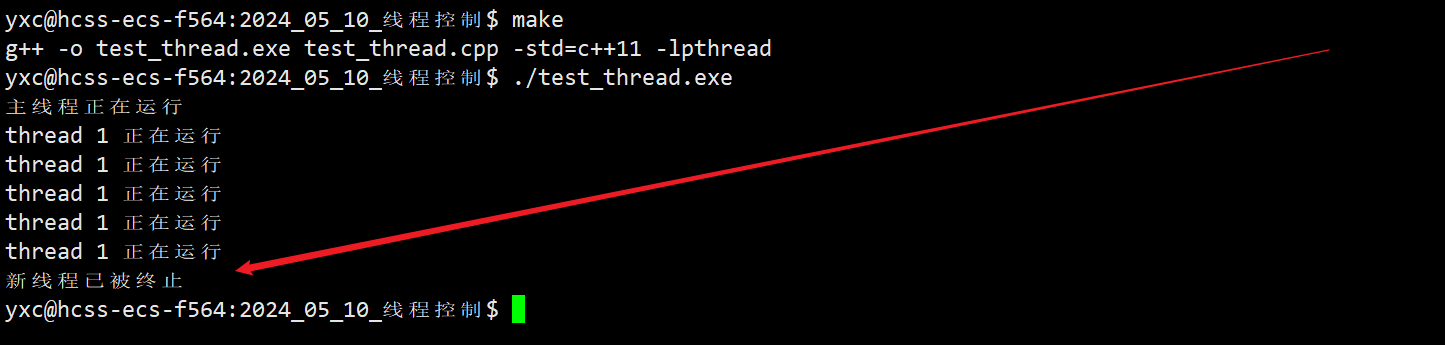
⭐ 3. 使用 pthread_cancel 函数终止线程
- 该函数可以根据线程 ID 终止任意线程,可以用来终止自己或其他线程,不过一般建议是拿来终止其他线程。
举个例子
- 在新线程运行 5s 后,用主线程将新线程终止。
#include <string>
#include <unistd.h>
#include <iostream>
#include <pthread.h>

using std::cout;
using std::endl;
using std::string;

void* thread_run(void* args)
{
    string thread_name = static_cast<const char*>(args);

    while (true)
    {
        cout << thread_name << " 正在运行" << endl;
        sleep(1);
    }
}

int main()
{
    pthread_t tid;
    pthread_create(&tid, nullptr, thread_run, (void*)"thread 1");

    cout << "主线程正在运行" << endl;
    sleep(5);
    pthread_cancel(tid);    // 主线程终止新线程
    cout << "新线程已被终止" << endl;

    return 0;
}
🌈 三、等待线程
- 和进程等待一样,一个线程在被创建出来时,也需要被等待。
- 新线程在退出时,主线程也要回收新线程所持有的资源,否则会产生类似进程的 “僵尸” 问题,从而造成内存泄漏。
- 新线程退出时,主线程需要根据新线程的返回值,获取新线程的退出信息。
- 此外,主线程不关心新线程异常退出的情况,因为线程一旦异常进程立马就会挂掉,只会关心进程退出的相关信息。
⭐ 1. 线程等待函数
- 该函数在等待成功时会返回 0,失败时返回对应的错误码。
#include <pthread.h>

int pthread_join(
    	pthread_t thread,	/* 被等待的线程的线程 ID */
    	void **retval);		/* 获取被等待的线程在退出时的返回值 */
- 调用该函数的线程将阻塞等待新线程,直到所等待的的新线程终止为止,被等待的线程以不同的方式终止时,通过 pthread_join 得到的终止状态也是不同的。
举个例子
#include <string>
#include <unistd.h>
#include <iostream>
#include <pthread.h>

using std::cout;
using std::endl;
using std::string;

void* thread_run(void* args)
{
    string thread_name = static_cast<const char*>(args);

    // 让新线程运行 5 秒之后退出
    for (size_t i = 0; i < 5; i++)
    {
        cout << thread_name << " 正在运行" << endl;
        sleep(1);
    }

    return nullptr;
}

int main()
{
    // 主线程创建新线程
    pthread_t tid;
    pthread_create(&tid, nullptr, thread_run, (void*)"thread 1");

    cout << "主线程正在运行" << endl;

    // 主线程阻塞等待 tid 所描述的新线程
    int n = pthread_join(tid, nullptr);

    cout << "主线程运行完毕, n: " << n << endl;

    return 0;
}

⭐ 2. 获取返回值
- pthread_create 创建出的线程所调用函数的返回值是一个 void* 类型的值,而 pthread_join 函数的第二个输出型参数是 void** 类型,就是为了获取新线程所调用函数的返回值。
1. 举个例子
- 让新线程调用的函数返回一个字符串。
#include <string>
#include <unistd.h>
#include <iostream>
#include <pthread.h>

using std::cout;
using std::endl;
using std::string;

void* thread_run(void* args)
{
    string thread_name = static_cast<const char*>(args);

    // 让新线程运行 5 秒之后退出
    for (size_t i = 0; i < 5; i++)
    {
        cout << thread_name << " 正在运行" << endl;
        sleep(1);
    }

    return (void*)"thread 1 done";  			// 返回这个字符串常量的起始地址
    // pthread_exit((void*)"thread 1 done");	// 这两种方法返回的内容一样
}

int main()
{
    // 主线程创建新线程
    pthread_t tid;
    pthread_create(&tid, nullptr, thread_run, (void*)"thread 1");

    cout << "主线程正在运行" << endl;

    // 主线程阻塞等待 tid 所描述的新线程
    void* ret = nullptr;            // 用来接收线程退出时的退出信息
    int n = pthread_join(tid, &ret);

    cout << "主线程运行完毕, n: " << n << endl;
    cout << "主线程获取到的新线程的退出信息为: " << (char*)ret << endl;

    return 0;
}

2. 线程退出时可以返回对象
- 由于线程所调用的函数的返回值是 void* 类型的,意味着线程在完事之后还可以返回一个处理好的对象。
#include <string>
#include <unistd.h>
#include <iostream>
#include <pthread.h>

using std::cout;
using std::endl;
using std::string;

// 保存线程退出时的相关信息
class thread_return
{
public:
    pthread_t _id;   // 哪个线程退了
    string _info;    // 退出时想传达的信息
    int _code;       // 线程退出的信息
public:
    thread_return(pthread_t id, const string& info, int code)
        : _id(id), _info(info), _code(code)
    {}
};

// 新线程所执行的函数
void* thread_run(void* args)
{
    string thread_name = static_cast<const char*>(args);

    // 让新线程运行 5 秒之后退出
    for (size_t i = 0; i < 5; i++)
    {
        cout << thread_name << " 正在运行" << endl;
        sleep(1);
    }

    thread_return* ret = new thread_return(pthread_self(), "线程正常退出", 10);
    pthread_exit(ret);
}

int main()
{
    // 主线程创建新线程
    pthread_t tid;
    pthread_create(&tid, nullptr, thread_run, (void*)"thread 1");

    cout << "主线程正在运行" << endl;

    // 主线程阻塞等待 tid 所描述的新线程
    void* ret = nullptr;            // 用来接收线程退出时的退出信息
    int n = pthread_join(tid, &ret);
    cout << "主线程运行完毕, n: " << n << endl;

    thread_return* r = static_cast<thread_return*>(ret);

    cout << "主线程获取到的新线程的退出信息为" << endl;
    cout << "id: " << r->_id << ", info: " << r->_info << ", code: " << r->_code << endl;

    delete r;

    return 0;
}
- 这种特性使得我们可以将任务分配给线程运行,运行完毕之后再将结果返回。
🌈 四、分离线程
⭐ 1. 线程分离概念
- 一般情况下,主线程是需要阻塞等待新线程的,如果不等待线程退出,就有可能造成 “僵尸” 问题。
- 但如果主线程就是不想等待新线程退出,也不关心新线程的返回值,此时就可以将新线程分离,被分离的线程在退出时会自动释放资源。
- 分离出的新线程依旧要使用进程的资源,且依旧在该进程内运行,甚至这个新线程崩溃了也会影响整个进程。线程分离只是让主线程不需要再阻塞等待整个新线程罢了,在新线程退出时系统会自动回收该线程所持有的资源。
- 一个线程可以将其他线程分离出去,也可以将自己分离出去。
- 等待和分离会发生冲突,一个线程不能既是可被等待的又是分离出去的。
- 虽然分离出去的线程已经不归主线程管了,但一般还是建议让主线程最后再退出。
- 分离出去的线程可以被 pthread_cancel 函数终止,但不能被 pthread_join 函数等待。
⭐ 2. 线程分离函数
#include <pthread.h>

int pthread_detach(pthread_t thread);	// thread 是要分离出去的线程的 ID
- 线程分离成功时返回 0,失败时则返回对应错误码。
举个例子
- 主线程将创建好的 thread 1 线程分离出去,之后主线程就不需要再 join 新线程了。
#include <string>
#include <unistd.h>
#include <iostream>
#include <pthread.h>

using std::cout;
using std::endl;
using std::string;

const int num = 5;

// 新线程
void* thread_run(void* args)
{
    string thread_name = static_cast<const char*>(args);

    // pthread_detach(tid); // 新线程也可以将自己分离出去

    for (int i = 0; i < num; i++)
    {
        cout << thread_name << " 正在运行" << endl;
        sleep(1);
    }

    pthread_exit(nullptr);
}

int main()
{
    // 创建新线程
    pthread_t tid;
    pthread_create(&tid, nullptr, thread_run, (void*)"thread 1");

    pthread_detach(tid); // 主线程将目标进程分离出去

    while (true)
    {
        cout << "I am a main thread" << endl;
        sleep(1);
    }

    return 0;
}