前言
今天,我们将展示如何使用 Java Swing 创建一个烟花效果,覆盖整个桌面。我们将重点讲解如何在桌面上展示烟花、如何实现发射和爆炸效果,以及如何将这些效果整合到一个完整的程序中。
效果展示

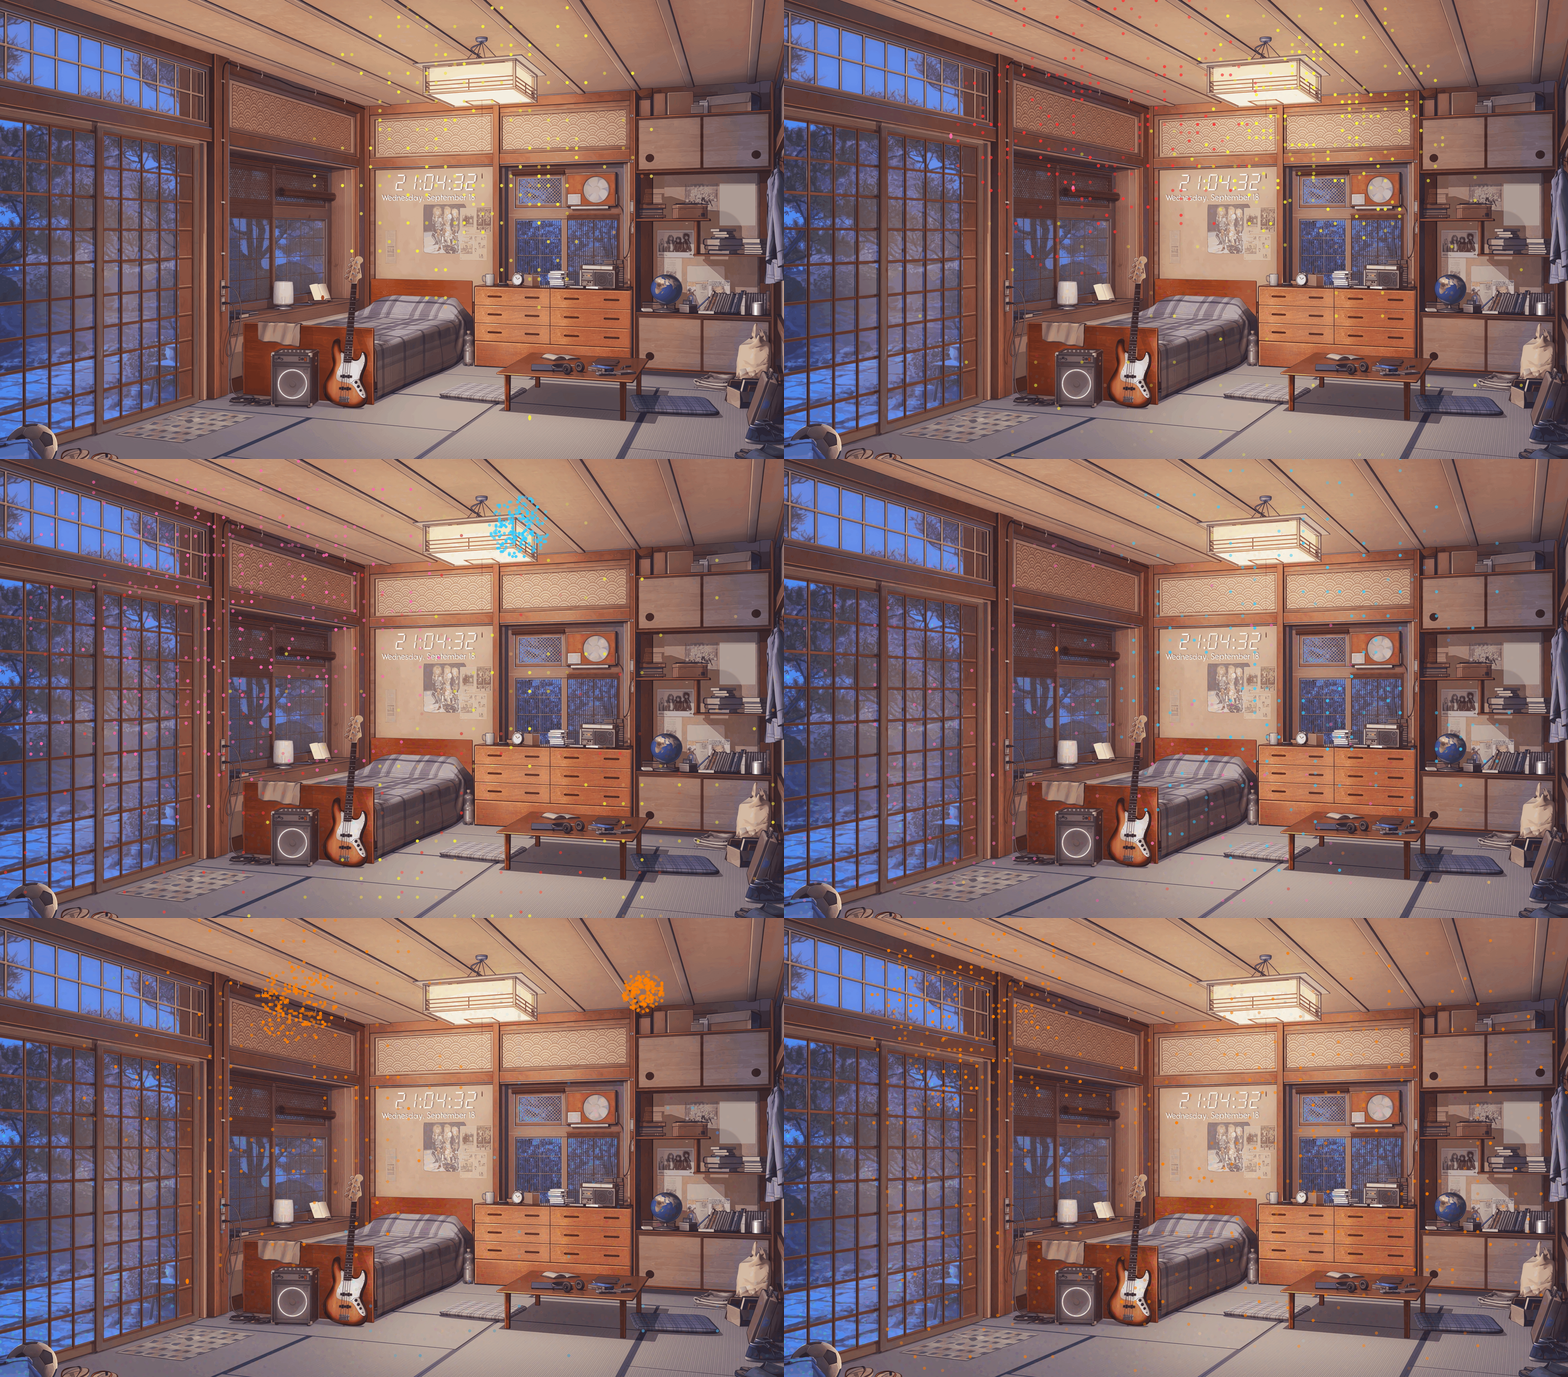
如上图所示,我们在桌面实现了:
- 发射烟花
- 烟花爆炸的特效
完整代码
下面是整个项目的完整代码。大家可以新建一个名为 FireworkDisplay.java 的文件,将完整代码拷贝进去,运行 main() 方法,就可以在桌面看到一场烟花秀了。
import javax.swing.*;
import java.awt.*;
import java.awt.event.ActionEvent;
import java.awt.event.ActionListener;
import java.util.ArrayList;
import java.util.Random;

// 发射粒子类
class LaunchParticle {
    public int x, y;       // 位置
    public int vx, vy;     // 速度
    public boolean exploded = false; // 是否已经爆炸
    public Color color;    // 粒子颜色
    public int targetHeight;  // 目标高度

    public LaunchParticle(int startX, int startY, int velocityX, int velocityY, int targetHeight, Color color) {
        this.x = startX;
        this.y = startY;
        this.vx = velocityX;
        this.vy = velocityY;
        this.targetHeight = targetHeight;
        this.color = color;
    }

    // 更新发射粒子的位置
    public void update() {
        x += vx;
        y += vy;
        vy += 1;  // 模拟重力

        // 当粒子到达目标高度或者开始下落时爆炸
        if (y <= targetHeight || vy >= 0) {
            exploded = true;
        }
    }
}

// 烟花爆炸粒子类
class FireworkParticle {
    public int x, y;       // 位置
    public int vx, vy;     // 速度
    public int life;       // 粒子寿命
    public Color color;    // 粒子颜色

    public FireworkParticle(int x, int y, int vx, int vy, int life, Color color) {
        this.x = x;
        this.y = y;
        this.vx = vx;
        this.vy = vy;
        this.life = life;
        this.color = color;
    }

    // 更新爆炸粒子的位置
    public void update() {
        x += vx;
        y += vy;
        vy += 1;  // 模拟重力
        life--;
    }

    public boolean isDead() {
        return life <= 0;
    }
}

// 显示烟花的面板
class FireworkPanel extends JPanel implements ActionListener {
    private final ArrayList<FireworkParticle> particles = new ArrayList<>();
    private final ArrayList<LaunchParticle> launchParticles = new ArrayList<>();
    private final Random random = new Random();
    private Timer timer;
    private int screenHeight;

    // 预定义一组颜色段,确保在任何背景下都好看
    private final Color[] colorPalette = {
        new Color(255, 128, 0),   // 橙色
        new Color(255, 51, 51),   // 红色
        new Color(51, 204, 255),  // 天蓝色
        new Color(51, 255, 51),   // 绿色
        new Color(204, 51, 255),  // 紫色
        new Color(255, 255, 51),  // 黄色
        new Color(255, 102, 178)  // 粉色
    };

    public FireworkPanel(int screenHeight) {
        this.screenHeight = screenHeight;
        // 设置面板为透明
        this.setOpaque(false);
        timer = new Timer(30, this);  // 每 30 毫秒更新一次
        timer.start();
    }

    // 选择随机颜色,从预定义的颜色段中选取
    private Color getRandomColor() {
        return colorPalette[random.nextInt(colorPalette.length)];
    }

    // 添加发射粒子
    public void addLaunchParticle() {
        int width = getWidth();
        int height = getHeight();

        if (width <= 0 || height <= 0) return;

        int startX = random.nextInt(width); // 发射起始位置
        int startY = height; // 从屏幕底部发射
        int targetHeight = (int) (screenHeight * 0.2); // 烟花将在屏幕高度的 4/5 处爆炸
        int velocityY = -(random.nextInt(10) + 50); // 增加初始向上速度,确保高度合适
        Color color = getRandomColor(); // 从预定义颜色中选取

        launchParticles.add(new LaunchParticle(startX, startY, 0, velocityY, targetHeight, color));
    }

    // 添加爆炸粒子,使用极坐标生成圆形分布,增加中心粒子密度
    public void addExplosion(int x, int y, Color color) {
        int numParticles = 200; // 每个烟花的粒子数量
        for (int i = 0; i < numParticles; i++) {
            double angle = 2 * Math.PI * random.nextDouble(); // 每个粒子的角度随机
            int speed = random.nextInt(15) + 5; // 粒子的速度增加随机性,靠近中心的速度会更小
            int vx = (int) (Math.cos(angle) * speed); // 使用极坐标计算x方向速度
            int vy = (int) (Math.sin(angle) * speed); // 使用极坐标计算y方向速度
            int life = random.nextInt(50) + 50; // 粒子寿命
            particles.add(new FireworkParticle(x, y, vx, vy, life, color));
        }
    }

    @Override
    protected void paintComponent(Graphics g) {
        super.paintComponent(g);
        Graphics2D g2d = (Graphics2D) g;

        // 绘制发射粒子
        for (LaunchParticle launchParticle : launchParticles) {
            g2d.setColor(launchParticle.color);
            g2d.fillOval(launchParticle.x - 3, launchParticle.y - 3, 6, 10); // 缩小发射粒子尺寸,使用半径为3的圆形
        }

        // 绘制爆炸粒子
        for (FireworkParticle particle : particles) {
            g2d.setColor(new Color(particle.color.getRed(), particle.color.getGreen(), particle.color.getBlue(), Math.max(particle.life * 255 / 100, 0)));
            g2d.fillOval(particle.x - 3, particle.y - 3, 6, 6); // 缩小爆炸粒子尺寸,使用半径为3的圆形
        }
    }

    @Override
    public void actionPerformed(ActionEvent e) {
        // 更新发射粒子
        ArrayList<LaunchParticle> toRemoveLaunch = new ArrayList<>();
        for (LaunchParticle launchParticle : launchParticles) {
            launchParticle.update();
            if (launchParticle.exploded) {
                addExplosion(launchParticle.x, launchParticle.y, launchParticle.color); // 发射粒子爆炸
                toRemoveLaunch.add(launchParticle);
            }
        }
        launchParticles.removeAll(toRemoveLaunch);

        // 更新爆炸粒子
        ArrayList<FireworkParticle> deadParticles = new ArrayList<>();
        for (FireworkParticle particle : particles) {
            particle.update();
            if (particle.isDead()) {
                deadParticles.add(particle);
            }
        }
        particles.removeAll(deadParticles);

        // 持续生成发射粒子,保证烟花不断生成
        if (random.nextInt(15) == 0) { // 增加生成频率
            addLaunchParticle(); // 随机生成多个烟花
        }

        // 重新绘制
        repaint();
    }
}

public class FireworkDisplay {
    public static void main(String[] args) {
        // 获取屏幕大小
        Dimension screenSize = Toolkit.getDefaultToolkit().getScreenSize();

        // 创建全屏的透明窗口
        JWindow window = new JWindow();
        window.setSize(screenSize);
        window.setBackground(new Color(0, 0, 0, 0)); // 设置背景透明
        window.setLayout(new BorderLayout()); // 使用 BorderLayout 布局

        // 添加烟花面板
        FireworkPanel panel = new FireworkPanel(screenSize.height); // 传递屏幕高度
        window.add(panel, BorderLayout.CENTER); // 确保 FireworkPanel 占满整个窗口
        window.setAlwaysOnTop(true); // 窗口始终在最前面
        window.setVisible(true);

        // 强制重绘刷新
        RepaintManager.currentManager(panel).markCompletelyDirty(panel);

        // 启动后立即生成发射粒子
        panel.addLaunchParticle();
    }
}
全屏透明窗口
为了让烟花在桌面上显示而不是局限在普通的应用程序窗口中,我们需要创建一个 全屏透明窗口。我们使用 JWindow 类,这是一个没有边框和标题栏的窗口,非常适合用于全屏特效展示。
为什么需要全屏透明窗口?
普通的窗口只会在应用程序区域内显示,而我们希望烟花能够在整个桌面上绽放。通过设置一个透明的 JWindow,我们就能让窗口完全覆盖桌面。
Dimension screenSize = Toolkit.getDefaultToolkit().getScreenSize(); // 获取屏幕大小
JWindow window = new JWindow(); // 创建全屏窗口
window.setSize(screenSize); // 设置窗口为屏幕大小
window.setBackground(new Color(0, 0, 0, 0)); // 使窗口背景完全透明
window.setLayout(new BorderLayout());
window.setBackground(new Color(0, 0, 0, 0)); 中的最后一个参数 0 表示完全透明。这样一来,窗口显示的部分就是我们后续的烟花效果,桌面背景不会被覆盖。
粒子系统
我们通过粒子的方式来模拟烟花的发射效果。首先,发射粒子从屏幕底部向上移动。我们创建 LaunchParticle 类来管理这些粒子。每个粒子都有位置、速度等属性,它们随着时间不断更新位置,模拟上升的过程。
class LaunchParticle {
    public int x, y; // 粒子的位置
    public int vx, vy; // 粒子的速度
    public boolean exploded = false; // 是否已爆炸

    public LaunchParticle(int startX, int startY, int velocityX, int velocityY) {
        this.x = startX;
        this.y = startY;
        this.vx = velocityX;
        this.vy = velocityY;
    }

    public void update() {
        this.x += this.vx; // 更新水平位置
        this.y += this.vy; // 更新垂直位置
    }
}
每个粒子都有初始的位置和速度,我们通过 update() 方法来不断改变它们的位置,形成粒子上升的效果。
当发射粒子上升到一定高度时,粒子就会爆炸。爆炸后,它们会分裂成多个小粒子,这些粒子四处扩散,就可以模拟出烟花绽放的效果。我们通过 FireworkParticle 类来实现这些爆炸后的粒子。
class FireworkParticle {
    public int x, y;
    public int vx, vy; // 爆炸粒子的速度
    public int life; // 粒子的生命值

    public FireworkParticle(int x, int y, int vx, int vy, int life) {
        this.x = x;
        this.y = y;
        this.vx = vx;
        this.vy = vy;
        this.life = life;
    }

    public void update() {
        this.x += this.vx; // 更新位置
        this.y += this.vy;
        this.life--; // 生命值减少
    }

    public boolean isDead() {
        return life <= 0; // 粒子是否存活
    }
}
在爆炸发生时,我们会生成多个 FireworkParticle,每个粒子的速度和方向都是随机的,这样可以让烟花的爆炸效果更加多样化。
结语
本期的分享就结束了,有兴趣的小伙伴可以思考一下如何实现更多有趣的特效哦。


