🌲 服务端接口准备
- pom文件,引入mybatis/mybatis-plus相关依赖
<dependencies>
  <dependency>
    <groupId>org.springframework.boot</groupId>
    <artifactId>spring-boot-starter-web</artifactId>
  </dependency>
  <dependency>
    <groupId>org.mybatis.spring.boot</groupId>
    <artifactId>mybatis-spring-boot-starter</artifactId>
    <version>2.3.1</version>
  </dependency>

  <dependency>
    <groupId>com.mysql</groupId>
    <artifactId>mysql-connector-j</artifactId>
    <scope>runtime</scope>
  </dependency>
  <dependency>
    <groupId>org.projectlombok</groupId>
    <artifactId>lombok</artifactId>
    <optional>true</optional>
  </dependency>
  <dependency>
    <groupId>org.springframework.boot</groupId>
    <artifactId>spring-boot-starter-test</artifactId>
    <scope>test</scope>
  </dependency>
  <dependency>
    <groupId>org.mybatis.spring.boot</groupId>
    <artifactId>mybatis-spring-boot-starter-test</artifactId>
    <version>2.3.1</version>
    <scope>test</scope>
  </dependency>

  <dependency>
    <groupId>com.baomidou</groupId>
    <artifactId>mybatis-plus-boot-starter</artifactId>
    <version>3.4.1</version>
  </dependency>
</dependencies>- application.properties
spring.datasource.url=jdbc:mysql://localhost:3306/study

spring.datasource.username=root
spring.datasource.password=123456
spring.datasource.driver-class-name=com.mysql.cj.jdbc.Driver

mybatis.mapper-locations=classpath*:mappers/*
mybatis.type-aliases-package=com.moxuan.vue_demo.entity
mybatis.configuration.log-impl=org.apache.ibatis.logging.stdout.StdOutImpl
- 启动类
package com.moxuan.vue_demo;

import org.mybatis.spring.annotation.MapperScan;
import org.springframework.boot.SpringApplication;
import org.springframework.boot.autoconfigure.SpringBootApplication;

@SpringBootApplication
@MapperScan("com.moxuan.vue_demo.dao")
public class VueDemoApplication {

    public static void main(String[] args) {
        SpringApplication.run(VueDemoApplication.class, args);
    }

}
- 工具类
package com.moxuan.vue_demo.util;

/**
 * 返回给客户端的状态码
 *
 * 封装状态码和消息的对应关系
 */
public enum ReturnCode {

    /*** 全局的returnCode,规定好后,任何人都不能变动这里面的内容  ***/
    SUCCESS("0000","操作成功"),
    BUSSINESS_EXCEPTION("1000","业务系统异常"),

    USER_NOT_LOGIN("8001","用户未登录"),
    ACCESS_FORBIDDEN("8002","无访问权限"),
    AUTHEN_FAILURE("8003","认证失败"),
    TOKEN_FORBIDDEN("8004","无访问口令,请登录后获取");

    /**
     * 状态码
     */
    private String code;
    /**
     * 返回的消息
     */
    private String msg;
    ReturnCode(String code, String msg) {
        this.code = code;
        this.msg = msg;
    }

    public String code() {
        return this.code;
    }

    public String msg(){
        return this.msg;
    }
}
package com.moxuan.vue_demo.util;

import lombok.Data;
import lombok.NoArgsConstructor;

@Data
@NoArgsConstructor
public class Result {
    private String code;
    private String msg;
    private Object data;// 数据源

    /**
     * 当不需要携带data数据,只返回状态码和对应的消息时
     * @param returnCode
     * @return
     */
    public static Result sendResult(ReturnCode returnCode){
        Result result = new Result();
        result.setCode(returnCode.code());
        result.setMsg(returnCode.msg());
        return result;
    }

    /**
     * 当返回结果是,需要携带数据,调用这个方法
     * @param returnCode
     * @param data
     * @return
     */
    public static Result sendResult(ReturnCode returnCode,Object data) {
        Result result =  sendResult(returnCode);
        result.setData(data);
        return result;
    }

}
- Dao接口
package com.moxuan.vue_demo.dao;

import com.baomidou.mybatisplus.core.mapper.BaseMapper;
import com.moxuan.vue_demo.entity.Hero;
import org.apache.ibatis.annotations.Mapper;

@Mapper
public interface HeroMapper extends BaseMapper<Hero> {
}
- service业务层
package com.moxuan.vue_demo.service;

import com.moxuan.vue_demo.dao.HeroMapper;
import com.moxuan.vue_demo.entity.Hero;
import com.moxuan.vue_demo.util.Result;
import com.moxuan.vue_demo.util.ReturnCode;
import org.springframework.beans.factory.annotation.Autowired;
import org.springframework.stereotype.Service;

import java.util.List;

@Service
public class HeroService {
    @Autowired
    private HeroMapper heroMapper;


    public Result getHeros() {
        List<Hero> heroList = heroMapper.selectList(null);
        return Result.sendResult(ReturnCode.SUCCESS,heroList);
    }

    public Result saveHero(Hero hero) {
        int count = heroMapper.insert(hero);
        if (count ==0){
            return Result.sendResult(ReturnCode.BUSSINESS_EXCEPTION);
        }
        return Result.sendResult(ReturnCode.SUCCESS);
    }

    public Result updateHeroById(Hero hero) {
        int count = heroMapper.updateById(hero);
        if (count ==0){
            return Result.sendResult(ReturnCode.BUSSINESS_EXCEPTION);
        }
        return Result.sendResult(ReturnCode.SUCCESS);
    }


    public Result deleteHero(int id) {
        int count = heroMapper.deleteById(id);
        if (count ==0){
            return Result.sendResult(ReturnCode.BUSSINESS_EXCEPTION);
        }
        return Result.sendResult(ReturnCode.SUCCESS);
    }
}
- 控制层
package com.moxuan.vue_demo.controller;

import com.moxuan.vue_demo.service.HeroService;
import com.moxuan.vue_demo.entity.Hero;
import com.moxuan.vue_demo.util.Result;
import lombok.extern.slf4j.Slf4j;
import org.springframework.beans.factory.annotation.Autowired;
import org.springframework.web.bind.annotation.*;

@RestController
@Slf4j
//@RequestMapping("/api")
public class HeroController {
    @Autowired
    private HeroService service;
    @GetMapping("/hero")
    public Result getHeros(){
        log.info("查询所有的用户");
        return service.getHeros();
    }

    @PostMapping("/hero")
    public Result saveHero(Hero hero){
        return service.saveHero(hero);
    }

    @PutMapping("/hero")
    public Result updateHero(Hero hero){
        return service.updateHeroById(hero);
    }

    @DeleteMapping("/hero/{id}")
    public Result deleteHero(@PathVariable int id){
        return service.deleteHero(id);

    }
}
🌲 axios使用
🌿 axios 库下载
Axios 是一个基于promise的网络请求库,Axios的应用是需要单独安装的
npm install --save axios如图所示:

🌿 解决跨域问题
应用程序跨服务器访问时,经常可能出现跨域问题,这里我们先解决一下vue的跨域问题。我们找到项目的vite.config.js(vite的配置文件),添加如下代码:
server:{
  // 配置代理
  proxy:{
      // 配置代理请求前缀
      // 当vue发送localhost:5173/api/xxx请求时
      '/api': {
        // 实际上执行的是 http://localhost:8080/xxx
        target: 'http://localhost:8080/',
          changeOrigin: true,
          // 到达真实服务器地址时,去掉请求前缀/api
          // 比如前端发送请求http://localhost:5173/api/hero
          // 经过rewrite重写后会变成:http://localhost:8080/hero
          rewrite: (path) => path.replace(/^\/api/, '')
      }
  }
}
🌿 get请求
使用axios发送get请求时,需要先在组件中导入axios
import axios from 'axios'具体发送请求代码:
<script setup>
import axios from 'axios'
import {ref} from 'vue'
const data = ref([])
// get请求
axios({
method:'get',
url:'/api/hero' // 此处请求前需要加/api才能被代理识别
}).then(res=>{
console.log(res.data)
// data.value = res.data.data;
});
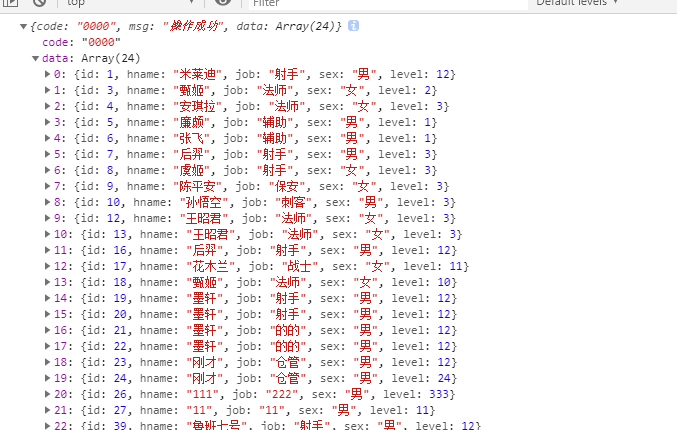
</script>运行结果:
🌿 post请求
post请求参数需要额外处理,否则后端解析不到相关数据
- 首先安装依赖
npm install --save querystring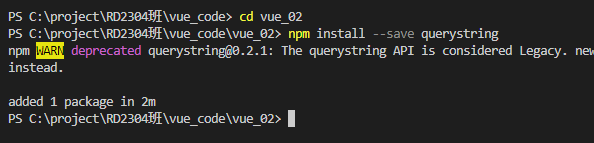
- 在组件中导入querystring
import qs from 'querystring'- 完整代码
<template>
    <button @click="addHero">添加数据</button>
</template>

<script setup>
    import axios from 'axios'
    import qs from 'querystring'
    import { computed } from 'vue';


    const addHero = computed(()=>{
        axios({
        method:'post',
        url:'/api/hero',
        data:qs.stringify({
            hname:"雪如意",
            sex:'女',
            job:"法师",
            level:12
        })
    }).then(res=>{
        console.log(res.data)
    });

    });

</script>
🌿 快捷方案
🍁 get请求
axios.get("/api/hero").then(res=>{
      console.log(res.data)
})
🍁 post请求
axios.post(
  "/api/hero",
  qs.stringify({
    hname:"马大哈",
    sex:'男',
    job:"法师",
    level:11
  })
).then(res=>{
  console.log(res.data)
})
🍁 put请求
axios.put(
  "/api/hero/",
  qs.stringify({
    id:1,
    hname:"雪如意",
    sex:'男'
  })

).then(res=>{
  console.log(res.data)
})
🍁 delete请求
axios.delete(
  "/api/hero/"+id.value

).then(res=>{
  console.log(res.data)
})
🍁 完整代码:
<template>

    <button @click="addHero">添加数据</button><br/>
    <button @click="getAllHeros">查询数据</button><br/>
    <input type="text" v-model="id"><button @click="updateHero">修改数据</button><br/>
    <hr/>
    <input type="text" v-model="id"><button @click="deleteHero">删除数据</button><br/>
</template>

<script setup>
    import axios from 'axios'
    import qs from 'querystring'
    import { computed,ref } from 'vue';

    const getAllHeros = computed(()=>{
        axios.get("/api/hero").then(res=>{
            console.log(res.data)
        })
    })


    const addHero = computed(()=>{
        axios.post(
            "/api/hero",
            qs.stringify({
                hname:"马大哈",
                sex:'男',
                job:"法师",
                level:11
                })
        ).then(res=>{
            console.log(res.data)
        })

    });

    const id = ref(0)
    const updateHero = computed(()=>{

        if(id.value==0){
            alert("请输入要修改数据的id")
        }else{
            axios.put(
                "/api/hero/",
                qs.stringify({
                    id:id.value,
                    hname:"雪如意",
                    sex:'男'
                })

            ).then(res=>{
                console.log(res.data)
            })
         }

    })

    const deleteHero = computed(()=>{
        axios.delete(
                "/api/hero/"+id.value

            ).then(res=>{
                console.log(res.data)
            })
    })

</script>


![[SWPU2019]Web1 超详细教程](https://i-blog.csdnimg.cn/direct/3788682fb59c41eaa7120155947d1117.png)