目录
CV Architecture
ViT and U-Net
Training ViT
Florence-2
Load Model
Load images
CV Scenarios test
Genarate CAPTION from the images
DENSE REGION CAPTION and REGION_PROPOSA
Caption to Phrase Grounding
Bounding boxes
OCR test
Fine Tuning Florence2
Qianwen-VL
Qianwen-VL-Inference
截至目前,CV 模型主要基于卷积神经网络。然而,随着 Transformer 的兴起,Vision Transformer 也逐渐得到应用。
接下来,让我们看看主流的 CV 实现及其特性。
CV Architecture
U-Net
- Features: Encoder-decoder structure, skip connections.
- Network Type: Convolutional Neural Network (CNN).
- Applications: Image segmentation, medical image processing.
- Advantages: Efficient in segmentation tasks, preserves details.
- Disadvantages: Limited scalability for large datasets.
- Usage: Widely used in medical image segmentation.
- Main Models: Original U-Net, 3D U-Net, Stable Diffusion.
R-CNN
- Features: Selective search for generating candidate regions.
- Network Type: CNN-based.
- Applications: Object detection.
- Advantages: High detection accuracy.
- Disadvantages: High computational complexity, slow speed.
- Usage: Replaced by faster models like Faster R-CNN.
- Main Models: Fast R-CNN, Faster R-CNN.
GAN
- Features: Adversarial training between generator and discriminator.
- Network Type: Framework, usually using CNN.
- Applications: Image generation, style transfer.
- Advantages: Generates high-quality images.
- Disadvantages: Unstable training, prone to mode collapse.
- Usage: Widely used in generation tasks.
- Main Models: DCGAN, StyleGAN.
RNN/LSTM
- Features: Handles sequential data, remembers long-term dependencies.
- Network Type: Recurrent Neural Network.
- Applications: Time series prediction, video analysis.
- Advantages: Suitable for sequential data.
- Disadvantages: Difficult to train, gradient vanishing.
- Usage: Commonly used in sequence tasks.
- Main Models: LSTM, GRU.
GNN
- Features: Processes graph-structured data.
- Network Type: Graph Neural Network.
- Applications: Social network analysis, chemical molecule modeling.
- Advantages: Captures graph structure information.
- Disadvantages: Limited scalability for large graphs.
- Usage: Used in graph data tasks.
- Main Models: GCN, GraphSAGE.
Capsule Networks
- Features: Capsule structure, captures spatial hierarchies.
- Network Type: CNN-based.
- Applications: Image recognition.
- Advantages: Captures pose variations.
- Disadvantages: High computational complexity.
- Usage: Research stage, not widely applied.
- Main Models: Dynamic Routing.
Autoencoder
- Features: Encoder-decoder structure.
- Network Type: Can be CNN-based.
- Applications: Dimensionality reduction, feature learning.
- Advantages: Unsupervised learning.
- Disadvantages: Limited generation quality.
- Usage: Used for feature extraction and dimensionality reduction.
- Main Models: Variational Autoencoder (VAE).
Vision Transformer (ViT)
- Features: Based on self-attention mechanism, processes image patches.
- Network Type: Transformer.
- Applications: Image classification.
- Advantages: Captures global information.
- Disadvantages: Requires large amounts of data for training.
- Usage: Gaining popularity, especially on large datasets.
- Main Models: Original ViT, DeiT.
ViT and U-Net
According to the paper: "Understanding the Efficacy of U-Net & Vision Transformer for Groundwater Numerical Modelling," U-Net is generally more efficient than ViT, especially in sparse data scenarios. U-Net's architecture is simpler with fewer parameters, making it more efficient in terms of computational resources and time. While ViT has advantages in capturing global information, its self-attention mechanism has high computational complexity, particularly when handling large-scale data.
In the experiments of the paper, models combining U-Net and ViT outperformed the Fourier Neural Operator (FNO) in both accuracy and efficiency, especially in sparse data conditions.
In image processing, sparse data typically refers to incomplete or unevenly distributed information in images. For example:
- Low-resolution images: Fewer pixels, missing details.
- Occlusion or missing data: Parts of the image are blocked or data is missing.
- Uneven sampling: Lower pixel density in certain areas.
- In these cases, models need to infer the complete image content from limited pixel information.
After the emergence of Vision Transformers, new branches and variations have appeared:
- DeiT (Data-efficient Image Transformers) by Facebook AI: DeiT models are refined ViT models. The authors also released more training-efficient ViT models, which can be directly integrated into ViTModel or ViTForImageClassification. Four variants are available (in three different sizes): facebook/deit-tiny-patch16-224, facebook/deit-small-patch16-224, facebook/deit-base-patch16-224, and facebook/deit-base-patch16-384. Note that images should be prepared using DeiTImageProcessor.
- BEiT (BERT pre-training of Image Transformers) by Microsoft Research: BEiT models use a self-supervised method inspired by BERT (masked image modeling) and based on VQ-VAE, outperforming vision transformers with supervised pre-training.
- DINO (a self-supervised training method for Vision Transformers) by Facebook AI: Vision Transformers trained with the DINO method exhibit interesting properties not found in convolutional models. They can segment objects without being explicitly trained for it. DINO checkpoints can be found on the hub.
- MAE (Masked Autoencoder) by Facebook AI: By pre-training Vision Transformers to reconstruct the pixel values of a large portion (75%) of masked patches (using an asymmetric encoder-decoder architecture), the authors demonstrate that this simple method outperforms supervised pre-training after fine-tuning.
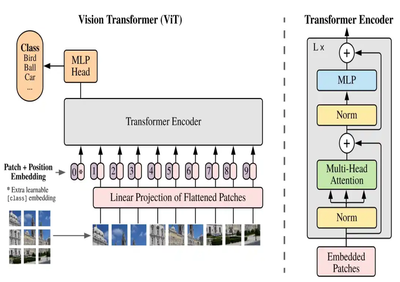
- The following diagram describes the workflow of Vision Transformer (ViT):
- Image Patching: The input image is divided into small, fixed-size patches.
- Linear Projection: Each image patch is flattened and transformed into a vector through linear projection.
- Position Embedding: Position embeddings are added to each image patch to retain positional information.
- CLS Token: A learnable CLS token is added at the beginning of the sequence for classification tasks.
- Transformer Encoder: These embedded vectors (including the CLS token) are fed into the Transformer encoder for multi-layer processing. Each layer includes a multi-head attention mechanism and a feedforward neural network.
- MLP Head: After processing by the encoder, the output of the CLS token is passed to a multi-layer perceptron (MLP) head for the final classification decision.
- This entire process demonstrates how the Transformer architecture can directly handle sequences of image patches to perform image classification tasks.
Training ViT
Pure ViT is mainly for Image Classifier.
class Attention(nn.Module):
    def __init__(self, dim, heads=8, dim_head=64, dropout=0.):
        super().__init__()
        inner_dim = dim_head * heads
        project_out = not (heads == 1 and dim_head == dim)
        self.heads = heads
        self.scale = dim_head ** -0.5
        self.norm = nn.LayerNorm(dim)
        self.attend = nn.Softmax(dim=-1)
        self.dropout = nn.Dropout(dropout)
        self.to_qkv = nn.Linear(dim, inner_dim * 3, bias=False)
        self.to_out = nn.Sequential(
            nn.Linear(inner_dim, dim),
            nn.Dropout(dropout)
        ) if project_out else nn.Identity()

    def forward(self, x):
        x = self.norm(x)
        qkv = self.to_qkv(x).chunk(3, dim=-1)
        q, k, v = map(lambda t: rearrange(t, 'b n (h d) -> b h n d', h=self.heads), qkv)
        dots = torch.matmul(q, k.transpose(-1, -2)) * self.scale
        attn = self.attend(dots)
        attn = self.dropout(attn)
        out = torch.matmul(attn, v)
        out = rearrange(out, 'b h n d -> b n (h d)')
        return self.to_out(out)

# 定义Feed Forward Network (FFN)
class FFN(nn.Module):
    def __init__(self, dim, hidden_dim, dropout=0.):
        super().__init__()
        self.net = nn.Sequential(
            nn.LayerNorm(dim),
            nn.Linear(dim, hidden_dim),
            nn.GELU(),
            nn.Dropout(dropout),
            nn.Linear(hidden_dim, dim),
            nn.Dropout(dropout)
        )

    def forward(self, x):
        return self.net(x)

# 定义Transformer Encoder
class Transformer(nn.Module):
    def __init__(self, dim, depth, heads, dim_head, mlp_dim_ratio, dropout):
        super().__init__()
        self.layers = nn.ModuleList([])
        mlp_dim = mlp_dim_ratio * dim
        for _ in range(depth):
            self.layers.append(nn.ModuleList([
                Attention(dim=dim, heads=heads, dim_head=dim_head, dropout=dropout),
                FFN(dim=dim, hidden_dim=mlp_dim, dropout=dropout)
            ]))

    def forward(self, x):
        for attn, ffn in self.layers:
            x = attn(x) + x
            x = ffn(x) + x
        return x

# 定义Vision Transformer (ViT)
class ViT(nn.Module):
    def __init__(self, *, image_size, patch_size, num_classes, dim, depth, heads, mlp_dim_ratio, pool='cls', channels=3, dim_head=64, dropout=0.):
        super().__init__()
        image_height, image_width = pair(image_size)
        patch_height, patch_width = pair(patch_size)
        assert image_height % patch_height == 0 and image_width % patch_width == 0, 'Image dimensions must be divisible by the patch size.'
        num_patches = (image_height // patch_height) * (image_width // patch_width)
        patch_dim = channels * patch_height * patch_width

        self.to_patch_embedding = nn.Sequential(
            Rearrange('b c (h p1) (w p2) -> b (h w) (p1 p2 c)', p1=patch_height, p2=patch_width),
            nn.LayerNorm(patch_dim),
            nn.Linear(patch_dim, dim),
            nn.LayerNorm(dim)
        )

        self.cls_token = nn.Parameter(torch.randn(1, 1, dim))
        self.pos_embedding = nn.Parameter(torch.randn(1, num_patches + 1, dim))
        self.dropout = nn.Dropout(dropout)
        self.transformer = Transformer(dim, depth, heads, dim_head, mlp_dim_ratio, dropout)
        self.pool = pool
        self.to_latent = nn.Identity()
        self.mlp_head = nn.Linear(dim, num_classes)

    def forward(self, img):
        x = self.to_patch_embedding(img)
        b, n, _ = x.shape
        cls_tokens = repeat(self.cls_token, '1 1 d -> b 1 d', b=b)
        x = torch.cat((cls_tokens, x), dim=1)
        x += self.pos_embedding[:, :(n + 1)]
        x = self.dropout(x)
        x = self.transformer(x)
        cls_token = x[:, 0]
        feature_map = x[:, 1:]
        pooled_output = cls_token if self.pool == 'cls' else feature_map.mean(dim=1)
        pooled_output = self.to_latent(pooled_output)
        classification_result = self.mlp_head(pooled_output)
        return classification_result

# 辅助函数
def pair(t):
    return t if isinstance(t, tuple) else (t, t)

# 数据预处理
transform = transforms.Compose([
    transforms.Resize((32, 32)),
    transforms.ToTensor(),
    transforms.Normalize((0.5,), (0.5,))
])

# 加载CIFAR-10数据集
train_dataset = datasets.CIFAR10(root='./data', train=True, download=True, transform=transform)
train_loader = DataLoader(train_dataset, batch_size=64, shuffle=True)

# 初始化ViT模型
model = ViT(
    image_size=32,
    patch_size=4,
    num_classes=10,
    dim=128,
    depth=6,
    heads=8,
    mlp_dim_ratio=4,
    dropout=0.1
)

# 定义损失函数和优化器
criterion = nn.CrossEntropyLoss()
optimizer = optim.Adam(model.parameters(), lr=3e-4)

# 训练模型
device = torch.device('cuda' if torch.cuda.is_available() else 'cpu')
model.to(device)

for epoch in range(10):  # 训练10个epoch
    model.train()
    total_loss = 0
    for images, labels in train_loader:
        images, labels = images.to(device), labels.to(device)
        optimizer.zero_grad()
        outputs = model(images)
        loss = criterion(outputs, labels)
        loss.backward()
        optimizer.step()
        total_loss += loss.item()

    print(f'Epoch {epoch+1}, Loss: {total_loss/len(train_loader)}')

# 保存整个模型
torch.save(model, 'vit_complete_model.pth')
print("训练完成并保存模型!")
Training result:
Files already downloaded and verified
Epoch 1, Loss: 1.5606277365513774
Epoch 2, Loss: 1.2305729564498453
Epoch 3, Loss: 1.0941925532067829
Epoch 4, Loss: 1.0005672584714183
Epoch 5, Loss: 0.9230595080139082
Epoch 6, Loss: 0.8589703797379418
Epoch 7, Loss: 0.7988450761188937
Epoch 8, Loss: 0.7343863746546724
Epoch 9, Loss: 0.6837297593388716
Epoch 10, Loss: 0.6306750321632151
训练完成并保存模型!
Inference test:
# 数据预处理
transform = transforms.Compose([
transforms.Resize((32, 32)),
transforms.ToTensor(),
transforms.Normalize((0.5,), (0.5,))
])
# 加载CIFAR-10数据集
test_dataset = datasets.CIFAR10(root='./data', train=False, download=True, transform=transform)
test_loader = DataLoader(test_dataset, batch_size=64, shuffle=False)
# 加载整个模型
model = torch.load('vit_complete_model.pth')
model.eval()
# 设备设置
device = torch.device('cuda' if torch.cuda.is_available() else 'cpu')
model.to(device)
# 进行推理测试
with torch.no_grad():
for images, labels in test_loader:
images, labels = images.to(device), labels.to(device)
outputs = model(images)
_, predicted = torch.max(outputs, 1)
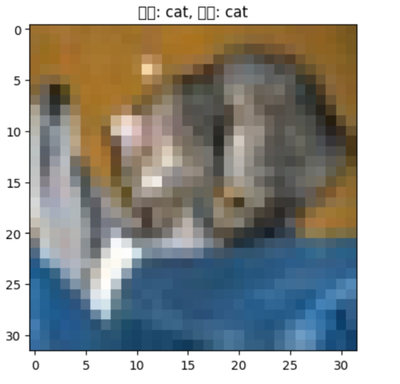
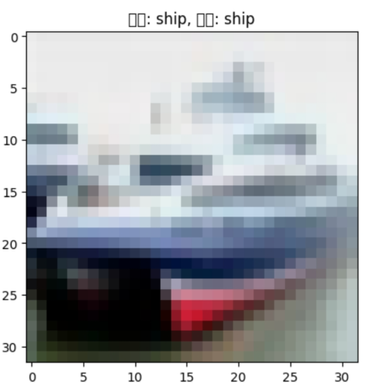
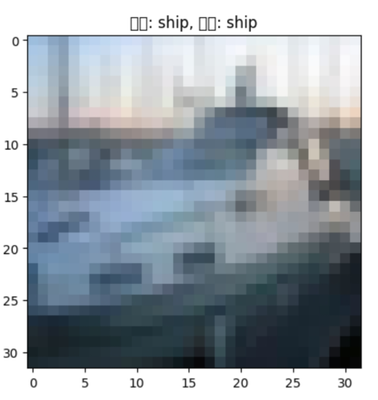
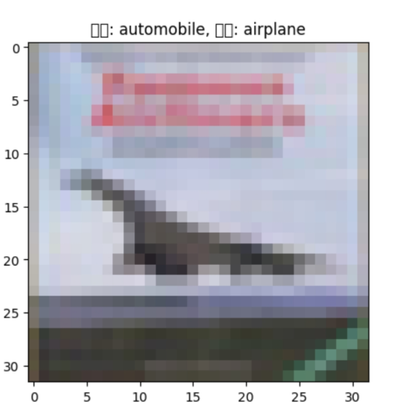
# 显示前5个样本的预测结果和图像
for i in range(5):
image = images[i].cpu().numpy().transpose((1, 2, 0))
image = (image * 0.5) + 0.5 # 反归一化
plt.imshow(image)
plt.title(f'预测: {test_dataset.classes[predicted[i]]}, 实际: {test_dataset.classes[labels[i]]}')
plt.show()
break # 只显示一批数据 Inference result:
Florence-2
Microsoft's Florence-2 uses a Transformer-based architecture, specifically adopting DeiT (Data-efficient Vision Transformer) as its visual encoder. DeiT's architecture is the same as ViT, with the addition of a distillation token in the input tokens. Distillation is a method to improve training performance, especially since ViT performs poorly with insufficient data.
BTW, Phi-3 vision is also based on ViT (ViT-L).
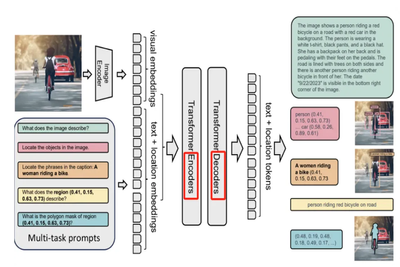
Florence-2's model architecture employs a sequence-to-sequence learning approach. This means the model processes input sequences (such as images with text prompts) progressively and generates output sequences (such as descriptions or labels). In the sequence-to-sequence framework, each task is treated as a translation problem: the model receives an input image and a specific task prompt, then generates the corresponding output.
Load Model
model_id = 'microsoft/Florence-2-large-ft'
model = AutoModelForCausalLM.from_pretrained(model_id, trust_remote_code=True, device_map='cuda')
print(model)
processor = AutoProcessor.from_pretrained(model_id, trust_remote_code=True)
Define related functrions:
def run_example(task_prompt, image):
    inputs = processor(text=task_prompt, images=image, return_tensors="pt")
    generated_ids = model.generate(
      input_ids=inputs["input_ids"].cuda(),
      pixel_values=inputs["pixel_values"].cuda(),
      max_new_tokens=1024,
      early_stopping=False,
      do_sample=False,
      num_beams=3,
    )
    generated_text = processor.batch_decode(generated_ids, skip_special_tokens=False)[0]
    parsed_answer = processor.post_process_generation(
        generated_text,
        task=task_prompt,
        image_size=(image.width, image.height)
    )

    return parsed_answer
Load images
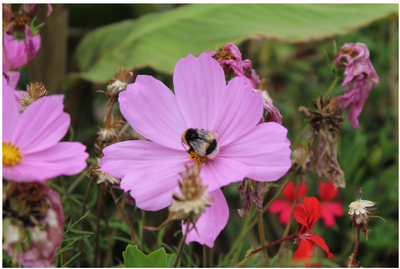
url1 = "https://huggingface.co/datasets/huggingface/documentation-images/resolve/main/transformers/tasks/bee.JPG?download=true"
image1 = Image.open(requests.get(url1, stream=True).raw)
image1.show()
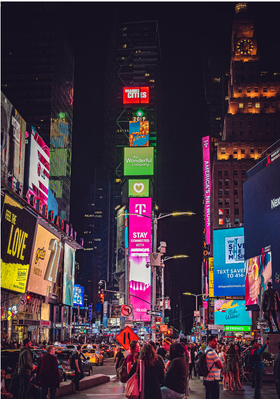
url2 = "https://images.unsplash.com/photo-1601751664209-be452817a8ce?q=80&w=2574&auto=format&fit=crop&ixlib=rb-4.0.3&ixid=M3wxMjA3fDB8MHxwaG90by1wYWdlfHx8fGVufDB8fHx8fA%3D%3D"
image2 = Image.open(requests.get(url2, stream=True).raw)
image2.show()
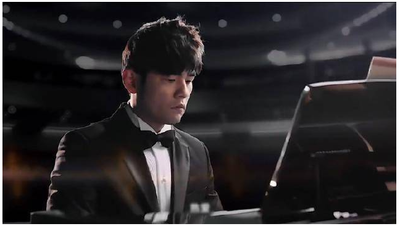
# 从本地路径加载图片
local_image_path = "/root/zhou.jpeg"
image3 = Image.open(local_image_path)
image3.show()
local_image_path = "/root/4.jpg"
image4 = Image.open(local_image_path)
image4.show()
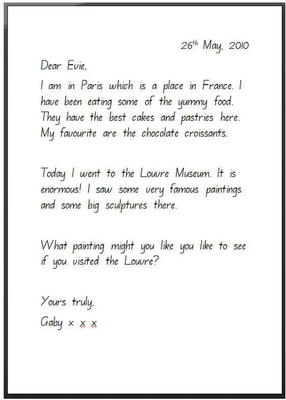
local_image_path = "/root/letter.jpg"
image5 = Image.open(local_image_path)
image5.show()

CV Scenarios test
Genarate CAPTION from the images
task_prompt = "<CAPTION>"
results = run_example(task_prompt,image1)
print(results)

***output***
{'<CAPTION>': 'A bee is sitting on a pink flower.'}
task_prompt = "<CAPTION>"
results = run_example(task_prompt,image2)
print(results)

***output***
{'<CAPTION>': 'A crowded city street at night with lots of people.'}
task_prompt = "<CAPTION>"
results = run_example(task_prompt,image3)
print(results)

***output***
{'<CAPTION>': 'A man in a tuxedo sitting at a piano.'}
task_prompt = "<CAPTION>"
results = run_example(task_prompt,image4)
print(results)

***output***
{'<CAPTION>': 'A man standing on a stage in front of a large screen that says Microsoft Al Day.'}
task_prompt = '<DETAILED_CAPTION>'
run_example(task_prompt, image4)

***output***
{'<DETAILED_CAPTION>': 'In this image we can see a few people, among them, some people are holding the mics, there are some screens with some text and images, also we can some lights, and the background is dark.'}
task_prompt = '<MORE_DETAILED_CAPTION>'
run_example(task_prompt, image1)


***output***
{'<MORE_DETAILED_CAPTION>': 'A bee is sitting on a flower. The flower is a light pink color. The bee is black and yellow. There is a yellow center on the flower. There are other flowers around the flower as well.'}
DENSE REGION CAPTION and REGION_PROPOSA
task_prompt = '<DENSE_REGION_CAPTION>'
results = run_example(task_prompt,image1)
print(results)
plot_bbox(image1, results['<DENSE_REGION_CAPTION>'])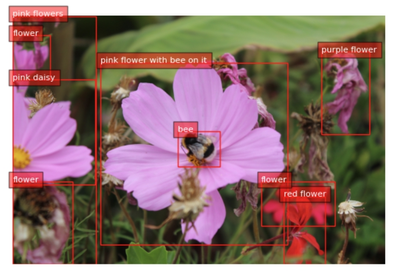
task_prompt = '<REGION_PROPOSAL>'
results = run_example(task_prompt,image3)
print(results)
plot_bbox(image3, results['<REGION_PROPOSAL>'])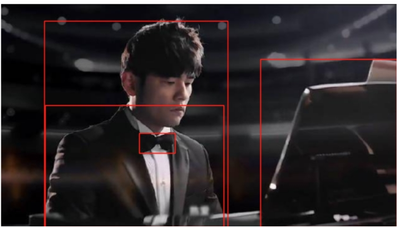
Caption to Phrase Grounding
import requests

from PIL import Image
from transformers import AutoProcessor, AutoModelForCausalLM


model = AutoModelForCausalLM.from_pretrained("microsoft/Florence-2-large", trust_remote_code=True)
processor = AutoProcessor.from_pretrained("microsoft/Florence-2-large", trust_remote_code=True)

url = "https://huggingface.co/datasets/huggingface/documentation-images/resolve/main/transformers/tasks/car.jpg?download=true"
image = Image.open(requests.get(url, stream=True).raw)


def run_example(task_prompt, text_input=None):
    if text_input is None:
        prompt = task_prompt
    else:
        prompt = task_prompt + text_input

    inputs = processor(text=prompt, images=image, return_tensors="pt")
    generated_ids = model.generate(
        input_ids=inputs["input_ids"],
        pixel_values=inputs["pixel_values"],
        max_new_tokens=1024,
        num_beams=3
    )
    generated_text = processor.batch_decode(generated_ids, skip_special_tokens=False)[0]
    parsed_answer = processor.post_process_generation(generated_text, task=task_prompt, image_size=(image.width, image.height))

    return parsed_answer

def draw_bboxes(image, bboxes, labels):
    draw = ImageDraw.Draw(image)
    for bbox, label in zip(bboxes, labels):
        # bbox 是 [x1, y1, x2, y2] 的格式
        draw.rectangle(bbox, outline="red", width=3)
        draw.text((bbox[0], bbox[1]), label, fill="red")
    image.show()

# 运行示例
task_prompt = "<CAPTION_TO_PHRASE_GROUNDING>"
text_input = "A green car parked in front of a yellow building."
results = run_example(task_prompt, text_input=text_input)

# 解析结果并绘制边界框
bboxes = results['<CAPTION_TO_PHRASE_GROUNDING>']['bboxes']
labels = results['<CAPTION_TO_PHRASE_GROUNDING>']['labels']
draw_bboxes(image, bboxes, labels) 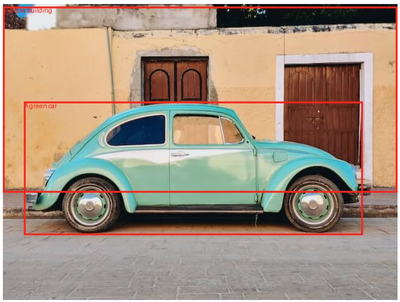
Bounding boxes
To process the location tokens and render them on the image, the following method will be called to plot bounding boxes.
import matplotlib.pyplot as plt
import matplotlib.patches as patches
def plot_bbox(image, data):
   # Create a figure and axes
    fig, ax = plt.subplots()

    # Display the image
    ax.imshow(image)

    # Plot each bounding box
    for bbox, label in zip(data['bboxes'], data['labels']):
        # Unpack the bounding box coordinates
        x1, y1, x2, y2 = bbox
        # Create a Rectangle patch
        rect = patches.Rectangle((x1, y1), x2-x1, y2-y1, linewidth=1, edgecolor='r', facecolor='none')
        # Add the rectangle to the Axes
        ax.add_patch(rect)
        # Annotate the label
        plt.text(x1, y1, label, color='white', fontsize=8, bbox=dict(facecolor='red', alpha=0.5))

    # Remove the axis ticks and labels
    ax.axis('off')

    # Show the plot
    plt.show()

task_prompt = '<OD>'
results = run_example(task_prompt,image3)
print(results)
plot_bbox(image3, results['<OD>'])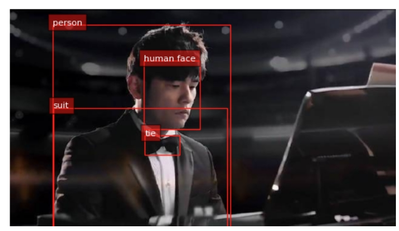
OCR test
task_prompt = '<OCR_WITH_REGION>'
results = run_example(task_prompt,image5)
print(results)
output_image5 = copy.deepcopy(image5)
draw_ocr_bboxes(output_image5, results['<OCR_WITH_REGION>'])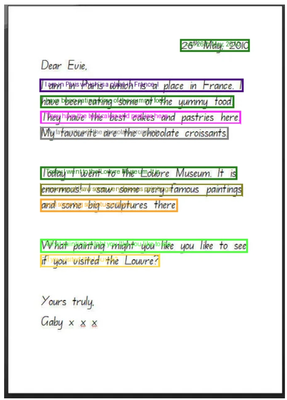
Fine Tuning Florence2
Load dataset on HF:
import torch
from datasets import load_dataset

data = load_dataset("HuggingFaceM4/DocumentVQA")

from transformers import AutoModelForCausalLM, AutoProcessor
import torch

device = torch.device("cuda" if torch.cuda.is_available() else "cpu")

model = AutoModelForCausalLM.from_pretrained(
    "microsoft/Florence-2-base-ft",
    trust_remote_code=True,
    revision='refs/pr/6'
).to(device)
processor = AutoProcessor.from_pretrained("microsoft/Florence-2-large-ft",
    trust_remote_code=True, revision='refs/pr/6')

for param in model.vision_tower.parameters():
  param.is_trainable = False

import torch
from torch.utils.data import Dataset

class DocVQADataset(Dataset):
    def __init__(self, data):
        self.data = data

    def __len__(self):
        return len(self.data)

    def __getitem__(self, idx):
        example = self.data[idx]
        question = "<DocVQA>" + example['question']
        first_answer = example['answers'][0]
        image = example['image'].convert("RGB")
        return question, first_answer, image


class DocVQADataset(Dataset):

    def __init__(self, data):
        self.data = data

    def __len__(self):
        return len(self.data)

    def __getitem__(self, idx):
        example = self.data[idx]
        question = "<DocVQA>" + example['question']
        first_answer = example['answers'][0]
        image = example['image'].convert("RGB")
        return question, first_answer, image
Identify training and validation dataset:
import os
from torch.utils.data import DataLoader
from tqdm import tqdm
from transformers import AdamW, get_scheduler

def collate_fn(batch):
    questions, answers, images = zip(*batch)
    inputs = processor(text=list(questions), images=list(images), return_tensors="pt", padding=True).to(device)
    return inputs, answers

train_dataset = DocVQADataset(data['train'])
val_dataset = DocVQADataset(data['validation'])
batch_size = 20
num_workers = 0

train_loader = DataLoader(train_dataset, batch_size=batch_size,
                          collate_fn=collate_fn, num_workers=num_workers, shuffle=True)
val_loader = DataLoader(val_dataset, batch_size=batch_size,
                          collate_fn=collate_fn, num_workers=num_workers)
Set training parameters and lauch training:
epochs = 1
optimizer = AdamW(model.parameters(), lr=1e-6)
num_training_steps = epochs * len(train_loader)
lr_scheduler = get_scheduler(
    name="linear",
    optimizer=optimizer,
    num_warmup_steps=0,
    num_training_steps=num_training_steps,
)

# 创建保存模型的目录
model_dir = "/root/models/florence2"
os.makedirs(model_dir, exist_ok=True)

for epoch in range(epochs):
    model.train()
    train_loss = 0
    i = -1
    for inputs, answers in tqdm(train_loader, desc=f"Training Epoch {epoch + 1}/{epochs}"):
        i += 1
        input_ids = inputs["input_ids"]
        pixel_values = inputs["pixel_values"]
        labels = processor.tokenizer(text=answers, return_tensors="pt", padding=True, return_token_type_ids=False).input_ids.to(device)
        outputs = model(input_ids=input_ids, pixel_values=pixel_values, labels=labels)
        loss = outputs.loss
        loss.backward()
        optimizer.step()
        lr_scheduler.step()
        optimizer.zero_grad()
        train_loss += loss.item()
    avg_train_loss = train_loss / len(train_loader)
    print(f"Average Training Loss: {avg_train_loss}")

    model.eval()
    val_loss = 0
    with torch.no_grad():
        for batch in tqdm(val_loader, desc=f"Validation Epoch {epoch + 1}/{epochs}"):
            inputs, answers = batch
            input_ids = inputs["input_ids"]
            pixel_values = inputs["pixel_values"]
            labels = processor.tokenizer(text=answers, return_tensors="pt", padding=True, return_token_type_ids=False).input_ids.to(device)
            outputs = model(input_ids=input_ids, pixel_values=pixel_values, labels=labels)
            loss = outputs.loss
            val_loss += loss.item()
    print(val_loss / len(val_loader))

    # 保存检查点
    checkpoint_dir = os.path.join(model_dir, f"checkpoint-epoch-{epoch + 1}")
    model.save_pretrained(checkpoint_dir)
    processor.save_pretrained(checkpoint_dir)
    print(f"Checkpoint saved at {checkpoint_dir}")

# 最终保存模型
model.save_pretrained(model_dir)
processor.save_pretrained(model_dir)
print(f"Model saved at {model_dir}")
Then load trained model from local and do Inference:
from transformers import AutoModelForCausalLM, AutoProcessor, AutoConfig
import torch
from PIL import Image
import matplotlib.pyplot as plt
# 加载配置、模型和处理器
config = AutoConfig.from_pretrained("/root/models/florence2", trust_remote_code=True)
if config.vision_config.model_type != 'davit':
config.vision_config.model_type = 'davit'
model = AutoModelForCausalLM.from_pretrained("/root/models/florence2", config=config, trust_remote_code=True)
processor = AutoProcessor.from_pretrained("/root/models/florence2", trust_remote_code=True)
# 设置设备
device = torch.device("cuda" if torch.cuda.is_available() else "cpu")
model.to(device)
def prepare_inference_data(question, image_path):
image = Image.open(image_path).convert("RGB")
inputs = processor(text=[question], images=[image], return_tensors="pt", padding=True).to(device)
return inputs
def infer(question, image_path):
model.eval()
inputs = prepare_inference_data(question, image_path)
with torch.no_grad():
outputs = model.generate(input_ids=inputs["input_ids"], pixel_values=inputs["pixel_values"], max_new_tokens=100)
answer = processor.tokenizer.decode(outputs[0], skip_special_tokens=True)
return answer
# 示例问题和图像路径
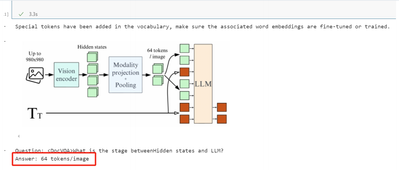
question = "<DocVQA>What is the stage betweenHidden states and LLM?"
image_path = "/home/david/2.jpg"
# 进行推理
answer = infer(question, image_path)
# 显示图片
image = Image.open(image_path)
plt.imshow(image)
plt.axis('off') # 关闭坐标轴
plt.show()
# 打印问题和答案
print(f"Question: {question}")
print(f"Answer: {answer}") The output is as following:
More detailed info please refer to my repo get more info about Florence-2 training and Inference:
https://github.com/xinyuwei-david/david-share/tree/master/Multimodal-Models/Florence-2-Inference-and...
Qianwen-VL
Qwen2-VL adopts an encoder-decoder architecture, combining Vision Transformer (ViT) with the Qwen2 language model. This architecture enables Qwen2-VL to handle image and video inputs and support multimodal tasks.
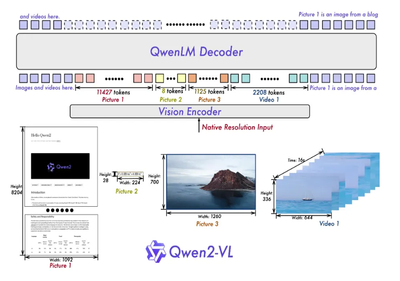
Qwen2-VL also utilizes a new Multimodal Rotary Position Embedding (M-ROPE). Position embeddings are decomposed to capture one-dimensional text, two-dimensional visual, and three-dimensional video positional information, enhancing the model's ability to process multimodal data.
Training of Qwen2-VL
Pre-training Phase:
- Objective: The main goal is to optimize the visual encoder and adapter, while the language model (LLM) remains frozen.
- Dataset: A large, curated image-text pair dataset is used, crucial for the model to understand the relationship between visuals and text.
- Optimization Goal: Improve the model's text generation ability by minimizing the cross-entropy of text tokens, enabling more accurate text descriptions given an image.
- Multitask Pre-training Phase:
- Training the Entire Model: In this phase, the entire model, including the LLM, is trained.
- Task Types: The model is trained on various vision-language tasks, such as image captioning and visual question answering.
- Data Quality: High-quality, fine-grained data is used to provide richer visual and language information.
- Input Resolution: Increasing the input resolution of the visual encoder to reduce information loss, helping the model capture image details better.
- Instruction Fine-tuning Phase:
- Objective: Enhance the model's conversational and instruction-following capabilities.
- Freezing the Visual Encoder: The visual encoder remains frozen, focusing on optimizing the LLM and adapter.
- Data Type: A mix of multimodal and pure text dialogue data is used for optimization, aiding the model in better understanding and generating natural language when processing multimodal inputs.
Qianwen-VL-Inference
messages = [
    {
        "role": "user",
        "content": [
            {
                "type": "image",
                "image": "/root/image0.jpg",
            },
            {"type": "text", "text": "How many dogs do you see? What are they doing? Reply in Chinese."},
        ],
    }
]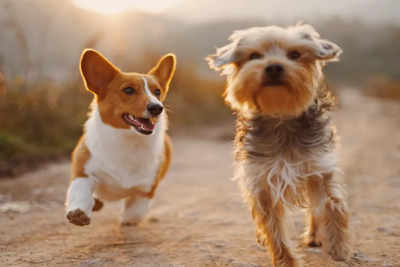
['在这张图片中,我看到两只狗。左边的狗看起来像是柯基犬,而右边的狗看起来像是约克夏梗犬。它们似乎在户外的环境中奔跑,可能是散步或玩耍。']
The corresponding English translation is:
[‘In this picture, I see two dogs. The dog on the left looks like a Corgi, while the dog on the right appears to be a Yorkshire Terrier. They seem to be running outdoors, possibly taking a walk or playing. ’]
The model supports analysing video, but also using frame splitting. The model does not analyse audio.
model_name = "Qwen/Qwen2-VL-2B-Instruct"
model = Qwen2VLForConditionalGeneration.from_pretrained(
    model_name,
    torch_dtype=torch.bfloat16,
    attn_implementation="flash_attention_2",
    device_map="auto"
)
processor = AutoProcessor.from_pretrained(model_name)

messages = [
    {
        "role": "user",
        "content": [
            {
                "type": "video",
                "video": "/root/cars.mp4",
                "max_pixels": 360 * 420,
                "fps": 1.0,  # 确保 fps 正确传递
                "video_fps": 1.0,  # 添加 video_fps
            },
            {"type": "text", "text": "Describe this video in Chinese."},
        ],
    }
]

text = processor.apply_chat_template(
    messages, tokenize=False, add_generation_prompt=True
)

image_inputs, video_inputs = process_vision_info(messages)

inputs = processor(
    text=[text],
    images=image_inputs,
    videos=video_inputs,
    padding=True,
    return_tensors="pt",
)

inputs = inputs.to("cuda")

generated_ids = model.generate(**inputs, max_new_tokens=256)
generated_ids_trimmed = [
    out_ids[len(in_ids):] for in_ids, out_ids in zip(inputs.input_ids, generated_ids)
]

output_text = processor.batch_decode(
    generated_ids_trimmed, skip_special_tokens=True, clean_up_tokenization_spaces=False
)

print(output_text) 
引用参考:
- https://huggingface.co/docs/transformers/model_doc/vit
- https://arxiv.org/pdf/2307.04010
- https://newsletter.kaitchup.com/p/run-qwen2-vl-on-your-computer-with
- https://huggingface.co/blog/finetune-florence2