前言
最近有个需求,是在浏览器插件中获取 window 对象下的某个数据,当时觉得很简单,和 document 一样,直接通过嵌入 content_scripts 直接获取,然后使用 sendMessage 发送数据到插件就行了,结果发现不是这样滴…
在这里不推荐使用
runtime.executeScript进行注入,很可能会报错:
Refused to execute inline script because it violates the following Content Security Policy directive: “script-src ‘self’ ‘wasm-unsafe-eval’ ‘inline-speculation-rules’ http://localhost:* http://127.0.0.1:*”. Either the ‘unsafe-inline’ keyword, a hash (‘sha256-P5exJBBLYN1KVh+CK9MkXvRal4ZQQu9VaKPvx4JuVLE=’), or a nonce (‘nonce-…’) is required to enable inline execution.
Chrome 浏览器插件获取网页 window 对象(方案一)
一、两个文件,通过 CustomEvent 传递消息
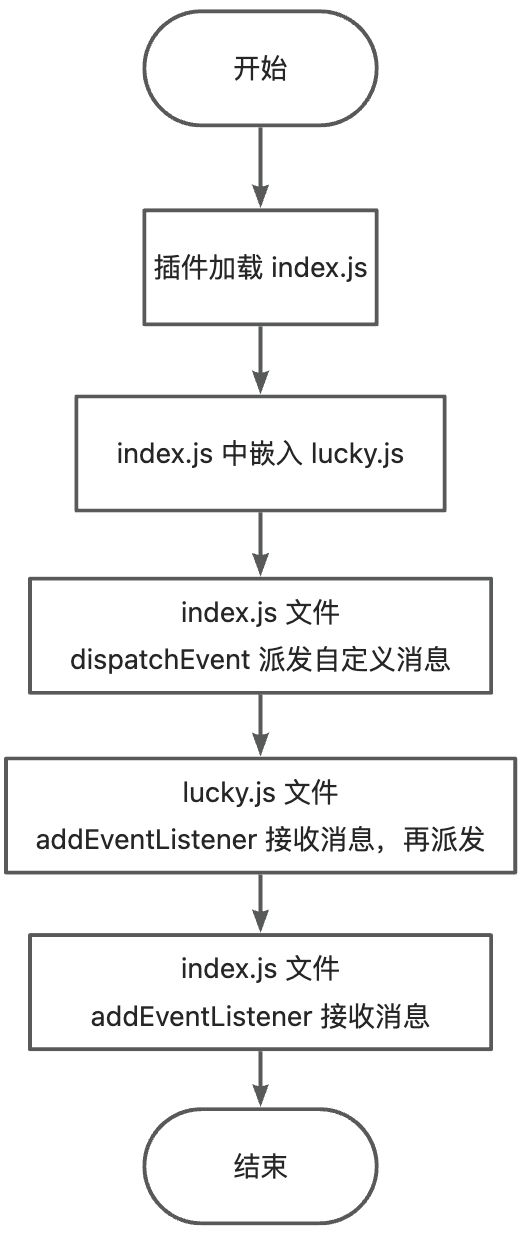
1. 方案思路
- 新建两个
js文件,index.js和lucky.js - 在
content_scripts中嵌入index.js文件 - 在
index.js中通过script标签,嵌入lucky.js - 在
index.js中通过window.dispatchEvent派发自定义custom event消息;派发消息的内容为一个函数转换的字符串,函数返回的内容则为你需要获取的window下的对象值 - 在
lucky.js中通过addEventListener监听消息,再通过dispatchEvent派发消息;监听到对应的custom event的type的时候,进行参数函数的执行,通过new Function()的方式执行,并获取返回值,再进行消息派发到index.js文件 - 在
index.js中通过addEventListener监听消息拿到对应的值 - 在
manifest.json文件中添加web_accessible_resources
1.1. 方案流程
流程图如下:

2. 获取内容
获取
window下的MyBlog字段
window.MyBlog = {
  juejin: 'https://juejin.cn/user/2409752520033768/posts',
  csdn: 'https://guoqiankun.blog.csdn.net/',
  'chrome-blog': {
    netlify: 'https://gqk-extension.netlify.app/',
    github: 'https://18055975947.github.io/extension/'
  }
}
3. 实现代码
3.1. index.js
/**
 * index 文件发送消息到 lucky.js 文件
 * @param {string} type custom 类型
 * @param {any} data 数据
 */
const indexSendMessageToLucky = async (type, data) => {
  window.dispatchEvent(new CustomEvent('custom-index-type', { detail: { type, data } }))
  return new Promise((res) => {
    function handleResponse(e) {
      const detail = e.detail
      if (detail.type == type) {
        window.removeEventListener('custom-lucky-type', handleResponse)
        return res(detail.data)
      }
    }
    window.addEventListener('custom-lucky-type', handleResponse)
  })
}

/**
 * 发送消息
 */
const sendMessage = () => {
  function getMyBolg() {
    return window.MyBlog
  }
  indexSendMessageToLucky('run-index-fun', {
    function: getMyBolg.toString()
  }).then((res) => {
    console.log('res-->', res)
  }).catch((e) => {
    console.log('e', e)
  })
}
/**
 * 初始化
 */
const init = () => {
  const script = document.createElement('script')
  script.src = chrome.runtime.getURL('lucky.js')
  document.head.appendChild(script)

  // lucky.js 加载
  setTimeout(() => sendMessage(), 100)

  // script.onload = () => {
  //   sendMessage()
  // }

  // 插入 button 按钮
  const button = document.createElement('button')
  button.innerText = '获取数据'
  button.id = 'chrome-ext-but'
  document.body.appendChild(button)
  button.onclick = () => {
    sendMessage()
  }
}

// 判断 window.top 和 self 是否相等,如果不相等,则不注入
if (window.top == window.self) {
  init()
}
3.2. lucky.js
/**
 * 事件监听
 */
window.addEventListener('custom-index-type', async (e) => {
  const { type, data } = e.detail
  switch (type) {
    case 'run-index-fun': {
      const fn = new Function(`return (${data.function})(...arguments)`)
      const rs = await fn(...(data.args ?? []))
      luckySendMessageToIndex(type, rs)
      break
    }
  }
})

/**
 * lucky 文件发送消息到 index.js 文件
 * @param {string} type custom 类型
 * @param {any} data 数据
 */
const luckySendMessageToIndex = (type, data) => {
  window.dispatchEvent(
    new CustomEvent('custom-lucky-type', {
      detail: { type, data, file: 'lucky' }
    })
  )
}
3.3. manifest.json
{
  "manifest_version": 3,
  "name": "Get Winddow Object Field",
  "version": "1.0",
  "description": "Gets the field under window",
  "content_scripts": [
    {
      "js": [
        "index.js"
      ],
      "matches": ["http://localhost:*/*"],
      "all_frames": true,
      "run_at": "document_end"
    }
  ],
  "background": {
    "service_worker": "service-worker.js"
  },
  "host_permissions": [
    "http://localhost:*/*"
  ],
  "permissions": [
  ],
  "web_accessible_resources": [
    {
      "resources": ["lucky.js"],
      "matches": ["http://localhost:*/*"],
      "use_dynamic_url": true
    }
  ]
}
3.4. 项目文件结构
.
├── index.html
├── index.js
├── lucky.js
├── manifest.json
└── service-worker.js
3.5. 方案效果
在控制台中选择当前插件,即可查看获取的 window 下的 MyBlog 对象

4. 动态获取数据
4.1. 实现思路
index.js文件中动态插入button按钮到当前页面- 绑定
click事件, - 点击的时候触发
index.js文件的派发事件,并进行数据监听 - 拿到对应的数据再进行操作
4.2. 点击按钮

4.3. 数据返回

5. 代码地址
- Gitee
- Github
参考
- 【Content_script】
- 【CustomEvent:CustomEvent() 构造函数】


![[数据集][目标检测]翻越栏杆行为检测数据集VOC+YOLO格式512张1类别](https://i-blog.csdnimg.cn/direct/89dbb7b5f7f048e1be7b315b429907df.png)


