目录
1 docker 镜像仓库介绍
1.1 什么是docker仓库
1.2 docker hub
2 docker仓库的工作原理
2.1 仓库中的三个角色
2.2 pull原理
2.3 push原理
3 使用互联网上提供的托管镜像仓库
3.1 docker hub 镜像仓库
3.1.1 docker hub 镜像仓库介绍
3.1.2 docker hub的使用方法
4 搭建docker的私有仓库
4.1 为什么搭建私有仓库
4.2 搭建简单的Registry仓库
4.2.1 下载Registry镜像
4.2.2 开启Registry
4.2.3 上传镜像到仓库中
4.4.4 为Registry提加密传输
4.4.5 htpasswd工具 创建用户认证
4.3 构建企业级私有仓库
4.3.1 私有仓库之HARBOR
4.3.1.1 HARBOR 的获取
4.3.1.2 HARBOR 的介绍
4.3.1.3 部署harbor
4.3.1.4 ChartMuseum 参数
4.3.1.5 管理HARBOR
4.5.1.6 查看镜像加载
4.5.1.7 实现效果
1 docker 镜像仓库介绍
1.1 什么是docker仓库
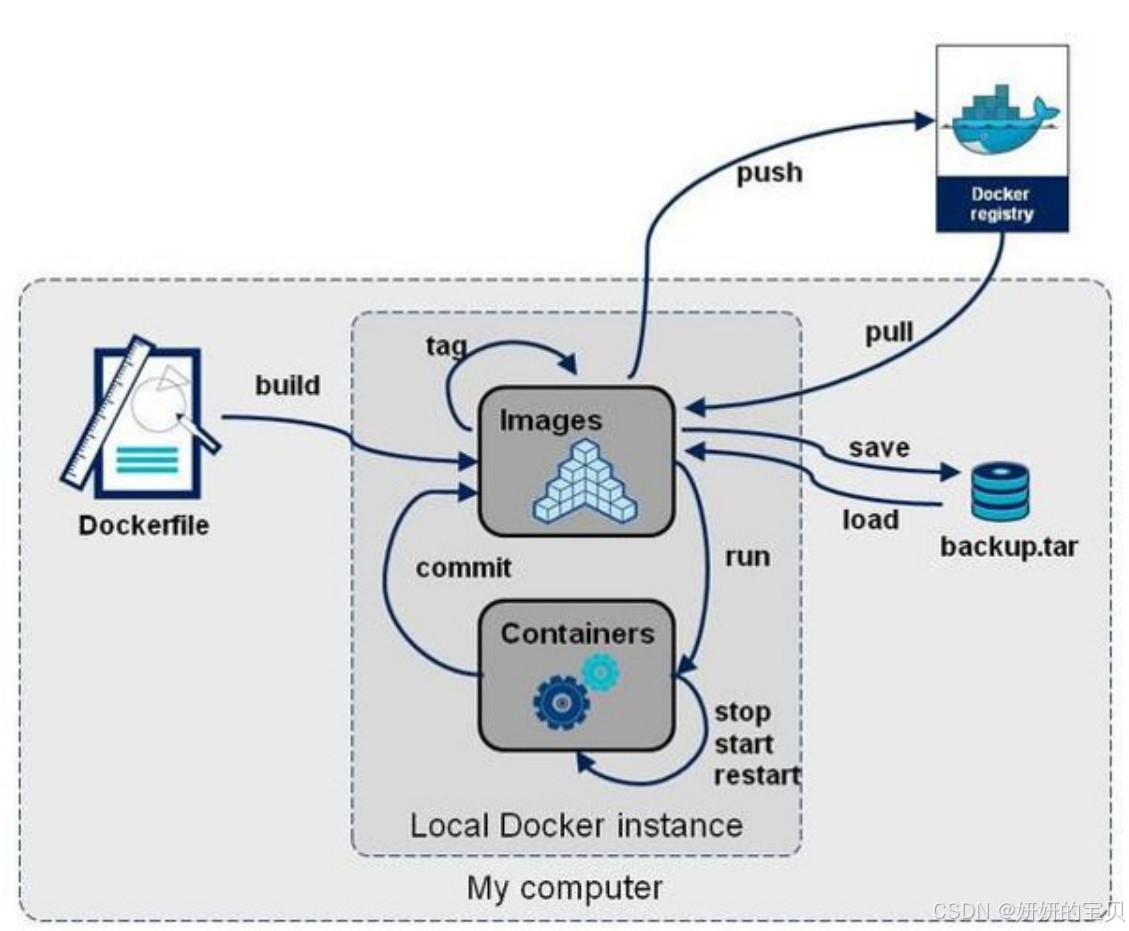
- 公共仓库,如 Docker Hub,任何人都可以访问和使用其中的镜像。许多常用的软件和应用都有在 Docker Hub 上提供的镜像,方便用户直接获取和使用。 例如,想要部署一个 Nginx 服务器,就可以从 Docker Hub 上拉取 Nginx 的镜像。
- 私有仓库则是由组织或个人自己搭建和管理的,用于存储内部使用的、不希望公开的镜像。 比如,一家企业为其特定的业务应用创建了定制化的镜像,并将其存储在自己的私有仓库中, 以保证安全性和控制访问权限。
1.2 docker hub

2 docker仓库的工作原理
2.1 仓库中的三个角色
- index docker索引服务,负责并维护有关用户帐户、镜像的校验以及公共命名空间的信息。
- registry docker仓库,是镜像和图表的仓库,它不具有本地数据库以及不提供用户认证,通过Index Auth service的Token的方式进行认证
- Registry Client Docker充当registry客户端来维护推送和拉取,以及客户端的授权。
2.2 pull原理
2.3 push原理
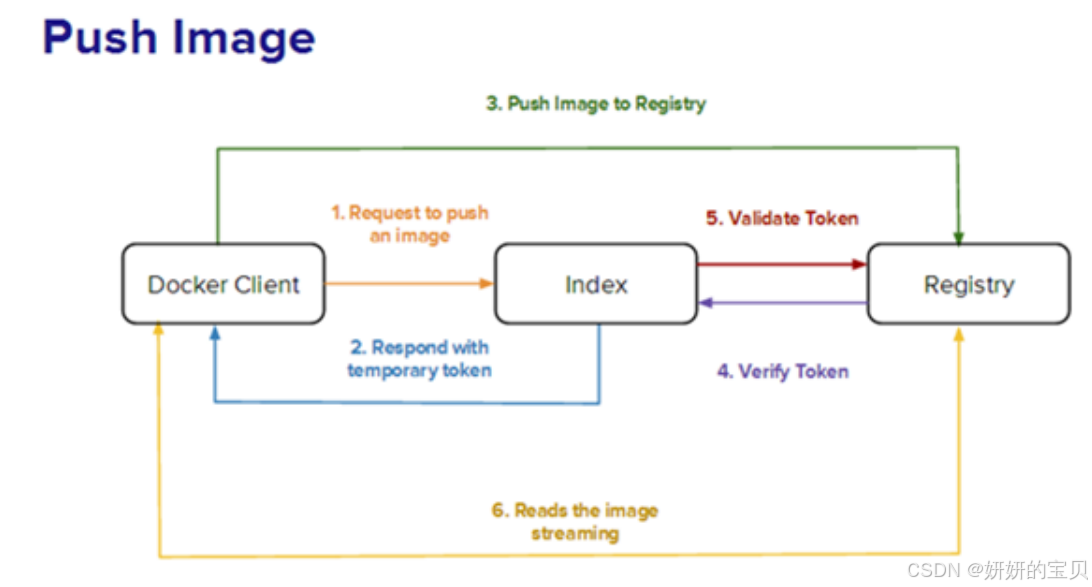
镜像上传的步骤:
1.client向index发送上传请求并完成用户认证
2.index会发方token给client来证明client的合法性
3.client携带index提供的token连接Registry
4.Registry向index合适token的合法性
5.index证实token的合法性
6.Registry开始接收客户端上传过来的镜像
3 使用互联网上提供的托管镜像仓库
3.1 docker hub 镜像仓库
3.1.1 docker hub 镜像仓库介绍

- 丰富的镜像资源:涵盖了各种常见的操作系统、编程语言运行时、数据库、Web 服务器等众多应用 的镜像。 例如,可以轻松找到 Ubuntu、CentOS 等操作系统的镜像,以及 MySQL、Redis 等数据库的镜像。
- 官方支持:提供了由 Docker 官方维护的一些重要镜像,确保其质量和安全性。
- 社区贡献:开发者们可以自由上传和分享他们创建的镜像,促进了知识和资源的共享。
- 版本管理:对于每个镜像,通常都有多个版本可供选择,方便用户根据需求获取特定版本。
- 便于搜索:用户可以通过关键词轻松搜索到所需的镜像
3.1.2 docker hub的使用方法
输入用户密码即可登录成功
dockerfile]# docker login

Log in with your Docker ID or email address to push and pull images from Docker Hub. If you don't have a Docker ID, head over to https://hub.docker.com/ to create one.
You can log in with your password or a Personal Access Token (PAT). Using a limited-scope PAT grants better security and is required for organizations using SSO. Learn more at https://docs.docker.com/go/access-tokens/

Username: 用户名
Password: 密码
WARNING! Your password will be stored unencrypted in /root/.docker/config.json.
Configure a credential helper to remove this warning. See
https://docs.docker.com/engine/reference/commandline/login/#credential-stores

Login Succeeded
给镜像打上标签 :docker tag [原来的镜像名] 用户名/镜像名:标签
上传本地镜像:docker push [用户名|网址|IP地址]/镜像名:标签
[root@rockynode-1 dockerfile]# docker images
REPOSITORY           TAG           IMAGE ID       CREATED         SIZE
busybox              latest        65ad0d468eb1   15 months ago   4.26MB
timinglee/game2048   latest        19299002fdbe   7 years ago     55.5MB
timinglee/mario      latest        9a35a9e43e8c   8 years ago     198MB

# 给镜像打上标签
[root@rockynode-1 dockerfile]# docker tag timinglee/game2048:latest 15307743762/shuyan:game2048

# 查看多了一个15307743762/shuyan 的镜像
[root@rockynode-1 dockerfile]# docker images
REPOSITORY           TAG           IMAGE ID       CREATED         SIZE
busybox              latest        65ad0d468eb1   15 months ago   4.26MB
15307743762/shuyan   game2048      19299002fdbe   7 years ago     55.5MB
timinglee/game2048   latest        19299002fdbe   7 years ago     55.5MB
timinglee/mario      latest        9a35a9e43e8c   8 years ago     198MB

# 上传镜像
[root@rockynode-1 dockerfile]# docker push 15307743762/shuyan:game2048
The push refers to repository [docker.io/15307743762/shuyan]
88fca8ae768a: Pushed
6d7504772167: Pushed
192e9fad2abc: Pushed
36e9226e74f8: Pushed
011b303988d2: Pushed
game2048: digest: sha256:8a34fb9cb168c420604b6e5d32ca6d412cb0d533a826b313b190535c03fe9390 size: 1364docker]# vim ~/.docker/config.json
{
"auths": {
"https://index.docker.io/v1/": {
"auth": "MTUzMDc3NDM3NjI6eGlhb21pbmcxNDQyLg=="
}
}
}
4 搭建docker的私有仓库
4.1 为什么搭建私有仓库
docker hub虽然方便,但是还是有限制
-
需要internet连接,速度慢
-
所有人都可以访问
-
由于安全原因企业不允许将镜像放到外网
好消息是docker公司已经将registry开源,我们可以快速构建企业私有仓库
地址:
4.2 搭建简单的Registry仓库
4.2.1 下载Registry镜像
[root@rockynode-1 docker]# docker pull registry
Using default tag: latest
latest: Pulling from library/registry
930bdd4d222e: Pull complete
a15309931e05: Pull complete
6263fb9c821f: Pull complete
86c1d3af3872: Pull complete
a37b1bf6a96f: Pull complete
Digest: sha256:12120425f07de11a1b899e418d4b0ea174c8d4d572d45bdb640f93bc7ca06a3d
Status: Downloaded newer image for registry:latest
docker.io/library/registry:latest
4.2.2 开启Registry
dockerfile]# docker run -d -p 5000:5000 --restart=always --name=registry registry

docker]# docker ps
CONTAINER ID   IMAGE      COMMAND                   CREATED             STATUS             PORTS                                       NAMES
4581c1f9d4e1   registry   "/entrypoint.sh /etc…"   About an hour ago   Up About an hour   0.0.0.0:5000->5000/tcp, :::5000->5000/tcp   registry
4.2.3 上传镜像到仓库中
dockerfile]# docker tag busybox:latest 192.168.239.10:5000/busybux:latest

dockerfile]# docker images
REPOSITORY                    TAG           IMAGE ID       CREATED         SIZE
registry                      latest        cfb4d9904335   11 months ago   25.4MB
# 已经成功生成
192.168.239.10:5000/busybux   latest        65ad0d468eb1   15 months ago   4.26MB
busybox                       latest        65ad0d468eb1   15 months ago   4.26MB
15307743762/shuyan            game2048      19299002fdbe   7 years ago     55.5MB
timinglee/game2048            latest        19299002fdbe   7 years ago     55.5MB
timinglee/mario               latest        9a35a9e43e8c   8 years ago     198MB


# docker在上传的过程中默认使用https,但是我们并没有建立https认证需要的认证文件所以会报错
# 所以需要修改他的默认上传的协议为http
dockerfile]# vim /etc/docker/daemon.json
{
  "registry-mirrors": [
    "https://docker.m.daocloud.io",
    "https://gy3ctkgm.mirror.aliyuncs.com"
  ],
  "insecure-registries": [
    "http://192.168.239.10:5000"
  ]
}

# 上传镜像
[root@rockynode-1 dockerfile]# docker push 192.168.239.10:5000/busybux
Using default tag: latest
The push refers to repository [192.168.239.10:5000/busybux]
d51af96cf93e: Pushed
latest: digest: sha256:28e01ab32c9dbcbaae96cf0d5b472f22e231d9e603811857b295e61197e40a9b size: 527

# 查看镜像是否上传
docker]# curl 192.168.239.10:5000/v2/_catalog
{"repositories":["busybux"]}
4.4.4 为Registry提加密传输
[root@rockynode-1 certs]# openssl req -newkey rsa:4096 \
-nodes -sha256 -keyout /root/certs/shuyan.key \
-addext "subjectAltName = DNS:reg.shuyan.com" \
-x509 -days 365 -out /root/certs/shuyan.crt

-----
You are about to be asked to enter information that will be incorporated
into your certificate request.
What you are about to enter is what is called a Distinguished Name or a DN.
There are quite a few fields but you can leave some blank
For some fields there will be a default value,
If you enter '.', the field will be left blank.
-----
Country Name (2 letter code) [XX]:CN
State or Province Name (full name) []:shanxi
Locality Name (eg, city) [Default City]:xian
Organization Name (eg, company) [Default Company Ltd]:docker
Organizational Unit Name (eg, section) []:shuyan
# 注意服务器主机名要和证书内的对得上
Common Name (eg, your name or your server's hostname) []:reg.shuyan.com
Email Address []:admin@shuyan.com
# 查看证书是否生成
[root@rockynode-1 certs]# ls
shuyan.crt  shuyan.key


# 在docker 客户端,也就是上传镜像的客户端,需要在指定目录下放至证书
# ca证书是由机构颁发的,在客户端需要有证书,在服务端需要有私钥和证书
# 客户端没有证书,所以需要将服务端的证书给客户端拷贝一份
# 在客户端上docker寻找证书是在 /etc/docker/certs.d/reg.shuyan.com/ 寻找的
# 其中 reg.shuyan.com 是服务器的主机名称
[root@rockynode-1 certs]# mkdir -p /etc/docker/certs.d/reg.shuyan.com/
[root@rockynode-1 certs]# cp shuyan.crt /etc/docker/certs.d/reg.shuyan.com/
[root@rockynode-1 certs]# docker images
REPOSITORY           TAG           IMAGE ID       CREATED         SIZE
15307743762/shuyan   centos7_min   7f2c20fc731e   12 hours ago    210MB
registry             latest        cfb4d9904335   11 months ago   25.4MB
busybox              latest        65ad0d468eb1   15 months ago   4.26MB
15307743762/shuyan   game2048      19299002fdbe   7 years ago     55.5MB
timinglee/game2048   latest        19299002fdbe   7 years ago     55.5MB
timinglee/mario      latest        9a35a9e43e8c   8 years ago     198MB
对服务端做解析
[root@rockynode-1 certs]# vim /etc/hosts
127.0.0.1   localhost localhost.localdomain localhost4 localhost4.localdomain4
::1         localhost localhost.localdomain localhost6 localhost6.localdomain6
192.168.239.10  rockynode-1 reg.shuyan.com
[root@rockynode-1 certs]# docker run --name registry -d -p 443:443 \
--restart=always -v /root/certs:/certs \ # 将本地证书向docker服务器进行挂载,相当于这个证书是需要放在服务端的
-e REGISTRY_HTTP_ADDR=0.0.0.0:443 \
-e REGISTRY_HTTP_TLS_CERTIFICATE=/certs/shuyan.crt \ # 指定服务端的的证书路径
-e REGISTRY_HTTP_TLS_KEY=/certs/shuyan.key registry # 指定服务器的私钥路径查看镜像是否上传
[root@rockynode-1 certs]# curl -k https://reg.shuyan.com/v2/_catalog
{"repositories":["shuyan"]}
为仓库建立登陆认证
certs]# yum install httpd-tools -y4.4.5 htpasswd工具 创建用户认证
当我们使用互联网上的托管仓库的时候,在push上传那必然是需要经过密码认证,在私有云虽然没有严格要求说一定要有这个功能,但为了安全起见,私有云也需要具备这样的功能
[root@rockynode-1 ~]# htpasswd -Bc auth/htpasswd shuyan
New password:
Re-type new password:
Adding password for user shuyan
1 ~]# docker run --name registry \
-d \
-p 443:443 \
--restart=always \
-v /root/certs:/certs \
-e REGISTRY_HTTP_ADDR=0.0.0.0:443 \
-e REGISTRY_HTTP_TLS_CERTIFICATE=/certs/shuyan.crt \
-e REGISTRY_HTTP_TLS_KEY=/certs/shuyan.key \
-v /root/auth:/auth \
-e "REGISTRY_AUTH=htpasswd" \ # 设置服务器认证方式为 htpasswd
-e "REGISTRY_AUTH_HTPASSWD_REALM=Registry Realm" \
-e REGISTRY_AUTH_HTPASSWD_PATH=/auth/htpasswd \ # 设置服务器 htpasswd 文件的路径
registry
811c123000f0ad02fa67bf9d70a0b09957671398a2a0d45716a94775def941ee
认证域 (-e "REGISTRY_AUTH_HTPASSWD_REALM=Registry Realm")
是在进行 htpasswd 认证时的一个配置选项,
用于定义认证提示信息中显示的文本。
这里的 Registry Realm 是一个字符串,
它会在用户尝试访问需要身份验证的资源时显示给用户。
认证域的作用
当用户尝试访问一个需要身份验证的服务时,
服务器会发送一个 HTTP 401 Unauthorized 响应,
其中包含一个 WWW-Authenticate 头部。
这个头部包含了认证所需的机制(例如 Basic 或 Digest),
以及一个可选的 realm 参数。realm 参数是一个简单的字符串,
用于告知用户他们正在尝试访问的资源的上下文。
[root@rockynode-1 ~]# docker ps
CONTAINER ID IMAGE COMMAND CREATED STATUS PORTS NAMES
811c123000f0 registry "/entrypoint.sh /etc…" 4 seconds ago Up 3 seconds 0.0.0.0:443->443/tcp, :::443->443/tcp, 5000/tcp registry尝试不通过登录上传
e-1 ~]# docker tag busybox:latest reg.shuyan.com/shuyan:busybox
e-1 ~]# docker push reg.shuyan.com/shuyan:busybox
The push refers to repository [reg.shuyan.com/shuyan]
d51af96cf93e: Preparing
no basic auth credentials
进行登录
[root@rockynode-1 ~]# docker login reg.shuyan.com
上传文件
[root@rockynode-1 ~]# docker push reg.shuyan.com/shuyan:busybox
查看上传的文件
 ~]# curl  https://reg.shuyan.com/v2/_catalog -u shuyan:123456 -k
{"repositories":["shuyan"]}

# 退出登录
[root@rockynode-1 ~]# docker logout
Removing login credentials for https://index.docker.io/v1/
4.3 构建企业级私有仓库
4.3.1 私有仓库之HARBOR

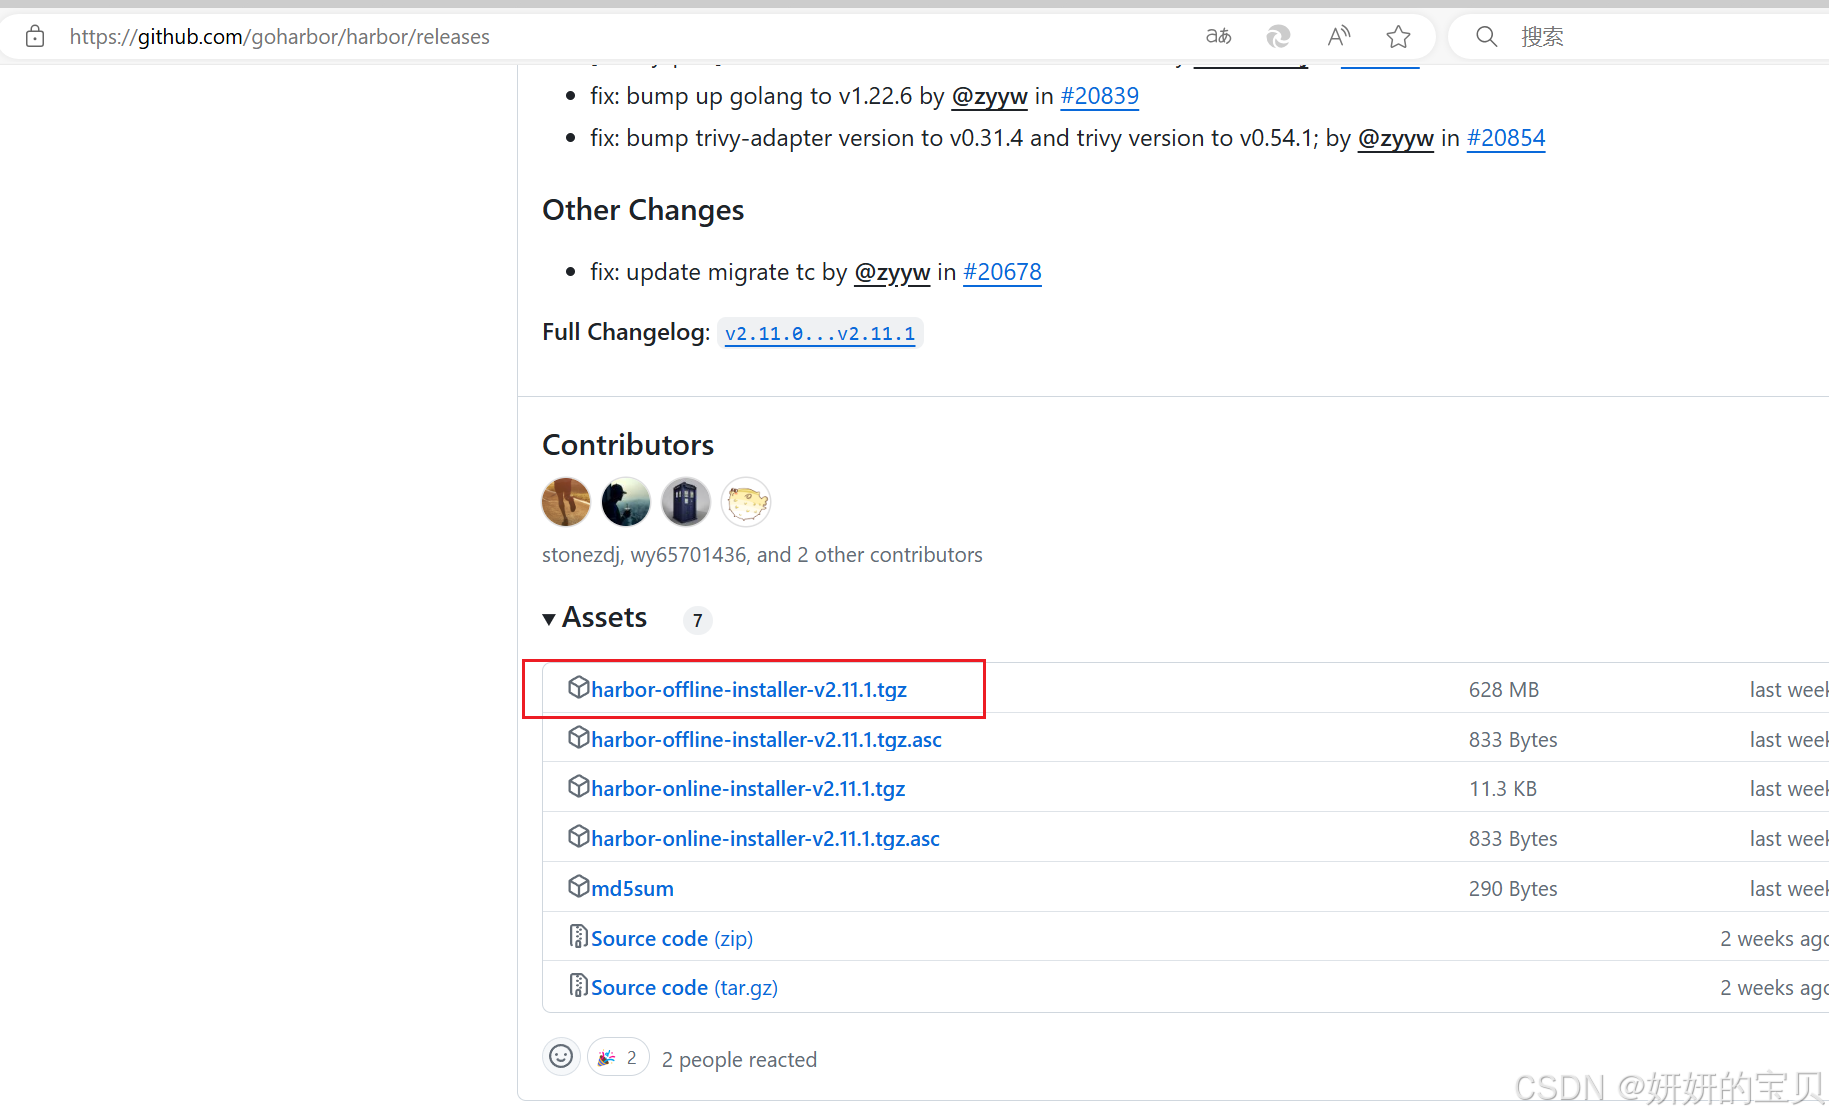
4.3.1.1 HARBOR 的获取
下载软件包地址
HARBOR 获取![]() https://github.com/goharbor/harbor/releases
https://github.com/goharbor/harbor/releases
4.3.1.2 HARBOR 的介绍
Harbor 是由vmware公司开源的企业级 Docker Registry 项目。
它提供了以下主要功能和特点:
1. 基于角色的访问控制(RBAC):可以为不同的用户和用户组分配不同的权限,增强了安全性和管理的灵活性。
2. 镜像复制:支持在不同的 Harbor 实例之间复制镜像,方便在多个数据中心或环境中分发镜像。
3. 图形化用户界面(UI):提供了直观的 Web 界面,便于管理镜像仓库、项目、用户等。
4. 审计日志:记录了对镜像仓库的各种操作,有助于追踪和审查活动。
5. 垃圾回收:可以清理不再使用的镜像,节省存储空间。
4.3.1.3 部署harbor
[root@rockynode-1 docker-page]# tar xzf harbor-offline-installer-v2.5.4.tgz -C /root
[root@rockynode-1 docker-page]# cd

[root@rockynode-1 ~]# cd harbor/
[root@rockynode-1 harbor]# ls
common.sh  harbor.v2.5.4.tar.gz  harbor.yml.tmpl  install.sh  LICENSE  prepare

#  harbor.yml 为HARBOR的核心配置文件
[root@rockynode-1 harbor]# cp harbor.yml.tmpl harbor.yml
[root@rockynode-1 harbor]# ls
common.sh             harbor.yml       install.sh  prepare
harbor.v2.5.4.tar.gz  harbor.yml.tmpl  LICENSE

#  修改核心配置文件
[root@rockynode-1 harbor]# vim harbor.yml
harbor_admin_password: 123456        # 设置管理员密码
hostname: reg.shuyan.com             # 设置本机主机名
  certificate: /data/certs/shuyan.crt    # 证书地址
  private_key: /data/certs/shuyan.key    # 私钥地址

# 创建目录存放证书与私钥
[root@rockynode-1 harbor]# mkdir -p /data/certs/

# 由于在构建Registry 私有仓库的时候已经生成过自签名的证书和私钥了,这里直接拷贝
[root@rockynode-1 harbor]# cp ~/certs/* /data/certs/
[root@rockynode-1 harbor]# ls /data/certs/
shuyan.crt  shuyan.key

[root@rockynode-1 harbor]# ./install.sh --help
Please set --with-notary #证书签名
Please set --with-trivy #安全扫描
Please set --with-chartmuseum if needs enable Chartmuseum in Harbor

# 安装 HARBOR
[root@rockynode-1 harbor]# ./install.sh --with-chartmuseum
[root@rockynode-1 harbor]# ./install.sh --with-chartmuseum
[Step 0]: checking if docker is installed ...
Note: docker version: 27.1.2
[Step 1]: checking docker-compose is installed ...
Note: Docker Compose version v2.29.1
[Step 2]: loading Harbor images ...
Loaded image: goharbor/redis-photon:v2.5.4
Loaded image: goharbor/registry-photon:v2.5.4
Loaded image: goharbor/prepare:v2.5.4
Loaded image: goharbor/harbor-db:v2.5.4
Loaded image: goharbor/harbor-registryctl:v2.5.4
Loaded image: goharbor/trivy-adapter-photon:v2.5.4
Loaded image: goharbor/harbor-portal:v2.5.4
Loaded image: goharbor/harbor-log:v2.5.4
Loaded image: goharbor/harbor-exporter:v2.5.4
Loaded image: goharbor/notary-signer-photon:v2.5.4
Loaded image: goharbor/chartmuseum-photon:v2.5.4
Loaded image: goharbor/harbor-core:v2.5.4
Loaded image: goharbor/harbor-jobservice:v2.5.4
Loaded image: goharbor/nginx-photon:v2.5.4
Loaded image: goharbor/notary-server-photon:v2.5.4
[Step 3]: preparing environment ...
[Step 4]: preparing harbor configs ...
prepare base dir is set to /root/harbor
Clearing the configuration file: /config/portal/nginx.conf
Clearing the configuration file: /config/log/logrotate.conf
Clearing the configuration file: /config/log/rsyslog_docker.conf
Clearing the configuration file: /config/nginx/nginx.conf
Clearing the configuration file: /config/core/env
Clearing the configuration file: /config/core/app.conf
Clearing the configuration file: /config/registry/passwd
Clearing the configuration file: /config/registry/config.yml
Clearing the configuration file: /config/registryctl/env
Clearing the configuration file: /config/registryctl/config.yml
Clearing the configuration file: /config/db/env
Clearing the configuration file: /config/jobservice/env
Clearing the configuration file: /config/jobservice/config.yml
Clearing the configuration file: /config/chartserver/env
Generated configuration file: /config/portal/nginx.conf
Generated configuration file: /config/log/logrotate.conf
Generated configuration file: /config/log/rsyslog_docker.conf
Generated configuration file: /config/nginx/nginx.conf
Generated configuration file: /config/core/env
Generated configuration file: /config/core/app.conf
Generated configuration file: /config/registry/config.yml
Generated configuration file: /config/registryctl/env
Generated configuration file: /config/registryctl/config.yml
Generated configuration file: /config/db/env
Generated configuration file: /config/jobservice/env
Generated configuration file: /config/jobservice/config.yml
loaded secret from file: /data/secret/keys/secretkey
Generated configuration file: /config/chartserver/env
Generated configuration file: /compose_location/docker-compose.yml
Clean up the input dir
Note: stopping existing Harbor instance ...
WARN[0000] /root/harbor/docker-compose.yml: the attribute `version` is obsolete, it will be ignored, please remove it to avoid potential confusion
[+] Running 6/6
✔ Container chartmuseum Removed 0.0s
✔ Container harbor-portal Removed 0.0s
✔ Container harbor-db Removed 0.0s
✔ Container harbor-log Removed 0.0s
✔ Network harbor_harbor-chartmuseum Removed 0.1s
✔ Network harbor_harbor Removed 0.2s
[Step 5]: starting Harbor ...
WARN[0000] /root/harbor/docker-compose.yml: the attribute `version` is obsolete, it will be ignored, please remove it to avoid potential confusion
[+] Running 12/12
✔ Network harbor_harbor-chartmuseum Created 0.1s
✔ Network harbor_harbor Created 0.1s
✔ Container harbor-log Started 0.6s
✔ Container harbor-portal Started 2.0s
✔ Container chartmuseum Started 1.9s
✔ Container registry Started 2.2s
✔ Container redis Started 2.5s
✔ Container harbor-db Started 2.0s
✔ Container registryctl Started 2.5s
✔ Container harbor-core Started 3.2s
✔ Container nginx Started 4.0s
✔ Container harbor-jobservice Started 4.0s
✔ ----Harbor has been installed and started successfully.----
[root@rockynode-1 harbor]# docker compose up -d
WARN[0000] /root/harbor/docker-compose.yml: the attribute `version` is obsolete, it will be ignored, please remove it to avoid potential confusion
[+] Running 10/0
✔ Container harbor-log Running 0.0s
✔ Container harbor-portal Running 0.0s
✔ Container harbor-db Running 0.0s
✔ Container redis Running 0.0s
✔ Container chartmuseum Running 0.0s
✔ Container registry Running 0.0s
✔ Container registryctl Running 0.0s
✔ Container harbor-core Running 0.0s
✔ Container nginx Running 0.0s
✔ Container harbor-jobservice Running 0.0s 4.3.1.4 ChartMuseum 参数
在使用 --with-chartmuseum 参数安装 Harbor 时,实际的 Helm Chart 仓库是由 ChartMuseum 提供的。这意味着 ChartMuseum 将作为 Harbor 的一部分来存储和管理 Helm Charts。
当在 Harbor 中上传或管理 Helm Charts 时,实际上是在与 ChartMuseum 交互。ChartMuseum 作为一个独立的服务,被集成到了 Harbor 中,从而使得 Harbor 不仅能够处理 Docker 镜像,还能处理 Helm Charts。
ChartMuseum 在这里扮演的角色是:
- 存储和管理 Helm Charts:ChartMuseum 作为 Harbor 的一部分,负责存储和管理 Helm Charts。
- 提供 RESTful API 接口:ChartMuseum 提供了一组 API,使用户能够通过 HTTP 请求上传、下载和管理 Charts。
- 提供 Web 界面:虽然 Harbor 自带了用户界面,但 ChartMuseum 也有自己的 Web 界面,用于浏览和管理 Charts。
因此,在使用 --with-chartmuseum 参数安装 Harbor 时,实际上是在创建一个集成了 ChartMuseum 的 Harbor 实例,以便能够有效地管理 Docker 镜像和 Helm Charts。
4.3.1.5 管理HARBOR
管理harbor的容器:
[root@rockynode-1 harbor]# docker compose stop
[root@rockynode-1 harbor]# docker compose up -d
4.5.1.6 查看镜像加载
[root@rockynode-1 harbor]# docker ps
CONTAINER ID   IMAGE                                COMMAND                   CREATED          STATUS                    PORTS                                                                            NAMES
22e307ef3685   goharbor/harbor-jobservice:v2.5.4    "/harbor/entrypoint.…"   20 minutes ago   Up 20 minutes (healthy)                                                                                    harbor-jobservice
cc809008c29c   goharbor/nginx-photon:v2.5.4         "nginx -g 'daemon of…"   20 minutes ago   Up 20 minutes (healthy)   0.0.0.0:80->8080/tcp, :::80->8080/tcp, 0.0.0.0:443->8443/tcp, :::443->8443/tcp   nginx
651833856cc2   goharbor/harbor-core:v2.5.4          "/harbor/entrypoint.…"   20 minutes ago   Up 20 minutes (healthy)                                                                                    harbor-core
2ee29ceb1adb   goharbor/registry-photon:v2.5.4      "/home/harbor/entryp…"   20 minutes ago   Up 20 minutes (healthy)                                                                                    registry
501130e2dd88   goharbor/chartmuseum-photon:v2.5.4   "./docker-entrypoint…"   20 minutes ago   Up 20 minutes (healthy)                                                                                    chartmuseum
4ddb26d60dae   goharbor/harbor-db:v2.5.4            "/docker-entrypoint.…"   20 minutes ago   Up 20 minutes (healthy)                                                                                    harbor-db
31283c3a4820   goharbor/harbor-portal:v2.5.4        "nginx -g 'daemon of…"   20 minutes ago   Up 20 minutes (healthy)                                                                                    harbor-portal
c759cff9acb2   goharbor/redis-photon:v2.5.4         "redis-server /etc/r…"   20 minutes ago   Up 20 minutes (healthy)                                                                                    redis
f996e89a2779   goharbor/harbor-registryctl:v2.5.4   "/home/harbor/start.…"   20 minutes ago   Up 20 minutes (healthy)                                                                                    registryctl
8682af8e85a2   goharbor/harbor-log:v2.5.4           "/bin/sh -c /usr/loc…"   20 minutes ago   Up 20 minutes (healthy)   127.0.0.1:1514->10514/tcp
4.5.1.7 实现效果

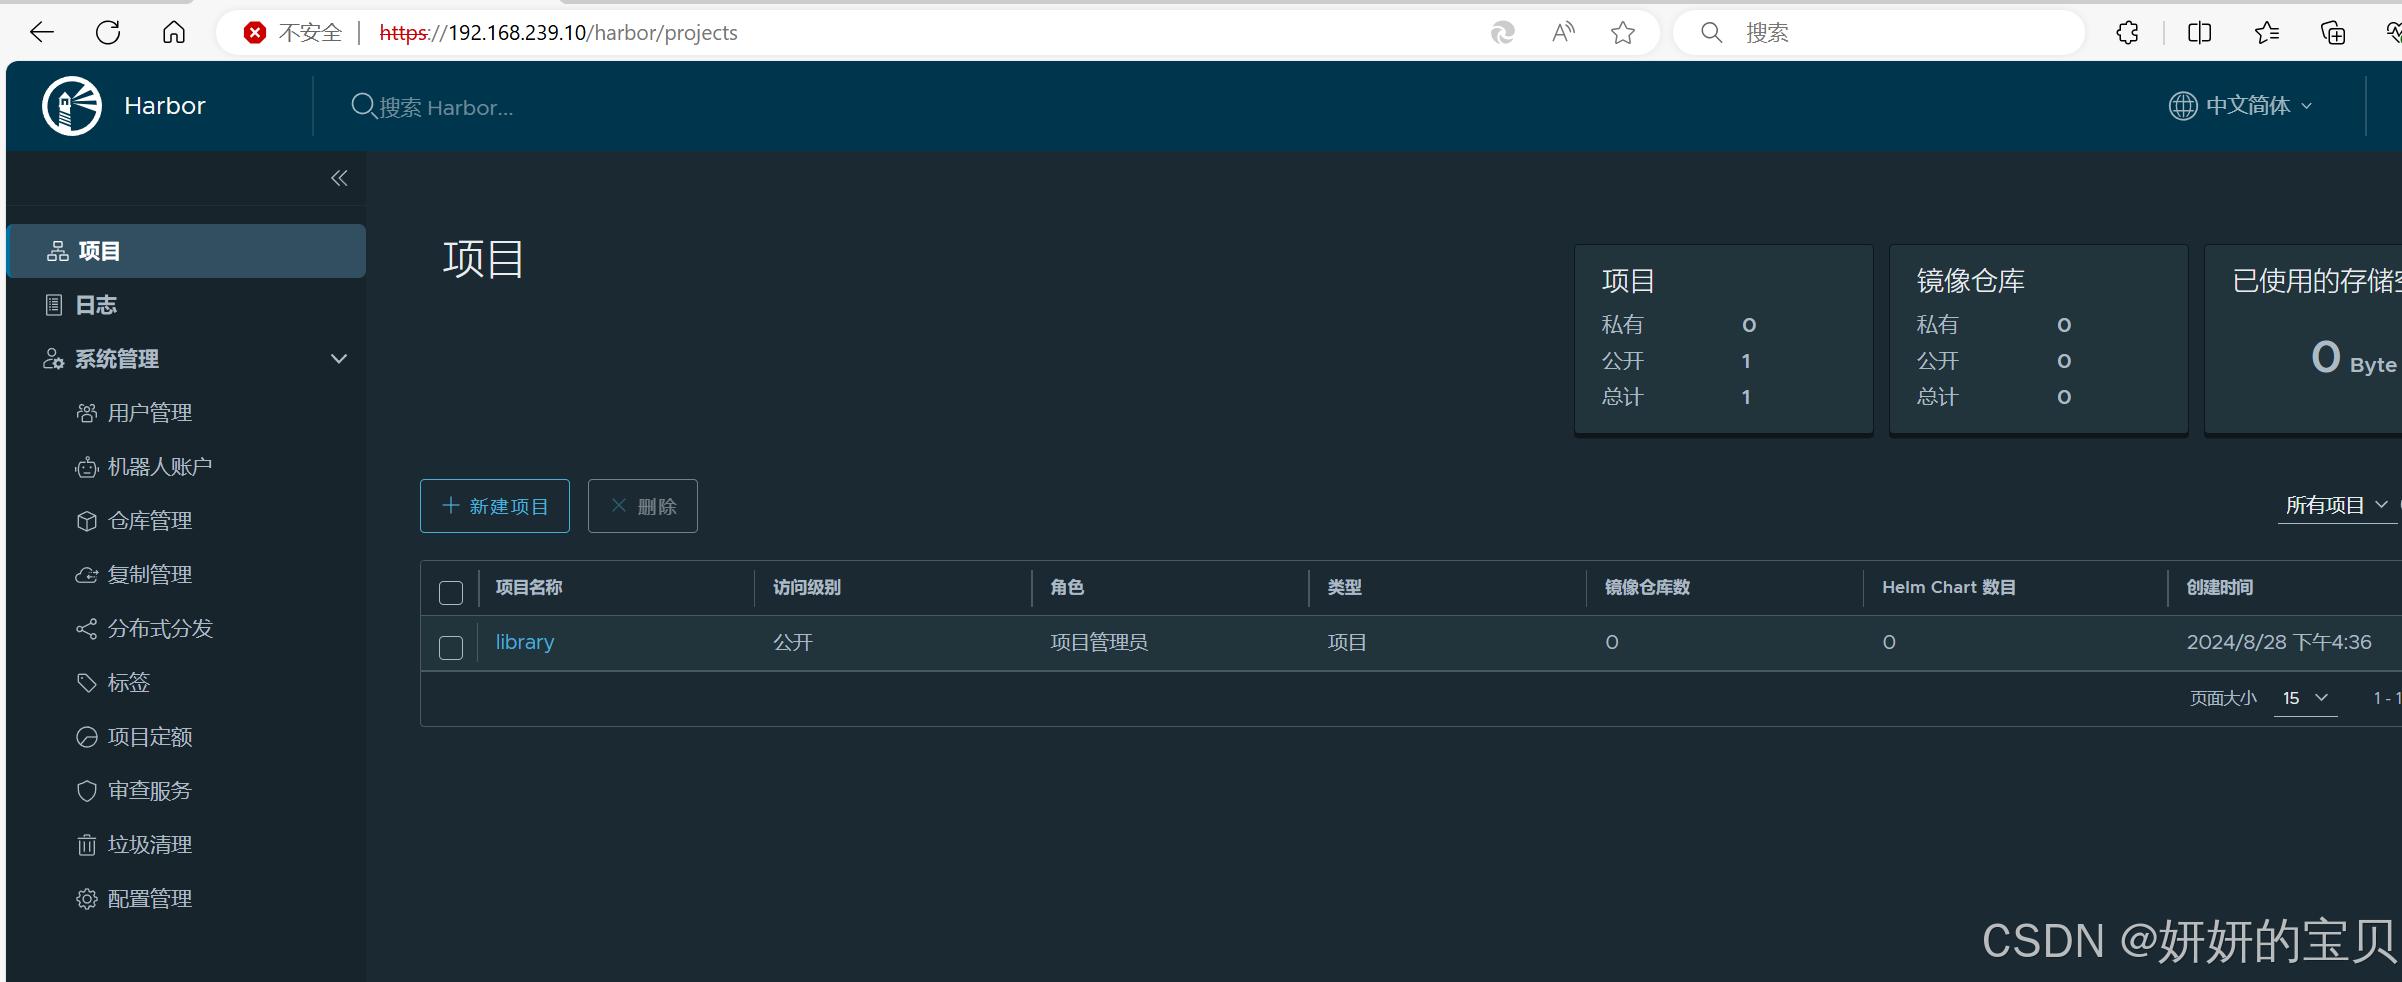
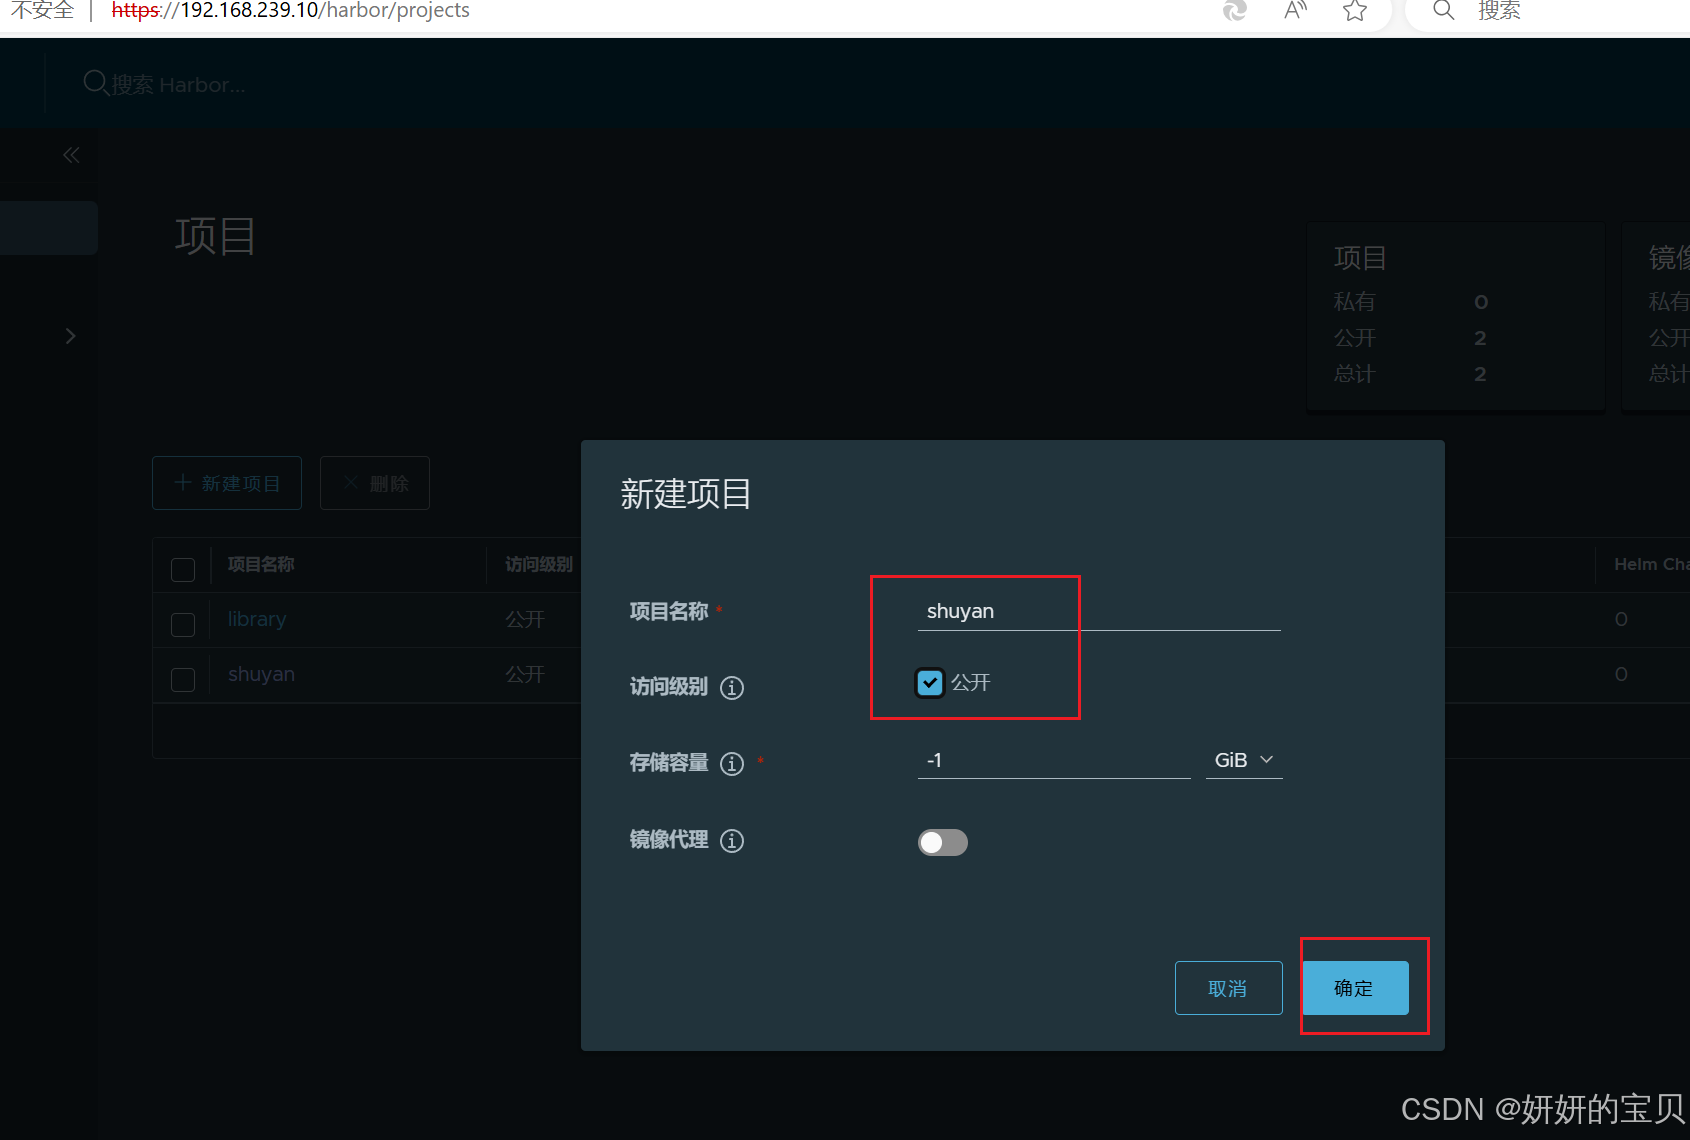
~]# docker tag busybox:latest reg.shuyan.com/shuyan/busybox:v5
[root@rockynode-1 ~]# docker push reg.shuyan.com/shuyan/busybox:v5
The push refers to repository [reg.shuyan.com/shuyan/busybox]
d51af96cf93e: Pushed
v5: digest: sha256:28e01ab32c9dbcbaae96cf0d5b472f22e231d9e603811857b295e61197e40a9b size: 527
删除打过标签的镜像
[root@rockynode-1 ~]# docker rmi reg.shuyan.com/shuyan/busybox:v5
Untagged: reg.shuyan.com/shuyan/busybox:v5
Untagged: reg.shuyan.com/shuyan/busybox@sha256:28e01ab32c9dbcbaae96cf0d5b472f22e231d9e603811857b295e61197e40a9b

[root@rockynode-1 ~]# docker rmi reg.shuyan.com/shuyan/nginx_min:v1
Untagged: reg.shuyan.com/shuyan/nginx_min:v1
Untagged: reg.shuyan.com/shuyan/nginx_min@sha256:bf845e418a24ba511da49449a125742d2358436352ad3fad79af089464027aae
修改配置文件拉取私有仓库镜像
[root@rockynode-1 ~]# vim /etc/docker/daemon.json 这里增加私有仓库的域名

查看是否加载了此域名
[root@rockynode-1 ~]# docker info
拉取私有仓库镜像
[root@rockynode-1 ~]# docker pull shuyan/nginx_min:v1
v1: Pulling from shuyan/nginx_min
Digest: sha256:bf845e418a24ba511da49449a125742d2358436352ad3fad79af089464027aae
Status: Downloaded newer image for shuyan/nginx_min:v1
docker.io/shuyan/nginx_min:v1
