一、高级RAG概述
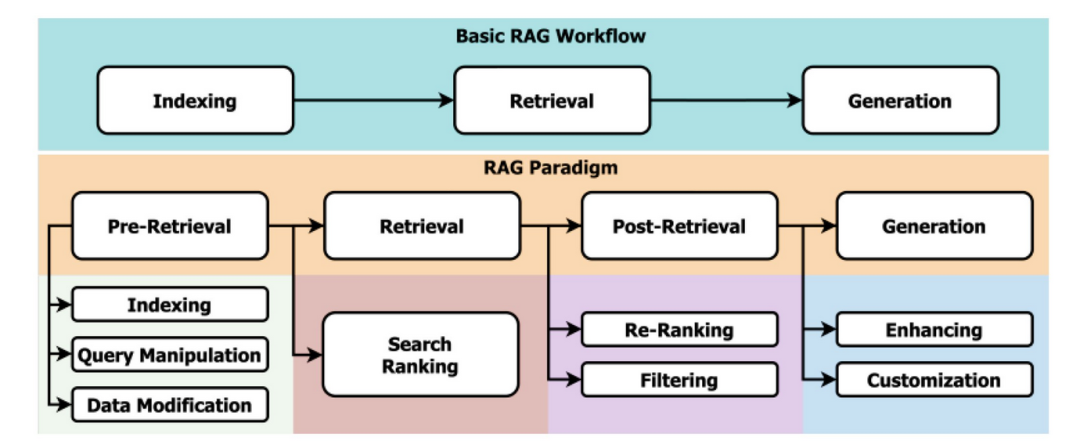
基本 RAG 的工作流程可分为三个步骤:索引、检索和生成。在索引阶段,文本被转换为嵌入,然后存储在向量数据库中以创建可搜索的索引。在检索步骤中,用户的查询也被转换为嵌入,此嵌入用于在向量数据库中搜索最相关的文本数据。最后,在生成步骤中,查询会使用先前检索到的相关文档进行增强,大型语言模型会使用此增强的提示来生成对用户问题的答案。
高级 RAG是在基本RAG流程基础上添加了很多新步骤(子步骤)。以下是本文将讨论的增强点列表,但总体列表并不仅限于这些。
-
Data Indexing Optimizations(数据索引优化):使用滑动窗口进行文本分块和有效利用元数据等技术来创建更易于搜索和更有条理的索引。
-
Query Enhancement(查询增强):使用同义词或更广泛的术语修改或扩展初始用户查询,以改进相关文档的检索。
-
Hybrid Search(混合搜索):将传统的基于关键字的搜索与使用嵌入向量的语义搜索相结合,以处理各种查询复杂性。
-
Fine Tuning Embedding Model(微调嵌入模型):调整预先训练的模型以更好地理解特定领域的细微差别,提高检索到的文档的准确性和相关性。
-
Response Summarization(响应摘要):在最终生成响应之前,浓缩检索到的文本以提供简洁且相关的摘要。
-
Re-ranking and Filtering(重新排序和过滤):根据相关性调整检索到的文档的顺序,并过滤掉不太相关的结果以优化最终输出。
关于RAG的更多高级优化技术,可以参考论文《A Survey on Retrieval-Augmented Text Generation for Large Language Models》[1]
技术交流群
前沿技术资讯、算法交流、求职内推、算法竞赛、面试交流(校招、社招、实习)等、与 10000+来自港科大、北大、清华、中科院、CMU、腾讯、百度等名校名企开发者互动交流~
我们建了_算法岗技术与面试交流群_, 想要大模型技术交流、了解最新面试动态的、需要源码&资料、提升技术的同学,可以直接加微信号:mlc2040。加的时候备注一下:研究方向 +学校/公司+CSDN,即可。然后就可以拉你进群了。
想加入星球也可以如下方式:
方式①、微信搜索公众号:机器学习社区,后台回复:交流
方式②、添加微信号:mlc2040,备注:交流
二、高级RAG之预检索
预检索是定义 a) 如何进行索引以及 b) 在将用户查询用于检索之前对其进行哪些操作的步骤。下面,我将讨论预检索优化的各种策略,包括数据索引和查询增强,并提供示例 Python 代码示例。
2.1 数据索引优化
在做其他事情之前,我们必须先存储数据,以便以后查询,这称为索引。这包括设置正确的块大小、有效使用元数据以及选择嵌入模型。
2.1.1. 用于文本分块的滑动窗口
索引文本的一种简单方法是将文本拆分为 n 个部分,将它们转换为嵌入向量,然后将它们存储在向量数据库中。滑动窗口方法创建重叠的文本块,以确保在块的边界处不会丢失任何上下文信息。以下代码示例使用 nltk 库按句子拆分文本。
import nltk
from nltk.tokenize import sent_tokenize

nltk.download('punkt')  # Ensure the punkt tokenizer is downloaded

def sliding_window(text, window_size=3):
    """
    Generate text chunks using a sliding window approach.

    Args:
    text (str): The input text to chunk.
    window_size (int): The number of sentences per chunk.

    Returns:
    list of str: A list of text chunks.
    """
    sentences = sent_tokenize(text)
    return [' '.join(sentences[i:i+window_size]) for i in range(len(sentences) - window_size + 1)]

# Example usage
text = "This is the first sentence. Here comes the second sentence. And here is the third one. Finally, the fourth sentence."
chunks = sliding_window(text, window_size=3)
for chunk in chunks:
    print(chunk)
    print("-----")
    # here, you can convert the chunk to embedding vector
    # and, save it to a vector database
2.1.2. 元数据利用
元数据可以包含文档创建日期、作者或相关标签等信息,这些信息可用于在检索过程中筛选或确定文档的优先顺序,从而增强搜索过程。
以下代码示例:使用 faiss 库创建一个向量数据库,并将向量插入其中并通过元数据(标签)进行搜索。
import numpy as np
import faiss

documents = [
    "Document 1 content here",
    "Content of the second document",
    "The third one has different content",
]
metadata = [
    {"date": "20230101", "tag": "news"},
    {"date": "20230102", "tag": "update"},
    {"date": "20230103", "tag": "report"},
]

# Dummy function to generate embeddings
def generate_embeddings(texts):
    """Generate dummy embeddings for the sake of example."""
    return np.random.rand(len(texts), 128).astype('float32')  # 128-dimensional embeddings

# Generate embeddings for documents
doc_embeddings = generate_embeddings(documents)

# Create a FAISS index for the embeddings (using FlatL2 for simplicity)
index = faiss.IndexFlatL2(128)  # 128 is the dimensionality of the vectors
index.add(doc_embeddings)  # Add embeddings to the index

# Example search function that uses metadata
def search(query_embedding, metadata_key, metadata_value):
    """Search the index for documents that match metadata criteria."""
    k = 2  # Number of nearest neighbors to find
    distances, indices = index.search(np.array([query_embedding]), k)  # Perform the search
    results = []
    for idx in indices[0]:
        if metadata[idx][metadata_key] == metadata_value:
            results.append((documents[idx], metadata[idx]))
    return results

# Generate a query embedding (in a real scenario, this would come from a similar process)
query_embedding = generate_embeddings(["Query content here"])[0]

# Search for documents tagged with 'update'
matching_documents = search(query_embedding, 'tag', 'update')
print(matching_documents)
2.2 查询增强
在某些情况下,用户无法清楚地表达问题。在这种情况下,我们可以通过完全重写或扩展查询来增强查询。
我们可以利用 LLM 本身。我们可以将问题发送给 LLM,并要求其更好地表达。以下提示将有助于此。
Given the prompt: '{prompt}', generate 3 question that are better articulated.
一旦我们有了新的查询,我们就可以将新的查询转换为嵌入向量,并使用它们在向量数据库中进行搜索。
三、高级RAG之检索技术
检索是使用查询来搜索先前索引的数据库的步骤。下面,我将讨论各种检索策略。
3.1 混合搜索模型
到目前为止,我们一直在讨论在向量数据库中搜索查询——我们在其中存储嵌入向量。让我们更进一步,将其与传统的基于关键字的搜索相结合。这种方法确保检索系统可以处理各种查询类型;从需要精确关键字匹配的查询到需要理解上下文的更复杂的查询。
让我们建立一个混合搜索模型。我们将使用 Elasticsearch 作为传统搜索机制,并使用 faiss 作为向量数据库进行语义搜索。
3.1.1. 创建Elasticsearch索引
首先假设所有文档都在“documents”字典中,并且我们已经获取了嵌入向量并将它们存储在字典中。以下代码块连接到 Elasticsearch 8.13.4 并为给定的示例文档创建索引。
ES_NODES = "http://localhost:9200"

documents = [
    {"id": 1, "text": "How to start with Python programming.", "vector": [0.1, 0.2, 0.3]},
    {"id": 2, "text": "Advanced Python programming tips.", "vector": [0.1, 0.3, 0.4]},
    # More documents...
]

from elasticsearch import Elasticsearch

es = Elasticsearch(
    hosts=ES_NODES,
)
for doc in documents:
    es.index(index="documents", id=doc['id'], document={"text": doc['text']})
3.1.2. 创建Faiss索引
在这一部分中,我们使用 faiss 作为向量数据库并对向量进行索引。
import numpy as np
import faiss

dimension = 3  # Assuming 3D vectors for simplicity
faiss_index = faiss.IndexFlatL2(dimension)
vectors = np.array([doc['vector'] for doc in documents])
faiss_index.add(vectors)
3.1.3. 混合索引
下面代码将Elasticsearch关键词搜索和faiss向量语义匹配进行混合搜索。
def hybrid_search(query_text, query_vector, alpha=0.5):
    # Perform a keyword search using Elasticsearch on the "documents" index, matching the provided query_text.
    response = es.search(index="documents", query={"match": {"text": query_text}})
    # Extract the document IDs and their corresponding scores from the Elasticsearch response.
    keyword_results = {hit['_id']: hit['_score'] for hit in response['hits']['hits']}

    # Prepare the query vector for vector search: reshape and cast to float32 for compatibility with Faiss.
    query_vector = np.array(query_vector).reshape(1, -1).astype('float32')
    # Perform a vector search with Faiss, retrieving indices of the top 5 closest documents.
    _, indices = faiss_index.search(query_vector, 5)
    # Create a dictionary of vector results with scores inversely proportional to their rank (higher rank, higher score).
    vector_results = {str(documents[idx]['id']): 1/(rank+1) for rank, idx in enumerate(indices[0])}

    # Initialize a dictionary to hold combined scores from keyword and vector search results.
    combined_scores = {}
    # Iterate over the union of document IDs from both keyword and vector results.
    for doc_id in set(keyword_results.keys()).union(vector_results.keys()):
        # Calculate combined score for each document using the alpha parameter to balance the influence of both search results.
        combined_scores[doc_id] = alpha * keyword_results.get(doc_id, 0) + (1 - alpha) * vector_results.get(doc_id, 0)

    # Return the dictionary containing combined scores for all relevant documents.
    return combined_scores

# Example usage
query_text = "Python programming"
query_vector = [0.1, 0.25, 0.35]
# Execute the hybrid search function with the specified query text and vector.
results = hybrid_search(query_text, query_vector)
# Print the results of the hybrid search to see the combined scores of documents.
print(results)
该hybrid_search 函数首先使用 Elasticsearch 进行关键字搜索。下一步,它使用 Faiss 执行向量搜索,Faiss 返回前五个最接近的文档的索引,这些索引用于根据文档的排名创建反向分数文档(即,最接近的文档得分最高)。
一旦我们获得了 Elasticsearch 和 Faiss 的结果,我们就可以把这两种方法的得分结合起来。每个文档的最终得分是使用参数 alpha加权平均值计算得到,如果alpha=0.5,意味这两个结果赋予了相同的权重。
完整的代码,可以参考[2]
3.2 微调嵌入模型
微调嵌入模型是增强检索增强生成系统性能的有效步骤。微调预训练模型有助于模型理解特定领域或数据集的细微差别,从而可以显著提高检索到的文档的相关性和准确性。
我们可以用以下几个要点来总结微调模型的重要性:
-
增强语义理解:微调有助于模型掌握原始训练数据中可能无法很好体现的特定领域的术语和概念。
-
适应内容的更新:某些领域(例如医学或技术领域)的信息正在迅速变化,通过微调保持嵌入更新可以保持系统的有效性。
-
提高检索精度:通过使嵌入空间与目标用例更紧密地对齐,微调可确保更可靠地检索语义相关的文本。
3.2.1 准备微调数据
以下代码块是微调模型的第一步。它初始化用于微调预训练屏蔽语言模型的管道,加载模型和标记器,并调整设备兼容性(GPU 或 CPU)。
初始化后,它会通过标记化和动态标记掩码处理样本数据集。此设置可让模型为自监督学习做好准备,在自监督学习中,它会预测掩码标记,从而增强其对输入数据的语义理解。
# Define the model name using a pre-trained model from the Sentence Transformers library
model_name = "sentence-transformers/all-MiniLM-L6-v2"

# Load the tokenizer for the specified model from Hugging Face's transformers library
tokenizer = AutoTokenizer.from_pretrained(model_name)

# Load the model for masked language modeling based on the specified model
model = AutoModelForMaskedLM.from_pretrained(model_name)

# Determine if a GPU is available and set the device accordingly; use CPU if GPU is not available
device = torch.device("cuda" if torch.cuda.is_available() else "cpu")

# Move the model to the appropriate device (GPU or CPU)
model.to(device)

# Define a generator function to create a dataset; this should be replaced with actual data loading logic
def dataset_generator():
    # Example dataset composed of individual sentences; replace with your actual dataset sentences
    dataset = ["sentence1", "sentence2", "sentence3"]
    # Yield each sentence as a dictionary with the key 'text'
    for sentence in dataset:
        yield {"text": sentence}

# Create a dataset object using Hugging Face's Dataset class from the generator function
dataset = Dataset.from_generator(dataset_generator)

# Define a function to tokenize the text data
def tokenize_function(example):
    # Tokenize the input text and truncate it to the maximum length the model can handle
    return tokenizer(example["text"], truncation=True)

# Apply the tokenization function to all items in the dataset, batch processing them for efficiency
tokenized_datasets = dataset.map(tokenize_function, batched=True)

# Initialize a data collator for masked language modeling which randomly masks tokens
# This is used for training the model in a self-supervised manner
data_collator = DataCollatorForLanguageModeling(tokenizer=tokenizer, mlm=True, mlm_probability=0.15)
3.2.2 开始微调模型
一旦数据准备好了,我们就可以开始微调阶段。在这个阶段,我们将使用模型的现有权重并开始更新它们。
以下代码块使用 Hugging Face 的 API 设置并执行语言模型的训练Trainer。它首先定义训练参数(时期、批量大小和学习率等)。Trainer然后,对象使用这些设置以及预加载的模型、标记化数据集和用于屏蔽语言建模的数据整理器(模型、标记化数据集和数据整理器是在上一步中创建的)。训练完成后,将保存新的更新模型及其标记器以供下一步使用。
# Define training arguments to configure the training session
training_args = TrainingArguments(
    output_dir="output",  # Directory where the outputs (like checkpoints) will be saved
    num_train_epochs=3,  # Total number of training epochs to perform
    per_device_train_batch_size=16,  # Batch size per device during training
    learning_rate=2e-5,  # Learning rate for the optimizer
)

# Initialize the Trainer, which handles the training loop and evaluation
trainer = Trainer(
    model=model,  # The model to be trained, already loaded and configured
    args=training_args,  # The training arguments defining the training setup
    train_dataset=tokenized_datasets,  # The dataset to train on, already tokenized and prepared
    data_collator=data_collator,  # The data collator that handles input formatting and masking
)

# Start the training process
trainer.train()

# Define the paths where the fine-tuned model and tokenizer will be saved
model_path = "./model"
tokenizer_path = "./tokenizer"

# Save the fine-tuned model to the specified path
model.save_pretrained(model_path)

# Save the tokenizer used in training to the specified path
tokenizer.save_pretrained(tokenizer_path)
3.2.3 使用微调后的模型
现在是时候使用保存的模型和标记器来生成嵌入向量了。以下代码块用于此目的。
以下代码块加载模型和标记器以生成给定句子的嵌入。首先,从保存的路径加载模型和标记器,并将其加载到 GPU 或 CPU。句子(在本文的上下文中,它们是查询)被标记化。模型在不更新其参数的情况下处理这些输入,这称为推理模式,可以使用with torch.no_grad()。我们不使用此模型来预测下一个标记;相反,我们的目标是从模型的隐藏状态中提取嵌入向量。最后一步,这些嵌入向量被移回 CPU。
# Load the tokenizer and model from saved paths, ensuring the model is allocated to the appropriate device (GPU or CPU)
tokenizer = AutoTokenizer.from_pretrained(tokenizer_path)
model = AutoModelForMaskedLM.from_pretrained(model_path).to(device)

# Define a function to tokenize input sentences, configuring padding and truncation to handle variable sentence lengths
def tokenize_function_embedding(example):
    return tokenizer(example["text"], padding=True, truncation=True)

# List of example sentences to generate embeddings for
sentences = ["This is the first sentence.", "This is the second sentence."]

# Create a Dataset object directly from these sentences
dataset_embedding = Dataset.from_dict({"text": sentences})

# Apply the tokenization function to the dataset, preparing it for embedding generation
tokenized_dataset_embedding = dataset_embedding.map(tokenize_function_embedding, batched=True, batch_size=None)

# Extract 'input_ids' and 'attention_mask' needed for the model to understand which parts of the input are padding and which are actual content
input_ids = tokenized_dataset_embedding["input_ids"]
attention_mask = tokenized_dataset_embedding["attention_mask"]

# Convert these lists into tensors and ensure they are on the correct device (GPU or CPU) for processing
input_ids = torch.tensor(input_ids).to(device)
attention_mask = torch.tensor(attention_mask).to(device)

# Generate embeddings using the model without updating gradients to save computational resources
with torch.no_grad():
    outputs = model(input_ids=input_ids, attention_mask=attention_mask, output_hidden_states=True)
    # Extract the last layer's hidden states as embeddings, specifically the first token (typically used in BERT-type models for representing sentence embeddings)
    embeddings = outputs.hidden_states[-1][:, 0, :]

# Move the embeddings from the GPU back to CPU for easy manipulation or saving
embeddings = embeddings.cpu()

# Print each sentence with its corresponding embedding vector
for sentence, embedding in zip(sentences, embeddings):
    print(f"Sentence: {sentence}")
    print(f"Embedding: {embedding}\n")
四、高级RAG之检索后处理
检索到相关信息后,还需要以正确顺序喂给大模型。在接下来的 2 个小节中,我们将解释如何使用摘要和重新排序来提高 RAG 的质量。
4.1 对响应进行摘要
如果在索引过程中在数据库中存储了大量的块文本向量,则此步骤可能是必要的。如果文本已经很小,则可能不需要此步骤。
以下代码块可用于摘要过程。以下代码块使用该transformers库通过预先训练的 BART 模型来提取文本摘要。该函数summarize_text接收文本并使用该模型根据定义的最大和最小长度参数生成简洁的摘要。
from transformers import pipeline
def summarize_text(text, max_length=130):

    # Load a pre-trained summarization model from Hugging Face's model hub.
    # 'facebook/bart-large-cnn' is chosen for its proficiency in generating concise summaries.
    summarizer = pipeline("summarization", model="facebook/bart-large-cnn")

    # The summarizer uses the BART model to condense the input text into a summary.
    # 'max_length' specifies the maximum length of the summary output.
    # 'min_length' sets the minimum length to ensure the summary is not too terse.
    # 'do_sample' is set to False to use a deterministic approach for summary generation.
    summary = summarizer(text, max_length=max_length, min_length=30, do_sample=False)

    # The output from the summarizer is a list of dictionaries.
    # We extract the summary text from the first dictionary in the list.
    return summary[0]['summary_text']

# Example text to be summarized.
# This text discusses the importance of summarization in retrieval-augmented generation systems.
long_text = "Summarization are vital steps in the workflow of retrieval-augmented generation systems. They ensure the output is not only accurate but also concise and digestible. These techniques are essential, especially in domains where the accuracy and precision of information are crucial."

# Call the summarize_text function to compress the example text.
summarized_text = summarize_text(long_text)

# Print the summarized text to see the output of the summarization model.
print("Summarized Text:", summarized_text)
完整的代码,可以参考[3]
4.2 重排序和过滤
在检索过程中,您应该已经得到每个文档的“分数”——这实际上是向量与查询向量的相似度分数。此信息可用于重新排序文档并根据给定的阈值过滤结果。以下代码块显示了如何重新排序和过滤的示例。
4.2.1. 基本重排序和过滤
下面代码块定义了一个文档列表,每个文档都由一个包含 ID、文本和相关性分数的字典表示。然后它实现了两个主要功能:re_rank_documents和filter_documents。该re_rank_documents函数按相关性分数降序对文档进行排序,在重新排序后,该filter_documents函数用于排除相关性分数低于指定阈值 0.75 的任何文档。
# Define a list of documents. Each document is represented as a dictionary with an ID, text, and a relevance score.
documents = [
    {"id": 1, "text": "Advanced RAG systems use sophisticated techniques for text summarization.", "relevance_score": 0.82},
    {"id": 2, "text": "Basic RAG systems primarily focus on retrieval and basic processing.", "relevance_score": 0.55},
    {"id": 3, "text": "Re-ranking improves the quality of responses by ordering documents by relevance.", "relevance_score": 0.89}
]

# Define a function to re-rank documents based on their relevance scores.
def re_rank_documents(docs):

    # Use the sorted function to order the documents by 'relevance_score'.
    # The key for sorting is specified using a lambda function, which extracts the relevance score from each document.
    # 'reverse=True' sorts the list in descending order, placing documents with higher relevance scores first.
    return sorted(docs, key=lambda x: x['relevance_score'], reverse=True)

# Re-rank the documents using the defined function and print the result.
ranked_documents = re_rank_documents(documents)
print("Re-ranked Documents:", ranked_documents)

# Define a function to filter documents based on a relevance score threshold.
def filter_documents(docs, relevance_threshold=0.75):

    # Use a list comprehension to create a new list that includes only those documents whose 'relevance_score'
    # is greater than or equal to the 'relevance_threshold'.
    return [doc for doc in docs if doc['relevance_score'] >= relevance_threshold]

# Filter the re-ranked documents using the defined function with a threshold of 0.75 and print the result.
filtered_documents = filter_documents(ranked_documents)
print("Filtered Documents:", filtered_documents)
4.2.2. 使用机器学习算法进行高级重排序
对于更复杂的方法,可以使用机器学习模型对文档进行重新排序。在这种方法中,挑战在于:如何知道哪些文档是相关的,以便我们可以训练机器学习模型对文档进行排序?
在这种方法中,我们需要假设我们有一个系统,该系统存储用户与系统之间的交互,并存储文档是否与给定查询相关。一旦我们有了这个数据集,我们就可以使用查询嵌入向量和文档嵌入来预测分数。
# assumung the data is stored in the following format in a database
# query_text | response_text | user_clicked

query_embeddings = get_embedding_vector(database.query_text)
response_embeddings = get_embedding_vector(database.response_text)

# create the dataset
X = concat(query_embeddings, response_embeddings)
y = database.user_clicked

model = model.train(X, y)
model.predict_proba(...)
上面提供的伪代码概述了使用机器学习根据相关性对文档进行重新排序的方法,具体来说,是通过预测用户根据过去的交互找到相关文档的可能性。下面伪代码是对描述流程的分步骤说明:
-
Generating Embeddings(生成嵌入):对于查询和响应文档,创建嵌入向量来捕获它们的语义内容。
-
Creating the Dataset(创建数据集):这些嵌入连接起来形成特征向量(X),目标变量(y)表示用户是否点击了文档。
-
Model Training(模型训练):在该数据集上训练分类模型,以根据组合查询和文档嵌入来预测文档被点击的可能性。
-
Prediction(预测):训练后的模型可以预测新查询-文档对的点击概率,帮助根据预测的相关性重新对文档进行排名,以提高搜索结果的准确性。
五、结论
实施简单的检索增强生成 (RAG) 系统可能会解决您的问题,但添加增强功能将改善您的结果并帮助您的系统生成更精确的答案。在本文中,我们讨论了旨在实现此目标的几项增强功能,包括数据索引优化、查询增强、混合搜索、嵌入模型的微调、响应汇总以及重新排名和过滤。
通过集成这些增强功能,您有机会显著提高性能。继续探索和应用这些方法,进行试验,看看哪种方法最适合您的需求。
参考文献:
[1] https://arxiv.org/pdf/2404.10981
[2] https://github.com/ndemir/machine-learning-projects/tree/main/hybrid-search
[3] https://github.com/ndemir/machine-learning-projects/tree/main/fine-tuning-embedding-model
零基础如何学习大模型 AI
领取方式在文末
为什么要学习大模型?
学习大模型课程的重要性在于它能够极大地促进个人在人工智能领域的专业发展。大模型技术,如自然语言处理和图像识别,正在推动着人工智能的新发展阶段。通过学习大模型课程,可以掌握设计和实现基于大模型的应用系统所需的基本原理和技术,从而提升自己在数据处理、分析和决策制定方面的能力。此外,大模型技术在多个行业中的应用日益增加,掌握这一技术将有助于提高就业竞争力,并为未来的创新创业提供坚实的基础。
大模型典型应用场景
①AI+教育:智能教学助手和自动评分系统使个性化教育成为可能。通过AI分析学生的学习数据,提供量身定制的学习方案,提高学习效果。
②AI+医疗:智能诊断系统和个性化医疗方案让医疗服务更加精准高效。AI可以分析医学影像,辅助医生进行早期诊断,同时根据患者数据制定个性化治疗方案。
③AI+金融:智能投顾和风险管理系统帮助投资者做出更明智的决策,并实时监控金融市场,识别潜在风险。
④AI+制造:智能制造和自动化工厂提高了生产效率和质量。通过AI技术,工厂可以实现设备预测性维护,减少停机时间。
⑤AI+零售:智能推荐系统和库存管理优化了用户体验和运营成本。AI可以分析用户行为,提供个性化商品推荐,同时优化库存,减少浪费。
⑥AI+交通:自动驾驶和智能交通管理提升了交通安全和效率。AI技术可以实现车辆自动驾驶,并优化交通信号控制,减少拥堵。
…
这些案例表明,学习大模型课程不仅能够提升个人技能,还能为企业带来实际效益,推动行业创新发展。
学习资料领取
如果你对大模型感兴趣,可以看看我整合并且整理成了一份AI大模型资料包,需要的小伙伴文末免费领取哦,无偿分享!!!
vx扫描下方二维码即可
加上后会一个个给大家发

部分资料展示
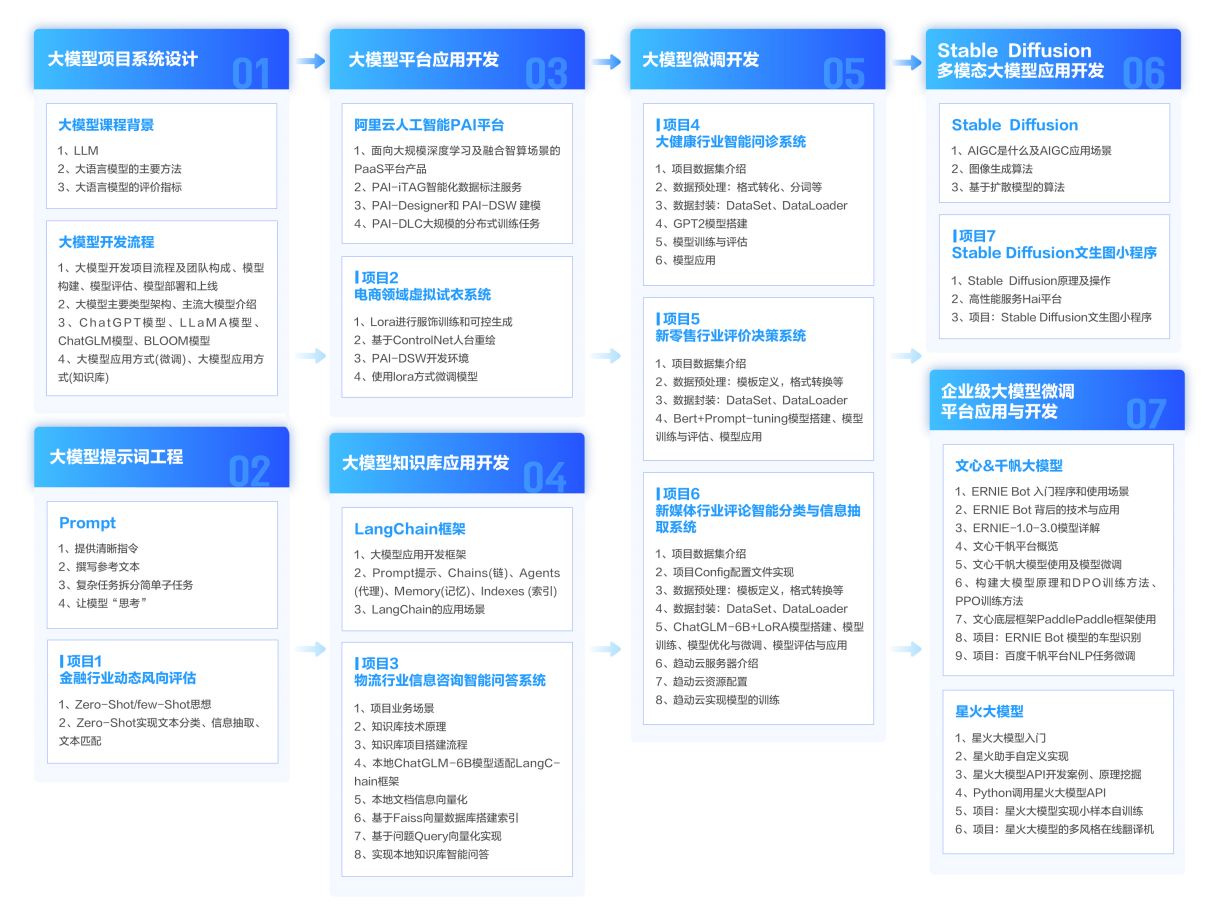
一、 AI大模型学习路线图
整个学习分为7个阶段
二、AI大模型实战案例
涵盖AI大模型的理论研究、技术实现、行业应用等多个方面。无论您是科研人员、工程师,还是对AI大模型感兴趣的爱好者,皆可用。

三、视频和书籍PDF合集
从入门到进阶这里都有,跟着老师学习事半功倍。


如果二维码失效,可以点击下方链接,一样的哦
【CSDN大礼包】最新AI大模型资源包,这里全都有!无偿分享!!!
😝朋友们如果有需要的话,可以V扫描下方二维码联系领取~


