5、分布式锁-redission
5.1 分布式锁-redission功能介绍
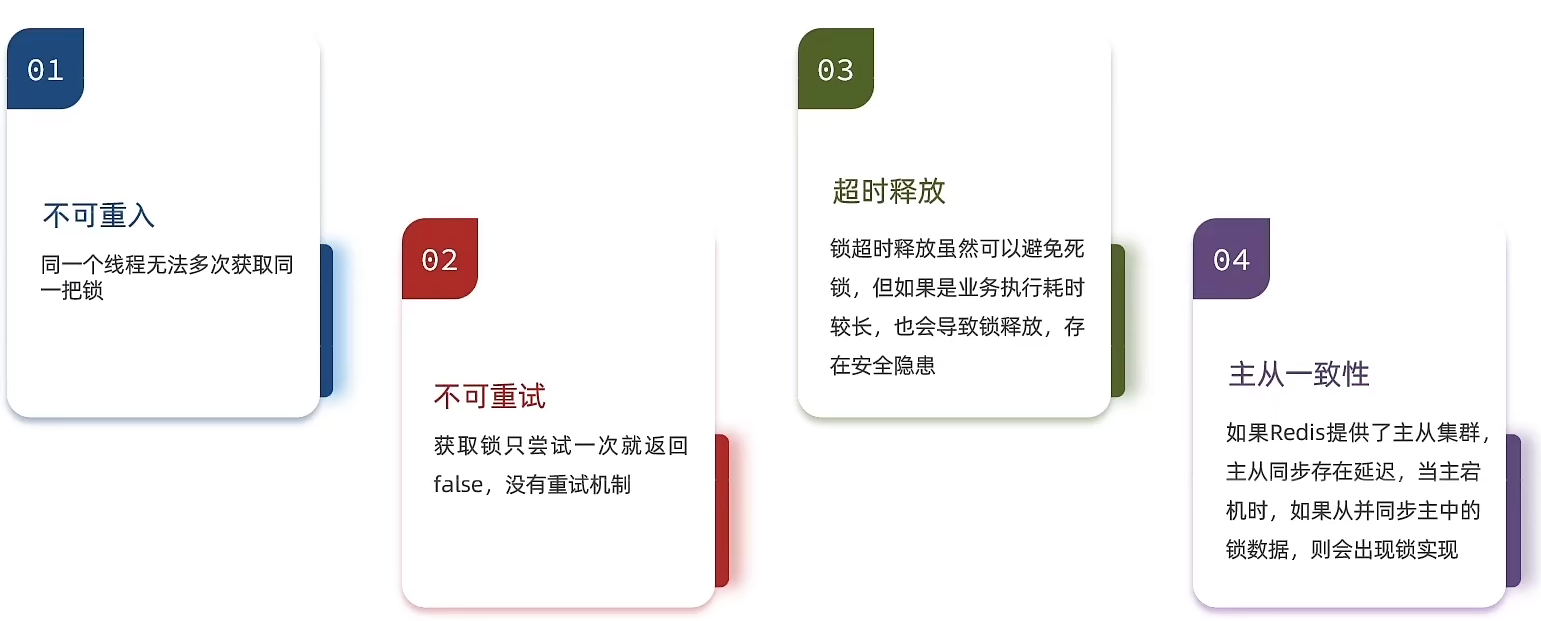
基于setnx实现的分布式锁存在下面的问题:
- 重入问题
- 重入问题是指获取锁的线程,可以再次进入到相同的锁的代码块中,可重入锁的意义在于防止死锁,例如在HashTable这样的代码中,它的方法都是使用synchronized修饰的,加入它在一个方法内调用另一个方法,如果此时是不可重入的,那就死锁了。所以可重入锁的主要意义是防止死锁,我们的synchronized和Lock锁都是可重入的
- 不可重试
- 我们编写的分布式锁只能尝试一次,失败了就返回false,没有重试机制。但合理的情况应该是:当线程获取锁失败后,他应该能再次尝试获取锁
- 超时释放
- 我们在加锁的时候增加了TTL,这样我们可以防止死锁,但是如果卡顿(阻塞)时间太长,也会导致锁的释放。虽然我们采用Lua脚本来防止删锁的时候,误删别人的锁,但现在的新问题是没锁住,也有安全隐患
- 主从一致性
- 如果Redis提供了主从集群,那么当我们向集群写数据时,主机需要异步的将数据同步给从机,万一在同步之前,主机宕机了(主从同步存在延迟,虽然时间很短,但还是发生了),那么又会出现死锁问题
那么什么是Redission呢
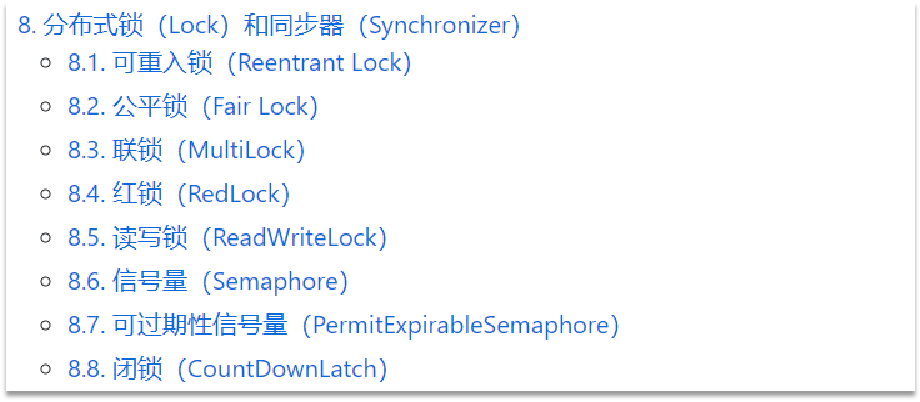
Redisson是一个在Redis的基础上实现的Java驻内存数据网格(In-Memory Data Grid)。它不仅提供了一系列的分布式的Java常用对象,还提供了许多分布式服务,其中就包含了各种分布式锁的实现。
Redission提供了分布式锁的多种多样的功能
5.2 分布式锁-Redission快速入门
引入依赖:
<dependency>
	<groupId>org.redisson</groupId>
	<artifactId>redisson</artifactId>
	<version>3.13.6</version>
</dependency>
配置Redisson客户端:
@Configuration
public class RedissonConfig {

    @Bean
    public RedissonClient redissonClient(){
        // 配置
        Config config = new Config();
        //添加redis地址,这里添加了单点的地址,也可以使用config.useClusterServers()添加集群地址
        config.useSingleServer().setAddress("redis://192.168.150.101:6379")
            .setPassword("123321");
        // 创建RedissonClient对象
        return Redisson.create(config);
    }
}
如何使用Redission的分布式锁
@Resource
private RedissionClient redissonClient;

@Test
void testRedisson() throws Exception{
    //获取锁(可重入),指定锁的名称
    RLock lock = redissonClient.getLock("anyLock");
    //尝试获取锁,参数分别是:获取锁的最大等待时间(期间会重试),锁自动释放时间,时间单位
    boolean isLock = lock.tryLock(1,10,TimeUnit.SECONDS);
    //判断获取锁成功
    if(isLock){
        try{
            System.out.println("执行业务");
        }finally{
            //释放锁
            lock.unlock();
        }

    }

}
在 VoucherOrderServiceImpl
注入RedissonClient
@Resource
private RedissonClient redissonClient;

@Override
public Result seckillVoucher(Long voucherId) {
        // 1.查询优惠券
        SeckillVoucher voucher = seckillVoucherService.getById(voucherId);
        // 2.判断秒杀是否开始
        if (voucher.getBeginTime().isAfter(LocalDateTime.now())) {
            // 尚未开始
            return Result.fail("秒杀尚未开始!");
        }
        // 3.判断秒杀是否已经结束
        if (voucher.getEndTime().isBefore(LocalDateTime.now())) {
            // 尚未开始
            return Result.fail("秒杀已经结束!");
        }
        // 4.判断库存是否充足
        if (voucher.getStock() < 1) {
            // 库存不足
            return Result.fail("库存不足!");
        }
        Long userId = UserHolder.getUser().getId();
        //创建锁对象 这个代码不用了,因为我们现在要使用分布式锁
        //SimpleRedisLock lock = new SimpleRedisLock("order:" + userId, stringRedisTemplate);
        RLock lock = redissonClient.getLock("lock:order:" + userId);
        //获取锁对象
        boolean isLock = lock.tryLock();

		//加锁失败
        if (!isLock) {
            return Result.fail("不允许重复下单");
        }
        try {
            //获取代理对象(事务)
            IVoucherOrderService proxy = (IVoucherOrderService) AopContext.currentProxy();
            return proxy.createVoucherOrder(voucherId);
        } finally {
            //释放锁
            lock.unlock();
        }
 }
5.3 分布式锁-redission可重入锁原理
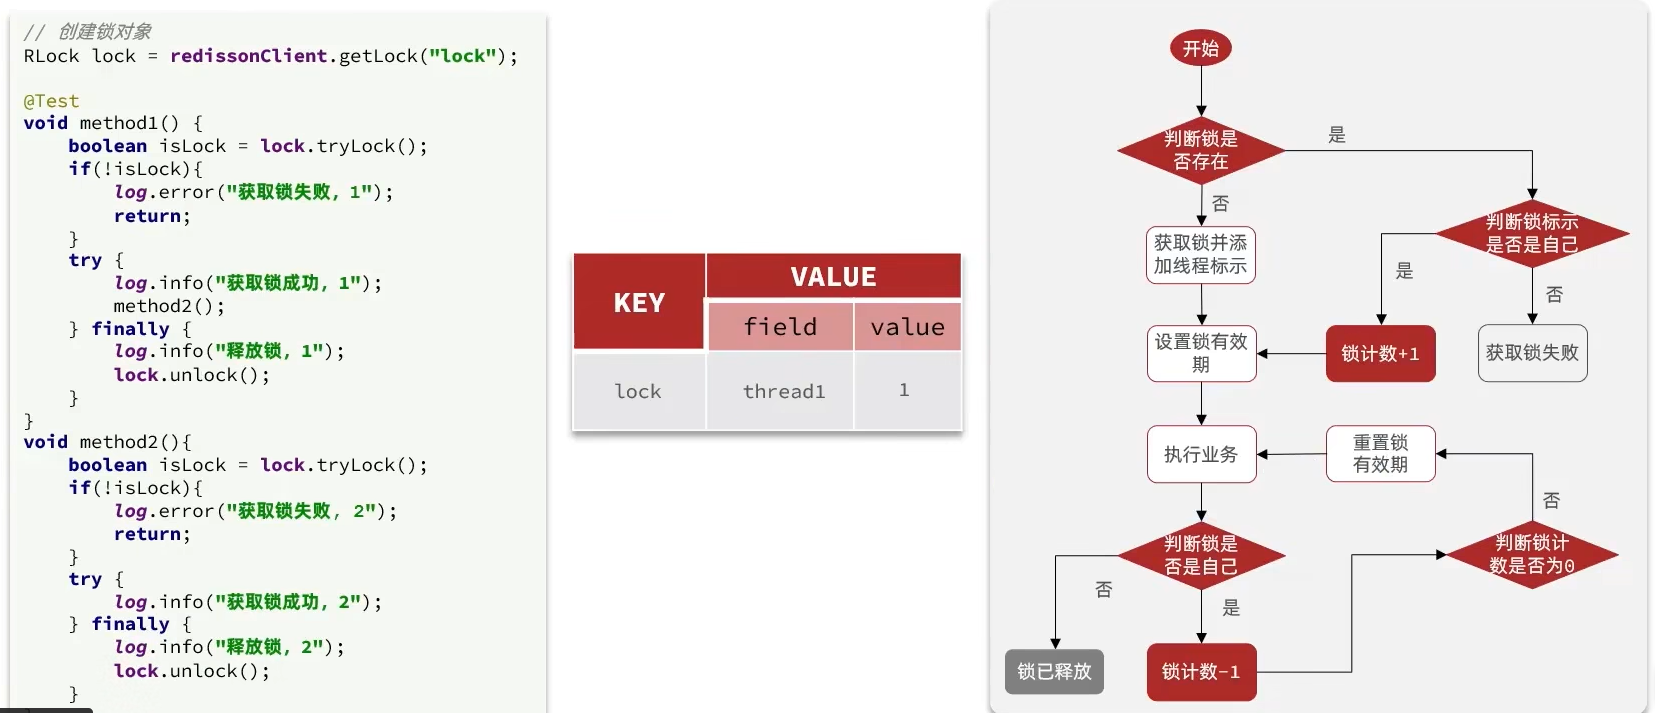
- method1在方法内部调用method2,method1和method2出于同一个线程,那么method1已经拿到一把锁了,想进入method2中拿另外一把锁,必然是拿不到的,于是就出现了死锁
- 所以我们需要额外判断,method1和method2是否处于同一线程,如果是同一个线程,则可以拿到锁,但是state会
+1,之后执行method2中的方法,释放锁,释放锁的时候也只是将state进行-1,只有减至0,才会真正释放锁 - 由于我们需要额外存储一个state,所以用字符串型
SET NX EX是不行的,需要用到Hash结构,但是Hash结构又没有NX这种方法,所以我们需要将原有的逻辑拆开,进行手动判断 - 为了保证原子性,所以流程图中的业务逻辑也是需要我们用Lua来实现的
- 获取锁的逻辑
local key = KEYS[1]; -- 锁的key
local threadId = ARGV[1]; -- 线程唯一标识
local releaseTime = ARGV[2]; -- 锁的自动释放时间
-- 锁不存在
if (redis.call('exists', key) == 0) then
    -- 获取锁并添加线程标识,state设为1
    redis.call('hset', key, threadId, '1');
    -- 设置锁有效期
    redis.call('expire', key, releaseTime);
    return 1; -- 返回结果
end;
-- 锁存在,判断threadId是否为自己
if (redis.call('hexists', key, threadId) == 1) then
    -- 锁存在,重入次数 +1,这里用的是hash结构的incrby增长
    redis.call('hincrby', key, thread, 1);
    -- 设置锁的有效期
    redis.call('expire', key, releaseTime);
    return 1; -- 返回结果
end;
return 0; -- 代码走到这里,说明获取锁的不是自己,获取锁失败
-
释放锁的逻辑
local key = KEYS[1];
local threadId = ARGV[1];
local releaseTime = ARGV[2];
-- 如果锁不是自己的
if (redis.call('HEXISTS', key, threadId) == 0) then
    return nil; -- 直接返回
end;
-- 锁是自己的,锁计数-1,还是用hincrby,不过自增长的值为-1
local count = redis.call('hincrby', key, threadId, -1);
-- 判断重入次数为多少
if (count > 0) then
    -- 大于0,重置有效期
    redis.call('expire', key, releaseTime);
    return nil;
else
    -- 否则直接释放锁
    redis.call('del', key);
    return nil;
end;
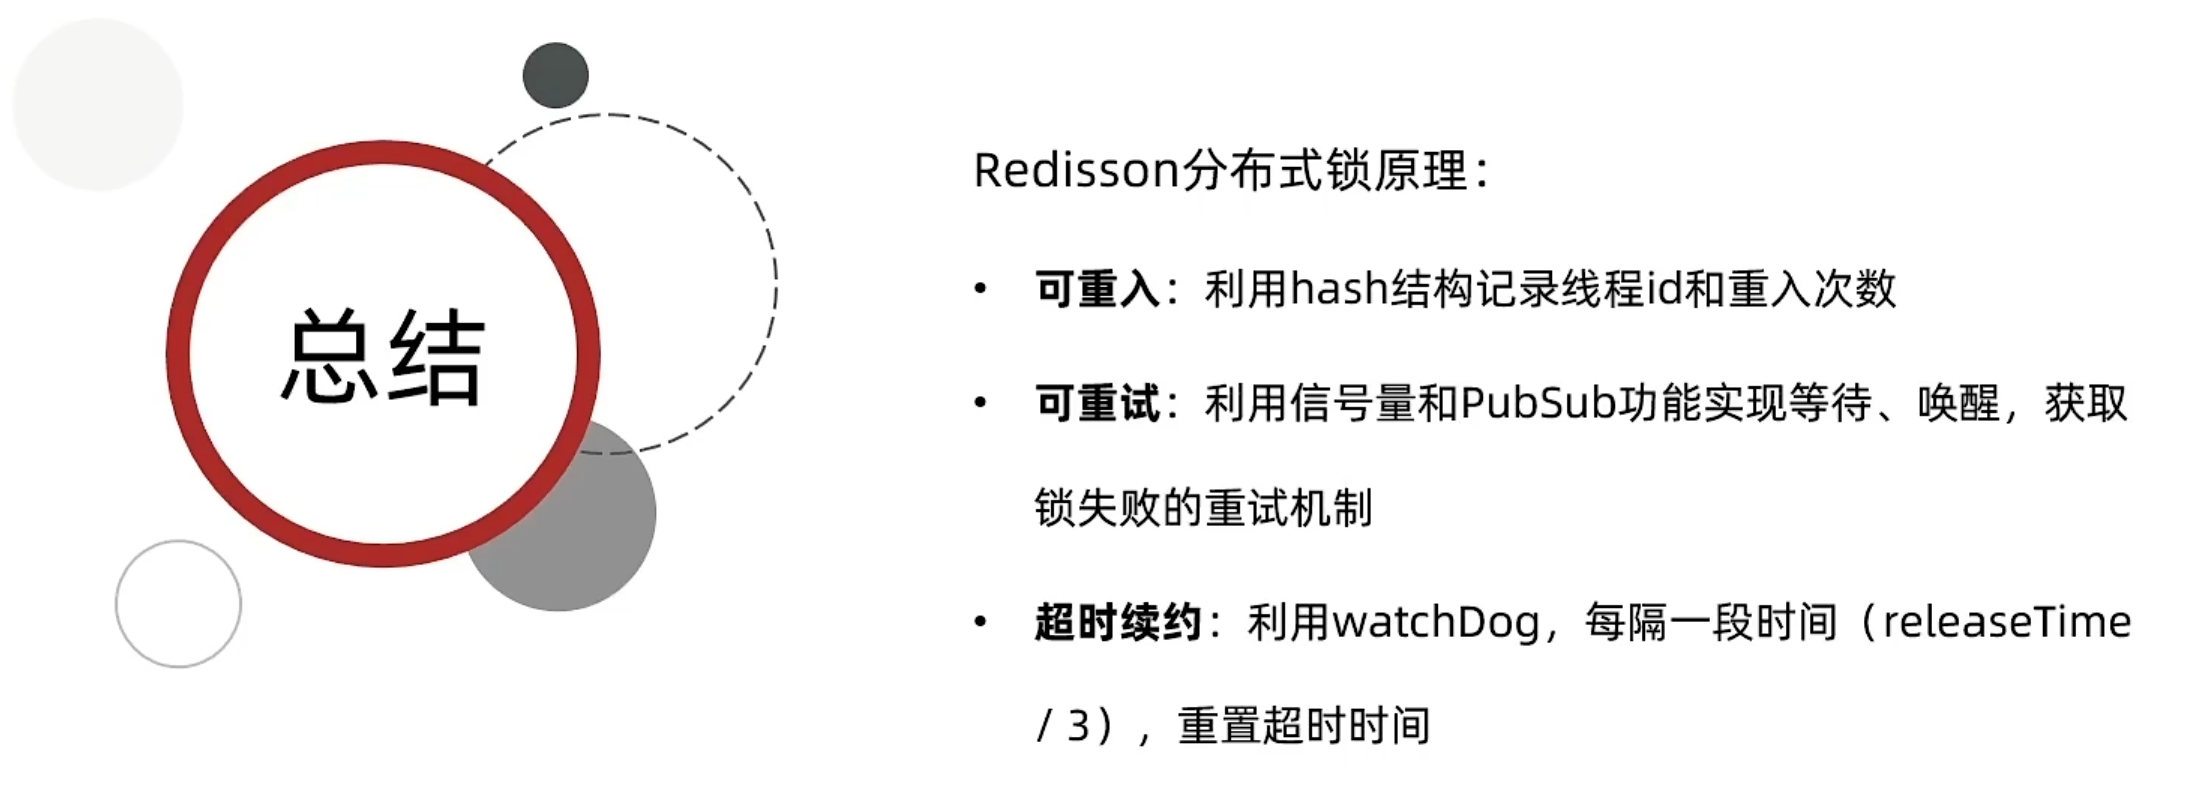
5.4 分布式锁-redission锁重试和WatchDog机制
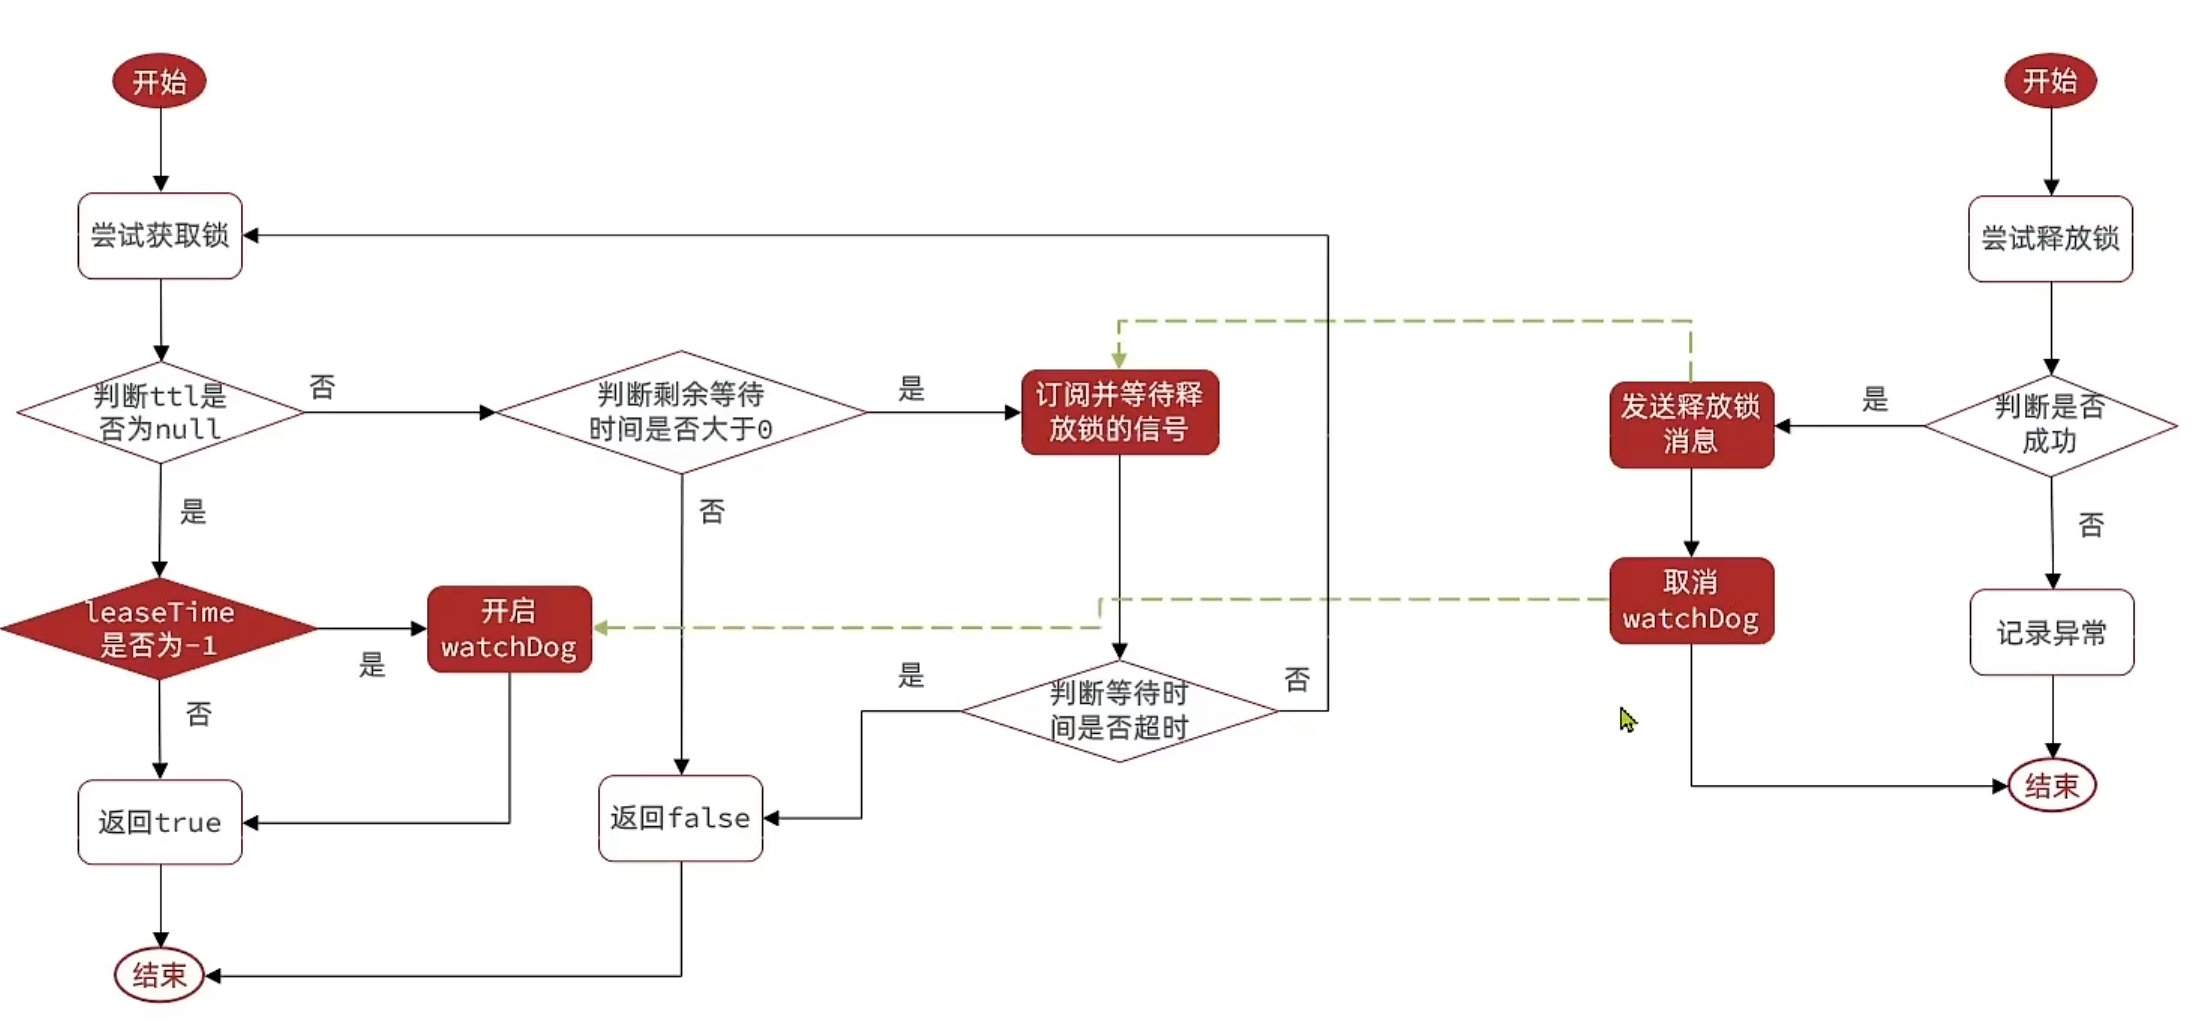
说明:由于课程中已经说明了有关tryLock的源码解析以及其看门狗原理,所以笔者在这里给大家分析lock()方法的源码解析,希望大家在学习过程中,能够掌握更多的知识
开门狗的前提就是不设置有效期,如果自己设置了有效期,则没有看门狗机制
ttl代表锁剩余有效时间,如果ttl为空,代表获取锁成功,
public boolean tryLock(long waitTime, long leaseTime, TimeUnit unit) throws InterruptedException {
        long time = unit.toMillis(waitTime);
        long current = System.currentTimeMillis();
        long threadId = Thread.currentThread().getId();
        Long ttl = this.tryAcquire(waitTime, leaseTime, unit, threadId);//返回锁剩余有效期
        //判断ttl是否为null,如果为null说明获取锁成功
        if (ttl == null) {
            return true;
        } else {
            //最大等待时间-获取锁所用的时间=剩余等待时间
            time -= System.currentTimeMillis() - current;
            //如果消耗时间太长了,直接返回false,获取锁失败
            if (time <= 0L) {
                this.acquireFailed(waitTime, unit, threadId);
                return false;
            } else {
                //等待时间还有剩余,再次获取当前时间
                current = System.currentTimeMillis();
                //订阅别人释放锁的信号
                RFuture<RedissonLockEntry> subscribeFuture = this.subscribe(threadId);
                //在剩余时间内,等待这个信号,如果已经等待超时,取消订阅,并获取锁失败
                if (!subscribeFuture.await(time, TimeUnit.MILLISECONDS)) {
                    //
                    if (!subscribeFuture.cancel(false)) {
                        subscribeFuture.onComplete((res, e) -> {
                            if (e == null) {
                                //取消订阅
                                this.unsubscribe(subscribeFuture, threadId);
                            }

                        });
                    }
                    //剩余时间内没等到,返回false
                    this.acquireFailed(waitTime, unit, threadId);
                    return false;
                } else {
                    try {
                        //如果剩余时间内等到了别人释放锁的信号,再次计算当前剩余最大等待时间
                        time -= System.currentTimeMillis() - current;
                        if (time <= 0L) {
                            //如果剩余时间为负数,则直接返回false
                            this.acquireFailed(waitTime, unit, threadId);
                            boolean var20 = false;
                            return var20;
                        } else {
                            boolean var16;
                            do {
                                //如果剩余时间等到了,dowhile循环重试获取锁
                                long currentTime = System.currentTimeMillis();
                                ttl = this.tryAcquire(waitTime, leaseTime, unit, threadId);
                                if (ttl == null) {
                                    var16 = true;
                                    return var16;
                                }

                                time -= System.currentTimeMillis() - currentTime;
                                if (time <= 0L) {
                                    this.acquireFailed(waitTime, unit, threadId);
                                    var16 = false;
                                    return var16;
                                }

                                currentTime = System.currentTimeMillis();
                                if (ttl >= 0L && ttl < time) {
                                    ((RedissonLockEntry)subscribeFuture.getNow()).getLatch().tryAcquire(ttl, TimeUnit.MILLISECONDS);
                                } else {
                                    ((RedissonLockEntry)subscribeFuture.getNow()).getLatch().tryAcquire(time, TimeUnit.MILLISECONDS);
                                }

                                time -= System.currentTimeMillis() - currentTime;
                            } while(time > 0L);

                            this.acquireFailed(waitTime, unit, threadId);
                            var16 = false;
                            return var16;
                        }
                    } finally {
                        this.unsubscribe(subscribeFuture, threadId);
                    }
                }
            }
        }
    }
tryAcquire继续调用tryAcquireAsync
private <T> RFuture<Long> tryAcquireAsync(long waitTime, long leaseTime, TimeUnit unit, long threadId) {

    if (leaseTime != -1L) {//查看是否设定默认失效时间
        return this.tryLockInnerAsync(waitTime, leaseTime, unit, threadId, RedisCommands.EVAL_LONG);
    } else {
        // 如果没有指定释放时间时间,则指定默认释放时间为getLockWatchdogTimeout,底层源码显示是30*1000ms,也就是30秒
        RFuture<Long> ttlRemainingFuture = this.tryLockInnerAsync(waitTime, this.commandExecutor.getConnectionManager().getCfg().getLockWatchdogTimeout(), TimeUnit.MILLISECONDS, threadId, RedisCommands.EVAL_LONG);
        //当上面的函数完成,则回调下面的函数
        ttlRemainingFuture.onComplete((ttlRemaining, e) -> {
            if (e == null) {
                //如果获取锁成功
                if (ttlRemaining == null) {
                    this.scheduleExpirationRenewal(threadId);
                }

            }
        });
        return ttlRemainingFuture;
    }
}
进入tryLockInnerAsync
<T> RFuture<T> tryLockInnerAsync(long waitTime, long leaseTime, TimeUnit unit, long threadId, RedisStrictCommand<T> command) {
    this.internalLockLeaseTime = unit.toMillis(leaseTime);
    return this.evalWriteAsync(this.getName(), LongCodec.INSTANCE, command,
"if (redis.call('exists', KEYS[1]) == 0) then
     redis.call('hincrby', KEYS[1], ARGV[2], 1);
     redis.call('pexpire', KEYS[1], ARGV[1]);
     return nil;
     end;
if (redis.call('hexists', KEYS[1], ARGV[2]) == 1) then
     redis.call('hincrby', KEYS[1], ARGV[2], 1);
     redis.call('pexpire', KEYS[1], ARGV[1]);
     return nil;
end;
return redis.call('pttl', KEYS[1]);", -- 代码走到这里,说明获取锁的不是自己,获取锁失败
Collections.singletonList(this.getName()), this.internalLockLeaseTime, this.getLockName(threadId));
}
return redis.call('pttl', KEYS[1]);:代表锁获取失败,返回锁剩余有效期,毫秒级别
local key = KEYS[1]; -- 锁的key
local threadId = ARGV[1]; -- 线程唯一标识
local releaseTime = ARGV[2]; -- 锁的自动释放时间
-- 锁不存在
if (redis.call('exists', key) == 0) then
    -- 获取锁并添加线程标识,state设为1
    redis.call('hset', key, threadId, '1');
    -- 设置锁有效期
    redis.call('expire', key, releaseTime);
    return 1; -- 返回结果
end;
-- 锁存在,判断threadId是否为自己
if (redis.call('hexists', key, threadId) == 1) then
    -- 锁存在,重入次数 +1,这里用的是hash结构的incrby增长
    redis.call('hincrby', key, thread, 1);
    -- 设置锁的有效期
    redis.call('expire', key, releaseTime);
    return 1; -- 返回结果
end;
return 0; -- 代码走到这里,说明获取锁的不是自己,获取锁失败
回调函数到期更新:
private void scheduleExpirationRenewal(long threadId) {
    ExpirationEntry entry = new ExpirationEntry();
    //不存在,才put,表明是第一次进入,不是重入,保证同一个锁
    ExpirationEntry oldEntry = (ExpirationEntry)EXPIRATION_RENEWAL_MAP.putIfAbsent(this.getEntryName(), entry);
    if (oldEntry != null) {
        oldEntry.addThreadId(threadId);
    } else {
        //如果是第一次进入,则跟新有效期
        entry.addThreadId(threadId);
        this.renewExpiration();
    }
}
更新有效期:
private void renewExpiration() {
    ExpirationEntry ee = (ExpirationEntry)EXPIRATION_RENEWAL_MAP.get(this.getEntryName());
    if (ee != null) {
        //Timeout是一个定时任务
        Timeout task = this.commandExecutor.getConnectionManager().newTimeout(new TimerTask() {
            public void run(Timeout timeout) throws Exception {
                ExpirationEntry ent = (ExpirationEntry)RedissonLock.EXPIRATION_RENEWAL_MAP.get(RedissonLock.this.getEntryName());
                if (ent != null) {
                    Long threadId = ent.getFirstThreadId();
                    if (threadId != null) {
                        //重置有效期
                        RFuture<Boolean> future = RedissonLock.this.renewExpirationAsync(threadId);
                        future.onComplete((res, e) -> {
                            if (e != null) {
                                RedissonLock.log.error("Can't update lock " + RedissonLock.this.getName() + " expiration", e);
                            } else {
                                if (res) {
                                    //然后调用自己,递归重置有效期
                                    RedissonLock.this.renewExpiration();
                                }

                            }
                        });
                    }
                }
            }
            //internalLockLeaseTime是之前WatchDog默认有效期30秒,那这里就是 30 / 3 = 10秒之后,才会执行
        }, this.internalLockLeaseTime / 3L, TimeUnit.MILLISECONDS);
        ee.setTimeout(task);
    }
}
刷新有效期:
protected RFuture<Boolean> renewExpirationAsync(long threadId) {
    return this.evalWriteAsync(this.getName(), LongCodec.INSTANCE, RedisCommands.EVAL_BOOLEAN, "if (redis.call('hexists', KEYS[1], ARGV[2]) == 1) then redis.call('pexpire', KEYS[1], ARGV[1]); return 1; end; return 0;", Collections.singletonList(this.getName()), this.internalLockLeaseTime, this.getLockName(threadId));
}
5.5 分布式锁-redission锁的MutiLock原理
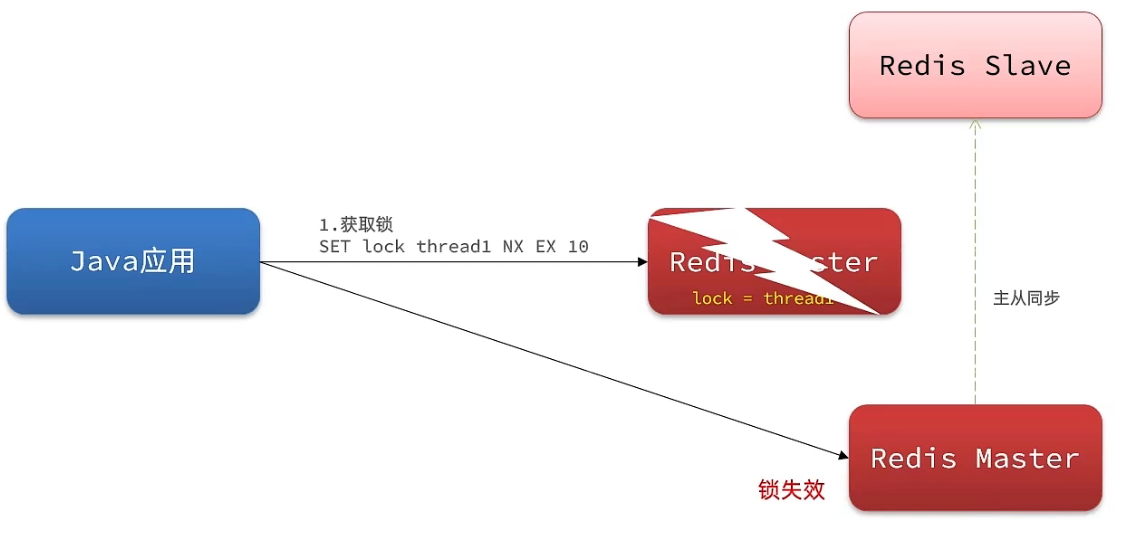
为了提高redis的可用性,我们会搭建集群或者主从,现在以主从为例
此时我们去写命令,写在主机上, 主机会将数据同步给从机,但是假设在主机还没有来得及把数据写入到从机去的时候,此时主机宕机,哨兵会发现主机宕机,并且选举一个slave变成master,而此时新的master中实际上并没有锁信息,此时锁信息就已经丢掉了。
为了解决这个问题,redission提出来了MutiLock锁,使用这把锁咱们就不使用主从了,每个节点的地位都是一样的, 这把锁加锁的逻辑需要写入到每一个主丛节点上,只有所有的服务器都写入成功,此时才是加锁成功,假设现在某个节点挂了,那么他去获得锁的时候,只要有一个节点拿不到,都不能算是加锁成功,就保证了加锁的可靠性。
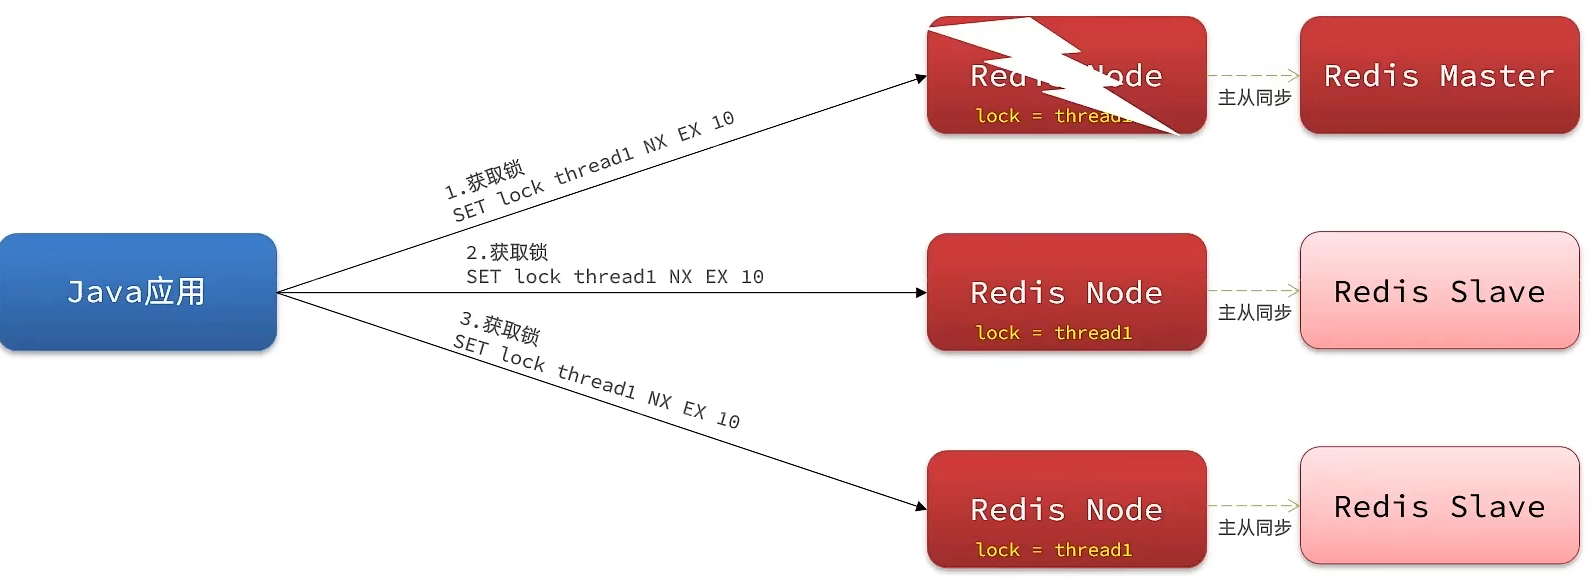
那么MutiLock 加锁原理是什么呢?笔者画了一幅图来说明
当我们去设置了多个锁时,redission会将多个锁添加到一个集合中,然后用while循环去不停去尝试拿锁,但是会有一个总共的加锁时间,这个时间是用需要加锁的个数 * 1500ms ,假设有3个锁,那么时间就是4500ms,假设在这4500ms内,所有的锁都加锁成功, 那么此时才算是加锁成功,如果在4500ms有线程加锁失败,则会再次去进行重试.

- 我们先使用虚拟机额外搭建两个Redis节点
@Configuration
public class RedissonConfig {
    @Bean
    public RedissonClient redissonClient() {
        Config config = new Config();
        config.useSingleServer().setAddress("redis://192.168.137.130:6379")
                .setPassword("root");
        return Redisson.create(config);
    }

    @Bean
    public RedissonClient redissonClient2() {
        Config config = new Config();
        config.useSingleServer().setAddress("redis://92.168.137.131:6379")
                .setPassword("root");
        return Redisson.create(config);
    }

    @Bean
    public RedissonClient redissonClient3() {
        Config config = new Config();
        config.useSingleServer().setAddress("redis://92.168.137.132:6379")
                .setPassword("root");
        return Redisson.create(config);
    }
}
- 使用联锁,我们首先要注入三个RedissonClient对象
@Resource
private RedissonClient redissonClient;
@Resource
private RedissonClient redissonClient2;
@Resource
private RedissonClient redissonClient3;

private RLock lock;

@BeforeEach
void setUp() {
    RLock lock1 = redissonClient.getLock("lock");
    RLock lock2 = redissonClient2.getLock("lock");
    RLock lock3 = redissonClient3.getLock("lock");
    //创建联锁,multiLock
    lock = redissonClient.getMultiLock(lock1, lock2, lock3);
}

@Test
void method1() {
    boolean success = lock.tryLock();
    redissonClient.getMultiLock();
    if (!success) {
        log.error("获取锁失败,1");
        return;
    }
    try {
        log.info("获取锁成功");
        method2();
    } finally {
        log.info("释放锁,1");
        lock.unlock();
    }
}

void method2() {
    RLock lock = redissonClient.getLock("lock");
    boolean success = lock.tryLock();
    if (!success) {
        log.error("获取锁失败,2");
        return;
    }
    try {
        log.info("获取锁成功,2");
    } finally {
        log.info("释放锁,2");
        lock.unlock();
    }
}
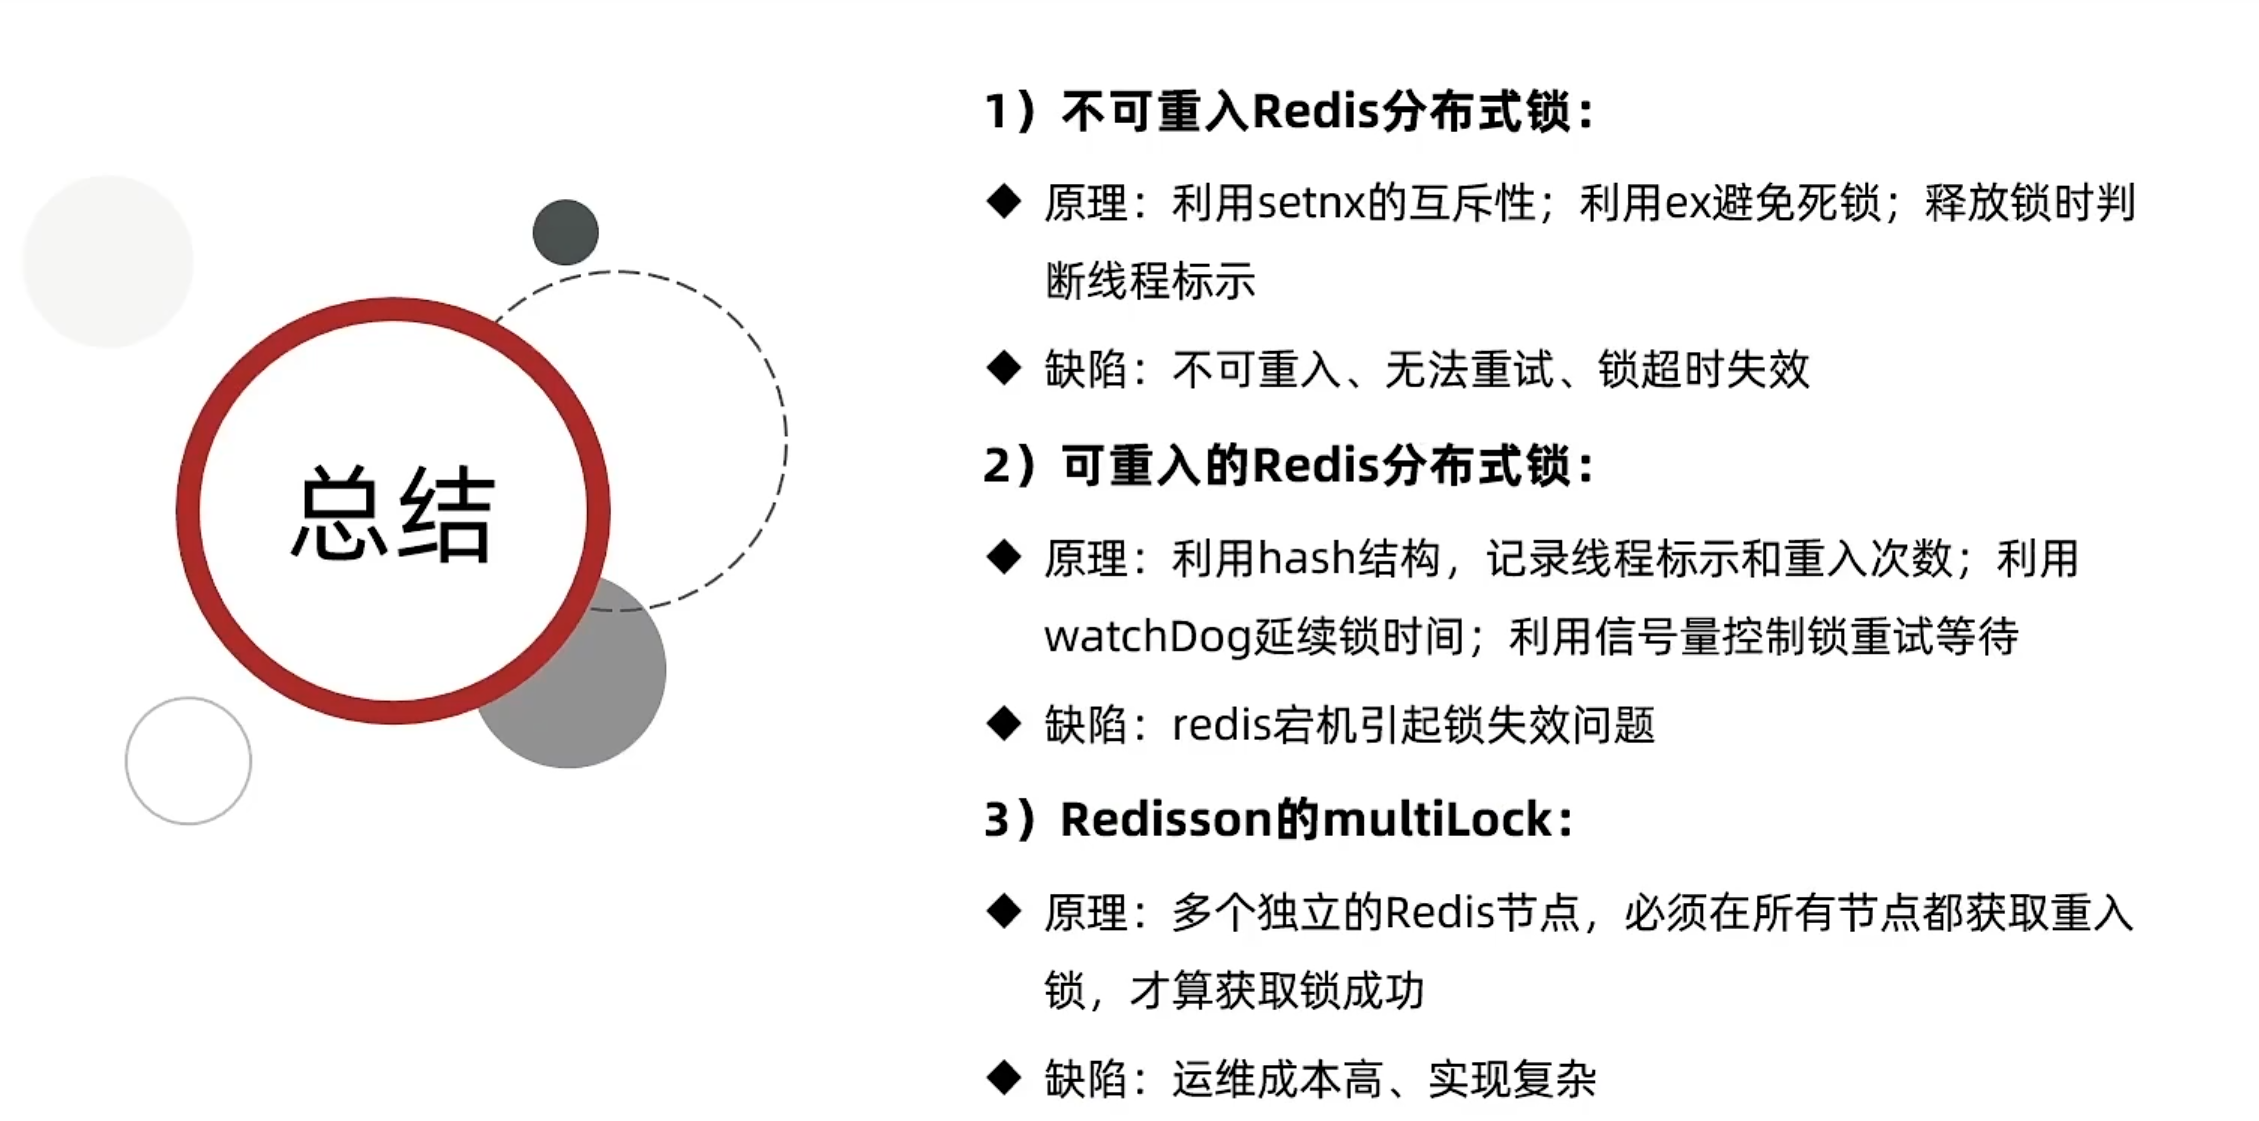
小结




![[Linux#44][线程] CP模型2.0 | 信号量接口 | 基于环形队列](https://img-blog.csdnimg.cn/img_convert/ab5df940328dad56696d2d86fff6d43f.jpeg)