自动化运维
ansible----自动化运维工具
特点:
部署简单,使用ssh管理
管理端与被管理端不需要启动服务
配置简单、功能强大,扩展性强
一、ansible环境搭建
准备四台机器

安装步骤
mo服务器:
#下载epel
[root@mo ~]# yum -y install epel-release.noarch
#安装ansible
[root@mo ~]# yum -y install ansible
#查看ansible版本
[root@mo ~]# ansible --version
进行免密登录

[root@mo ~]# ssh-copy-id -i 192.168.1.25
[root@mo ~]# ssh-copy-id -i 192.168.1.26
编辑配置文件
[root@mo ~]# vim /etc/ansible/hosts
[group01]
192.168.1.25
192.168.1.26[group02]
192.168.1.25
192.168.1.26
192.168.1.27
测试连接性
[root@mo ~]# ansible 192.168.1.25 -m ping
192.168.1.25 | SUCCESS => {
"ansible_facts": {
"discovered_interpreter_python": "/usr/bin/python"
},
"changed": false,
"ping": "pong"
}
设置别名分组
[root@mo ~]# vim /etc/ansible/hosts
[group01]
192.168.1.25
192.168.1.26other ansible_ssh_host=192.168.1.27 ansible_ssh_port=22 ansible_ssh_user=root ansible_ssh_pass=1
[group02]
192.168.1.25
192.168.1.26
other
再次测试连通性
group01:
[root@mo ~]# ansible group01 -m ping
192.168.1.26 | SUCCESS => {
"ansible_facts": {
"discovered_interpreter_python": "/usr/bin/python"
},
"changed": false,
"ping": "pong"
}
192.168.1.25 | SUCCESS => {
"ansible_facts": {
"discovered_interpreter_python": "/usr/bin/python"
},
"changed": false,
"ping": "pong"
}
other | SUCCESS => {
"ansible_facts": {
"discovered_interpreter_python": "/usr/bin/python"
},
"changed": false,
"ping": "pong"
}
group02:
[root@mo ~]# ansible group02 -m ping
192.168.1.26 | SUCCESS => {
"ansible_facts": {
"discovered_interpreter_python": "/usr/bin/python"
},
"changed": false,
"ping": "pong"
}
192.168.1.25 | SUCCESS => {
"ansible_facts": {
"discovered_interpreter_python": "/usr/bin/python"
},
"changed": false,
"ping": "pong"
}
other | SUCCESS => {
"ansible_facts": {
"discovered_interpreter_python": "/usr/bin/python"
},
"changed": false,
"ping": "pong"
}
other:
[root@mo ~]# ansible other -m ping
other | SUCCESS => {
"ansible_facts": {
"discovered_interpreter_python": "/usr/bin/python"
},
"changed": false,
"ping": "pong"
}
更改group02的名字
[root@mo ~]# ansible group02 -m hostname -a 'name=dd'
二、file模块
file模块⽤于对⽂件相关的操作(创建, 删除, 软硬链接等)
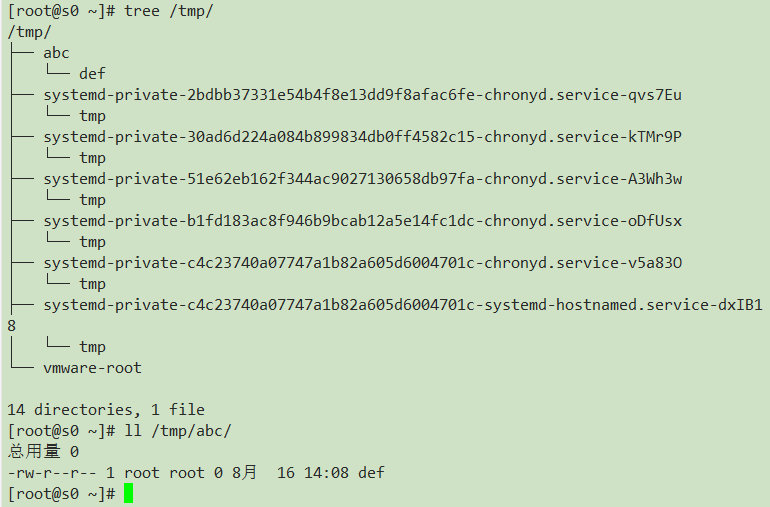
1.创建目录
[root@mo ~]# ansible group01 -m file -a 'path=/tmp/abc state=directory'
查看

2.创建文件
[root@mo ~]# ansible group02 -m file -a 'path=/tmp/abc/def state=touch'
查看

3.递归修改
[root@mo ~]# ansible group02 -m file -a 'path=/tmp/abc recurse=yes owner=bin group=daemon mode=1777'
查看
[root@s0 ~]# ll /tmp/abc/
总用量 0-rwxrwxrwt 1 bin daemon 0 8月 16 14:08 def
4.修改文件
[root@mo ~]# ansible group02 -m file -a 'path=/tmp/abc state=absent'
[root@mo ~]# ansible group02 -m file -a 'path=/tmp/aaaa state=touch owner=bin group=de=1777'
查看
[root@s0 ~]# ls -l /tmp/
总用量 0-rwxrwxrwt 1 bin daemon 0 8月 16 14:21 aaaa
5.删除文件
[root@mo ~]# ansible group02 -m file -a 'path=/tmp/aaaa state=absent'
6.创建链接文件
创建软连接
[root@mo ~]# ansible group02 -m file -a 'src=/etc/fstab path=/tmp/xxx state=link'
创建硬链接
[root@mo ~]# ansible group02 -m file -a 'src=/etc/fstab path=/tmp/xxx2 state=hard'
查看
[root@s0 ~]# ll /tmp/
lrwxrwxrwx 1 root root 10 8月 16 14:31 xxx -> /etc/fstab
-rw-r--r--. 2 root root 502 5月 25 18:31 xxx2
7.获取文件统计信息
[root@mo ~]# ansible group02 -m stat -a 'path=/etc/fstab'
三、copy模块
copy模块⽤于对⽂件的远程拷⻉操作(如把本地的⽂件拷⻉到远程 的机器上)
使⽤content参数直接往远程⽂件⾥写内容(会覆盖原内容)
使⽤force参数控制是否强制覆盖
使⽤backup参数控制是否备份⽂件
copy模块拷⻉时要注意拷⻉⽬录后⾯是否带"/"符号
没有"/"把表示拷贝目录,有"/"表示拷贝目录下的文件
用于远程拷贝文件
给虚拟机传mysql包
[root@mo ~]# rz -E
rz waiting to receive.
查看
[root@mo ~]# ls
anaconda-ks.cfg mysql-5.7.44-linux-glibc2.12-x86_64.tar.gz
改名
[root@mo ~]# mv mysql-5.7.44-linux-glibc2.12-x86_64.tar.gz mysql57.tar.gz
复制
将当前目录下的mysql57.tar.gz文件复制到group02组内所有机器的用户主目录中
[root@mo ~]# ansible group02 -m copy -a 'src=./mysql57.tar.gz dest=~'
查看
[root@s0 ~]# ls -lh
总用量 663M
-rw-------. 1 root root 1.4K 5月 25 16:47 anaconda-ks.cfg
-rw-r--r-- 1 root root 663M 8月 16 15:07 mysql57.tar.gz[root@s1 ~]# ls -lh
总用量 663M
-rw-------. 1 root root 1.4K 5月 25 16:47 anaconda-ks.cfg
-rw-r--r-- 1 root root 663M 8月 16 15:07 mysql57.tar.gz[root@s2 ~]# ls -lh
总用量 663M
-rw-------. 1 root root 1.4K 5月 25 16:47 anaconda-ks.cfg
-rw-r--r-- 1 root root 663M 8月 16 15:07 mysql57.tar.gz
写入内容
[root@mo ~]# ansible group02 -m copy -a 'content="wo shi dd chao ji wu di yu zhou bao long zhan shen" dest=~/tst'
查看
[root@s0 ~]# ls
anaconda-ks.cfg mysql57.tar.gz tst
[root@s0 ~]# cat tst
wo shi dd chao ji wu di yu zhou bao long zhan shen
四、user模块
user模块⽤于管理⽤户账号和⽤户属性。
创建aaa⽤户,默认为普通⽤户,创建家⽬录
ansible group1 -m user -a ‘name=aaa state=present’
创建bbb系统⽤户,并且登录shell环境为/sbin/nologin
ansible group1 -m user -a ‘name=bbb state=present system=yes shell="/sbin/nologin"’
创建ccc⽤户, 使⽤uid参数指定uid, 使⽤password参数传密码
echo 123456 | openssl passwd -1 -stdin
$1$DpcyhW2G$Kb/y1f.lyLI4MpRlHU9oq0
下⼀句命令注意⼀下格式,密码要⽤双引号引起来,单引号的话验证时会密码不正确
ansible group1 -m user -a 'name=ccc uid=2000 state=present password="$1$DpcyhW2G$Kb/y1f.lyLI4MpRlHU9oq0"'
创建⼀个普通⽤户叫hadoop,并产⽣空密码密钥对
ansible group1 -m user -a 'name=hadoop generate_ssh_key=yes'
删除aaa⽤户,但家⽬录默认没有删除
ansible group1 -m user -a 'name=aaa state=absent'
删除bbb⽤户,使⽤remove=yes参数让其删除⽤户的同时也删除家⽬录
ansible group1 -m user -a 'name=bbb state=absent remove=yes'
五、group模块
group模块⽤于管理⽤户组和⽤户组属性。
创建组
ansible group1 -m group -a 'name=groupa gid=3000 state=present'
删除组(如果有⽤户的gid为此组,则删除不了)
ansible group1 -m group -a 'name=groupa state=absent'
六、cron模块
cron模块⽤于管理周期性时间任务。
创建⼀个cron任务,不指定user的话,默认就是root
如果minute,hour,day,month,week不指定的话,默认都为*
ansible group1 -m cron -a 'name="test cron1" user=root job="touch /tmp/111" minute=*/2'
删除cron任务
ansible group1 -m cron -a 'name="test cron1" state=absent'
七、yum模块
yum模块⽤于使⽤yum命令来实现软件包的安装与卸载。
使⽤yum安装⼀个软件(前提:group1的机器上的yum配置都已经OK)
ansible group1 -m yum -a 'name=vsftpd state=present'
使⽤yum安装httpd,httpd-devel软件,state=latest表示安装最新版本
ansible group1 -m yum -a 'name=httpd,httpd-devel state=latest'
使⽤yum卸载httpd,httpd-devel软件
ansible group1 -m yum -a 'name=httpd,httpddevel state=absent'
八、service模块
service模块⽤于控制服务的启动,关闭,开机⾃启动等。
启动vsftpd服务,并设为开机⾃动启动
ansible group1 -m service -a 'name=vsftpd state=started enabled=on'
关闭vsftpd服务,并设为开机不⾃动启动
ansible group1 -m service -a 'name=vsftpd state=stopped enabled=false'
九、其他模块
hostname模块
hostname模块⽤于修改主机名(注意: 它不能修改/etc/hosts⽂件)
stat模块
stat模块类似linux的stat命令,⽤于获取⽂件的状态信息。
template模块
template模块⾸先使⽤变量渲染jinja2模板⽂件成普通⽂件,然后再复制过去.⽽copy模块不⽀持.(jinja2是⼀个基于python的模板引擎)
template模块不能拷⻉⽬录
fetch模块
fetch模块与copy模块类似,但作⽤相反。⽤于把远程机器的⽂件拷⻉到本地。
注意: fetch模块不能从远程拷⻉⽬录到本地
yum_repository模块
yum_repository模块⽤于配置yum仓库。
增加⼀个/etc/yum.repos.d/local.repo配置⽂件
ansible group1 -m yum_repository -a "name=local description=localyum baseurl=file:///mnt/ enabled=yes gpgcheck=no"
注意:此模块只帮助配置yum仓库,但如果仓库⾥没有软件包,安装⼀ 样会失败。所以可以⼿动去挂载光驱到/mnt⽬录
# mount /dev/cdrom /mnt
删除/etc/yum.repos.d/local.repo配置⽂件
ansible group1 -m yum_repository -a "name=local state=absent"
script模块
script模块⽤于在远程机器上执⾏本地脚本。
在master上准备⼀个脚本
vim /tmp/1.sh
#!/bin/bash
mkdir /tmp/haha touch /tmp/haha/{1..10}
在group1的远程机器⾥都执⾏master上的/tmp/1.sh脚本
(此脚本 不⽤给执⾏权限)
ansible group1 -m script -a '/tmp/1.sh'
command与shell模块
两个模块都是⽤于执⾏linux命令的,这对于命令熟悉的⼯程师来说,⽤起来⾮常high。
shell模块与command模块差不多
(command模块不能执⾏⼀些类似$HOME,>,等符号,但shell可以)
注意: shell模块并不是百分之百任何命令都可以,⽐如vim或ll别名就不可以。


