目录
- 一、LLM.in8 的量化方案
- 1.1 模型量化的动机和原理
- 1.2 LLM.int8 量化的精度和性能
- 1.3 LLM.int8 量化的实践
- 二、SmoothQuant 量化方案
- 2.1 SmoothQuant 的基本原理
- 2.2 SmoothQuant 的实践
- 三、GPTQ 量化训练方案
- 3.1 GPTQ 的基本原理
- 3.2 GPTQ 的实践
- 参考资料
一、LLM.in8 的量化方案
1.1 模型量化的动机和原理
成本和准确度。
常见精度介绍:大模型涉及到的精度是啥?FP32、TF32、FP16、BF16、FP8、FP4、NF4、INT8区别
在训练时,为保证精度,主权重始终为 FP32。而在推理时,FP16 权重通常能提供与 FP32 相似的精度,这意味着在推理时使用 FP16 权重,仅需一半 GPU 显存就能获得相同的结果。那么是否还能进一步减少显存消耗呢?答案就是使用量化技术,最常见的就是 INT8 量化。
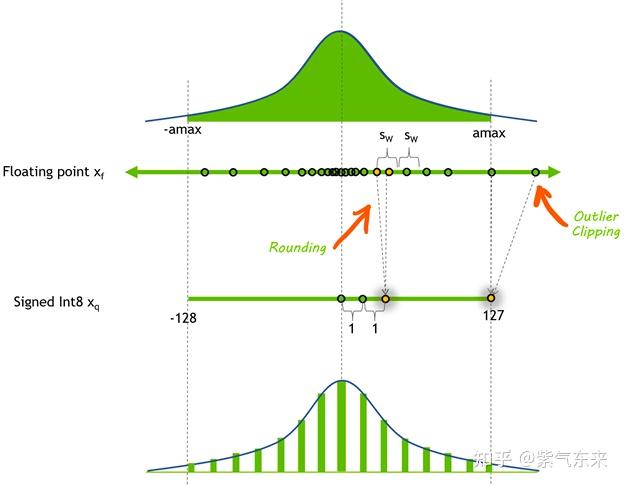
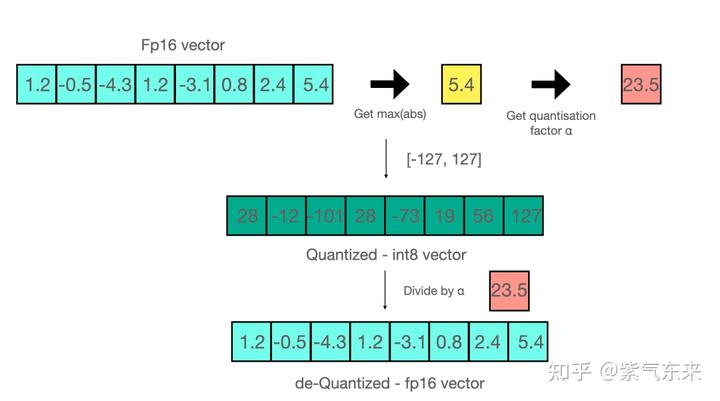
简单来说, INT8 量化即将浮点数 x f x_f xf 通过缩放因子 s c a l e scale scale 映射到范围在[-128, 127] 内的 8bit 表示 x q x_q xq ,即
x q = Clip ( Round ( x f ∗ scale ) ) x_q=\operatorname{Clip}\left(\operatorname{Round}\left(x_f * \text { scale }\right)\right) xq=Clip(Round(xf∗ scale ))
其中 Round 表示四舍五入都整数,Clip 表示将离群值(Outlier) 截断到 [-128, 127] 范围内。对于 scale 值,通常按如下方式计算得到:
a m a x = max ( a b s ( x f ) ) scale = 127 / a m a x \begin{aligned} &amax =\max \left(a b s\left(x_f\right)\right)\\ &\text { scale }=127/amax \end{aligned} amax=max(abs(xf)) scale =127/amax
反量化的过程为:
x f ′ = x q / s c a l e x_f^{'} = x_q/scale xf′=xq/scale
下面是通过该方式实现的量化-反量化的例子:
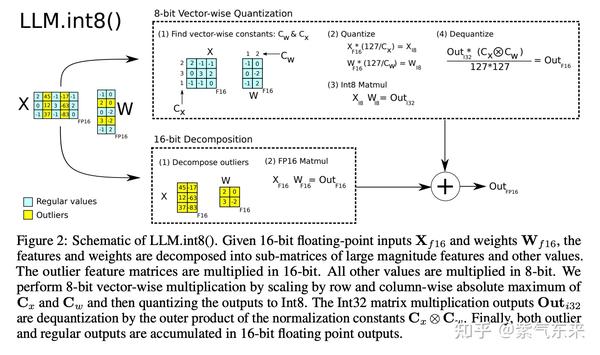
当进行矩阵乘法时,可以通过组合各种技巧,例如逐行或逐向量量化,来获取更精确的结果。举个例子,对矩阵乘法,我们不会直接使用常规量化方式,即用整个张量的最大绝对值对张量进行归一化,而会转而使用向量量化方法,找到 A 的每一行和 B 的每一列的最大绝对值,然后逐行或逐列归一化 A 和 B 。最后将 A 与 B 相乘得到 C。最后,我们再计算与 A 和 B 的最大绝对值向量的外积,并将此与 C 求哈达玛积来反量化回 FP16。
1.2 LLM.int8 量化的精度和性能
上文说明了如何对单个向量进行量化,原理比较简单,但是可能也会出现一些问题,比如下面这个例子:
A=[-0.10, -0.23, 0.08, -0.38, -0.28, -0.29, -2.11, 0.34, -0.53, -67.0]
注意到向量A中有离群值(Emergent Features) − 67.0 -67.0 −67.0 ,如果去掉该值对向量A做量化和反量化,处理后的结果是:
[-0.10, -0.23, 0.08, -0.38, -0.28, -0.28, -2.11, 0.33, -0.53]
出现的误差只有-0.29 -> -0.28。但是如果我们在保留 − 67.0 -67.0 −67.0 的情况下对该向量做量化和反量化,处理后的结果是:
[ -0.00, -0.00, 0.00, -0.53, -0.53, -0.53, -2.11, 0.53, -0.53, -67.00]
可见大部分信息在处理后都丢失了。
幸运的是,Emergent Features的分布是有规律的。对于一个参数量为6.7亿的transformer模型来说,每个句子的表示中会有150000个Emergent Features,但这些Emergent Features只分布在6个维度中
基于此,可以采用混合精度分解的量化方法:将包含了Emergent Features的几个维度从矩阵中分离出来,对其做高精度的矩阵乘法;其余部分进行量化。如下图所示:
精度与性能
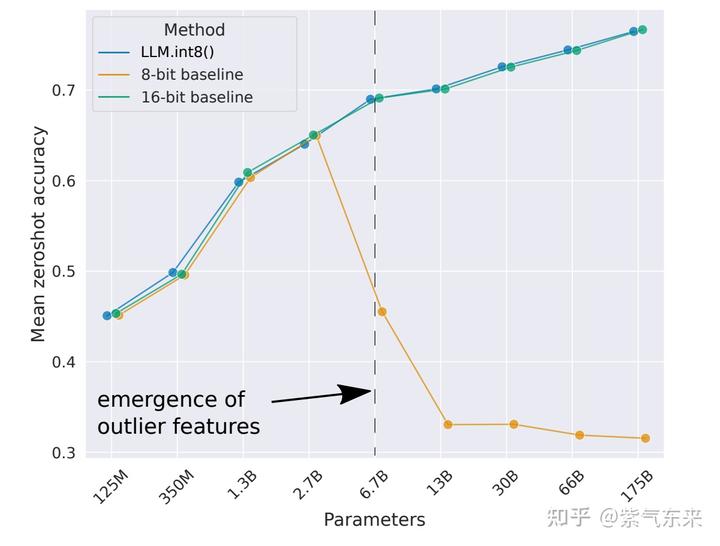
如下图所示的对比实验,可以看到,在模型参数量达到6.7亿时,使用vector-wise方法进行量化会使模型性能有非常大的下降,而使用LLM.int8()方法进行量化则不会造成模型性能的下降。
对 OPT-175B 模型,使用 lm-eval-harness 在 8 位和原始模型上运行了几个常见的基准测试,结果如下:
| 测试基准 | - | - | - | - | - |
|---|---|---|---|---|---|
| 测试基准名 | 指标 | 指标值 int8 | 指标值 fp16 | 标准差 fp16 | 指标差值 |
| hellaswag | acc_norm | 0.7849 | 0.7849 | 0.0041 | 0 |
| hellaswag | acc | 0.5921 | 0.5931 | 0.0049 | 0.001 |
| piqa | acc | 0.7965 | 0.7959 | 0.0094 | 0.0006 |
| piqa | acc_norm | 0.8101 | 0.8107 | 0.0091 | 0.0006 |
| lambada | ppl | 3.0142 | 3.0152 | 0.0552 | 0.001 |
| lambada | acc | 0.7464 | 0.7466 | 0.0061 | 0.0002 |
| winogrande | acc | 0.7174 | 0.7245 | 0.0125 | 0.0071 |
LLM.int8() 方法的主要目的是在不降低性能的情况下降低大模型的应用门槛,使用了 LLM.int8() 的 BLOOM-176B 比 FP16 版本慢了大约 15% 到 23%,结果如下所示:
| 精度 | 参数量 | 硬件 | 延迟 (ms/token,BS=1) | 延迟 (ms/token,BS=8) | 延迟 (ms/token,BS=32) |
|---|---|---|---|---|---|
| bf16 | 176B | 8xA100 80GB | 239 | 32 | 9.9 |
| int8 | 176B | 4xA100 80GB | 282 | 37.5 | 10.2 |
| bf16 | 176B | 14xA100 40GB | 285 | 36.5 | 10.4 |
| int8 | 176B | 5xA100 40GB | 367 | 46.4 | oom |
| fp16 | 11B | 2xT4 15GB | 11.7 | 1.7 | 0.5 |
| int8 | 11B | 1xT4 15GB | 43.5 | 5.3 | 1.3 |
| fp32 | 3B | 2xT4 15GB | 45 | 7.2 | 3.1 |
| int8 | 3B | 1xT4 15GB | 312 | 39.1 | 10.2 |
1.3 LLM.int8 量化的实践
bitsandbytes 是基于 CUDA 的主要用于支持 LLM.int8() 的库。它是torch.nn.modules的子类,你可以仿照下述代码轻松地将其应用到自己的模型中。
- 首先导入模块,初始化fp16 模型并保存
import torch
import torch.nn as nn
from bitsandbytes.nn import Linear8bitLt

fp16_model = nn.Sequential(
    nn.Linear(64, 64),
    nn.Linear(64, 64)
).to(torch.float16).to(0)
torch.save(fp16_model.state_dict(), "model.pt")
- 初始化 int8 模型并加载保存的weight,此处标志变量
has_fp16_weights非常重要。默认情况下,它设置为True,用于在训练时使能 Int8/FP16 混合精度。
int8_model = nn.Sequential(
    Linear8bitLt(64, 64, has_fp16_weights=False),
    Linear8bitLt(64, 64, has_fp16_weights=False)
)

int8_model.load_state_dict(torch.load("model.pt"))
此时还未进行量化操作,可以查看weight值
int8_model[0].weight
Parameter containing:
Parameter(Int8Params([[ 0.1032,  0.0544,  0.1021,  ..., -0.0465,  0.1050,  0.0687],
            [ 0.0083,  0.0352,  0.0540,  ..., -0.0931, -0.0224,  0.0541],
            [ 0.0476,  0.0220, -0.0803,  ...,  0.1031,  0.1134,  0.0905],
            ...,
            [-0.0523, -0.0858,  0.0330,  ...,  0.1122, -0.1082,  0.1210],
            [ 0.0045, -0.1019,  0.0072,  ..., -0.1069, -0.0417,  0.0365],
            [-0.1134,  0.0032, -0.0742,  ..., -0.1142, -0.0374,  0.0915]]))
之后将模型加载到GPU上,此时发生量化操作:
int8_model = int8_model.to(0) # Quantization happens here
此时可以查看weight值,可以看到值已经传到GPU上并转为 INT8 类型。
int8_model[0].weight
Parameter containing:
Parameter(Int8Params([[ 105,   55,  104,  ...,  -47,  107,   70],
            [   9,   36,   56,  ...,  -96,  -23,   56],
            [  49,   23,  -82,  ...,  105,  116,   92],
            ...,
            [ -54,  -89,   34,  ...,  116, -112,  126],
            [   5, -107,    8,  ..., -112,  -44,   38],
            [-116,    3,  -76,  ..., -117,  -38,   94]], device='cuda:0',
           dtype=torch.int8))
获取 FP16 权重以便在 FP16 中执行离群值的矩阵乘,可见与原始值比较接近
(int8_model[0].weight.CB * int8_model[0].weight.SCB) / 127
tensor([[ 0.1032,  0.0532,  0.1018,  ..., -0.0453,  0.1017,  0.0682],
        [ 0.0088,  0.0348,  0.0548,  ..., -0.0926, -0.0219,  0.0546],
        [ 0.0482,  0.0223, -0.0802,  ...,  0.1012,  0.1102,  0.0897],
        ...,
        [-0.0531, -0.0861,  0.0333,  ...,  0.1118, -0.1064,  0.1228],
        [ 0.0049, -0.1036,  0.0078,  ..., -0.1080, -0.0418,  0.0370],
        [-0.1140,  0.0029, -0.0744,  ..., -0.1128, -0.0361,  0.0916]],
       device='cuda:0')
最后比较 fp16 模型与 int8 模型输出结果
input_ = torch.randn(8, 64, dtype=torch.float16)
hidden_states_int8 = int8_model(input_.to(0))
hidden_states_fp16 = fp16_model(input_.to(0))
print(torch.max(hidden_states_fp16 - hidden_states_int8))
可以最大的绝对误差为
tensor(0.0098, device='cuda:0', dtype=torch.float16, grad_fn=<MaxBackward1>)
另外,我们也可以直接加载预训练完成的模型为 int8 类型,方式如下:
from transformers import LlamaForCausalLM
model = LlamaForCausalLM.from_pretrained(args.base_model,
                                         load_in_8bit=args.load_8bit,
                                         torch_dtype=torch.float16,
                                         device_map={"auto"}, )
其INT8转化实际是调用了如下操作,函数的具体实现参见这里
from bitsandbytes import set_module_8bit_tensor_to_device
if param.dtype == torch.int8 and param_name.replace("weight", "SCB") in state_dict.keys():
    fp16_statistics = state_dict[param_name.replace("weight", "SCB")]
else:
    fp16_statistics = None

if "SCB" not in param_name:
    set_module_8bit_tensor_to_device(model, param_name, param_device, value=param, fp16_statistics=fp16_statistics)
二、SmoothQuant 量化方案
2.1 SmoothQuant 的基本原理
当模型规模更大时,单个token的值变化范围较大,难以量化,相比之下 weight 的变化范围较小,即 weight 较易量化,而 activation 较难量化。基于此,SmoothQuant 核心思想是引入一个超参,减小激活值的变化范围,增大权重的变化范围,从而均衡两者的量化难度。

由于量化前的激活值变化范围较大,即使对于同一 token,不同channel数值差异较大,对每个 token 的量化也会造成精度损失,但是不难看出较大值一般出现在同一 channel,因此作者也分析了采用 per-channel 的量化方式,这种量化方式能很好的避免精度损失,但是硬件不能高效执行,增加了计算时间,因此大多数量化仍采用 per-token 及 per-tensor 的量化方式。从下图可以看出,量化前的 activation 矩阵在某些 channel 的数值较大,weight 矩阵相对平缓,经过 SmoothQuant 之后,activation 张量中数值较大的 channel 相对减小,对应 weight 张量的 channel 处数值增大,达到均衡二者量化难度的目的。

将 activation 的量化难度转移到 weight 上,需要引入平滑因子 s \mathbf{s} s ,则
Y = ( X diag ( s ) − 1 ) ⋅ ( diag ( s ) W ) = X ^ W ^ \mathbf{Y}=\left(\mathbf{X} \operatorname{diag}(\mathbf{s})^{-1}\right) \cdot(\operatorname{diag}(\mathbf{s}) \mathbf{W})=\hat{\mathbf{X}} \hat{\mathbf{W}} Y=(Xdiag(s)−1)⋅(diag(s)W)=X^W^
为了减少激活的量化难度,可以让 s j = m a x ( ∣ X j ∣ ) , j = 1 , 2 , … , C j s_j = max(|X_j|), j = 1, 2, …, C_j sj=max(∣Xj∣),j=1,2,…,Cj ,即第 j j j 个 channel 的最大值。
但是这样 weight 的量化难度会变得难以量化,因此需要引入另一个超参转移强度 α α α ,
s j = max ( ∣ X j ∣ ) α / max ( ∣ W j ∣ ) 1 − α \mathbf{s}_j=\max \left(\left|\mathbf{X}_j\right|\right)^\alpha / \max \left(\left|\mathbf{W}_j\right|\right)^{1-\alpha} sj=max(∣Xj∣)α/max(∣Wj∣)1−α
其中 α α α 可以根据 activation 和 weight 的量化难易程度进行调整,对于大多数模型 α = 0.5 α= 0.5 α=0.5 ,对于模型GLM-130B,由于其 activation 值更加难以量化,设置 α = 0.75 α= 0.75 α=0.75 ,可以更好地进行量化。
具体的计算过程下图所示,从结果可以看出,activation 值较大的 channel 数值相对减小,量化难度降低,对应channel 的 weight 量化难度增加。

得到smooth变换之后的 activation 和 weight 矩阵,可以再采用 per-token 或 per-tensor 的量化方式,即

又根据激活值是基于先验数据获得或者执行时获得分为动态量化和静态量化,作者提出了三个层次的量化方式,其中O1~O3的计算延迟依次减少。
| Method | Weight | Activation |
|---|---|---|
| W8A8 | per-tensor | per-tensor dynamic |
| ZeroQuant | group-wise | per-token dynamic |
| LLM.int8 | per-channel | per-token dynamic+FP16 |
| Outlier Suppression | per-tensor | per-tensor static |
| SmoothQuant-O1 | per-tensor | per-token dynamic |
| SmoothQuant-O2 | per-tensor | per-tensor dynamic |
| SmoothQuant-O3 | per-tensor | per-tensor static |
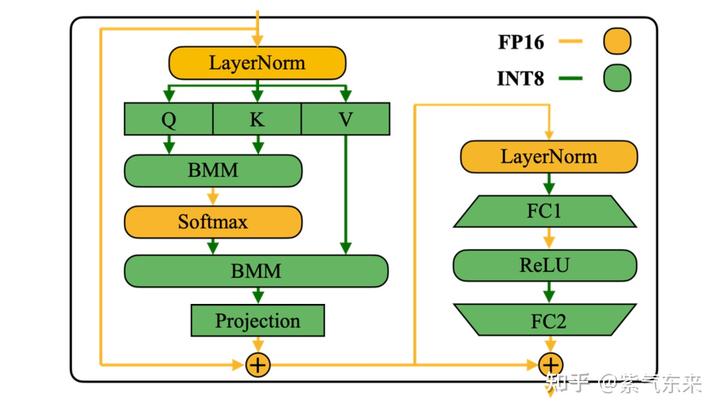
作者将 SmoothQuant 应用到 Transformer 结构中,由于存储和计算开销大多在attention模块和前向模块,对应图中绿色部分均量化为W8A8进行计算。平滑因子S的计算也可以融合到前层 Layernorm/Softmax 中。
2.2 SmoothQuant 的实践
接下来,我们将通过一个 LLaMa-13B 的模型来体验 SmoothQuant 的效果。
- Step 1. 加载模型和数据集, 采用标准的 LLaMa-13B 模型
import torch
from transformers import LlamaTokenizer, LlamaForCausalLM
from transformers.models.llama.modeling_llama import LlamaAttention, LlamaDecoderLayer
from smoothquant.smooth import smooth_lm
from smoothquant.fake_quant import W8A8Linear
from datasets import load_dataset

model_fp16 = LlamaForCausalLM.from_pretrained('decapoda-research/llama-13b-hf', torch_dtype=torch.float16, device_map='auto')
tokenizer = LlamaTokenizer.from_pretrained('decapoda-research/llama-13b-hf')
dataset = load_dataset('lambada', split='validation[:1000]')
- Step 2. 构造 Evaluator 并评估 FP16 模型
class Evaluator:
    def __init__(self, dataset, tokenizer, device):
        self.dataset = dataset
        self.tokenizer = tokenizer
        self.device = device

        # tokenize the dataset
        def tokenize_function(examples):
            example = self.tokenizer(examples['text'])
            return example

        self.dataset = self.dataset.map(tokenize_function, batched=True)
        self.dataset.set_format(type='torch', columns=['input_ids'])

    @torch.no_grad()
    def evaluate(self, model):
        model.eval()
        # The task is to predict the last word of the input.
        total, hit = 0, 0
        for batch in self.dataset:
            input_ids = batch['input_ids'].to(self.device).unsqueeze(0)
            label = input_ids[:, -1]
            outputs = model(input_ids)
            last_token_logits = outputs.logits[:, -2, :]
            pred = last_token_logits.argmax(dim=-1)
            total += label.size(0)
            hit += (pred == label).sum().item()
        acc = hit / total
        return acc

acc_fp16 = evaluator.evaluate(model_fp16)
print(f'Original model (fp16) accuracy: {acc_fp16}')
输出结果为:
Original model (fp16) accuracy: 0.888
- Step 3. 使用 SmoothQuant 将模型矩阵乘部分转为W8A8并评估
def quantize_model(model, weight_quant='per_tensor', act_quant='per_tensor', quantize_bmm_input=True):
    for name, m in model.model.named_modules():
        if isinstance(m, LlamaDecoderLayer):
            m.mlp.gate_proj = W8A8Linear.from_float(m.mlp.gate_proj, weight_quant=weight_quant, act_quant=act_quant)
            m.mlp.up_proj = W8A8Linear.from_float(m.mlp.up_proj, weight_quant=weight_quant, act_quant=act_quant)
            m.mlp.down_proj = W8A8Linear.from_float(m.mlp.down_proj, weight_quant=weight_quant, act_quant=act_quant)
        elif isinstance(m, LlamaAttention):
            # Her we simulate quantizing BMM inputs by quantizing the output of q_proj, k_proj, v_proj
            m.q_proj = W8A8Linear.from_float(
                m.q_proj, weight_quant=weight_quant, act_quant=act_quant, quantize_output=quantize_bmm_input)
            m.k_proj = W8A8Linear.from_float(
                m.k_proj, weight_quant=weight_quant, act_quant=act_quant, quantize_output=quantize_bmm_input)
            m.v_proj = W8A8Linear.from_float(
                m.v_proj, weight_quant=weight_quant, act_quant=act_quant, quantize_output=quantize_bmm_input)
            m.o_proj = W8A8Linear.from_float(m.o_proj, weight_quant=weight_quant, act_quant=act_quant)
    return model

model_w8a8 = quantize_model(model_fp16)
print(model_w8a8)
acc_w8a8 = evaluator.evaluate(model_w8a8)
print(f'SmoothQuant W8A8 quantized model accuracy: {acc_w8a8}')
可以看到相关模块被替换为 W8A8Linear:
(self_attn): LlamaAttention(
          (q_proj): W8A8Linear(5120, 5120, bias=False, weight_quant=per_tensor, act_quant=per_tensor, output_quant=per_tensor)
          (k_proj): W8A8Linear(5120, 5120, bias=False, weight_quant=per_tensor, act_quant=per_tensor, output_quant=per_tensor)
          (v_proj): W8A8Linear(5120, 5120, bias=False, weight_quant=per_tensor, act_quant=per_tensor, output_quant=per_tensor)
          (o_proj): W8A8Linear(5120, 5120, bias=False, weight_quant=per_tensor, act_quant=per_tensor, output_quant=None)
          (rotary_emb): LlamaRotaryEmbedding()
        )
(mlp): LlamaMLP(
          (gate_proj): W8A8Linear(5120, 13824, bias=False, weight_quant=per_tensor, act_quant=per_tensor, output_quant=None)
          (down_proj): W8A8Linear(13824, 5120, bias=False, weight_quant=per_tensor, act_quant=per_tensor, output_quant=None)
          (up_proj): W8A8Linear(5120, 13824, bias=False, weight_quant=per_tensor, act_quant=per_tensor, output_quant=None)
          (act_fn): SiLUActivation()
        )
转化后 INT8 的精度存在一定程度得下降:
SmoothQuant W8A8 quantized model accuracy: 0.791
三、GPTQ 量化训练方案
3.1 GPTQ 的基本原理
GPTQ 的核心思想是逐一量化模型的各个层,对于每个层寻找可以满足下式的量化结果:
a r g m i n w ^ = ∣ ∣ W X − W ^ X ∣ ∣ 2 argmin_{\widehat{w}} = ||WX - \widehat{W}X||^2 argminw =∣∣WX−W X∣∣2
即对于每个需要被量化的层(对应参数 W W W ),希望量化前后该层输出变化尽量小。
GPTQ的核心原理来自于OBQ(Optimal Brain Quantization), 而OBQ的思路主要来自于OBS(Optimal Brain Surgeon)。 在OBS中,假设我们要抹去一个权重记为 w q w_q wq ,使得其对整体的误差增加最少,并且同时计算出一个补偿 δ q \delta_q δq 应用于剩余的权重上,使得抹去的这个权重增加的误差被抵消。作者找到了这样的一个方法,公式为:
w q = a r g m i n q w q 2 [ H − 1 ] q q , δ q = − w q [ H q q − 1 ] ⋅ H : , q − 1 w_q = argmin_q{\dfrac{w_q^2}{[H^{-1}]_{qq}}} , \delta_q=-\dfrac{w_q}{[H^{-1}_{qq}]}·H^{-1}_{:,q} wq=argminq[H−1]qqwq2,δq=−[Hqq−1]wq⋅H:,q−1
其中 H H H 是一个代表loss的 Hessian 矩阵。
OBQ把它推广到量化中,即可将剪枝稀疏看作量化的极端情况。OBQ里的公式是这样的:
w q = a r g m i n q ( q u a n t ( q ) − w q ) 2 [ H − 1 ] q q , δ q = − w q − q u a n t ( q ) [ H q q − 1 ] ⋅ H : , q − 1 w_q = argmin_q{\dfrac{(quant(q) - w_q)^2}{[H^{-1}]_{qq}}} , \delta_q=-\dfrac{w_q - quant(q)}{[H^{-1}_{qq}]}·H^{-1}_{:,q} wq=argminq[H−1]qq(quant(q)−wq)2,δq=−[Hqq−1]wq−quant(q)⋅H:,q−1
其中 q u a n t ( q ) quant(q) quant(q) 是把 q q q 近似到最近的quant grid的点上,简单说就是四舍五入到指定位数上。可以看到假如quant(q)永远返回零其实就是原版的OBS。
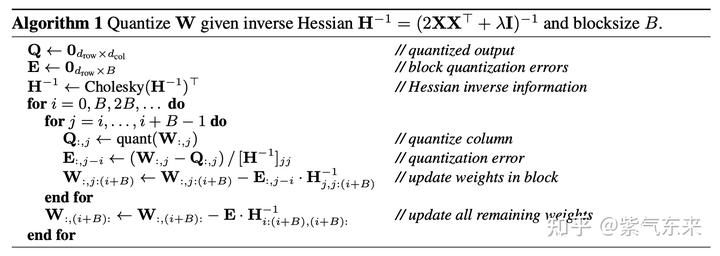
OBQ 算法理论很好,但其算法复杂度是 O ( d r o w ∗ d c o l 3 ) O(d_{row}*d_{col}^3) O(drow∗dcol3) ,计算太慢。因此 GPTQ 在此基础上做了以下改进:
- **取消贪心算法:**OBQ使用贪心算法,逐个找影响最小的 q q q 来剪枝/量化,经过观察发现,其实随机的顺序效果也一样好(甚至在大模型上更好)。原算法对 W W W 进行优化时,逐行计算,每一行挑选q的顺序都是不一样的。在GPTQ中直接全部都采用固定顺序,使得复杂度从 O ( d r o w ∗ d c o l 3 ) O(d_{row}*d_{col}^3) O(drow∗dcol3) 优化到 O ( m a x ( d r o w ∗ d c o l 2 , d c o l 3 ) ) O(max(d_{row} * d^2_{col}, d^3_{col})) O(max(drow∗dcol2,dcol3)) 。
- **批处理:**OBQ 对权重一个个进行单独更新,作者发现瓶颈实际在于GPU的内存带宽,而且同一个特征矩阵W不同列间的权重更新是不会互相影响的。因此作者提出了批处理的方法,一次处理多个(如128)列,大幅提升了计算速度。
- **数值稳定性: **作者观察到一些操作会引入数值误差(主要是 H − 1 H^{-1} H−1 相关的部分)。为了解决这个误差提出了两种方法,一是往 H − 1 H^{-1} H−1里加入一个小的常数项。另一个是用数值稳定的 Cholesky 分解提前计算好所有需要的信息,避免在更新的过程中再计算。
GPTQ 算法过程如下所示:
3.2 GPTQ 的实践
此处采用 GPTQ-for-LLaMa 来说明 GPTQ 的 4bit 的 LLaMa 模型的训练过程,其命令如下所示:
python3 llama.py decapoda-research/llama-13b-hf c4 --wbits 4 --true-sequential --act-order --groupsize 128 --save llama13b-4bit-128g.pt
其中核心部分则是 QuantLinear 的实现,如下:
class QuantLinear(nn.Module):
    def __init__(self, bits, groupsize, infeatures, outfeatures, bias):
        super().__init__()
        if bits not in [2, 4, 8]:
            raise NotImplementedError("Only 2,4,8 bits are supported.")
        self.infeatures = infeatures
        self.outfeatures = outfeatures
        self.bits = bits
        self.maxq = 2**self.bits - 1
        self.groupsize = groupsize if groupsize != -1 else infeatures

        self.register_buffer('qweight', torch.zeros((infeatures // 32 * self.bits, outfeatures), dtype=torch.int32))
        self.register_buffer('qzeros', torch.zeros((math.ceil(infeatures / self.groupsize), outfeatures // 32 * self.bits), dtype=torch.int32))
        self.register_buffer('scales', torch.zeros((math.ceil(infeatures / self.groupsize), outfeatures), dtype=torch.float16))
        self.register_buffer('g_idx', torch.tensor([i // self.groupsize for i in range(infeatures)], dtype=torch.int32))
        if bias:
            self.register_buffer('bias', torch.zeros((outfeatures), dtype=torch.float16))
        else:
            self.bias = None

    def pack(self, linear, scales, zeros, g_idx=None):
        self.g_idx = g_idx.clone() if g_idx is not None else self.g_idx

        scales = scales.t().contiguous()
        zeros = zeros.t().contiguous()
        scale_zeros = zeros * scales
        self.scales = scales.clone().half()
        if linear.bias is not None:
            self.bias = linear.bias.clone().half()

        intweight = []
        for idx in range(self.infeatures):
            intweight.append(torch.round((linear.weight.data[:, idx] + scale_zeros[self.g_idx[idx]]) / self.scales[self.g_idx[idx]]).to(torch.int)[:, None])
        intweight = torch.cat(intweight, dim=1)
        intweight = intweight.t().contiguous()
        intweight = intweight.numpy().astype(np.uint32)
        qweight = np.zeros((intweight.shape[0] // 32 * self.bits, intweight.shape[1]), dtype=np.uint32)
        i = 0
        row = 0
        while row < qweight.shape[0]:
            if self.bits in [2, 4, 8]:
                for j in range(i, i + (32 // self.bits)):
                    qweight[row] |= intweight[j] << (self.bits * (j - i))
                i += 32 // self.bits
                row += 1
            else:
                raise NotImplementedError("Only 2,4,8 bits are supported.")

        qweight = qweight.astype(np.int32)
        self.qweight = torch.from_numpy(qweight)

        zeros -= 1
        zeros = zeros.numpy().astype(np.uint32)
        qzeros = np.zeros((zeros.shape[0], zeros.shape[1] // 32 * self.bits), dtype=np.uint32)
        i = 0
        col = 0
        while col < qzeros.shape[1]:
            if self.bits in [2, 4, 8]:
                for j in range(i, i + (32 // self.bits)):
                    qzeros[:, col] |= zeros[:, j] << (self.bits * (j - i))
                i += 32 // self.bits
                col += 1
            else:
                raise NotImplementedError("Only 2,4,8 bits are supported.")

        qzeros = qzeros.astype(np.int32)
        self.qzeros = torch.from_numpy(qzeros)

    def forward(self, x):
        out_shape = x.shape[:-1] + (self.outfeatures, )
        out = QuantLinearFunction.apply(x.reshape(-1, x.shape[-1]), self.qweight, self.scales, self.qzeros, self.g_idx, self.bits, self.maxq)
        out = out + self.bias if self.bias is not None else out
        return out.reshape(out_shape)
使用训练完成后的模型进行推理,命令如下:
python3 llama_inference.py decapoda-research/llama-13b-hf --wbits 4 --groupsize 128 --load llama13b-4bit-128g.pt --text "Who are you?"
输出如下:
 ⁇  Who are you? I've been looking for you.
Brigitte: I've been busy.
Maria: I'm not interested in your lies. Now, who are you?
Brigitte: I'
参考资料
[1] A Gentle Introduction to 8-bit Matrix Multiplication for transformers at scale using transformers, accelerate and bitsandbytes
[2] 大规模 Transformer 模型 8 比特矩阵乘简介
[3] 模型量化(int8)知识梳理 - 知乎 (zhihu.com)
[4] https://arxiv.org/pdf/2208.07339.pdf
[5] LLM.int8() and Emergent Features — Tim Dettmers
[6] Achieving FP32 Accuracy for INT8 Inference Using Quantization Aware Training with NVIDIA TensorRT | NVIDIA Technical Blog
[7] arxiv.org/pdf/2211.10438.pdf
[8] smoothquant/smoothquant_opt_demo.ipynb at main · mit-han-lab/smoothquant · GitHub
[9] LLM大语言模型量化方法(一)
[10] [2210.17323] GPTQ: Accurate Post-Training Quantization for Generative Pre-trained Transformers (arxiv.org)
[11] qwopqwop200/GPTQ-for-LLaMa: 4 bits quantization of LLaMA using GPTQ (github.com)
[12] IST-DASLab/gptq: Code for the ICLR 2023 paper “GPTQ: Accurate Post-training Quantization of Generative Pretrained Transformers”. (github.com)
桥如虹,水如空,一叶飘然烟雨中。 —— 陆游《长相思》


